3 Central Users
This chapter includes the following sections:
About Central Users
This chapter describes the tasks that can be performed by the Central Users of Argus Affiliate. Unless you are an Enterprise Workflow Manager, you are limited to events you can access from the following dialog boxes:
-
Local Affiliate --> Worklist --> Pending Local Labeling
-
Local Affiliate --> Worklist --> Cases in Pending Central Actions
-
Local Affiliate --> Worklist --> Not Routed cases
If you are an Enterprise Workflow Manager, you can view all cases across multiple sites.
Note:
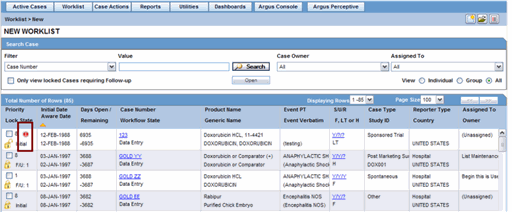
Central users must log on to Argus Safety Web in order to perform the activities that are related to local affiliates.Viewing the Worklist
In the Argus User Interface, select Worklist from the Local Affiliate Menu to access the different options available through this screen. The Worklist screen appears as shown:
The following table lists and describes each of the tabs on this screen.
| Field | Description |
|---|---|
| Pending Central Actions | Displays actions on local events that are pending at central |
| Not Routed | Displays local events that have not yet been routed to central |
| Cases Pending Local Labeling | Displays pending action items that have been assigned to the Local Affiliate Users. |
| Action Items from Local | Displays the list of action items pending from Local. |
| Action Items from Central | Displays the list of action items pending from Central. |
| Intake Worklist | Displays the list of cases present in the Intake queue. |
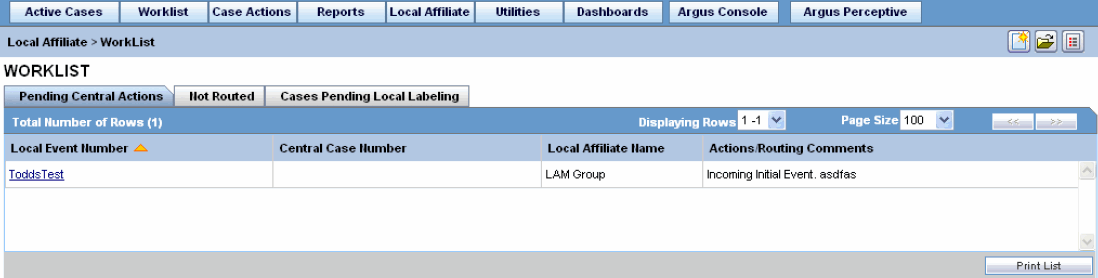
Pending Central Actions Tab
The following is an illustration of the Pending Central Actions tab.
The following table lists and describes the fields on the Pending Central Actions tab.
| Field | Description |
|---|---|
| Local Event Number | Displays the local event number. The link displayed in this field helps you in viewing event information. |
| Central Case Number | Displays the central case number. |
| Central Workflow State | Displays the current workflow state of the Central Case. |
| Actions/Routing Comments | Displays any actions or routing comments for the case. |
| Print List | Prints the list displayed in the screen in a PDF. |
Not Routed Tab
The following is an illustration of the Not Routed tab.
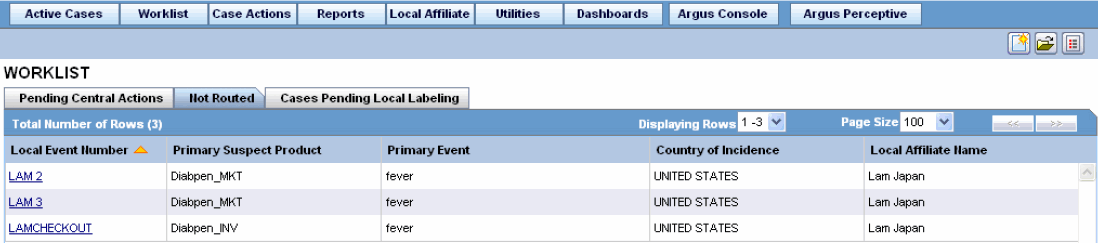
The following table lists and describes the fields on the Not Routed tab.
| Field | Description |
|---|---|
| Local Event Number | Displays the local event number. The link displayed in this field helps you in viewing event information. |
| Primary Suspect Product | Displays the name of the primary suspect product. |
| Primary Event | Displays the name of the primary event. |
| Route to Central | On selecting LAM Event(s) and clicking the Route to Central button, the system displays the Routing Confirmation dialog followed by the Route to Central dialog to confirm the routing of LAM Events to Central. |
| Country of Incidence | Displays the country where the adverse event occurred. |
| Local Affiliate Name | Displays the name of the local affiliate. |
| Print List | Prints the list displayed in the screen in a PDF. |
Action Items from Local
The following is an illustration of the Action Items from Local tab.
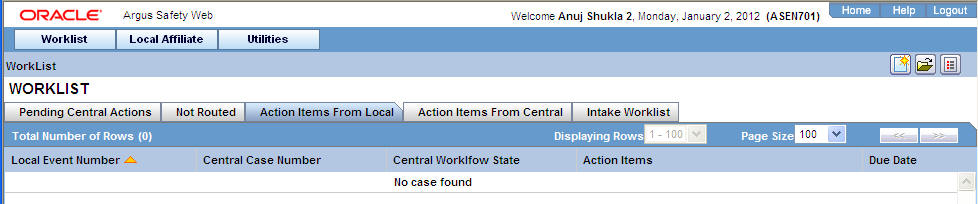
The following table lists and describes the fields on the Action Items from Local tab.
| Field | Description |
|---|---|
| Local Event Number | Displays the local event number. The link displayed in this field helps you in viewing event information. |
| Central Case Number | Displays the case number with Central. |
| Central Workflow State | Displays the workflow state of the case. |
| Action Items | Displays a description of the action to be taken up for the LAM event. |
| Due Date | Displays the due date for the action item. |
| Print List | Displays the option to print the list. |
Action Items from Central
The following is an illustration of the Action Items from Central tab.
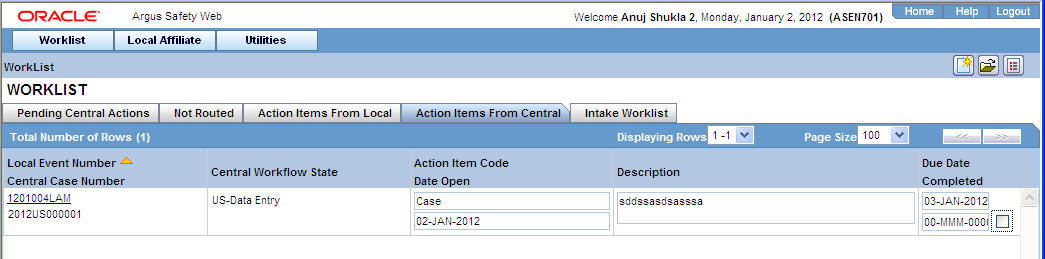
The following table lists and describes the fields on the Action Items from Central tab.
| Field | Description |
|---|---|
| Local Event Number | Displays the local event number. The link displayed in this field helps you in viewing event information. |
| Central Case Number | Displays the case number with Central. |
| Central Workflow State | Displays the workflow state of the case. |
| Action Item Code | Displays a code of the action to be taken up for the LAM event. |
| Date Open | Displays the date since when the action has been due. |
| Description | Displays the description of the action. |
| Due Date | Displays the due date for the action item. |
| Completed | Displays the date by when the action item will be completed. |
| Print List | Displays the option to print the list. |
Cases Pending Local Labeling Tab
The following is an illustration of the Cases Pending Local Labeling tab.
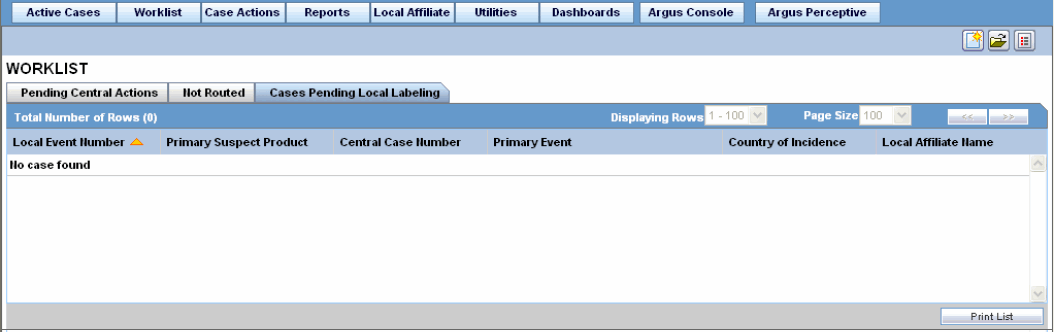
The following table lists and describes the fields on the Cases Pending Local Labeling tab.
| Field | Description |
|---|---|
| Local Event Number | Displays the local event number. The link displayed in this field helps you in viewing event information. |
| Primary Suspect Product | Displays the name of the primary suspect product. |
| Central Case Number | Displays the case number with Central. |
| Primary Event | Displays the name of the primary event. |
| Country of Incidence | Displays the country where the adverse event occurred. |
| Local Affiliate Name | Displays the name of the local affiliate. |
Intake Worklist
The following is an illustration of the Intake Worklist - Pending tab.
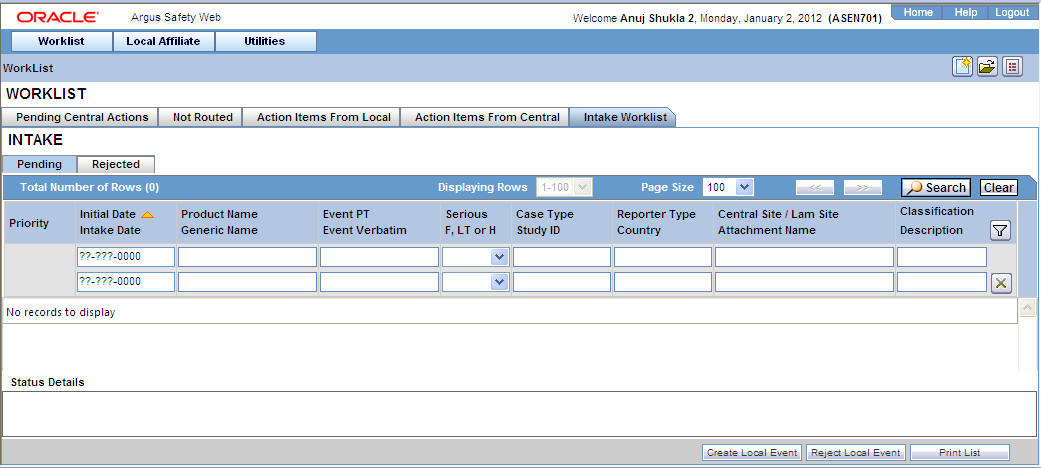
The following table lists and describes the fields on the Intake Worklist - Pending tab.
| Field | Description |
|---|---|
| Priority | Allows the user to view the priority of the case. |
| Initial Date | Allows the user to view the initial receipt date of the case. |
| Intake Date | Allows the user to view the date the system imported the attachment within the Intake Worklist. |
| Product Name | Allows the user to view the Suspect Product in question. |
| Generic Name | Allows the user to view the generic name of the suspect product in question. |
| Event PT | Allows the user to view the Primary Event and Verbatim as Reported. |
| Event Verbatim | The following format will be used:Primary Event (Verbatim as Reported) |
| Serious | Allows the user to view the case-level assessments. |
| F, LT or H | Displays the status as Fatal (F) or Life-Threatening (LT) or Hospitalized (H). If the case is neither of the above, it displays 'No'. |
| Case Type | Allows the user to view the report type information. |
| Study ID | Allows the user to view the Study ID of the study cases. For cases where the Study ID is not present, this field is empty. |
| Reporter Type | Allows the user to view the Reporter Type of the study cases. For cases where the Reporter Type is not present, this field is empty. |
| Country | Allows the user to view the country of incident. |
| Central / LAM Site | Allows the user to view the current site (Argus or Affiliate) of the case. |
| Attachment | Allows the user to view the attachment which is associated to the case. If there are multiple files, these shall be separated by a comma. |
| Classification | Allows the user to view the attachment classifications which is associated to the attachment. |
| Description | Allows the user to view the attachment description which is associated to the case. |
| Status Details | Allows the user to view the details of the status associated to the case. |
| Accept/Reject Local Event | Allows the user to accept/reject the Local Event associated to the case. |
| Print List | Allows the user to print the list of cases displayed on this screen. |
The following is an illustration of the Intake Worklist - Rejected tab.
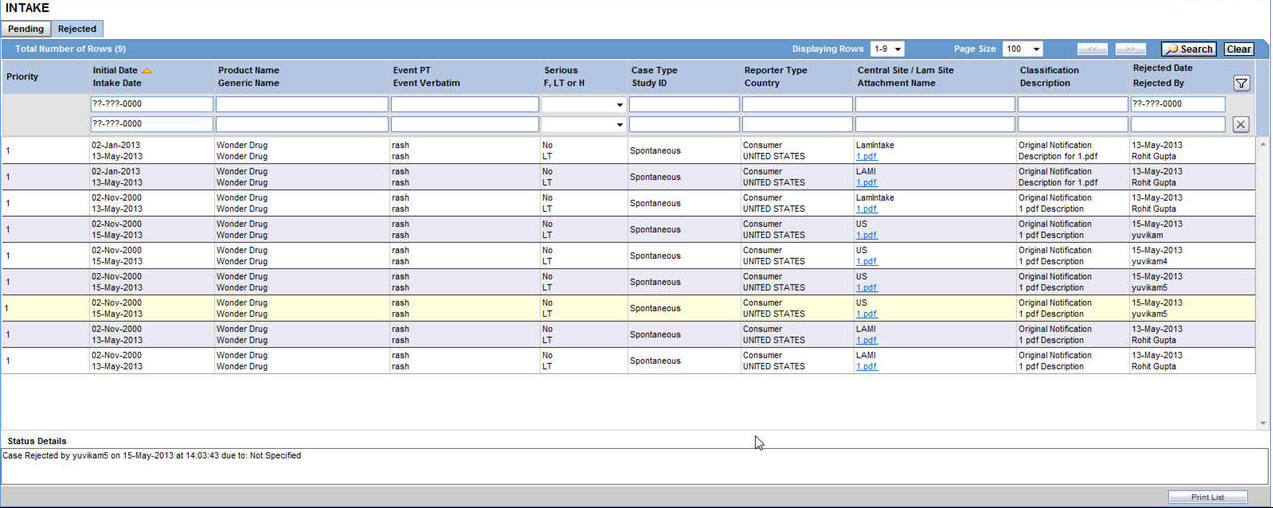
The following table lists and describes the fields on the Intake Worklist - Rejected tab.
| Field | Description |
|---|---|
| Priority | Allows the user to view the priority of the case. |
| Initial Date | Allows the user to view the initial receipt date of the case. |
| Intake Date | Allows the user to view the date the system imported the attachment within the Intake Worklist. |
| Product Name | Allows the user to view the Suspect Product in question. |
| Generic Name | Allows the user to view the generic name of the suspect product in question. |
| Event PT | Allows the user to view the Primary Event and Verbatim as Reported. |
| Event Verbatim | The following format will be used:Primary Event (Verbatim as Reported) |
| Serious | Allows the user to view the case-level assessments. |
| F, LT or H | Displays the status as Fatal (F) or Life-Threatening (LT) or Hospitalized (H). If the case is neither of the above, it displays 'No'. |
| Case Type | Allows the user to view the report type information. |
| Study ID | Allows the user to view the Study ID of the study cases. For cases where the Study ID is not present, this field is empty. |
| Reporter Type | Allows the user to view the Reporter Type of the study cases. For cases where the Reporter Type is not present, this field is empty. |
| Country | Allows the user to view the country of incident. |
| Central / LAM Site | Allows the user to view the current site (Argus or Affiliate) of the case. |
| Attachment | Allows the user to view the attachment which is associated to the case. If there are multiple files, these shall be separated by a comma. |
| Classification | Allows the user to view the attachment classifications which is associated to the attachment. |
| Description | Allows the user to view the attachment description which is associated to the case. |
| Rejected Date | Allows the user to view the date when the case was rejected. |
| Rejected By | Allows the user to view the name of the user who rejected the case. |
| Status Details | Allows the user to view the details of the status associated to the case. |
| Accept/Reject Local Event | Allows the user to accept/reject the Local Event associated to the case. |
| Print List | Allows the user to print the list of cases displayed on this screen. |
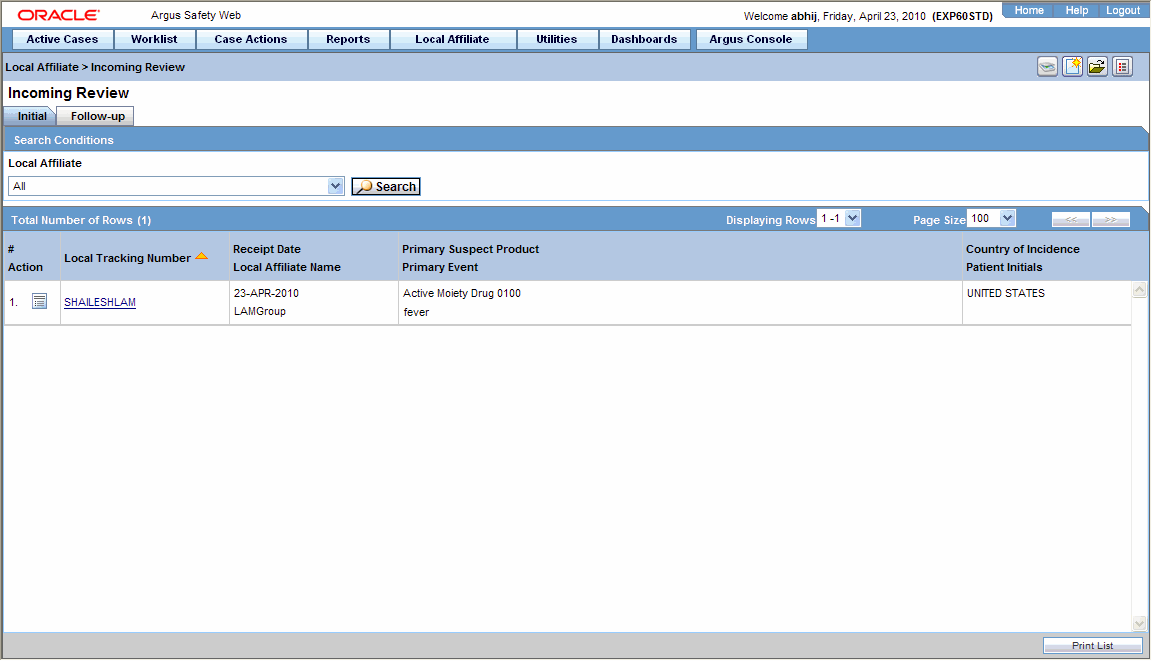
Reviewing Incoming Events
You can review incoming events from the Incoming Review page. The page has two tabs:
-
Initial
-
Follow-up
To review incoming events
-
Select Local Affiliate > Incoming Review to open the Incoming Review page.
-
The system opens the Initial tab by default. On this tab you can review new incoming events.
The following table describes the fields on the Initial tab.
Field Description # Displays the serial number of each search result. Action Enables you to perform an action item. Central Case Number Displays the central case number of the event. Local Tracking Number Displays the local tracking number of incoming events. Click the link displaying the local tracking number to view the follow-up information. Receipt Date Displays the date when the incoming events was received. Local Affiliate Name Displays the name of the local affiliate. Primary Suspect Product Displays the name of the product that is most likely to have caused the adverse event. Primary Event Displays the name of the primary event. Country of Incidence Displays the name of the country where the adverse event occurred. Patient Initials Displays the initials of the patient. Print List Displays the list of follow-up events in a PDF. -
If you wish to review follow-up events or information click the Follow-up tab.
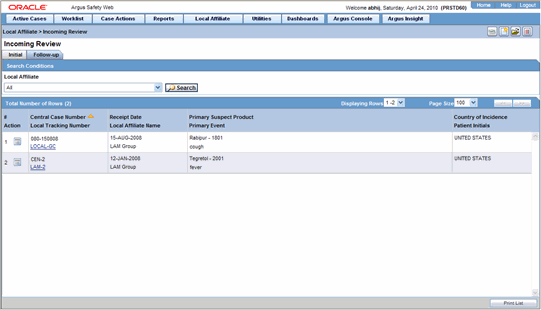
The following table lists and describes the fields on the Follow-up tab.
Field Description # Displays the serial number of each search result. Action Enables you to perform an action item. Central Case Number Displays the central case number of the event. Local Tracking Number Displays the local tracking number of incoming events. Click the link displaying the local tracking number to view the follow-up information. Receipt Date Displays the date when the incoming events was received. Local Affiliate Name Displays the name of the local affiliate. Primary Suspect Product Displays the name of the product that is most likely to have caused the adverse event. Primary Event Displays the name of the primary event. Country of Incidence Displays the name of the country where the adverse event occurred. Patient Initials Displays the initials of the patient. Print List Displays the list of follow-up events in a PDF. -
Under Local Affiliate, select the local affiliate whose events are to be reviewed.
-
Click Search. A list of matching search results is displayed.
The following table lists the columns that appear in search results:
Initial Events Follow-up Local Tracking Number Central Case Number Receipt Date Local Tracking Number Local Affiliate Name Receipt Date Primary Suspect Product Local Affiliate Name Country of Incidence Primary Suspect Product Primary Event Country of Incidence Patient Initials Primary Event Patient Initials -
To view the incoming event or follow-up information, click the link associated with the Local Tracking Number. The following review screen is displayed.
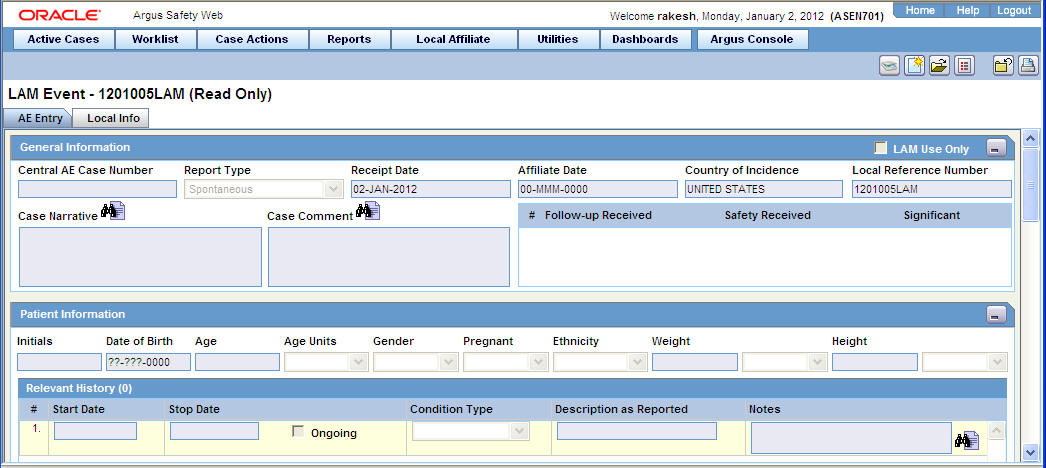
The event information viewed from here cannot be modified.
Tip:
You can accept follow-up information, and accept or reject local events, from the list of incoming events.Searching for Duplicates
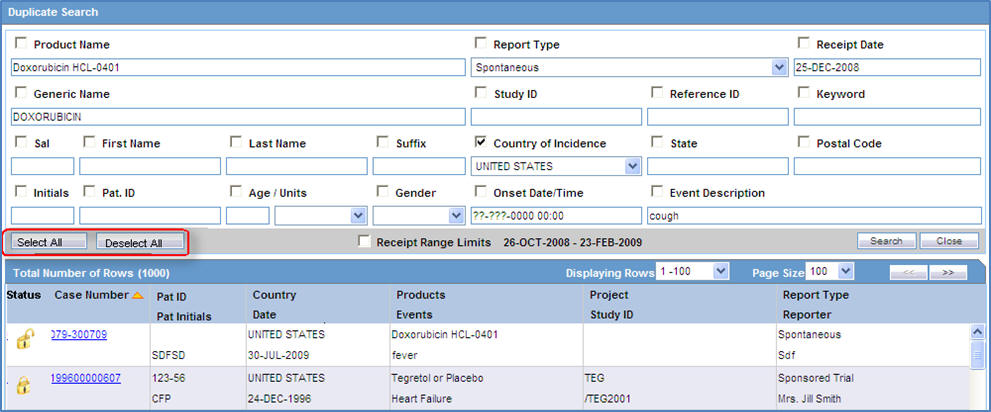
When performing a duplicate search, be aware of the following:
-
You can perform a duplicate search for incoming follow-up cases.
-
When you click the Duplicate Search dialog, the system performs a duplicate search on the selected case.
-
The user can search a maximum of 1000 cases.
-
The system performs the duplicate search in the same way it performs the Central AE Bookin Dialog Dup search.
-
The system runs the duplicate search against cases in the Central AE database.
-
The Receipt Range Limits checkbox enables the user to restrict the search to the last 3 months. If the checkbox is unchecked, the system runs the search against all cases.
-
The Select All and Deselect All buttons allow all the checkboxes associated with the Search fields to be checked/unchecked (respectively) in Duplicate Search.
-
The system uses the Oracle Text profile settings for the duplicate search in Affiliate.
-
Review incoming events from Local Affiliates.
-
Click the icon associated with the required case and select Duplicate Search.
-
The Argus Safety Duplicate Search dialog opens.
-
Select the check boxes associated with the items by which the duplicate search is to be executed. Clear the check boxes that are not to be considered for duplicate search.
-
Click Search. A list of search results matching the specified search criteria is displayed.
Inspect the search results to determine if the event is already associated with a previously entered case.
Accepting Local Events
On reviewing incoming events, you can accept an event that was routed by a local affiliate.
-
Before accepting an event, search for duplicates to check if a similar event is not associated with a case at Central.
-
Click the icon associated with the incoming event and select Accept Local Event.
-
If the system is configured for manual numbering of cases, enter the Case ID Number and click OK.
-
If the system is configured for automatic numbering of cases, a Case ID Number is automatically allotted to the case.
-
In the Accept Local Event dialog, click OK.
-
When the case is accepted, the Accept icon appears next to the case.
Accepting Events for Initial Cases
You can select the fields that need updating after clicking Accept Local Event. The following is an illustration of the Incoming Review page.
Be aware of the following when accepting local events:
-
After you accept the local event, the system displays the Affiliate Acceptance dialog box.
-
By default, the system checks all the elements for the affiliate event so they will be accepted in Argus Central.
-
If an element does not have any data, the system does not display it.
-
The field labels are configured in the same manner as the field labels in the Central Case Form fields in the Console.
-
If the section is checked, all child elements are checked.
-
You can check or uncheck individual entities.
-
The system does not enable the Accept Case button until the following fields contain data:
-
Initial Receipt Date
-
Country of Incidence
-
Report Type
-
Any single Product Name Information
-
Any Single Event Verbatim
-
-
When you click Accept Initial, the system displays the Justification dialog for acceptance.
-
When you click Reject Initial, the system rejects the affiliate event.
Accepting Events for Follow-up Cases
When accepting events for follow-up cases, be aware of the following:
-
In the Affiliate Acceptance dialog box, you can select the fields that need to be updated in the Argus Central case.
-
By default, the system checks all the elements for the affiliate event to be accepted in Argus Central.
-
The acceptance order is the same as the order defined in the Argus Case and the affiliate event for multiple entities (e.g., Products/Events/Reporters are compared against as entered in Argus Safety case and Affiliate case).
-
The system displays the elements for deleted entities in red.
-
The system displays the elements for updated entities in yellow.
-
The system displays the elements for added entities in grey.
-
The system displays the affiliate field labels in the Acceptance dialog.
-
The number of follow-ups are the total number of follow-ups in the affiliate event.
-
When you click Accept Follow-up, the system displays the Justification dialog for acceptance.
-
When you click Reject Follow-up, the system rejects the follow-up affiliate event.
-
The system attaches the difference report to the case after you accept the Argus Affiliate event.
Entering Follow-up Information
When you review incoming events, you can update a case with the follow-up information routed by the local affiliate.
To enter follow-up information:
-
Click the icon associated with the incoming event and select Accept Follow-up.

-
The follow-up information appears in a new window in PDF format.
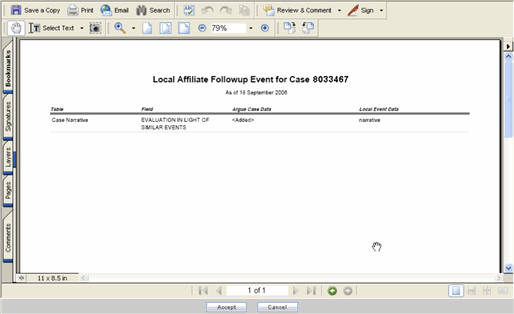
-
Review the follow-up information in the follow-up report. You can then make the appropriate changes to the case information from the Argus Safety Case Form.
Note:
The follow-up information appears in the Additional Info tab of the Case Form -
Refer to the Argus Safety User's Guide for further information on entering case information on the Case Form.
Accepting Follow-ups from Affiliate for Archived Cases
You can accept follow-up for an archived case. Use the following procedure to do so.
To accept a follow-up for an archived case:
-
Enter the password and required notes, to reopen the case from the Archived Case dialog.
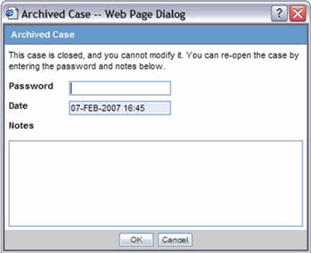
-
If you are able to unarchive the case successfully, the standard routing dialog is displayed.
-
The system auto-populates the "Current State" field with the state it was archived from (such as Work in Progress).
-
The system auto-populates other values in the Routing dialog based on the current state following the normal or current functionality of the Routing dialog.
Accepting Follow-ups from Affiliate for Locked Cases
You can accept follow-up for locked case. Use the following procedure to do so.
To accept a follow-up for a locked case:
-
Enter the password and required notes, to unlock the case from the Locked Case dialog.
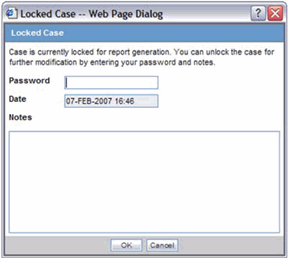
-
If the case is unlocked successfully, the system opens the standard routing dialog. The Current field is auto-populated in this dialog with the state it was currently in.
The other values in this dialog can also be auto-populated based on the current state.
Accepting Follow-ups for Open Cases
The preceding functionality of the Current State is the same for accepting follow-ups for open cases. In all scenarios, the last follow-up date entered in Argus Affiliate is auto-populated in the Argus accepted case.
An Argus Affiliate Follow-up case is identified by a red exclamation mark in the Worklist > New section of Argus Safety.
This icon is cleared automatically after the case is routed.
Rejecting Local Events
On reviewing incoming events, you can reject an event that was routed by a local affiliate.
-
Click the icon associated with the incoming event and select Reject Local Event.
-
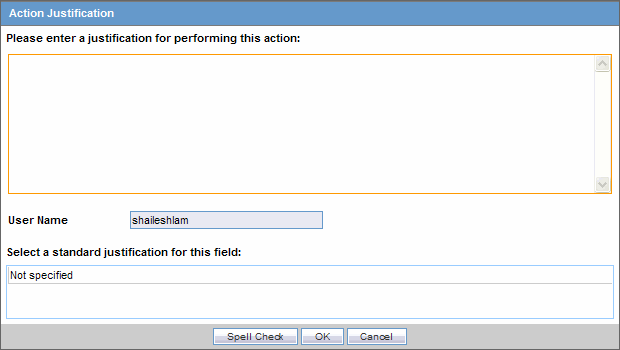
Enter a justification for rejecting the event in the Action Justification dialog box and click OK.
-
In the Reject Local Event dialog, click OK.
-
When the case is rejected, the Reject icon appears adjacent to the case.
-
When the case is rejected, the action item is displayed within LAM Worklist - LAM Action Items from Central in both Initial and Follow-up rejection scenarios, with the following attributes:
| Initial Events | Follow-up |
|---|---|
| Date | The local date of the person rejecting the case |
| Action Item Code | The action item code that can be configured through List Maintenance. |
| Action Item Description | "Case rejected by central due to" followed by the notes/reason entered by the Argus Affiliate acceptor. |
| Responsible User | Set to "any". |
| Due Date | The due date, which is populated automatically. |
Encoding Events
After a case related to the local event is created in Argus Safety, the events for the case must be encoded.
Refer to Argus Safety Web User's Guide for information on encoding events.
Locking Cases
After the events for a case are encoded, the case can be locked so that local labeling can be performed by the Affiliate Users.
Refer to the Argus Safety Web User's Guide for instructions on locking a case.
Viewing Affiliate Report Submission
Use the following procedure to view affiliate report submissions.
-
Select Report Submission from the Local Affiliate menu to open the Report Submission page.
-
Select whether you want to view Submitted Reports only or Non-Submit Reports or reports that are Pending Submission.
-
Enter a custom date range or select an appropriate date range under Range.
-
Click Search. A list of submitted or non-submitted reports appears as per the option you selected.
-
To view report details, click the icon associated with the report and select Report Details.
-
To open a report, click the icon associated with the report and select View Report.
About the Report Submission Page
The Report Submission page has three tabs as follows:
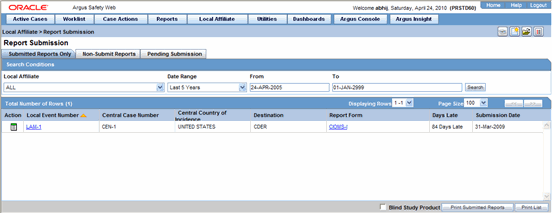
Submitted Reports Only Tab
The following is an illustration of the Submitted Reports Only tab.
The following table lists and describes the fields on the Submitted Reports Only tab
| Field | Description |
|---|---|
| Local Affiliate | Enables you to select the local affiliate to be viewed. |
| Date Range | Enables you to specify a date range for searching report during a period.
Note: If a Date Range is selected, the From and To fields get populated automatically. |
| From | Enables you to manually enter the start date for the search period. |
| To | Enables you to manually enter the last date for a search period. |
| Action | View Report |
| Report Details | Enables you with the option of viewing report details. |
| Unsubmit Report | Enables you to un-submit the selected reports. |
| Local Event Number | Displays the Local Event Number of submitted reports. Click this link to view the report in a PDF. |
| Central Case Number | Displays the Central Case Number of submitted reports. |
| Central Country of Incidence | Enter the country where the adverse event occurred. Enter the partial two-character code, the country name, or the three-character code. Argus Safety will decode the entry. The Administrator can adjust the information in this list. |
| Destination | Displays the destination of submitted reports. |
| Report Form | Displays the type of report form for the report. Click this link to view the report in a PDF. |
| Days Late | Displays the days by which the report had been delayed in its submission. |
| Submission Date | Displays the date when the report was submitted. |
| Blind Study Product | Enables you to blind the study product on the Submitted Expedited reports. |
| Print Submitted Reports | Enables you to print the submitted reports. |
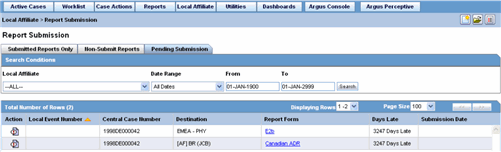
Non-Submit Reports Tab
The following is an illustration of the Non-Submit Reports tab.

The following table lists and describes the fields on the Non-Submit Reports tab.
| Field | Description |
|---|---|
| Local Affiliate | Enables you to select the local affiliate to be viewed. |
| Date Range | Enables you to specify a date range for searching report during a period.
Note: If a Date Range is selected, the From and To fields get populated automatically. |
| From | Enables you to manually enter the start date for the search period. |
| To | Enables you to manually enter the last date for a search period. |
| Action | View Report |
| Report Details | Enables you with the option of viewing report details. |
| Local Event Number | Displays the Local Event Number of unsubmitted reports. Click this link to view the report in a PDF. |
| Central Case Number | Displays the Central Case Number of unsubmitted reports. |
| Central Country of Incidence | Enter the country where the adverse event occurred. Enter the partial two-character code, the country name, or the three-character code. Argus Safety will decode the entry. The Administrator can adjust the information in this list. |
| Destination | Displays the destination of unsubmitted reports. |
| Report Form | Displays the type of report form for the report. Click this link to view the report in a PDF. |
| Days Late | Displays the days by which the report had been delayed in its non-submission. |
| Non-Submission Date | Displays the date when the report was not submitted. |
Pending Submission Tab
The following is an illustration of the Pending Submission tab.
The following table lists and describes the fields on the Pending Submission tab.
| Field | Description |
|---|---|
| Local Affiliate | Enables you to select the local affiliate to be viewed. |
| Date Range | Enables you to specify a date range for searching report during a period.
Note: If a Date Range is selected, the From and To fields get populated automatically. |
| From | Enables you to manually enter the start date for the search period. |
| To | Enables you to manually enter the last date for a search period. |
| Action | View Report |
| View Draft Report | Enables you to view the draft report. |
| Report Details | Enables you with the option of viewing report details. |
| Local Event Number | Displays the Local Event Number of unsubmitted reports. Click this link to view the report in a PDF. |
| Central Case Number | Displays the Central Case Number of unsubmitted reports. |
| Central Country of Incidence | Enter the country where the adverse event occurred. Enter the partial two-character code, the country name, or the three-character code. Argus Safety will decode the entry. The Administrator can adjust the information in this list. |
| Destination | Displays the destination of unsubmitted reports. |
| Report Form | Displays the type of report form for the report. Click this link to view the report in a PDF. |
| Days Late | Displays the days by which the report had been delayed in its non-submission. |
| Submission Date | Displays the date when the report was due for submission. |
Medical Review
Use the Medical Review function to quickly and efficiently view important information in a case. The following is an illustration of the Medical Review screen.
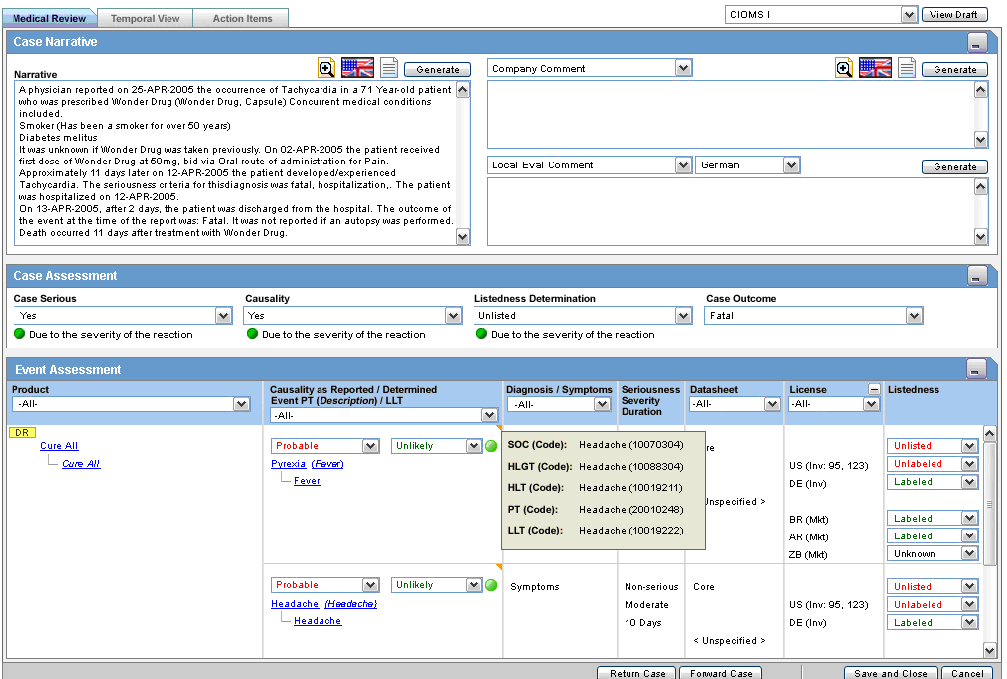
Note:
The Medical Review section from Local Affiliate Module is a read-only section. You can view the information related to a case but cannot edit it from the Argus Affiliate's Medical Review.-
Select Case Actions -- > Medical Review to open the Medical Review screen.
-
The system opens the Medical Review screen.
Common Features in Medical Review
The following table lists and describes the common features under Medical Review.
| Field | Description |
|---|---|
| Generate | Click Generate in either of the narrative fields to enable Auto Narrative Generation. |
| Return Case | Click Return Case to open the return route dialog and save the information. |
| Forward Case | Click Forward Case to open the forward route dialog and save the information.
When the case has been routed and the form is closed, you cannot route from the case form Activities tab till the case has been closed and re-opened. |
| View Draft | Select a report and click View Draft to generate a draft version of the report based on the open case.
Note: This report form type is saved as a default and the next time the user opens the Medical Review for another case, this is defaulted to the Report Form selected previously. The Draft report does not display all the changes made to the Case until the case has been saved in the database. |
| Zoom/un-zoom icon | Click the zoom icon to view the selected dialog on a much bigger scale.
Click Un-Zoom icon to revert back to the earlier view. |
About Medical Review
Medical Review contains 3 sections:
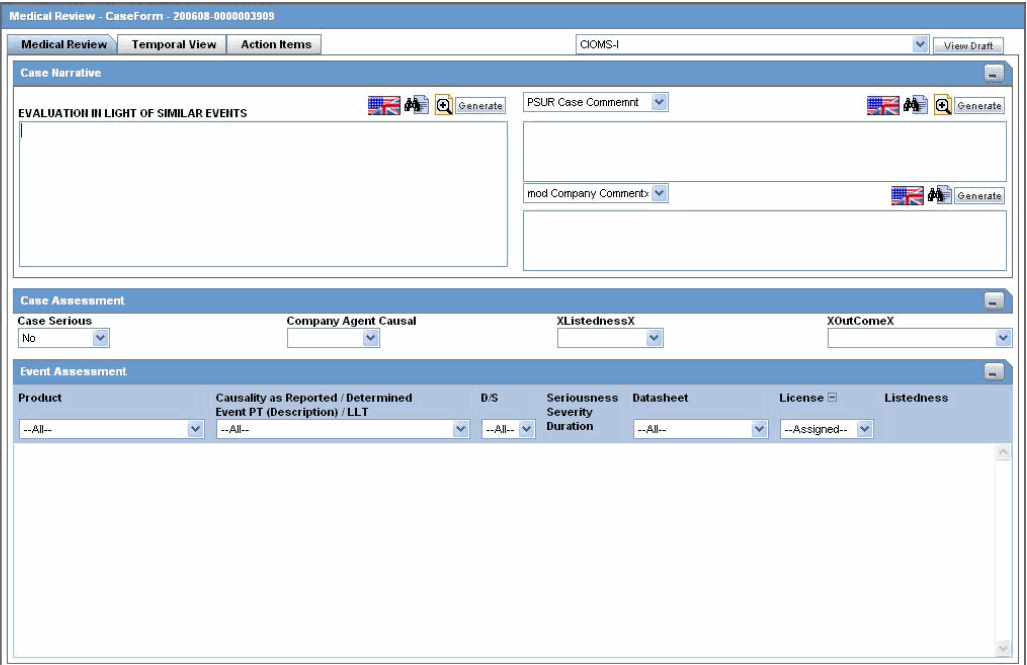
Enter information in the Case Narrative, Case Assessment and Event Assessment sections.
Note:
An (S) is displayed for Serious events.An (F) is displayed for Fatal events.
An (LT) is displayed for Life Threatening events.
An (H) is displayed for Hospitalized events.
Case Narrative Section
The Case Narrative section is read-only and cannot be changed.
However, you can choose from the drop down options in other fields to view any of the other narrative fields.
This view is saved as a default and the next time the user opens the Medical Review for another case, this is defaulted to the narrative fields selected previously.
You cannot choose the same Narrative field in the drop down options available. The first selected narrative field is disabled in the second drop down option.
Case Assessment
The Case Assessment section assesses the case details.
Select whether the case is serious or not from the Case Serious drop-down list.
Similarly, select relevant information about Company Agent Causal, Listedness and Outcome from the drop-down lists.
Event Assessment
The Event Assessment section enables you to understand more about the events.
The following table lists and describes the fields in the Event Assessment section.
| Field | Description |
|---|---|
| Recalculate | Refreshes the Event Assessment section with the newly entered data if new suspect products or events are entered, or the Event Relationship is modified. |
| Event | This field is populated when events are entered in the Events tab and is displayed in the following format:
• First Line - Event PT • Second Line - Verbatim • Third Line - LLT |
| Products | This field is populated when events are entered in the Products tab and is displayed in the following format:
• First Line - Product Name • Second Line - Generic Name |
| Datasheet | Displays the datasheet(s) for the agent |
| License | Displays the license(s) for the agent |
| Reported Causality | Indicates the degree of reported causality. |
| Determined Causality | This field is populated automatically, along with the information entered in the Reported Causality field. |
| Determined Listedness | Indicates whether the system found the event on the datasheet for this product. |
| D/S | Displays the Diagnosis/Symptom details by D or S in line with the Events |
| Seriousness Severity Duration | Display the Seriousness, Severity and the Duration of the Event. |
Filtering in the Event Assessment Section
The following table describes how each field of the Event Assessment screen is filtered.
| Field | Description |
|---|---|
| Product | The product filter drop down list contains all products listed in the event assessment. The user can filter on all the products which are present in the Event Assessment dialog. |
| Event | Contains a drop down of values of distinct Event PT. The user can filter on all the products which are present in the Event Assessment dialog. |
| Diagnosis | Contains a drop down values of D for Diagnosis or S for Symptoms. |
| Datasheet | Contains a drop down of values of distinct Datasheets. All the blank datasheets shall be displayed as a single row of <Unspecified> |
| Licenses | Contains a drop down of values of distinct Countries of the Licenses. All the Licenses which are not associated to a Datasheet shall be displayed under <Unspecified> else aligned with the Datasheet view. |
Note:
Only the assessment rows that match the selected criteria are displayed in the filtering results.User Actions within Event Assessment
The following tables describes user actions and their results.
| Field | Description |
|---|---|
| Click the Datasheet column's "plus" icon | Displays the license and datasheet views and displays the License Column and enable the "-" for the License Column. |
| Click Product Name | Displays the Product Information dialog for the selected product |
| Click Event Description | Displays the Event Information dialog for the selected event |
| Click License Description | Displays the Product Information as defined in the License Configuration |
| Click Datasheet Description | Displays all the configured terms in the datasheet |
About Temporal View
Click Temporal View to view a read-only version of the case before routing.
The information displayed in the Temporal View tab is taken from the information entered in the Case Form section.
Temporal View Fields: Summary Section
The following is an illustration of the Summary section of the Temporal View tab.
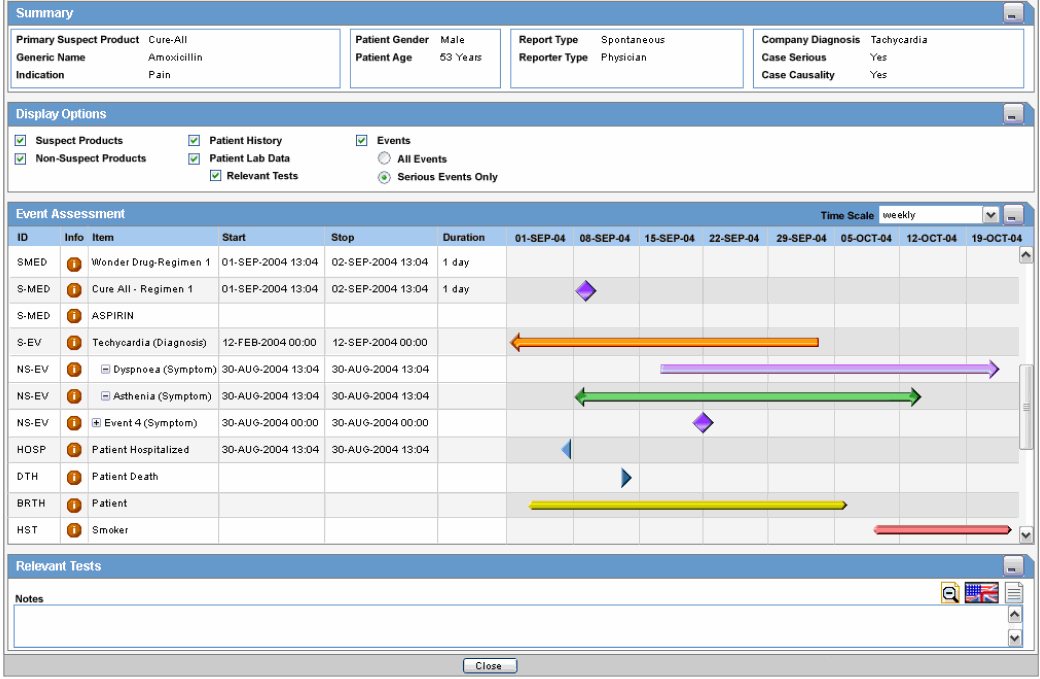
The following table lists and describes the fields in the Summary section.
| Field | Description |
|---|---|
| Primary Suspect Product | Displays the name of the primary suspect product |
| Generic Name | Displays the generic name of the primary suspect product |
| Indication | Displays information about the product indication. |
| Patient Gender | Displays the gender of the patient. |
| Patient Age | Displays the age of the patient |
| Report Type | Displays the report type. |
| Reporter Type | Displays the type of reporter reporting the event |
| Company Diagnosis | Displays the company diagnosis |
| Case Serious | Displays whether the case is serious or not |
| Case Causality | Displays the case causality status |
Temporal View Fields: Displays Options Section
The following table lists and describes the fields in the Display Options section.
| Field | Description |
|---|---|
| Suspect Products | Select the checkbox to view Suspect Products in the Event Assessment Section |
| Non-Suspect Products | Select the checkbox to view Non-Suspect Products in the Event Assessment Section |
| Patient History | Select the checkbox to view Patient History in the Event Assessment Section |
| Patient Lab Data | Select the checkbox to view Patient Lab Data in the Event Assessment Section |
| Relevant Tests | Select the checkbox to view Relevant Tests in the Event Assessment Section |
| Events - All Events, Serious Events Only | Select the checkbox as required to view All Events/Serious Events Only in the Event Assessment Section |
Temporal View Fields: Event Assessment Section
The following is an illustration of the Event Assessment section of the Temporal View tab.
The following table lists and describes the fields in the Event Assessment section.
| Field | Description |
|---|---|
| Time Scale | Displays the time period pertaining to the event assessment like weekly, monthly, etc. |
| ID | Denotes the type of event. For example, HOSP means Hospitalized |
| Info | Click the Info icon (i) to view details about the selected entity. |
| Item | Displays the item name |
| Start | Displays the date from when the event assessment began |
| Stop | Displays the last date of the event assessment |
| Duration | Displays the duration of the event assessment |
Temporal View Fields: Relevant Tests Section
The following table lists and describes the fields in the Relevant Tests section.
| Field | Description |
|---|---|
| Notes | Displays the notes entered, if any |
| Zoom/Un-zoom icon | Click the Zoom icon to view the report on a bigger scale.
Click the Unzoom icon to revert to the earlier view |
| Flag icon | This icon displays the language text that is supported |
| Notes icon | Click this icon to view/enter notes. |
| Save and Close | Closes the dialog, saving any changes |
About Action Items
The following is an illustration of the Action Items tab.
The following table lists and describes the fields on the Action Items tab.
| Field | Description |
|---|---|
| Date Open | Enter the date the action item was created. Open action items appear in the Worklist of the user who is responsible for the action item. They also appear in the Open Action Items Report. |
| Code | Select an Action Item code from the drop-down list. This will display the description of the selected Action Item Code. The Administrator can adjust this list. |
| Description | Selecting an Action Item code automatically enters information into this field. The text can be modified as required. The Administrator can adjust this list. |
| Group/User | Select a group responsible for the Action Item from the given drop-down list. From the drop-down list below this, select a user from the selected group who will be responsible for the action. The Action Item will appear in the Worklist for the selected user. If "Any" is chosen as the group, the Action Item appears in all the users' Worklist. The Administrator can adjust these lists. |
| Due | Enter the date on which the action item is to be completed. |
| Completed | Enter the date on which the action item was completed. |