2 Install Oracle Argus Analytics
Note:
This installation assumes that assumes the typical hardware configuration with an Oracle database server, an ODI Studio, and a Windows Server 2012 R2 Standard (64 bit) with OBIEE Server, ODI Studio, and an Oracle Database Client.All installation and configuration actions must be performed as an administrator or root user.
2.1 Argus Analytics Upgrade Matrix
Before deciding on an upgrade for Argus Analytics, it is important that we first map ourselves as per our current Argus Analytics version and the tasks required to upgrade from one version to another.
The following matrix provides a high-level overview of the tasks to be performed to upgrade from one Argus Analytics version to another:
| Current Argus Analytics Version | Upgrade to Argus Analytics Version: | ||||||
|---|---|---|---|---|---|---|---|
| 1.1 | 1.1.1 | 7.0.3 | 8.0 | 8.1 | 8.1.1 | 8.2 | |
| 1.0 | Cannot upgrade. Need to perform a fresh installation. | Cannot upgrade. Need to perform a fresh installation. | Cannot upgrade. Need to perform a fresh installation. | Cannot upgrade. Need to perform a fresh installation. | Cannot upgrade. Need to perform a fresh installation. | Cannot upgrade. Need to perform a fresh installation. | Cannot upgrade. Need to perform a fresh installation. |
| 1.1 | Not applicable | Use Argus Analytics 1.1.1 Installer to upgrade. | Use Argus Analytics 7.0.3 installer to make the upgrade. | Use Argus Analytics 8.0 installer to make the upgrade. | Cannot upgrade. Need to perform a fresh installation. | Cannot upgrade. Need to perform a fresh installation. | Cannot upgrade. Need to perform a fresh installation. |
| 1.1.1 | Not applicable | Not applicable | Follow the steps to Upgrade Argus Analytics from 1.1.1 to 7.0.3. | Use Argus Analytics 8.0 installer to make the upgrade. | Cannot upgrade. Need to perform a fresh installation. | Cannot upgrade. Need to perform a fresh installation. | Cannot upgrade. Need to perform a fresh installation. |
| 7.0.3 | Not applicable | Not applicable | Not applicable | Use Argus Analytics 8.0 installer to make the upgrade. | Cannot upgrade. Need to perform a fresh installation. | Cannot upgrade. Need to perform a fresh installation. | Cannot upgrade. Need to perform a fresh installation. |
| 8.0 | Not applicable | Not applicable | Not applicable | Not applicable | Use Argus Analytics 8.1 installer to make the upgrade. | Cannot upgrade. Need to perform a fresh installation. | Use Argus Analytics 8.2 installer to make the upgrade. |
| 8.1 | Not applicable | Not applicable | Not applicable | Not applicable | Not applicable | Use Argus Analytics 8.1.1 installer to make the upgrade. | Use Argus Analytics 8.2 installer to make the upgrade. |
| 8.1.1 | Not applicable | Not applicable | Not applicable | Not applicable | Not applicable | Not applicable | Use Argus Analytics 8.2 installer to make the upgrade. |
This section describes the detailed Oracle Argus Analytics installation process. It also describes the pre and post Oracle Argus Analytics installation tasks that you must complete for different environments.
Note:
To connect to SQLPLUS, execute the following steps:-
Open a command window in Windows. Alternatively, in Unix, type at the shell prompt.
-
Enter the sqlplus <dbuser>@<tnsnames_entry> command and press Enter.
-
Enter the password when prompted by the SQLPLUS program.
2.2 Preinstallation Configuration
-
The TNS entries for both the Data Mart Schema and the Argus Safety Database Schema should be present in the OBIEE 12c home in the path:
<OracleBI Home>\user_projects\domains\<BI Domain Name>\config\fmwconfig\bienv\core\
-
Configuring the TNS for Oracle Client:
The TNS names entry for both Argus Analytics data mart and the Argus Safety Source system should be configured here:
<Oracle Client Home>\network\admin\tnsnames.ora
-
Configuring the TNS for Oracle DB Servers:
The TNS names entry for both Argus Analytics data mart and the Argus Safety Source system should be configured here:
Argus Safety DB Server:
<Oracle Client Home>\network\admin\tnsnames.ora
This should contain the TNS entry for AN Data DB Server.
Argus Safety DB Server:
<Oracle DB Home>\network\admin\tnsnames.ora
This should contain the TNS entry for Argus Safety DB Server.
-
Set up the Oracle Client Home in the PATH variable.
-
Set up an INSTALL (DBA) user:
-
Execute the ancreatedbauser.bat file from <Argus Analytics Installer directory>\install\utils.
-
Enter the following inputs:
- Database Connection String for Argus Safety or Argus Analytics DB
- Enter the user with SYSDBA privileges in <Argus Analytics/Argus Safety> database
- Enter password for <SYSDBA user> in <Argus Analytics/Argus Safety> database
- Enter DBA User to be created in <Argus Analytics/Argus Safety> database
- Enter password for <DBA user> in <Argus Analytics/Argus Safety> database
Repeat the procedure to create INSTALL(DBA) user for Argus Safety database, and Argus Analytics database.
Note:
-
If the INSTALL (DBA) user already exits in the database, then the script provides the required additional grants to the user. If the user does not exists in the database, a new user is created, and necessary grants are provided.
-
When the installation is complete, you may drop this user from the database by executing the following command:
DROP USER <INSTALL (DBA) USER> CASCADE;
-
-
-
Set up the TABLESPACES:
The installer creates new schemas in the data mart and prompts for the tablespaces to be used. It is recommended to create one default tablespace and a temporary tablespace to be used for the new schemas that get created in both the Argus Analytics DB Instance and the Argus Safety DB Instance.
You can create tablespaces either by executing a batch file or manually.
-
To create tablespace from a batch file:
a. Execute the ancreatetablespace.bat file from <Argus Analytics Installer directory>\install\utils.
b. Enter the following parameters:
- Database Connection String for Argus Safety or Argus Analytics DB
- Enter the user with SYSDBA privileges in &db_mart. database
- Enter password for &sysdba_user in &db_mart. Database
- Enter the DATA Tablespace Name [e.g. AN_DATA_TS]
- Enter the TEMP Tablespace Name [e.g. AN_TEMP_TS]
- Enter the complete data file path
- Tablespace Encryption Required [0 - No, 1 - Yes]
- Tablespace Encryption Algorithm [e.g AES256]
Repeat the procedure to create tablespaces for Argus Safety database and Argus Analytics database.
-
To manually create the tablespaces, see the following examples:
Default TABLESPACE [one each needed at the AN DWH DB Server and Argus Safety DB Server]:
CREATE TABLESPACE <AN_DATA_TS>
DATAFILE '/DatafilePath/<AN_DATA_TS>_01.dbf'
SIZE 100M
AUTOEXTEND ON
NEXT 1M
LOGGING;
Temporary TABLESPACE [one each needed at the AN DWH DB Server and Argus Safety DB Server]:
CREATE TEMPORARY TABLESPACE <AN_TEMP_TS>
TEMPFILE '/Tempfile Path/<AN_TEMP_TS>_01.dbf'
SIZE 100M
AUTOEXTEND ON
NEXT 1M;
-
2.2.1 Configure ETL Client on ODI
This section lists steps to configure ETL Client on ODI and install ODI Studio and create master and work repository.
Before configuring ODI Settings, you must install ODI Studio and configure an agent (either Standalone Agent, Java EE Agent, or Colocated Agent).
ODI 12c has the following types of installation:
-
Enterprise Installation—Enables you to deploy ODI Studio along with the binaries to configure either Java EE Agent, or Colocated Agent.
-
Standalone Installation—Enables you to deploy ODI Studio along with the binaries to configure Standalone Agent.
To understand the agent topologies for the best suitable installation, Oracle recommends you to refer ODI Install and Configuration Guide > Planning the Oracle Data Integrator Installation section.
When installing the ODI, note down the SUPERVISOR credentials, and Master and Work Repository credentials.
For more details, refer to the Oracle Data Integrator Install and Configuration Guide for ODI 12.2.1.3:
2.3 Run the Oracle Argus Analytics Installer
The basic Oracle Argus Analytics components are installed using the Oracle Universal Installer. The installer gathers all the information about the database connectivity, data mart, sequence of prompt screens and then installs the components accordingly. This installer needs to be executed in the Oracle Argus Analytics server where Oracle client is installed.
Note:
Make sure that PERL is present in the system path before running the installer.2.3.1 Launch the Universal Installer
-
Extract the contents of the media pack into a temporary directory (For example, C:\argus_analytics_temp).
-
Navigate to the \install directory under the extracted temporary folder.
-
Double-click the setup.exe file to launch the Oracle Universal Installer with the Welcome screen.
2.3.2 Complete the Oracle Argus Analytics Installer Process
The installer will take you through a series of prompts. Attend to the Installer's prompts. The following sections describe each Installer screen, and the required action.
-
Choice of New Install / Upgrade from Previous Versions
Select if Argus Analytics is a fresh installation or an upgrade installation which is supported from Argus Analytics 8.1.1 to 8.2.
Note:
The upgrade path installation needs information to be provided on the previous Argus Analytics installation details. -
Oracle Argus Analytics Home Path
The Oracle Argus Analytics Home path is the location where all the staged files from the Installer will get copied to the local machine. This is also the location from where the Installer would execute the database scripts.
Home Name: ANHome1
Path: C:\argus_analytics
Click Next.
Note:
In case of Installation choice as upgrade path, provide the previously installed AN Home details. -
Select the Choice of New Install / Upgrade from AN 8.1.1
For new or upgrade install, corresponding details will be asked. These details are explained in the respective sections below.
-
Argus Safety Database Details
This screen collects all information about the source Argus Safety database.
Supply the values for:
-
Argus Safety Database Connect String
-
Argus Safety Schema, Password
-
Argus Safety DBA User: Enter the custom INSTALL(DBA) user name (created in Section 2.2, "Preinstallation Configuration" > Step 5).
-
Argus Safety DBA Password: Password of the INSTALL(DBA) user
-
VPD Schema Name
-
ESM Schema Owner
-
ESM Schema Password
-
Oracle Argus Analytics Source Schema and Password
-
Oracle Argus Analytics Source RPD Schema and Password
-
Oracle Argus Analytics Source Work Schema and Password
-
Oracle Argus Analytics Source Default Tablespace [<AN_DATA_TS>]
-
Oracle Argus Analytics Source Temp Tablespace [<AN_TEMP_TS>]
Note:
Oracle Argus Analytics Source schema, Argus Analytics Source RPD schema, and Argus Analytics Source Work schema are the new schemas which would get created by the installer to store the views for all Argus Source tables that are needed for the ETL and reporting process. You must ensure that these are not pre-existing schemas before running the Oracle Argus Analytics Installer.If Upgrade Install is chosen, provide the existing details of AN Schemas respectively.
Example:
-
AS Database Connect String: AS70X_SID
-
AS Schema: ARGUS_APP
-
AS Password: <ARGUS_APP user's password>
-
AS DBA User Name: <INSTALL user name>
-
AS DBA User Name: <INSTALL user's password>
-
VPD Schema: VPD_ADMIN
-
ESM Schema Owner: ESM_OWNER
-
ESM Schema Password: < ESM_OWNER's password>
Click Next
-
Oracle Argus Analytics Source Schema: AN_SRC
-
Oracle Argus Analytics Source Password: <AN_SRC password>
-
Oracle Argus Analytics Source RPD Schema: AN_SRC_RPD
-
Oracle Argus Analytics Source RPD Password: <AN_SRC_RPD password>
-
Oracle Argus Analytics Source Work Schema: AN_SRC_WRK
-
Oracle Argus Analytics Source Work Password: <AN_SRC_WRK password>
-
Oracle Argus Analytics Source Default Tablespace: <AN_DATA_TS>
-
Oracle Argus Analytics Source Temp Tablespace: <AN_TEMP_TS>
-
-
Oracle Argus Analytics Data Mart Details
This screen collects all the information regarding the Oracle Argus Analytics data mart details.
The following are the details of the data mart:
-
DWH Data Mart DB Connect String
-
DWH Data Mart DBA User name: Enter the customer INSTALL(DBA) User Name (created in Section 2.2, "Preinstallation Configuration" > Step 5).
-
DWH Data Mart DBA User Password: Password of the INSTALL(DBA) user
-
DWH Schema and Password
-
DWH RPD Schema and Password
-
DWH Work Schema and Password
-
DWH Default Tablespace
-
DWH Temporary Tablespace
Note:
DW Schema, DWH RPD Schema, and DWH Work Schema are the new schemas that will be created by the installer to store the ETL data. Oracle Argus Analytics RPD schema is the schema which would contain the synonyms of all the data mart tables and is used by OBIEE reports.Tablespaces that are going to be specified here should have got created during the pre-installation steps.
If Upgrade Install is chosen, provide the existing details of AN Schemas respectively.
If the Argus Safety System is a multi-tenant application, the VPD policy and additional contexts are created during installation with names predefined as:
-
VPD Policy Names:
<AN_SRC>_src_vpd
<AN_DWH>_dwh_vp
-
Contexts:
<AN_SRC>_src_ctx
<AN_DWH>_dwh_ctx
-
Exadata Context:
<AN_DWH>_exa_ctx
Example:
-
DW Database Connect String: ANDWH_SID
-
DW DBA User Name: <INSTALL user name>
-
DW DBA User Password: <INSTALL user's password>
-
Oracle Argus Analytics DW Schema: AN_DWH
-
Oracle Argus Analytics DW Password: <password for AN_DWH schema>
-
Oracle Argus Analytics RPD Schema: AN_DWH_RPD
-
Oracle Argus Analytics RPD Password: <password for AN_DWH_RPD schema>
-
Oracle Argus Analytics Work Schema: AN_DWH_WRK
-
Oracle Argus Analytics Work Password: <password for AN_DWH_WRK schema>
-
DW Default table space: <AN_DATA_TS>
-
DW Temporary tablespace: <AN_TEMP_TS>
Click Next.
-
-
Exadata Database
If the Datawarehouse DB Server is Exadata, select Yes.
-
Summary Screen
Verify setting => details provided in the summary screen and click Install.
The installer will stage the required components into the Oracle Argus Analytics home and will create the Data Mart schemas, RPD & WORK schemas. In addition, it will also create contexts and VPD policy if the Argus Safety installation is a multitenant application.
After the installation has been completed, the install log can be verified from the following path or from your local Oracle Inventory logs folder.
<Argus Analytics Home>\install\pvadriverscript<timestamp>.log
This log file must be verified to ensure that the installer has completed successfully.
2.4 ODI Smart Import and Topology Configuration (ODI only)
This section comprises the following sub-sections:
2.4.1 Connect to ODI Studio
-
Execute the following procedures from:
-
Oracle Data Integrator Install and Configuration Guide > Configuring Oracle Data Integrator Studio > Starting ODI Studio.
-
Oracle Data Integrator Install and Configuration Guide > Configuring Oracle Data Integrator Studio > Connecting to the Master Repository.
-
-
Create a Work Repository Login by following the same steps as in Step 1 b > Connecting to the Master Repository.
In the Work Repository section, select a work repository from the find list instead on Master Repository Only option. For example, name the repository as AN Work Repository.
Refer to the Oracle Data Integrator Install and Configuration Guide for ODI 12.2.1.3:
2.4.2 Execute the ODI Smart Import
-
Log in to the work repository in ODI Studio by selecting the AN Work Repository connection.
-
Select the Connect Navigator drop-down list from the top right on the Designer tab and click Import.
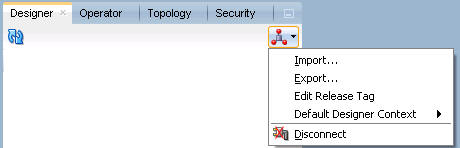
-
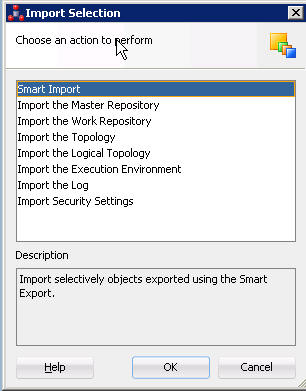
Select Smart Import from the Import Selection menu and click OK. The Smart Import Wizard is displayed.
-
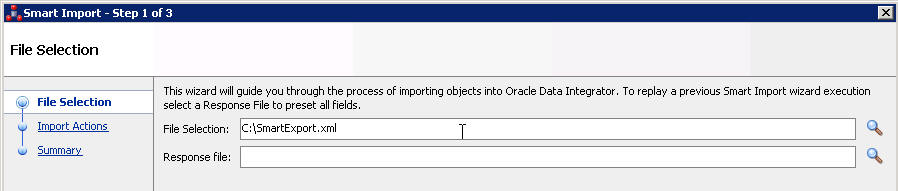
Select the zip file called an.zip from the <AN_INSTALL_HOME>\odi directory in the File Selection textbox and click next. The files can also be browsed by clicking on the symbol available with the textbox.
-
ODI imports the file and checks for any issues that can occur while importing ODI objects. If issues are found, then the same will be displayed in import actions window. Click Next if no issues are found.
-
Click Finish.
This imports all the AN objects in ODI repository and makes them visible in the ODI Studio Console.
2.4.3 Configure the Topology in ODI Studio
-
Open the ODI Studio and connect as AN Work Repository.
-
Navigate to Topology.
-
Select the Physical Architecture tab.
-
Expand the tree structure to expose the following:
Technologies > Oracle >
-
Edit the node DS_AN_ArgusAnalytics.
-
Edit the following fields in the Definition window:
-
Instance/dblink (Data Server):
The complete TNS entry of the DWH server should be pasted here in a single line:
(DESCRIPTION = (ADDRESS = (PROTOCOL = TCP)(HOST = <DWH_DB_SERVER>)(PORT = <DWH_DB_LISTENER_PORT>)) (CONNECT_DATA =(SERVICE_NAME=<DWH_DB_SERVICE_NAME>)))
-
Connection:
-
User: <AN_DWH_WRK> [the DWH work schema user created during installation]
-
Password: <AN_DWH_WRK_PASS> [The password for the DWH Work schema]
-
-
-
In the JDBC window, edit the following fields:
-
JDBC URL: jdbc:oracle:thin: <DWH_DB_SERVER>:<DWH_DB_LISTENER_PORT>:<DWH_DB_SID>
or
jdbc:oracle:thin: <DWH_DB_SERVER>:<DWH_DB_LISTENER_PORT>/<DWH_DB_SERVICE_NAME>
Use the jdbc connection string with database SERVICE_NAME in case the database version is 12c.
-
-
Save the details and click Test Connection to validate it.
-
Expand the tree below DS_AN_ArgusAnalytics to expose the tree node DS_AN_ArgusAnalytics.AN_DWH.
-
Edit the node DS_AN_ArgusAnalytics.AN_DWH.
-
Change the Schema by selecting from the drop-down list for the following fields:
-
Schema (Schema): <AN_DWH>
-
Schema (Work Schema): <AN_DWH_WRK>
-
-
Save the changes.
-
Similarly, edit the node DS_AN_ARGUS_SAFETY to provide information on the Argus Safety DB Server.
-
Edit the following fields in the Definition window:
-
Instance/dblink (Data Server):
The complete TNS entry of the DWH server should be pasted here in a single line:
(DESCRIPTION = (ADDRESS = (PROTOCOL = TCP)(HOST = <AS_DB_SERVER>)(PORT = <AS_DB_LISTENER_PORT>)) (CONNECT_DATA =(SERVICE_NAME=<AS_DB_SERVICE_NAME>)))
-
Connection:
-
User: <AN_SRC_WRK> [the AN Source Work Schema user created during installation]
-
Password: <AN_SRC_WRK_PASS> [The password for the AN Source Work Schema]
-
-
-
In the JDBC window, edit the following fields:
-
JDBC URL: jdbc:oracle:thin: <AS_DB_SERVER>:<AS_DB_LISTENER_PORT>:<AS_DB_SID>
or
jdbc:oracle:thin: <AS_DB_SERVER>:<AS_DB_LISTENER_PORT>/<AS_DB_SERVICE_NAME>
Use the jdbc connection string with database SERVICE_NAME in case the database version is 12c.
-
-
Save the details and click Test Connection to validate it.
-
Expand the tree below DS_AN_ArgusSafety to expose the tree node DS_AN_ArgusSafety.AN_SRC.
-
Edit the node DS_AN_ArgusSafety.AN_SRC.
-
Change the Schema by selecting from the drop-down list for the following fields:
-
Schema (Schema): <AN_SRC>
-
Schema (Work Schema): <AN_SRC_WRK>
-
-
Save the changes.
2.4.4 Configure the ODI Agent
You need to configure either one of the agents: Java EE Agent, Colocated Agent, or Standalone Agent.
To understand the agent topologies for the best suitable installation, Oracle recommends you to refer the ODI Install and Configuration Guide > Planning the Oracle Data Integrator Installation section.
When installing the ODI, use SUPERVISOR credentials, and Master and Work Repository credentials as created in the Section 2.2.1, "Configure ETL Client on ODI."
Note:
Make sure to create the agent with name PA_AN, as the same is available in Argus Analytics ODI code.For more details, refer to the Oracle Data Integrator Install and Configuration Guide for ODI 12.2.1.3:
To configure the Standalone ODI Agent:
-
Use the ODI Studio Topology Manager to edit the standalone agent PA_AN definition. And save the information as per the installation done for ODI.
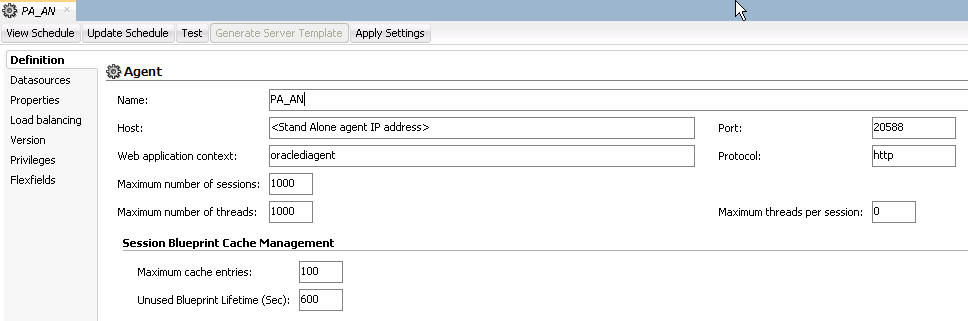
Note:
The Host field contains the Host name where the ODI Agent will be running. In this example, the host is on the same server, and the default port number used is 20910.Change the Port Number to any value other than the default to avoid conflicts with other installations (for example, 20920).
Note:
Before making Argus Analytics OBIEE URL available to the end users, the Initial/Full load ETL (LP_FL_AN) in ODI should be successfully run.To run the ETLs in ODI and for more information on ODI Configurable Parameters, refer to the Executing the ETL Load Plans in ODI section in the Oracle Argus Analytics User Guide.
Refer to the following table. In ODI, the VPD Policies on the warehouse tables do not get disabled during the execution of the ETLs (Full/Incremental) for a multi-tenant installation.
| Parameters | Load Type | Description | Allowed Values |
|---|---|---|---|
|
VAR_ALN_PERIOD_FROM_DATE |
Full Load |
The start date of the days to populate from in the W_DAY_D/PVA_DAY table. It should be in the format: MM/DD/RRRR |
Date values such as: 01/01/1980 Recommended value: 01/01/1980 |
|
VAR_ALN_PERIOD_TO_DATE |
Full Load |
The end date of the days to populate till in the W_DAY_D/PVA_DAY table. It should be in the format: MM/DD/RRRR |
Date values such as: 12/31/2019 Recommended Value: 12/31/2019 |
|
VAR_INT_TRUNCATE_STAGE |
Both |
This variable is used to decide whether to truncate the stage table or not and is useful in multiple Argus Safety DB support |
Valid values:0: Does not truncate Stage table1: Truncate Stage tableShould be specified as 1 always in case of Single Argus Safety Instance as source information Recommended Value: 1 |
|
VAR_INT_COLLECT_STATISTICS |
Both |
This variable is used to decide whether the statistics of the target tables need to be collected or not. |
Default Value: 1 Values Accepted: 0,1 0: Load Plans will not collect statistics 1: Load Plans will collect statistics after loading data |
|
VAR_ALN_ENTERPRISE |
Both |
The specific Enterprise ID to run the ETL for. |
-1: Runs the ETL for the entire Warehouse0: Runs the ETL for all the enterprises the user ($$p_user_name) has access toInteger Value [1,2,3, etc]: Runs the Incremental ETL for the specified Enterprise only. Note: For Full Load, this value has to be -1. |
|
VAR_ALN_ERROR_REJECT_LIMIT |
Both |
This variable is used to set the number of rows that will be tracked in the respective error tables prior to aborting the ETL in case of errors. |
Valid Values:Positive Integer numbers: (E.g. 0, 100, 1000, etc.)UNLIMITED: All the error records are logged Recommended Value: UNLIMITED |
|
VAR_ALN_USER_NAME |
Both |
The user name for which the ETL shall use to set the VPD Context for the specified enterprise in the parameter: VAR_ALN_ENTERPRISE. This value should be passed inside single quotes: such as 'username'. |
Default value: 'admin' |
|
VAR_INT_RAISE_ERROR |
Both |
Setting this variable to 0 or 1 will appropriately either stop a Load Plan/Interface or continue the same when data errors are encountered during the load. |
0: Do not raise data error when encountered during ETLs1: Raise data error when encountered during ETLs Recommended Value: 1 |
|
VAR_INT_CONFIG_DAYS |
Incremental Load |
Reduces the incremental extract window by the specified number of days. Example: Extract all changed rows between LAST_EXTRACT_DATE and (SYSDATE - $$p_config_days) |
Integers Recommended Value: 0 |
2.4.5 Modify ODI Java EE Agent Connection Pool Settings
Note:
This section is applicable only if you are using ODI Java EE Agent.After configuring the ODI 12c Java EE Agent, follow these steps to increase the size of the connection pool to enable parallel step executions as appropriate for Argus Analytics:1. Open the ODI WLS administration console (ex: http://<ODI server name>:<ODI port number>/Console)
2. Navigate to Services -> Datasources -> odiMasterRepository
3. Go to the tab Configuration -> Connection Pool
4. Change the Maximum Capacity to 50.
5. Repeat these steps for increasing the connection pool size for the datasource odiWorkRepository as well.
Note that without increasing the connection pool size the Argus Analytics ETLs will fail.
2.5 Configure the OBIEE Repository and Webcatalog
2.5.1 Prerequisites
Make sure OBIEE 12c (12.2.1.4) with latest patch set is installed and the Administrator Console and the Enterprise Manager (Fusion Middleware Control) is running by checking the following URLs:
-
http://<machinename>.<port>/emNote:
Port 9500 is the default Weblogic port. It may change based upon the system configuration. Check with your Oracle Weblogic administrator for the correct port number if the above port does not work as expected.
2.5.1.1 Upgrade the AN RPD and Catalog (Upgrade Install Only)
Note:
Catalog and RPD upgrade are not available from Argus Analytics 1.1/1.1.1/7.0.3/8.0/8.1/8.1.1. Use the latest catalog provided with the AN 8.2 installation (present at <AN_INSTALL_HOME>/catalog/opva.zip) for deployment.2.5.1.1.1 Upgrade the RPD
The following steps upgrades the AN 8.1.1 RPD to the latest code in AN 8.2
Note that if there have been no customizations to the existing AN RPD, you can skip this section, because the latest RPD is already present at <AN_INSTALL_HOME>/repository/opva.rpd.
To upgrade the AN RPD (if required):
-
Open the existing AN RPD file that you wish to upgrade to AN 8.2 in the BI Administration Tool in offline mode.
-
Provide the repository password.
-
From the menu, select File > Merge.
-
Select the Full Repository Merge radio button.
-
Select the button to choose the Original Master Repository, and click Repository. This opens the file dialog window to choose a repository file.
-
Select the existing AN RPD file.
-
Enter the repository password as 'opva123'.
-
Similarly, select the button to choose the Modified Repository and click the Repository. This opens the file dialog window to choose a repository file.
-
Select the AN 8.2 RPD file present at <AN_INSTALL_HOME>/repository/opva.rpd.
-
Enter the repository password as opva1234.
-
Provide a file name for the merged repository file to be saved.
-
Provide the merged repository password as opva1234.
-
Click Next.
This generates the merged RPD, which is upgraded to the AN 8.2 release.
-
Copy this file to another location and rename it back to opva.rpd, which will later be used to deploy on the OBIEE Server.
2.5.1.1.2 Upgrade the AN Catalog
Catalog upgrade from Argus Analytics 1.1/1.1.1/7.0.3/8.0/8.1/8.1.1 is not available. Use the latest catalog provided with the AN 8.2 installation (present at <AN_INSTALL_HOME>/catalog/opva.zip) for deployment.
2.5.2 Deploy OBIEE Repository and Catalog
2.5.2.1 Configure the OBIEE Repository and Web Catalog using the BAR File
Note:
The default password for the opva.rpd repository file is opva1234. You should change this password, as per your requirement prior to deployment in OBIEE, using the OBIEE Administrator Tool. You must remember to use this password in the steps mentioned below.Oracle Business Intelligence Application Archive (BAR) file is a compressed archive file that contains a cohesive set of BI metadata artifacts (data model, content model, and authorization model). The OBIEE BAR file for Argus Analytics is available at the following location:
<Argus Analytics Home>\report\ssi.bar
A BAR file contains the following BI application module artifacts:
-
Data model metadata for the Oracle BI Server. This metadata is xml-based but functionally equivalent to an .RPD file.
-
Presentation Services catalog metadata for a service instance.
-
Security policy metadata containing application role and application role memberships, and permission and permission set grants for a service instance.
-
A manifest file declaring the dependencies of the BAR file.
This section comprises the following:
Note:
Importing a BAR file replaces all the Catalog files, RPD files, and the Security Model in an existing OBIEE instance with any customization.It is recommended that the BAR file import is done on a new OBIEE instance.
2.5.2.1.1 Import the BAR file in an existing OBIEE instance
Before importing the BAR file, make sure:
-
OBIEE 12.2.1.4 is installed
-
The Administrator Console is up and running
(validate it from http://<machinename>.<port>/console)
-
The Enterprise Manager (Fusion Middleware Control) is up and running
(validate it from http://<machinename>.<port>/em)
-
Copy the BAR file from <Argus Analytics Home>\report\ssi.bar to a machine where the OBIEE is installed.
-
Login to the Enterprise Manager with the WebLogic credentials.
-
Click Target Navigation.

The Target Navigation drop-down menu appears.
-
Go to Business Intelligence > biinstance.
The Business Intelligence Instance screen appears.
-
From the Availability tab, select Processes, and click Stop All.
A confirmation dialog box appears.
-
Click Yes.
All the running processes are stopped.
-
Go to the command prompt, and start the WebLogic Scripting Tool (using wlst.cmd (for Windows), or wlst.sh (for Unix or Linux)) from the following path:
<Middleware Home>\oracle_common\common\bin
-
To know the BI Service Instance key, type the following command, and press Enter.
listBIServiceInstances(<BI DomainHome path>)
where, Domain Home is the directory of the BI Install domain, the default path is:
<obiee_home>/user_projects/domains/bi
The Key appears at the end of the command.
Note:
All the WLST commands are case sensitive.To start the WebLogic Scripting Tool on Unix or Linux, use wlst.sh command, rest all of the commands mentioned in the procedure remains same.
While executing the WLST on Windows server, you must use forward slash (/) to avoid any error messages.
-
Exit WLST using the exit () command.
-
To import the BAR file, Go to the Domain Home path <obiee_home>/user_projects/domains/bi/bitools/bin
and execute the command, importarchive.cmd BI Service Instance key <Complete path of Bar file to import>
BI Service Instance Key: ssi (This key must be ssi for Argus Analytics deployment).
For example, importarchive.cmd ssi C:\an82\ssi.bar
-
Go to Enterprise Manager, from the Availability tab, select Processes, and click Start All.
A confirmation dialog box appears.
-
Click Yes.
The BAR file imports the RPD, Catalog and the Security model.
To check if the BAR file has imported RPD, Catalog, and the Security Model:
-
To verify the Roles and Policies imported by BAR file in the Enterprise Manager, go to Business Intelligence Instance > Security > Application Roles and Application Policies.
The following roles are imported as default application roles:
-
PVAAdminRole
-
PVASafetyRole
-
PVASafetyConsumersRole
-
-
To modify the Connection Pool Settings:
-
From the following path, right click the admintool.cmd file, and click Run as Administrator.
<MiddlewareHome>\user_projects\domains\bi\bitools\bin
The Oracle BI Administration Tool opens.
Note:
If OBIEE is installed on a Unix or Linux machine, then you must setup the Oracle Business Intelligence Developer Client tool on any Windows machine to access the BI Administration Tool.See Appendix A, "Create ODBC Connection for OBIEE Administration Tool."
-
To open the RPD, select the online mode, and enter the WebLogic user credentials.
Note:
You must set the Open Database Connectivity (ODBC).To open the RPD in online mode on Unix or Linux, set the ODBC on a Windows machine where OBIEE client is installed, and open the RPD.
-
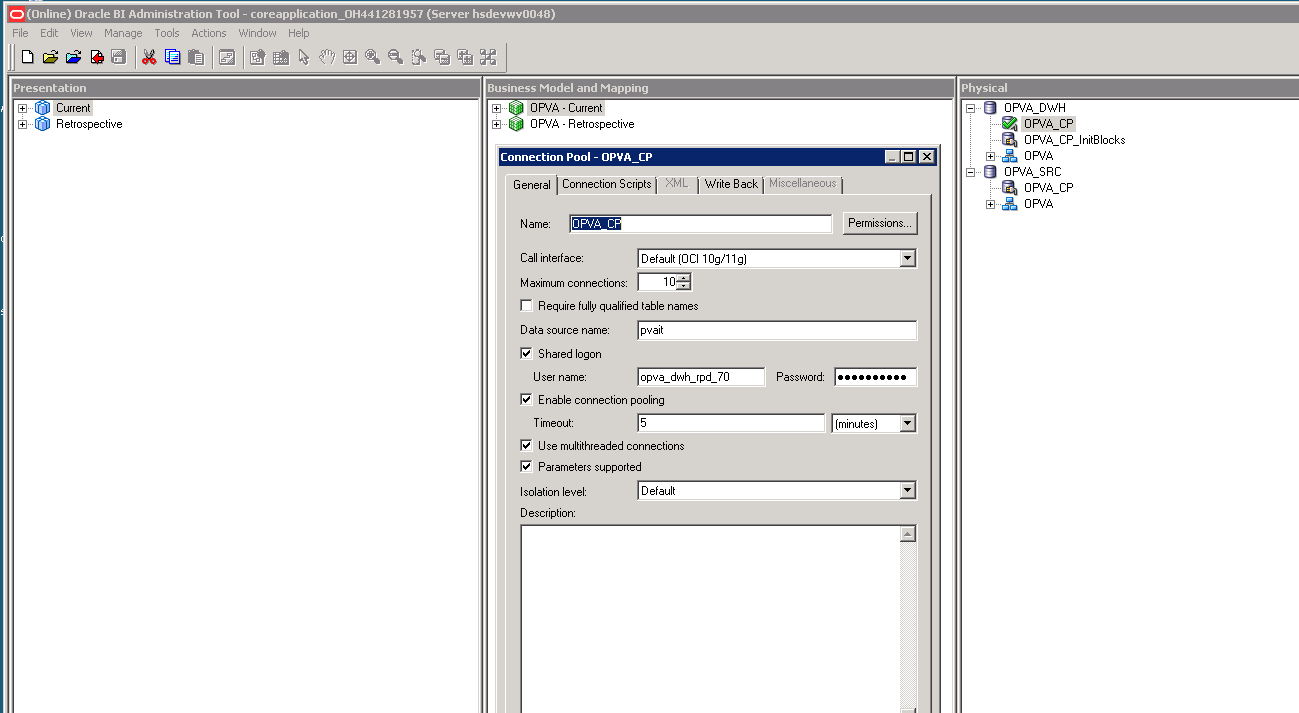
Click the Connection Pool, and modify the Data source name, User name, and Password.
Modify both the following connection pools:
- Under OPVA_DWH database:
* OPVA_CP:
Data Source Name—Argus Analytics database TNS Name
User name—Argus Analytics DWH RPD schema <AN_DWH_RPD>
Password—Password for Argus Analytics DWH RPD schema
* OPVA_CP_InitBlocks:
Data Source Name—Argus Analytics database TNS Name
User name—Argus Analytics DWH RPD schema <AN_DWH_RPD>
Password—Password for Argus Analytics DWH RPD schema
- Under OPVA_SRC database:
* OPVA_CP:
Data Source Name—Argus Safety database TNS Name
User name—Argus Analytics SRC RPD schema <AN_SRC_RPD>
Password—Password for Argus Analytics SRC RPD schema
-
-
Check-in the changes, and save the RPD.
Ignore the warning messages that appear during the consistency check.
-
To view and administer privileges for the Oracle Business Intelligence components, login to OBIEE Analytics (http://obieeser.com:port/analytics) with WebLogic user credentials.
-
Go to Security > Administration > Manage Privileges.
For a list of privileges assigned to the BI Application roles, refer to Section 2.5.6, "OBIEE Default Application Roles."
-
Go to Catalog, and set the folder level permissions for the OBIEE Groups. (See Section 2.5.5, "OBIEE Catalog Folder-level Permissions")
-
Create OBIEE Groups and Users. (See Section 2.5.3, "Create Users and Groups in OBIEE")
2.5.2.1.2 Import the BAR file when creating a new OBIEE Instance
-
Copy the BAR file from <Argus Analytics Home>\report\ssi.bar to a machine where the OBIEE is installed.
When creating an instance in OBIEE 12c, on the OBIEE Initial Application wizard screen, select Your own existing BI Application from export bunder (.jar file) option, and enter the Path of the Argus Analytics ssi.bar file.
-
To modify the Connection Pool Settings:
-
From the following path, right click the admintool.cmd file, and click Run as Administrator.
<MiddlewareHome>\user_projects\domains\bi\bitools\bin
The Oracle BI Administration Tool opens.
Note:
If OBIEE is installed on a Unix or Linux machine, then you must setup the Oracle Business Intelligence Developer Client tool on any Windows machine to access the BI Administration Tool.See Appendix A, "Create ODBC Connection for OBIEE Administration Tool."
-
To open the RPD, select the online mode, and enter the WebLogic user credentials.
Note:
You must set the Open Database Connectivity (ODBC).To open the RPD in online mode on Unix or Linux, set the ODBC on a Windows machine where OBIEE client is installed, and open the RPD.
-
Click the Connection Pool, and modify the Data source name, User name, and Password.
Modify both the following connection pools:
- Under OPVA_DWH database:
* OPVA_CP:
Data Source Name—Argus Analytics database TNS Name
User name—Argus Analytics DWH RPD schema <AN_DWH_RPD>
Password—Password for Argus Analytics DWH RPD schema
* OPVA_CP_InitBlocks:
Data Source Name—Argus Analytics database TNS Name
User name—Argus Analytics DWH RPD schema <AN_DWH_RPD>
Password—Password for Argus Analytics DWH RPD schema
- Under OPVA_SRC database:
* OPVA_CP:
Data Source Name—Argus Safety database TNS Name
User name—Argus Analytics SRC RPD schema <AN_SRC_RPD>
Password—Password for Argus Analytics SRC RPD schema
-
-
Check-in the changes, and save the RPD.
Ignore the warning messages that appear during the consistency check.
-
To view and administer privileges for the Oracle Business Intelligence components, login to OBIEE Analytics (http://obieeser.com:port/analytics) with WebLogic user credentials.
-
Go to Security > Administration > Manage Privileges.
For a list of privileges assigned to the BI Application roles, refer to Section 2.5.6, "OBIEE Default Application Roles."
-
Go to Catalog, and set the folder level permissions for the OBIEE Groups. (See Section 2.5.5, "OBIEE Catalog Folder-level Permissions")
-
Create OBIEE Groups and Users. (See Section 2.5.3, "Create Users and Groups in OBIEE")
2.5.2.2 Configure OBIEE Repository and Web Catalog Manually
-
Copy the RPD, and Catalog files from <Argus Analytics Home>\report\opva.rpd and report\catalog\opva.zip folders to a machine where the OBIEE is installed.
-
Open the RPD Admin tool in offline mode from the following path:
<Middleware Home>\user_projects\domains\bi\bitools\bin\admintool.cmd
-
Open the opva.rpd file in offline mode. (The default password of the repository is opva1234.)
-
Click the Connection Pool, and modify the Data source name, User name, and Password.
Modify the following connection pools:
- Under OPVA_DWH database:
* OPVA_CP:
Data Source Name—Argus Analytics database TNS Name
User name—Argus Analytics DWH RPD schema <AN_DWH_RPD>
Password—Password for Argus Analytics DWH RPD schema
* OPVA_CP_InitBlocks:
Data Source Name—Argus Analytics database TNS Name
User name—Argus Analytics DWH RPD schema <AN_DWH_RPD>
Password—Password for Argus Analytics DWH RPD schema
- Under OPVA_SRC database:
* OPVA_CP:
Data Source Name—Argus Safety database TNS Name
User name—Argus Analytics SRC RPD schema <AN_SRC_RPD>
Password—Password for Argus Analytics SRC RPD schema
-
Save the changes, and close the RPD.
-
From the command prompt:
-
Navigate to the <Middleware Home>\user_projects\domains\bi\bitools\bin
-
Run the following command:
datamodel.cmd uploadrpd -I <RPDname> [-W <RPDpwd>] -U <cred_username> [-P <cred_password>] -SI <service_instance>
For example,
datamodel.cmd uploadrpd -I C:\temp\opva.rpd -W opva1234 -U weblogic -P weblogic1 -SI ssi
Note:
In Linux, execute the data-model-cmd.sh command with same inputs.
-
-
Login to the Enterprise Manager with the WebLogic credentials.
-
Click Target Navigation.
The Target Navigation drop-down menu appears.
-
Go to Business Intelligence > biinstance.
The Business Intelligence Instance screen appears.
-
From the Availability tab, select Processes, and click Stop All.
A confirmation dialog box appears.
-
Click Yes.
All the running processes are stopped.
-
Extract the contents of Argus Analytics catalog opva.zip into a local folder, and navigate to \opva\root\shared folder.
-
Copy the following folders and files:
- current
- current.atr
- personal+user
- personal+user.atr
- retrospective
- retrospective.atr
-
Paste in <Oracle_Home>\user_projects\domains\bi\bidata\service_instances\ssi\metadata\content\catalog\root\shared folder.
-
-
Go to Enterprise Manager, from the Availability tab, select Processes, and click Start All.
A confirmation dialog box appears.
-
Click Yes.
-
Create User Groups and Users manually in Admin Console. (See Section 2.5.3, "Create Users and Groups in OBIEE.").
-
Create Roles and policies manually in Enterprise Manager. (See Section 2.5.4, "Create Roles and Policies with Fusion Middleware Control.")
-
To view and administer privileges for the Oracle Business Intelligence components, login to OBIEE Analytics (http://obieeser.com:port/analytics) with WebLogic user credentials.
-
Go to Security > Administration > Manage Privileges.
For a list of privileges assigned to these roles, refer to Section 2.5.6, "OBIEE Default Application Roles."
-
Go to Catalog, and set the folder level permissions for the OBIEE Groups. (See Section 2.5.5, "OBIEE Catalog Folder-level Permissions")
2.5.2.3 Post-deployment of the Oracle Argus Analytics RPD
Open the Oracle Argus Analytics RPD in the Administration Tool in online mode and specify the details, as mentioned below:
-
Repository Password: Enter the password set in Section 2.5.2, "Deploy OBIEE Repository and Catalog", as mentioned in the Note before Step 1.
-
User: weblogic
-
Password: Password for the user mentioned above
Change the Connection Pool Settings
Once the Argus Analytics RPD is opened in online mode, change the Connection Pool settings, as follows:
-
Change the OPVA_DWH -> OPVA_CP and OPVA_CP_InitBlocks to point to the Argus Analytics DWH RPD Schema <AN_DWH_RPD>, created during installation, on the Argus Analytics DB Instance.
-
Data Source Name: TNS name entry for Argus Analytics DB Instance.
-
User Name: <AN_DWH_RPD> [the schema name specified for the AN DWH RPD Schema during installation].
-
Password: The password specified for the <AN_DWH_RPD> schema.
-
Change the OPVA_SRC -> OPVA_CP to the Argus Safety Source RPD schema <AN_SRC_RPD>, created during installation, on the Argus Safety Instance.
-
Data Source Name: TNS name entry for Argus Safety DB Instance.
-
User Name: <AN_SRC_RPD> [the schema name specified for the AN Source RPD schema during installation].
-
Password: The password specified for the <AN_SRC_RPD> schema.
-
Save the RPD.
2.5.3 Create Users and Groups in OBIEE
To create groups in Fusion Middleware Control:
-
Open the WebLogic Administration Console.
-
Navigate to Security Realms > myrealm > Users and Groups > Groups tab.
-
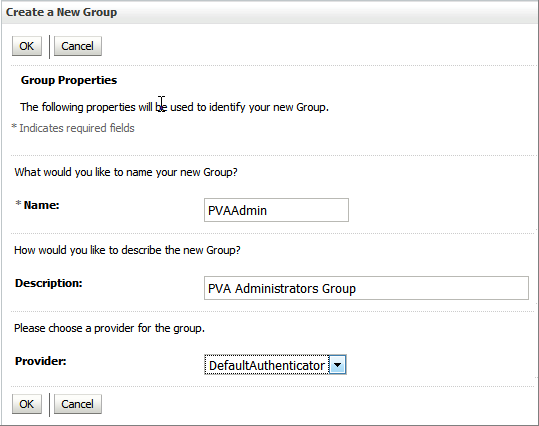
From the Groups section, and click New.
The Create a New Group dialog box appears.
-
Create the following groups by entering the Name and Description, and click OK.
-
PVAAdmin
-
PVASafetyGroup
-
PVASafetyConsumersGroup
-
To create users in the Fusion Middleware Control:
-
Open the WebLogic Administration Console.
-
Navigate to Security Realms > myrealm > Users and Groups > Users.
-
From the Users section, and click New.
The Create a New User dialog box appears.
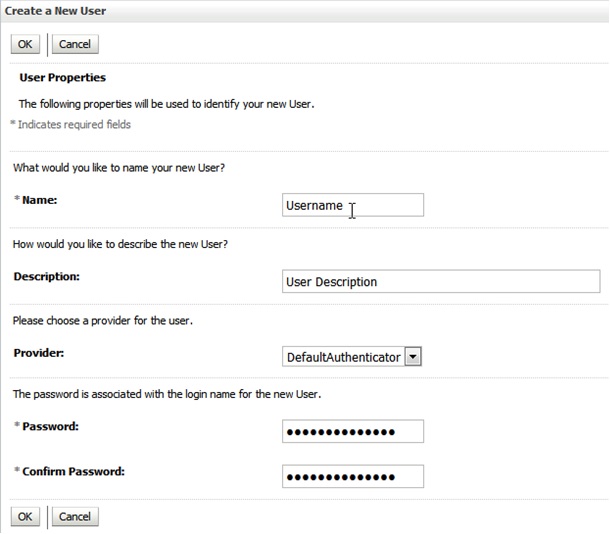
-
Enter the following fields, and click OK.
-
Name
-
Description
-
Provider
-
Password
-
Confirm Password
-
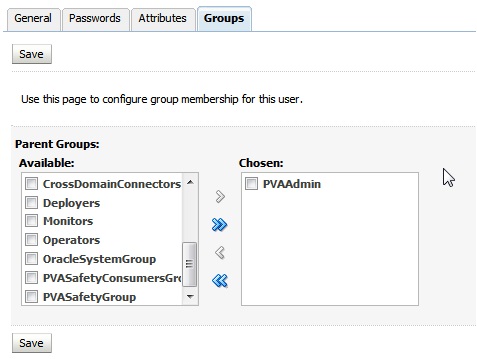
-
To assign a group to the user, from the Groups tab, select a Group, and click Save.
2.5.4 Create Roles and Policies with Fusion Middleware Control
Note:
This section is applicable only when you manually upload the RPD file and Catalog. For more details, refer to Section 2.5, "Configure the OBIEE Repository and Webcatalog."To create new application roles:
-
Login to Fusion Middleware Control Enterprise Manager.
-
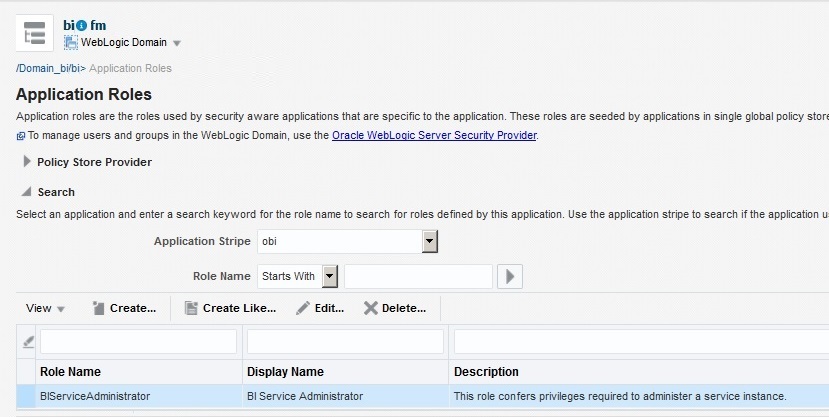
Go to WebLogic Domain > Security > Application Roles.
The Application Roles dialog box appears.
-
From the Application Stripe drop-down list, select OBI, and click Search
 .
.The default role available in clean slate installation appears.
-
Click Create.
The Create Application Role dialog box appears.
-
In the Role Name field, enter PVAAdminRole.
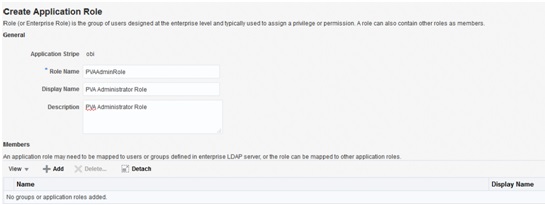
-
From the Members section, click +Add.
The Add Principal dialog box appears.
-
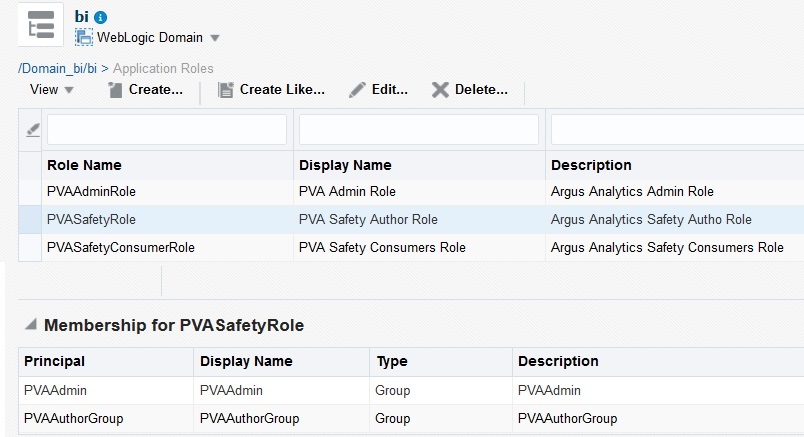
From the Type drop-down list, select Group, and click Search.
A list of principals appears.
-
From the list of Searched Principals, select PVAAdmin, and click OK.

The Membership for PVAAdminRole appears as below:

-
To add PVASafetyRole, repeat from Step 4 to Step 8.
-
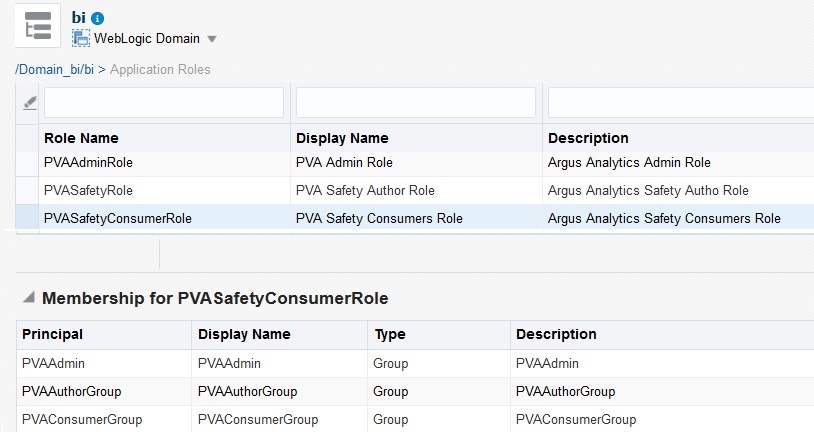
To add PVASafetyConsumerRole, repeat from Step 4 to Step 8.
Note:
For more details, refer to Oracle® Fusion Middleware Security Guide for Oracle Business Intelligence Enterprise Edition.To create new application policy:
-
Login to Fusion Middleware Control Enterprise Manager.
-
Go to WebLogic Domain > Security > Application Policies.
The Application Policies screen appears.
-
To create a new application policy, click Create.
The Create Application Grant dialog box appears.
-
From the Grantee section, click +Add.
The Add Principal dialog box appears.
-
From the Type drop-down list, select Application Role, and click Search
. -
From the list of Searched Principals, select PVAAdminRole, and click OK.
-
From the Permissions section, click +Add.
The Add Permission dialog box appears.
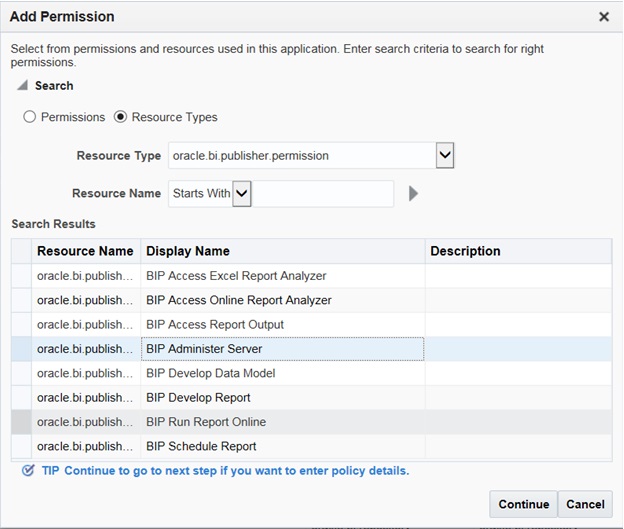
-
Select the Resource Types radio button.
-
From the Resource Type drop-down list, select oracle.bi.publisher.permission, and click Search.
-
From the Search Results, select oracle.bi.publisher.permission (BIP Administer Server), and click Continue.
The Add Permission dialog box appears.
-
For Permission Actions, select All (_all_), and click Select.
-
Repeat from Step 4 to Step 11, to add the following:
Policy Name/Principal Resource Type Resource Name Permission Actions PVAAdminRole oracle.bi.catalog * manage oracle.bi.repository oracle.bi.repository manage oracle.bi.publisher.permission oracle.bi.publisher.developDataModel _all_ oracle.bi.scheduler.permission oracle.bi.scheduler.manageJobs _all_ oracle.bi.presentation.catalogmanager.permission oracle.bi.presentation.catalogmanager.permission _all_ oracle.bi.delivers.job oracle.bi.delivers.job manage oracle.bi.server.permission oracle.bi.server.manageRepositories _all_ oracle.bi.publisher.permission oracle.bi.publisher.developReport _all_ oracle.bi.publisher.permission oracle.bi.publisher.administerServer _all_ PVASafetyRole oracle.bi.publisher.permission oracle.bi.publisher.developReport _all_ oracle.bi.delivers.job oracle.bi.delivers.job schedule oracle.bi.publisher.permission oracle.bi.publisher.developDataModel _all_ oracle.bi.tech.visualanalyzer.permission oracle.bi.tech.visualanalyzer.generalAccess * PVASafetyConsumerRole oracle.bi.publisher.permission oracle.bi.publisher. runReportOnline _all_ oracle.bi.publisher.permission oracle.bi.publisher.accessReportOutput _all_ ESSMetadataPermission oracle.bip.ess.JobDefinition.EssBipJob READ, EXECUTE oracle.bi.publisher.permission BIP Access Excel Report Analyzer _all_ oracle.bi.publisher.permission oracle.bi.publisher.accessOnlineReportAnalyzer _all_ oracle.bi.publisher.permission oracle.bi.publisher.scheduleReport _all_
Note:
For more details, refer to Oracle® Fusion Middleware Security Guide for Oracle Business Intelligence Enterprise Edition >Section 2.4.3 Creating Application Policies Using Fusion Middleware Control from http://docs.oracle.com/middleware/1221/biee/BIESC/authentication.htm#BIESC767.2.5.5 OBIEE Catalog Folder-level Permissions
-
Go to Catalog > Shared Folders > Tasks > Permissions.
The Permissions dialog box appears.
-
Set the Permissions as follows:
Accounts Permissions PVA Administrator Role Full Control PVA Safety Author Role Full Control PVA Safety Consumers Role Open (Read, and Traverse) BI Service Administrator (Owner) Full Control -
Select Apply Permissions to sub-folders.
-
Select Permissions to items within folder.
-
Click OK.
-
-
For each of the following folders, set the account permissions:
-
Shared Folders > Shared Folder > Current > Permissions
-
Shared Folders > Shared Folder > Personal User > Permissions
-
Shared Folders > Shared Folder > Retrospective > Permissions
Accounts Permissions PVA Administrator Role (Owner) Full Control PVA Safety Author Role Full Control PVA Safety Consumers Role Custom (Read, Traverse, Run Publisher Report, Schedule Publisher Report, and View Publisher Output) BI Service Administrator Full Control -
Select Apply Permissions to sub-folders.
-
Select Permissions to items within folder.
-
Click OK.
-
2.5.6 OBIEE Default Application Roles
To view and administer privileges of Oracle Business Intelligence components:
-
Login to OBIEE Analytics with WebLogic user credentials.
-
Go to Security > Administration > Manage Privileges.
Note:
Create these privileges only when you manually upload the RPD and Catalog.You do not need to create these privileges when you import the BAR file.
You must NOT remove the privileges already present in the Manage Privileges tab for the various components. The below mentioned default role grants should only be appended to the existing grants in OBIEE components.
| Component | Privilege | Default Role Granted |
|---|---|---|
| Access | Access to Dashboards | PVASafetyConsumerRole, BI Service Administrator |
| Access | Access to Answers | PVA Safety Author Role, BI Service Administrator |
| Access | Access to BI Composer | PVA Safety Author Role, BI Service Administrator |
| Access | Access to Delivers | PVA Safety Author Role, BI Service Administrator |
| Access | Access to Briefing Books | PVASafetyConsumerRole, BI Service Administrator |
| Access | Access to Mobile | PVASafetyConsumerRole, BI Service Administrator |
| Access | Access to Administration | PVA Admin Role, BI Service Administrator |
| Access | Access to Segments | PVASafetyConsumerRole, BI Service Administrator |
| Access | Access to Segment Trees | PVA Safety Author Role, BI Service Administrator |
| Access | Access to List Formats | PVA Safety Author Role, BI Service Administrator |
| Access | Access to Metadata Dictionary | PVA Safety Author Role, BI Service Administrator |
| Access | Access to Oracle BI for Microsoft Office | PVASafetyConsumerRole, BI Service Administrator |
| Access | Access to Oracle BI Client Installer | PVASafetyConsumerRole, BI Service Administrator |
| Access | Catalog Preview Pane UI | PVASafetyConsumerRole, BI Service Administrator |
| Access | Access to Export | PVASafetyConsumerRole, BI Service Administrator |
| Access | Access to KPI Builder | PVA Safety Author Role, BI Service Administrator |
| Access | Access to Scorecard | PVASafetyConsumerRole, BI Service Administrator |
| Actions | Create Navigate Actions | PVASafetyConsumerRole, BI Service Administrator |
| Actions | Create Invoke Actions | PVA Safety Author Role, BI Service Administrator |
| Actions | Save Actions containing embedded HTML | PVA Admin Role, BI Service Administrator |
| Admin: Catalog | Change Permissions | PVA Safety Author Role, BI Service Administrator |
| Admin: Catalog | Toggle Maintenance Mode | PVA Admin Role, BI Service Administrator |
| Admin: General | Manage Sessions | PVA Admin Role, BI Service Administrator |
| Admin: General | Create Dashboards | PVA Safety Author Role, BI Service Administrator |
| Admin: General | See sessions IDs | PVA Admin Role, BI Service Administrator |
| Admin: General | Change Log Configuration | PVA Admin Role, BI Service Administrator |
| Admin: General | Issue SQL Directly | PVA Admin Role, BI Service Administrator |
| Admin: General | View System Information | PVA Admin Role, BI Service Administrator |
| Admin: General | Performance Monitor | PVA Admin Role, BI Service Administrator |
| Admin: General | Manage Agent Sessions | PVA Admin Role, BI Service Administrator |
| Admin: General | Manage Device Types | PVA Admin Role, BI Service Administrator |
| Admin: General | Manage Map Data | PVA Admin Role, BI Service Administrator |
| Admin: General | See privileged errors | PVA Admin Role, BI Service Administrator |
| Admin: General | See SQL issued in errors | PVASafetyConsumerRole, BI Service Administrator |
| Admin: General | Manage Global Variables | PVA Admin Role, BI Service Administrator |
| Admin: General | Diagnose BI Server Query | Denied: Authenticated User |
| Admin: General | Manage Marketing Jobs | PVA Safety Author Role, BI Service Administrator |
| Admin: General | Manage Marketing Defaults | PVA Admin Role, BI Service Administrator |
| Admin: Security | Manage Catalog Accounts | PVA Admin Role, BI Service Administrator |
| Admin: Security | Manage Privileges | PVA Admin Role, BI Service Administrator |
| Admin: Security | Set Ownership of Catalog Objects | PVA Admin Role, BI Service Administrator |
| Admin: Security | User Population - Can List Users | PVASafetyConsumerRole, BI Service Administrator, BI System |
| Admin: Security | User Population - Can List Catalog Groups | PVASafetyConsumerRole, BI Service Administrator, BI System |
| Admin: Security | User Population - Can List Application Roles | PVASafetyConsumerRole, BI Service Administrator, BI System |
| Admin: Security | Access to Permissions Dialog | PVASafetyConsumerRole, BI Service Administrator |
| Briefing Book | Add To or Edit a Briefing Book | PVA Safety Author Role, BI Service Administrator |
| Briefing Book | Download Briefing Book | PVASafetyConsumerRole, BI Service Administrator |
| Briefing Book | Add to Snapshot Briefing Book | PVASafetyConsumerRole, BI Service Administrator |
| Catalog | Personal Storage (My Folders and My Dashboard) | PVASafetyConsumerRole, BI Service Administrator |
| Catalog | Reload Metadata | PVA Admin Role, BI Service Administrator |
| Catalog | See Hidden Items | PVA Safety Author Role, BI Service Administrator |
| Catalog | Create Folders | PVA Safety Author Role, BI Service Administrator |
| Catalog | Archive Catalog | PVA Admin Role, BI Service Administrator |
| Catalog | Unarchive Catalog | PVA Admin Role, BI Service Administrator |
| Catalog | Upload Files | PVA Admin Role, BI Service Administrator |
| Catalog | Perform Global Search | PVA Safety Author Role, BI Service Administrator |
| Catalog | Perform Extended Search | PVA Safety Author Role, BI Service Administrator |
| Conditions | Create Conditions | PVA Safety Author Role, BI Service Administrator |
| Dashboards | Save Customizations | PVASafetyConsumerRole, BI Service Administrator |
| Dashboards | Assign Default Customizations | PVA Safety Author Role, BI Service Administrator |
| Dashboards | Create Bookmark Links | PVASafetyConsumerRole, BI Service Administrator |
| Dashboards | Create Prompted Links | PVASafetyConsumerRole, BI Service Administrator |
| Dashboards | Export Entire Dashboard To Excel | PVASafetyConsumerRole, BI Service Administrator |
| Dashboards | Export Single Dashboard Page To Excel | PVASafetyConsumerRole, BI Service Administrator |
| Formatting | Save System-Wide Column Formats | PVA Admin Role, BI Service Administrator |
| Home and Header | Access Home Page | PVASafetyConsumerRole, BI Service Administrator |
| Home and Header | Access Catalog UI | PVASafetyConsumerRole, BI Service Administrator |
| Home and Header | Access Catalog Search UI | PVASafetyConsumerRole, BI Service Administrator |
| Home and Header | Access Rapid Search UI | PVASafetyConsumerRole, BI Service Administrator |
| Home and Header | Simple Search Field | PVASafetyConsumerRole, BI Service Administrator |
| Home and Header | Advanced Search Link | PVASafetyConsumerRole, BI Service Administrator |
| Home and Header | Open Menu | PVASafetyConsumerRole, BI Service Administrator |
| Home and Header | New Menu | PVASafetyConsumerRole, BI Service Administrator |
| Home and Header | Help Menu | PVASafetyConsumerRole, BI Service Administrator |
| Home and Header | Dashboards Menu | PVASafetyConsumerRole, BI Service Administrator |
| Home and Header | Favorites Menu | PVASafetyConsumerRole, BI Service Administrator |
| Home and Header | My Account Link | PVASafetyConsumerRole, BI Service Administrator |
| Home and Header | Custom Links | PVASafetyConsumerRole, BI Service Administrator |
| Home and Header | Access Administration Menu | Denied: Authenticated User |
| Home and Header | Access User & Role Admin | Denied: Authenticated User |
| Home and Header | Access Modeler | Denied: Authenticated User |
| Home and Header | Access Data Loader | Denied: Authenticated User |
| My Account | Access to My Account | PVASafetyConsumerRole, BI Service Administrator |
| My Account | Change Preferences | PVASafetyConsumerRole, BI Service Administrator |
| My Account | Change Delivery Options | PVASafetyConsumerRole, BI Service Administrator |
| Answers | Create Views | PVA Safety Author Role, BI Service Administrator |
| Answers | Create Prompts | PVA Safety Author Role, BI Service Administrator |
| Answers | Access Advanced Tab | PVA Safety Author Role, BI Service Administrator |
| Answers | Edit Column Formulas | PVA Safety Author Role, BI Service Administrator |
| Answers | Save Content with HTML Markup | PVA Admin Role, BI Service Administrator |
| Answers | Enter XML and Logical SQL | PVA Safety Author Role, BI Service Administrator |
| Answers | Edit Direct Database Analysis | PVA Admin Role, BI Service Administrator |
| Answers | Create Analysis From Simple SQL | PVA Admin Role, BI Service Administrator |
| Answers | Create Advanced Filters and Set Operations | PVA Safety Author Role, BI Service Administrator |
| Answers | Save Filters | PVA Safety Author Role, BI Service Administrator |
| Answers | Save Column | PVA Safety Author Role, BI Service Administrator |
| Answers | Add EVALUATE_PREDICATE Function | PVA Safety Author Role, BI Service Administrator |
| Answers | Execute Direct Database Analysis | PVA Admin Role, BI Service Administrator |
| Answers | Upload Images | PVA Safety Author Role, BI Service Administrator |
| Delivers | Create Agents | PVA Safety Author Role, BI Service Administrator |
| Delivers | Publish Agents for Subscription | PVA Safety Author Role, BI Service Administrator |
| Delivers | Deliver Agents to Specific or Dynamically Determined Users | PVA Admin Role, BI Service Administrator |
| Delivers | Chain Agents | PVA Safety Author Role, BI Service Administrator |
| Delivers | Modify Current Subscriptions for Agents | PVA Admin Role, BI Service Administrator |
| Proxy | Act As Proxy | Denied: Authenticated User |
| RSS Feeds | Access to RSS Feeds | PVASafetyConsumerRole, BI Service Administrator |
| Scorecard | Create/Edit Scorecards | PVA Safety Author Role, BI Service Administrator |
| Scorecard | View Scorecards | PVASafetyConsumerRole, BI Service Administrator |
| Scorecard | Create/Edit Objectives | PVA Safety Author Role, BI Service Administrator |
| Scorecard | Create/Edit Initiatives | PVA Safety Author Role, BI Service Administrator |
| Scorecard | Create Views | PVA Safety Author Role, BI Service Administrator |
| Scorecard | Create/Edit Causes And Effects Linkages | PVA Safety Author Role, BI Service Administrator |
| Scorecard | Create/Edit Perspectives | PVA Safety Author Role, BI Service Administrator |
| Scorecard | Add Annotations | PVASafetyConsumerRole, BI Service Administrator |
| Scorecard | Override Status | PVASafetyConsumerRole, BI Service Administrator |
| Scorecard | Create/Edit KPIs | PVA Safety Author Role, BI Service Administrator |
| Scorecard | Write Back to Database for KPI | PVASafetyConsumerRole, BI Service Administrator |
| Scorecard | Add Scorecard Views To Dashboards | PVASafetyConsumerRole, BI Service Administrator |
| List Formats | Create List Formats | PVA Safety Author Role, BI Service Administrator |
| List Formats | Create Headers and Footers | PVA Safety Author Role, BI Service Administrator |
| List Formats | Access Options Tab | PVA Safety Author Role, BI Service Administrator |
| List Formats | Add/Remove List Format Columns | PVA Admin Role, BI Service Administrator |
| Segmentation | Create Segments | PVA Safety Author Role, BI Service Administrator |
| Segmentation | Create Segment Trees | PVA Safety Author Role, BI Service Administrator |
| Segmentation | Create/Purge Saved Result Sets | PVA Admin Role, BI Service Administrator |
| Segmentation | Access Segment Advanced Options Tab | PVA Admin Role, BI Service Administrator |
| Segmentation | Access Segment Tree Advanced Options Tab | PVA Admin Role, BI Service Administrator |
| Segmentation | Change Target Levels within Segment Designer | PVA Safety Author Role, BI Service Administrator |
| Mobile | Enable Local Content | PVASafetyConsumerRole, BI Service Administrator |
| Mobile | Enable Search | PVASafetyConsumerRole, BI Service Administrator |
| SOAP | Access SOAP | PVASafetyConsumerRole, BI Service Administrator, BI System |
| SOAP | Impersonate as system user | BI System |
| SOAP | Access MetadataService Service | PVASafetyConsumerRole, BI Service Administrator, BI System |
| SOAP | Access ScorecardAssessmentService Service | PVASafetyConsumerRole, BI Service Administrator, BI System |
| SOAP | Access MsgdbService Service | PVASafetyConsumerRole, BI Service Administrator, BI System |
| SOAP | Access ReportEditingService Service | PVASafetyConsumerRole, BI Service Administrator, BI System |
| SOAP | Access KPIAssessmentService Service | PVASafetyConsumerRole, BI Service Administrator, BI System |
| SOAP | Access ConditionEvaluationService Service | PVASafetyConsumerRole, BI Service Administrator, BI System |
| SOAP | Access SecurityService Service | PVASafetyConsumerRole, BI Service Administrator, BI System |
| SOAP | Access Tenant Information | BI System |
| SOAP | Access SchedulerService Service | PVASafetyConsumerRole, BI Service Administrator, BI System |
| SOAP | Access DashboardService Service | PVASafetyConsumerRole, BI Service Administrator, BI System |
| SOAP | Access ScorecardMetadataService Service | PVASafetyConsumerRole, BI Service Administrator, BI System |
| SOAP | Access JobManagementService Service | PVASafetyConsumerRole, BI Service Administrator, BI System |
| SOAP | Access CatalogIndexingService Service | PVASafetyConsumerRole, BI Service Administrator, BI System |
| SOAP | Access UserPersonalizationService Service | PVASafetyConsumerRole, BI Service Administrator, BI System |
| SOAP | Access AnalysisExportViewsService Service | PVASafetyConsumerRole, BI Service Administrator |
| SOAP | Access CatalogService Service | PVASafetyConsumerRole, BI Service Administrator, BI System |
| SOAP | Access AdministrationSOAPService Service | PVASafetyConsumerRole, BI Service Administrator, BI System |
| SOAP | Access HtmlViewService Service | PVASafetyConsumerRole, BI Service Administrator, BI System |
| SOAP | Access XmlGenerationService Service | PVASafetyConsumerRole, BI Service Administrator, BI System |
| SOAP | Access IBotService Service | PVASafetyConsumerRole, BI Service Administrator, BI System |
| Subject Area: "Current" | Access within Oracle BI Answers | PVA Admin Role, BI Service Administrator |
| Subject Area: "Retrospective" | Access within Oracle BI Answers | PVA Admin Role, BI Service Administrator |
| View Canvas | Add/Edit Canvas View | PVA Safety Author Role, BI Service Administrator |
| View Column Selector | Add/Edit Column Selector View | PVA Safety Author Role, BI Service Administrator |
| View Compound Layout | Add/Edit Compound Layout View | PVA Safety Author Role, BI Service Administrator |
| View Contribution Wheel | Add/Edit Contribution Wheel View | PVA Safety Author Role, BI Service Administrator |
| View Graph | Add/Edit Graph View | PVA Safety Author Role, BI Service Administrator |
| View Funnel | Add/Edit Funnel View | PVA Safety Author Role, BI Service Administrator |
| View Gauge | Add/Edit Gauge View | PVA Safety Author Role, BI Service Administrator |
| View Micro Chart | Add/Edit Micro Chart View | PVA Safety Author Role, BI Service Administrator |
| View Filters | Add/Edit Filters View | PVA Safety Author Role, BI Service Administrator |
| View Dashboard Prompt | Add/Edit Dashboard Prompt View | PVA Safety Author Role, BI Service Administrator |
| View Performance Tile | Add/Edit Performance Tile View | PVA Safety Author Role, BI Service Administrator |
| View Heat Matrix | Add/Edit Heat Matrix View | PVA Safety Author Role, BI Service Administrator |
| View Static Text | Add/Edit Static Text View | PVA Safety Author Role, BI Service Administrator |
| View Javascript view | Edit Javascript View | PVA Safety Author Role, BI Service Administrator |
| View Legend | Add/Edit Legend View | PVA Safety Author Role, BI Service Administrator |
| View Map | Add/Edit Map View | PVA Safety Author Role, BI Service Administrator |
| View Narrative | Add/Edit Narrative View | PVA Safety Author Role, BI Service Administrator |
| View No Results | Add/Edit No Results View | PVA Safety Author Role, BI Service Administrator |
| View Pivot Table | Add/Edit Pivot Table View | PVA Safety Author Role, BI Service Administrator |
| View Generic Plugin View | Add/Edit Generic Plugin View View | PVA Safety Author Role, BI Service Administrator |
| View Report Prompt | Add/Edit Report Prompt View | PVA Safety Author Role, BI Service Administrator |
| View Create Segment | Add/Edit Create Segment View | PVA Safety Author Role, BI Service Administrator |
| View Selection Steps | Add/Edit Selection Steps View | PVA Safety Author Role, BI Service Administrator |
| View Logical SQL | Add/Edit Logical SQL View | PVA Safety Author Role, BI Service Administrator |
| View Table | Add/Edit Table View | PVA Safety Author Role, BI Service Administrator |
| View Create Target List | Add/Edit Create Target List View | PVA Safety Author Role, BI Service Administrator |
| View Ticker | Add/Edit Ticker View | PVA Safety Author Role, BI Service Administrator |
| View Title | Add/Edit Title View | PVA Safety Author Role, BI Service Administrator |
| View Treemap | Add/Edit Treemap View | PVA Safety Author Role, BI Service Administrator |
| View Trellis | Add/Edit Trellis View | PVA Safety Author Role, BI Service Administrator |
| View View Selector | Add/Edit View Selector View | PVA Safety Author Role, BI Service Administrator |
| Write Back | Manage Write Back | PVA Admin Role, BI Service Administrator |
| Write Back | Write Back to Database | Denied: Authenticated User |
2.5.7 Change the OBIEE RPD Password
To change the password for OBIEE RPD, execute the following steps:
-
Open the BI Administrator Tool and open <ARGUS_ANALYTICS_HOME>\report\opva.rpd in Offline mode.
-
Select File > Change Password.
-
Enter the password set in Section 2.5.2, "Deploy OBIEE Repository and Catalog", as mentioned in the Note before Step 1.
-
Enter the new password and confirm by entering it again. You must remember this password, and use the same later in the installation process.
2.6 Configure the OBIEE Help files
Note:
If the OBIEE Server is not the same machine where the installer is run, then copy the opva_help.zip file into the machine where OBIEE server is installed.2.6.1 Configure the Help links in the Dashboards and Reports
-
Extract the contents of the opva_help.zip file at any location on the OBIEE Server. For example, e.g /scratch/stage/opva_help.
The opva_help folder contains analyticsRes folder.
-
Log in to Console (Log in to the Weblogic Server).
-
Navigate to Deployments.
-
Click Lock & Edit in the left pane to enable the Install button.
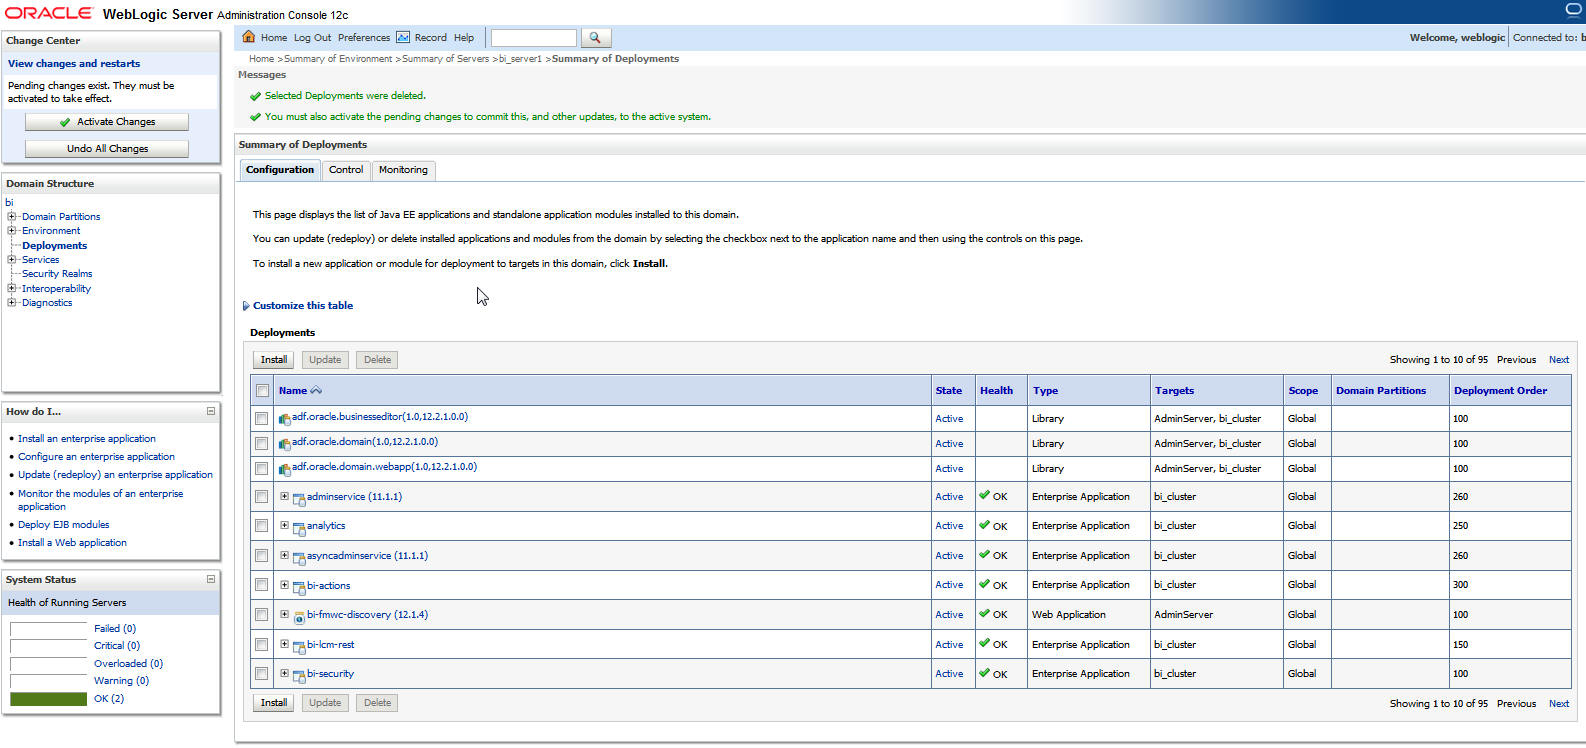
-
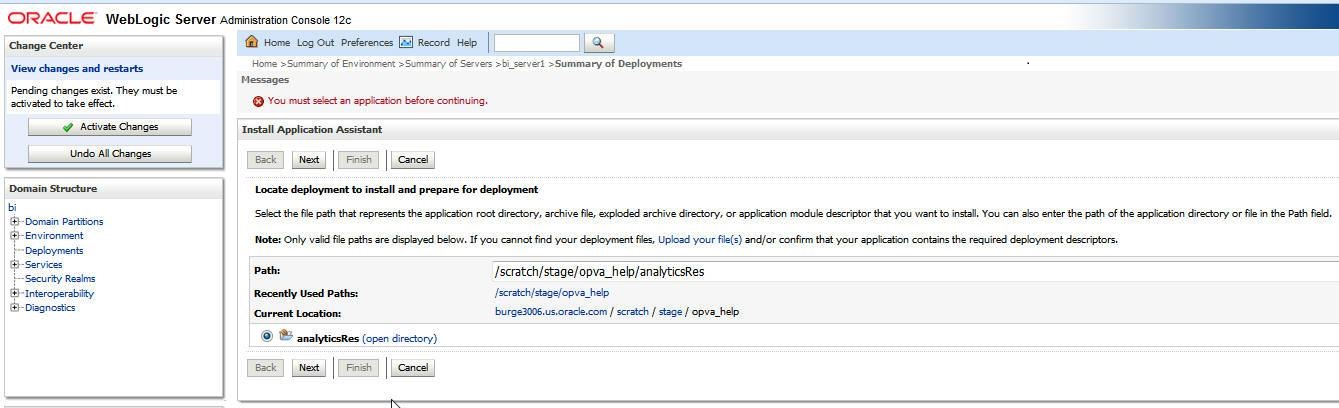
Click Install, and navigate to the location where opva_help.zip was extracted in Step 1.
-
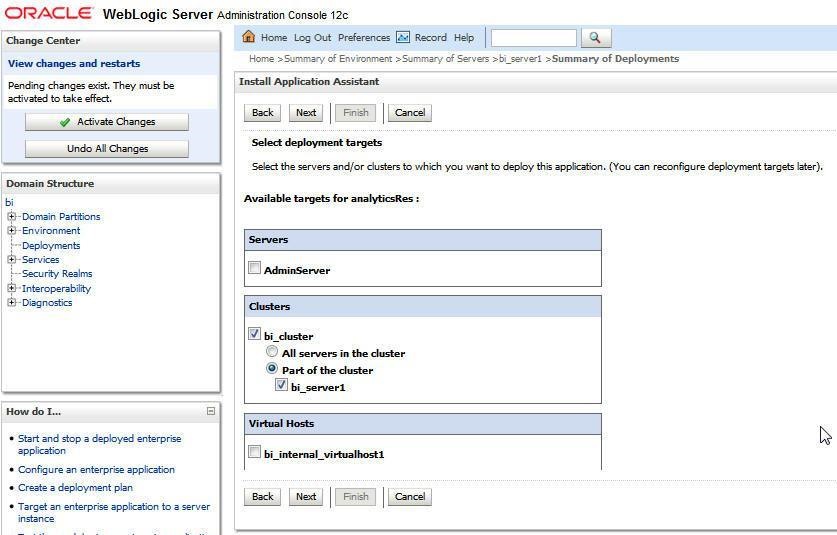
Select analyticsRes, and click Next.
-
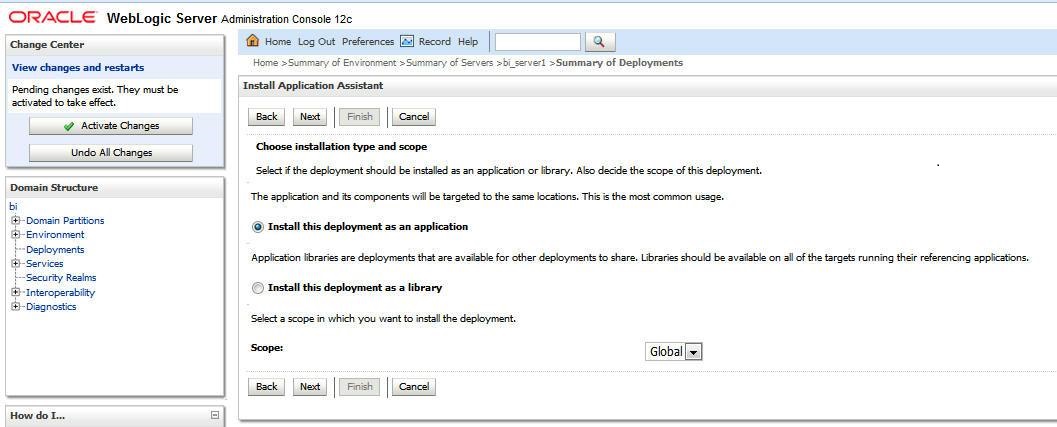
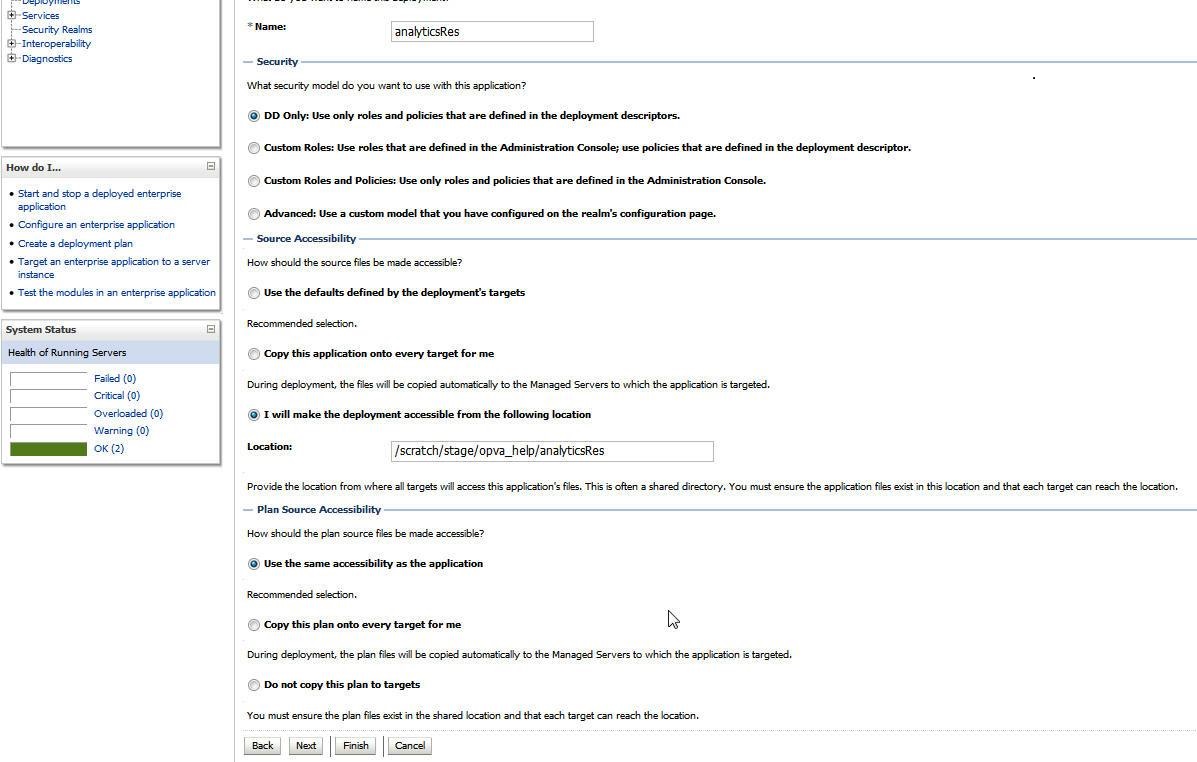
Select Install this deployment as an application (default), and click Next.
-
Select Deployment targets, choose bi_server1, and click Next.
-
Under Source accessibility:
Select I will make the deployment accessible from the following location option, and select the path for analyticsRes as selected in step 6.For example, /scratch/stage/opva_help/analyticsRes
-
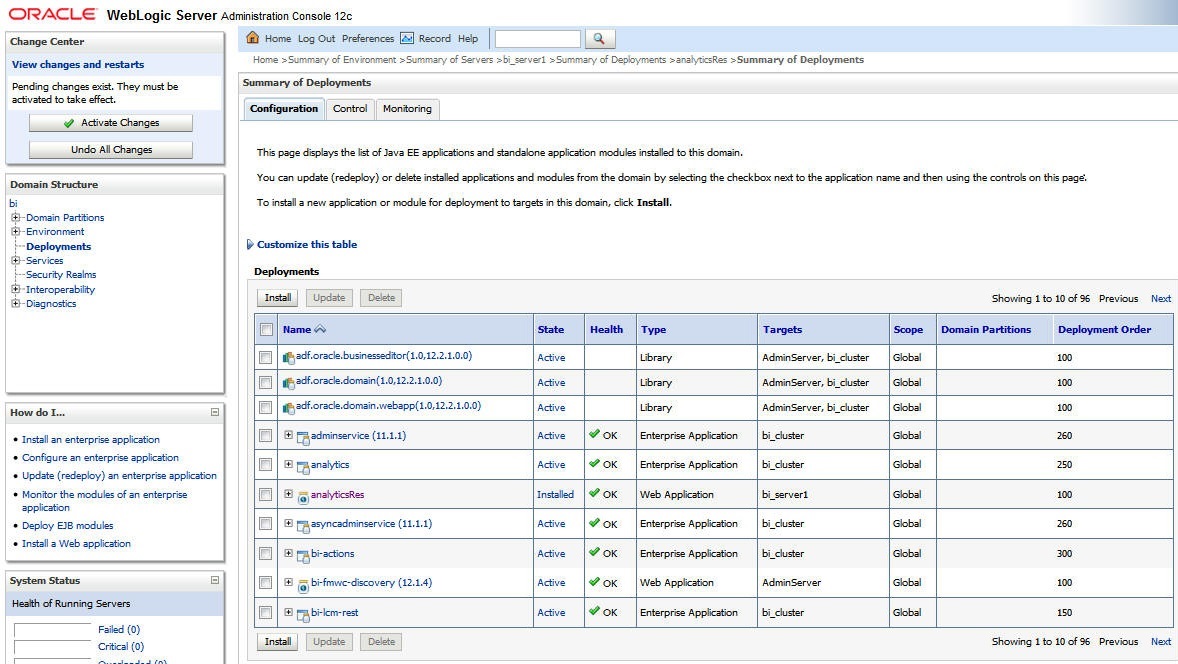
Click Finish.
The analyticsRes appears under Deployments.
-
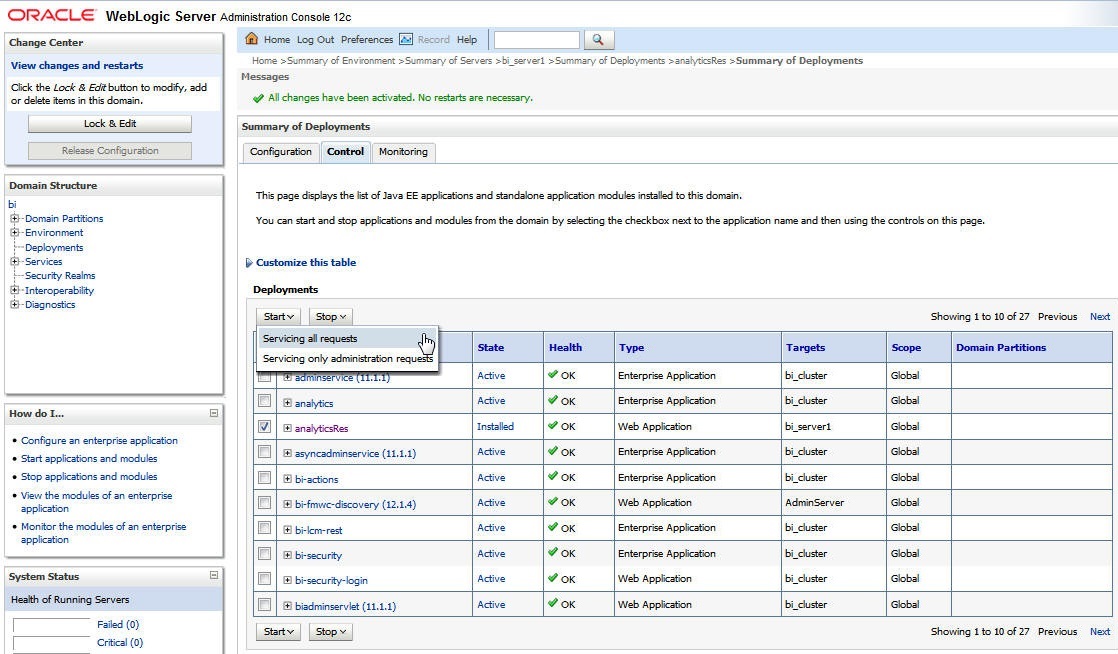
Click Active Changes, and navigate to the Control tab.
-
Select analyticsRes, and click Start.
-
Start the Application Assistant, and click Yes.
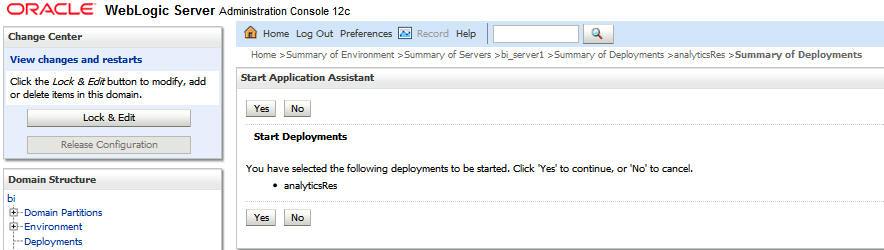
The analyticsRes State is activated after starting the application assistant. Logout from the Console.
-
Log in to EM (Enterprise Manager) and restart the BI Components.
When the BI components have been restarted successfully, log in to Analytics, and check the Brand Name and help links provided in the Dashboards.
2.7 Configure SSO using the Oracle Access Manager 11g
2.7.1 Prerequisites
-
There must be an OAM 11g installation configured to work with the desired LDAP (for example, OID), as the identity data-store.
-
User profiles must exist in the LDAP server as well as in Argus Safety with the same credentials (login information).
-
Oracle Webgate 11g must be installed on the same server where the OBIEE server is installed, as mentioned above.
2.7.2 Install SSO on OAM 11g
-
Navigate to the OAM 11g OAM Console URL (http://oam_server:port/oamconsole) and login with the OAM Admin credentials.
-
Select the System Configuration Tab.
-
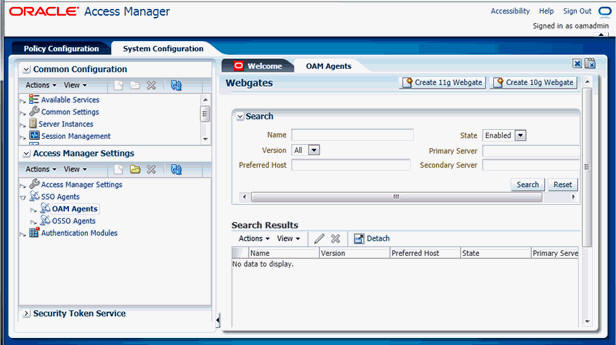
Select the Access Manager Settings sub menu in the left navigation window of the browser.
-
Double-click the SSO Agents > OAM Agents option to open the OAM Agents sub window.
-
Click the Create 11g Webgate button and enter the following details:
-
Name: ArgusAnalyticsPolicy
-
Security: Open
-
Host Identifier: <obiee_server>
-
Auto Create Policies: Checked
Note:
The <obiee_server> refers to the server where the OBIEE 12c is installed along with Oracle Web Tier and Oracle Webgate.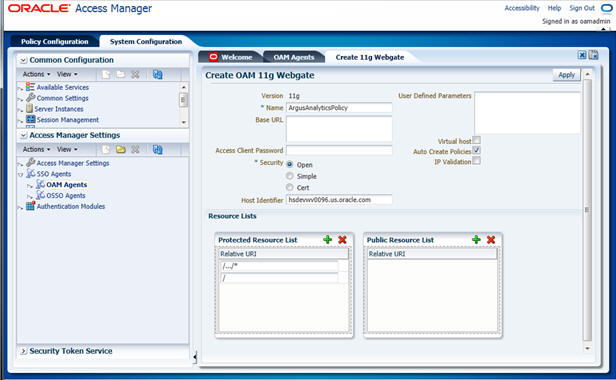
-
-
Click Apply to save and register the 11g Webgate and policies with OAM.
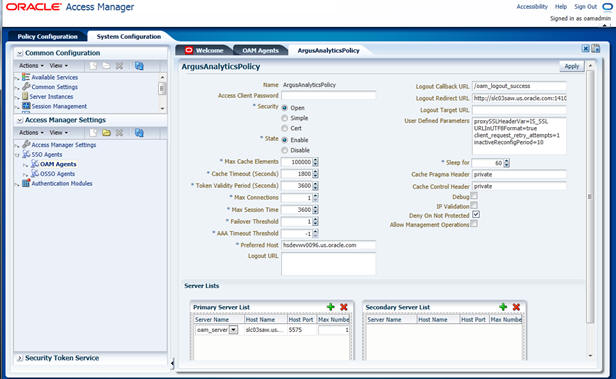
-
On the subsequent page, update the details for the ArgusAnalyticsPolicy created in the above step:
-
Cache Pragma Header: Private
-
Cache Control Header: Private
-
-
Click Apply.
-
Navigate to the Policy Configuration tab.
-
Expand and double-click the Shared Components > Resource Type > Host Identifiers > <obiee_server> (For Example, hsdevwv0096.oracle.com) to open the Host Identifiers window and add the following details:
-
<obiee_server>
-
<obiee_server> <port>
-
<obiee_server_ip>
-
<obiee_server_ip> <port>
Note:
<obiee_server> refers to the server where the OBIEE 12c is installed along with Oracle Web Tier and Oracle Webgate. The port refers to the Oracle Web Tier Port.
Example:
Hostname Port obiee_server.oracle.com obiee_server.oracle.com 7777 <ip address> <ip address> 7777 -
-
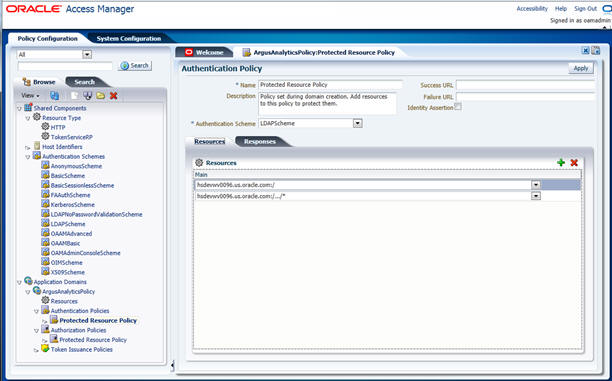
Expand and double-click Application Domains > ArgusAnalyticsPolicy > Authentication Policies > Protected Resource Policy.
-
Ensure that the Authentication Scheme is set as LDAPScheme.
-
Ensure that the following resources are present:
-
/
-
/…/*
-
-
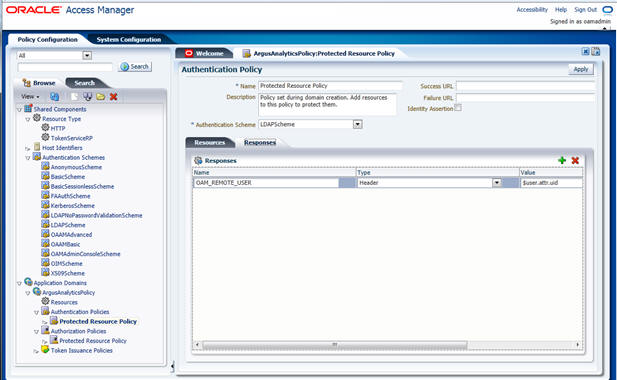
Add the following Response variables:
-
Name: OAM_REMOTE_USER
-
Type: Header
-
Value: $user.attr.uid [based on the LDAP schema setup]
-
-
Click Apply and save the changes.
-
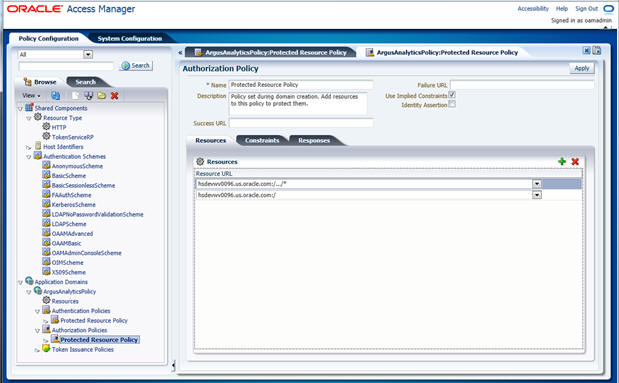
Expand and double-click Application Domains > ArgusAnalyticsPolicy > Authorization Policies > Protected Resource Policy
-
Ensure that the following resources are present:
-
/
-
/…/*
-
-
Add the following Response variables:
-
Name: OAM_REMOTE_USER
-
Type: Header
-
Value: $user.attr.uid [as based on the LDAP schema setup]

-
-
Click Apply to save the changes
-
Navigate to the OPVA Web Tier Machine [<obiee_server>], which is the machine where you have installed the OPVA OBIEE Server, and run the installer for Webgate (OFM Webgate 11g for OAM 11g) to complete the installation.
-
Configure the 11g Webgate using the following steps to communicate with the OAM 11g server:
Note:
Refer to the following link for advanced details:http://docs.oracle.com/cd/E21764_01/install.1111/e12002/webgate.htm
-
Move to the following directory under your Oracle Home for Webgate:
On UNIX Operating Systems:
<Webgate_Home>/webgate/ohs/tools/deployWebGate
On Windows Operating Systems:
Webgate_Home>\webgate\ohs\tools\deployWebGate
-
On the command line, run the following command to copy the required bits of agent from the Webgate_Home directory to the Webgate Instance location:
On UNIX Operating Systems:
./deployWebgateInstance.sh -w <Webgate_Instance_Directory> -oh <Webgate_Oracle_Home>
On Windows Operating Systems:
deployWebgateInstance.bat -w <Webgate_Instance_Directory> -oh <Webgate_Oracle_Home>
Where <Webgate_Oracle_Home> is the directory where you have installed Oracle HTTP Server Webgate and created as the Oracle Home for Webgate, as shown in the following example:
MW_HOME>/Oracle_OAMWebGate1
The <Webgate_Instance_Directory> is the location of Webgate Instance Home, which is the same as the Instance Home of Oracle HTTP Server, as shown in the following example:
<MW_HOME>/Oracle_WT1/instances/instance2/config/OHS/ohs1
-
Run the following command to ensure that the LD_LIBRARY_PATH variable contains <Oracle_Home_for_Oracle_HTTP_Server>/lib:
On UNIX (depending on the shell):
export LD_LIBRARY_PATH=$LD_LIBRARY_PATH:<Oracle_Home_for_Oracle_HTTP_Server>/lib
On Windows:
Set the <Webgate_Installation_Directory>\webgate\ohs\lib location and the <Oracle_Home_for_Oracle_HTTP_Server>\bin location in the PATH environment variable. Add a semicolon (;) followed by this path at the end of the entry for the PATH environment variable.
-
From your present working directory, move up one directory level:
On UNIX Operating Systems, move to:
<Webgate_Home>/webgate/ohs/tools/setup/InstallTools
On Windows Operating Systems, move to:
<Webgate_Home>\webgate\ohs\tools\EditHttpConf
-
On the command line, run the following command to copy the apache_webgate.template from the Webgate_Home directory to the Webgate Instance location (renamed to webgate.conf) and update the httpd.conf file to add one line to include the name of webgate.conf:
On UNIX operating systems:
./EditHttpConf -w <Webgate_Instance_Directory> -oh <Webgate_Oracle_Home> -o <output_file>
On Windows operating systems:
EditHttpConf.exe -w <Webgate_Instance_Directory> -oh <Webgate_Oracle_Home> -o <output_file>
Where <Webgate_Oracle_Home> is the directory where you have installed Oracle HTTP Server Webgate for Oracle Access Manager and created as the Oracle Home for Webgate, as shown in the following example:
<MW_HOME>/Oracle_OAMWebGate1
The <Webgate_Instance_Directory> is the location of Webgate Instance Home, which is the same as the Instance Home of Oracle HTTP Server, as shown in the following example:
<MW_HOME>/Oracle_WT1/instances/instance2/config/OHS/ohs1
The <output_file> is the name of the temporary output file used by the tool, as shown in the following example:
Edithttpconf.log
-
Copy Generated Files (Artifacts) to the Webgate Instance Location from the OAM 11g server.
The 11g Webgate Agent (ArgusAnalyticsPolicy), which was created in the OAM 11g OAM Console earlier, would have also created the following artifacts on the OAM 11g server:
cwallet.sso
ObAccessClient.xml
This is based on the Security Mode that you have configured, which in this case is Open.
On the OAM 11g server, these files are present at the following location:<OAM_FMW_HOME>/user_projects/domains/<OAM_domain>/output/ArgusAnalyticsPolicy
Copy these files to the <obiee_server> in the following directory:
<Webgate_Instance_Directory>/webgate/config directory [Example: <MW_HOME>/Oracle_WT1/instances/instance2/config/OHS/ohs1/webgate/config]
-
Restart the Oracle HTTP Server Instance.
To stop the Oracle HTTP Server instance, run the following commands on the command line:
<MW_HOME>/Oracle_WT1/instances/instance2/bin/opmnctl stopall
To restart the Oracle HTTP Server instance, run the following commands on the command line:
<MW_HOME>/Oracle_WT1/instances/instance2/bin/opmnctl startall
-
-
Configure the HTTP Server as a reverse proxy for the WebLogic Server. To execute this, modify the mod_wl_ohs.conf file present at the following location:
OracleWebTierHome\instances\instance2\config\OHS\ohs1
The following is a template to configure mod_weblogic:
LoadModule weblogic_module "${ORACLE_HOME}/ohs/modules/mod_wl_ohs.so"# This empty block is needed to save mod_wl related configuration from EM to this file when changes are made at the Base Virtual Host Level<IfModule weblogic_module># WebLogicHost <WEBLOGIC_HOST># WebLogicPort <WEBLOGIC_PORT># Debug ON# WLLogFile /tmp/weblogic.log# MatchExpression *.jsp<Location /console> SetHandler weblogic-handler WebLogicHost hsdevwv0096.oracle.com WeblogicPort 7001 WLProxySSL ON WLProxySSLPassThrough ON</Location><Location /em> SetHandler weblogic-handler WebLogicHost hsdevwv0096.oracle.com WeblogicPort 7001 WLProxySSL ON WLProxySSLPassThrough ON</Location><Location /analytics> SetHandler weblogic-handler WebLogicHost hsdevwv0096.oracle.com WeblogicPort 9704 WLProxySSL ON WLProxySSLPassThrough ON</Location><Location /analyticsRes> SetHandler weblogic-handler WebLogicHost hsdevwv0096.oracle.com WeblogicPort 9704 WLProxySSL ON WLProxySSLPassThrough ON</Location><Location /xmlpserver> SetHandler weblogic-handler WebLogicHost hsdevwv0096.oracle.com WeblogicPort 9704 WLProxySSL ON WLProxySSLPassThrough ON</Location></IfModule># <Location /weblogic># SetHandler weblogic-handler# PathTrim /weblogic# ErrorPage http:/WEBLOGIC_HOME:WEBLOGIC_PORT/# </Location>
Restart the Web Tier Instance in WebLogic EM or as described above.
-
Configure a new Authenticator for Oracle WebLogic Server on the OBIEE Server using the following steps:
-
Login to the WebLogic Server Administrator Console and navigate to Security Realms > myrealm.
-
Click the Providers tab.
-
Click Lock & Edit on the right corner of the webpage, highlighted as Change Center.
-
Click New to create a new Authentication Provider and add the following details:
Name: OPVAOIDAuthenticator, or a name of your choice
Type: OracleInternetDirectoryAuthenticator
-
After saving the details, click the new Authenticator that you have created and enter the following details:
In the sub tab change the Control Flag as SUFFICIENT
-
Click Save.
-
Click the Provider Specific tab and enter the following required settings using values for your environment:
-
Host: Your LDAP host.
For example: oid_server.oracle.com
-
Port: Your LDAP host listening port.
For example: 3060
-
Principal: LDAP administrative user.
For example: cn=orcladmin,cn=Users,dc=us,dc=oracle,dc=com
-
Credential: LDAP administrative user password
-
User Base DN: Same searchbase as in Oracle Access Manager.
For example: cn=Users,dc=us,dc=oracle,dc=com
-
All Users Filter:
For example: (&(uid=*) (objectclass=person))
-
User Name Attribute: Set as the default attribute for username in the directory server.
For example: uid
-
Group Base DN: The group searchbase
For example: cn=Groups,dc=us,dc=oracle,dc=com
-
Leave the other defaults as is.
-
GUID Attribute: The GUID attribute defined in the OID LDAP Server
For example: uid
-
Click Save.
-
-
-
Configure a new Identity Asserter for WebLogic Server using the following steps:
-
In the Oracle WebLogic Server Administration Console, select Security Realms from the left pane and click the realm which you want to configure. For example, myrealm. Select Providers.
-
Click New and enter the following values in the fields:
Name: OPVAOAMIdentityAsserter, or a name of your choice
Type: OAMIdentityAsserter
-
Click OK.
-
Click on the newly created Asserter and set the Control Flag to REQUIRED.
-
Ensure that the Active Types that you have selected is OAM_REMOTE_USER.
-
Click Save.
-
Navigate to the Provider Specific tab and enter the following details:
-
Transport Security: open
-
Application Domain: ArgusAnalyticsPolicy, as set in the OAM 11g Console
-
Access Gate Name: ArgusAnalyticsPolicy, as specified in the OAM 11g Console
-
Primary Access Server: oam_server.oracle.com:5575, OAM 11g server with port
-
Click Save.
-
-
In the Providers tab, perform the following steps to reorder Providers:
-
Click Reorder.
-
On the Reorder Authentication Providers page, select a Provider Name and use the arrows besides the list to order the following providers:
OPVAOAMIdentityAsserter
OPVAOIDAuthenticator
DefaultAuthenticator
DefaultIdentityAsserter
-
Click OK to save your changes.
-
-
In the Providers tab, click Default Authenticator and change the Control Flag to Sufficient.
-
In the Change Center, click Activate Changes.
-
Restart Oracle WebLogic Server
-
-
The BISystemUser present in the default embedded LDAP must be deleted (using Security Realms in the Administration Console Link of the WebLogic Server) and the same/another user must be added in the newly added OID. This user also needs to be added to the BI Application Roles using the following steps:
-
Navigate to Administration Console > Security Realms > myrealm > Users and Groups > Users and select the checkbox against BISystemUser (from Provider: Default Authenticator)
-
Click Delete.
-
Navigate to Security Realms > myrealm > Roles and Policies > Realm Roles.
-
In the tree structure, expand Global Roles node and select the Roles link.
-
In the subsequent screen, click the Admin Role link
-
Click the Add Conditions button.
-
In the next screen, select the Predicate List as User and click Next.
-
In the User Argument Name, enter BISystemUser and click ADD.
-
Click Finish.
-
In the Role Conditions screen, ensure that the set operator is set to Or.
-
Save the configuration.
-
Navigate to the Enterprise Manager of OBIEE or the Fusion Middleware Control page and navigate in the tree structure to the Business Intelligence > coreapplication node.
-
In the Business Intelligence drop-down menu, select Security > Application Roles.
-
In the Roles displayed, select BISystem and in the next screen remove the old BISystemUser (from the Default Provider) and add the newly created BISystemUser user in OID.
-
Add the trusted user's credentials to the oracle.bi.system credential map.
-
Using Fusion Middleware Control target navigation pane, navigate to farm > WebLogic Domain, and select bifoundation_domain.
-
Using the WebLogic Domain menu, select Security > Credentials.
-
Open the oracle.bi.system credential map, and select system.user.
-
Click Edit.
-
In the Edit Key dialog box, enter BISystemUser (or the name that you have selected) in the User Name field.
-
In the Password field, enter the trusted user's password that is contained in Oracle Internet Directory.
-
Click OK.
-
-
Restart the Managed Servers.
-
-
Enable the SSO Authentication in the Weblogic Server for OBIEE using the following steps:
-
Login to Fusion Middleware Control (EM) of the WebLogic Server.
-
Go to the Business Intelligence Overview page.
-
Go to the Security page.
-
Click Lock and Edit Configuration.
-
Check Enable SSO, this makes the SSO provider list active.
-
Select the configured SSO provider from the list, as Oracle Access Manager.
-
In The SSO Provider Logoff URL, specify the following URL:
http://<oam_server>:14100/oam/server/logout
-
Click Apply.
-
Click Activate Changes.
-
Restart the Oracle Business Intelligence components using Fusion Middleware Control.
-
2.8 Enable SSL in WebLogic
-
Open the following URL:
https://docs.oracle.com/middleware/1221/biee/BIESC/ssl.htm#BIESC6414
-
Complete all the steps of the Section 5.2.2 Configuring WebLogic SSL including all the sub-sections:
-
Section 5.2.2.1, "Starting Only the Administration Server"
-
Section 5.2.2.2, "Configuring HTTPS Ports"
-
Section 5.2.2.3, "Configuring Internal WebLogic Server LDAP to Use LDAPs"
-
Section 5.2.2.4, "Configuring Internal WebLogic Server LDAP Trust Store"
-
Section 5.2.2.5, "Disable HTTP"
-
Section 5.2.2.6, "Restart"
-
Section 5.2.2.7, "Configure OWSM to Use t3s"
-
Section 5.2.2.8, "Restart System"
-
-
Complete all the steps of the Section 5.3 Enabling BIEE Internal SSL.
-
(Optional, not required for Argus Analytics)
To further configure BI Publisher for SSL communication, follow the steps mentioned in the Section 4.3.2 Add Virtualize Property to the Identity Store Configuration from the following URL:
https://docs.oracle.com/middleware/1221/bip/BIPAD/other_security.htm#CHDJEAFJ
-
Re-enable the Non-SSL ports, and disable the Non-SSL ports.
Note:
You must perform this step or you will not be able to login to the OBIEE.-
Login to WebLogic Admin console.
-
Click Lock & Edit.
-
Select environment, servers.
-
For each server:
i. Display the Configuration tab.
ii. To enable the Listen Port, click Listen Port Enabled check box.
iii. Click Save.
iv. To disable the listen Port, deselect the Listen Port Enabled check box.
v. Click Save.
-
2.9 Configure SSL for SSO with OAM 11g
-
Configure OBIEE in SSL mode as given in the Section 2.8, "Enable SSL in WebLogic"
-
Follow the steps as mentioned in the Part , "Configure SSO using the Oracle Access Manager 11g", except for the deviations as mentioned here:
Update/Create the Webgate Registration in OAM 11g, which you have created in the Section 2.7, "Configure SSO using the Oracle Access Manager 11g".
Note:
The OAM Server configured in OAM 11g must be running with Security set to Simple, else it does not let you create a Webgate with Security set as Simple.-
Open the OAM 11g OAM Console.
-
Navigate to the Policy Configuration tab.
-
Expand and double-click Shared Components > Resource Type > Host Identifiers > <obiee_server> (for example, oamserver.tmp.domain.com) to open the Host Identifiers window and add the following details in addition to the ones that are already present:
<obiee_server>
<obiee_server> <ssl port>
<obiee_server_ip>
<obiee_server_ip> <ssl port>
Note:
<obiee_server> refers to the server, where the OBIEE 12c is installed along with Oracle Web Tier and Oracle Webgate. The <ssl port> refers to the Oracle Web Tier SSL Port. -
Click Apply.
-
From the System Configuration tab, access the Manager Settings section, expand the SSO Agents node, and expand OAM Agents.
-
On the Search page, define your criteria in the Name field as ArgusAnalyticsPolicy and click Search.
-
In the Search results, click ArgusAnalyticsPolicy to edit the Agent Registration.
-
Locate the Security options and click Simple.
-
Click Apply to submit the changes.
-
This generates the artifacts again or afresh. Copy the generated Files (Artifacts) to the Webgate Instance Location from the OAM 11g server.
The 11g Webgate Agent (ArgusAnalyticsPolicy), which is updated/created in the OAM 11g OAM Console, also creates the following artifacts on the OAM 11g server:
cwallet.sso
ObAccessClient.xml
aaa_cert.pem
aaa_key.pem
password.xml
This is based on the Security Mode that you have configured, which in this case now is Simple. On the OAM 11g server, these files are present at the following location:
<OAM_FMW_HOME>/user_projects/domains/<OAM_domain>/output/ArgusAnalyticsPolicy.Copy the password.xml, cwallet.sso, and ObAccessClient.xml files to the <obiee_server> in the <Webgate_Instance_Directory>/webgate/config directory (Example: <MW_HOME>/Oracle_WT1/instances/instance2/config/OHS/ohs1/webgate/config)
Copy the aaa_cert.pem and aaa_key.pem files to the <obiee_server> in the <Webgate_Instance_Directory>/webgate/config/simple directory (Example: <MW_HOME>/Oracle_WT1/instances/instance2/config/OHS/ohs1/webgate/config/simple)
-
Restart the OAM Server
-
-
The Oracle Web Tier is configured with OBIEE as a reverse proxy, as mentioned in step 22 of the Section 2.7, "Configure SSO using the Oracle Access Manager 11g". In addition to those steps, you also need to enable SSL for the Oracle Web Tier using the following steps:
-
Locate and edit the <ORACLE_WT_INSTANCE>/config/OHS/ohs1/ssl.conf
-
Find the VirtualHost section and ensure the following entry is present:
SSLWallet "${ORACLE_INSTANCE}/config/${COMPONENT_TYPE}/${COMPONENT_NAME}/keystores/default"
-
Save the file and restart the HTTP Server.
-
2.10 Enable default SSL Configuration in OBIEE
-
Open the WLS Administrator console for OBIEE.
-
Navigate to Environment -> Servers in the tree view displayed on the left side.
-
Click the Lock & Edit button to change the configuration.
-
Click the AdminServer(admin) link and in the General Tab, enable the SSL listen port, as displayed below:
-
Click Save.
-
In the Servers window, click bi_server1 (or the link for the OBIEE server configured).
-
Enable the SSL Listen Port for the OBIEE server as well.

-
Click on Save.
-
Edit the startWebLogic.cmd file present in the location
<OracleBIHome>\user_projects\domains\bifoundation_domain\ and add the below entry to the file before the ”call” statement.
set JAVA_OPTIONS=%JAVA_OPTIONS% -Djavax.net.ssl.trustStore="D:/Oracle/Middleware/wlserver_10.3/server/lib/DemoTrust.jks" -Djavax.net.ssl.trustStorePassword=""
Note:
Edit the Path names according to your installation directories. -
Restart all the Managed BI Servers.
Note:
For more detailed information on configuring SSL certificates in OBIEE, refer to the guide - Oracle® Fusion Middleware Security Guide for Oracle Business Intelligence Enterprise Edition.