6 Manage your Expedited Report submissions
This chapter lists tasks related to preparing, submitting and tracking compliance for Expedited Reports (ICSRs - Individual Case Safety Reports).
Schedule an Expedited Report
Schedule a report manually
-
Open the case for which the report has to be scheduled.
-
When the system displays the Case Form for the selected case, select Regulatory Reports, and then select Schedule New Reports.
-
When the system opens the Schedule New Expedited Report dialog box, enter the appropriate information in the fields in the dialog box:
Field Description Aware Date If an Aware Date is appended with '(A)' in the drop-down list, it is used to denote the aware date of an Amendment. The resulting expedited report Due Date is based on the selected Aware Date and the duration of the Due Date section.
The selected Aware Date has no impact on the Actual Due Date if the user specifies an absolute Due Date. For instance, selecting a date in the Due Date field causes the report to be due on the specified date, regardless of the selected Aware Date.
This drop-down list is only populated and enabled after a license has been selected. The Aware Dates are displayed in descending order of the Current Aware Date.
Protect Confidentiality of Patient and Reporter Check this checkbox if identifying information about the patient and the reporter must not appear on the report. The system also displays 'MSK' null flavor in the eVAERS report when this checkbox is checked. MSK is populated only when the data element contains some data and is not null.
-
Click OK.
To view all scheduled reports, go to Reports, then select Compliance, and click Expedited. Alternatively, you can go to Worklist, and select Reports.
Auto-schedule a report
-
Open the case for which the report has to be scheduled.
-
Select Regulatory Reports, then select Auto Schedule or Auto Schedule Device.
Reports will be scheduled against the reporting rules which have been set up by the administrators.
Create unscheduled expedited reports
-
Select Reports, then select Compliance, and select Expedited.
-
Click Batch Print or Create Report and search for the case for which the expedited report has to be scheduled.
-
When the system displays the search results, select the locked cases for which the expedited report is to be scheduled.
-
Click Batch.
-
When the system opens the Batch Print or Create Reports dialog box, enter the appropriate information and click OK.
The system generates the unscheduled expedited report.
| Field | Description |
|---|---|
| Suspect Product | Displays the Trade Name for which the report has been scheduled. A (+) displayed at the end of the Product Name denotes that more than one Suspect Company Product exists.
For Reports which were scheduled for the Device, the Device name gets displayed. |
| F / LT | Denotes Fatal / Life Threatening
If the case is both F and LT, only F is displayed. If the case is neither F nor LT, No is displayed. |
| 7/15 | Displays 7 if the report is due within 7 days
Displays 15 if the report is due in more than 7 days |
Batch print or create reports
You can use the Batch Reports function to schedule and generate reports for multiple cases. Before using this function, verify that no cases or reports are open.
-
Select Expedited Reports from the Reports - Compliance menu.
-
When the system opens the Expedited Reports dialog box, click Batch Print or Create Report.
Field Description Suspect Product Displays the Trade Name for which the report has been scheduled. A (+) displayed at the end of the Product Name denotes that more than one Suspect Company Product exists. For Reports which were scheduled for the Device, the Device name gets displayed.
-
When the system opens the Expedited Reports dialog box, search for the cases for which the expedited report needs to be scheduled.
-
When the system displays the search results, select the appropriate cases and click Batch.
-
When the system opens the Batch Print or Create Reports dialog box, enter the appropriate information in the fields and click OK
The Expedited Batch Printing dialog box supports printing Batch CIOMS, Medwatch, and VAERS on Argus Web locally.
Batch Print or Create Reports dialog box—Fields and Field Descriptions
| Field | Description |
|---|---|
| Format | Enables you to print reports As Draft or As Final.
|
| Destination | Check the Printer checkbox to print the report |
| Protect Confidentiality of Reporter and Patient | Check this checkbox to hide the Reporter and Patient information on the expedited reports. |
| Scheduling | 1. If Run Now is selected, all the selected reports run against all selected cases and a PDF is generated.
The Run Now option is visible only when a MedWatch, MedWatch Drug, CIOMS, or VAERS form is selected on the Batch Expedited Report screen. If you select an unlocked case, the report gets printed in draft form only and is not saved. 2. Select Run at and enter the appropriate date and time when the generation of reports should occur. |
Review a draft Expedited Report
-
Open the case for which you want to view a draft report.
-
Click the Regulatory Reports tab.
-
From the Total Number of Rows tab, locate the relevant report and click Draft to view the report.
-
Alternatively, click the Draft Report icon on the top right of the screen and select the required draft report.
Review your scheduled reports
The Regulatory Reports tab enables you to view all scheduled reports.
When a new case is created, there are no reports associated with it. As data is entered and the case is saved, the regulatory report scheduling algorithm determines which reports, if any, are required for that case.
The reports determined to be necessary appear in the Regulatory Reports tab. You can manually schedule reports through the Reports menu or by clicking the Regulatory Reports tab. You can also add comments to existing reports. The comment section can be updated to enter notes for a report even after it has been submitted.
-
The case submission date must be on or after the initial receipt date for the case. If the submission date is before the initial receipt date, the system displays an error message.
-
The system displays the time component for the date generated on the Case Form > Regulatory Reports tab using the IE offset of the client machine for the display.
-
The system displays the time component for the date generated on the Report Details using the IE offset of the client machine for the display.
-
When you manually schedule an Expedited report, the system places the word, Manual, in the Notes field along with the current notes information.
Review a list of your scheduled reports
-
Go to Reports, then select Compliance, and then select Expedited Reports.
You can print draft expedited reports from the Batch Print or Create Reports without printing DRAFT on the reports from the Case Open or the Reports | Compliance | Expedited Reports dialog box.
View your scheduled reports
-
To view scheduled reports, hover over the Worklist menu and select Reports.
When the system opens the Reports screen, enter the appropriate information as necessary.
Report filter options
-
The search results appear in the Report Details dialog box and permit the user to enter the approval notes that are applied to all selected reports. The system skips any reports selected by the user that have the following statuses:
-
Scheduled
-
Disapproved
-
Approved
-
-
The system hides the reports fields from the report details dialog box and does not permit the user to access or modify any other tabs.
-
The system hides the Route button to prevent users from modifying the Report Status.
| Option | Description |
|---|---|
| Reporting Destination | Displays the report destination (agency) for which the report is scheduled. |
| Report Status | Displays the status of the report as Approved, Generated or Scheduled. |
| Report Form | Displays the description of the report. |
| Filtering Reports | You can click the respective magnifying glass icons to filter reports based on Destination, Product Family, and Country of Incidence. The system displays the standard lookup dialog box. |
| By Destination | The Report Destination filter multi-selection screen list contains the names of all agencies as configured in the Argus Regulatory Authority CodeList. |
| By Product Family | The Product Family filter multi-selection screen contains a list of all product family names as configured in the Argus Products codelist. |
| By Country of Incidence | The Country of Incidence filter multi-selection screen contains a list of all available countries. |
View filter results
The Total Number of Rows section displays the result based on the selected filter criteria with following details:
| Field | Description |
|---|---|
| Selected | Allows the user to select one or more reports, on which actions can be performed. |
| Suspect Product | Displays the Trade name for which the report has been scheduled. A "+" displayed at the end of a Product Name indicates that more than one Suspect Company Products exist.
A Device Name is also displayed for those reports which were scheduled for the Device. |
| Diagnosis | Displays the Primary Event Diagnosis PT. |
| Event Verbatim | Displays the event verbatim (verbatim as reported) of the Primary Event. |
| F or LT | Indicates whether a case is fatal or life threatening as follows:
If any of the above are present together, then Fatal takes precedence followed by LT. If the case is neither of the above, No is displayed. |
| 7/15 | Displays 7 if the report is due within 7 days.
Displays 15 if the report is due in more than 7 days. |
| Report Form | Displays the description of the report.
Click the link to view the DRAFT report PDF. |
| Initial / Follow-up (#) | Displays if the report is Initial or Follow-up.
If it is a Follow-up, the follow-up number is printed. |
| Downgrade | Displays Yes if the report is a Downgrade report. |
| View Report | Enables the user to view the report as a PDF. |
| Local Labeling | Enables the user to view the local labeling dialog box.
|
View Expedited Report status
-
To review the status of expedited reports, select Dashboards, and then select Expedited Report Status.
-
In the Search Case section, enter the parameters, and click Retrieve.
-
To view a list of cases, click the relevant section of the pie chart or bar chart.
Note:
When you have access to Expedited Report Status, you also have access to the Report Due Soon dashboard.Submit your Expedited Reports
Generate an Expedited Report
You can generate a report using either of the following procedures.
Method 1: Generating a report
-
Verify that the relevant case has been locked and the required report has been scheduled.
-
Open the selected case to display its associated Case Form.
-
Open the report from the Regulatory Reports tab of the Case Form.
-
When the system opens the Regulatory Reports details for the selected case, locate the relevant report and click the Final link to generate the report.
Method 2: Generating a report
-
Verify that the relevant case has been locked and the required report has been scheduled.
-
Select Case Actions, and then click Open to view the Case Open form.
-
Click Search to view cases matching the search criteria.
-
When the system displays the search results, click the Lock State icon and select Case Details.
-
When the system opens the Argus Safety Case Details dialog box, open the Scheduled Regulatory Reports folder and select the relevant regulatory report.
Note:
-
You do not need to lock the case to preview a report in draft mode.
-
If you have access rights to view or print blinded information, you are prompted to select whether you would like to view a blinded or unblinded version of the report. If your access rights disallow you from viewing or printing unblinded information, you can view only a blinded version of the expedited report. The following items are not displayed when viewing a blinded version of the expedited report:
-
Clinical Treatment Given (Study Drug field)
-
Study Drug Formulation and Concentration
-
Study Drug Dose, Daily Dose and Route
-
Study Drug Batch/Lot # and Expiration Date
-
-
If the case is locked you can generate the report from the Worklist | Reports, Reports | Bulk Reporting and Reports | Compliance | Expedited screens.
Approve your report
-
Open the case associated with the report that needs to be approved.
-
When the system opens the Case Form, click the Regulatory Reports tab to displays the case details.
-
Click the icon associated with the report you wish to approve and select View Report Details.
-
When the system opens the Report Details dialog box, click the Routing tab.
-
When the system opens the Routing tab, select Approved from the State drop-down list and click Route.
-
When the system opens a dialog box, enter the required information and click OK to approve the report.
Transmit an ICSR
To transmit reports one by one, select Reports Detail Dialog, and click the Transmit tab.
-
Go to Case Actions, then click Open, and select Regulatory Reports. Left-click on the Status icon, and select Transmit.
-
Go to Report, then select Compliance, and select Expedited. Left-click on the globe icon to show the report details, and select Transmit.
The Transmit tab enables you to transmit a case electronically.
-
Select the recipient from the Available Recipients list.
-
Select the transmission method from the Method list.
-
Enter any comments under Comments.
-
Click Transmit.
Transmit several ICSRs at once
To transmit several reports at a time, go to Reports and select Bulk Reporting, then select Print Regulatory Report and click Transmit. Select the cases you wish to transmit, and click Transmit at the bottom of the screen.
The Bulk Transmit function lists the status for all transmission events against your assigned cases.
To view the Bulk Transmit page, hover over the Worklist menu and select Bulk Transmit.
Filter reports
The Total Number of Rows section displays the search result based on the filter criteria.
| Field | Description |
|---|---|
| Report Form | Displays the description of the report.
Click the link to view the DRAFT report PDF. |
| Recipient Company | Displays the name of the company of the report recipient |
| Date Created | Displays the date on which the report was created. |
| Date Sent | Displays the date on which the report was transmitted to the recipient. |
| # of Pages | Displays the number of pages in the report. |
| Attempts | Displays the number of attempts made to transmit the report. If you are using Right Fax, the value of this field is displayed as 0 even if the Right Fax had attempted it multiple times. This is an unsupported feature in Right Fax. |
| Sender | Displays the name of the sender of the report. |
| Lock State | Displays the lock status of the report. |
| Sender Agency Name | Displays the name of the agency that has generated the report |
| Status | Displays the Report Status such as Scheduled, Generated, and so on. |
User options
| Option | Description |
|---|---|
| View Transmission | Displays the report in a PDF format. |
| Mark report as Submitted | Marks the report for the selected row as submitted.
This option is displayed to only those users who have the access rights to mark a report as submitted. |
| Remove transmission | Failed transmissions can be removed using this option as it removes the transmission log entry from the list.
A report whose status is pending cannot be transmitted. |
| Re-transmit | This options allows reports to be re-generated and re-transmitted if report generation had failed earlier. For failure in other stages of report transmission, this option performs only retransmission. |
| Submit Multiple Reports | Multiple reports that are selected from the list can be marked as submitted simultaneously. |
| Re-transmit Multiple | The status of multiple reports that are selected from the list can be changed to pending, and those reports can be re-transmitted. |
| Remove Multiple Transmissions | Transmission of multiple reports that are selected from the list can be removed. |
Print your reports
The Bulk Print function displays a separate list for all Bulk Print events against reports.
-
Hover over the Worklist menu and select Bulk Print.
-
When the system opens the Bulk Print page, enter the appropriate information.
Bulk print user options
| Option | Description |
|---|---|
| Remove Print Job | Removes the print job entry from the list.
A report whose status is pending cannot be printed. |
| Re-print | This option is displayed if the selected row has a status of failure or success. Select this option to change the status back to pending and the re-print the report. |
| Submit Multiple Reports | Multiple reports that are selected from the list can be marked as submitted simultaneously. |
| Re-print Multiple | The status of multiple reports that are selected from the list can be changed to pending, and those reports can be re-transmitted. |
| Remove Multiple Print Jobs | Print jobs of multiple reports that are selected from the list can be removed. |
Store Expedited Reports in Documentum
Argus Safety lets you store your Expedited Reports in Documentum.
-
Mark an Expedited Report as submitted from within Argus to insert the report into the Documentum system as a PDF.
-
If the report is to be transmitted via fax or email, Argus Safety Service marks the report as a successful submission in Documentum only after the fax or email transmission has succeeded.
Track your Expedited Report submissions
Track ICSR outgoing status
-
To monitor the Outgoing messages and Acknowledgements, go to Utilities, then select ICSR, and click ICSR ICSR Transmit Status.
-
In the Search Reports section, enter the search criteria, and click Search.
The search results appear in the Total Number of Rows section.
If the Agency is selected as Any, the search results display all ICSR messages and acknowledgements for all receivers.
View ICSR transmit status
The Bulk ICSR Transmit function displays only those ICSR Reports that are awaiting submission (not in submitted state) when transmitted from Bulk Report By Form to the Trading partner.
-
Hover over the Worklist menu and select Bulk ICSR Transmit.
The Bulk ICSR Transmit page appears with following tabs:
-
Reports—Displays the status of individual ICSR Reports that are in the process of being transmitted.
-
Messages—Displays the status of ESM Messages which may contain multiple reports.
-
-
Once reports have been successfully submitted and marked as submitted, they no longer show when you go to Worklist and select Bulk Transmit, when you go to Worklist and select Bulk Print, or when you go to Worklist and select Bulk ICSR transmit. To find a list of all successfully submitted cases, go to Reports, then select Compliance, and click Submitted.
-
Alternatively, go to Utilities, then select ICSR, and click ICSR Transmit Status.
Search for reports
On the Reports tab, select the options to search for reports.
| Field | Description |
|---|---|
| Report | Select the type of report from the drop-down list, as applicable.
Select E2B, eVAERS or eMDR from the list to view the transmission status of the report. |
| Message Type | Select a pre-defined message type.This field is set to ichicsr and is disabled if report is set as eMDR or eVAERS. |
| Periodic Report | This field is enabled for message type that are marked as Periodic in the Message type codelist.
This field is disabled for eVAERS and eMDR. |
| Range | Select a date range. |
| Search button | Triggers search based on the search criteria. |
| Only show transmissions that have reached a failure state | Check this checkbox to search for only those transmissions that have a failed status. |
| Show all transmissions (submitted and unsubmitted) having a error ACK | When this checkbox is checked by the user during the Search action, the system brings back any ICSR report that has received an error ACK (acknowledgement), irrespective of whether it has been marked as submitted or not.
When this checkbox is checked, the checkbox Only show transmissions that have reached a failure state is automatically unchecked. |
| Stage Legend | Shows the status (through colors) corresponding to each stage. |
Search for ESM messages
On the Messages tab, select the options to search for ESM messages.
| Field | Description |
|---|---|
| Report | Select E2B, eVAERS or eMDR from the drop-down list to view the transmission status of these reports. |
| Agency Trading Partners | Enter the agency or trading partner. |
| Transmit Date Range From | Select the transmit date range. |
| Range | Select a range to auto-populate the Start Date and End Date.
The Range option is cleared if the Start Date or End Date is changed. |
View search results
The Total Number of Rows section displays the search result based on the search criteria.
If the ICSR report in a result set row was already submitted, the system does not display the following pop-up windows:
-
Remove Transmission
-
Re-Transmit
-
Mark as Submitted
-
Re-Transmit Multiple
-
Submit Multiple Reports
-
ICSR Transmission History
For the same record above, the system, however, keeps the View Report Details and View ICSR Report menus enabled.
| Option | Description |
|---|---|
| View Acknowledgement (Read only) | Displays the Acknowledgment report.
This menu option is not displayed if ACK has not been received for message. |
| View xml acknowledgement | Displays business level acknowledgement. |
| View Reports | Opens the Bulk Transmit ICSR in the report view for all the reports in the message. |
| View Report Details
(read -only) |
Opens the existing Report Details dialog box in read-only mode. |
| View ICSR Report
(ICSR Viewer for the report) |
Opens the existing ICSR Viewer report. |
| ICSR Transmission History
(Transmission History for the selected report) |
Opens the new Transmission History screen. |
Manage your Incoming ICSRs
To view the Incoming ICSR Reports screen, select Reports, and then click ICSR Pending Reports. You can:
-
View the ICSR reports sent by the agency or the trading partner.
-
Process an incoming ICSR report.
-
Check all the ICSR values of the reports sent and determine whether to accept or reject the reports.
-
Provide a user password and acceptance notes/rejection reason and accept or reject an incoming ICSR report.
Track incoming ICSR reports
| Field | Description |
|---|---|
| Message Type | Allows selection of ICSR based on the message type for all allowed values for the N.1.1 tag. By default, the drop-down is populated as ichicsr. |
| Trading Partner |
|
| Product Name/Generic Name | Click the Select button next to this text box.
A pop-up screen appears with a text box (2000 characters), a Search button, an OK button, and a Cancel button. This pop-up screen is called "Generic Name" or "Product Name" as per the radio button selected in the Incoming ICSR Reports for which this popup was being invoked. This pop-up screen is titled "Product Name" when invoked from the Processed ICSR Reports screen. The text box in the pop-up screen is auto-populated with text entered in product name or generic name field on the corresponding screen but can be the user updated. Besides, when the user switches tabs between the Pending and Processed Sub Tabs, the default processing page icon appears which information that it is still processing and switching is not completed. |
| Initial / F-U / Nullification/ Amendment / Downgrade | The report version of the report for the case received. |
| Country of Incidence/ Primary Source Country | Displays the country where the incident occurred. |
| Is/Will be assigned to this site | Displays the site membership of the case.
This field appears in the search result. |
| Accept ICSR | Imports ICSRs in a batch from ICSR Pending screen after selecting one or more reports (E2B (R2) and/or E2B(R3). |
Button and right-click options
| Button | Description |
|---|---|
| ICSR Viewer | Select this right-click option to launch the ICSR viewer. For details, refer to the ESM User Help.
Note: At the time of generating an ICSR report, some characters entered in the case form may not be displayed the same in the ICSR report. For example, the ICSR report equivalent of the "&" character entered in the case form is &. Similarly, there are other such characters that are represented differently in the ICSR report. |
| View Error/Warning Message | Select this right-click option to view all warning messages including M2 validation errors and Multiple ICSR Codes log. |
| Accept ICSR | Selects the incoming ICSR report for both single and multiple acceptance.
Execute these steps to accept an ICSR Case: 1. Click the Accept ICSR Case button. The Acceptance of Initial Report Confirmation dialog opens. 2. Enter your user password, date, and select a justification from the pre-defined list of justifications. 3. Click OK. Accepting Amendment report is the same accepting a Follow-up report. The application supports importing attachments for the file types as configured in the profile switch Case Processing -> Valid attachment file type. |
| View Validation Failure | Opens the ICSR validation report (pdf) in the same format as it does at the time of export. This validation report prints all the validations that are categorized as soft validations for the import. Applicable for (R3) based ICSR reports only. |
| Duplicate Search | Select this right-click option to perform Duplicate Search for the case being imported with the case present in the system. |
Manage pending reports
When using ICSR Pending reports, right-click the row and select the following:
-
Case Summary
-
Medical Summary
-
Case Form Print
Track bulk incoming ICSR reports
The Bulk Incoming ICR Reports enable you to import multiple ICSR reports that are sent by the agency or trading partner. To view the Bulk Incoming Reports:
-
Select multiple reports from the Incoming ICSR Reports screen.
-
Click Accept ICSRs.
Note that:
-
The reports that are imported can be a combination of Initial, Follow-up and Nullification reports.
-
The only pre-requisite for this dialog box is that Case numbering should be set to auto-numbering and not manually.
-
Bulk Incoming Reports does not prevent the duplicate cases to be loaded into the system.
The following table lists Bulk Incoming Reports fields.
| Field | Description |
| Agency Name | This drop-down list contains unique trading partner from the ICSR reports have been received.
Select an agency/trading partner to filter the ICSR reports. |
| Product Name | This drop-down list contains unique suspect Product Names extracted from the received ICSR reports.
Select a suspect product to filter the ICSR reports. If an Agency Name is selected, the Product Name list contains all suspect products belonging to that agency name. |
| Follow Up Output Format | This drop-down list contains CIOMS-I, MedWatch and Case Form. You can print all ICSR reports only if the Follow Up checkbox is checked. |
| Source Count | Displays the total number of ICSR reports with breakdown in 'Initial' 'Follow Up' and 'Nullification' category. |
| Selected Count | Displays the number of ICSR selected by the user to load the ICSR reports in Argus Safety. Selected count can be changed by checking the 'Initial' or 'Follow Up' or 'Nullification' checkbox. |
| Import | Imports all the reports.
Note: For the Import process, if the system receives an ICSR report with the Medically Confirm field set to 1, the Primary reporter is marked as HCP. |
| Cancel | Removes the Import ICSR reports window. |
Search for duplicate reports
The Duplicate Search dialog box for an ICSR report enables you to search for possible duplicate cases in the Argus Safety system. You can select different combinations of search criteria. When more than one criterion is selected, only cases that satisfy all criteria are listed. By default, the fields that are present in the ICSR Report are checked for the Duplicate Search.
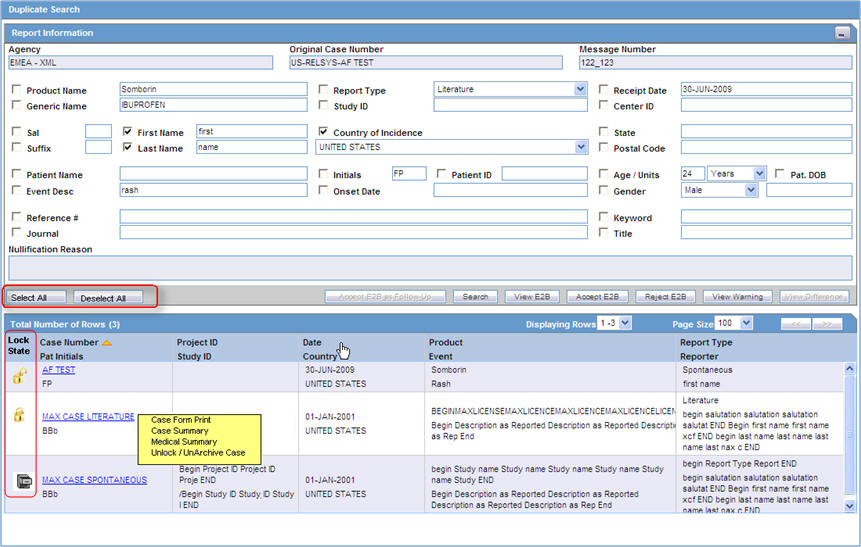
View duplicate search options
| Field | Description |
|---|---|
| Onset Date | The date from when the first reaction or adverse event occurred. |
| Reference # | National Regulatory Authority's Report Number, used as a Reference Number. |
| ICSR Viewer | Enables you to view the E2B report. |
| View Differences | Allows viewing differences between the current XML to be imported (a message that is not yet imported into the database), the current case data in the database, and if a case has been imported before, the last imported case.
Note: This button is available only for follow-up and nullification reports. |
| Action | Enables you to view the Case Summary dialog box. |
| Reporter | Displays the reporter involved with the case matching the search criteria.
This field appears in the search results. |
| Reference ID | Searches on the following fields in the Argus case:
|
| Keyword | By default, the first value from the incoming affiliate event appears. |
Search duplicates for incoming review
The Duplicate Search in Argus Central Incoming review enables you to search on Reference ID and Keyword field in Argus cases.
You can right-click the Case Number for a listed case and use the following options:
| Right-click Option | Description |
|---|---|
| Case Form Print | This option is displayed for only those users who belong to the group with access to Argus Console > Access Management > Groups > Menu > File > Print.
This option allows you to print the case form report. |
| Case Summary | This option is displayed for only those users who belong to the group with access to Argus Console > Access Management > Groups > Menu > File > Open Case Summary.
This option allows you to open the summary report of the case. |
| Medical Summary | This option is displayed for only those users who belong to the group with access to Argus Console > Access Management > Groups > Menu > File > Print.
It displays the medical summary of the case. |
| Unlock/UnArchive Case | This option is displayed to allow users to re-open the archived and locked cases. On clicking this option, a Locked Case/Archived Case screen (as applicable) is displayed. You need to enter your password along with any remarks/notes and select a reason for your action to complete the unlocking/unarchiving of the case.
|
View differences report
You can view differences between the current XML to be imported (a message that is not yet imported into the database), the current case data in the database, and if a case has been imported before, the last imported case.
Note: View Differences is available for follow-up reports only. This option is enabled only when an initial case or case number is selected in the duplicate search output section.
To view the View Difference report:
-
From the Duplicate Search screen, click View Differences.
The ICSR Difference Report screen appears.
The differences in the ICSR reports appears as:
-
Addition—New elements are highlighted in grey.
-
Deletion—Deleted elements are highlighted in red.
-
Modification—Modified elements are highlighted in yellow.
-
The following table describes the fields in the report.
| Field | Description |
|---|---|
| Trading Partner | Allows you to view the Trading Partner name from whom the ICSR report is received.
Note: The Lock/Archive icon displayed with this field denotes the status of the case. |
| DTD Version | Allows you to view the DTD version of the follow-up ICSR report. |
| Case Number | Displays the original case number of the ICSR report. |
| Follow Up # | Displays the sequence number of the follow-up for the E2B report. |
| Total Number of Rows | Allows you to select the type of ICSR Difference to view from: Current ICSR vs. Current Case in Database
|
| Import | Highlights the import differences. |
| ICSR Element | Highlights the ICSR differences. |
| Current ICSR | Highlights the differences in the current ICSR. |
| Current Case in Database | Highlights the differences in the current case in the database. |
| Last Imported ICSR | Highlights the differences in the last imported ICSR. |
| Accept Follow-up | Allows you to update the corresponding fields for the selected ICSR elements in the Argus case. |
| Reject Follow-up | Does not update the corresponding fields for the selected ICSR elements in the Argus case. |
| Print List | Provides the difference report in a PDF format. |
Accept initial E2B cases as follow-up
This option is enabled only when an initial case or case number is selected in the duplicate search output section.
-
To add an ICSR as a follow up to the Case Number (that is highlighted in the duplicate search output section), click Accept Initial E2B Cases As Follow-Up.
-
Click OK when the following pop-up dialog box appears:
"Do you want to add this ICSR as a Follow-up to the Case Number<Num>?"
The Argus application attaches the incoming ICSR as a follow-up, to the selected case number highlighted in the duplicate search screen.
View processed ICSR reports
The Processed ICSR Reports page contains a list of ICSR that are processed successfully or processed with Errors/Warnings.
Search for reports
| Field | Description |
|---|---|
| Trading Partner |
|
| Product Name | Enables you to select a Product Name as a search criterion.
The result set is limited to 1000 rows. To update the Product or Generic Name, selects a value from the search result, and click OK. |
View search results
The search results appear in the Total Number of Rows section.
| Field | Description |
|---|---|
| Interchange Date | Displays the Case Number with which the case has been imported on the specified interchange date. |
| ACK GEN Sent | Displays the status of the ACK GEN.
|
| EDI Out | Displays the EDI Out status.
|
| Warnings / Errors | Click binoculars icon to view warnings/errors associated, if any. |
Track ICSR incoming status
To monitor incoming ICSR:
-
From Utilities, go to ICSR, and select ICSR Receive Status.
-
In the Search Reports section, enter the search criteria, and click Search.
The search results appear in the Total Number of Rows section.
If the Agency is selected as Any, the search results display all ICSR messages and acknowledgements for all receivers.
-
Click the Type Icon link to view message options.
View message options
-
Click the Type icon to view the options:
-
Any—Displays all the ICSR messages and acknowledgments.
-
MSG—Double-click MSG to view messages in the ICSR Viewer.
-
ACK—Double-click ACK to view the acknowledgement.
-
When you click any above-mentioned option, the Message Acknowledgement screen appears.
This screen contains all the safety report detail information such as, if the report is loaded or not loaded with error and enables you to monitor message acknowledgements.
Find overdue reports
-
On the Home page, hover over the Worklist menu and click Reports.
-
Click on the field Days Past Due on the right of the Total Number of Rows and if needed click again to show Days Past Due in descending order (arrow pointing downwards).
-
To view all reports select ALL at top right of the screen.
For details on entering data in each section of the Total Number of Rows tab, see Total Number of Rows link.
FAQs
What is a scheduled report?
A scheduled report allows the system to calculate a report based on the date received, seriousness criteria, and reporting rule configuration if any. You can schedule any report. The case data within the reports continues to be updated as the case is updated.
What is a generated report?
A generated report creates a draft report for review. The case needs to be locked for the system to generate a report.
What happens when a report is approved?
Approving the report allows the User to sign off the report.
What is the difference between submitting and transmitting a report?
A report can be submitted to a regulatory authority either by printing it off and marking it as submitted, or sending it electronically from within Argus via fax, email or E2B. Transmission is the electronic form of submitting a report.
What happens when manually scheduling a Local Japan report?
On Manual Scheduling of a report by a user, the application identifies if the report is a Local Japan report by matching the Country of the License#, Destination and Report Form chosen by the user in the "Schedule New Report" manual report scheduling dialog box with the "Local Reports Configuration".
If DLP is not enabled for Expedited Report Generation:
-
On the Global lock of a case by a user, the application generates the global reports but does not generate any Local Japan reports.
-
The Local Japan reports shall be generated on subsequent local lock for Japan.
If DLP is enabled for Expedited Report Generation, refer to the chapter in Oracle Argus Safety Japanese User's Guide > 4 Reports.
For a Study-based WHO Drug Report, the application identifies if the report is a Local Japan report by matching only the Destination and Report Form chosen by the user.
For a Study-based WHO Drug Report, the application identifies if the report is a Local Japan report by ignoring the country, matching only the Destination and Report Form chosen by the user and if the Truly Local Case switch returns value > 0.
Note that if AUTO_FOLLOWUP_MANUAL switch is ON, the existing functionality of scheduling a follow-up report for a manual report is retained as is and if the manual report was a local report, the follow-up is treated as a local report.
What happens when auto-scheduling a Local Japan report?
On the Global lock of a case by a user, the application triggers the qualifying reporting rules including the Japan reporting rules and schedule the relevant global and local reports. There are modifications to the Report Generation functionality however, and is explained under section Changes to Report Generation.
On the Local Lock of a case by a user, the Local Reporting Rules for Japan are triggered again as follows, depending on the value in the configuration switch "Case Form Configuration | Auto Regulatory Scheduling":
-
If the value is set to Always: The Local Japan reporting rules are triggered on case save during the follow-up cycles of case processing when any of the local fields caused the "Significant" data change. If any of the other fields caused the "Significant" data change, then all the reporting rules are triggered as with the existing algorithm. Also, for the initial case cycle, only local reporting rules are triggered on Local lock.
-
If the value is set to Significant: The Local Japan reporting rules are triggered on Local Lock but respecting the existing algorithm to check that Significant Follow-up was added during the prior global lock cycle during the follow-up cycles. For the initial case cycle, as with the existing algorithm, they trigger on Local lock.
-
If the value is set to any value other than None, including Manual: A new checkbox called Schedule Local Reports Only will be added under the Total Number of Rows section in the Regulatory Reports tab of the Case Form. This checkbox is visible only when the configuration switch Case Form Configuration > Auto Regulatory Scheduling is not set to None. After the rules are successfully triggered, the application unchecks the checkbox. If the checkbox is unchecked, the application triggers all the qualifying reporting rules keeping the current functionality.
Note:
As a result of triggering of local reporting rules again, the Local reports that were already scheduled during Global Lock may result in being overwritten or being removed.Force Distribution: If force distribute is checked for a reporting rule, the application triggers that reporting rule as per the existing functionality. However, the generation and force distribution of the Local Reports have the following modifications:
a. When a Local reporting rule marked for "Force Distribute" has a local report that has become due, the report is scheduled, generated and force distributed by performing the global and local lock on the case using the existing AG Service Force Reporting process.
i.When a Local report that was already scheduled outside of the force distribution process from a local reporting rule marked for "Force Distribute" has become due, the application does not force generate this report keeping it consistent with the existing functionality.
b. For the above scenario, AG Service uses the one step global/local lock comment "Case Globally and Locally locked for JP." (refer section Routing Comments Log and Case Print) followed by the configured comments under Argus Console ' Reporting ' Expedited screen' Forced Distribution comments.
i. Case Globally and Locally locked for JP. << Forced Distribution comments>>
c. After the report generation is complete, the case gets unlocked globally. AG Service uses the one step global/local unlock comment "Case Globally and Locally unlocked for JP." (refer section Routing Comments Log and Case Print) followed by the configured comments under Argus Console ' Reporting ' Expedited screen' Forced Distribution comments.
i. Case Globally and Locally unlocked for JP. << Forced Distribution comments>>
What components are affected by the expedited reporting rules algorithm?
The expedited reporting rules algorithm affects the following:
Suppression of duplicate reports
You can suppress duplicate expedited reports to be scheduled at the reporting destination level, according to the following criteria:
-
The Suppress Duplicate Reports option only applies to drug reports. It does not apply to device reports.
-
This option does not reduce the number of reporting rules the system evaluates. However, it does prevent the system from scheduling and generating expedited reports that match the duplication criteria.
-
When you select Suppress Duplicate Reports, the system uses the following attributes to determine whether the reports are duplicates of other reports:
-
Report Form
-
Reporting Destination
-
Aware Date
-
-
If two or more duplicate reports have different due dates (regardless of license type), the system schedules the report with the earliest due date.
Blinded/forced distribution
The system enables you to configure the Blinding Study option for products in the case.
-
When you check this checkbox, the system blinds the study products for the report being sent to the reporting destination in a manner similar to the Bulk Reporting dialog box option.
-
If you select either of the Blind Study product options (Reporting Rules or Bulk Reporting), the system blinds the study product information on the report form.
-
The system blinds only active blinded studies. It does not blind the following case reports even if the Blind Study product is selected
-
Open Label Studies
-
Study is eligible for unblinding - If the Study is Unblinding checkbox is not kept as unchecked in study configuration, the user will be able to see the complete case data even if he/she has protection enabled.
-
-
In cases where expedited reports are due, the system permits the user to force-distribute the reports based on user-defined reporting rules, even if case processing is incomplete.
-
When you select the Force Distribution rule, the following occurs:
-
If a case encounters a rule where a report is due is locked, the system schedules the report based on the rule and does the following:
-
Generates the report on the due date.
-
Dynamically replaces the current case comment with the force distribution case comment.
-
Transmits the report based on the preferences defined by the reporting destinations.
-
Displays the status in the Worklist Bulk Transmit/Transmit ICSR dialog boxs.
-
-
The AG Service Force Reporting process for expedited reports completes the process by:
-
Checking the reports required for force distribution
-
Locks the case (if it's not already locked)
-
Generates the reports and makes sure it is ready for transmission
-
-
The notes for the Case Locking/Unlocking are the same as those defined as the common profile value for the Forces Distribution option; System is the user.
When are follow-up reports created?
Follow-up reports are created depending on the following parameters:
-
Data for a case changes.
-
Update information for a case has been entered by entering follow-up information in the General Information section of the General tab.
-
Depending on the configuration set up by the Administrator, the system analyzes the scheduled reports prior to the data changes to see if they are still required.
-
If the system determines that they are not required, the report status is marked as Downgrade. New reports are automatically scheduled, if required.
-
If the system determines the report is still needed and needs to be updated, one of two functions can take place depending on the configuration done by the Administrator:
-
The system overwrites the report
-
The system schedules a new report in addition to the old report
-
-
If the system has been configured to overwrite the existing report, the report status becomes New Data Available.
-
In the Worklist, the status for this report shows New Data Available for this report. When you re-generate the report, you can select whether or not you would like to re-generate the report with the new data.
-
If the system is configured to create a Follow-up report, the previous report remains in its current state and a new report is scheduled with the status of Scheduled.
-
If a report has been previously submitted, this report is never deleted under any configuration.
Why doesn't my draft report print a follow-up number?
The following expedited report forms do not print a Follow-up number when the user selects DRAFT on the Regulatory Reports tab or when he/she selects the Quick Launch Draft option:
-
US FDA MedWatch Drug/Device
-
US FDA VAERS
-
CIOMS I/CIOMS I (Local)
-
French CERFA
-
Spanish Spontaneous/Clinical
How does the Lock State Column under Reports > Compliance > Expedited allow me to sort my cases?
Click the Lock State header row to sort on the following category of cases. A pop-up window appears, with the following sorting options:
-
Lock State
-
SUSAR
-
Exp/Per
Click the required option to sort cases based on the selected case categorization.
Lock icons
| Icon... | Identifies... |
|---|---|
| A case marked for a Periodic ICSR submission. | |
| A locked case. | |
| An unlocked case | |
| A SUSAR (Suspected Unexpected Serious Adverse Reaction) case. |
Lock icon options
| Field | Description |
|---|---|
| Report Details | Displays specific information about the report as entered in the Regulatory Reports section.
The information displayed in the fields of the Report Details dialog box is fetched from the data entered in the Regulatory Reports section of Case Form. |
How do I view the status of my Expedited Report?
| To.. | Do.. |
|---|---|
| View the regulatory reports for a particular case (scheduled, generated and submitted) | Open the Regulatory Reports tab of the Case Form. |
| View all scheduled, generated, and approved reports, as well as other outstanding action items | Select Reports from the Worklist menu. |
| View a list of all scheduled, generated, and approved reports | Select Compliance | Expedited from the Reports menu. |
| View all the submitted reports in the system | Select Compliance |Submitted from the Reports menu. |
How do I know if an unscheduled report is due soon or needs to be submitted?
As report scheduling is commonly configured to be executed when significant changes are made to a case, the expedited reports may be delayed if a case never gets locked. You cannot know that a report is late if it has never been scheduled. To address this potential compliance issue Argus Safety assesses case reportability prior to formal report scheduling. Workflow and Expedited Status monitoring screens identify unlocked cases due soon.
-
To view a list of unlocked cases with reports due, select Dashboards, and then click Reports Due Soon.
The Unlocked Cases with Possible Reports Due Soon screen appears.
-
The Workflow and Expedited status include another report with cases that have not had reports scheduled but that may generate a report with a due date in the near future. This graph is displayed below the graph detailing the actual case status. The reports included in this sub-dashboard are limited to the filter criteria specified for the main dashboard.
To view a Worklist with cases of the selected state (red or yellow), click the graphical bar.
Where can I view single reports which have been generated as part of a periodic report?
The Periodic folder contains single case report forms (MedWatch, VAERS or CIOMS) that were generated as part of a Periodic Report.
-
Pending Reports by Destination
-
Submitted Reports by Destination
-
Non-submitted Reports by Destination