10 Install Argus Safety Database
10.1 Create Argus Safety Database Schema
-
For Windows—To use the interactive user interface, execute the dbinstallerUI.bat file.
For silent installation—execute the dbinstaller.bat file.
-
Create the tablespaces and schemas using the dbinstallerUI. bat or dbinstaller.bat file available at <Argus Release Media>\Database\Argus Safety.
-
Argus Safety database schemas:
-
Argus Schema
-
Interchange Service Schema
-
ESM Query Schema
-
DLP Schema
-
DLP ESM Query Schema
Note:
The mapping SQLs for ESM Generation and Import can be executed only through restricted database user account that have access only to Argus and ESM Schemas (ESM Query Schema and DLP ESM Query Schema).These DB users does not have access to create or execute anything that would result in change or alteration of the schema or database.
DLP Schema and DLP ESM Query Schema are part of Argus Database, but DLP setup can be enabled or disabled by executing separate batch files shipped with the software.
Besides, features like Factory Data, DB Upgrade, and Oracle Text are merged with the Create Schema option.
-
-
BI Publisher Schema—This schema holds the Flexible Aggregate Reporting (FAR) objects and the Japanese PMDA R3 Paper Reports related objects. This schema must always be created.
Note:
When creating new users in Oracle, the password can only contain any ASCII Character, 0-9, or any of the following special characters _ # $. -
-
Create Axway B2Bi or Oracle B2B Database Instance (Optional)—Required only for respective gateway being integrated with Argus Safety.
10.1.1 Prepare to execute the DBInstaller
10.1.1.1 Prerequisites
Before you execute the dbinstallerUI.bat or dbinstaller.bat file on a server, verify that:
-
an Oracle client with Administrator option is installed on the server.
-
database TNS entry should be added in the TNSNAMES.ora file.
-
Java JRE 1.8 or higher must be installed and Java Cryptography Extension (JCE) Unlimited Strength Jurisdiction Policy Files 8 is applied.
-
login machine user should have administrative privileges.
10.1.1.2 Install Java
-
Download the jce_policy-8.zip file on your local machine from the following link:
http://www.oracle.com/technetwork/java/javase/downloads/jce8-download-2133166.html -
Unzip the jce_policy-8.zip.
-
Replace local_policy.jar and US_export_policy.jar files present in all Java JRE installation security folders with local_policy.jar and US_export_policy.jar shipped in jce_policy-8.zip.
For example, the location of Java JRE 64-bit:
C:\Program Files\Java\jre1.8.0_161\lib\security
-
From the command prompt verify that Java is properly installed by executing:
java-version
If no Java version appears, check that the environment variable settings and the path system variables have correct the Java installation path.
10.1.1.3 Set Java Install Path
-
Right-click the My Computer (or Computer) icon and from the drop-down menu select Properties.
-
From the left-pane, select Advanced system settings.
The System Properties dialog box appears.
-
In the Advanced tab > Startup and Recovery section, click Environment Variables...
-
From the System variables section, scroll down to the Path variable and double-click.
The Edit System Variable dialog box appears.
-
In the Variable value: field, enter the location where Java will be installed and end it with a semi-colon (;).
-
Click OK to close the Edit System Variable dialog box.
-
Click OK to close the System Properties dialog box.
10.1.1.4 Install XDB Schema for Interchange
Oracle Schema XDB must be present for Interchange packages to load. To create the XDB schema, if already not present:
-
Click sqlplus.exe.
-
Connect to sys as sysdba.
-
Execute the <Oracle_Home>/rdbms/admin/catqm.sql script.
-
Enter the following parameters:
-
user password
-
user default tablespace
-
user temporary tablespace
For example:
SQL>@?/rdbms/admin/catqm.sql SYSTEM SYSAUX TEMP
-
10.1.2 Run Create DBA User Script
You must run the Create DBA User scripts to create a new DBA user or grant required privileges to the existing DBA or SYSTEM user. Use this new DBA user account when running the DBInstaller to create the Argus Safety schema.
The DBA user created by this script can perform the actions as done by the SYSTEM user. All the manual grants which used to be assigned to the SYSTEM user (prior to the Argus Safety 8.1 release), are now part of this script. The term SYSTEM mentioned in this chapter can be replaced with the new DBA user. If you use the newly created DBA User to execute the DBInstaller, then the validation file might display extra or missing privileges for the SYSTEM or the newly created DBA user.If you do not wish to create a new DBA user, you may enter SYSTEM when running the script.
To create the DBA user:
-
From the command prompt, run the batch file:
<Argus Release Media>\Database\Argus Safety\Utilities\Create_Dba_User\create_dba_user.bat
-
Enter the following parameters:
-
TNSName of the database
-
SYSDBA username
-
Password for SYSDBA account
-
Name for the new DBA User account that will be created
-
Password for the new account
-
-
Follow the remaining steps to complete the script.
-
You may also run the script:
-
For Windows—execute the script from <Argus Release Media>\Database\Argus Safety\Utilities\Create_Dba_User\create_dba_user.bat
-
For Linux—execute the script from <Argus Release Media>/Database/Argus Safety/Utilities/Create_Dba_User/create_dba_user
-
10.1.3 Create Tablespaces (Optional)
The DBInstaller creates the tablespaces if they do not exist with default parameter settings.
You can create tablespaces as per your parameter requirements before installing Argus Safety. The following is the list of tablespaces that is required for the Argus Safety installation:
| Tablespaces for Argus Safety | Tablespaces for DLP |
|---|---|
| ARGUS_AEXP_DATA_01 | DLP_DATA_01 |
| ARGUS_AEXP_INDEX_01 | DLP_DATA_02 |
| ARGUS_AL_DATA_01 | DLP_DATA_03 |
| ARGUS_AL_INDEX_01 | DLP_DATA_04 |
| ARGUS_DATA_01 | DLP_DATA_05 |
| ARGUS_DATA_02 | DLP_DATA_06 |
| ARGUS_DATA_03 | DLP_INDEX_01 |
| ARGUS_DATA_04 | DLP_INDEX_02 |
| ARGUS_DATA_05 | DLP_INDEX_03 |
| ARGUS_INDEX_01 | DLP_INDEX_04 |
| ARGUS_INDEX_02 | DLP_INDEX_05 |
| ARGUS_INDEX_03 | DLP_INDEX_06 |
| ARGUS_INDEX_04 | DLP_LOB_01 |
| ARGUS_INDEX_05 | |
| ARGUS_INDEX_06 | |
| ESM_DATA_01 | |
| ESM_INDEX_01 |
10.1.4 Prerequisites to Create the Schema
-
Create the Cryptographic Key, refer to the chapter Argus Password Management—Cryptography Tool.
-
A blank Oracle database instance is available.
-
A DBA-privileged or a SYSTEM user account is available.
-
The Oracle database is available from the machine where the DBInstaller is installed.
-
Java is installed and JCE policy is applied. See Section 10.1.1.2, "Install Java."
-
Set database semantics to CHAR.
The Argus Safety Database requires the database semantics to be CHAR and not BYTE. Follow the steps below:
-
Log in to the database as the SYS user.
-
Execute: ALTER SYSTEM SET NLS_LENGTH_SEMANTICS=CHAR SCOPE=BOTH;
-
Shutdown and startup the database after applying the above statement.
-
10.1.5 Configure the Database Setup Properties File
Make sure the dbinstaller.properties file that contains the information for the Argus Safety Database setup has correct data. If not, edit the file.
The file is located on the database server at <Argus Release Media>\Database\Argus Safety.
Note:
In case you are creating the schema on windows from the User Interface, you MUST update only the following parameter:-
argus_securekey_path=<path of the ArgusSecureKey.ini file>
The default value is C:/windows
-
tablespace_encryption=<blank> or <text>, where
- blank = no encryption
- text like: encryption using 'AES256' default storage (encrypt)
You may ignore other parameters.
-
#DB Connection Details
-
db_connect_string=<host name>:<port>/<service name>
-
dba_user=<argus dba user or system user>
-
-
#Application Type
-
application_type=MULTI (for a multi-tenant setup) or SINGLE (for a single-tenant setup)
-
enterprise_name=DEFAULT
-
enterprise_short_name=DEFAULT
-
-
#Complete path of Argus Secure Key ini file
-
argus_securekey_path=<path of the ArgusSecureKey.ini file>
The default value is C:/windows
-
url—URL for the database connection
-
dbaUser—SYSTEM or DBA privileged user
-
-
#Argus DB Schemas—Schema Name and Password (optional). If the password is left blank, it will be prompted at run-time.
-
To prompt for each password on the screen:
-
appSchema_argus_schema=argus_app
-
appSchema_argususer=argususer
-
appSchema_argus_login=argus_login
-
appSchema_vpd_schema=vpd_owner
-
appSchema_bip_schema=bip_owner
-
appSchema_esm_login=esm_login
-
appSchema_esm_schema=esm_owner
-
appSchema_esmquery_schema=esm_query
-
appSchema_dlp_schema=dlp_owner
-
appSchema_dlp_esmquery_schema=dlp_esm_query
-
-
To avoid prompt for each password on the screen, set up the password as the login password for each user:
-
appSchema_argus_schema=argus_app/<password>
-
appSchema_argususer=argususer/<password>
-
appSchema_argus_login=argus_login/<password>
-
appSchema_vpd_schema=vpd_owner/<password>
-
appSchema_bip_schema=bip_owner/<password>
-
appSchema_esm_login=esm_login/<password>
-
appSchema_esm_schema=esm_owner/<password>
-
appSchema_esmquery_schema=esm_query/<password>
-
appSchema_dlp_schema=dlp_owner/<password>
-
appSchema_dlp_esmquery_schema=dlp_esm_query/<password>
-
-
-
#Argus DB Roles—Enter the names of the database roles you need to be required. If this is an upgrade, list the roles under For upgrade. If this is a fresh installation, enter the roles under For the new setup in the file.
-
#Argus Data Tablespaces—Define the tablespace and datafile details.
Similarly ESM and DLP sections Define Data and Index datafiles.
-
#Default and Temporary table spaces
-
default_ts=USERS
-
temp_ts=TEMP
-
-
#TableSpace parameters
-
tablespace_encryption=<blank> or <text>, where
- blank = no encryption
- text like: encryption using 'AES256' default storage (encrypt)
-
tablespace_initial_size=10M
-
tablespace_autoextend=ON
-
tablespace_next_size=10M
-
tablespace_block_size=8K
-
-
#Logging level parameters
-
log_level=info
Logs the entire history of changes applied to the database. This is the default value.
-
log_level=debug
Logs the entire history of changes applied to the database along with additional debug information.
-
10.1.6 Create the Schema on Windows from the User Interface
-
Run the dbinstallerUI.bat file to invoke the user interface. You must run the file as an administrator.
The Database Installer dialog box appears.
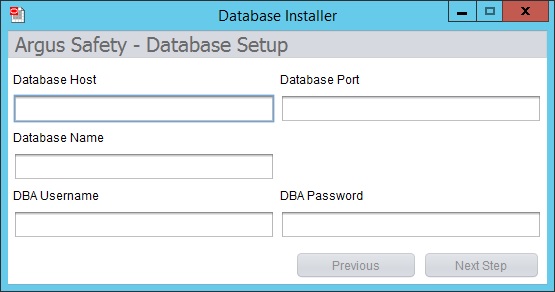
-
Enter the parameters and click Next Step.
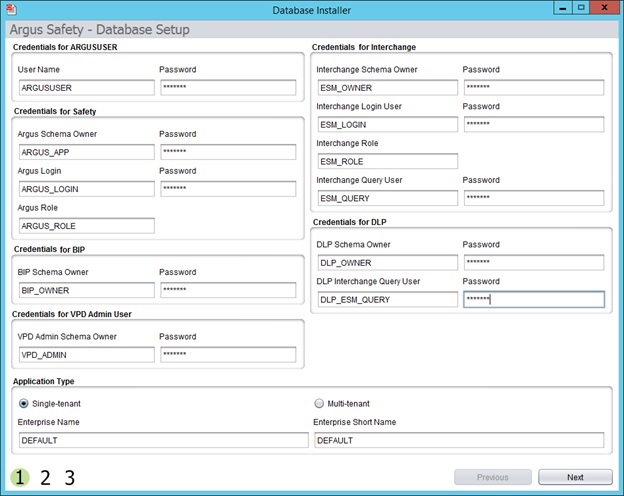
Argus Safety - Database Setup screen appears.
-
Enter the parameters, select the Application Type, and click Next.
-
Single Tenant—Select this option to allow the database to support only single tenant. The options to create multiple tenants in the safety system is disabled.
-
Multi-Tenant—Select this option to allow the database to support multiple tenants. Users are able to create multiple tenants using the Global Enterprise setup screens.
-
-
Create new tablespaces or use the existing tablespaces.
-
Under Complete Path and Data File Name, enter the database server path (complete path including the filename) where the data file is placed.
Instead of entering path for each tablespace, you can set up a common folder path. To do so, in the text box, enter the datafile folder path, and click Set Datafile Folder.

-
If the data file does not exist, the system creates a data file.
-
If the data file exists, to use the current data file, click Yes in the confirmation dialog box.
Note:
When you have existing tablespaces, you may use them; you are not required to create new ones. The system will not regenerate the tablespaces. -
Click Next.
-
-
Verify the Setup Parameters and click Execute.
When execution is complete, a message appears in the Execution Log on screen 3 - Liquibase Update Successful.
-
To view the execution status or errors, open the schema creation log file with the latest timestamp from <Argus Release Media>\Database\Argus Safety\logs.
10.1.7 Create the Schema on Windows from a Batch file
-
Make sure the dbinstaller.properties are set up correctly. (See Configure the Database Setup Properties File.)
-
From Start menu, select Run, type cmd, and click OK.
-
In the command prompt, go to the following path:
cd <Argus Release Media>\Database\Argus Safety
-
Type dbinstaller.bat and press Enter.
-
Monitor the execution log and progress on the running window.
-
To view the log file, go to <Argus Release Media>\Database\Argus Safety\logs.
10.1.8 Create the Schema on Linux or Unix
-
Make sure the dbinstaller.properties are set up correctly.
-
Copy the <Argus Release Media>\Database\Argus Safety folder in the Linux directory.
You must have privileges to execute and create files in this directory and /tmp directory.
-
Open a terminal, log in as the Argus Safety DBA user, and execute the following command:
cd <Argus Release Media>/Database/Argus Safety -
Type dbinstaller and press Enter.
-
Type the DBA user password and press Enter.
-
View logs in <Argus Release Media>/Database/Argus Safety/logs.
10.2 Post Fresh Install Steps
-
Log in to ARGUS_APP schema.
-
Verify that the common profile switch DATABASE_TIMEZONE is not empty by executing the following script:
select key, value from cmn_profile where key = 'DATABASE_TIMEZONE';
10.3 Oracle Text
Oracle Text search is an index-based querying solution that improves Duplicate Case search performance.
Argus Safety DB Installer checks whether Oracle Text is installed. If not, it displays an error message.
Before enabling Oracle Text, there must be enough free space available in the tablespace. If there is not enough free space available, a dialog box appears with the amount of space currently available (in megabytes).
Enable Oracle Text is part of the Create Schema Setup. When enabled, Oracle Text performs the following functions:
-
Estimates the tablespace size requirements and adjusts as required.
-
Populates existing cases in the Oracle Text duplicate search table for indexing. This process can take a few hours.
-
Creates the Oracle Text Index.
-
Creates the PDP job for delta updates.
-
Updates the CMN_PROFILE Key, ORA_TXT_SRCH_ENABLE, to a value of 1.
Note:
If Oracle Text is not installed and the Common Profile Switch is enabled, it would lead to an error when you run a search from the Argus Book-in screen.10.4 Validate Argus Safety Database
You must validate the database after installation.
Note:
If you are creating a fresh Argus Safety database, be sure the factory data is loaded before running the Schema Validation tool.10.4.1 Validate Argus Safety Database on Windows
-
From Start menu, select Run, type cmd, and click OK.
-
In the command prompt, go to the following location:
<Argus Release Media>\Database\Argus Safety\SchemaValidation
-
Type SchemaValidation.bat and press Enter.
-
Enter the following parameters:
-
TNSNAMES entry to connect to the Argus database: <ASDB>
-
DBA username in the Argus database: <argus_dba>
-
Password for the DBA user
-
Validation CTL file [Default VLDN_821.CTL]
-
Schema difference log file [Default SV_Schema_Diffs_asdb.log]
-
CTL loader log file [Default SV_CTLFile_asdb.log]
-
-
Check the log file for errors.
10.4.2 Validate Argus Safety Database on Linux or Unix
-
Copy the <Argus Release Media>\Database\Argus Safety folder in your Linux or Unix directory.
You must have privileges to execute and create files in this directory and /tmp directory.
-
Open a Linux or Unix terminal, and execute the following command:
cd <Argus Release Media>/Database/Argus Safety -
Type SchemaValidation and press Enter.
-
Type the DBA user password and press Enter.
-
View logs in <Argus Release Media>/Database/Argus Safety/logs.
10.5 Enable and Disable Data Lock Point (DLP)
DLP allows a periodic report to use case data as it looked as of a certain date in the past. DLP is a specific type of point-in-time query which runs against the Argus History schema in the Argus Safety database. Argus History, once it is enabled at the system level, records all revisions of all cases, allowing point-in-time queries such as DLP to retrieve case data as it was captured at a previous date.
10.5.1 Prerequisites
Before enabling or disabling DLP, make sure that:
-
no one is logged on to the Argus Safety database before beginning the enable or disable DLP procedure.
-
an Oracle Argus database instance is available.
-
a DBA-privileged user or a SYSTEM user account is available.
-
the dlpsetup.properties file is correctly updated.
10.5.2 Enable DLP
-
For Windows, execute the enableDLP.bat file from <Argus Release Media>\Database\Argus Safety\Utilities\DLP_Setup.
-
For Linux or Unix, execute the enableDLP shell script.
10.5.3 Disable DLP
-
For Windows, execute the disableDLP.bat file from <Argus Release Media>\Database\Argus Safety\Utilities\DLP_Setup.
-
For Linux or Unix, execute the disableDLP shell script.
Note:
Argus Case Save will not function in case any DLP trigger (s) starting with T_DLP_CASE exists in Argus application schema. This fail safe is to prevent any case data corruption in DLP Schema, in case any trigger is disabled.-
To check if DLP trigger is disabled, use the following SQL from Argus Application Login:
SELECT trigger_name FROM user_triggers WHERE trigger_name LIKE 'T_DLP_CASE%' AND status='DISABLED';
-
If all the triggers are enabled, check the value of CMN Profile Global Switch DLP_TRIGGER_ENABLED and update the value if it is 0:
SELECT key,value FROM cmn_profile_global WHERE key ='DLP_TRIGGER_ENABLED' ;

UPDATE cmn_profile_global SET value = 1 WHERE key ='DLP_TRIGGER_ENABLED' AND value != 1;
COMMIT;
10.6 Enable DLP on a Specific Enterprise
You can enable DLP for:
-
a specific enterprise merged from a non-DLP system to a DLP enabled multi-tenant Argus Safety system.
-
delta cases merged into an existing enterprise of a DLP enabled multi-tenant or single-tenant Argus Safety system.
10.6.1 Set Up the Base Database
-
Set up an Argus Safety 8.2.1 multi-tenant or single-tenant database.
Enable DLP on the Argus Safety 8.2.1 database by executing the enableDLP.bat file. This sets up the initial DLP infrastructure on the Argus database for all existing enterprises.
-
Validate the schema by executing the SchemaValidation.bat file. Use the compatible CTL file.
If any MISSING object exists in schema validation log, fix it before proceeding to the next step.
-
Populate new Argus Safety cases into the existing enterprise of a DLP enabled multi-tenant or single-tenant Argus Safety system from a non-DLP system.
Or, create new enterprise in a DLP enabled multi-tenant Argus Safety system using data migration or merge to multi-tenant utility.
10.6.2 Enable DLP on Specific Enterprise or Delta Cases
To enable DLP on a specific enterprise or delta cases in a specific enterprise, make sure that you use the correct login credentials and set up the appropriate enterprise context.
-
Extract the custom DLP Enable Enterprise Specific script from the following location into a machine's local folder where Argus Safety 8.2.1 is installed:
<Argus Release Media>\Database\Argus Safety\Utilities\DLP_Enable_Enterprise_Specific
-
Double-click DLP_Enable_Enterprise.bat from:
<Argus Release Media>\Database\Argus Safety\Utilities\DLP_Enable_Enterprise_Specific\Argus\DLP\
This batch file execution handles the following scenarios to populate DLP data on newly created Argus Safety cases:
-
process all cases merged in Argus Safety system due to creation of new enterprise by merge process
-
process of delta cases merged in an enterprise due to any migration activity
-
-
Enter a name and location for the log file.
For example, DLP_Enable_Enterpirse_Specific.log
-
Enter values at the prompts.
A confirmation message appears.
-
Press Enter.
The values you entered are displayed.
-
Verify that the details entered are correct and press Enter.
-
Check the log file for errors. If there are errors, the execution process pauses. Fix the errors and continue the process from another SQL window.
-
Check the log file to see if there are any Argus Safety cases missing in DLP.
<Argus Release Media>\Database\Argus Safety\Utilities\DLP_Enable_Enterprise_Specific\Argus\DLP\DLP_ENABLE_Missing_Cases_in_DLP_log.log
10.6.3 Validate the Schema
After enabling DLP Enterprise Specific to Argus Safety 8.2.1, validate the schema by double-click on the SchemaValidation.bat file located in the <Argus Release Media>\Database\Argus Safety\SchemaValidation folder.
Extra objects related to table DLP_ENABLE_CASE_HISTORY are ignored in schema validation log file.
The following table and related objects are ignored in Schema Validation if Argus Safety 8.2.1 DLP Enabled system with DLP_Enable_Enterprise_Specific scripts is applied:
-
Owner—DLP
-
Table—DLP_ENABLE_CASE_HISTORY
-
Index—PK_DLP_ENABLE_CASE_HISTORY
-
Reason for extra object—Objects are part of Enable DLP Enterprise Specific implementation.
10.7 Copy Configuration Data (Optional)
The Copy Configuration Tool allows you to copy configuration data from one Argus Safety database to another.
10.7.1 Set Up the Copy Configuration Tool
-
The Copy Configuration Tool creates a database directory in order to execute. Make sure to create a physical directory on the database server where export and import dump files are created and copied respectively. The physical path of these directories is required while performing the export and import.
-
Validate Schema on the source database using SchemaValidation.bat file.
Make sure that there are no extra or missing objects exist in Schema Validation log file. Messages for extra custom objects created should be ignored.
-
Copy the Copy Configuration Tool utility files recursively from <Argus Release Media>\Database\Argus Safety\Utilities\Copy_Config to the C:\CONFIG_EXP_IMP folder.
10.7.2 Use the Copy Configuration Tool
-
Export the source database by running the batch file and following the prompts:
C:\CONFIG_EXP_IMP\Data_ExportConfigOnly.bat
-
Copy ArgusSecureKey.ini (working with source database) from the .\Windows folder, and save it with generated source database file.
In case you do not have ArgusSecureKey.ini, follow the steps listed in the Section 19.2.6, "Reset the Environment if ArgusSecureKey.ini is Lost."
-
Move the dump files generated on the source Database Server (physical path provided while performing the export) to the target Database Server (physical path where import will be done).
-
To perform the import on the client machine, in the Directory Path on DB Server where dump files are placed for import parameter, use the same folder as entered in the DB Directory Path for export dump files while executing the export process for logs.
Or move the contents of the export logs folder provided to the Directory including full path for log/script files parameter while executing the export process, in the folder being used for the import process for log generation.
-
Create a new database (with or without TDE enabled) using the dbinstallerUI.bat or dbinstaller.bat file.
-
Import into the target database by running the batch file, and follow the prompts:
C:\CONFIG_EXP_IMP\Data_ImportConfigOnly.bat
Ignore any "ORA-28101: policy already exists" errors.
-
Validate Schema on the target database executing the SchemaValidation.bat file.
-
Copy ArgusSecureKey.ini from the source database folder and paste it in the .\Windows folder of application server(s) which are intended to be used with the target database.
10.8 Create Argus Safety Read-only Database Account (Optional)
-
From the command prompt, run the batch file:
<Argus Release Media>\Database\Argus Safety\Utilities\Create_Readonly_User
-
Enter the following parameters and follow the instructions provided in the script.
-
TNS name of Safety database.
-
DBA user in the above specified database.
-
Password of the DBA user.
-
New read-only user to be created.
-
Password for the read-only user.
-
New read-only role to be created.
-
Note:
This is not a requirement to install and run Argus Safety. This is an optional script that can be used to create the read-only account for any external interface you may have that needs read-only access to the data.