9 Setting Up the Security System
This section contains the following topics:
See also:
-
"Designing a Security System" in the Oracle Life Sciences Data Hub Implementation Guide.
-
Managing Database Account Privileges for Generic Visualization Business Areas
-
"Managing User Groups" in the Oracle Life Sciences Data Hub User's Guide
About Security in the Oracle Life Sciences Data Hub
Before using the Oracle Life Sciences Data Hub (Oracle LSH), you must set up Oracle LSH security. You can continue to add to and modify security components as necessary over time. The basic tasks for setting up security are:
-
Create a user account for each user and assign one or more application roles to each user account. Application roles allow access to part or the whole of the Oracle LSH user interface or grant blinding privileges. See "Setting Up User Accounts".
-
Assign specialized administrative roles to a few users. Each of these administrators must then perform a specific task: set up the classification system, create Domains to contain and organize objects, grant blind break and unblind privileges, or add users to user groups. See "Setting Up Specialized Administrators".
-
Set up a security system for defined objects and outputs. See "Designing a Security System" in the Oracle Life Sciences Data Hub Implementation Guide for information on how to design a security system for the contents of the Life Sciences Data Hub: defined objects, outputs, and through them, data. Instructions are included in this chapter for creating the necessary subtypes, user groups, and object roles, and assigning roles to subtypes and user groups. See "Setting Up Object Security".
Figure 9-1 shows how these tasks relate to each other. The tasks are described in detail in the subsequent sections.
Required Roles To perform most of the tasks described in this chapter, you must be assigned either the LSH Security Administrator role or one of its component roles: LSH Function Security Administrator (for assigning administrative or other application roles to users) or LSH Data Security Administrator (for setting up object security.) Information on assigning these roles is included in the "Create System Administrator and Security Administrator Users" section in the chapter on installing Oracle LSH in the Oracle Life Sciences Data Hub Installation Guide.
Creating user accounts is done through a standard Oracle Applications UMX user interface, and you need the UMX sysadmin role to create user accounts.
Figure 9-1 Flowchart of Security Administrator Tasks
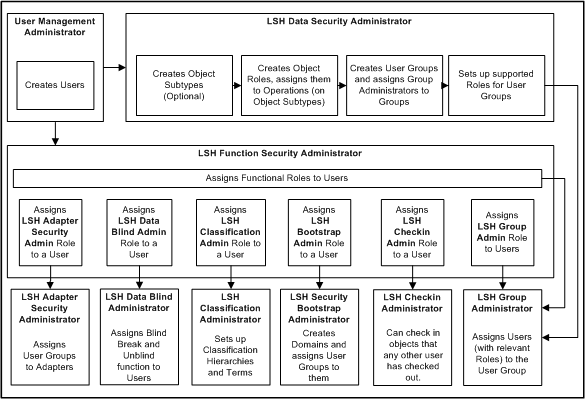
Description of ''Figure 9-1 Flowchart of Security Administrator Tasks''
About Security in Oracle Health Sciences Data Management Workbench
Oracle Health Sciences Data Management Workbench (Oracle DMW) is installed on top of Oracle LSH and uses its security system, which is itself based in part on the Oracle Applications (Oracle E-Business Suite) security system. For introductory information, see the chapter on administration in the Oracle Health Sciences Data Management Warehouse User's Guide.
To set up Oracle DMW security:
-
Assign specialized administrative roles to a few users to create Domains to contain and organize studies, grant blind break and unblind privileges, and add users to user groups. See "Setting Up Specialized Administrators".
-
Create user accounts for all users, including application roles for all users; see "Creating User Accounts" and "Assigning Application Roles".
-
Create user groups; see "Creating and Maintaining User Groups".
-
Assign object security roles to user groups. You can use shipped roles created for use with Oracle DMW or modify them as required.
See the appendix "Predefined Roles" in the Oracle Health Sciences Data Management Warehouse User's Guide for more information.
-
Assign users to object security roles within user groups; see "Adding Supported Roles to User Groups".
-
Assign user groups to objects in Oracle DMW; see the Oracle Health Sciences Data Management Warehouse User's Guide.
Setting Up User Accounts
This section contains the following topics:
About Users
Every person who will use Oracle LSH or Oracle DMW must have a user account. A user account includes:
-
The user's name and other information; see "Creating User Accounts".
-
One or more application roles. These predefined roles determine which parts of the Oracle LSH or Oracle DMW user interface a user can see and manipulate. See "Assigning Application Roles".
You use the Oracle Applications UMX interface for creating user accounts and assigning application roles.
To reach the User Management screens, log in to Oracle LSH as sysadmin and then select the User Management responsibility. For further information see "Create System Administrator and Security Administrator Users" in the chapter on installing Oracle LSH in the Oracle Life Sciences Data Hub Installation Guide.
Note:
For complete information, see the Oracle® E-Business Suite System Administrator's Guide - Security athttp://download.oracle.com/docs/cd/B53825_08/current/acrobat/121sasg.pdf.Note:
The system prevents you from modifying your own user account; the account you used to log in.Creating User Accounts
System Administrators and Security Administrators can create user accounts in the system.
To register a user:
-
Log in as the system administrator.
-
Select User Management from the Navigator drop-down or from the Home page, then click Users. The Oracle User Management User Maintenance screen appears.
-
In the Register drop-down, select External Organization Contact and click Go.
-
Enter values in the following fields:
-
Email. The user's email address. Oracle LSH uses this address for corresponding with the user to reset passwords and send notifications.
-
Name Fields. Enter the name of the user in the fields. The First Name and the Last Name are mandatory. Prefix, Middle Name and Suffix are optional.
-
Organization. Enter or search for the Organization to which the user belongs.
Note:
You must set up the list of allowed values as a post-installation step for Oracle Applications. See the Oracle® E-Business Suite System Administrator's Guide - Security athttp://download.oracle.com/docs/cd/B53825_08/current/acrobat/121sasg.pdf. -
Phone Number. The telephone contact details of the user.
-
Account Information--Password. If you select Generate Automatically, the system generates and emails the password to the email account you specified for the user.
If you select Enter Manually you must type and confirm the password an inform the user what it is. The user will have to reset the password in either case.
Note:
You can set the minimum length and other requirements for passwords; see Chapter 3, "Setting Profile Values".
-
-
Click Submit. The Confirmation screen appears.
-
Click OK. The system creates the user and returns to the User Management screen.
Maintaining User Accounts
In the User Maintenance screen, search for the user you want to update and click the corresponding Update icon. After you make the relevant changes, click Apply to save them or click Cancel to discard the changes.
Name Fields Type the name of the user in the fields. The First Name and the Last Name are mandatory. Prefix, Middle Name and Suffix are optional.
Email Address The user's email address. Oracle LSH uses this address for corresponding with the user.
Active From The date the user account becomes active.
Active To The date the user account becomes inactive and the user can no longer use Oracle LSH. Leave this field blank to keep the user account active indefinitely. Enter an end time when the user leaves the company.
Roles See "Assigning Application Roles".
Contact Information You can only view the user's contact information.
Assigning Application Roles
To assign an application role to a User:
-
In the User Maintenance screen, search for the user to whom you want to assign Roles.
-
Click the Update icon corresponding to the User. The Update User screen appears.
-
In the Roles subtab, click Assign Roles. The Search and Select screen appears.
-
Search for all Oracle LSH predefined roles by selecting Search By Role, entering
LSH%, and clicking Go. The system displays all the predefined Oracle LSH application roles in the lower part of the screen.For an explanation of application-type application roles required for using Oracle LSH, see "Oracle Life Sciences Data Hub Application Roles" and "Oracle Health Sciences Data Management Workbench Application Roles". For an explanation of administrative-type application roles, see "Setting Up Specialized Administrators".
-
Select each role you want to assign by selecting its check box.
-
Click Select. The system adds the roles to the user and the Update User screen appears.
-
You must enter a justification for assigning each role to the user.
-
Click Apply. The system assigns the roles to the user and returns to the User Maintenance screen.
Oracle Life Sciences Data Hub Application Roles
Users need one or more of the predefined application roles to perform their work in Oracle LSH. The predefined nonadministrative Oracle LSH application roles follow. For descriptions of the administrative roles, see "Setting Up Specialized Administrators".
LSH Application User The role on which all other application roles are based.
LSH Consumer Users assigned the LSH Consumer role have access to the Home and Reports tabs in the user interface. Assign this role to users who need to retrieve information from Oracle LSH and/or run Oracle LSH applications to load and transform data. Oracle LSH object security determines which operations these users are allowed to perform on particular applications and reports.
LSH Definer Users assigned the LSH Definer role have access to the same tabs as the LSH Consumer, plus the Applications tab. Assign this role to users who must build, test, or validate Oracle LSH applications. Oracle LSH object security determines which operations these users are allowed to perform on particular defined objects and outputs.
LSH Data Blind Break User Only the LSH Data Blind Administrator can assign this role to users. This role does not provide access to any tabs in the user interface. Users assigned to this role typically also have the LSH Consumer role.
Users with this application role can do the following, if they have normal object security access and the blinding-related object security privilege noted:
-
Run a job on Tables with a Blinding Status of Blinded that displays the real data, not the dummy data (also requires an object security role with the Blind Break operation on Table instances)
-
View the output(s) generated by a job run on real, blinded data (also requires an object security role with the Blind Break operation on outputs)
LSH Data Unblind User Only the LSH Data Blind Administrator can assign this role to users. This role does not provide access to any tabs in the user interface. Users assigned to this role typically also have the LSH Consumer role.
Users with this application role can do the following, if they have normal object security access and the blinding-related object security privilege noted:
-
Permanently unblind data in Table instances (also requires an object security role with the Unblind operation on Table instances)
-
Change the status of an output from Blinded to Unblinded (also requires an object security role with the Unblind operation on outputs)
-
Note:
The LSH Data Unblind User application role is not required in conjunction with the Read Unblind operation on either Table instances or outputs. Users can have an object security role that includes the Read Unblind operation on Table instances (to run a job on unblinded Table instances) and/or outputs (to view the results of such a job) without having the LSH Data Unblind User application role as well.
XMLP Roles You can assign the BI Publisher roles (XML Publisher is the old name for Oracle BI Publisher) to Oracle LSH Definers to enable them to create or use Oracle LSH BI Publisher Programs. See "Assigning Application Roles in Oracle LSH" for more information.
Note:
These predefined roles and composite roles should be sufficient for your needs. However, it is possible to create custom composite roles. See the Oracle® E-Business Suite System Administrator's Guide - Security athttp://download.oracle.com/docs/cd/B53825_08/current/acrobat/121sasg.pdf.)Oracle Health Sciences Data Management Workbench Application Roles
Each user must have at least one of the following application roles to access the Oracle DMW user interface.
DMW_STUDY_MANAGER is intended for users who run data loads, transformations, and validation checks. It provides access to the Home, Study Configuration, Listings, and Discrepancies pages.
Users with this role can create, modify, and remove studies in the Home page.
DMW_STUDY_CONFIG is intended for users who set up studies by defining models, transformations, and validation checks. It provides access to the Home, Study Configuration, Listings, and Discrepancies pages.
Users with this role can create, modify, and remove studies in the Home page.
Note:
There is no functional difference between the application roles DMW_STUDY_MANAGER and DMW_STUDY_CONFIG.DMW_STUDY_CONSUMER is intended for users who need to review data and raise discrepancies. It provides access to the Home, Listings, and Discrepancies pages.
DMW_LIB_ADMIN is intended for users who create and modify library models and code lists. It provides access only to the Library page.
DMW_SYS_ADMIN is intended for users who do administrative tasks including setting up data sources and defining objects used across studies, such as categories, flags, and tags. It provides access only to the Administration tab.
Note:
In addition, some Oracle DMW users should have blinding-related privileges in order to view blinded data and/or unblind data. This requires both a blinding-related application role-- LSH Data Blind Break User or LSH Data Unblind User--and blinding-related object security privileges through a role in a user group assigned to the object, plus normal object security access to the object. For more information about blinding data in Oracle LSH, see the Oracle Life Sciences Data Hub Implementation Guide and the Oracle Life Sciences Data Hub Application Developer's Guide.Setting Up Specialized Administrators
As part of setting up Oracle LSH, the Security Administrator needs to assign the following administrative application roles to users. Each of these administrators has special privileges and responsibilities as follows:
LSH Adapter Security Admin The LSH Adapter Security Admin role is required to see the Adapter Security subtab of the Security tab and to assign user groups to Adapter Domains and Adapter Areas. See Chapter 2, "Setting Up Adapters to External Systems" for further information.
LSH Classification Admin The Classification Administrator creates and maintains classification hierarchies and terms. See Chapter 8, "Setting Up the Classification System" for more information.
LSH Data Blind Admin The Data Blind Administrator is responsible for assigning the Blind and Unblind application roles to users. See "LSH Data Blind Admin" in the Oracle Life Sciences Data Hub Implementation Guide for more information.
LSH Data Security Admin The Data Security Administrator sets up security for defined objects.
LSH Checkin Admin The Checkin Administrator can check in objects checked out by any user, provided he or she also has the Modify object security privileges for the object. This is required if the user who has checked out the object becomes unavailable for some reason. Note that a Checkin Administrator can install Reports Sets, and Work Areas that contain objects checked out by other users.
LSH Function Security Admin The Function Security Administrator assigns functional roles to users.
LSH Groups Admin Users with this role can be designated the Group Administrator of a user group. This role allows them to see the Groups Administration subtab under the Security tab, which is required for assigning users to user groups. See "Creating User Groups" for more information.
LSH Security Admin The Security Administrator role includes both the LSH Function Security Admin role's functions and the LSH Data Security Admin role's functions. Instructions for setting up the first user with this role are included in the "Create System Administrator and Security Administrator Users" section in the chapter on installing Oracle LSH in the Oracle Life Sciences Data Hub Installation Guide.
LSH Security Bootstrap Admin This Administrator is responsible for creating Domain and assigning user groups to the Domains. See instructions for creating Domains in "Applications User Interface" of the Oracle Life Sciences Data Hub Application Developer's Guide.
LSH System Admin The LSH System Administrator can run the post-installation job and define service locations and services. Instructions for setting up the first user with this role are included in the "Create System Administrator and Security Administrator Users" section in the chapter on installing Oracle LSH in the Oracle Life Sciences Data Hub Installation Guide.
LSH Super User The LSH Super User has access to all user interface tabs in LSH: Home, Applications, Reports, Classification, Security, and Administration, as well as the Oracle Applications user and role screens. The Super User role does not include the Bootstrap role or the blinding-related roles.
To create an Administrator:
-
Log in as the Security Administrator.
-
Create a user account. See "Creating User Accounts".
-
Assign one of the administrative application roles (listed above) to the user. See "Assigning Application Roles".
XMLP Admin The XMLP Admin has administrative privileges in Oracle BI Publisher. Assign this role to an Oracle LSH Administrator who needs to perform administrative tasks (manage /delete reports and folders) in Oracle BI Publisher.
Setting Up Object Security
This section contains the following topics:
Your company must design a security system that meets its particular needs. For information, recommendations, and examples of security system design, see "Designing a Security System" in the LSH Implementation Guide.
Each time a user tries to perform an operation on a defined object, the system runs a check that compares the security privileges of the user with the security requirements of the object.
A user can operate on an object only if both these conditions are met:
-
The user belongs to an active user group that is assigned to that object, either explicitly or through inheritance.
-
The user has a role in that user group that permits the operation on the object's subtype.
The Oracle Life Sciences Data Hub Implementation Guide has information on designing an appropriate set of object subtypes, roles, and user groups to meet your company's needs. This section contains the instructions for actually creating these things in Oracle LSH.
Creating and Maintaining Object Subtypes
This section contains the following topics:
See also:
Assigning Subtype Operations to Roles and Modifying Assignments
Oracle LSH includes a set of predefined object types, such as Tables, Programs, Report Sets, and Variables. Each of these object types has a predefined set of all possible operations that can be performed on objects of that type.
To allow you greater flexibility as you set up your security system, Oracle LSH bases object security on subtypes rather than the predefined object types. You can define different subtypes—for example, Clinical and Financial—for one or more object types and define different classification and security requirements for each subtype of the same object type. Object subtypes have the same predefined set of operations as their object type. Oracle LSH ships with one default subtype for each object type. If you do not wish to add the flexibility (and complexity) of subtypes to your design, you can use the predefined subtype only.
Defining additional subtypes is optional.
When a Definer creates an object, he or she must select an object subtype on which to base the object. The object has the classification and security requirements defined for the selected subtype.
When the Definer creates an object, the system checks the subtype of the parent object and, if a subtype with the same name is defined for the new object, uses that subtype for the new object. If the new object does not have a subtype with the same name, the system uses the predefined Default subtype. The Definer can change it as necessary.
For further information, see "Designing a Security System" in the LSH Implementation Guide. For information on using subtypes in classification, see "Assigning Levels to Object Subtypes".
Creating Object Subtypes
To create a new object subtype, go to the Subtype subtab of the Security tab and do the following:
-
In the Manage Subtype screen, choose either Operation or Role from the View Subtypes drop-down list.
-
Choose Role if you have created a new role and want to add multiple operations to it at the same time. This is the more common situation.
-
Choose Operation if you want to add multiple roles to a single operation on the subtype at the same time.
-
-
Click the node (+) icon in the Manage column of the object type for which you want to add a Subtype. The Create Subtype screen appears.
-
Enter a name for the Subtype (required, maximum 60 characters). You do not need to include the name of the Object Type in the Subtype name.
-
Click Apply. The system creates the Subtype and the Manage Subtype screen reappears. The new Subtype is automatically created as:
-
Not Active; not available for use in object definition.
-
Not the Default; when a Definer creates an object of this type, this Subtype is not the default Subtype of the new object. See "Default Subtype Behavior" below for further information.
To change either the Active or Default setting, click the pencil icon in the Update column.
-
Default Subtype Behavior The subtype you set as the default here is not necessarily the one that all new objects of this type default to. Instead, when a user creates a new object, the system reads the subtype of the object's parent, and if the new object has a subtype with the same name as the parent's, the system creates the new object with the same subtype as its parent. If not, the system uses the default subtype.
For example, if a user creates a new Program instance in a Work Area, and the Work Area's subtype is Clinical, the system checks whether there is a Program instance subtype called Clinical. If there is, the system creates the new Program instance with a subtype of Clinical. If Program instances do not have a subtype called Clinical, the system creates the new Program instance with the subtype defined as the default for Program instances.
The user can change the subtype manually.
Modifying Object Subtypes
To modify a Subtype, click the corresponding Update icon in the Manage Subtype screen.
You can modify the following Subtype characteristics:
-
Name
-
Is Active. If selected, this Subtype is available for use during definition of objects of this Object Subtype.
-
Is Default. If selected, this is the default Subtype for objects of this Object Subtype.
Creating and Maintaining Object Security Roles
This section contains the following topics:
A role consists of a name, description, and a set of operations allowed on object subtypes. Users in a user group that have access to a particular object will be able to perform the operations on the types of objects specified by the role(s) they have in the user group.
Predefined roles intended for use with Oracle Health Sciences Data Management Warehouse (Oracle DMW) are shipped with Oracle LSH. These roles appear in the Oracle LSH Manage Roles page. Although they were created for use with Oracle DMW, you can also use these roles in Oracle LSH user groups either as they are or with any modifications you choose. Additional privileges are required to perform Oracle LSH tasks on objects that do not exist in Oracle DMW.
You can also define your own roles for either Oracle LSH or Oracle DMW. See "Designing a Security System" in the Oracle Life Sciences Data Hub Implementation Guide for information on designing a set of roles.
Creating Object Security Roles
To create a Role:
-
In the Security tab, click Roles. The Manage Roles screen appears.
-
Click Create. The Create Role screen appears.
-
Enter values in the following fields:
-
Role Name. Enter a unique name for the role to be displayed in the Oracle LSH user interface.
-
Code Value. Enter a unique code for the role to be used internally by Oracle LSH.
-
Description. Enter a description of the role to help group administrators decide if they want to assign the role to a particular user in their user group.
-
-
Click Apply. The Manage Roles screen appears. You can query for the role by name to check that it was created successfully.
-
Set it to Active so that it is available for use.
-
In the Manage Roles screen, query for the role. The role appears.
-
Click the icon in the Update column. The Update Role screen appears.
-
Select Is Active and click Apply. You can assign subtype operations only to Active roles.
-
-
Assign operations on object subtypes to the role. Users assigned to the role within a user group will be able to perform the operations you specify on the object subtypes you specify. See "Assigning Subtype Operations to Roles and Modifying Assignments" for instructions.
Modifying Object Security Roles
In the Manage Roles screen, click the corresponding Update icon to modify a particular Role. After you make the relevant changes, click Apply to save them or click Cancel to discard the changes.
You can modify the following characteristics:
-
Role Name. You can change the name of the role that appears in the Oracle LSH user interface.
-
Description. You can change the description that appears in the Oracle LSH user interface.
-
Is Active. If selected, you can assign the role to operations on object subtypes and a user group administrator can assign the role to a user in his or her user group.
Assigning Subtype Operations to Roles and Modifying Assignments
This section contains the following topics:
Subtype operations are predefined. They are the same as the predefined operations on their object type. You must assign at least one role to each operation; if no roles are assigned to the operation, no one will be able to perform the operation on objects of that subtype.
Users who are assigned to a particular role can perform operations on the subtype that are assigned to the same role, if the user is assigned to the role in the context of an active user group assigned to the object.
See "Designing a Security System" in the Oracle Life Sciences Data Hub Implementation Guide for information on how Oracle LSH security uses Roles and Operations.
In the Subtypes subtab in the Administration tab, you can see the relationship of roles to object operations two ways. Make your choice in the View Subtype By drop-down list:
-
Choose Operation to add a new role to operations or to add multiple roles to a single operation on a subtype at the same time.
-
Choose Role if you have already assigned the role to operations and want to view or modify the role's assignments.
Assigning Roles to Operations
To assign roles to operations, go to the Subtype subtab of the Security tab and do the following:
-
Select Operation from the View Subtype By drop-down list.
-
Expand the node (+) of the object type. All the subtypes appear.
-
Expand the node (+) of the object subtype. All the subtype's operations appear.
-
Click the icon in the Manage column of the operation to which you want to assign or remove a role. The Add Role(s) to Operation screen appears.
-
Double-click on a role in the Available Roles column to move it into the Selected Roles column and assign it to the role. Or move it from Selected Roles to Available Roles to remove the assignment.
You can also select multiple roles by using Shift+Click or Control+Click and use the arrows to move one, a few, or all at once to the column in the shuttle.
You can change the order of the operations using the Up and Down arrows on the right. The display order has no functional effect.
-
Click Apply. The system assigns the role(s) to the operation on the subtype and the Manage Subtype screen appears.
Modifying Operation Assignments to Roles
To modify assignments, go to the Subtype subtab of the Security tab and do the following:
-
Select Role from the View Subtype By drop-down list.
-
Expand the node (+) of the object type. All the subtypes appear.
-
Expand the node (+) of the object subtype. All the roles currently assigned to any operation on the subtype appear.
-
Click the icon in the Manage column of the role whose assignments you want to modify. The Add Operation for Role screen appears.
-
Double-click on an operation in the Available Operations column to move it into the Selected Roles column and assign it to the role.
You can also select multiple operations by using Shift+Click or Control+Click and use the arrows to move one, a few, or all at once to the column in the shuttle.
You can change the order of the operations using the Up and Down arrows on the right. The display order has no functional effect.
-
Click Apply. The system adds the operations to the role for the subtype and the Manage Subtype screen appears.
Notes on Particular Object Types
Some object types require some explanation:
-
Execution Setups. To delete or modify an Execution Setup, a user must also have Modify privileges on the object instance that owns the Execution Setup. Therefore, any role you assign to Remove or Modify Execution Setups, you should also assign to Modify the type executable object whose Execution Setup it can remove or modify.
-
Adapter Domains and Adapter Areas. These include all the same operations that Domains and Application Areas have. However, only view operations on some objects are required; see "Creating Roles with the Required Operations for Adapters".
Creating and Maintaining User Groups
This section contains the following topics:
User groups control the access of users to objects and outputs (and through them, to data). A user has access to an object only if he or she belongs to a user group that is assigned to the object, either explicitly or through inheritance. See "User Groups" in the Oracle Life Sciences Data Hub Implementation Guide for further information.
A user group definition consists of a name, description, and a set of object security roles supported by the group (available for assignment to users within the group). Each group must also have an assigned Group Administrator.
You may require the same or very similar user groups, with the same or different users, assigned to different objects. For example, you might have a Study01 user group assigned to your Study01 Application Area. Study02, which has its own Application Area, might require a user group with exactly the same set of roles as Study01. Oracle LSH allows you to copy a user group either with or without users. You can then modify the name or roles assigned as necessary. The Group Administrator can add and remove users and/or change their roles within the copied group.
Group Administrator tasks, adding roles to a group and assigning users to a group and to roles within the group, are covered in "Managing User Groups" in the Oracle Life Sciences Data Hub User's Guide.
Creating User Groups
To create a new user group:
-
In the Security tab, click User Groups. The Manage User Groups screen appears.
-
Click Create. The Create User Group screen appears.
-
Enter values in the following fields:
-
Group Name
-
Description
-
Is Active. If selected, you can assign the user group to an object subtype.
-
-
Click Apply. The Manage User Group screen appears.
You must assign at least one role to a user group. See Step 5 of "Adding Supported Roles to User Groups".
Adding Supported Roles to User Groups
The roles you add to a user group become available for the Group Administrator to assign to users within that user group.
To add roles to a user group:
-
In the Security tab, click User Groups. The Manage User Groups screen appears.
-
Type the name of the user group for which you want to add roles in the user group box.
-
Click Search. All the user groups matching the search criteria appear.
-
Click the required user group. The Group screen appears.
-
Click Add and Remove Role. The Add a Default Role to Group screen appears.
-
Double-click on a role in the Available Roles column to move it into the Selected Roles column.
You can also select multiple Roles by using Shift+Click or Control+Click and use the arrows to move one, a few, or all at once to the column in the shuttle.
You can change the order of the Roles using the Up and Down arrows on the right.
-
Click Apply. The system assigns all the roles displayed in the Selected Roles column to this user group and returns to the Group screen.
Note:
You must assign a Group Administrator to every user group. See "Assigning a Group Administrator to the User Group".Assigning a Group Administrator to the User Group
The Group Administrator is responsible for adding and removing users to a particular user group, and changing users' role assignments within the group.
You must have the LSH Security Admin or LSH Function Security Admin role to assign the LSH Group Admin role to a user.
To assign a Group Administrator to a user group:
-
Select the Life Sciences Data Hub responsibility in the navigator and click the Users Groups subtab. The Manage User Groups screen appears.
-
Search for and select the required group.
-
Click Expand All. All the supported roles appear.
-
Click the Add User icon corresponding to the LSH Group Administrator role. The Search and Select Users to Add to Role screen appears.
-
Search for and select the users who need to be LSH Group Administrators for this User Group.
-
Click Select. The system assigns the LSH Group Administrator role to the selected users and the Group screen appears.
Note:
Group Administrators must have the Group Admin application role assigned. See Assigning Application Roles.
Duplicating User Groups
You can create copies of a user group in two ways. Either you can duplicate only the user group definition with its supported roles or you can duplicate the definition with its supported roles and also the users assigned to it and their role assignments. When you duplicate a user group, the system appends 'Copy of' to the name of the user group. For example, if you duplicate a user group named Study01 User Group, the system names the new user group Copy of Study01 User Group.
Duplicate Definition with Roles Only To duplicate only the user group definition with its roles:
-
In the Security tab, click User Groups. The Manage User Groups screen appears.
-
Enter a search string—the name of the user group you want to duplicate in the User Group box or text with the wildcard %, or leave blank to retrieve all user groups.
-
Click Go. All the user groups matching the search criteria appear.
-
Click the Select check box corresponding to the required user group.
-
Click Duplicate with Roles. The system creates a copy of the user group and the Manage User Groups screen appears.
Duplicate Definition with Roles and Users To duplicate the definition with its roles and assigned users:
-
In the Security tab, click User Groups. The Manage User Groups screen appears.
-
Type the name of the user group you want to duplicate the User Group box.
-
Click Search. All the user groups matching the search criteria appear.
-
Click the Select check box corresponding to the required user group.
-
Click Duplicate with Roles, Users. The system creates a copy of the user group and the Manage User Groups screen appears.
Modifying User Groups
In the Manage User Groups screen, click the corresponding Update icon to modify a particular User Group. After you make the relevant changes, click Apply to save them or click Cancel to discard the changes.
You can modify the following characteristics:
-
Group Name
-
Description
-
Is Active. If selected, you can assign the User Group to an Object Subtype.
You can also add and remove Roles from the User Group; see "Adding Supported Roles to User Groups".
Granting Security Access to APIs
In order to run any of the public APIs for Oracle LSH from outside Oracle LSH, a user must have the Execute privilege granted on the API package cdr_pub_api_initialization.
To grant this privilege to a user, do the following:
-
Log in to SQL*Plus on the Oracle LSH database.
-
Enter:
Grant execute on cdr_pub_api_initialization touser_name;