3 Customizing with RDC Configurations
A configuration is a collection of settings that customizes certain features in the RDC application. For example, the configuration settings let you hide the group verify option, customize the Links label, and set the default highlighting scheme for the Data Entry window.
Using the RDC Administration application, you create a configuration, define its settings, and then assign the configuration to one or more users. When a user logs in to the application, RDC checks the assignments and loads the correct configuration for that user.
Configurations give you the power to make features available depending on users, the studies they access, and their user role.
This chapter includes the following topics:
3.1 About the RDC Configurations
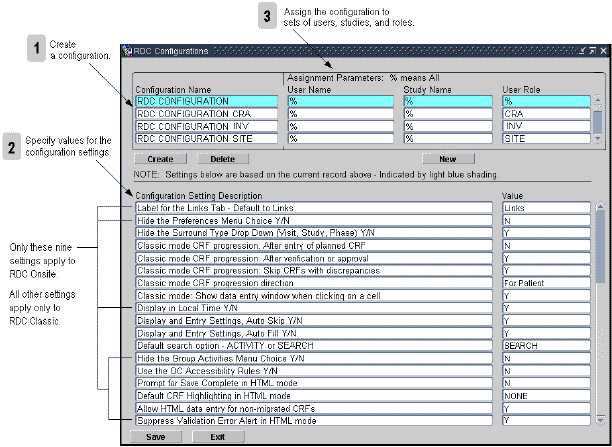
Using the RDC Configurations form in the RDC Administration application, you can create one or more configurations. Figure 3-1 shows the RDC Configurations form and summarizes the key steps to creating and assigning configurations.
The settings in a configuration let you:
-
Specify whether to show or hide the options for changing preferences, for performing group verifications, and for performing group approvals
-
Specify whether to show or hide the Save Complete prompt and the Validation Error alert
-
Customize the label for the Links section on the home page, the display of time stamps, and the default highlighting scheme for the Data Entry window
-
Configure how RDC uses Oracle Clinical rules and entered CRFs
After you create a configuration and define its settings, you use the assignment parameters to assign the configuration to one user, several users, or all users. You assign a configuration based on a combination of user name, study name, and user role.
When a user logs in to the application, RDC checks the assignments and loads the correct configuration for that user.
3.1.1 Default Configurations
Table 3-1 lists the default configurations available after you install RDC.
Table 3-1 Default Configurations for RDC
| Configuration Name | Description |
|---|---|
|
RDC CONFIGURATION |
Default settings for users, if no other configuration is appropriate. |
|
RDC CONFIGURATION CRA |
Default settings for the Clinical Research Associate (CRA) role. |
|
RDC CONFIGURATION INV |
Default settings for the investigator role. |
|
RDC CONFIGURATION SITE |
Default settings for the site user role. |
3.1.2 Assignment Parameters
When a user logs in to the application, RDC uses the three assignment parameters to apply the correct configuration:
-
User Name
-
Study Name
-
User Role
Description of the illustration ''rdc_config_assgnmnts2.gif''
3.1.2.1 Default Value (%) for Assignment Parameters
The percent sign (%) is a wildcard character meaning include all. For example, % in the User Name field includes all user names.
The default value for each assignment parameter is the percent sign (%).
3.1.2.2 Assigning Configurations
After you create a new configuration and define its settings, you assign the configuration to one user, several users, or all users. You can make more than one assignment to a configuration. The configuration uses the same name and the same settings, but the assignment parameters are different for each instance of the configuration.
For example, you can have many instances of a configuration named RDC CONFIGURATION CRA, as long as at least one assignment parameter for each instance is different. See Table 3-2.
Table 3-2 Unique Assignments to the Same Configuration
| Configuration Name | User Name | Study Name | User Role |
|---|---|---|---|
|
RDC CONFIGURATION CRA |
% |
% |
CRA |
|
RDC CONFIGURATION CRA |
% |
STUDY03 |
% |
|
RDC CONFIGURATION CRA |
% |
STUDY11 |
% |
|
RDC CONFIGURATION CRA |
JSMITH |
% |
% |
|
RDC CONFIGURATION CRA |
JDOE |
% |
% |
Based on the assignments defined in Table 3-2, RDC assigns the RDC CONFIGURATION CRA under the following circumstances:
-
To all users assigned the CRA role, regardless of the study they access
-
To all users who access STUDY03 or STUDY11, regardless of their assigned role
-
To users JSMITH and JDOE, regardless of the study accessed or their assigned role
3.1.2.3 Precedence and Parsing of Assignment Parameters
When a user starts a session, RDC uses the three assignment parameters to apply the correct configuration. RDC parses the assignment parameters for all configurations in the following order:
-
First by user name
-
Then by study name
-
Finally by user role
In other words, study takes precedence over role, and user takes precedence over study and role. As soon as it matches one of the parameters to the user, RDC assigns the corresponding configuration to the user.
For example, suppose you set up the configurations listed in Table 3-3.
Table 3-3 Example of Precedence and Parsing of Assignment Parameters
| Configuration Name | User Name | Study Name | User Role |
|---|---|---|---|
|
RDC CONFIGURATION STUDY03 |
% |
STUDY03 |
% |
|
RDC CONFIGURATION JDOE |
JDOE |
% |
% |
Note that the first configuration, RDC CONFIGURATION STUDY03, is set for all users of any role who access Study03. The second configuration, RDC CONFIGURATION JDOE, is set for the user, JDOE.
When JDOE accesses Study03, the RDC CONFIGURATION JDOE configuration takes precedence because it corresponds at the user name level, and RDC loads that configuration. If another user starts a session and accesses Study03, RDC loads RDC CONFIGURATION STUDY03.
In a similar manner, the default configurations that are installed with RDC (see Table 3-1) are invoked based on the role associated with each user:
-
If the user is assigned the CRA, INV, or SITE user role, RDC uses the associated configuration.
-
If the user is not associated with one of these roles, RDC uses the RDC CONFIGURATION, which is the default configuration.
3.2 Managing RDC Configurations
To manage and customize configurations for the RDC application, you need to know how to:
-
Open and use the RDC Configurations form
-
Create a new configuration
-
Assign configurations to users
-
Delete assignments and configurations
3.2.1 Opening and Using the RDC Configurations Form
The RDC Configurations form (see Figure 3-1) lists the current configurations, along with the settings and assignments defined for the each configuration.
To open the RDC Configurations form:
-
Open the RDC Administration application.
-
Select Maintain, and then select Configurations.
Tips for working with the RDC Configurations form:
-
You can enter and execute queries to view a subset of the configurations, users, studies, or roles. Press F7 to enter a query; press F8 to execute the query. You can use the wildcard character (%) when entering queries.
-
You can use the menu, the toolbar icons, and the keyboard to access commands. Open the Help menu and then select Key Definitions to view a description of the available keyboard commands.
-
Once you position the cursor in an input field, you can press F9 to display the list of valid values for that field. Alternatively, you can use the menu command, the toolbar icon, or the List of Values button to display the valid values for a field.
3.2.2 Creating a New Configuration
Recall that a configuration is a collection of settings that control which features of the RDC application a user can view or access. The settings customize the RDC features and functionality available to the users who are assigned to the configuration.
When you create a new RDC configuration, you specify a unique name for the configuration. In addition, you specify an existing configuration on which to base your new configuration.
Your new configuration:
-
Inherits the configuration settings from the base configuration you select. You can change the settings for your new configuration at any time without affecting the settings of the selected base configuration.
-
Is automatically assigned to all users, all studies, and all roles. (That is, the assignment parameters are set to the percent sign (%) wildcard, which is the default value and means ALL.) You can change the default assignment. You can also create a variety of new assignments for your configuration.
To create a new configuration:
-
Open the RDC Administration application.
-
Select Maintain, and then select Configurations.
-
Click Create.
-
Complete the Create New Configuration dialog box as follows:
-
Enter a unique text string for the name of your configuration.
-
Click the Based on field and then select an existing configuration from the list to use as the base for your new configuration.
You can leave the field blank or select DEFAULT to base your new configuration on the default configuration named RDC CONFIGURATION.
-
-
Click OK.
-
Click Yes to create the new configuration. The system inserts your new configuration into the Configuration Name list.
Once you create a new configuration, you need to:
-
Specify the settings for the configuration. See Section 3.2.3, "Specifying the Settings for a Configuration" for details.
-
Modify the default assignment parameters to assign the configuration to one, some, or all users. See Section 3.2.4, "Assigning Configurations to Users" for details.
-
3.2.3 Specifying the Settings for a Configuration
When you change the settings of a configuration, the change affects all users assigned to that configuration.
To change the settings in a configuration:
-
Open the RDC Administration application.
-
Select Maintain, and then select Configurations.
-
Select the configuration whose settings you want to change. Enter and execute a query, if necessary, to search for the configuration.
-
Scroll through the Configuration Settings list and modify the values relevant to RDC. You can press F9 to view a list of valid values for the selected field.
For a description of each setting and its valid values, see Section 3.3, "Configuration Settings for RDC."
-
Save your changes.
3.2.4 Assigning Configurations to Users
After you create a new configuration and define its settings, you assign the configuration to one user, several users, or all users. When a user logs in to the application, RDC checks the assignments and loads the configuration assigned to that user.
You use the User Name, Study Name, and User Role fields to define and modify the assignments for a configuration. You can:
-
Modify the existing assignments for a configuration.
-
Create new assignments for a configuration. Creating new assignments lets you assign the same configuration to different sets of users.
3.2.4.1 Modifying the Existing Assignments for a Configuration
By default, the system automatically assigns a newly-created configuration to all users, all studies, and all roles. Note that the User Name, Study Name, and User Role fields are set to the percent sign (%) wildcard, which is the default value and means ALL.
After you create a new configuration, you should modify the default assignments.

Description of the illustration ''rdc_config_assgnmnts_def.gif''
To modify the existing assignments for a configuration:
-
Open the RDC Administration application.
-
Select Maintain, and then select Configurations.
-
Place the cursor on the row of the configuration you want to modify. Enter and execute a query, if necessary, to search for a subset of configurations.
-
Select the Assignment Parameters fields to modify.
-
Click the List of Values button or press F9 to view a list of valid values for the selected field. Use the Find field, if necessary, to search for a subset of the values.
-
Select an appropriate value from the list.
-
Click OK to insert the value into the parameter field.
-
Save your changes.
3.2.4.2 Creating New Assignments for an Existing Configuration
Recall that you can make more than one assignment to a configuration. The configuration uses the same name and the same settings, but the assignment parameters are different for each instance of the configuration.
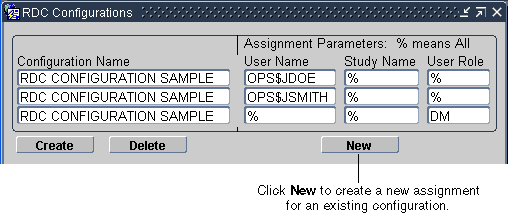
For example, suppose you create the RDC CONFIGURATION SAMPLE and define the settings for that configuration. You now want to assign that configuration of settings to JDOE, JSMITH, and all data managers. You click the New button to create a new set of assignment parameters.
For each new assignment that you create, the system inserts another instance (row) of the original configuration into the Configuration Name list and sets all the assignment parameters to the default value (that is, %). You can then change the assignment parameters for that instance.

Description of the illustration ''rdc_config_assgnmnts2.gif''
If a configuration has multiple assignments, the configuration is listed multiple times on the RDC Configurations form. Note, however, that as you move from row to row of the same configuration, the values for the configuration settings are the same. The settings apply to the configuration. Changes you make to the settings apply to all users assigned to the configuration.
Note:
Before you can specify new assignments for an existing configuration, at least one of the assignment parameters associated with the existing configuration must be set to a non-default value (that is, cannot be set to the % sign).To specify new assignment parameters for an existing configuration:
-
Open the RDC Administration application.
-
Select Maintain, and then select Configurations.
-
Click New to open the New Assignment Parameters dialog box.
-
Select an existing configuration for which you want to create new assignment parameters. Your new assignment parameters are in addition to any sets of parameters already defined for the configuration.
-
Click OK.
-
Click Yes. Note that the system inserts another instance of the original configuration into the Configuration Name list and sets all the assignment parameters to the default values (that is, %).
-
Modify the assignment parameters.
-
Save your changes.
3.2.5 Deleting Assignments and Configurations
When you delete a configuration, you delete one instance of the configuration and its assignments. If you made multiple assignments to the same configuration, you delete each one individually.
You cannot delete the default configuration, RDC CONFIGURATION.
To delete one instance of a configuration and its assignments:
-
Open the RDC Administration application.
-
Select Maintain, and then select Configurations.
-
Place the cursor in the row you want to delete.
-
Click Delete.
-
Click Yes to confirm the delete and automatically save your changes.
3.2.6 RDC Configurations in the Oracle Clinical Reference Local Codelists
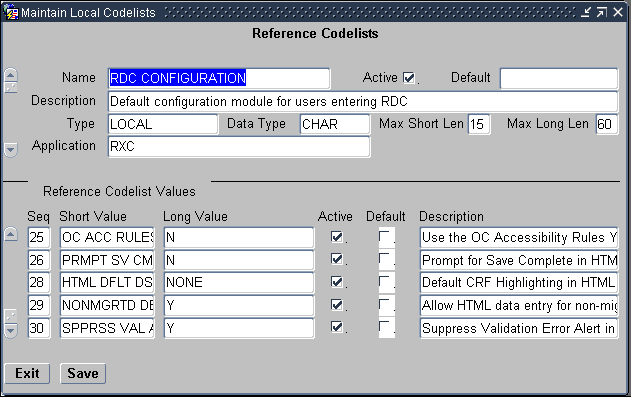
When you create a new RDC configuration, the system also creates a new local reference codelist in Oracle Clinical. The local codelist has the following name:
RDC CONFIGURATION identifier
where identifier is the unique text string you entered in the Create New Configuration dialog box.
The local codelist has the same configuration settings as the RDC Configurations form. You can update the settings in either location.
Description of the illustration ''cdelst_rdc_config.gif''
3.3 Configuration Settings for RDC
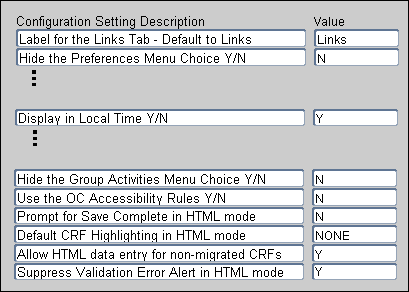
The RDC Configurations form has many settings. This section describes only the settings applicable to RDC. See Figure 3-2.
Figure 3-2 Configuration Settings Applicable to RDC
Description of ''Figure 3-2 Configuration Settings Applicable to RDC''
3.3.1 Customizing the Label for the Links Section on the Home Page
The Label for the Links Tab configuration setting lets you customize the title of the Links section on the Home page. For example, you may want to change the title to More Study Information or Helpful Web Sites.

Description of the illustration ''config_set_linkstitle.gif''
You can enter any combination of alphabetic, numeric, and special characters for the title. If you do not specify a value, RDC uses Links.
In addition, you can configure and customize the links that display in the Links section by using the Maintain Links form in the RDC Administration application. See Chapter 11, "Configuring Links" for more information.
3.3.2 Hiding the Preferences Links
The Hide the Preferences Menu configuration setting determines whether RDC displays the Preferences links in the page header and footer, and in the Data Entry window.
-
Preferences link in the page header and footer. If the link is available, the user can customize the number of items to display in lists, the format of dates, and the time zone to use when displaying time stamps.
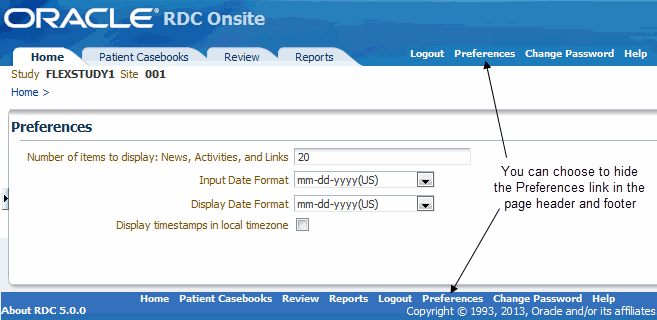
Description of the illustration ''rdc_config_prefdb_lbl.gif''
-
Preferences link in the Data Entry window. If the link is available, the user can customize whether to show or hide the Save Complete prompt and the Validation Error Alert prompt.
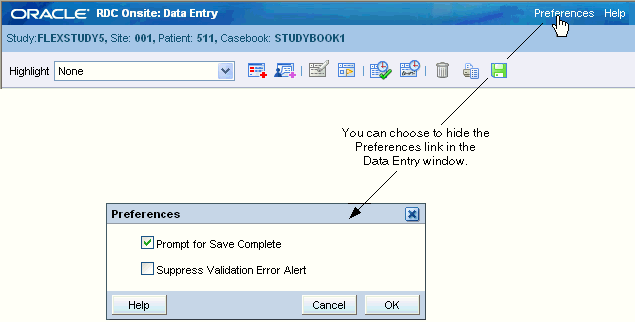
Description of the illustration ''rdc_config_prefs_dew.gif''
If you set the Hide the Preferences Menu configuration setting to N, the Preferences links are available. Note that when the links are available, users can change the value you defined for the following configuration settings:
-
Display in Local Time
-
Prompt for Save Complete in HTML Mode
-
Suppress Validation Error Alert in HTML Mode
Preferences remain in effect for the current session or until the user switches to another study. The next time the user logs in, RDC loads the assigned configuration and your defined settings. If you do not want the user to be able to change the preferences, set the Hide the Preferences Menu configuration setting to Y.
3.3.3 Displaying Time Stamps in Local Time
The Display in Local Time configuration setting affects only the display of time stamps for events such as when the CRF was last modified, verified, approved, or locked. If you set this value to Y, users see time stamps adjusted to their local time zone.
Note that this setting:
-
Does not affect the format RDC uses to record time stamps in the database. RDC always stores time stamps according to the time zone of the database server.
-
Does not affect the format of the time stamp entered as part of CRF data entry.
-
Does not affect the format of the Last Refresh time displayed in the session information.
If the Preferences link is available in RDC, a user can open the Preferences page and then select the Display timestamps in local timezone check box to change the setting for the current session. To prevent users from setting preferences, you can hide the Preferences link. See Section 3.3.2, "Hiding the Preferences Links" for information.
3.3.4 Allowing CRF Group Actions
In RDC, the Multi Patient Casebooks page, the Single Patient Casebooks and the Review CRFs page can include several options that let the user:
-
Verify a group of CRFs
-
Approve a group of CRFs
-
Update the custom review status for a group of CRFs
The Hide the Group Activities Menu configuration setting determines whether RDC hides or shows the group verification and approval options.
-
If you set this value to Y, RDC hides the group verification and approval options.
-
If you set this value to N, RDC displays the group verification and approval options.
This setting only controls the ability to verify or approve a group of CRFs (that is, the group verification and approval options). Users with the appropriate VERIFY and APPROVE privileges are still able to verify and approve an individual CRF from the Data Entry window.
For details about other options on the Group Verify and Group Approve screens, see the section "Options in Group Verify Dialog" and "Options in Group Approve Dialog" in the Oracle Clinical Administrator's Guide.
3.3.5 Using the Oracle Clinical Accessibility Rules
When a CRF becomes accessible, Oracle Clinical runs validation and derivation procedures against that CRF during batch validation or in RDC, during site validation, during patient validation, or when you save the CRF.
Ordinarily, RDC marks a CRF as accessible whenever you perform a Save Complete on the CRF.
However, if you are running a paper study or a hybrid study, you may need to apply Oracle Clinical accessibility rules. In Oracle Clinical, if a study requires Pass 2 Data Entry, Oracle Clinical does not mark the CRF as accessible until Pass 2 is complete. If a study does not require two passes, Oracle Clinical marks the CRF as accessible when Pass 1 is complete (Entry Complete).
-
If Use the OC Accessibility Rules is set to N, when a CRF becomes Entry Complete, RDC marks the CRF as accessible and runs the ONLINE/DCM procedures when the CRF is saved. In addition, Oracle Clinical also processes the CRF during the next batch validation.
-
If Use the OC Accessibility Rules is set to Y and the study requires two passes, RDC does not mark the CRF as accessible until the CRF reaches a status of Pass 2 Complete. As a result, the ONLINE/DCM procedures are not run until the CRF reaches a status of Pass 2 Complete.
-
If Use the OC Accessibility Rules is set to Y and the study does not require two passes, the behavior is the same as if there is no accessibility setting. When a CRF becomes Entry Complete, RDC marks the CRF as accessible and runs the ONLINE/DCM procedures when the CRF is saved. In addition, Oracle Clinical also processes the CRF during the next batch validation.
3.3.6 Disabling the Save Complete Prompt
The Prompt for Save Complete in HTML Mode configuration setting lets you give users the chance to save a CRF as data complete or data incomplete.
It may be convenient to allow users to save a CRF in an incomplete status. When a CRF is saved incomplete, responses are saved to the database, but no validation procedures are executed and no prompt for change reason is issued when data is updated. Saving a CRF as incomplete implies that the user is not yet finished inputting responses and that the user intends to complete the CRF at a later time.
If Prompt for Save Complete in HTML Mode is set to Y, RDC displays a dialog box that lets the user click Save Incomplete or Save Complete to save the CRF.
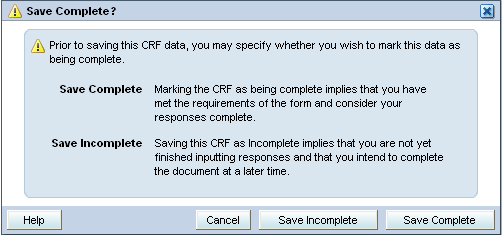
Description of the illustration ''rdc_config_svecomp.gif''
If you always want CRFs to be saved in a complete status, specify N for this setting. In this case, RDC displays no prompt before saving the CRF. The user has no option to save the CRF as incomplete.
If the Preferences link is available in the Data Entry window, the user can control whether RDC prompts to save the CRF as complete or incomplete. If you do not want the user to be able to change the preferences, set the Hide the Preferences Menu configuration setting to Y. See Section 3.3.2, "Hiding the Preferences Links" for information.
3.3.7 Specifying a Default Highlighting Scheme for the Data Entry Window
In the Data Entry window, RDC uses color to highlight fields in a CRF that have discrepancies, investigators comments, an audit history, or changes since the last verification or approval.
You use the Default CRF Highlighting in HTML Mode configuration setting to specify the initial highlighting scheme for the Data Entry window.
Table 3-4 lists the valid values for the highlighting scheme. You can also position the cursor in the Value field on the RDC Configurations form, and then press F9 to select from the list of valid values.
Table 3-4 Valid Values for the Highlighting Scheme in the Data Entry Window
| Value | Description |
|---|---|
|
NONE |
Highlights no fields. |
|
ACTIVE_DISC |
Highlights all fields that have active discrepancies. |
|
OPEN_DISC |
Highlights all fields that have an open discrepancy. Open discrepancies include active and other discrepancies. |
|
CLOSED_DISC |
Highlights all fields that have closed discrepancies. (These are manually resolved discrepancies not system closed discrepancies). |
|
ALL_DISC |
Highlights all fields that have a discrepancy. |
|
INV |
Highlights all fields that have an investigator comment. |
|
AUDIT |
Highlights all fields that have an audit history. |
|
CHANGED_SINCE_LAST_VERIFY |
Highlights all fields that have changed since the last verification. Note that fields whose only update is an update to the investigator comment are highlighted. |
|
CHANGED_SINCE_LAST_APPROVE |
Highlights all fields that have changed since the last approval. Note that fields whose only update is an update to the investigator comment are highlighted. |
The user has these same options available in the Highlight field in the Data Entry window. The user can change the setting and choose to highlight different fields during a session. Once changed, the setting persists throughout the session until the user either changes the highlighting again or changes to another study. The next time the user logs in, RDC reverts to the default setting defined in the configuration.
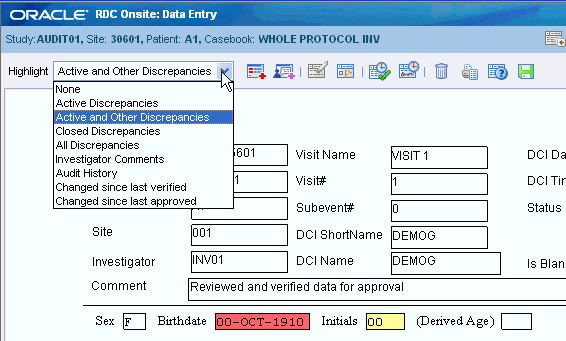
Description of the illustration ''dew_highlightscheme.gif''
3.3.8 Allowing Access to CRFs Entered via Oracle Clinical
The Allow HTML Data Entry for Non-migrated CRFs configuration setting affects how RDC treats CRFs that were entered via batch load operation, Oracle Clinical data entry, and you choose NOT to migrate those CRFs to DCI Forms.
-
If set to N, RDC prevents users from opening and updating those non-migrated CRFs.
-
If set to Y, RDC lets users open and update CRFs entered in Oracle Clinical, even if those CRFs have not been migrated to a DCI Form. (This assumes that a DCI Form exists for the DCI.)
You can control whether RDC displays a warning message when the user opens a non-migrated CRF. See Section 6.1.8, "Suppressing Prompts and Warnings" for more information.
3.3.9 Suppressing the Validation Error Alert
During data entry or data update, RDC checks the information for possible validation errors. RDC checks the data against the rules defined for the study in Oracle Clinical. For example, RDC can check if the data is the correct type (numeric, alphabetic, date), exceeds a maximum length, or matches a value in a discrete value group. If the data is incorrect, RDC displays an error message. Users have the opportunity to correct the data before continuing to the next field.
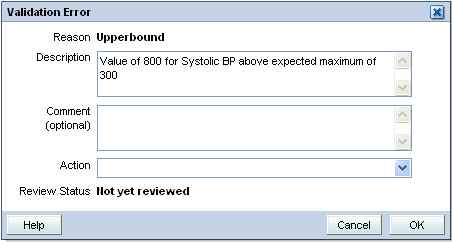
Description of the illustration ''rdc_config_val_promt.gif''
If the Suppress Validation Error Alert in HTML Mode configuration setting is set to Y, RDC does not display a message when a validation error occurs. Users can perform data entry without being interrupted by alerts when tabbing from a field where discrepant data has been entered.
Note:
When you suppress the validation error message, RDC still creates a discrepancy when the error occurs, but does not alert the user to the problem.If the Preferences link is available in the Data Entry window, the user can control whether RDC shows or hides the validation alert. If you do not want the user to be able to change the preferences, set the Hide the Preferences Menu configuration setting to Y. See Section 3.3.2, "Hiding the Preferences Links" for information.
3.4 Required Parameters in an rdcConfig.properties File
The rdcConfig.properties file contains global parameters for the RDC application and their attributed values. There are a number of properties that are required to be included in the rdcConfig.properties file and, of these properties, some may be edited to customize RDC.
A typical properties file in RDC should contain the parameters described in Table 3-5. The default values indicated are those set by the installer.
Table 3-5 Typical Parameters in an rdcConfig.properties File
| Property | Mandatory? | Default value | Description |
|---|---|---|---|
|
application_path |
Yes |
C:\opapps52 |
The path for the home folder of the application, OPA_HOME. This folder stores the bin folder with DCAPI DLL files and where the system creates the data entry log files if debugging is enabled. |
|
dataentry_cache_disk_path |
Yes |
C:\opapps52\rdc |
The location where data entry cache files are stored, if applicable. |
|
dataentry_cache_disk_size |
No |
Blank |
The maximum disk space allocated for data entry. |
|
dataentry_cache_distribute |
No |
Blank |
|
|
performanceprofile |
No |
Blank |
If the value is set to 1, performance profiling for data entry sever code is enabled. |
|
xhrdtime |
No |
Blank |
Attribute for storing the XHRD time value used by the JavaScript client. |
|
dataentry_service_request_timeout |
No |
6000 |
The number of seconds after which data entry commands time out. |
|
dataentry_reportlog_path |
Yes |
C:\opapps52\rdc\rlogs |
The path where the data entry report is stored. |
|
dataentry_log_path |
Yes |
C:\opapps52\rdc\logs |
The path where the data entry log is stored. If the application_path is set, then this path is not used and the log folder is created inside the home folder. |
|
dataentry_temp_path |
Yes |
C:\opapps52\rdc\temp |
The path where temporary data entry files are stored. |
|
rw_webservice_url |
No |
http://host-domain/reports/rwwebservice |
The URL of the report server web service, of the form host.domain:port. |
|
web_server_url |
No |
Blank |
The URL of the web server for CRF help. |
|
max_row_fetched |
No |
1000 |
The maximum number of rows that can be fetched from the database for one query. |
|
rdc_session_timeout |
No |
30 |
The number of minutes after which requests are timed out. |
|
jdbc_ds_name |
No |
jdbc/dbnameDS |
The default JNDI name of the data source to which RDC connects. |
|
crf_images_path |
No |
C:\opapps52\html\rdc\dcif_images |
The location where external images used for CRFs are stored. |
|
development_mode |
Yes |
0 |
Do not change this value. |
-
Navigate to the OPA_CONFIG_FOLDER as specified in the opa52 registry under HKEY_LOCAL_MACHINE > Software > Oracle.
-
Back up the rdcConfig.properties file.
-
Open the rdcConfig.properties file in a text editor.
-
Make changes as necessary.
Tip:
Do not use the Tab key while editing the file, use the space bar instead. Also, do not enter extra spaces either for parameters or values. Make sure that no trailing space is left for any parameter values unless otherwise required. -
Save the file.
-
Restart the OPA server for the changes to take effect. See "Restarting the OPA Server" for instructions.
