14 Generating Reports from the Command Line
In the RDC application, you can use the Reports page to define report parameters, and generate Patient Data Reports and Blank Casebook Reports. In addition, RDC includes a DOS command-line interface for generating either a Patient Data Report or a Blank Casebook Report from the command line.
Generating reports from the command line can be useful when producing electronic submissions for new drug applications (NDAs). Adding the commands to a batch file lets you generate many Patient Data Reports at once.
This chapter includes the following topics:
-
Section 14.1, "Configuring Desktop PDR for Report Generation"
-
Section 14.2, "Generating a Patient Data Report from the Command Line"
-
Section 14.3, "Generating a Blank Casebook Report from the Command Line"
14.1 Configuring Desktop PDR for Report Generation
For every desktop where a user must be able to generate Patient Data Reports or Blank Casebook Reports from the command line, you must:
-
Install the Java Runtime Environment (JRE)
-
Copy the desktoppdr folder and files to the appropriate location on each desktop
-
Copy and Configure the xdobookbinder.cfg File for Embedding Type 1 Fonts
-
Copy the xdobookbinder.cfg file to the JRE installation folder, and then modify the file to define the location of the PC's Windows directory
-
Edit settings in the RunPDR.cmd file and the RunBlankCasebook.cmd file to configure the user's environment
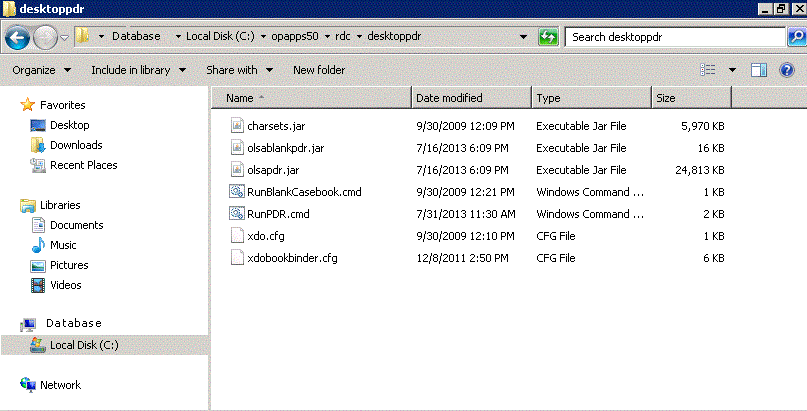
14.1.1 Contents of the desktoppdr Folder
During the installation of Oracle Clinical, the system creates a desktoppdr folder in the installation directory.
The desktoppdr folder has the following files:
-
charsets.jar, olsablankpdr.jar, and olsapdr.jar — Java ARchive (JAR) files containing the required class files for generating Patient Data Reports and Blank Casebook Reports.
-
RunBlankCasebook.cmd — Command file used to generate a Blank Casebook Report from the command line.
-
RunPDR.cmd — Command file used to generate a Patient Data Report from the command line.
-
xdobookbinder.cfg — Configuration file with information about the Arial font generation in the reports.
Figure 14-1 Sample PC Desktop Showing the desktoppdr Folder
Description of ''Figure 14-1 Sample PC Desktop Showing the desktoppdr Folder''
14.1.2 Installing the Java Runtime Environment
You must install the Java Runtime Environment (JRE) on the PC desktop if it is not already installed.
The desktop PDR supports Java SE 8 Update 111 (Standard Edition, Version 1.8.0.111) or later.
You can download the JRE from the Oracle Clinical launch page or from the Oracle Web site at this URL:
http://www.oracle.com/technetwork/java/javase/downloads/index.html
Check with the system administrator which method to use, if you are not sure.
14.1.3 Copying the Files in the desktoppdr Folder
Copy the desktoppdr folder and its files to the RDC directory on your PC desktop. For example:
C:\opapps52\rdc
In addition, you need to copy the xdobookbinder.cfg file from the desktoppdr folder to the directory where you installed the JRE. For more information, see Section 14.1.5.1, "Copying and Configuring the xdobookbinder.cfg File for Fully Embedding Fonts."
14.1.4 Copying and Modifying the xdo.cfg File
The xdo.cfg file stores system information about the Arial font, which is the font used by the Patient Data Report and the Blank Casebook Report.
During the installation of the Report Server component of Oracle Clinical, the system automatically creates and copies the xdo.cfg file to the following location:
middleware_home/jdk/jre/lib
In addition, any PC that will be used to generate reports from the command line must have a copy of the xdo.cfg file in the JRE installation directory on the desktop. You must also edit the file to define the location of the Windows directory.
To copy and modify the xdo.cfg file:
-
Copy the xdo.cfg file to the following directory where you installed the JRE on your PC desktop:
JRE_Install_Directory/jdk/jre/lib
-
Open the xdo.cfg file with a text editor.
-
Locate the following two lines in the file:
<truetype path="%OUI_WIN_DIR%\fonts\Arial.ttf" />
<truetype path="%OUI_WIN_DIR%\fonts\arialbd.ttf" />
-
Replace each occurrence of the %OUI_WIN_DIR% variable with the location of the Windows directory on your PC.
For example:
<truetype path="C:\WINDOWS\fonts\Arial.ttf" />
14.1.5 Embedding Fonts into the Patient Data Report
By default, when you generate a Patient Data Report, the system:
-
Does not embed any Adobe (Type 1) fonts.
-
Embeds a subset of the TrueType fonts—only those TrueType font characters that are actually used in the report.
When you use the RunPDR command to generate a Patient Data Report from the command line, you can specify the -cfg parameter to embed the full character set for the fonts used in the report. This may be required for official submissions. Additionally, embedding Acrobat fonts is required if you use Wingbat or Symbol characters. The system uses the information that you specify in the xdobookbinder.cfg file to determine the fonts to embed.
To embed fonts into Patient Data Reports, follow the steps presented in the following section, Copying and Configuring the xdobookbinder.cfg File for Fully Embedding Fonts.
14.1.5.1 Copying and Configuring the xdobookbinder.cfg File for Fully Embedding Fonts
The xdobookbinder.cfg file controls font embedding in the Patient Data Reports. When you install this patch, the system automatically copies the xdobookbinder.cfg file into the desktoppdr folder on the Application Server.
You must copy the xdobookbinder.cfg file to every PC that you will use to generate reports from the command line and embed fonts into the report PDF file. In addition, you must edit the xdobookbinder.cfg file to define the fonts to embed, the location of the Windows font directory, and the location of the Adobe font directory.
To copy and configure the xdobookbinder.cfg file for embedding fonts:
-
Copy the xdobookbinder.cfg file from the desktoppdr folder on the Application Server to the PC. You can copy the xdobookbinder.cfg file to any directory on the PC. You specify the location of the xdobookbinder.cfg file when you execute the RunPDR command.
-
Open the xdobookbinder.cfg file with a text editor.
-
Locate the following lines in the file and verify that the value of the process-font-substitution property is set to true:
<properties><property name="process-font-substitution">true</property></properties> -
To embed TrueType fonts, replace each occurrence of the %OUI_WIN_DIR% variable with the path to the Windows directory on this PC:
<font-substitute name="Arial"><truetype path="%OUI_WIN_DIR%\fonts\arial.ttf"/></font-substitute> -
To embed Wingbat or symbol characters, replace each occurrence of the %OUI_ADOBE_FONT_DIR% variable with the path to the Adobe fonts directory on this PC:
<font-substitute name="Symbol"><type1 pfb="%OUI_ADOBE_FONT_DIR%\Sy______.pfb" pfm="%OUI_ADOBE_FONT_DIR%\pfm\Sy______.pfm"/></font-substitute>Note that the Symbol and ZapfDingbats fonts are Adobe fonts, also called Type 1 fonts. . The fonts must be present on this PC and in the specified directory if you want to embed them into Patient Data Reports.
-
Save your changes.
Here is a sample of xdobookbinder.cfg file:
<config version="1.0.0" xmlns="http://xmlns.oracle.com/oxp/config/">
    <fonts>
       <!-- Core 14 PDF fonts -->
       <font-substitute name="Helvetica">
         <truetype path="c:\windows\fonts\arial.ttf"/>
       </font-substitute>
       <font-substitute name="Helvetica-Oblique">
         <truetype path="c:\windows\fonts\ariali.ttf"/>
       </font-substitute>
       <font-substitute name="Helvetica-Bold">
         <truetype path="c:\windows\fonts\arialbd.ttf"/>
       </font-substitute>
       <font-substitute name="Helvetica-BoldOblique">
         <truetype path="c:\windows\fonts\arialbi.ttf"/>
       </font-substitute>
       <font-substitute name="Times-Roman">
         <truetype path="c:\windows\fonts\times.ttf"/>
       </font-substitute>
       <font-substitute name="Times-Bold">
         <truetype path="c:\windows\fonts\timesbd.ttf"/>
       </font-substitute>
       <font-substitute name="Times-Italic">
         <truetype path="c:\windows\fonts\timesi.ttf"/>
       </font-substitute>
       <font-substitute name="Times-BoldItalic">
         <truetype path="c:\windows\fonts\timesbi.ttf"/>
       </font-substitute>
       <font-substitute name="Courier">
         <truetype path="c:\windows\fonts\cour.ttf"/>
       </font-substitute>
       <font-substitute name="Courier-Bold">
         <truetype path="c:\windows\fonts\courbd.ttf"/>
       </font-substitute>
       <font-substitute name="Courier-Oblique">
         <truetype path="c:\windows\fonts\couri.ttf"/>
       </font-substitute>
       <font-substitute name="Courier-BoldOblique">
         <truetype path="c:\windows\fonts\courbi.ttf"/>
       </font-substitute>
       <font-substitute name="Symbol">
         <truetype path="c:\windows\fonts\courbi.ttf"/>
       </font-substitute>
       <font-substitute name="Symbol">
         <type1 pfb="C:\windows\fonts\adobecore14\Sy______.pfb"
 pfm="C:\windows\fonts\adobecore14\pfm\Sy______.pfm"/>
       </font-substitute>
       <font-substitute name="ZapfDingbats">
         <type1 pfb="C:\windows\fonts\Zd______.pfb"
 pfm="C:\windows\fonts\Zd______.pfm"/>
       </font-substitute>
       <!-- Arial is not a core PDF font, but sometiimes used -->
       <font-substitute name="Arial">
          <truetype path="c:\windows\fonts\arial.ttf"/>
       </font-substitute>
       <font-substitute name="Arial,Italic">
         <truetype path="c:\windows\fonts\arial.ttf"/>
       </font-substitute>
       <font-substitute name="Arial,Bold">
         <truetype path="c:\windows\fonts\arial.ttf"/>
       </font-substitute>
       <font-substitute name="Arial,BoldItalic">
         <truetype path="c:\windows\fonts\arial.ttf"/>
       </font-substitute>
       <font-substitute name="ArialMT">
          <truetype path="c:\windows\fonts\arial.ttf"/>
       </font-substitute>
       <font-substitute name="Arial-ItalicMT">
         <truetype path="c:\windows\fonts\arial.ttf"/>
       </font-substitute>
       <font-substitute name="Arial-BoldMT">
         <truetype path="c:\windows\fonts\arial.ttf"/>
       </font-substitute>
       <font-substitute name="Arial-BoldItalicMT">
         <truetype path="c:\windows\fonts\arial.ttf"/>
       </font-substitute>
       <font-substitute name="Univers">
          <truetype path="c:\windows\fonts\arial.ttf"/>
       </font-substitute>
       <font-substitute name="UniversItalic">
         <truetype path="c:\windows\fonts\arial.ttf"/>
       </font-substitute>
       <font-substitute name="UniversBold">
         <truetype path="c:\windows\fonts\arial.ttf"/>
       </font-substitute>
       <font-substitute name="UniversBoldItalic">
        <truetype path="c:\windows\fonts\arial.ttf"/>
       </font-substitute>
       <!-- TrueType version of TimesNewRoman -->
       <font-substitute name="TimesNewRoman">
         <truetype path="c:\windows\fonts\times.ttf"/>
       </font-substitute>
       <font-substitute name="TimesNewRoman,Bold">
         <truetype path="c:\windows\fonts\timesbd.ttf"/>
       </font-substitute>
       <font-substitute name="TimesNewRoman,Italic">
         <truetype path="c:\windows\fonts\timesi.ttf"/>
       </font-substitute>
       <font-substitute name="TimesNewRoman,BoldItalic">
         <truetype path="c:\windows\fonts\timesbi.ttf"/>
       </font-substitute>
       <font-substitute name="TimesNewRomanPSMT">          <truetype path="c:\windows\fonts\times.ttf"/>        </font-substitute>        <font-substitute name="TimesNewRomanPS-BoldMT">          <truetype path="c:\windows\fonts\timesbd.ttf"/>        </font-substitute>        <font-substitute name="TimesNewRomanPS-ItalicMT">          <truetype path="c:\windows\fonts\timesi.ttf"/>        </font-substitute>        <font-substitute name="TimesNewRomanPS-BoldItalicMT">          <truetype path="c:\windows\fonts\timesbi.ttf"/>        </font-substitute>        <!-- Fonts used for W-2 -->        <font-substitute name="FranklinGothic-Demi">          <truetype path="c:\windows\fonts\framd.ttf"/>        </font-substitute>        <font-substitute name="Helvetica-Condensed">          <truetype path="c:\windows\fonts\arialn.ttf"/>        </font-substitute>        <font-substitute name="Helvetica-Condensed-Black">          <truetype path="c:\windows\fonts\arialnb.ttf"/>        </font-substitute>        <font-substitute name="HelveticaNeue-Bold">          <truetype path="c:\windows\fonts\arialbd.ttf"/>        </font-substitute>        <font-substitute name="HelveticaNeue-BoldItalic">          <truetype path="c:\windows\fonts\arialbi.ttf"/>        </font-substitute>        <font-substitute name="HelveticaNeue-Italic">          <truetype path="c:\windows\fonts\ariali.ttf"/>        </font-substitute>        <font-substitute name="HelveticaNeue-Roman">          <truetype path="c:\windows\fonts\arial.ttf"/>        </font-substitute>        <!-- For Canadian T-4A -->        <font-substitute name="ArialNarrow">          <truetype path="c:\windows\fonts\arialn.ttf"/>        </font-substitute>     </fonts>     <properties>         <!-- The below option can be set to true to adjust character layout,  but setting this option to true may affect page layout -->         <property name="replace-character-widths">false</property>         <!-- Set process-font-substitution=true when you want to process font  substitution in PDFBookBinder -->         <property name="process-font-substitution">true</property>     </properties>  </config>
Note:
The font embedding is configurable. Please set the following property to false in xdobookbider.cfg file if you do not want embedding, like this:<properties> <property name="process-font-substitution">false</property> </properties>
When you execute RunPdr command (see 13.2) you must include the -cfg parameter to specify the location of the xdobookbinder.cfg file on your PC. In addition, the fonts must be located on the same machine that you use to run the report.
For example:
RunPDR.cmd -st test3 -l D:\temp -u jsmith -cfg D:\pdr\xdobookbinder.cfg
14.1.6 Modifying the RunPDR.cmd File
To modify the RunPDR.cmd file:
-
Navigate to the desktoppdr folder on your PC.
-
Open the RunPDR.cmd file with a text editor.
-
Modify the following lines in the file:
-
set JAVA_CMD to the directory path where you installed the JRE. For example:
set JAVA_CMD=C:\Progra~1\Java\jre\bin\java -
set JAR_PATH to the directory path where you installed the JAR files (charsets.jar, olsapdr.jar, and olsablankpdr.jar). For example:
set JAR_PATH=C:\OLSAPDR -
set DB_CONNECT_STRING in the following format to specify the database connection:
host-name:port-number:database-sidFor example, if you have a database with sid, proddb, that is installed on the prodserver host machine at port number 1532, then you define your database connection string as follow:
set DB_CONNECTION=prodserver:1532:proddb -
In the command line, add the -Xms and the -Xmx options to set the initial and maximum amount of memory for the report generation. For example:
%JAVA_CMD% -classpath %CLASSPATH% -Xms64M -Xmx512M %JAV…For more information on these options, see Section 14.1.8, "Adjusting the Heap Size for the Java Virtual Machine (JVM)."
-
-
Save your changes.
-
Copy and rename the RunPDR.cmd file for every database that your users need to connect to and access. For example, if your users need to connect to a production database and a test database, create the following two new files: RunPDRprod.cmd and RunPDRtest.cmd.
-
Open each copy of the RunPDR.cmd file.
-
Modify the set DB_CONNECT_STRING parameter for each database connection.
-
Save your changes.
-
14.1.7 Modifying the RunBlankCasebook.cmd File
To modify the RunBlankCasebook.cmd file:
-
Navigate to the desktoppdr folder on your PC.
-
Open the RunBlankCasebook.cmd file with a text editor.
-
Modify the following lines in the file:
-
set JAVA_CMD to the directory path where you installed the JRE. For example:
set JAVA_CMD=C:\Progra~1\Java\jre\bin\java -
set JAR_PATH to the directory path where you installed the JAR files (charsets.jar, olsapdr.jar, and olsablankpdr.jar). For example:
set JAR_PATH=C:\OLSAPDR -
Use the following lines to specify the database connection:
set HOST=host-name
set PORT=port-number
set SID=database-sid -
In the command line, add the -Xms and the -Xmx options to set the initial and maximum amount of memory for the report generation. For example:
%JAVA_CMD% -classpath %CLASSPATH% -Xms64M -Xmx512M %JAV…For more information on these options, see Section 14.1.8, "Adjusting the Heap Size for the Java Virtual Machine (JVM)."
-
-
Save your changes.
-
Copy and rename the RunBlankCasebook.cmd file for every database that your users need to connect to and access. For example, if your users need to connect to a production database and a test database, create the following two new files:
-
RunBlankCasebookprod.cmd
-
RunBlankCasebooktest.cmd
-
-
Open each copy of the RunBlankCasebook.cmd file.
-
Modify the set HOST, set PORT, and set SID parameters for each database connection.
-
Save your changes.
-
14.1.8 Adjusting the Heap Size for the Java Virtual Machine (JVM)
Report generation may fail with an OutOfMemoryError message. This failure occurs when the Java program needs more memory than the amount currently allocated. As the number of pages in the Patient Data Reports and the Blank Casebook Reports increases, you may need to increase the JVM heap size accordingly.
To support large reports, use the following JVM options to specify the heap size:
-
Use the -Xms option to set the initial amount of memory allocated for the program.
-
Use the -Xmx option to set the maximum amount of memory that can be allocated for the program.
As a benchmark, Oracle has successfully generated a 4000-page report with an allocation of 4GB.
14.1.8.1 Adjusting JVM Heap Size Options for the Desktop
To adjust the heap size available for reports generated from the command line, you need to modify the RunPDR.cmd file (for Patient Data Reports) and the RunBlankCasebook.cmd file (for Blank Casebook Reports).
To adjust the heap size in the files:
-
Open the RunPDR.cmd file or the RunBlankCasebook.cmd file.
-
Locate the following line in the file:
%JAVA_CMD% -classpath %CLASSPATH% … -
Add the -Xms and -Xmx options to the line. For example:
%JAVA_CMD% -classpath %CLASSPATH% -Xms64M -Xmx512M %JAVA…Substitute the 64M value for the initial amount of memory to allocate, and the 512M value for the maximum amount of memory to allocate.
-
Save your changes.
14.1.8.2 Adjusting JVM Heap Size Options on the Reports Server
You can adjust the heap size available to reports generated from either the RDC or the Oracle Clinical application.
To adjust the heap size on the Reports Server:
-
Log in to Oracle Enterprise Manager 10g Application Server Control.
-
Click the name of the Reports Server (for example, oclw2k36) in the System Components table.
-
Click the Configuration link in the Administration section. The system opens the Configuration page and displays the Reports Engine Parameters section.
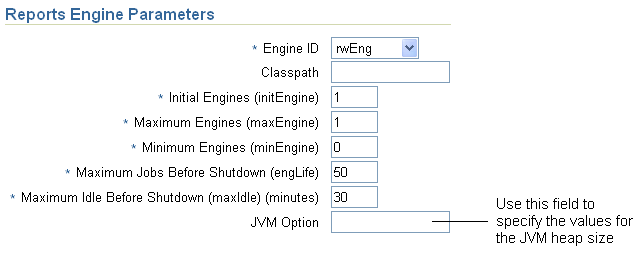
Description of the illustration ''pdr_heapsize01.gif''
-
Click the JVM Option field. Set the appropriate values for the JVM heap size options as follows:
-Xms64M -Xmx512M
Substitute the 64M value for the initial amount of memory to allocate, and the 512M value for the maximum amount of memory to allocate.
-
Click OK to save your changes. The system prompts for confirmation to restart the Reports Server now.
-
Click Yes. You must restart the Reports Server before your changes to the JVM heap size will take effect.
When the system confirms that the Reports Server has been restarted, click OK.
14.2 Generating a Patient Data Report from the Command Line
You can generate a Patient Data Report by issuing the RunPDR command from the Microsoft Windows command line.
You enter the RunPDR command in the following format:
RunPDR.cmd -st study [-si study_site] [-p patient] [-bk DCI_Book]
-l folder_location -u user [-pw password] [-aud] [-disc] [-debug] [-trace] [-nobm] [-o orientation] -cfg xdobookbinder_location [-test]
For example:
RunPDR.cmd -st test3 -l D:\temp -u jsmith -cfg D:\pdr\xdobookbinder.cfg
14.2.1 Displaying the Command Syntax
To display the syntax for the command:
-
Type RunPDR on the command line.
-
Press Enter.
14.2.2 Parameters for the RunPDR Command
Table 14-1 describes the required and optional parameters for the RunPDR command.
Table 14-1 Parameters for the RunPDR Command
| Parameter | Required? | Description |
|---|---|---|
|
-st study |
Yes |
Runs the Patient Data Report for the specified study. The system produces a separate PDF report file for each patient. |
|
-si study_site |
No |
Runs a report for all patients currently assigned to the specified study site. If you do not specify a site, the system runs the report for all patients assigned to those study sites that your user role has privileges to access. The system produces a separate PDF report file for each patient. |
|
-p patient |
No |
Runs a report for the specified patient only. If you do not specify a patient, the system runs a report for all patients in the specified study and sites. |
|
-bk DCI_Book |
No |
Denotes the DCI Book (casebook) to use for any CRF that was not entered against a casebook. Note that:
|
|
-l folder_location |
Yes |
Specifies the directory where the system saves the PDF file created for each report, and the log files created during the generation of the report. In addition, the system uses this directory to write the debug information if you include the -debug parameter on the command line. The directory that you specify must already exist. If the directory does not exist, the command fails and displays an error message that the folder is invalid. |
|
-u user |
Yes |
Specifies your user name for logging in to the Oracle Clinical database. |
|
-pw password |
No |
Specifies your password for logging in to the Oracle Clinical database. When you use this parameter, your password is visible on the screen. If you do not use this parameter, the system prompts you for your password. Asterisks mask your password as you type it. For security reasons, Oracle recommends that you do not specify your password directly on the command line. |
|
-aud |
No |
Includes change history for individual responses. In addition, if the DCI Form Settings Include Approval Information and Include Verification Information are set to Note: The verification history appears only if the user generating the report has one or more of the Verify privileges (BROWSE_VERIFY, BROWSE_SDVPLAN, UPDATE_SDVPLAN, or VERIFY). |
|
-disc |
No |
Includes discrepancy information in the report. |
|
-debug |
No |
Leaves data in temporary tables and outputs files to the directory that you specified with the -l folder_location parameter. This data is useful when working with customer support to debug an issue. After you resolve the issue and the debug information is no longer necessary, be sure you truncate the temporary pdr_temp and pdr_superscripts tables. |
|
-trace |
No |
Turns on database trace and creates a trace file during the execution of the report. Trace data is useful when debugging performance problems. The system saves the trace file in the directory specified in the init.ora file of the database. Check with your database administrator for the location. |
|
-nobm |
No |
Does not create the bookmarks or a table of contents for the report. |
|
-o orientation |
No |
Denotes the orientation of the pages in the cover, table of contents, ancillary data sections, and appendixes. Valid entries are:
|
|
-test |
No |
Runs the report in test mode for test data. The report uses provisional DCI form versions in place of active ones when the provisional versions exist. |
|
-cfg xdobookbinder_location |
No |
Location (path, excluding file name) of xdobookbinder configuration file. If executing command line PDR from a client, provide the xdobookbinder configuration file as a parameter to ensure that all fonts are correctly embedded in the PDR and similar output with similar fonts is generated when compared to the report output generated from Oracle Clinical and RDC. If you omit to provide the parameter from the command line, the PDR report output could use different fonts compared to the output generated from the application server. See "Copying and Configuring the xdobookbinder.cfg File for Fully Embedding Fonts". |
|
rdci |
No |
Receives the DCI ID for which PDR needs to be generated. |
|
jid |
No |
Indicates the job ID for which PDR needs to be generated. |
|
rtyp |
No |
Pass crfh to generate the CRF report and sdr to generate soft-deleted CRFs report. |
|
doc |
No |
Indicates the document number for which PDR needs to be generated. |
|
dci |
No |
Indicates DCI for which PDR needs to be generated. |
|
rtyp |
No |
Pass crfr to generate CRF Report, crfh to generate CRF History, and sdr to generate soft-deleted CRFs report. |
14.3 Generating a Blank Casebook Report from the Command Line
You can generate a Blank Casebook Report by issuing the RunBlankCasebook command from the Microsoft Windows command line.
You enter the RunBlankCasebook command in the following format:
RunBlankCasebook.cmd -st study [-p patient] -bk DCI_Book
-l folder_location -u user [-pw password] [-debug] [-trace] [-o orientation]
14.3.1 Displaying the Syntax for the RunBlankCasebook Command
To display the syntax for the command:
-
Type RunBlankCasebook on the command line.
-
Press Enter.
14.3.2 Parameters for the RunBlankCasebook Command
Table 14-2 describes the required and optional parameters for the RunBlankCasebook command.
Table 14-2 Parameters for the RunBlankCasebook Commands
| Parameter | Required? | Description |
|---|---|---|
|
-st study |
Yes |
Specifies the name of the study to use for the generated report.
|
|
-p patient |
No |
Specifies a unique patient number (ID). The system generates a Blank Casebook Report that is specific to the specified patient. |
|
-bk DCI_Book |
Yes |
Specifies the name of the DCI Book (casebook) to use for the generated report. Note that for a patient-specific report, this value may not match the casebook assigned to the specified patient. |
|
-l folder_location |
Yes |
Specifies the directory where the system saves the PDF file created for each report, and the log files created during the generation of the report. In addition, the system uses this directory to write the debug information if you include the -debug parameter on the command line. The directory that you specify must already exist. If the directory you specify does not exist, the command fails and displays an error message that the folder is invalid. |
|
-u user |
Yes |
Specifies your user name for logging in to the Oracle Clinical database. |
|
-pw password |
No |
Specifies your password for logging in to the Oracle Clinical database. When you use this parameter, your password is visible on the screen. If you do not use the -pw parameter, the system prompts you for your password. Asterisks mask your password as you type it. For security reasons, Oracle recommends that you do not specify your password directly on the command line. |
|
-debug |
No |
Leaves data in temporary tables and outputs files to the directory that you specified with the -l folder_location parameter. This data is useful when working with customer support to debug an issue. After you resolve the issue and the debug information is no longer necessary, be sure you truncate the temporary pdr_temp and pdr_superscripts tables. |
|
-trace |
No |
Turns on database trace and creates a trace file during the execution of the report. Trace data is useful when debugging performance problems. The system saves the trace file in the directory specified in the init.ora file of the database. Check with your database administrator for the location. |
|
-o orientation |
No |
Denotes the orientation of the pages in the cover, table of contents, ancillary data sections, and appendixes. Valid entries are:
|
14.4 File Names for Reports
The name of the PDF output file for the Patient Data Report and the Blank Casebook Report uses the format that is specified in the local reference codelist PDR_FILE_NAMING:
STUDY_SITE_PATIENT_JOBID.pdf
where STUDY, SITE, PATIENT, and JOBID are the study name, the study site name, the patient number, and the batch job ID, respectively.
Example: pdfrun_ss002_1001_25366.pdf
Notes:
If you generate a Blank Casebook Report that is not specific to a patient, the PDF file name does not include the site and patient information. In this case, the output file name has the format STUDY_JOBID.pdf.Also, the file name can have up to 70 characters. If the file name would exceed this limit, the file name has the format oJOBID.pdf.
Lastly, if the study or study site names include any spaces, those spaces are replaced in the report file name with underscores (_).
The file naming rules apply for reports generated from Oracle Clinical, from RDC, or from the command line, except for CRF Reports submitted from the RDC CRF Review page or from the RDC Data Entry window.
About the File Naming Conventions
The file naming conventions follow the PDF specifications defined by the United States Food and drug Administration (FDA).
-
Use numeric and lowercase alphabetic characters.
-
Use hyphens (-) and underscores (_), as necessary.
-
Do not use spaces, punctuation, or other non-alphanumeric symbols (for example, \ / : * ? < > | " % # +).
In addition, these naming conventions comply not only with the FDA guidelines, but also with Image Solutions eCTD Express tool for publishing eSubmissions.