14 Using the TMS Lite Browser
The TMS Lite Browser enables you to search and browse a read-only display of the Oracle Thesaurus Management System (TMS) Repository data, and search for dictionary terms within the source data in these records in the database. Because this tool works in a browser window without requiring a plug-in, and may not require user names or passwords to view dictionary data, it provides an easy way to publish this data for use throughout your organization.
When TMS is fully integrated with an external system, you can use the TMS Lite Browser to search for source data from that external system. See "Searching for Source Data".
See also "TMS Lite Browser Administration."
The following topics explain how the TMS Lite Browser works, and how to use it:
Overview
This section describes which tasks you can perform in the TMS Lite Browser, how it structures information in a Web browser window, and how to edit the list of dictionaries available for browsing.
Available Repository Data and Verbatim Terms
This section describes which dictionaries you can search and browse in TMS Lite Browser windows.
User Roles
Any user with the RXCLIN_READ role can browse and search for dictionary data. Oracle Clinical users with the RXCLIN roles (such as RXCLIN_READ and RXCLIN_MOD) have access to dictionary data, but cannot search for source data without a TMS role. See "Available External System Data".
Accessible Dictionaries
The TMS Lite Browser can display Repository data, including verbatim terms, for all of a database's active dictionaries that have the Accessible to Light Browser? option selected. If the dictionary is accessible and has a verbatim term level, you can use it to search for verbatim term data.
You can change the Accessible to Light Browser? setting for any dictionary by selecting that box for the dictionary in the Define Dictionaries window of TMS. You may want to leave this option deselected for dictionaries that you want to keep secure.
As long as a dictionary is accessible, you can browse or search it in the TMS Lite Browser. This includes base and virtual dictionaries, and strong and dynamic dictionaries. See Chapter 6, "Defining and Loading Dictionaries" for an overview of the types of dictionaries you can define in TMS, and what characteristics distinguish them.
Autoquerying Dictionaries
When you autoquery a dictionary in the TMS Lite Browser, it displays all of the terms in the top level of that dictionary. Because only strong dictionaries contain top levels, autoquerying is only possible for this type of dictionary.
You can make a dictionary eligible for autoquery by selecting the Autoqueried in Light Browser? box for that dictionary in the Define Dictionaries window.
For instructions on autoquerying, see "Browsing in the Terminology Data Tree Structure".
Available External System Data
Source data searches scan the data in one external system or all integrated systems for the source term that you enter. The TMS Lite Browser keeps external system data secure during these searches. If a record contains the source term for which you searched, but you do not have sufficient privileges to browse that record in the external system, the Browser will not allow you to view the record either.
The Source Data Search feature only appears in the TMS Lite Browser when:
-
You log in as a user with one of the following TMS roles: TMS_CLASSIFY_PRIV, TMS_RECLASSIFY_PRIV, TMS_APPROVE_PRIV, or TMS_RESEARCH_PRIV. You may want to grant an external system user the TMS_RESEARCH_PRIV role if you prefer to deny them access to TMS, but grant them access to Source Data Searches in the TMS Lite Browser.
-
You connect to a database in which TMS is fully integrated with an external system. Oracle Clinical and Oracle Adverse Event Reporting System are fully integrated automatically, but you can fully integrate with other external systems as well.
Basic and Complex Searches
All advanced search pages in the TMS Lite Browser include Use Context Search boxes, which control whether the browser performs a Basic or Context Search. The difference is significant: Basic Searches can use only two of the special character operators, which enable you to introduce fuzzy logic or language properties in your search.
The two allowable special characters in Basic Searches are the wildcards. The single character wildcard (an underscore: _) matches any single character when inserted in a query. The multi-character wildcard (a percent symbol: %) matches one or more characters.
In addition, the syntax for including wildcards is different in Basic and Context Searches. Assume you want to search for all dictionary terms that begin with the word "ankle" and end with the word "swelling." This search would yield three matches: "ankle swelling", "ankle really swelling" and "ankles are swelling."
Basic Search syntax follows standard SQL queries. Inserting a multi-character wildcard (%) directly between the starting and ending strings returns all three matches:
ankle%swelling
Context Searches treat multi-character wildcards differently. You must insert a space after the wildcard to retrieve the same results:
ankle% swelling
TMS Lite Browser Map
Figure 14-1, "Map of TMS Lite Browser Screens with Links" shows which TMS Lite Browser screens have links to which other screens.
The letters A and B represent additional links that didn't fit in the diagram. You can go from A to A in the direction of the arrows, and from B to B in the direction of the arrows.
Figure 14-1 Map of TMS Lite Browser Screens with Links
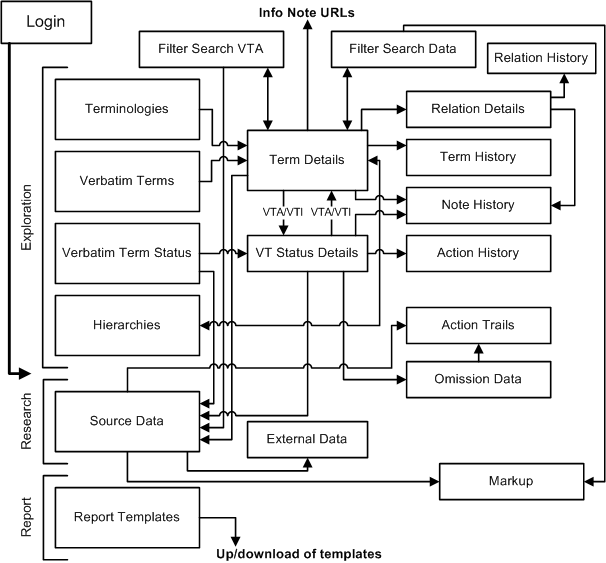
Description of ''Figure 14-1 Map of TMS Lite Browser Screens with Links''
Choosing a Type of Search
The TMS Lite Browser divides all searches into two main categories: Exploration Tab Searches scan dictionary data in the TMS Repository, while Research Tab Searches use external source system data.
Exploration Tab Searches
The Exploration tab (Figure 14-2) contains links to four types of search: Terminologies, Verbatim Term Assignment, Verbatim Term Status, and Hierarchies.

Terminology Searches enable you to search for TMS dictionary data in any accessible dictionary in the database, or across all dictionaries. See "Searching for Terminology Data".
Verbatim Term Assignment Searches scan only the verbatim term levels of dictionaries, and return information about the verbatim term itself, dictionary terms to which it is classified, and specifics about the VTA or VTI. See "Searching for Verbatim Term Assignments (VTAs and VTIs)".
Verbatim Term Status searches scan the verbatim term levels of one dictionary (or all dictionaries in the database, if you choose that option) for your search criteria. For each record returned, the browser lists the verbatim term.
Hierarchy Browsing let you examine a dictionary's terms from its top level, by using the Terminology Data Tree Structure. See "Browsing a Dictionary Hierarchy".
Research Tab Searches
The Research tab contains a link to access Source Data search.
Data Searches enable you to search in any external system that is fully integrated with TMS for Clinical, Adverse Event, or other data. See "Searching for Source Data".
The Source Data tab (under the Research tab) appears only if the TMS database you are browsing is fully integrated with an external system. Oracle Clinical and Oracle Adverse Event Reporting System are fully integrated when you install them, and you can install other external systems in full integration as well.
Searching for Terminology Data
Terminology Searches are searches for dictionary terms. You can perform these searches on very broad data sets—across all domains and dictionaries in the database, for example—or within one domain and one dictionary level.
To search for dictionary terms, start with the following steps:
To browse a dictionary from the top level (known as autoquerying), perform the steps described in "Browsing in the Terminology Data Tree Structure".
Like the other windows in the TMS Lite Browser, the Terminology Search page is dynamic: when you choose a setting in one field, it may update the choices available in other fields in the page. For example, if you choose English from the Language list, the page refreshes and only lists English dictionaries in the Terminology list.
Using Special Characters in Searching
Simple Terminology Searches return all the dictionary terms whose Term Names contain the entire text string that you specify. For example, a Simple Search for ache returns the terms "backache" and "ache in back" but not the term "aching back."
You can also include special characters as operators in your search string:
-
Underscore (_). The underscore character represents exactly one unspecified character.
-
Per Cent (%). The per cent character represents one or more unspecified characters.
-
Dollar Sign ($). The dollar sign prompts TMS to do a language stemming search to find terms with the same linguistic root.
-
Question Mark (?). The question mark prompts TMS to do a fuzzy logic search to find records that nearly match your query parameters.
-
Exclamation Point (!). The exclamation point prompts TMS to do a soundex search to find words that sound similar. You can use soundex searches to find words that are spelled differently but sound the same.
-
Curly Brackets (
{}) serve as escape sequences to enable you to include special characters in your query that would normally be handled as logical operators. Searching for{10%}retrieves records with that search string, and the browser does not use the per cent sign as an operator.
Perform a Simple Terminology Search
Simple Searches allow you to search for the term's name within one dictionary, one domain, or across all dictionaries or domains. You must perform an advanced search if:
-
You want to search for Repository data using details other than the term's name.
-
You want to perform a more complex search than a single text string.
-
You want to search for terms within specific dictionary levels.
If your Terminology Search satisfies any of these advanced criteria, proceed to "Advanced".
Note:
Simple Search finds both VTAs and VTIs that satisfy the criteria. To query for just one or the other, use Advanced Search and specify the Type as a criterion.To perform a simple terminology search, do the following:
-
If you are not in the Terminology Search page, click the Terminology link in the Exploration tab.
-
If the Language list appears, choose the language for the dictionary (or dictionaries) you want to search. (The Language field does not appear if all of the accessible dictionaries in this database are in the same language.)
When you select a language, the Terminology Search page refreshes, and narrows the list in the Terminology list to dictionaries in that language.
-
From the Terminology list, select:
-
All Terminologies to include all accessible dictionaries of the current language in your search.
-
One of the listed dictionaries, to focus your search within that dictionary's data.
If you select a filter dictionary such as MedDRA SMQs, the system will search for terms in that filter dictionary. You can then go to the Details window to see base dictionary terms to which the filter term has a named relation; see "Searching for Terms Using Filter Dictionaries".
Your dictionary choice restricts the values in the Domain list to the subset of domains that contain the selected dictionary.
-
-
From the Domain list, choose a domain in which to focus your search, or All Domains to search in every domain that has this dictionary assigned to it.
-
If a Custom Layout exists for the selected dictionary, the browser includes the Layout list. Choose either the Default Layout or a Custom Layout.
Layouts determine which data columns are displayed for each record in the search results. Custom Layouts are dictionary-specific, and allow you to specify a different subset of data columns. See "Defining HTML Layouts" for more about Custom Layout creation.
-
Click Search.
The Terminology Search window displays the terms that match your search criteria in the lower part of the window. You can now choose a dictionary term to investigate. See "Analyze the Results of a Terminology Search".
Perform an Advanced Terminology Search
Advanced Terminology Searches provide more flexibility than Simple Searches, because they enable you to:
-
Use context searches to broaden your query when exact naming matches are not sufficient.
-
Focus your search to one or more dictionary levels.
-
Search for dictionary data using criteria other than the Term Name. These include the Code, Alternate Code, Dictionary Content ID, the term's Type and Subtype, Approval Status, and the User who introduced the term to the database.
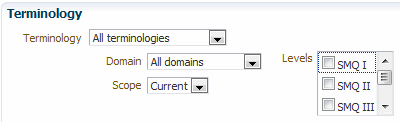
To start an Advanced Terminology Search, open the Terminology Search page, then click the Advanced Search button. The TMS Lite Browser opens the Terminologies: Advanced Search page, which is split into three sections: Terminology, Term, and Direction.
The process of creating an Advanced Terminology Search includes the following steps:
Step 1: Determine the Terminology Data Set
The Terminology section of the Advanced Search page lets you choose which Repository data you want to include in the search. Figure 14-3 shows the fields in this section, with their default choices listed.
Figure 14-3 Terminology Section of the Advanced Terminology Search Page
Description of ''Figure 14-3 Terminology Section of the Advanced Terminology Search Page''
You can choose the Language for the candidate dictionaries, and the Dictionary, Domain, Dictionary Levels, and Data Currency Status for the search.
To determine the Terminology Data Set:
-
If the Language list appears, choose the language for the dictionary (or dictionaries) you want to search. (The Language field does not appear on this page if all of the accessible dictionaries in this database are in the same language.)
When you select a language, the Terminology Search page refreshes, and narrows the list in the Terminology to dictionaries in that language.
-
From the Terminology list, select:
-
All Terminologies to include all accessible dictionaries of the current language in your search.
-
The name of the dictionary to restrict your search to a single dictionary.
If you select a filter dictionary such as MedDRA SMQs, the system will search for terms in that filter dictionary. You can then go to the Details window to see base dictionary terms to which the filter term has a named relation; see "Searching for Terms Using Filter Dictionaries".
Because choosing a dictionary changes the available information for your search, the TMS Lite Browser refreshes and updates the following fields:
-
The Domain list will only contain domains that contain the selected dictionary.
-
The Levels field will populate with the level names in the selected dictionary.
-
If you choose a virtual dictionary, the browser hides the Scope field. This change occurs because virtual dictionaries by definition show a base dictionary at a certain point in time; the browser displays this cut-off date next to the Terminology field when you choose the dictionary.
-
If a Custom Layout exists for the selected dictionary, the browser adds the Layout list to the page.
-
-
From the Domain list, choose a domain in which to search, the Global Domain, or All Domains to search across every domain.
-
Choose a data scope for this search. You can include only Current data, All data (both current and expired), or Date.
When you choose Date, the browser adds a field that enables you to enter a cut-off date. The Terminology Search will display terms and relations that existed on the date you specify.
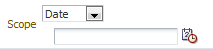
Description of the illustration ''lb_term_adv_term_date.gif''
You can also choose a cut-off date graphically, by clicking the Calendar button and navigating to a date.
-
If you selected one dictionary for this search, you can restrict your search to one or more dictionary levels. Shift-click to highlight contiguous levels, or Ctrl-click for non-continuous levels. To deselect a selected level, Ctrl-click on it.
-
Choose either the Default Layout or a Custom Layout.
Layouts determine which data columns are displayed for each record in the search results. Custom Layouts are dictionary-specific, and allow you to specify a different subset of data columns. See "Defining HTML Layouts" for more about Custom Layout creation.
-
Click Search to execute the search, or proceed to "Choose Term Query Criteria" to further define your Advanced Terminology Search.
Step 2: Choose Term Query Criteria
The fields in the Term section enable you to query for almost any column in a Term Record. The Tip text under the Term field lists several context operators you may want to include in your search; select the Use Context Search? box as well to perform a context search. Select a Term Type: VTA or VTI (for nonunique dictionary terms).
Step 3: Include Related Dictionary Data in the Search
You can also expand Terminology Searches so that, in addition to the dictionary term that matches your query, the search also includes all related dictionary terms above or below the matching term in the dictionary hierarchy.
The Direction field enables you to use the dictionary hierarchy to include related dictionary terms. Choose Up to include parent terms and other terms upward in the dictionary hierarchy; choose Down to include child terms and other terms downward in the dictionary hierarchy; or choose Up/Down to include terms in both directions.
Analyze the Results of a Terminology Search
When you complete either type of Terminology Search, Simple or Advanced, the browser displays the matches in the bottom of the window.
This section includes:
Presentation of Results in the Terminology Search Window
Figure 14-4 shows some of the results of a Simple Search. This search for the string "headache" uses the Default Layout, and includes all dictionaries and domains.
Figure 14-4 Terminology Search Results Using Default Layout
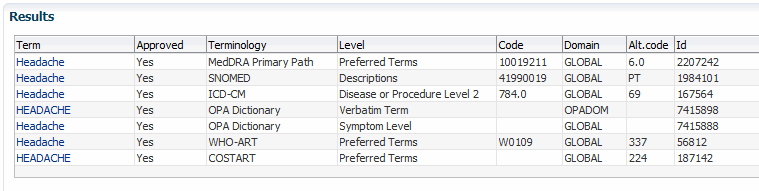
Description of ''Figure 14-4 Terminology Search Results Using Default Layout''
Two variables control the information that the TMS Lite Browser returns in the Results screen:
Columns The columns that the Terminology Search page displays for each record are determined by which layout you select when you enter your search parameters. The search shown in Figure 14-4 used the Default Layout, which returns each term's Term Name, Approval Status, Dictionary Level, Code Number, Alternate Code Number, and TMS Internal ID Number. If you choose All Terminologies or All Domains in your search, the page includes columns for each record's dictionary or domain as well.
Rows Each search window in the TMS Lite Browser returns no more than 25 rows per page. You cannot change this row-per-page setting, but you can change the maximum number of rows that a query can find by updating the OPA setting OPA_UIX_MAX_ROWS. See "Customizing Defaults in TMS Windows Using TMS Settings" for more information on using TMS Settings to control some default values in the TMS Lite Browser.
Navigating Through Results
You can navigate through the results of any kind of search using the scrollbars at the right of the screen. They provide continuous scrolling through the entire set of results retrieved by the Search.
Sorting the columns of the Results page can also help you navigate to a term more quickly. You can sort on any of the columns that you include in your layout.
Refining Your Search
If your search did not yield any of the records you wanted, you may want to edit the search criteria at the top of the page, then execute this new search. Note that when you update any of these lists, the change causes the Web browser to refresh the page, but this refresh does not requery the database for new results. When you complete your changes to the search criteria, you must click the Search button to execute the search.
Select a Term
When you find the term you want to use from the records returned in your Repository search, you can view more detailed information about that term or browse its place in the dictionary hierarchy.
When you use a Default Layout, each record that a Terminology Search returns is presented like the example below. This record shows the Lowest Level Term "Back ache," from the MedDRA Primary Path Dictionary in the Global Domain.
Description of the illustration ''lb_single_match.gif''
Click the hyperlinked Term Name to access the Term Details window, which displays three types of data about a dictionary term: all of the detailed information in the database about that Term Record, its derived path in its dictionary, and any related terms. See "Using the Term Details Window".
Searching for Terms Using Filter Dictionaries
If your company uses filter dictionaries such as MedDRA SMQs, you can use the filter dictionary to find related dictionary terms, VTAs, and source terms. In the Term Details window you can see the relations between filter terms and base dictionary terms.
To begin, do the following:
-
Go to the Terminologies window in the Exploration tab.
-
Enter a query for a filter dictionary term; specify a filter dictionary in the Dictionary field or specify a filter dictionary term in the Term field. Or do an Advanced Search; see "Advanced".
-
Click Search. The system displays terms in the Results section that satisfy the search criteria.
-
Click the term in the Results section. The Term Details window opens. Expand the Term Details node (>) to see the following filter dictionary-related information:
-
Informative Notes. If there are Informative Notes associated with the term you see them at the bottom of the Term Details section. You can see the text of all Informative Notes associated with the term. For Informative Notes of type Algorithm you see the actual algorithm.
You can click on the icon for each Informative Note to see its history. If changes have been made to the note over time, you see each version of the note.
-
SMQ category. The term Status field displays the SMQ category for the term. The category is used in search algorithms.
The Related Terms section displays all terms to which the filter dictionary term has a named relation. The terms' dictionary and dictionary level are displayed in the Level column.
See "Using the Term Details Window" for more information.
-
You can link to other windows from the Term Details Window:
-
Related VTAs. Click the Verbatim Term Assignment link and enter a query to see VTAs related to the term that meet your search criteria; see "Performing a Simple VTA Filter Search" and "Performing an Advanced VTA Filter Search".
-
Related Source Terms. Click the Source Data link and enter a query to see source terms related to the term that meet your search criteria; see "Performing a Simple Source Data Filter Search" and "Performing an Advanced Source Data Search".
-
Hierarchy Search. Expand the Term Details node (+) and click the Term Hierarchy link; see "Browsing a Dictionary Hierarchy".
-
Term History. Expand the Term Details node (+) and click the Term History link; see "Examining a Term's Details and History".
-
Relation Details. Click on a link in the Relations column to see the details of that relation; see "Using the Relation Details Window". The Status of the relation indicates the SMQ Category of the relation, which is used in SMQ algorithms.
Performing a Simple VTA Filter Search
Use this window to search for VTAs related to Filter Dictionary terms (SMQ terms).
To Reach This Window After you have queried for a filter dictionary term in the Terminologies window (see the previous section), click a filter dictionary term, then click Verbatim Term Assignment.
Searches in this window return VTAs that satisfy the search criteria you enter here and are related to the filter dictionary term you selected in the Term Details window. To perform a search do the following:
-
Select a Domain in which to search, or select All Domains. Global is also an option.
-
Select a Direction to use the dictionary hierarchy to include related verbatim term assignments (VTAs) in the search results:
-
None. No hierarchical search is conducted; the search retrieves only VTAs with a direct relation to the selected term.
-
Up. The search retrieves parent terms and other terms upward in the dictionary hierarchy; in the case of SMQs, this option does not make sense because there will never be VTAs in levels above SMQ terms.
-
Down. The search retrieves child terms and other terms downward in the dictionary hierarchy.
-
Up/Down. Retrieves related terms both above and below the selected term in the hierarchy; in the case of SMQs, this option does not make sense because there will never be VTAs in levels above SMQ terms.
For example, if you select the SMQ term Hepatic disorders (SMQ) and search with Direction set to None the search retrieves no records because Hepatic disorders (SMQ) has no direct relations to any MedDRA terms. However, if you search with Direction set to Down it will retrieve many terms because its children do have relations with MedDRA terms, many of which may be VTAs.
-
-
Select a Filter Relationship. For MedDRA SMQs the choices are as your company defined them: Broad Scope, Narrow Scope, or All named relations, or the equivalent.
-
Click Search. The system displays the retrieved VTAs in the Results section; see "Viewing VTA Filter Search Results".
Performing an Advanced VTA Filter Search
Advanced Search allows you to use additional search criteria. Specify a value for one or more of the following criteria:
-
Select a Domain in which to search, or select All Domains. Global is also an option.
-
Select a Direction to use the dictionary hierarchy to include related verbatim term assignments (VTAs) in the search results:
-
None. No hierarchical search is conducted; the search retrieves only VTAs with a direct relation to the selected term.
-
Up. The search retrieves parent terms and other terms upward in the dictionary hierarchy; in the case of SMQs, this option does not make sense because there will never be VTAs in levels above SMQ terms.
-
Down. The search retrieves child terms and other terms downward in the dictionary hierarchy.
-
Up/Down. Retrieves related terms both above and below the selected term in the hierarchy; in the case of SMQs, this option does not make sense because there will never be VTAs in levels above SMQ terms.
For example, if you select the SMQ term Hepatic disorders (SMQ) and search with Direction set to None the search retrieves no records because Hepatic disorders (SMQ) has no direct relations to any MedDRA terms. However, if you search with Direction set to Down it will retrieve many terms because its children do have relations with MedDRA terms, many of which may be VTAs.
-
-
Select a Filter Relationship. For MedDRA SMQs the choices are as your company defined them: Broad Scope, Narrow Scope, or All named relations, or the equivalent.
-
Select a MedDRA SMQ or other filter dictionary Status.
-
Select an Approval status for the VTAs: Approved, Not Approved, or All.
-
Select a VTA Subtype: Misspelled, Accepted, or All.
-
Click Search. The system displays the retrieved VTAs in the Results section; see "Viewing VTA Filter Search Results".
Viewing VTA Filter Search Results
For each term retrieved by either a simple or advanced VTA filter search, the system displays the following information:
-
Verbatim Term name.
-
Link to Source Data. See "Performing a Simple Source Data Filter Search" and "Performing an Advanced Source Data Search".
-
Approved. If Y, the VTA is approved, if N, it is not approved.
-
Dictionary Term. The dictionary term to which the verbatim term is assigned. Use this link to see dictionary term details; see "Using the Term Details Window".
-
Code. The unique ID of the dictionary term to which the verbatim term is assigned.
-
Domain. The VTA's domain, if the VTA is specific to a domain, or GLOBAL if it is global.
Note:
Virtual dictionaries cannot have global VTAs. -
Terminology. The dictionary that contains the VTA's dictionary term.
-
Level. The dictionary level of the VTA's dictionary term.
Performing a Simple Source Data Filter Search
Use this window to search for source terms related to Filter Dictionary terms (SMQ terms). After you have queried for a filter dictionary term (see the previous section), click Source Data and enter a query here. The search returns source terms that satisfy the search criteria you enter here and are related to the term you selected in the Term Details window.
To view source data for VTAs that are related to a filter dictionary term, do the following:
-
Select an Application; the external source data system that collected the source terms you want to view.
-
Select a Group. Groups control which external system columns you return for each external system data record. In Oracle Clinical Data Searches, for example, you can view the Project, Study, and Patient for each record. See "Setting Up External System Drill-down Queries" for instructions about how to define groups.
-
Select a Domain or All Domains.
-
Select a Direction to use the dictionary hierarchy to include related verbatim term assignments (VTAs) in the search results:
-
None. No hierarchical search is conducted; the search retrieves only VTAs with a direct relation to the selected term.
-
Up. The search retrieves parent terms and other terms upward in the dictionary hierarchy; in the case of SMQs, this option does not make sense because there will never be VTAs in levels above SMQ terms.
-
Down. The search retrieves child terms and other terms downward in the dictionary hierarchy.
-
Up/Down. Retrieves related terms both above and below the selected term in the hierarchy; in the case of SMQs, this option does not make sense because there will never be VTAs in levels above SMQ terms.
For example, if you select the SMQ term Hepatic disorders (SMQ) and search with Direction set to None the search retrieves no records because Hepatic disorders (SMQ) has no direct relations to any MedDRA terms. However, if you search with Direction set to Down it will retrieve many terms because its children do have relations with MedDRA terms, many of which may be VTAs.
-
-
Select a Filter Relationship. For MedDRA SMQs the choices are as your company defined them: Broad Scope, Narrow Scope, or All named relations; or the equivalent.
Alternatively, if the filter dictionary term is associated with an algorithm Informative Note, you can conduct a search using that algorithm by selecting: @ SMQ Algorithm.
-
Click Search. The VTA Source Data window appears; see "Viewing Source Data for a Verbatim Term Record".
Performing an Advanced Source Data Search
Use this window to search for source terms related to Filter Dictionary terms (SMQ terms). After you have queried for a filter dictionary term (see the previous section), click Source Data, then click Advanced Search and enter a query here. The search returns source terms that satisfy the search criteria you enter here and are related to the term you selected in the Term Details window.
Advanced Search allows you to use additional search criteria.
-
Select an Application; the external source data system that collected the source terms you want to view.
-
Select a Group. Groups control which external system columns you return for each external system data record. In Oracle Clinical Data Searches, for example, you can view the Project, Study, and Patient for each record. See "Setting Up External System Drill-down Queries" for instructions about how to define groups.
-
Select a Domain or All Domains.
-
Select a Direction to use the dictionary hierarchy to include related verbatim term assignments (VTAs) in the search results:
-
None. No hierarchical search is conducted; the search retrieves only VTAs with a direct relation to the selected term.
-
Up. The search retrieves parent terms and other terms upward in the dictionary hierarchy; in the case of SMQs, this option does not make sense because there will never be VTAs in levels above SMQ terms.
-
Down. The search retrieves child terms and other terms downward in the dictionary hierarchy.
-
Up/Down. Retrieves related terms both above and below the selected term in the hierarchy; in the case of SMQs, this option does not make sense because there will never be VTAs in levels above SMQ terms.
For example, if you select the SMQ term Hepatic disorders (SMQ) and search with Direction set to None the search retrieves no records because Hepatic disorders (SMQ) has no direct relations to any MedDRA terms. However, if you search with Direction set to Down it will retrieve many terms because its children do have relations with MedDRA terms, many of which may be VTAs.
-
-
Select a Filter Relationship. For MedDRA SMQs the choices are as your company defined them: Broad Scope, Narrow Scope, or All named relations, or the equivalent.
-
Select a Status. TMS stores the MedDRA SMQ term category in this field.
-
Select an Approval status for the VTAs: Approved, Not Approved, or All.
-
Select a VTA Subtype: Misspelled, Accepted, or All.
-
Enter values in the Source Data section. TMS displays the external system source data fields defined for the application you selected. In each field you can enter a specific value to narrow the search.
For example, if you selected Oracle Clinical as the application, you can enter a specific study to retrieve source terms collected in that study only.
-
Click Search. The VTA Source Data window appears; see "Viewing Source Data for a Verbatim Term Record".
Searching for Verbatim Term Assignments (VTAs and VTIs)
Verbatim Term Assignment (VTA) Searches scan only the verbatim term levels of dictionaries, and return information about the verbatim term itself, dictionary terms to which it is classified, and specifics about the VTA.
To search for verbatim terms:
-
In the Exploration tab, select Verbatim Term Assignment, then choose a simple or advanced search. See Simple or Advanced.
After you choose the term you want to examine, you can perform any of the following tasks with that verbatim term record:
Perform a Simple Verbatim Term Search
Simple Searches return all the verbatim terms whose Term Names contain the entire text string that you specify. For example, a Simple Search for ache returns the terms "backache" and "ache in back" but not the term "aching back." You can also include in your search string any of the text operators available in the interMedia text option; see "Using Special Characters in Searching".
You can perform Simple Searches for data within one dictionary and domain, or expand the search across all domains and accessible dictionaries in the Repository. If you need to search for verbatim term data using details other than the term's name, or you want to perform more complex searches than just one text string, follow the instructions in "Analyze the Results of a Verbatim Term Search".
Like the other windows in the TMS Lite Browser, the Terminology Search page is dynamic: when you choose a setting in one field, it may update the choices available in other fields in the page. For example, if you choose English from the Language list, the page refreshes and only lists English dictionaries in the Terminology list.
To perform a Simple Verbatim Term Search:
-
If you are not in the Verbatim Terms Search page, click the Verbatim Term Assignment tab.
-
From the Language list, choose the language for the dictionary (or dictionaries) you want to search. When you select a language, the Search page narrows the list in the Terminology list to dictionaries in that language.
-
From the Terminology list, select:
-
All Terminologies to include all accessible dictionaries of the current language in your search.
-
The name of the dictionary to restrict your search to a single dictionary.
When you choose a specific dictionary, the Search page may change in several ways. Your dictionary choice can also effect which domains are listed in the Domain field. The Terminology Search restricts the values in this list to those domains that contain the selected dictionary.
-
-
From the Domain list, choose a single domain to focus your search, or All Domains to search across every domain that includes the selected dictionary or dictionaries.
-
Click Search.
The Verbatim Term Search window displays the terms that match your search criteria in the lower part of the window. See "Analyze the Results of a Verbatim Term Search" for the next step.
Perform an Advanced Verbatim Term Search
Advanced Verbatim Term searches allow you more flexibility and power than Simple Searches, because they allow you to search for:
-
Current or retired verbatim terms
-
All verbatim terms that classify to a particular dictionary term
-
Verbatim terms that match external system criteria
To start an Advanced Verbatim Term Search, open the Verbatim Term Search page, then click the Advanced Search button. The Advanced Search page contains the following sections:
Terminology

Description of the illustration ''lb_vt_adv_terminology.gif''
The Terminology selections restrict the Candidate Data Set for your Verbatim Term Search according to dictionary (labelled "Terminology"), domain, and data currency.
Verbatim Term

Description of the illustration ''lb_vt_adv_verbterm.gif''
The Verbatim Term selections enable you to focus your search using the following fields relating to verbatim terms. The following selections can refine your Verbatim Term Search:
Use Context Search. If selected, the TMS Lite Browser will use the Context Server Index for your search. See "Querying in Windows" for an overview of the differences between simple and context searches. This page includes a tip with the common context search operators, such as Fuzzy and Soundex.
Use VT as DT. If selected, the search returns only direct matches, where the verbatim term (VT) and dictionary term (DT) match exactly.
Only Inconsistent. If selected, the browser will only return verbatim terms that are inconsistently classified in different domains.
Search ID. If a search object created this VTA or VTI, you can search for it using the values in this list.
Approval. The approval status of the VTA. Choose Approved, Not Approved, or All.
User. The user who classified the VTA or VTI.
Database. The external system database from which the source term originates.
Relations

Description of the illustration ''lb_vt_adv_rels.gif''
Settings in the Relations section enable you to include a wider range of verbatim terms in your search, based on dictionary structure.
Searching for verbatim terms under a Start Level enables you to include all the verbatim terms that derive up to a particular verbatim term. If you search for "nerv%" in MedDRA and specify System Order Class (SOC) as the Start Level, the browser returns all verbatim terms that derive up to the "Nervous system disorders." If you include a Reverse at Level setting as well, the system derives the terms that share the common parent at the level specified. You can also focus the verbatim terms returned in this search to primary relations only by selecting the Only Primary Rels box.
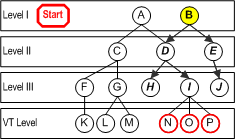
The sample dictionary in Figure 14-5 illustrates a Verbatim Term Search with a Start Level. If a query uses Level I as the start level, and the query criteria match Term B only, the resulting verbatim Term Records would be the VT records whose primary derivable path goes up to Term B. The End Level for all VT searches is always the VT level. In this example, the search would return the VT Level terms N, O, and P.
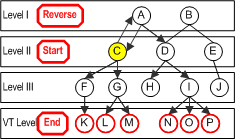
For the same sample dictionary, Figure 14-6 illustrates how the browser conducts a Reverse at Level search for verbatim term data. Assume a Verbatim Term Search uses Level II as the Start Level and Level I as the Reverse Level. If Term C is the only match for the query criteria, the browser derives Term C's parent in the Reverse Level (Term A), then returns all of the verbatim term level records whose Level I derivable parent is Term A. Effectively, the search in this example finds all of the verbatim terms that derive up to term C and any of term C's sibling terms (in this case, it is only sibling is term D).
Selecting the Only Primary Rels box excludes all secondary relations from the Verbatim Term Search. Viewing just primary paths information can clarify the classification information for you, but could focus the search more than you need.
External System

Description of the illustration ''lb_vt_adv_ext_sys.gif''
You can focus a Verbatim Term Search according to which external system data is included in the verbatim term. When you choose an external system from the list (Oracle Clinical, in this case), the page refreshes and includes that external system's columns.
Analyze the Results of a Verbatim Term Search
When you complete either type of Repository Search, Simple or Advanced, the browser displays the matches at the bottom of the window.
This section includes:
Presentation of Results in the Verbatim Term Search Window
Figure 14-7 shows the results of a Simple Search of the MedDRA Primary Path Dictionary across all domains for the string "pain".
Figure 14-7 Results in the Verbatim Term Search Window
Description of ''Figure 14-7 Results in the Verbatim Term Search Window''
By default, each search window in the TMS Lite Browser returns no more than 25 rows per page. You cannot change this rows-per-page setting, but you can change the maximum number of records the TMS Lite Browser can retrieve; to do so, update the variable OPA_UIX_MAX_ROWS in the TMS Settings window. See "Customizing Defaults in TMS Windows Using TMS Settings" for more information on using TMS Settings to control some default values in the TMS Lite Browser.
You cannot use an HTML Layout to change the set of columns displayed for Verbatim Term Searches. All Verbatim Term Searches use the columns displayed in Figure 14-7.
Refining Your Search
If your search did not yield any of the records you wanted, or produced too many matches, you can edit your search criteria to create a more inclusive or specific search. To refine your search, change any of your choices for the dictionary or domain, or enter a new search string in the Search field, then click the Search button.
Note:
When you update any of these lists, the change causes the Web browser to refresh the page, but this refresh does not requery the database for new results. When you complete your changes to the search criteria, you must click the Search button to execute the search.Select a Verbatim Term Record
When you find the verbatim term you want to examine from the records returned in your Verbatim Term Search, you can either view more detailed information about that term or browse its derivable path or paths in the dictionary hierarchy.
Example 14-2 Selecting a Verbatim Term
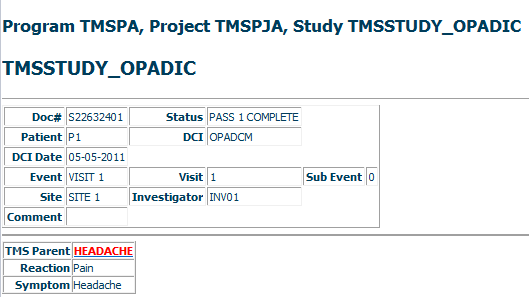
Verbatim Term Searches return records in the format below. This example shows the verbatim term "left ear pain" classified to the dictionary term "Ear ache." This classification applies in the global domain for the MedDRA Primary Path Dictionary.
Description of the illustration ''lb_vt_srch_results_2.gif''
Clicking either hyperlinked Term Name (the verbatim term or the dictionary term to which it is classified) launches the Term Details window for that term. The Term Details window displays three types of data about a term: all of the detailed information in the database about that Term Record, its derived path in its dictionary, and any related terms. See "Using the Term Details Window".
Viewing Source Data for a Verbatim Term Record
Each verbatim Term Record includes a Source Data icon under the Source heading. Clicking this icon launches the Classified Source Data window, which you can use to view the original source data from a particular external system. Reading through the external system source data can provide information about the source term, such as the clinical trial project and study from which it arose.
To view a verbatim term's external system source data:
-
From the Verbatim Term Search window, click the Source Data icon for the verbatim Term Record you want to investigate.
The TMS Lite Browser loads the Classified Source Data page, with two fields displayed: Application and Database.
-
From the Application list, choose the external system you want to investigate.
-
Choose the Database from which you want to retrieve external system data.
-
Click Search. The browser loads external system records that contain the term you selected, and to which you have access in the external system.

Description of the illustration ''lb_vt_source_data_results.gif''
To view an external system record, click the Markup icon to the left of the Project column. The Source Data page for that record loads in the browser; see "Viewing a Source Data Record with Markup" for more information.
Some external system information is displayed as hyperlinks. These details have been generated by external system views or functions, and the hyperlinks launch a page that provides more information about the external system. See "Viewing Data from an External Drill-down Function or View".
Viewing a Source Data Record with Markup
Markup reformats the presentation of a source data record so that the selected source term is hyperlinked, and appears prominently in the page (Figure 14-8).
Viewing Data from an External Drill-down Function or View
Drill-down information enables you to see more about the program, study, or project generating the data record that contains your source term. Clicking any of these hyperlinks launches either the Source Term Data view or Data Function page.
Viewing VTA and Omission Status Information
The Verbatim Term Status window allows you to search for verbatim terms, including omissions and VTAs, by their status. Using Advanced Search you can also search for particular verbatim term occurrences by external system values and by assignee. See:
From the search results, through one or more links, you can see additional information, including the following:
Performing a Simple Verbatim Term Status Search
To perform a Simple Verbatim Term Status search:
-
If you are not in the Verbatim Terms Search page, click the Verbatim Term Status tab.
-
If there are multiple languages available, choose the language for the dictionary (or dictionaries) you want to search from the Language list. When you select a language, the Search page narrows the selection in the Terminology list to dictionaries in that language.
-
From the Terminology list, select:
-
All Terminologies to include all accessible dictionaries of the current language in your search.
-
The name of the dictionary to restrict your search to a single dictionary.
If you choose a virtual dictionary, the system displays its base dictionary name and its cut-off date and time.
When you choose a specific dictionary, the Search page may change in several ways. Your dictionary choice can also effect which domains are listed in the Domain field. The Terminology Search restricts the values in this list to those domains that contain the selected dictionary.
-
-
From the Domain list, choose a single domain to focus your search, or All Domains to search across every domain that includes the selected dictionary or dictionaries.
-
From the Status list, choose a single status to focus your search or Any Status.
-
If you wish, enter a specific Term for which to search, or use special characters; see "Searching for Verbatim Term Assignments (VTAs and VTIs)" for information on using special characters.
-
Click Search.
In the Results section of the window the system displays the terms that match your search criteria, with each term's current status and substatus, domain name, the user name of the person or process that performed the action that led to the term's current status, and the user to whom the term is assigned, if any.
The verbatim term name is a link. Click it to view the status history of the term; see "Viewing Verbatim Term Status History Details".
Performing an Advanced Verbatim Term Status Search
Advanced verbatim term status searches allow you to specify:
-
Substatuses as well as statuses
-
The person to whom a term is currently assigned
-
External system criteria
To perform an advanced verbatim term status search, enter values in the following fields to serve as search criteria and click Search:
Language If multiple languages are available, choose one from the list.
Terminology Choose a terminology from the list.
Domain Choose a domain from the list (choices are limited by the terminology you chose.
Status Leave at the default value of Any Status or choose a specific status as a search criterion; see "Term Statuses".
Substatus Leave at the default value of Any Substatus or choose a specific substatus as a search criterion; see "Term Statuses".
-
Leave blank to retrieve all terms that fit the other search criteria.
-
Enter the name of a specific term to retrieve that term only.
-
Use special characters with a character string; see "Simple" for information.
Created By leave blank or enter the user name of the person or process that created the term or terms you are searching for.
Assignee Leave blank or enter the user name of the person to which the term is currently assigned.
External System From the list, choose the external system where the term was collected. When you choose an external system, TMS displays additional fields appropriate for that system. For example, you can enter values in any of these fields to further narrow the search.
Viewing Verbatim Term Status History Details
To reach this window, click the term name in the Verbatim Term Status window; see "Performing a Simple Verbatim Term Status Search".
This window displays the following information for a single term:
-
a complete history of the statuses that have been assigned to a term, with the most recent at the top
-
the user to whom the term is currently assigned, if it is assigned
-
the complete history of Informative Note that have been assigned to the term, if any, with the most recent at the top
There are several links to additional information from this window:
-
Term Details. Click the verbatim term name to see the Term Details window; see "Using the Term Details Window".
-
Omission Data. If the term is an omission, click the Omission Data icon to see external system information associated with the verbatim term; see"Browsing a Dictionary Hierarchy".
-
Source Data. If the term is not an omission, click the Source Data icon to see external system information associated with the verbatim term; see "Viewing Source Data for a Verbatim Term Record".
-
Action Details. If the term has ever had an Action assigned to it, click the Action text for additional details; see "Viewing a Term's Action History".
-
Dictionary Term Details. If the term is a VTA (is assigned to a dictionary term), click the dictionary term to see additional information on the dictionary term; see "Using the Term Details Window".
-
Info Note History. Click the Informative Note icon to see the history of Informative Notes applied to this term; see "Examining a Record's Informative Notes".
Viewing a Term's Action History
In this window you can see the complete history of actions applied to a term, including the following information for each Action. This window shows every change to an Action—including, for example, a change to the Action's text—even if the change does not result in a change in status for the term.
-
Action Text. The text that appears to the user assigned to the task in TMS, or to the external system, depending on the Action type.
-
Action Type. Internal, Answerable, or Unanswerable; see "Action Types" for information.
-
Action Ref Type. If the Action is of type Internal, it must reference an Action of type Answerable or Unanswerable. This is the Action it references. (If the Action is type Answerable or Unanswerable, this field does not appear.)
-
Creation Time. The date and time the Action was assigned to the term.
-
Created By. The user name of the person who assigned the Action.
-
Valid Until. The expiration date of the Action. If the Action is currently valid and has no set expiration date, Valid Until is set to 15-Aug-3501 00:00:00.
To reach this window, do the following:
-
Search for a verbatim term in the Verbatim Term Status Search window or the Verbatim Term Assignment window.
-
In the Search Results section, click the verbatim term name to see the Verbatim Term Status Details window.
-
If the term has had an Action assigned, click the Action text.
Viewing the Action History of an Omission Occurrence
This window displays the complete Action history associated with a single occurrence of a verbatim term omission (an unclassified source term). Because the information is for a single occurrence, the system can provide information not available in the Action History window, including the omission status and information on which system owns the term. The system displays the following Action-related information:
-
Verbatim Term. The term collected in the external source data system.
-
Action. The Action name.
-
Action App. Owner. The name of the application that currently owns the omission; either TMS or the external system where the term was collected.
-
Action Owner. The user name of the person who applied the Action to the term.
-
Omission Status. The status TMS has assigned to this particular occurrence of the omission. This is the status that is sent to the external system.
-
Action Text. The text that appears to the user assigned to the task in TMS, or to the external system, depending on the Action type.
-
Action Type. Internal, Answerable, or Unanswerable; see "Action Types" for information.
-
Creation Time. The date and time the Action was assigned to the term.
-
Valid Until. The expiration date of the Action. If the Action is currently valid and has no set expiration date, Valid Until is set to 15-Aug-3501 00:00:00.
To reach this window, do the following:
-
Search for a verbatim term omission in the Verbatim Term Status Search window.
-
In the Search Results section, click the verbatim term name to see the Verbatim Term Status Details window.
-
Click the omissions icon. The Omission Data window appears.
-
Click the icon in the Action Text column, if any.
Viewing External System Information for Omissions
To view the source system information associated with each occurrence of a verbatim term omission, choose the external system from the list and click Search. The system displays the term information appropriate for that external system.
To reach this window, do the following:
-
Query a verbatim term in the Verbatim Term Status page.
-
Click on the term name in the results, it should be a record with the status of VTO - Verbatim Term Omission. The system opens the Term Status Details page.
-
Click the omission icon displayed near the Omission Data field.
Browsing a Dictionary Hierarchy
This section provides tips and strategies for browsing through data in the Terminology Data Tree Structure window. You can start a browsing session in the following ways:
-
In the Exploration tab, click Hierarchies, then choose a Language and Dictionary to explore. This strategy starts a browsing session at the top level of a dictionary.
You can only browse the top level of a dictionary if that dictionary is eligible for autoquery. For instructions on checking if a dictionary is eligible, see "Autoquerying Dictionaries".
-
Perform a Terminology Search or Verbatim Term Search, choose a term, expand its Details node, then click the Term Hierarchy link. The Terminology Data Tree Structure window will open and display the selected term in focus.
This section discusses the following Actions you can take in the Terminology Data Tree Structure window:
Introduction to Browsing the Dictionary Hierarchy
The example in Figure 14-9 shows the Terminology Data Tree Structure interface for selected terms in a strong dictionary, MedDRA Primary Path.
Figure 14-9 Overview of the Structure of the Terminology Data Tree Structure Window
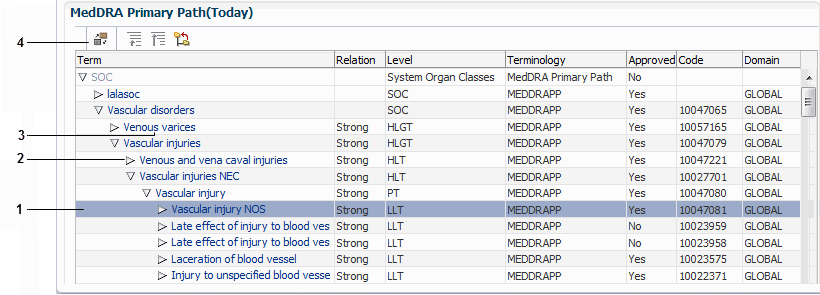
Description of ''Figure 14-9 Overview of the Structure of the Terminology Data Tree Structure Window''
Example 14-3 Explanations of Annotations in Figure 14-9
-
In order to set the focus on a term, click on the row that contains it or use the Ctrl key to select the respective row.
-
The arrow button expands or contracts a single branch of the tree. In this example, "Vascular disorders", "Vascular injuries" and "Vascular injury" are expanded, while "Venous and vena caval injuries" is contracted.
-
The Term Name of each record is hyperlinked to the Term Details page.
-
Clicking the reverse button switches the orientation of the Tree Structure window. If the tree structure is organized to display the child terms of the in-focus term (the one on the highlighted row), you can reverse direction to see the parent terms of any term you select in the window.
There are also three more buttons that you can use, located on the table header:
-
When you have a term highlighted on a row, click this button:
 to go up one level in the tree structure.
 -
To go to the top of the structure, click this button:
 .
. -
When you want to explore a multi-layered structured, you can choose to see the highlighted term as the first row in the table by clicking this button: . If you wish to go back to the previous view, click the blue arrow that will appear next to the term to have an overall view of the structure and choose the desired level of detail:

Description of the illustration ''show_hierarchy.gif''
Starting a Browsing Session from the Hierarchies Link
Clicking the Hierarchies link on the Exploration tab enables you to start browsing a dictionary's data from its top level. To start browsing the top level of a dictionary:
-
From the Exploration tab, click Hierarchies. The Hierarchy page opens.
-
If the Language list appears, choose the language of the dictionary you want to browse. The Terminology list populates with dictionaries in that language.
The Language list is not included when all accessible dictionaries in the database are in the same language.
-
Choose a dictionary from the Terminology list, and click Search. The TMS Lite Browser launches the Terminology Data Tree Structure; see "Browsing in the Terminology Data Tree Structure".
Browsing in the Terminology Data Tree Structure
When you browse dictionary hierarchy, the Terminology Data Tree Structure window loads all of the terms from that dictionary's highest level. Figure 14-10 displays part of the tree from a session browsing the top level of the MedDRA Primary Path Dictionary.
Figure 14-10 Several Records in the Terminology Data Tree Structure
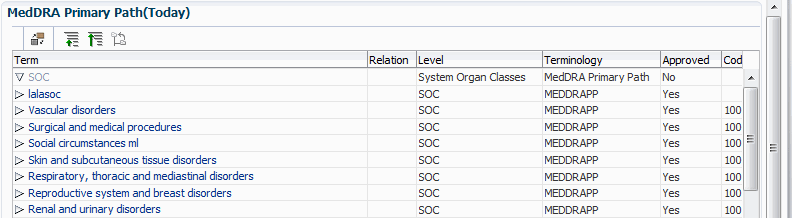
Description of ''Figure 14-10 Several Records in the Terminology Data Tree Structure''
Each of the rows in this example are terms on the SOC level, the top level of this dictionary. You can use this output as a starting point for further searches into the hierarchy.
Expanding a Branch One Level Using the Arrow Keys
You can expand and contract branches up or down one level in the Repository tree by clicking the arrow keys next to each expandable term.
Expanding a Branch in the Dictionary
You can expand the tree to one node at a time to view all data under one term in the dictionary hierarchy.
Reversing the Orientation of the Tree Window
You can orient your view of the data in the Terminology Data Tree Structure window to browsing up or down the dictionary hierarchy. Browsing up the hierarchy reveals a term's derivable path; browsing down shows its child relations.
Reversing the orientation also changes which term is in focus, because you must choose a dictionary term around which you change the direction.
To reverse the orientation, choose row of the term you want to be in focus, then click the reverse icon. The Repository tree refreshes, with the newly selected term now in focus.
Launching the Term Details Window
The Term Names for each record in the Terminology Data Tree Structure are hyperlinked to the Term Details window. The Term Details window includes all of the information in the TMS database regarding the selected term, including derived path and all of the term's relations.
Searching for Source Data
Source Data Searches scan an external system for records that contain your search parameters. You can only search for data in external systems that are fully integrated with TMS, and that have at least one external system query defined in TMS (see "Setting Up External System Drill-down Queries").
The Source Data Search feature can provide an easy method of finding which patients in a clinical trial took a particular drug, or reporting a specific adverse event.
The Source Data Search feature is only available to TMS users with one of the following privileges: TMS_APPROVE_PRIV, TMS_CLASSIFY_PRIV, TMS_RECLASSIFY_PRIV, or TMS_RESEARCH_PRIV. If you connect to the TMS Lite Browser as a user without any of these privileges, or your TMS Lite Browser is configured for Auto-login, Data Searches will not be available.
Source Data Searches only return records from studies to which you have access in the external system. If you search for terms from a particular Oracle Clinical Project, and you only have access to three studies within that project, the TMS Lite Browser only returns matches from those three studies. For more details on clinical data security in the TMS Lite Browser, see "Available External System Data".
Source Data Searches follow this general procedure:
-
Choose a Simple or Advanced Search. See "Starting a Simple Search for Source Data" or "Starting an Advanced Search for Source Data".
Starting a Simple Search for Source Data
To search for external system data records that contain a particular text string:
-
If you are not in the Source Data search window, click the Source Data tab under the Research tab.
The Source Data Search window opens (Figure 14-11).
-
Choose a Language in which you want to search for data.
-
Choose an external system from the Application list. The Source Data Search page refreshes, updating the Group list.
-
Choose a Group.
Groups control which external system columns you return for each external system data record. In Oracle Clinical Data Searches, for example, you can view the Project, Study, and Patient for each record. See "Setting Up External System Drill-down Queries" for instructions about how to define groups.
-
Enter the text for which you want to search, then click Search.
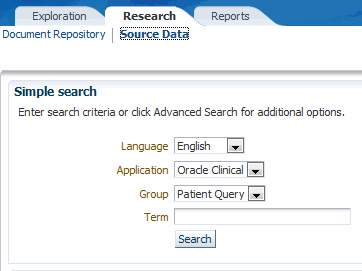
The Source Data Search page refreshes, and returns any matches in the bottom part of the page. See "Analyzing Source Data Search Results" for information about handling the results of a Source Data Search.
Starting an Advanced Search for Source Data
The Advanced Source Data Search window contains three sections. Choose a language for your search, then make your selections in each of these areas:
Application
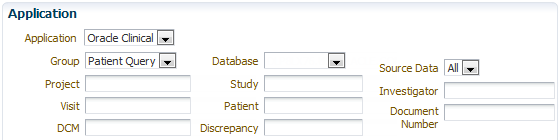
Description of the illustration ''lb_adv_source_data_appl.gif''
You can focus a Source Data Search according to its detailed external system data. When you choose an external system from the Application list (Oracle Clinical, in this case), the page refreshes and includes that external system's columns and the databases where it is installed.
Verbatim Terms

Description of the illustration ''lb_adv_source_data_vt.gif''
This section enables you to focus your source data queries according to detailed information about the verbatim term or the dictionary term to which it classifies.
Term

Description of the illustration ''lb_adv_source_data_term.gif''
For each term that you want to include in the search, you can specify the search keywords, dictionary and levels within that dictionary, and domain. In addition, the Advanced Search page allows you to specify whether you want to perform a simple or context search, or use a direction to include hierarchically related dictionary terms in the search.
Entering the Query Criteria
To start an Advanced Search for source data:
-
If you are not in the Source Data Search window, click the Source Data tab under the Research tab.
The Source Data Search window opens.
-
Click the Advanced Search button.
The Source Data: Advanced Search window opens.
-
Choose a Language for the Source Term Search.
-
Enter search criteria in any or all of the Application, Verbatim Terms or Term sections.
-
Click Search.
The Source Data Search page refreshes, and returns any matches in the bottom part of the page. The data displayed depends on the external system and the integration defined in TMS.
Analyzing Source Data Search Results
The presentation of source data results depends on which external system group you used for the search. The group determines which columns are displayed for each record.
In the example below, the Source Data Search for Oracle Clinical data used a group that included Project, Study, and Patient Data.
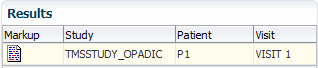
Description of the illustration ''lb_source_data_results.gif''
To examine the patient data in Markup mode, click the Markup icon for the external system record you want to investigate. For information about navigating through an external system record, see "Viewing a Source Data Record".
Viewing a Source Data Record
Once you find a source data record you want to investigate from your results in the Source Data Search page, click its Markup icon. If you have access to this record in the external system, the browser loads it in the Source Data page. If you do not have access, the browser loads an error message.
See "Defining Views and Functions in the External System" for information on defining an HTML plug-in function.
Examining a Term's Details and History
Two windows provide more information about Term Records: the Term Details Window and the Term History Window. To examine the Informative Notes attributed to a Term Record, see "Examining a Record's Informative Notes".
Using the Term Details Window
The Term Details window displays, in separate sections, a Term Record's entire detailed record, its derived path in the dictionary, its indication assignments, and all of its relations.
Term (Currency Status)
Figure 14-12 shows the Term part of the Term Details window.
Figure 14-12 Term Section of the Term Details Window
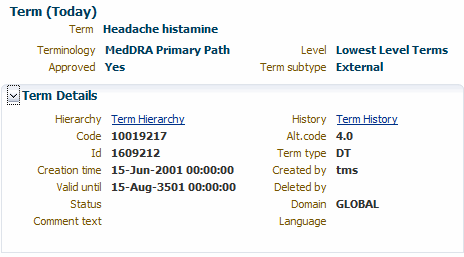
Description of ''Figure 14-12 Term Section of the Term Details Window''
The Term heading displays the term's currency in parentheses. In the example in Figure 14-12, the term "Headache histamine" is current, so the value appears as "Today." When you browse an expired record, this heading includes the term's Expiration Date instead.
The Hierarchy link launches the Terminology Data tree structure, where you can browse the selected term in its position in the dictionary hierarchy. See "Browsing a Dictionary Hierarchy".
The History link launches the Term History window, which displays the details for this term for each change in its history. See "Using the Term History Window".
The Term Details section also includes any Informative Notes you define for the dictionaries and terms in the Repository and, if the term is a VTI, any auxiliary information associated with it.
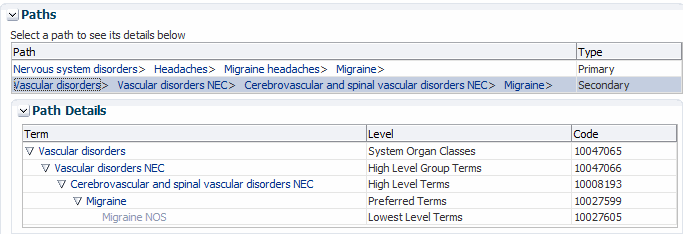
Paths
For terms in strong dictionaries, the Term Details window includes a section for the current term's derived paths in this domain. This section does not appear for terms in weak dictionaries.
If a term has more than one derived path, the upper part of this section displays each path and its type (primary or secondary). Select the option to the left of the path you want to investigate.
The Path Details section shows the terms and their levels in the selected path. When you select a new path by clicking on its row, this section refreshes with the terms and levels in the newly selected derived path.
Description of the illustration ''lb_term_details_dv_path.gif''
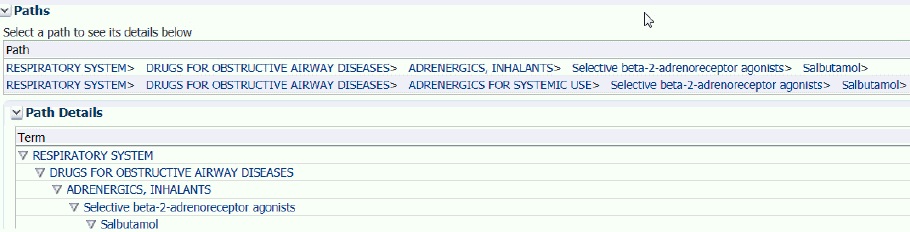
Indication Assignments
If a term has relations to higher level terms based on the indication for which the drug is being taken, the system displays the assignments. For example, the drug Salbutamol may be classified first to Selective beta-2-adrenoreceptor agonists and then to either Adrenergics, Inhalants or Adrenergics for System Use.
Description of the illustration ''indic_assign.jpg''
Related Terms
The Related Terms part of the Term Details window lists any terms in any dictionary that contain relations to "Migraine." In this example, there are several related terms, and because all of them are in the same dictionary as the currently selected term, the browser does not display a Dictionary column in the results.
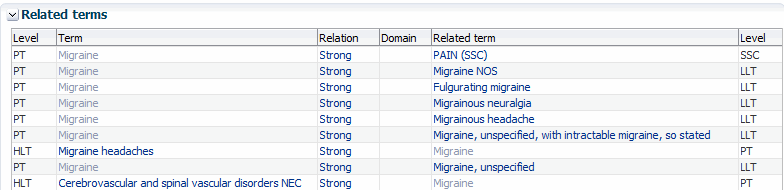
Description of the illustration ''lb_term_details_rel_terms.gif''
Each row includes the type of relation that connects the terms. The Relation Name is hyperlinked to the Relation Details window; see "Using the Relation Details Window" for more information.
There are two types of relation that this section displays. Strong relations connect terms in strong dictionaries, where each term belongs to a dictionary level, and relations are created between terms in different dictionary levels. The Relation is listed as "Strong" when this occurs.
In weak (or "dynamic") dictionaries, all terms reside in the same dictionary level, and the named relations of type Standard describe the structure of the dictionary. The following example shows the Related Terms section when Narrow Scope and Broad Scope relations occur.
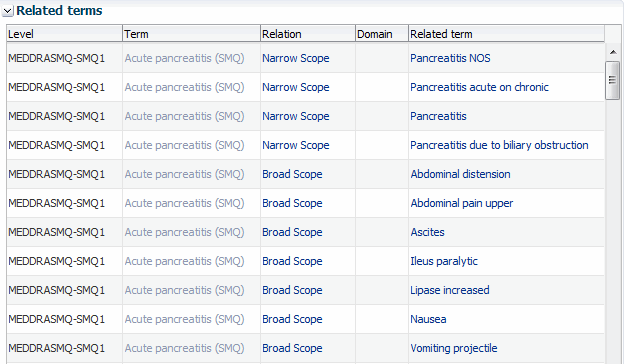
Description of the illustration ''lb_term_details_rel_terms_n.gif''
The Level field is blank for all of these records. Terms in weak dictionaries all reside on the same dictionary level, so the level is irrelevant.
Related Release Label Terms
The Related Release Label Terms section displays terms that have a named relation of type Release Label (RL) with the dictionary term you selected. However, depending on the way the named relation is defined, the selected term may appear in the Related Term column instead of the Term column.
For example, if you query for and select the term "Hepatobiliary and spleen infections" and look in the Related Release Label Terms section, you see "Hepatobiliary and spleen infections" because the two terms with RL named relations to it have a "merge" relation defined as "is merged with" so that the older terms must be displayed on the Term side and the term they "are merged with" on the Related Term side, so that the relationship is correct when read left to right.
Using the Term History Window
The Term History window has two components: the Version section displays a term's details for each stage of its history in the Repository, and the Relations section shows all relations that this term has had throughout its history. You can use the Term History window to check, for example, when a term was approved in this domain.
Version
Figure 14-13 shows the history of the MedDRA term "Parkinson's dis." The Term Valid headings identify the time periods over which the selected term details apply:
The upper row reflects the current status of the term, because it is valid until August 15, 3501. All current records in TMS have this date as the end timestamp.
The lower row reflects the status of the term from the date it was loaded into TMS (March 15, 1999), until the term was changed on March 6, 2002.
Figure 14-13 Version Section of the Term History Window
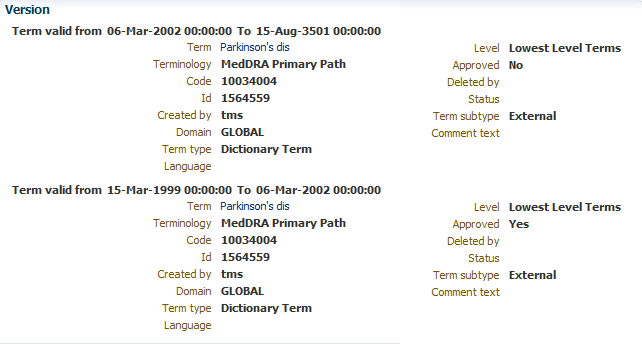
Description of ''Figure 14-13 Version Section of the Term History Window''
By checking the differences between term details in the two sections, you can determine which changes were made on March 6, 2002. In this case, one term detail changed: the Approval Status was changed from Yes to No.
Relations
Relation Records in the Term History window include the creation and expiration dates for the relation, listed respectively as Creation Time and Valid Until in the headings. For verbatim terms, you can use this information to see the verbatim term's classification history.
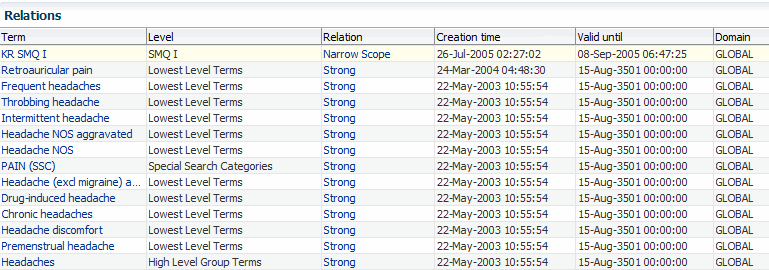
Description of the illustration ''lb_term_history_rels.gif''
Examining a Relation's Details and History
This section discusses the two windows that provide more information about Relation Records.
Using the Relation Details Window
The Relation Details window (see Figure 14-14) provides all of the information in the database about the relation itself, and details about the terms that this relation connects.
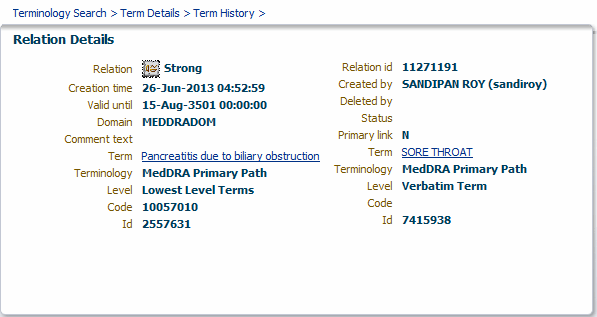
For relations in strong dictionaries, the Relation field displays the word "Strong." In dynamic dictionaries, the Relation Details window shows the Short Name of the named relation being used; the relation in Figure 14-14 uses the named relation "Broad Scope."
You can view the history of this relation by clicking the History button, which appears to the left of the Relation Name. See "Using the Relation History Window".
Using the Relation History Window
The Relation History window displays a relation's details for each stage of its history in the database. You can use the different groupings of records in this window to see when certain aspects of a relation changed.
Figure 14-15, "Relation History Window" shows the history of the same relation under consideration in Figure 14-14, "Relation Details Window": Other newborn respiratory problems - Broad Scope - Respiratory disorder neonatal.
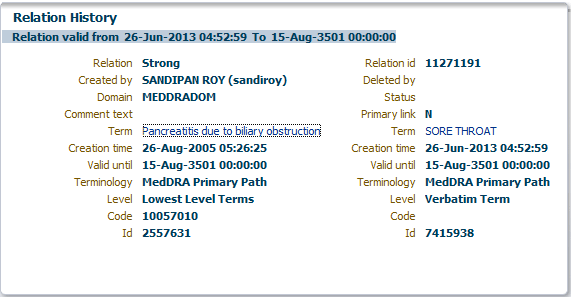
In this example, only two records appear in the Relation History window, so this relation has only changed once since it was initially created.
Examining a Record's Informative Notes
The TMS Lite Browser's Note History pages enable you to see which Informative Notes have been defined for a Term or Relation Record. Informative Notes can provide more detail about records in the Repository, such as the reasons why a term's status changed from Approved to Nonapproved.
To browse an Informative Note's history, navigate to the Term Details or Relation Details page, then click the Info Note History icon: ![]()
The Note History window provides information about the Informative Note at each stage of its history in the database, and the timespan during which each set of details was effective.