| Oracle® Health Sciences Translational Research Center Installation Guide Release 3.1 E66212-06 |
|


 Previous |
 Next |
| Oracle® Health Sciences Translational Research Center Installation Guide Release 3.1 E66212-06 |
|
Previous |
Next |
This section describes how to configure ETLs and related components on ODI and Informatica. This chapter contains the following topics:
Install Oracle 11g database version 11.2.0.4
Install Oracle Healthcare Data Warehouse Foundation 6.1
Verify CDM, ODB, and APPS Schema user and grant all privileges
If you are using Informatica, ensure that
You install Informatica Power Center 9.5.1 Hot Fix 3.
You add TNS entry against ORCL_HDM_DBLINK in the tnsnames.ora file, since a DB Link [ORCL_HDM_DBLINK] is used in some of the Informatica ETLs.
The database initialization parameter, GLOBAL_NAMES, is set to false.
|
Note: Verify the value of the GLOBAL_NAMES parameter with the following query run as a DBA account:SQL> select value from v$parameter where name = 'global_names'; If the return value is true, set this parameter to false by executing the following command: SQL> alter system set global_names=false scope=both sid='*'; Setting GLOBAL_NAMES to false is required for all subsequent Informatica runs. For more information on this parameter, see |
A database link (ORCL_HDM_DBLINK) has been used for some ETL-related database procedures. Consequently, add a TNS entry for ORCL_HDM_ DBLINK in the tnsnames.ora file.
The install_hdwf_script.sh script is located in the cdm_hdm_install folder. This script updates the HDWF 6.1 schema (ETL related objects) to successfully run the ETLs. Perform the following steps to install the ODI or Informatica script HDWF schema:
|
Note: Make sure that HDWF 6.1 is installed before proceeding further. |
Execute install_hdwf_script.sh from the cdm_hdm_install folder with the following parameters.
cdm_schema - This is the CDM user name.
hdwf_schema - This is the HDWF user name.
cdm_db_conn - This is the database connection of the CDM schema.
hdwf_db_conn - This is the database connection of the HDWF schema.
ORCL_HDM_DBLINK - This is the service name created for the database link.
etl_mode - Enter the ETL mode, either ODI or INFA.
For example,
install_hdwf_script.sh -cdm_schema <<cdm schema user>> -hdwf_schema <<hdm schema user>> -cdm_db_conn <<sid>> - hdwf_db_conn <<hdwf sid>> - ORCL_HDM_DBLINK <<Service name created for DB link>> -etl_mode<<ODI/INFA>>
|
Note: The above script prompts for the HDM and CDM schema password. |
This section describes the steps to be performed to install ODI ETLs for TRC 3.1.
Perform the following steps for a new installation:
Procure the master repository (Cohort_Explorer_ODI_Master_Repository.zip) and work repository (Cohort_Explorer_ODI_Work_Repository.zip) files from the installation package.
Create one database schema for both the ODI master and Work repository.
For example,
create user TRC_31_REP identified by TRC_31_REP default tablespace TRC_31_REP_TS;
alter user TRC_31_REP quota unlimited on TRC_31_REP_TS;
grant connect,resource to TRC_31_REP;
Creating an ODI master repository involves the following three steps:
Perform this step before you import the master repository.
Click Master Repository Creation Wizard.
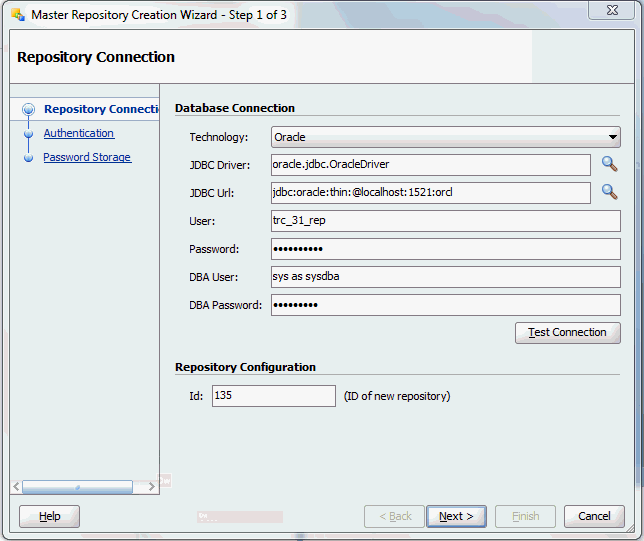
Enter the following information:
Technology: Oracle
JDBC Driver: oracle.jdbc.OracleDriver
JDBC Url: jdbc:oracle:thin:@localhost:1521:orcl
User: Enter username
Password: Enter password.
DBA User: sys as sysdba
DBA Password: Enter sys user password.
Id: Enter the ID for the new repository.
|
Note: Each repository ID must be unique. ODI does not permit importing a repository if its ID already exists.The repository zip files already contain the following IDs: 0,10,33,95,100,123,150,305,308,999 While creating a repository, provide IDs that are different from these. |
Click Next.
Enter the authentication mode for your master repository.
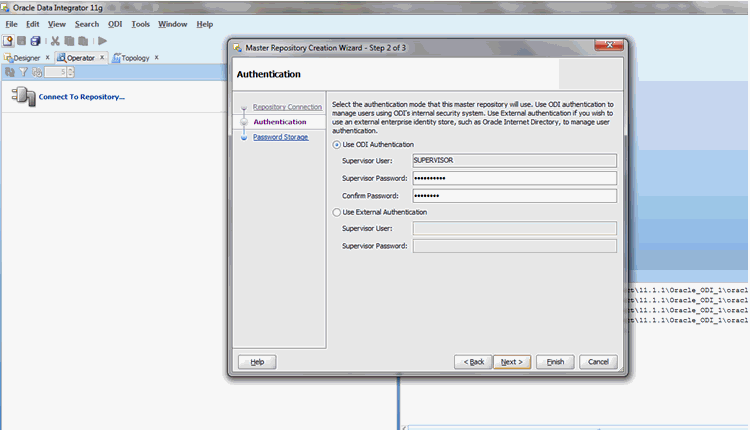
Click Next.
Select Internal Password Storage.
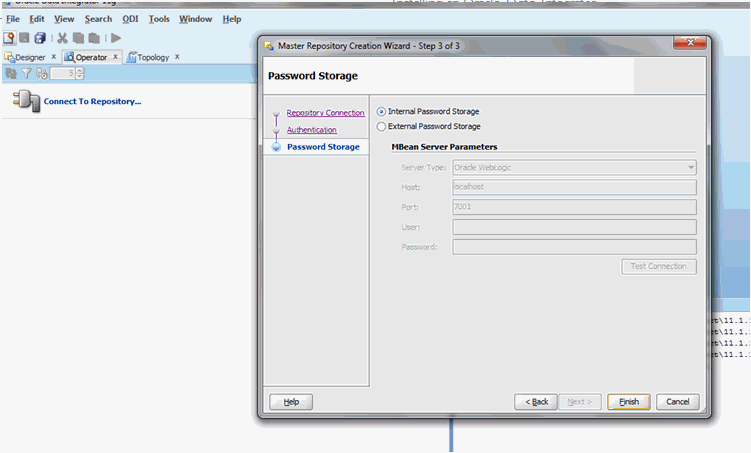
Click Finish. A confirmation message is displayed.
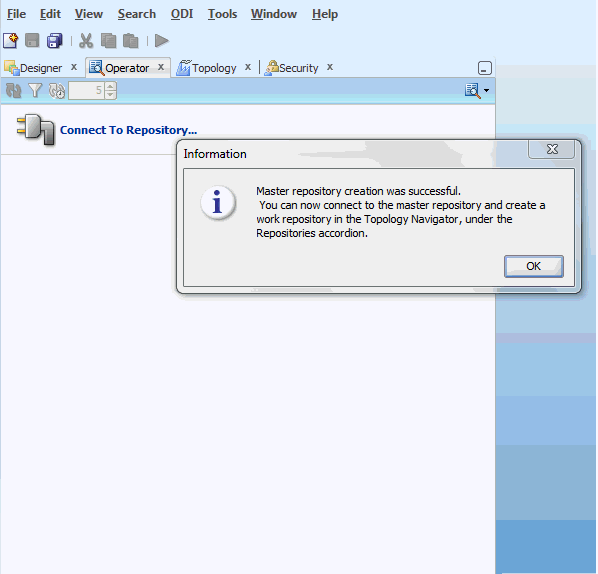
Click OK.
To create a new ODI repository login, perform the following steps:
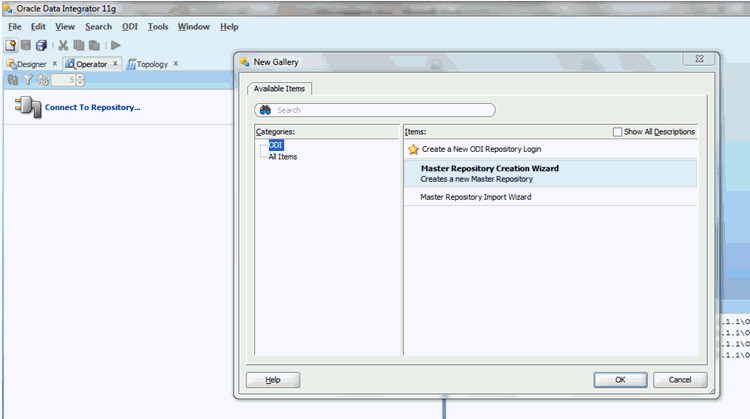
Open Oracle Data Integrator.
Select File >New >Create a new ODI repository Login in the New Gallery window.
Click OK.
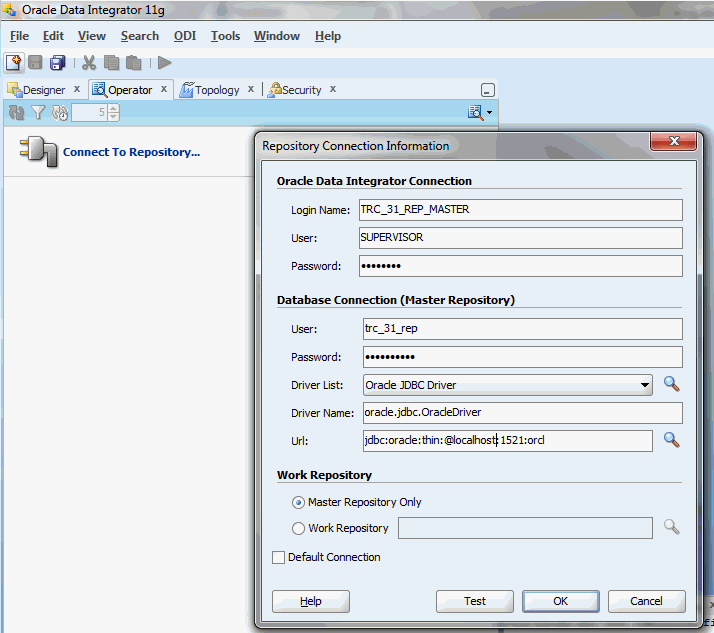
The Repository Connection Information window opens.
Enter values for all the properties as described below.
Oracle Data Integrator Connection details:
Login name: Provide any value.
User: The default value is Supervisor.
Password: Provide any value.
Database Connection (Master Repository) details:
User: Provide the Master repository schema name in the database.
Password: Provide the Master repository schema password.
Driver List: Select Oracle JDBC Driver from the drop-down list.
Driver Name: Auto-populated when you select the Driver list.
URL: Use the search icon to get the URL format and provide the host, port and SID values of the master repository.
The following figure displays the Repository Connection Information window:
Figure 3-1 Repository Connection Information Window
Select Master Repository Only.
Test the connection.
Click OK.
A login name is created with the name provided.
Perform the following steps to import the ODI master repository:
Open Oracle Data Integrator.
Connect to the ODI master repository as SUPERVISOR using the password SUNOPSIS.
Click OK. You are now connected to the master repository.
Click the icon located on the right, as shown in the following screen.
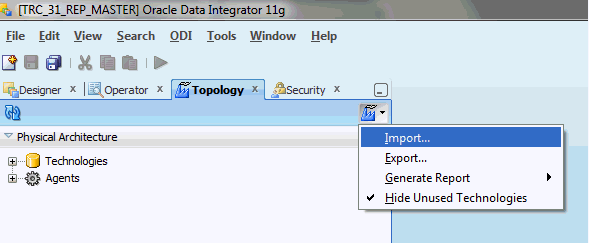
Click Import.
Select Import the Master Repository.
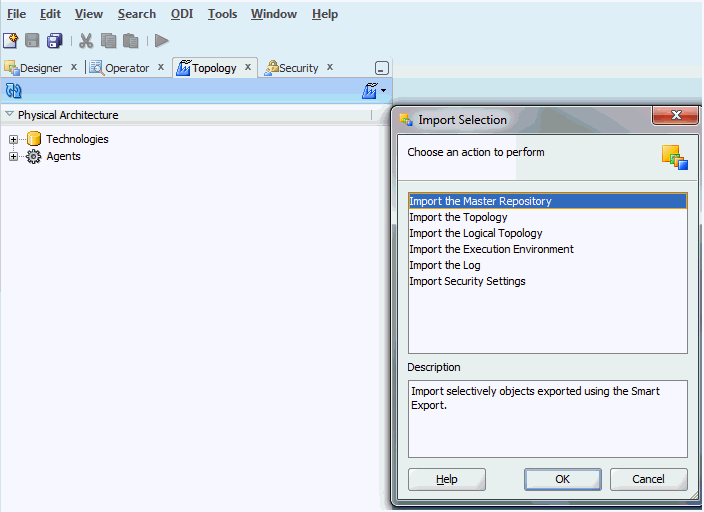
Select Import from Zip File and provide the path to import the master repository zip file.
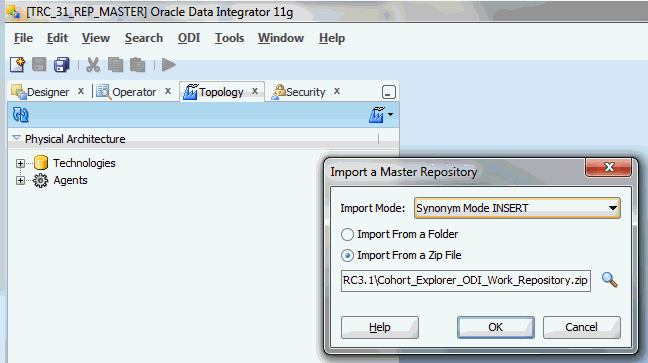
Click OK.
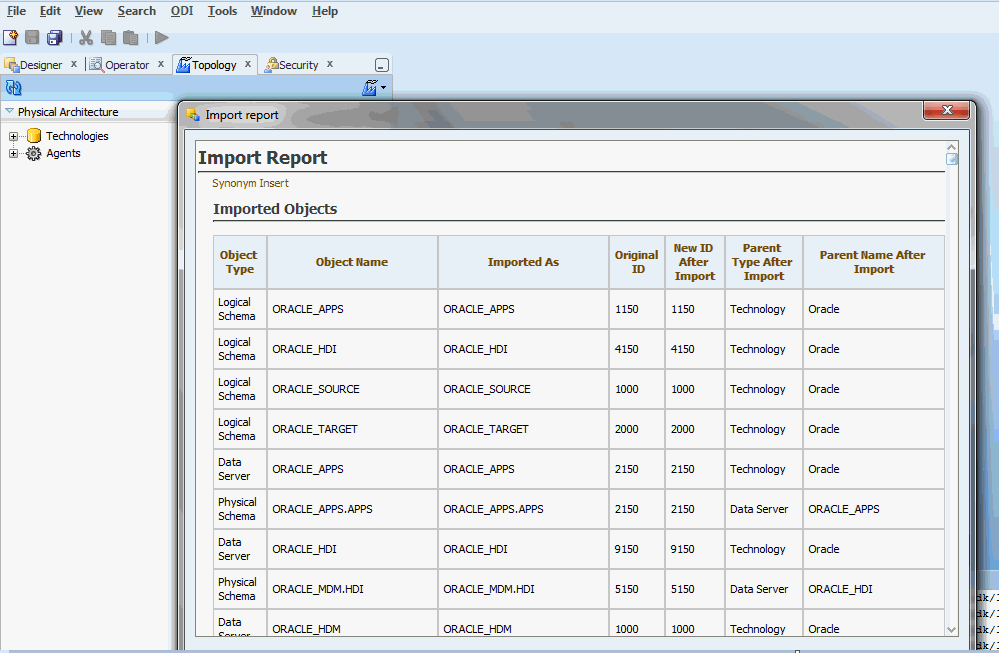
.Click Close. The import report is displayed.
Perform the instructions detailed from Section 3.3.1.3 onwards.
Creating an ODI work repository involves two steps:
Perform the following steps to create a new ODI work repository:
Disconnect and re-connect to the master repository as SUPERVISOR using the password SUNOPSIS.
|
Note: Ensure that you use the above credentials to log in. The defined SUPERVISOR password is overwritten with the imported repository password. For more information, see Oracle Healthcare Analytics Data Integration Secure Installation and Configuration Guide Release 2.0.2 for Oracle Data Integrator. |
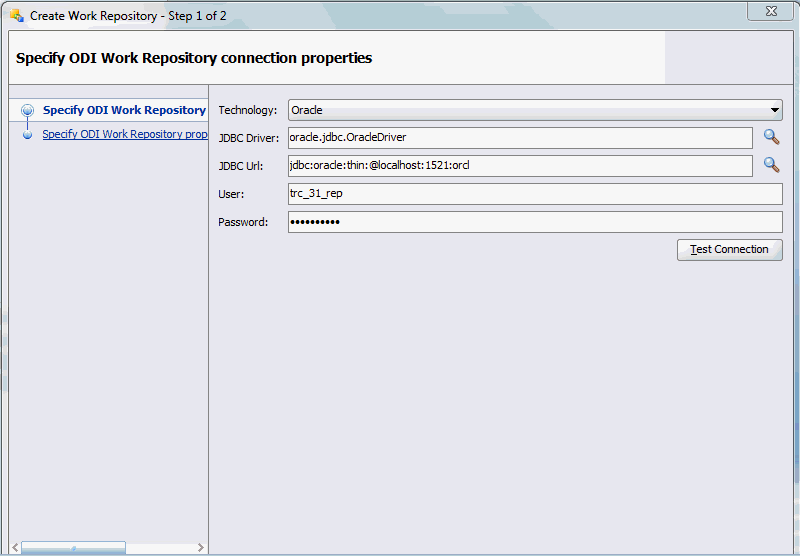
Select Topology > Repositories. Right-click Work repositories, and select New Work Repository.
The Create Work Repository window is displayed.
Select the following values for these fields:
Technology: Oracle
JDBC Driver: Use the search icon to select Oracle JDBC Driver. The syntax is populated automatically.
JDBC URL: Use the search icon to get the URL format and provide the host, port and SID values of the work repository.
User: Work repository schema user name
Password: Work repository schema password
Click Test Connection to verify whether the connection is successful. Click Next.
Figure 3-3 Create Work Repository Window: Specifying ODI Work Repository Properties
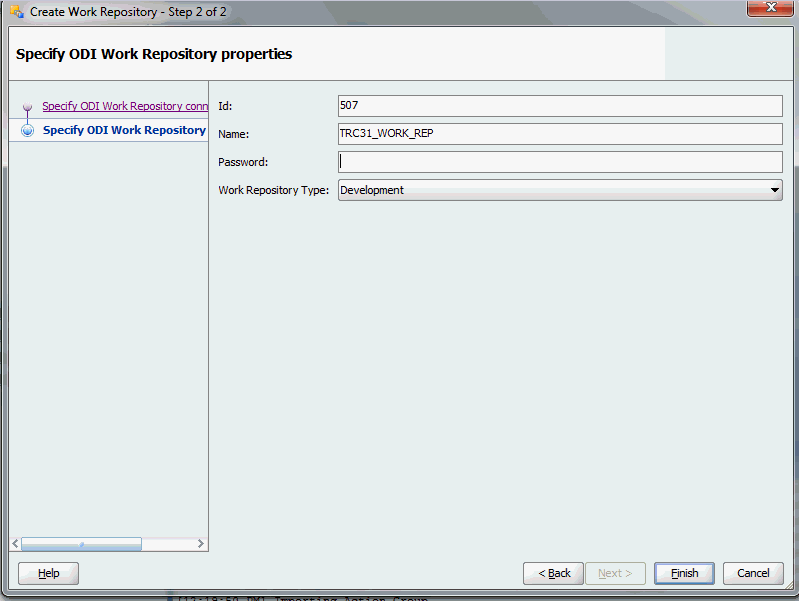
Provide the necessary values for the fields in step 2 of the Create Work Repository window.
ID: The Work Repository ID.
|
Note: Each repository ID must be unique. ODI does not let you import a repository if its ID already exists.The repository zip files already contain the following IDs: 1, 2, 3, 4, 5, 6, 7, 8, 11, 18, 19, 66, 77, 99, 101, 111, 117, 122, 133, 137, 141, 167, 189, 222, 234, 235, 245, 249, 271, 287, 295, 307, 309, 343, 347, 348, 369, 371, 417, 472, 479, 500, 501, 502, 505, 506, 516, 532, 593, 600, 615, 631, 634, 636, 638, 642, 666, 668, 676, 738, 777, 786, 813, 817, 835, 858, 888, 892, 900, 912, 913, 915, 927, 987, 991, 992, 993, 994, 995, 996, 997, 998, 999. While creating a repository, provide IDs different from these. |
Name: Provide the name of the repository
Password: Provide the password for the repository
Work Repository Type: Select the type of the work repository
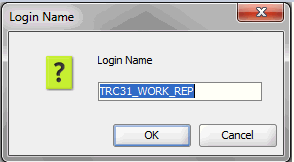
Click Finish. The work repository is created successfully. You are prompted to create a login name for the work repository.
Click Yes.
Provide a login name for the work repository and click OK.
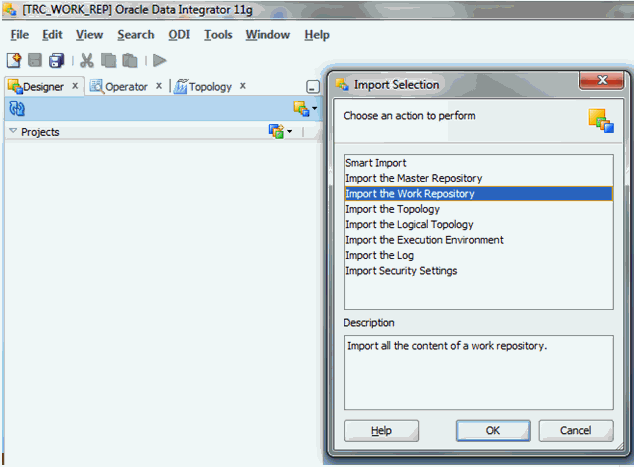
Perform the following steps to import the OHSCE Work Repository into ODI:
Disconnect from the master repository.
Re-connect to the work repository with the login name created in the previous step.
Within the Designer tab, select the Connect Navigator icon.
Select Import > Import the Work Repository as shown below.
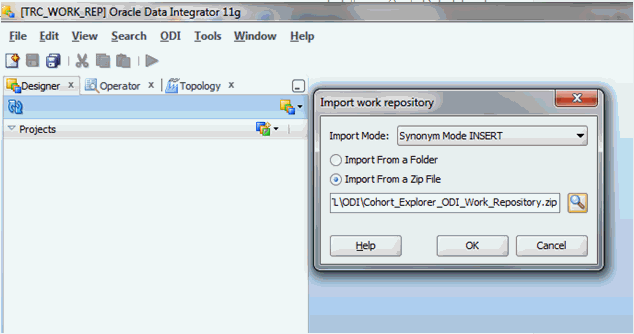
The Import Work Repository window opens.
Select Import Mode as Synonym Mode Insert.
Select Import from a zip File.
Select the work repository zip file and click OK.
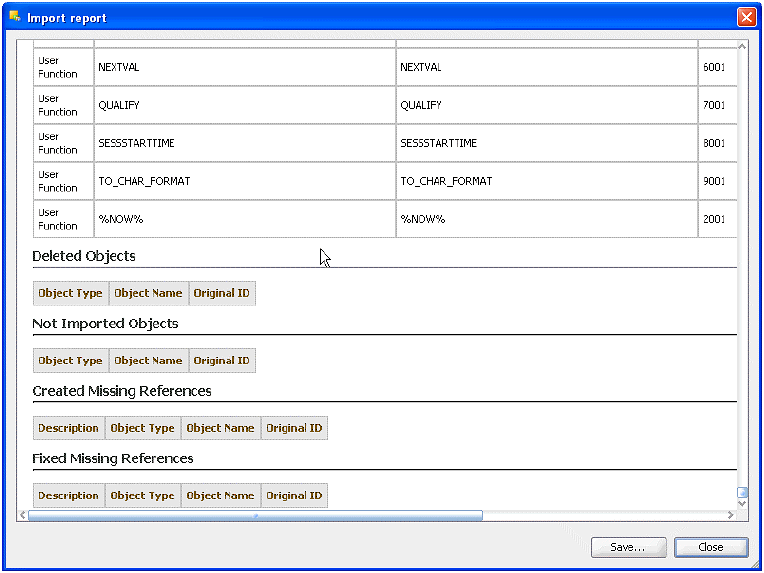
While importing the work repository, you are prompted to declare different work repository numbers in the master repository as shown in Figure 3-6. Click OK for each one of them.
The Import report is displayed.
Click Close. The application is now installed successfully.
During the installation the following physical data servers are created automatically:
ORACLE_APPS
ORACLE_HDM
ORACLE_TMP_DATAMART
Configure these data servers as described below:
Navigate to Topology > Physical Architecture tab, expand Oracle under Technologies. Select the physical data server created for HDM and double-click it. The Definition details for the HDM data server are displayed as shown in the following figure:
Figure 3-8 Configuring the Physical Data Server
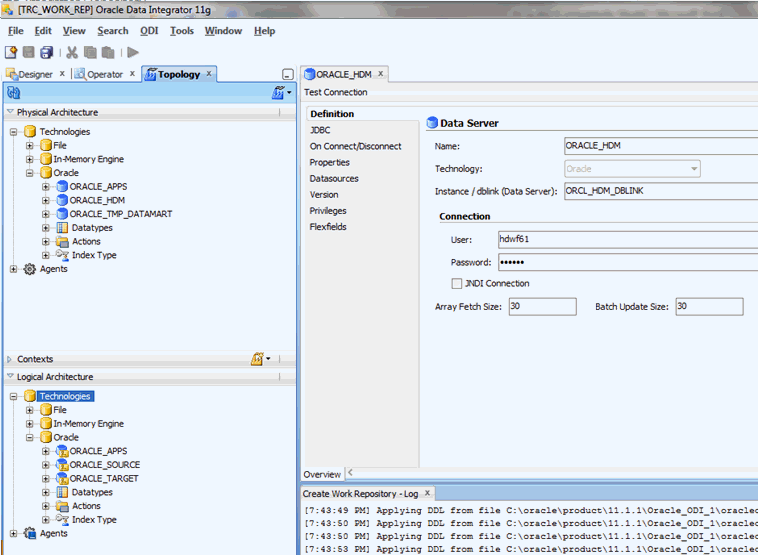
Update Definition tab properties as follows:
Connection User name and Password: Provide the user name and password for connecting to the HDM schema.
Instance/ DBlink (data server): Enter NET_SERVICE_NAME. This is the TNS entry name of the HDM schema
Update the JDBC tab properties of the system containing HDM schema:
JDBC Driver: The field is automatically populated.
JDBC URL: Provide the host, port and SID of the HDWF schema.
Figure 3-9 Configuring JDBC Properties of the Physical Data Server
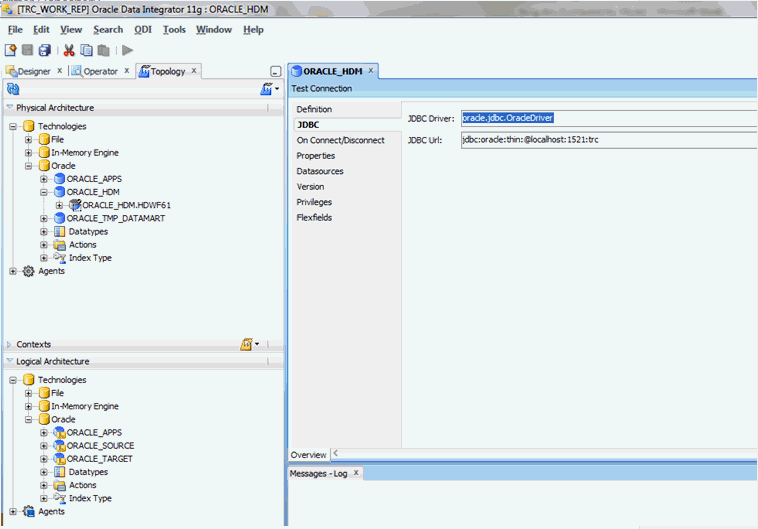
Click Test Connection to test whether the values are correct.
Click Save on the menu bar. The existing Physical Data Server ORACLE_HDM is updated.
Repeat steps 1 through 5 on the physical data servers ORACLE_TMP_DATAMART, ORACLE_APPS, and ORACLE_HDI.
To update the existing physical schema:
Connect to the master repository and navigate to Topology > Technologies > Oracle.
Figure 3-10 Configuring the Physical Schema
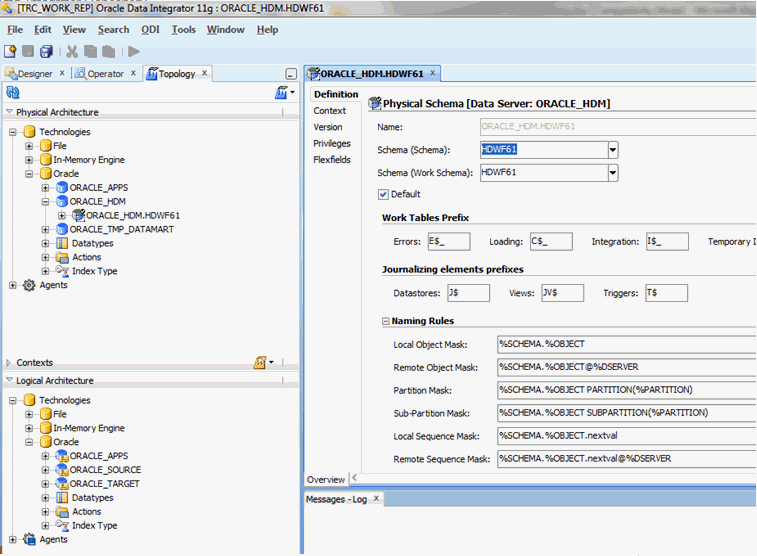
Double-click ORACLE_HDM.HDWF, select Source schema name from the Schema and Work Schema drop-down lists.
Repeat the above steps for ORACLE_TMP_DATAMART.CDM, ORACLE_APPS.APPS.
|
Note: For further information on Topology configuration, see the following ODI guides:
|
Navigate to Topology > Oracle. Double-click Oracle. On the right side, verify that the Ordered option is deselected under Data Handling.
Figure 3-11 Verifying Data Handling Setting

ODI requires a database link between the target CDM schema and the source (HDWF schema); Target APPS schema to source (HDWF Schema) to move data from the source to temporary tables created in the target.
For details, refer to ODI architecture in the Oracle® Data Integrator User's Guide.
To create a database link:
Copy the TNS string from the HDM tnsnames.ora in the HDWF schema to the tnsnames.ora of the OHSCE Data Mart Schema.
Repeat step 2 for APPS Schema.
Connect to the ODI Work Repository.
In ODI, navigate to Designer > Oracle Healthcare Analytics > Execution Plans > Initial Setup folder. The Initial Setup folder contains a Create DBLink with tasks Create HdmApps DBLink, Create HdmCdm DBLink packages.
Select each package and click Execute located in the tool bar menu.
The above steps require that both the HDM database user and the CDM database user reside on separate instances of the database.
In Exadata installations, all the schemas are located in the same database instance. The scripts for linking schemas does not work in this case. If you do not want the HDWF and Cohorts to reside on different databases, perform the following changes:
Check the global_names parameter in the database by executing the following command:
show parameter global_names;
If TRUE (in database or in SQL developer):
Connect to the CDM schema and change the global_names parameter to FALSE (to session level) by executing the following command:
Alter session set global_names = FALSE
Execute the following SQL statement manually:
CREATE DATABASE LINK "HDM_DBLINK" CONNECT TO <HDWF schema name> IDENTIFIED BY VALUES <encrypted value of the HDWF schema password> USING <entire TNS string>
|
Note: You can create the database link automatically from ODI to obtain the encrypted password and then copy it from its definition. |
Test the database link in the SQL developer by executing the following command:
"Select * from dual@<dblink_name>."
After successfully installing ODI, the ODI physical agent, LOCALHOST_20910, automatically appears. Modify the properties of the ODI agent as follows:
Select the Topology tab.
Navigate to Physical Architecture > Agents.
Double-click LOCALHOST_20910.
Edit the following:
Name: Enter a new name for the agent.
Host: Enter the host name where the ODI repository is installed.
Port: Enter a new port number or retain the default.
Save your changes. The new physical agent is created.

To configure a standalone agent, see the section Manually Configuring and Starting the Standalone Agent in the Oracle® Fusion Middleware Installation Guide for Oracle Data Integrator at the following location:
http://docs.oracle.com/cd/E28280_01/install.1111/e16453/configure.htm#ODING300
The Cohort ETL objects consist of ODI Master Repository and the ODI Work Repository, which must be deployed in the ODI Server.
After deploying the ODI Master Repository, change all connection configurations as described in the Oracle® Health Sciences Cohort Explorer Installation Guide to point to the customer database connection parameters.
The ODI Work Repository contains only metadata for Cohort ODI ETLs. Since the metadata is used within the context of the ODI Server, follow the security guidelines applicable to the ODI Server while deploying these objects.
Perform the following steps to install Informatica ETLs:
Download the Informatica workflows wf_SIL_CDM.xml from the installation package and save it on your machine.
Log into the Power Center Administration Console (Server) and create a Repository Service with the name EHA_CDM.
The default user name and password to login into Power Center Administration Console is Administrator.
After setting up the Informatica Server (such as, creating Repository Service and Integration Service), connect to the Repository Service (EHA_CDM) from your Informatica Client (Power Center Repository Manager).
The default user name and password to connect to the Informatica Repository is Administrator.
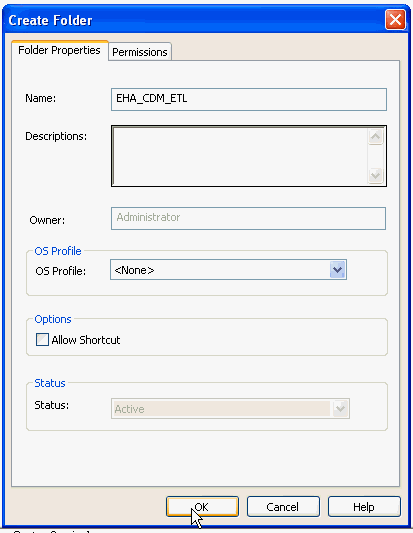
In the Power Center Repository Manager, navigate to Folder > Create and create a new folder EHA_CDM_ETL (under the Informatica Repository created in step 2 and 3).
Click OK.
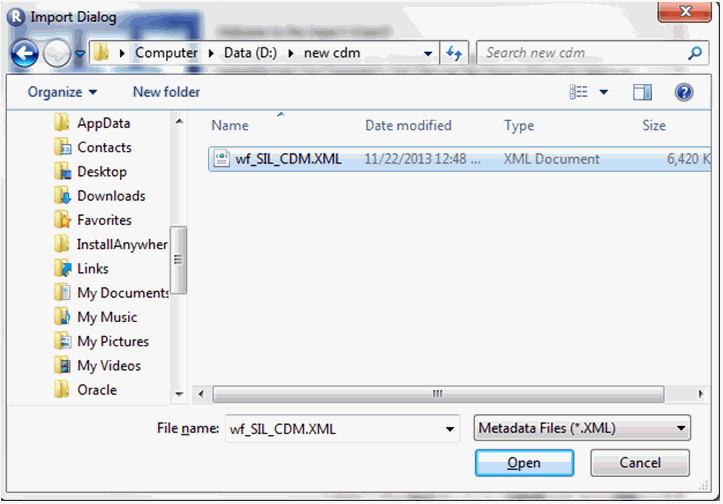
In the Import Wizard dialog, navigate to the folder where the downloaded copy of the Informatica xml is placed. Select wf_SIL_CDM.XML and click Open.
Click Add All to import all objects. Click Next.
For the Folder in XML file PowerCenter_slc04lx1:EHA_CDM_ETL_155, select EHA_CDM::EHA_CDM_ETL. Click Next.
Ensure that Check In is not selected. Click Next.
Click Next.
Reuse objects if any are unresolved while importing.
Once the import is successful in the above steps, navigate to the Informatica Power Center Workflow Manager and connect to the folder EHA_CDM_ETL.
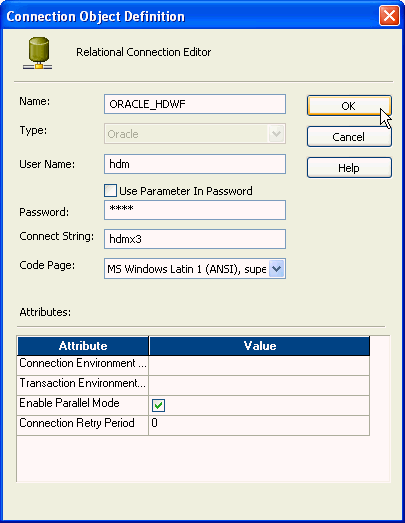
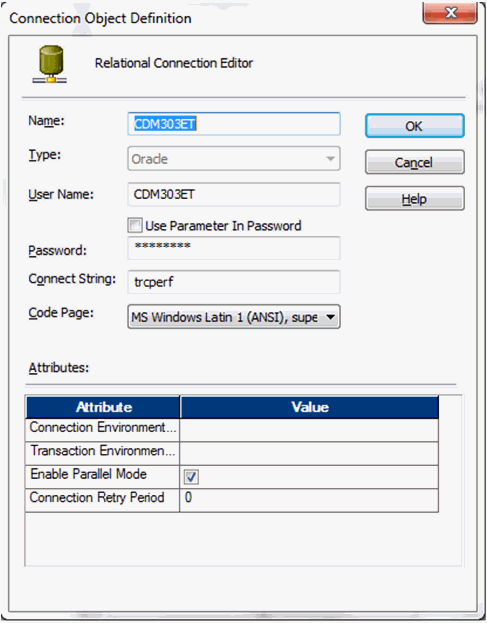
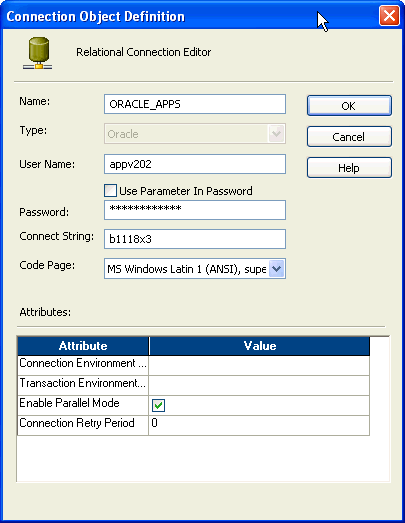
Navigate to Connections > Relational and create the following Relational Connections:
ORACLE_HDWF to connect to schema containing HDWF tables.
Figure 3-14 Creating Relational Connections
ORACLE_CDM to connect to schema containing CDM tables.
Figure 3-15 Creating Relational Connections
ORACLE_APPS to connect to schema containing APPS tables.
Figure 3-16 Creating Relational Connections
Make a note of the connection objects.
Manually create a SIL_CDM_Global_Param_File.prm file with the following contents:
[Global]
$$CDM_INDEX_TS_NAME=<Table Space Name for CDM Indexes>
$$DBSCHEMA_HDWF=<HDWF Schema Name>
$$DBSCHEMA_CDM=<CDM Schema Name>
$$DBSCHEMA_APPS=<APPS Schema Name>
$DBConnection_HDWF=ORACLE_HDWF
$DBConnection_CDM=ORACLE_CDM
$DBConnection_APPS=ORACLE_APPS
$$VPD_RAW=10
Copy the updated global parameter file to the following location:
${INFA_INSTALL_DIR}/server/infa_shared/SrcFiles
Navigate to the Informatica Power Center Workflow Manager.
Connect to the repository and open the folder EHA_CDM_ETL.
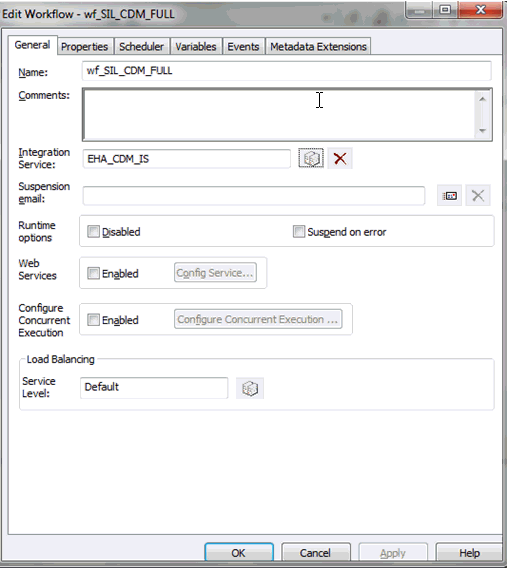
Expand the workflows section on the left-hand side and select or right-click on workflow wf_SIL_CDM_FULL to open.
Navigate to Workflows > Edit.
From the Integration Service browser, select and associate the Integration Service to the workflow (wf_SIL_CDM_FULL).
Figure 3-17 Associating the Integration Service
Repeat step 16 for incremental load workflow, that is, wf_SIL_CDM workflow. From the Integration Service browser, select and associate the Integration Service to the workflow wf_SIL_CDM.
Save changes to the Repository.
Perform the steps in Section 3.3.1, "Installing an Oracle Data Integrator Repository" to upgrade your ODI repository.
Download the Informatica workflows wf_SIL_CDM.xml from the installation package and save it on your machine.
Log into the Power Center Repository Manager.
The default user name and password to login into Power Center Administration Console is Administrator.
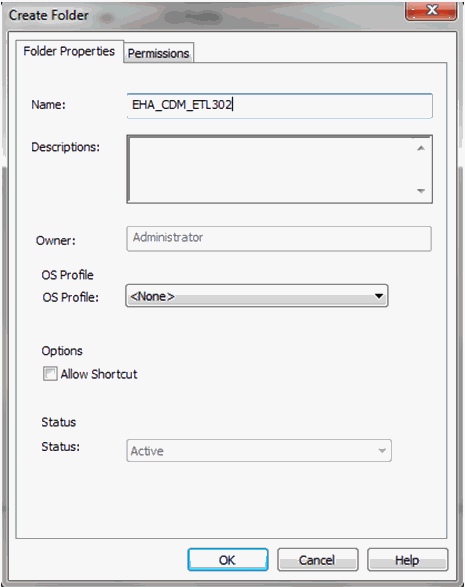
In the Power Center Repository Manager, navigate to Folder > Create and create a new folder EHA_CDM_ETL3.1 (or any valid name).
Click OK.
In the Import Wizard dialog, navigate to the folder where the downloaded copy of the Informatica xml is placed. Select wf_SIL_CDM.XML and click Open.
Click Add All to import all objects. Click Next.
For the Folder in XML file PowerCenter_slc04lx1::EHA_CDM_ETL_155, select EHA_CDM::EHA_CDM_ETL302. Click Next.
Ensure that Check In is not selected. Click Next.
Click Next.
Reuse objects if any are unresolved while importing.
Once the import is successful in the above steps, navigate to the Informatica Power Center Workflow Manager and connect to the folder EHA_CDM_ETL302.
Check the existing parameter file SIL_CDM_Global_Param_File.prm has following parameters or value defined:
[Global]
$$CDM_INDEX_TS_NAME=<Table Space Name for CDM Indexes>
$$DBSCHEMA_HDWF=<HDWF Schema Name>
$$DBSCHEMA_CDM=<CDM Schema Name>
$$DBSCHEMA_APPS=<APPS Schema Name>
$DBConnection_HDWF=ORACLE_HDWF
$DBConnection_CDM=ORACLE_CDM
$DBConnection_APPS=ORACLE_APPS
$$VPD_RAW=10
Global parameter file is placed in the following location:
${INFA_INSTALL_DIR}/server/infa_shared/SrcFiles
Navigate to the Informatica Power Center Workflow Manager.
Connect to the repository and open the folder EHA_CDM_ETL302.
Expand the workflows section on the left-hand side and select or right-click the workflow wf_SIL_CDM_FULL to open it.
Navigate to Workflows > Edit.
From the Integration Service browser, select and associate the Integration Service to the workflow (wf_SIL_CDM_FULL).
Figure 3-20 Associating the Integration Service
Repeat step 14 for incremental load workflow, that is, wf_SIL_CDM workflow. From the Integration Service browser, select and associate the Integration Service to the workflow wf_SIL_CDM.
Save changes to the Repository.
|
 Copyright © 2013, 2016, Oracle and/or its affiliates. All rights reserved. Legal Notices |
|