| Oracle® Argus Safety Installation Guide Release 8.1 E71757-01 |
|

 Previous |
 Next |
Argus BI Publisher Periodic Reports are the flexible periodic reporting feature that has been introduced in 8.0. By default, this feature is not enabled in the Safety environment.
This chapter lists the various steps to enable and configure the BI Publisher Periodic reports.
It includes the following sections:
Managing Users and Roles in BI Publisher Security Model [BI Publisher Standalone]
Managing Users and Roles in Oracle Fusion Middleware [BI Publisher Standalone]
Managing Users and Roles for BI Publisher [OBIEE and BI Integrated Installation]
A standalone BI Publisher Server or BI Publisher on a OBIEE Server needs to be prepared before enabling the BI Publisher Periodic reporting for Argus Safety.
Once the BI Publisher Server/OBIEE Server is successfully installed, make a note of:
TNS Names details of the database where BI Publisher repository is created
BI Platform User ID and Password
BI Publisher Console login credentials
BI Publisher Console URL along with the Port Number
During enabling, a database link would be created between the Argus Safety Database and the BI Publisher Metadata repository database.
In order to have this link created, copy the TNS Names of the BI Publisher metadata repository database's TNS Names into the TNS Names.ora file of Argus Safety database server.
Some database configurations need to be handled in order to enable the BI Publisher reporting in Argus. These steps need to be handled from a machine where the Argus 8.0 database can be accessed (preferably the Argus Safety Web Server).
* Open a command prompt and navigate to the directory where Argus_BIP_Enable.bat file is located.
* Execute the batch file. The batch file would prompt for few database details. Enter the following information, as prompted:
Enter TNSNAMES Entry to Connect to the Argus Safety Database: <The database SID of Argus Safety>.
Enter SYSTEM or DBA user name in Argus Database: <the system or dba user name>.
Enter password for &user_dba. in Argus Database: <the system or dba user password>.
Enter Argus schema owner name: <the argus safety schema owner, typically argus_app>.
Enter Argus schema password: <password for the argus safety schema owner>.
Enter BI Publisher Schema which is created: <the BI Publisher Schema owner name created through the schema creation utility during Argus Safety db creation>.
Enter Password for BIP user: <password of the BI Publisher Schema owner>.
Enter BIP Repository Instance name: <database SID of the BI Publisher metadata repository database>.
Enter BIP Repository User name (Default DEV_BIPLATFORM): <the DEV_BIPLATFORM user created in BI Publisher metadata repository database>.
Enter BIP Repository Password: (password for the DEV_BIPLATFORM user>.
|
Note: If you are using Argus Mart with BI Publisher enabled in Argus Safety, make sure that you re-create the Safety RO user. |
With this information, the batch file will execute and create the database objects that are needed for enabling and integrating the BI Publisher Periodic reports to Argus Safety.
A detailed log file called Argus_BIP_Enable_Batchfile_<datetime>.log will be created in the path of the batch file.
|
Note: The following message can be displayed while installing over the Oracle 12.1.0.2 Database:Note: ZipUtil uses or overrides a deprecated API. Note: Recompile with -Xlint:deprecation for details. creating f_UnzipBlobThis note about deprecation can be safety ignored. |
This section contains the following topics:
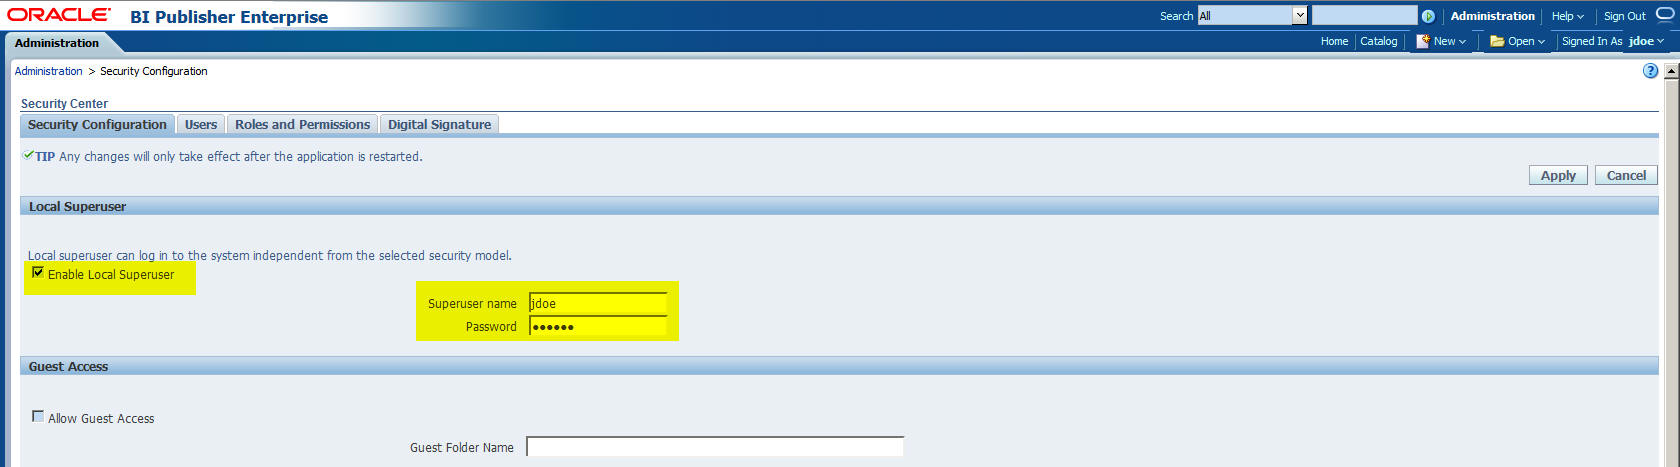
BI Publisher enables you to define an administration Superuser. Using the Superuser credentials you can directly access the BI Publisher administrative functions without logging in through the defined security model. Set up this Superuser to ensure access to all administrative functions in case of failures with the configured security model. It is highly recommended that you set up a Superuser.
To enable a local superuser:
Click Administration.
Under Security Center, click Security Configuration.
Under Local Superuser, select the box and enter the credentials for the Superuser, as shown.
Restart the BI Publisher service.
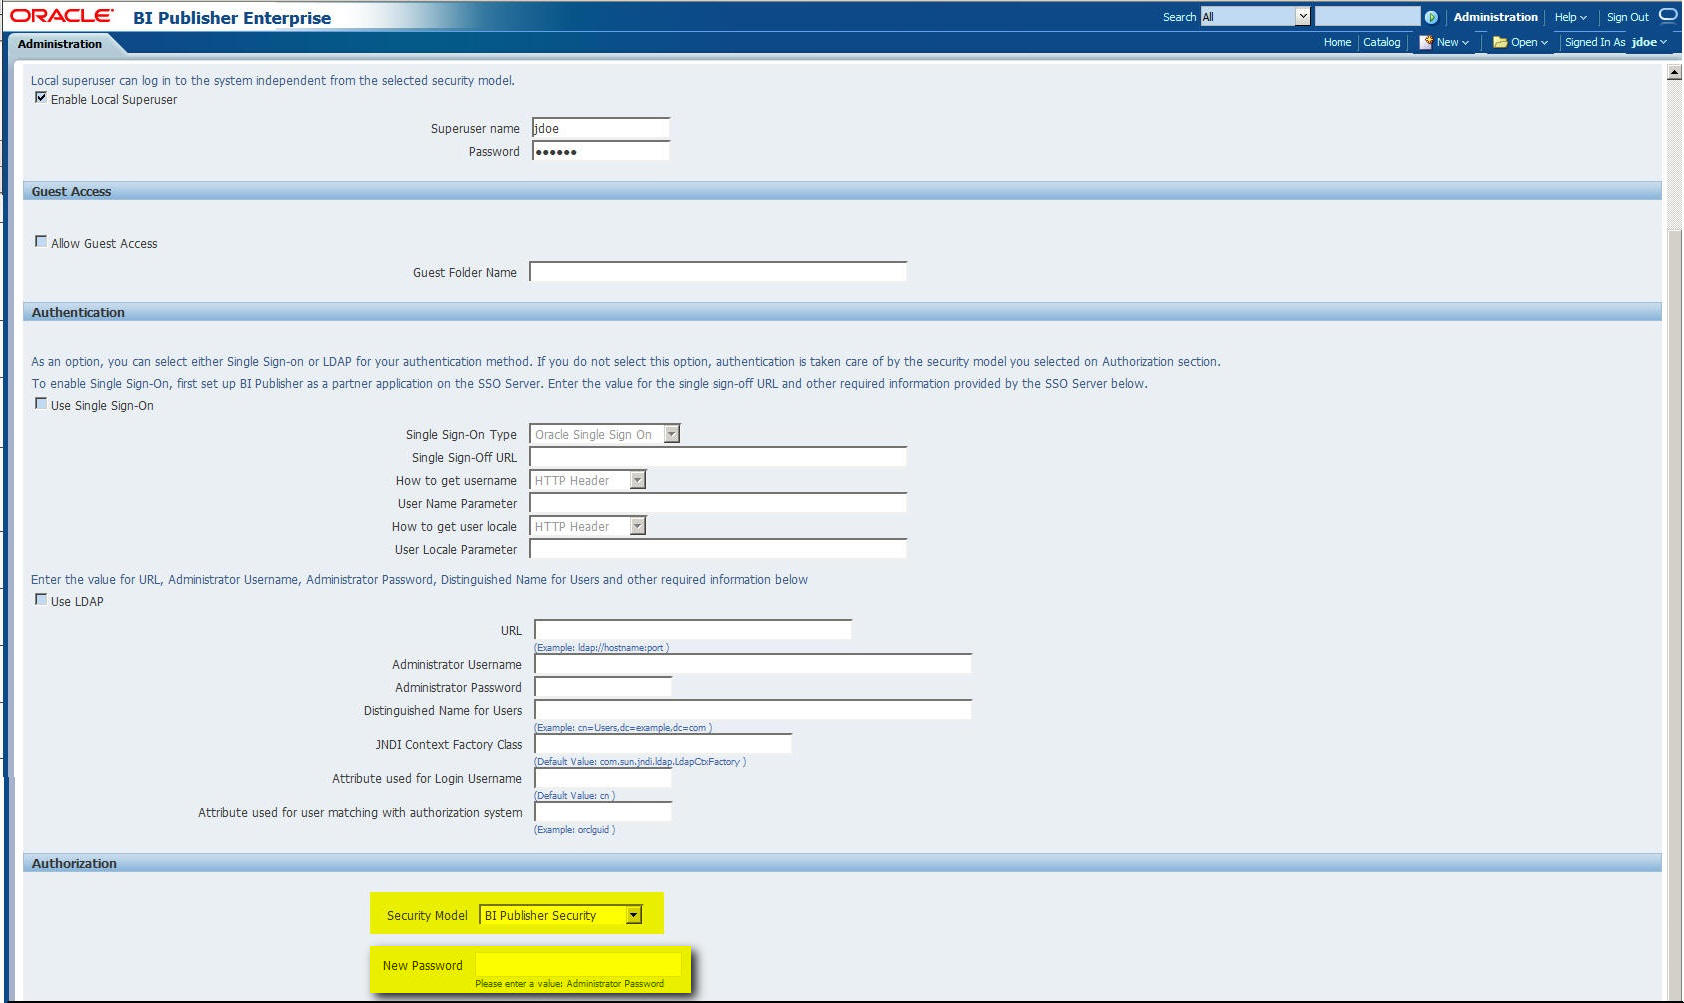
BI Publisher supports numerous security models. For Argus Safety 8.0, the following security models are supported:
BI Publisher Security (default)
Oracle Fusion Middleware
After setting up the security model, restart the BI Publisher server.
For more information about configuring BI Publisher over different security authentication and authorization models, refer to the BI Publisher Admin Guide.
|
Note: The following sections of the BI Publisher setup are based on the standalone BI Publisher installation with BI Publisher Security mode. For more details about configuring the BI Publisher Security Model or Oracle Fusion Middleware Security set up, refer to Oracle Argus Safety Extensibility Guide. |
|
Note: All the users who have access to run the periodic reports using AS UI should be created in the BI Publisher local as well (applicable for BI Publisher Security model only).The password in BI Publisher local user corresponding to the AS UI need not to be same as that of AS UI. |
To connect the BI Publisher and the database, execute the following steps:
Log on to BI Publisher using the administrator credentials. This displays the BI Publisher Home Page.
Click Administration.
Click JDBC Connection under Data Sources.
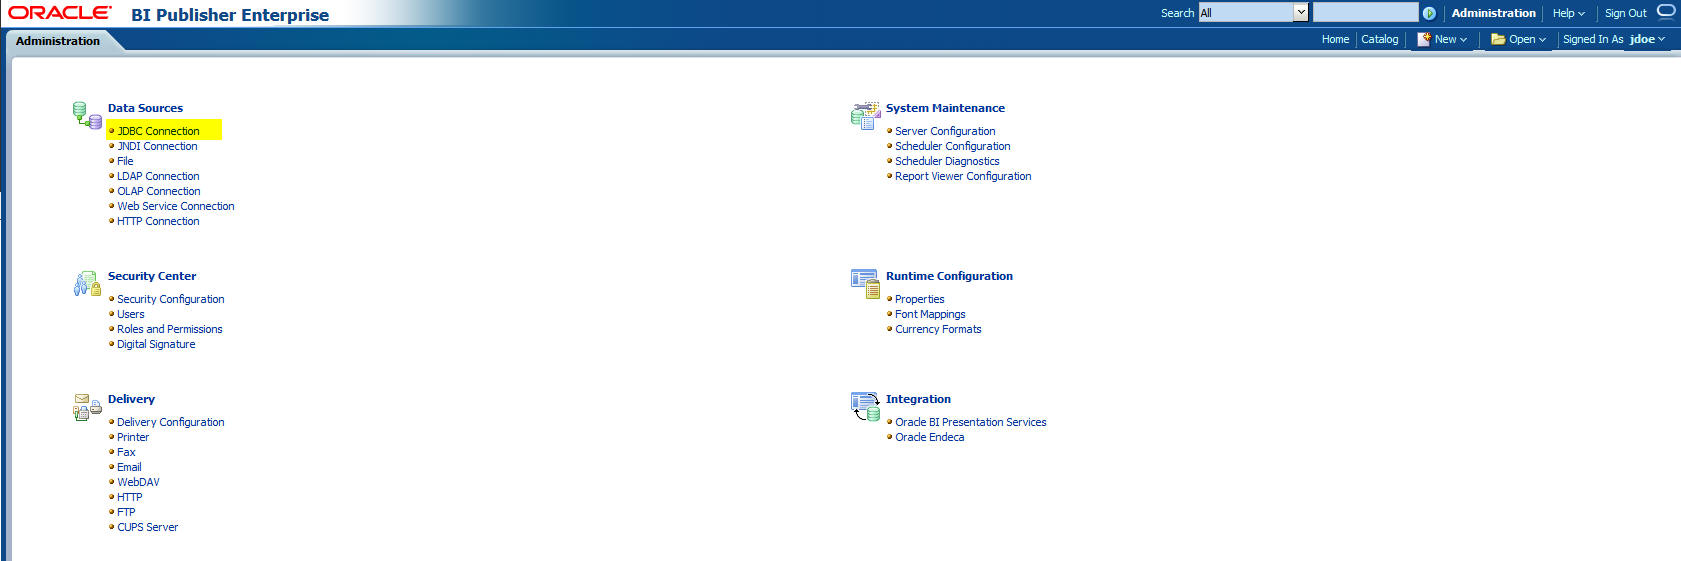
This displays the Data Sources screen.
Click Add Data Source.

In the Add Data Source section:
Enter asbip in the Data Source Name field.
Make sure that you enter this data source name in lowercase only.
Select the database from the Driver Type drop-down list.
This auto-populates the Database Driver Class field.
Enter either of the following connection string in the Connection String field.
- url="jdbc:oracle:thin:@[host]:[port]/[sid]"
- url="jdbc:oracle:thin:@(DESCRIPTION=(ADDRESS_LIST=(ADDRESS=(PROTOCOL=TCP)(HOST=host.com)(PORT=1521)))(CONNECT_DATA=(SID=orcl)))"
You must enter all the details in lower case in this field.
Enter the username (Argus Safety BIP DB Schema user, for example, bip_user, which got created during Argus Safety database installation) to connect to the database in the Username field.
Click Test Connection.
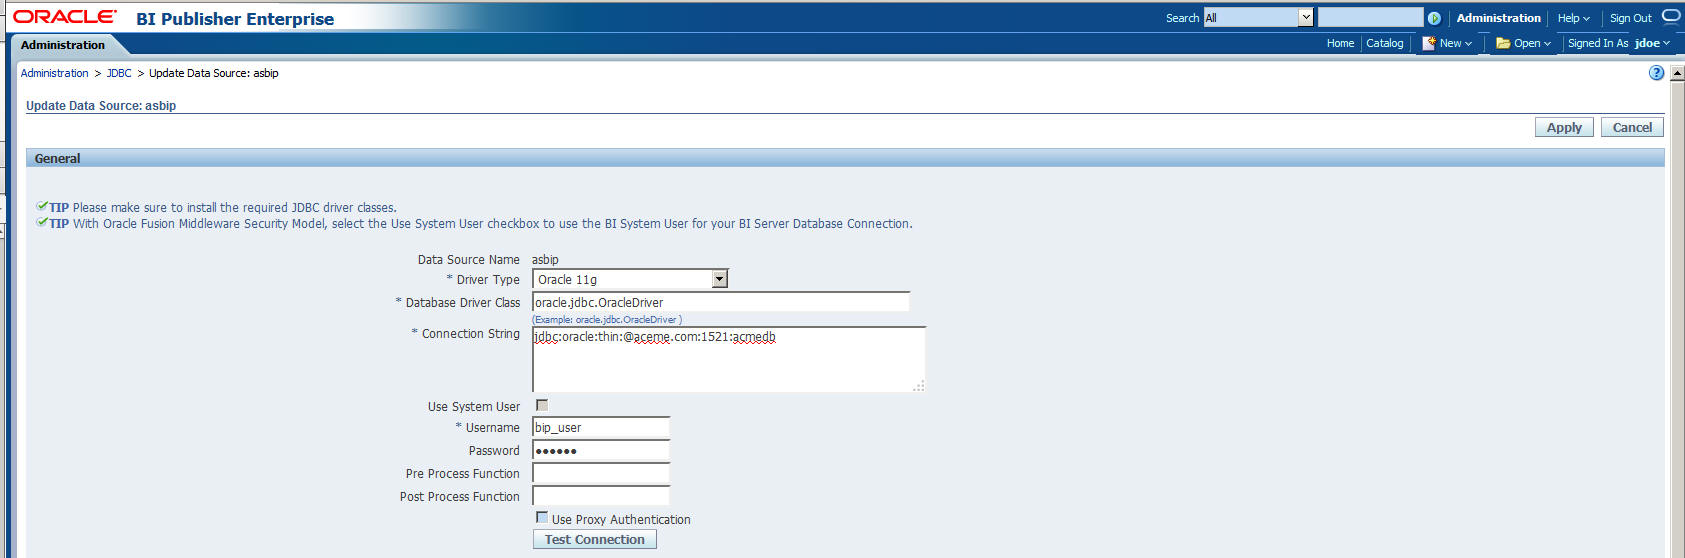
If successful, this displays a confirmation message.
Click Apply. This displays the asbip Data Source in the list of already existing data source names.

This successfully creates a connection between BI Publisher and the database.
Login to BI Publisher.
Click Administration.
From Runtime Configuration section, click Properties.
Modify the following parameter values to 1800 seconds from 600 seconds:
Memory Guard > Process timeout for online report formatting
Data Model > SQL Query Timeout
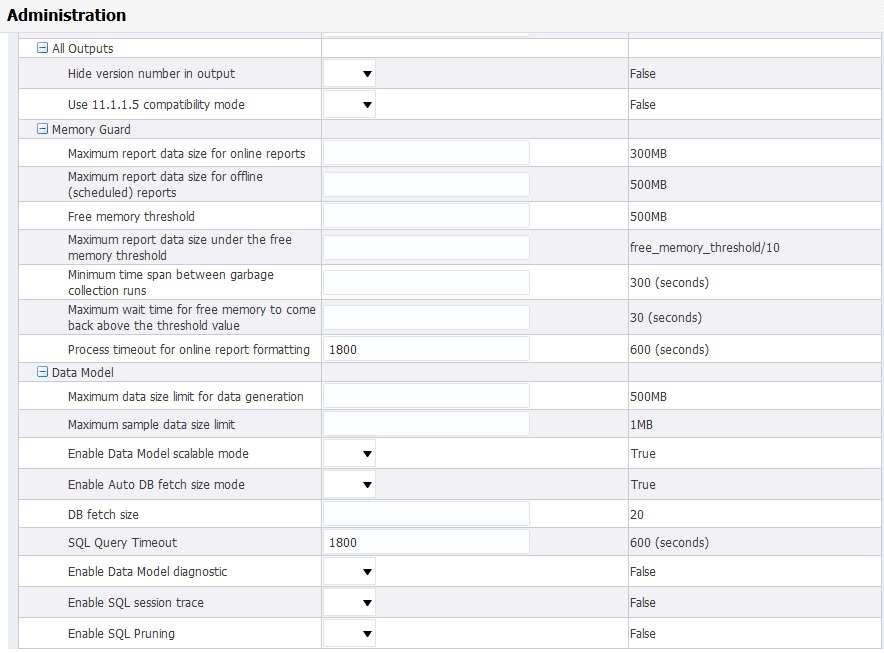
Click on Apply.
These changes ensures the out-of-the-box BI Publisher reports to execute successfully.
These values can be increased as needed, for any BIP custom reports that takes longer time-period.
This section contains the following:
To create users and assign them roles:
Log in to BI Publisher with the administrator credentials.
The BI Publisher Home Page appears.
Click Administration.
The Administration screen appears.
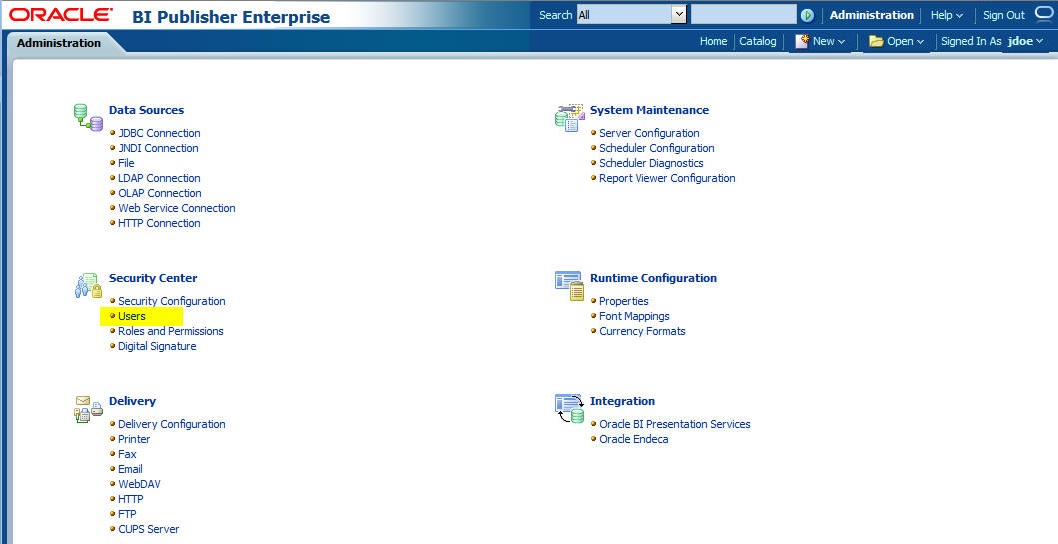
Under Security Center, click Users.
The Users screen appears.
Click Create Users.
The Create User screen appears.
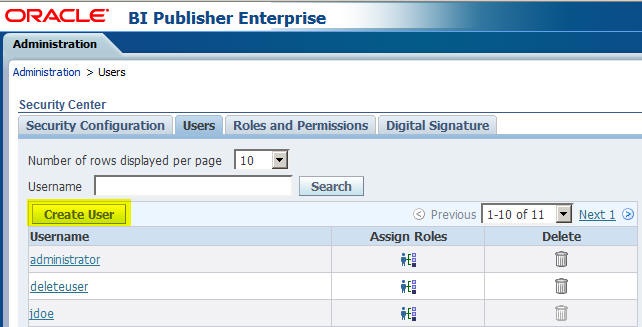
Enter a Username and Password, and click Apply.
A new user is created.
To assign roles to the user, click the Assign Roles icon corresponding to the new user.
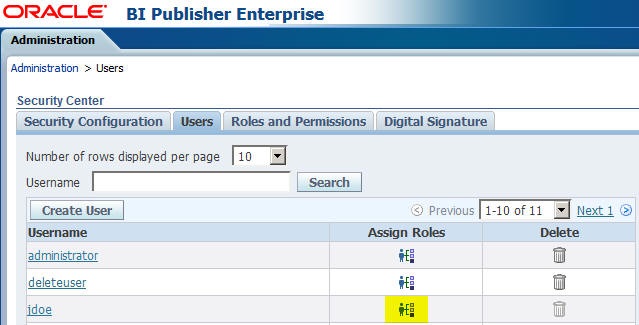
The Assign Roles screen appears with the BI Publisher system roles as the following:
BI Publisher Administrator
BI Publisher Excel Analyzer
BI Publisher Online Analyzer
BI Publisher Developer
BI Publisher Scheduler
BI Publisher Template Designer
These roles are available by default along with the custom roles you create.
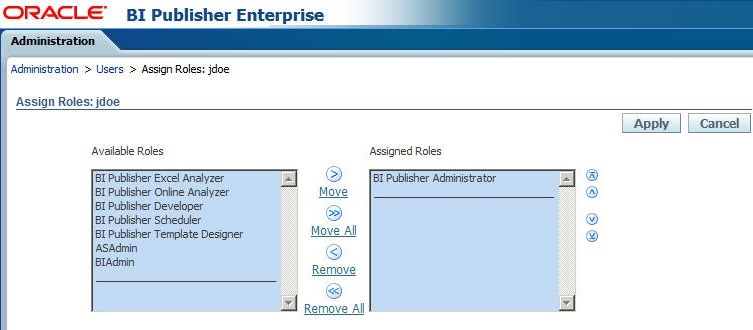
In the above figure, ASAdmin and BIAdmin are custom roles.
From the Available Roles section, select a role, and click Move (>) to move the selected role to the Assigned Roles section.
Click Apply.
The selected role is assigned to the user.
This section describes the steps to create custom roles and assign data sources to them.
Log in to BI Publisher with the administrator credentials.
The BI Publisher Home Page appears.
Click Administration.
Under Security Center, click Roles and Permissions.
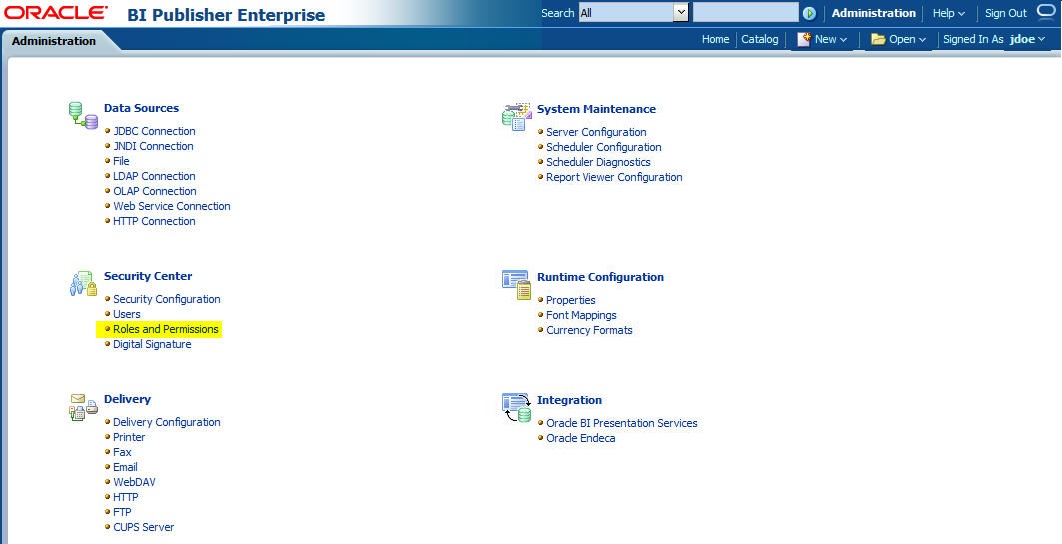
The Roles and Permissions screen appears.
Click Create Role.
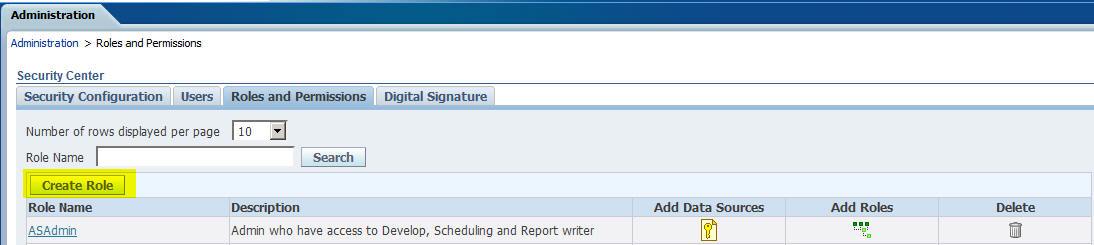
The Create Role screen appears.
Enter a role Name and Description, and click Apply.
A new custom role is created.
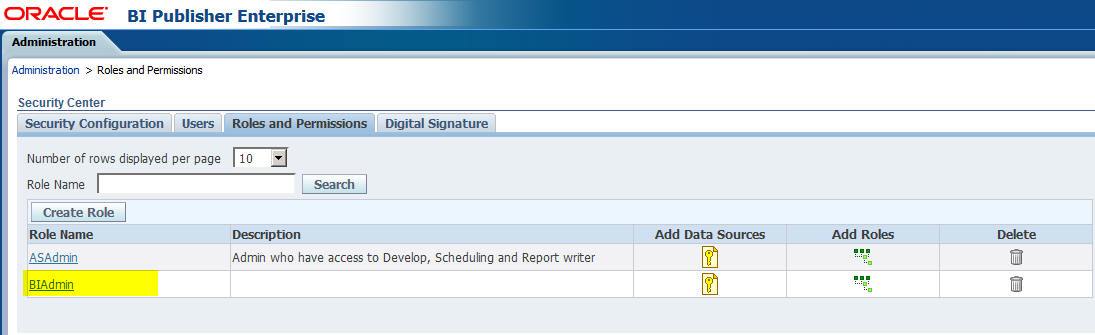
To assign data sources to the created role, click the Add Data Sources icon  .
.
From the Available Data Source section, select a data source (for example, asbip), and click Move (>) to add it to the Allowed Data Sources section.
Click Apply.
To assign the required roles to the custom role, click Add Roles icon  .
.
The Add Roles screen appears.
From the Available Roles, select the roles to be included, and click Move (>) to add the selected roles to Included Roles.
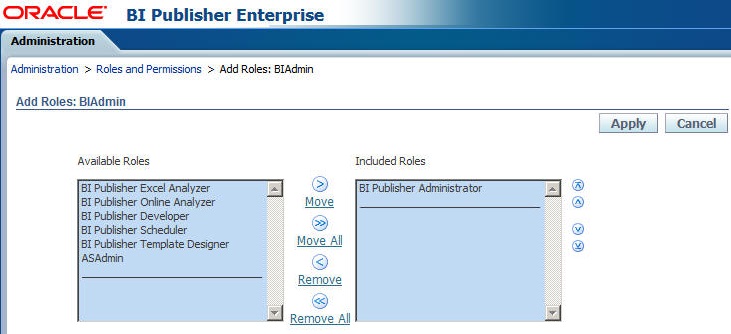
Click Apply.
This section describes the steps to create roles, policies, users, and groups in Oracle Fusion Middleware (OFM) security in BI Publisher Standalone installation.
|
Note: For detailed information, refer to section 2.5.2 Managing Users and Groups Using the Default Authentication Provider of https://docs.oracle.com/middleware/1221/bip/BIPAD.pdf. |
To create new groups for FAR periodic:
Login to Fusion Middleware Console.
Navigate to WebLogic Domain > Security > Users and Groups > Groups.
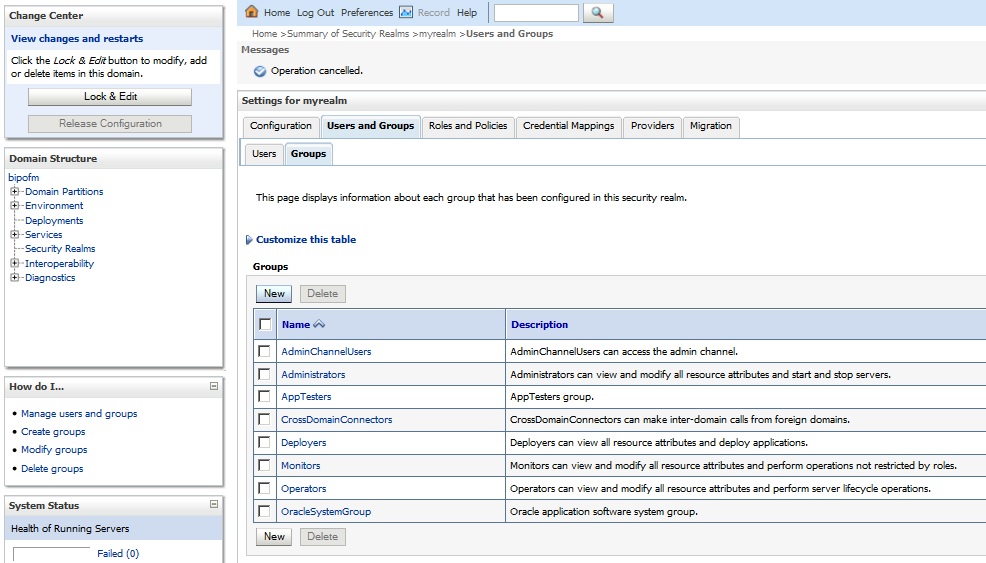
From the Groups section, click New.
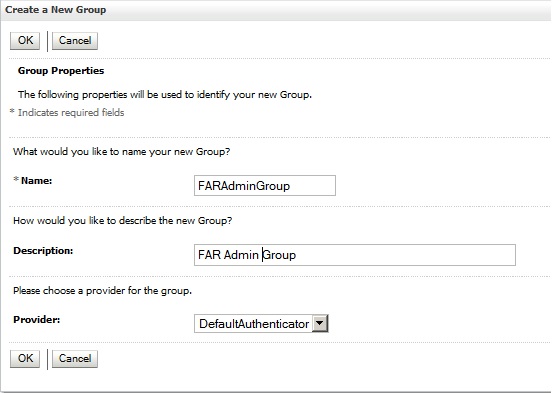
The Create a New Group dialog box appears.
Create the following groups by entering the Name and Description:
FARAdminGroup
FARSafetyAuthorGroup
FARSafetyConsumerGroup
To create new users in Fusion Middleware Console:
Login to Fusion Middleware Console.
Navigate to WebLogic Domain > Security > Users and Groups > Users.
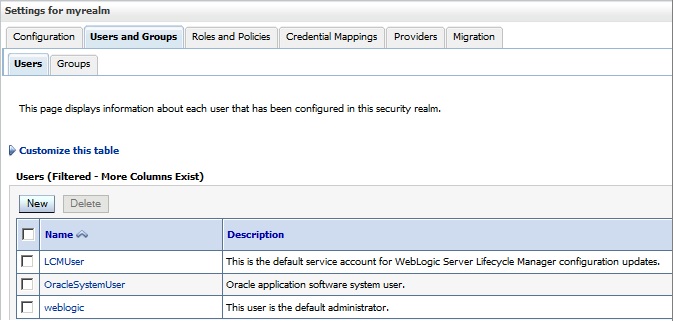
From the Users section, click New.
The Create a New User screen appears.
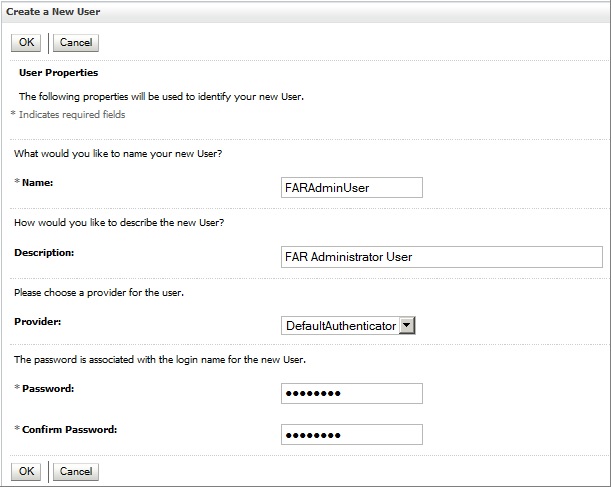
Enter the following fields, and click OK.
Name
Description
Provider
Password
Confirm Password
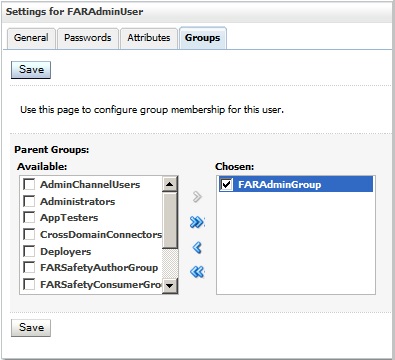
Assign role to the user, and click Save.
To create new application roles:
Login to Fusion Middleware Control Enterprise Manager.
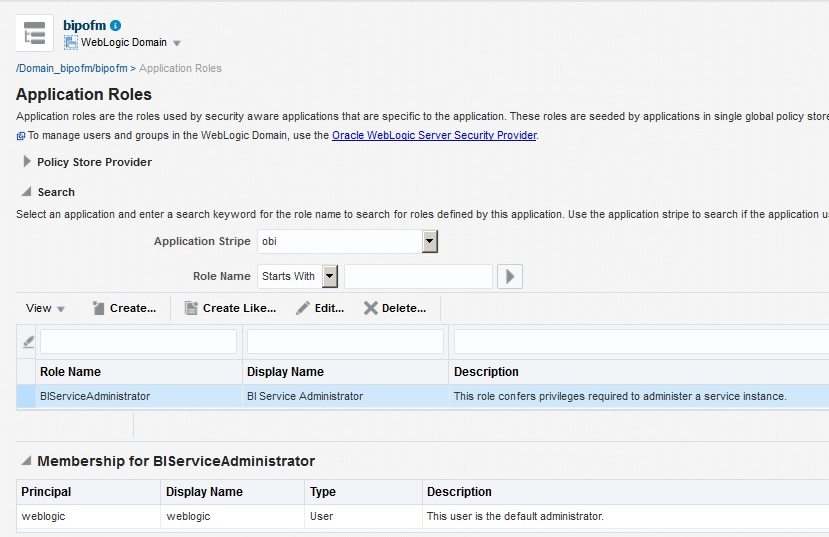
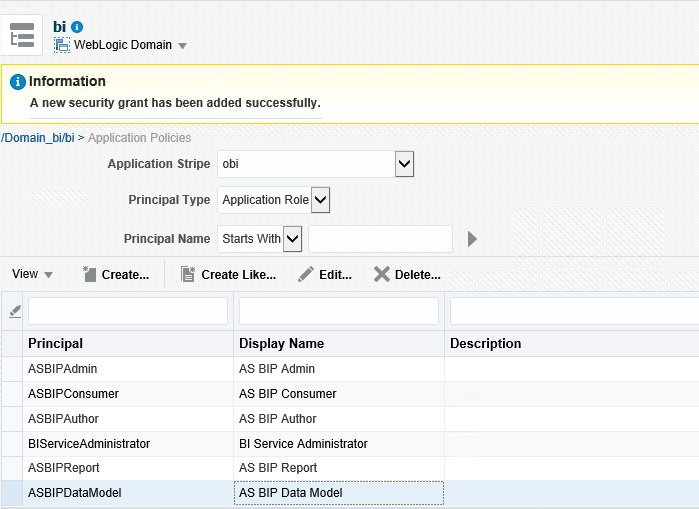
Go to WebLogic Domain > Security > Application Roles.
The Application Roles dialog box appears.

From the Application Stripe drop-down list, select OBI, and click Search  .
.
The default Role available in clean slate installation appears.
Click Create.
The Create Application Role dialog box appears.
In the Role Name field, enter FARAdminRole.
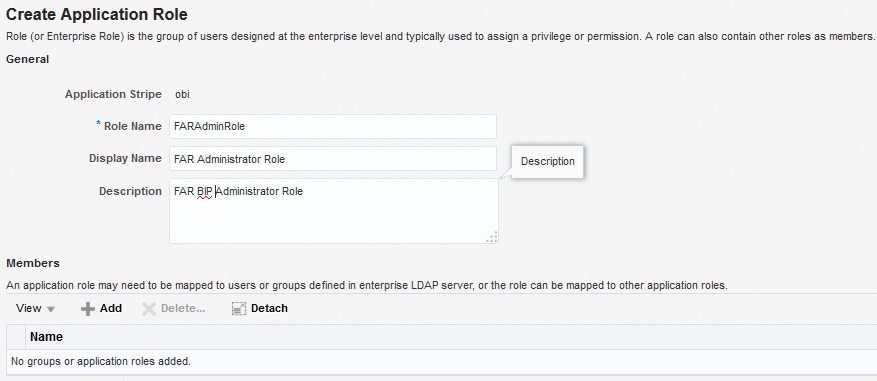
From the Members section, click +Add.
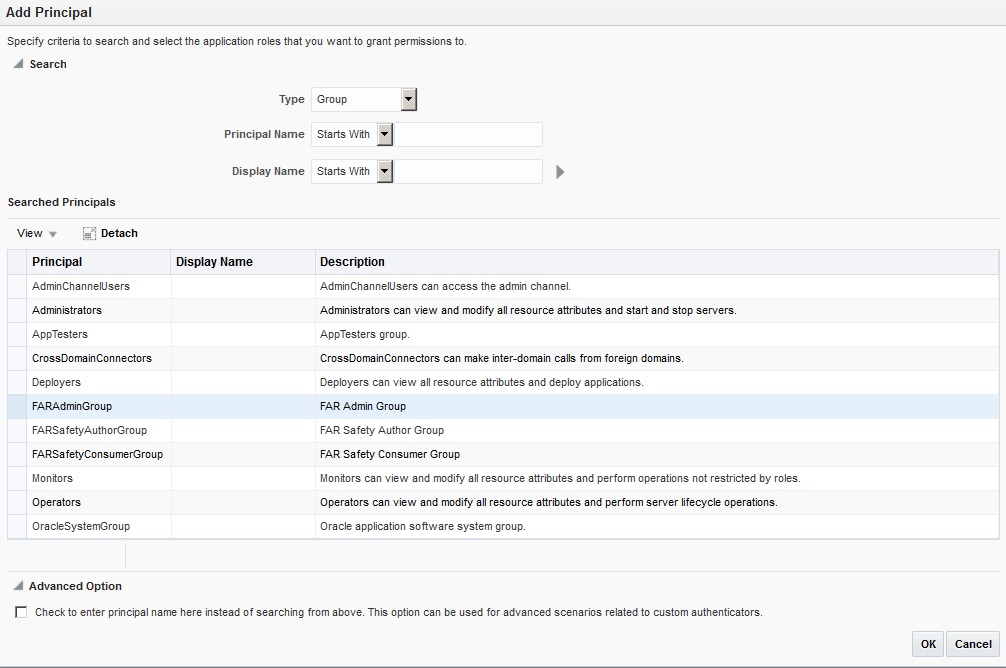
The Add Principal dialog box appears.
From the Type drop-down list, select Group, and click Search.
A list of principals appears.
From the list of Searched Principlals, select FARAdminGroup, and click OK.
From the Members section, click +Add.
The Add Principal dialog box appears.
From the Type drop-down list, select Application Role, and click Search.
A list of principals appears.
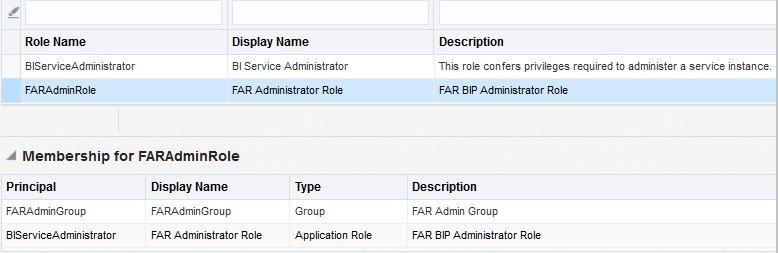
From the list of Searched Principals, select BIServiceAdministrator , and click OK.

The Membership for FARAdminRole appears as below:
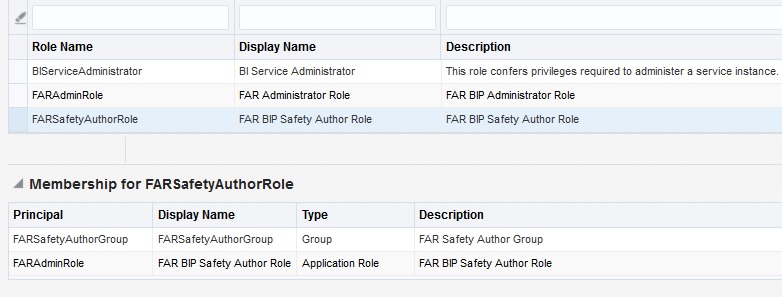
To add FARSafetyAuthorRole, repeat from Step 4 to Step 11.
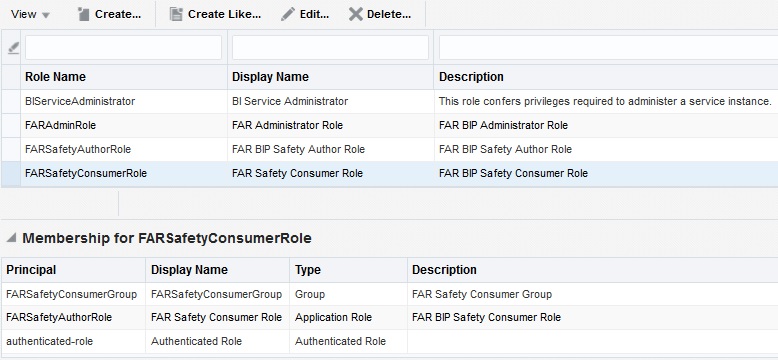
To add FARSafetyConsumerRole, repeat from Step 4 to Step 11, and add authenticated-role as a Member for this role.
|
Note: For more details, refer to Section 2.8.3.1 Creating Application Roles Using Fusion Middleware Control from https://docs.oracle.com/middleware/1221/bip/BIPAD.pdf |
To create new application policy:
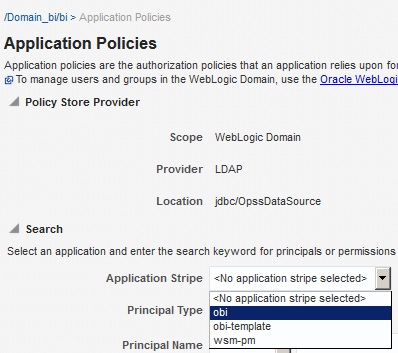
Login to Fusion Middleware Control Enterprise Manager.
Go to WebLogic Domain > Security > Application Policies.
The Application Policies screen appears.
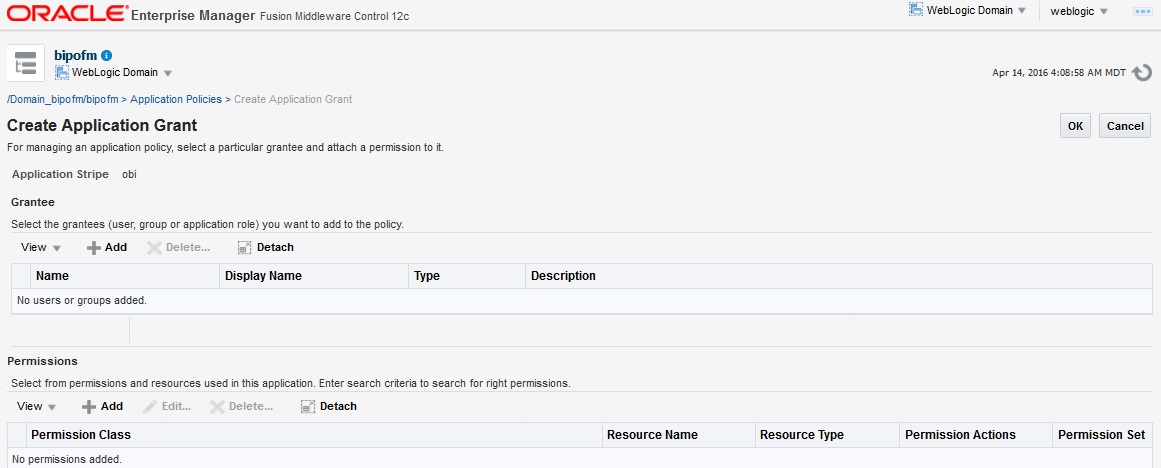
To create a new application policy, click Create.
The Create Application Grant dialog box appears.
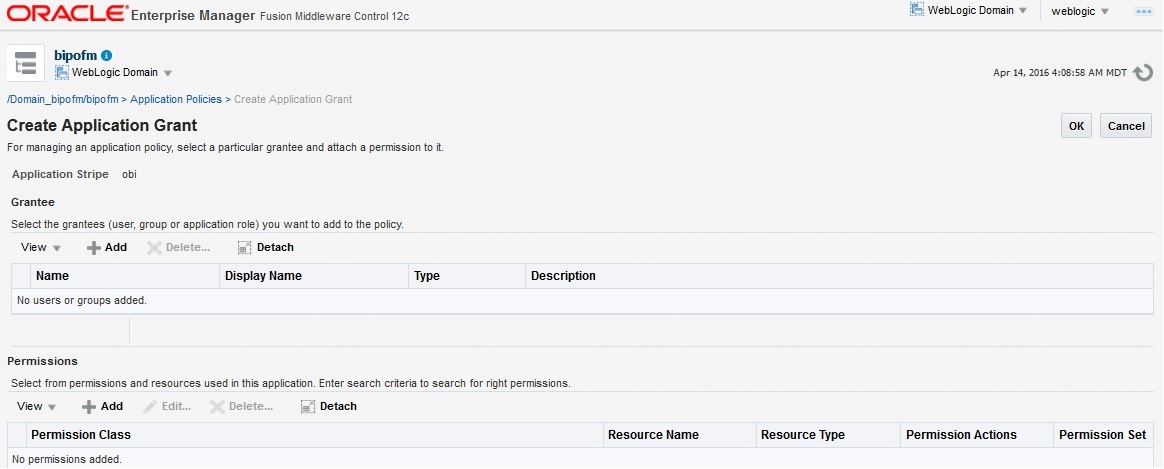
From the Grantee section, click +Add.
The Add Principal dialog box appears.
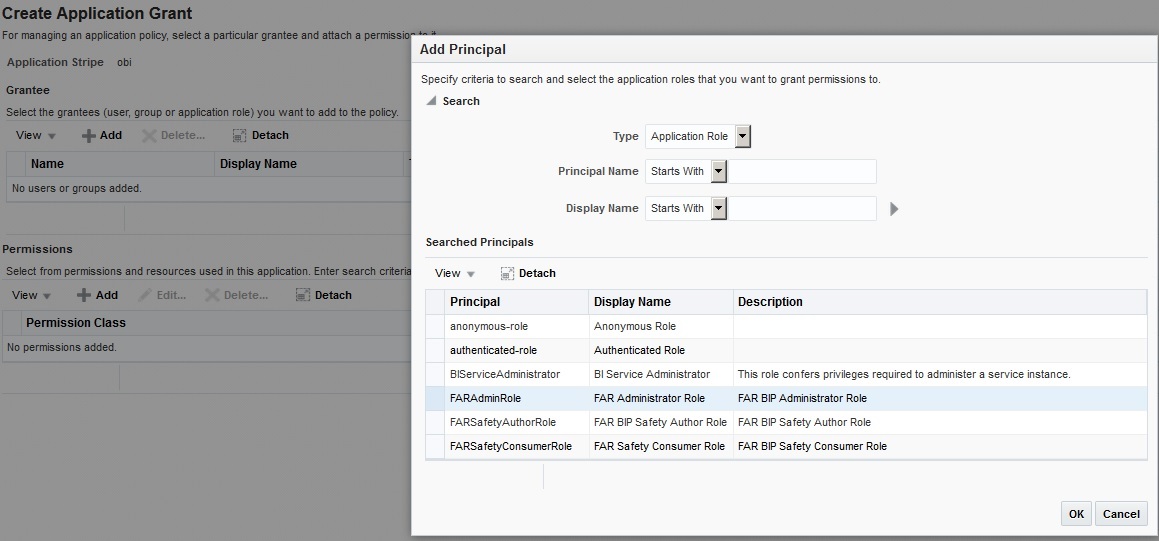
From the Type drop-down list, select Application Role, and click Search .
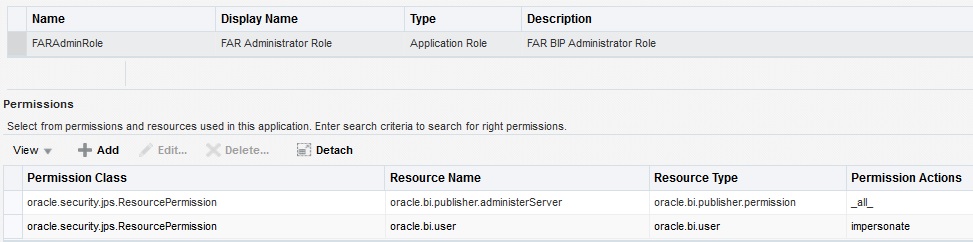
From the list of Searched Principals, select FARAdminRole, and click OK.
From the Permissions section, click +Add.
The Add Permission dialog box appears.
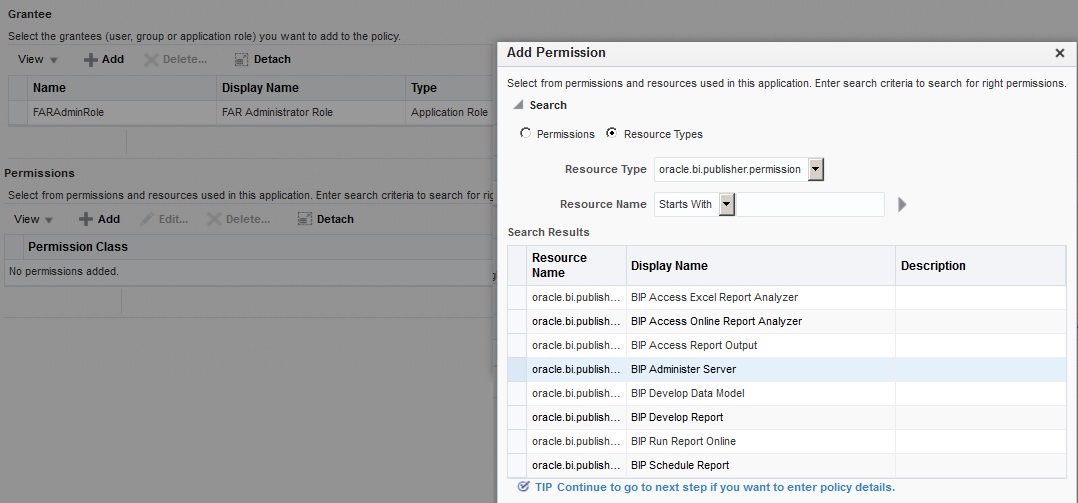
Select the Resource Types radio button.
From the Resource Type drop-down list, select oracle.bi.publisher.permission, and click Search.
From the Search Results, select oracle.bi.publisher.permission (BIP Administer Server), and click Continue.
The Add Permission dialog box appears.
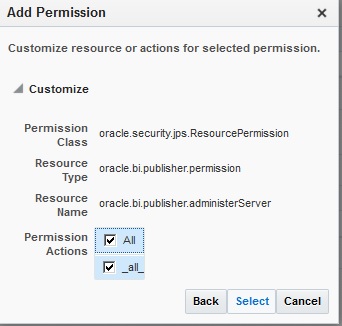
For Permission Actions, select All (_all_), and click Select.
Add Resource Name as oracle.bi.user with Impersonate permission.
The new FAR Admin policy has all the permissions.
|
Note: Make sure all the fields are either selected or entered manually. |
Repeat from Step 4 to Step 12, to add the following:
| Name | Grantee | Resource Permissions |
|---|---|---|
| FAR Author | FARSafetyAuthorRole | BIP Develop Report
BIP Develop Data Model |
| FAR Consumer | FARSafetyConsumerRole | BIP Access Excel Report Analyzer
BIP Access Online Report Analyzer BIP Access Report Output BIP Schedule Report |
|
Note: For more details, refer to Section 2.8.3.2 Creating Application Policies Using Fusion Middleware Control from https://docs.oracle.com/middleware/1221/bip/BIPAD.pdf |
To set Catalog Folder-level permissions in BI Publisher:
Go to Catalog > Shared Folders > Tasks > Permissions.
The Permissions dialog box appears.
Set the Permissions as follows, and click OK.
| Accounts | Permissions |
|---|---|
| FAR Administrator Role | Write, and Delete |
| FAR BIP Safety Author Role | Read, Write, and Delete |
| FAR Safety Consumer Role | Read |
| BI Service Administrator | Write, and Delete |
|
Note: Make sure the Apply permissions option for the sub-folders and the items is NOT selected. |
Go to Shared folders > Argus Safety > Tasks > Permissions.
The Permissions dialog box appears.
Set the Permissions as follows, and click OK.
| Accounts | Permissions |
|---|---|
| FAR Administrator Role | Write, and Delete |
| FAR BIP Safety Author Role | Read, Write, and Delete |
| FAR Safety Consumer Role | Read |
| BI Service Administrator (Owner) | Write, and Delete |
|
Note: Make sure to select the Apply permissions option for the sub-folders and the items. |
To add the Data Sources to Roles in BI Publisher:
Login to the BIP with Administrator credentials.
For example, login to BIP from http://acme.com:9502/xmlpserver/
The BIP home page appears.
Go to Administration > Roles and Permissions.
The Roles and Permissions screen appears.
From the list of roles, select FARAdminRole, and click the corresponding Add Data Sources icon.
The Add Data Sources screen appears.
From the Available Data Sources section, select asbip, and click the Move (>) icon to move the asbip data source to the Allowed Data Sources section.
Click Apply.
Repeat the steps to asbip data source to FARSafetyAuthorRole and FARSafetyConsumerRole as well.
This section comprises the steps to manage users and their roles for OBIEE and BI Publisher in Oracle Fusion Middleware.
Refer to Section 13.6.1, "Creating Users and Assigning Groups."
To create new application role and adding members:
See Section 13.6.2, "Creating Roles and Policies" > To create new application roles:
Do NOT copy policies from this reference, and see the following section.
|
Note: As you cannot modify the Catalog Type to BI Publisher File System, you must not use BI Publisher Security for this type of installation. Beside, if you do use BI Publisher Security for this installation, then you will not be able to log-in. |
To create new application policies:
Login to Fusion Middleware Control Enterprise Manager.
Go to WebLogic Domain > Security > Application Policies.
The Application Policies screen appears.
From the Application Stripe drop-down list, select OBI.
Click Create.
The Create Application Grant dialog box appears.
From the Grantee section, click +Add.
The Add Principal dialog box appears.
From the Type drop-down list, select Application Role, and click Search .
From the list of Searched Principals, select FARAdminRole, and click OK.
From the Permissions section, click +Add.
The Add Permission dialog box appears.
Select the Resource Types radio button.
From the Resource Type drop-down list, select <Resource Type>, and click Search.
From the Search Results, select <Resource Name>, and click Continue.
The Add Permission dialog box appears.
|
Note: If the Resource Name field is blank, enter it manually.For Principal, Resource Type, and Resource Name, see Table 13-1. |
For Permission Actions, select All (_all_), and click Select.
When all the permissions are added, click OK.
Repeat Steps 5-13 for other principals and their permissions. (See Table 13-1)
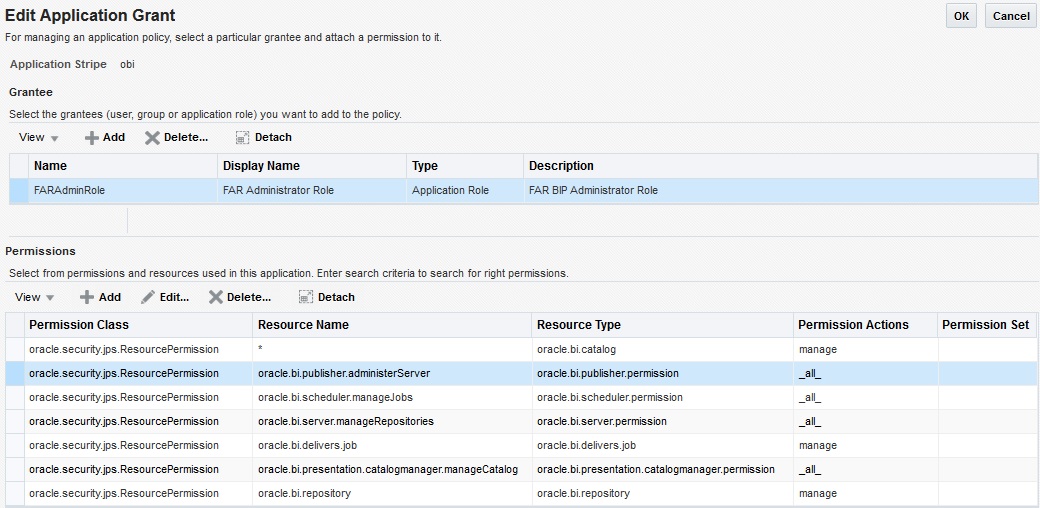
Table 13-1 List of Policies and their Permissions
| Policy Name/Principal | Resource Type | Resource Name | Permission Actions |
|---|---|---|---|
|
FARAdminRole |
oracle.bi.catalog |
* |
manage |
|
oracle.bi.server.permission |
oracle.bi.server.manageRepositories |
_all_ |
|
|
oracle.bi.presentation.catalogmanger.permission |
oracle.bi.presentation.catalogmanger.manageCatalog |
_all_ |
|
|
oracle.bi.delivers.job |
oracle.bi.delivers.job |
manage |
|
|
oracle.bi.publisher.permission |
oracle.bi.publisher.administerServer |
_all_ |
|
|
oracle.bi.repository |
oracle.bi.repository |
manage |
|
|
oracle.bi.scheduler.permission |
oracle.bi.scheduler.manageJobs |
_all_ |
|
|
FARSafetyAuthorRole |
oracle.bi.publisher.permission |
oracle.bi.publisher.developReport |
_all_ |
|
oracle.bi.publisher.permission |
oracle.bi.publisher.developDataModel |
_all_ |
|
|
oracle.bi.tech.visualanalyzer.permission |
oracle.bi.tech.visualanalyzer.generalAccess |
_all_ |
|
|
oracle.bi.delivers.job |
* |
schedule |
|
|
FARSafetyConsumerRole |
oracle.bi.publisher.permission |
oracle.bi.publisher.scheduleReport |
_all_ |
|
oracle.bi.publisher.permission |
oracle.bi.publisher.runReportOnline |
_all_ |
|
|
oracle.bi.publisher.permission |
oracle.bi.publisher.accessReportOutput |
_all_ |
|
|
oracle.bi.publisher.permission |
oracle.bi.publisher.accessOnlineReportAnalyzer |
_all_ |
|
|
ESSMetadataPermission |
oracle.bip.ess.JobDefinition.EssBipJob |
Read,Execute |
|
|
oracle.bi.publisher.permission |
oracle.bi.publisher.accessExcelReportAnalyzer |
_all_ |
|
Note: For more details, refer to Section 2.8.3.2 Creating Application Policies Using Fusion Middleware Control from https://docs.oracle.com/middleware/1221/bip/BIPAD.pdf |
Log in to the OBIEE application as a privileged user.
For example: Login to http://obieeapps.us.oracle.com:9502/analytics with WebLogic user credentials.
Go to Administration > Security > Manage Privileges.
Add the following Catalog Roles:
| Component | Privilege | Default Role Granted |
|---|---|---|
| Access | Access to Administration | FAR Administrator Role, BI Service Administrator |
| Access | Access to Answers | FAR Safety Author Role |
| Access | Access to BI Composer | FAR Safety Author Role |
| Access | Access to Briefing Books | FAR Safety Consumer Role |
| Access | Access to Dashboards | FAR Safety Consumer Role |
| Access | Access to Delivers | FAR Safety Author Role |
| Access | Access to Export | FAR Safety Consumer Role |
| Access | Access to KPI Builder | FAR Safety Author Role |
| Access | Access to List Formats | FAR Safety Author Role |
| Access | Access to Metadata Dictionary | FAR Safety Author Role |
| Access | Access to Mobile | FAR Safety Consumer Role |
| Access | Access to Oracle BI Client Installer | FAR Safety Consumer Role |
| Access | Access to Oracle BI for Microsoft Office | FAR Safety Consumer Role |
| Access | Access to Scorecard | FAR Safety Consumer Role |
| Access | Access to Segment Trees | FAR Safety Author Role |
| Access | Access to Segments | FAR Safety Consumer Role |
| Access | Catalog Preview Pane UI | FAR Safety Consumer Role |
| Actions | Create Invoke Actions | FAR Safety Author Role |
| Actions | Create Navigate Actions | FAR Safety Consumer Role |
| Actions | Save Actions containing embedded HTML | FAR Administrator Role, BI Service Administrator |
| Admin: Catalog | Change Permissions | FAR Safety Author Role |
| Admin: Catalog | Toggle Maintenance Mode | FAR Administrator Role, BI Service Administrator |
| Admin: General | Change Log Configuration | FAR Administrator Role, BI Service Administrator |
| Admin: General | Create Dashboards | FAR Safety Author Role |
| Admin: General | Diagnose BI Server Query | Denied: Authenticated User |
| Admin: General | Issue SQL Directly | FAR Administrator Role, BI Service Administrator |
| Admin: General | Manage Agent Sessions | FAR Administrator Role, BI Service Administrator |
| Admin: General | Manage Device Types | FAR Administrator Role, BI Service Administrator |
| Admin: General | Manage Global Variables | FAR Administrator Role, BI Service Administrator |
| Admin: General | Manage Map Data | FAR Administrator Role, BI Service Administrator |
| Admin: General | Manage Marketing Defaults | FAR Administrator Role, BI Service Administrator |
| Admin: General | Manage Marketing Jobs | FAR Safety Author Role |
| Admin: General | Manage Sessions | FAR Administrator Role, BI Service Administrator |
| Admin: General | Performance Monitor | FAR Administrator Role, BI Service Administrator |
| Admin: General | See privileged errors | FAR Administrator Role, BI Service Administrator |
| Admin: General | See sessions IDs | FAR Administrator Role, BI Service Administrator |
| Admin: General | See SQL issued in errors | FAR Safety Consumer Role |
| Admin: General | View System Information | FAR Administrator Role, BI Service Administrator |
| Admin: Security | Access to Permissions Dialog | FAR Safety Consumer Role |
| Admin: Security | Manage Catalog Accounts | FAR Administrator Role, BI Service Administrator |
| Admin: Security | Manage Privileges | FAR Administrator Role, BI Service Administrator |
| Admin: Security | Set Ownership of Catalog Objects | FAR Administrator Role, BI Service Administrator |
| Admin: Security | User Population - Can List Application Roles | FAR Safety Consumer Role, BI System |
| Admin: Security | User Population - Can List Catalog Groups | FAR Safety Consumer Role, BI System |
| Admin: Security | User Population - Can List Users | FAR Safety Consumer Role, BI System |
| Answers | Access Advanced Tab | FAR Safety Author Role |
| Answers | Add EVALUATE_PREDICATE Function | FAR Safety Author Role |
| Answers | Create Advanced Filters and Set Operations | FAR Safety Author Role |
| Answers | Create Analysis From Simple SQL | FAR Administrator Role, BI Service Administrator |
| Answers | Create Prompts | FAR Safety Author Role |
| Answers | Create Views | FAR Safety Author Role |
| Answers | Edit Column Formulas | FAR Safety Author Role |
| Answers | Edit Direct Database Analysis | FAR Administrator Role, BI Service Administrator |
| Answers | Enter XML and Logical SQL | FAR Safety Author Role |
| Answers | Execute Direct Database Analysis | FAR Administrator Role, BI Service Administrator |
| Answers | Save Column | FAR Safety Author Role |
| Answers | Save Content with HTML Markup | FAR Administrator Role, BI Service Administrator |
| Answers | Save Filters | FAR Safety Author Role |
| Answers | Upload Images | FAR Safety Author Role |
| Briefing Book | Add To or Edit a Briefing Book | FAR Safety Author Role |
| Briefing Book | Add to Snapshot Briefing Book | FAR Safety Consumer Role |
| Briefing Book | Download Briefing Book | FAR Safety Consumer Role |
| Catalog | Archive Catalog | FAR Administrator Role, BI Service Administrator |
| Catalog | Create Folders | FAR Safety Author Role |
| Catalog | Perform Extended Search | FAR Safety Author Role |
| Catalog | Perform Global Search | FAR Safety Author Role |
| Catalog | Personal Storage (My Folders and My Dashboard) | FAR Safety Consumer Role |
| Catalog | Reload Metadata | FAR Administrator Role, BI Service Administrator |
| Catalog | See Hidden Items | FAR Safety Author Role |
| Catalog | Unarchive Catalog | FAR Administrator Role, BI Service Administrator |
| Catalog | Upload Files | FAR Administrator Role, BI Service Administrator |
| Conditions | Create Conditions | FAR Safety Author Role |
| Dashboards | Assign Default Customizations | FAR Safety Author Role |
| Dashboards | Create Bookmark Links | FAR Safety Consumer Role |
| Dashboards | Create Prompted Links | FAR Safety Consumer Role |
| Dashboards | Export Entire Dashboard To Excel | FAR Safety Consumer Role |
| Dashboards | Export Single Dashboard Page To Excel | FAR Safety Consumer Role |
| Dashboards | Save Customizations | FAR Safety Consumer Role |
| Delivers | Chain Agents | FAR Safety Author Role |
| Delivers | Create Agents | FAR Safety Author Role |
| Delivers | Deliver Agents to Specific or Dynamically Determined Users | FAR Administrator Role, BI Service Administrator |
| Delivers | Modify Current Subscriptions for Agents | FAR Administrator Role, BI Service Administrator |
| Delivers | Publish Agents for Subscription | FAR Safety Author Role |
| Formatting | Save System-Wide Column Formats | FAR Administrator Role, BI Service Administrator |
| Home and Header | Access Administration Menu | Denied: Authenticated User |
| Home and Header | Access Catalog Search UI | FAR Safety Consumer Role |
| Home and Header | Access Catalog UI | FAR Safety Consumer Role |
| Home and Header | Access Data Loader | Denied: Authenticated User |
| Home and Header | Access Home Page | FAR Safety Consumer Role |
| Home and Header | Access Modeler | Denied: Authenticated User |
| Home and Header | Access Rapid Search UI | FAR Safety Consumer Role |
| Home and Header | Access User & Role Admin | Denied: Authenticated User |
| Home and Header | Advanced Search Link | FAR Safety Consumer Role |
| Home and Header | Custom Links | FAR Safety Consumer Role |
| Home and Header | Dashboards Menu | FAR Safety Consumer Role |
| Home and Header | Favorites Menu | FAR Safety Consumer Role |
| Home and Header | Help Menu | FAR Safety Consumer Role |
| Home and Header | My Account Link | FAR Safety Consumer Role |
| Home and Header | New Menu | FAR Safety Consumer Role |
| Home and Header | Open Menu | FAR Safety Consumer Role |
| Home and Header | Simple Search Field | FAR Safety Consumer Role |
| List Formats | Access Options Tab | FAR Safety Author Role |
| List Formats | Add/Remove List Format Columns | FAR Administrator Role, BI Service Administrator |
| List Formats | Create Headers and Footers | FAR Safety Author Role |
| List Formats | Create List Formats | FAR Safety Author Role |
| Mobile | Enable Local Content | FAR Safety Consumer Role |
| Mobile | Enable Search | FAR Safety Consumer Role |
| My Account | Access to My Account | FAR Safety Consumer Role |
| My Account | Change Delivery Options | FAR Safety Consumer Role |
| My Account | Change Preferences | FAR Safety Consumer Role |
| Proxy | Act As Proxy | Denied: Authenticated User |
| RSS Feeds | Access to RSS Feeds | FAR Safety Consumer Role |
| Scorecard | Add Annotations | FAR Safety Consumer Role |
| Scorecard | Add Scorecard Views To Dashboards | FAR Safety Consumer Role |
| Scorecard | Create Views | FAR Safety Author Role |
| Scorecard | Create/Edit Causes And Effects Linkages | FAR Safety Author Role |
| Scorecard | Create/Edit Initiatives | FAR Safety Author Role |
| Scorecard | Create/Edit KPIs | FAR Safety Author Role |
| Scorecard | Create/Edit Objectives | FAR Safety Author Role |
| Scorecard | Create/Edit Perspectives | FAR Safety Author Role |
| Scorecard | Create/Edit Scorecards | FAR Safety Author Role |
| Scorecard | Override Status | FAR Safety Consumer Role |
| Scorecard | View Scorecards | FAR Safety Consumer Role |
| Scorecard | Write Back to Database for KPI | FAR Safety Consumer Role |
| Segmentation | Access Segment Advanced Options Tab | FAR Administrator Role, BI Service Administrator |
| Segmentation | Access Segment Tree Advanced Options Tab | FAR Administrator Role, BI Service Administrator |
| Segmentation | Change Target Levels within Segment Designer | FAR Safety Author Role |
| Segmentation | Create Segment Trees | FAR Safety Author Role |
| Segmentation | Create Segments | FAR Safety Author Role |
| Segmentation | Create/Purge Saved Result Sets | FAR Administrator Role, BI Service Administrator |
| SOAP | Access AdministrationSOAPService Service | FAR Safety Consumer Role, BI System |
| SOAP | Access AnalysisExportViewsService Service | FAR Safety Consumer Role |
| SOAP | Access CatalogIndexingService Service | FAR Safety Consumer Role, BI System |
| SOAP | Access CatalogService Service | FAR Safety Consumer Role, BI System |
| SOAP | Access ConditionEvaluationService Service | FAR Safety Consumer Role, BI System |
| SOAP | Access DashboardService Service | FAR Safety Consumer Role, BI System |
| SOAP | Access HtmlViewService Service | FAR Safety Consumer Role, BI System |
| SOAP | Access IBotService Service | FAR Safety Consumer Role, BI System |
| SOAP | Access JobManagementService Service | FAR Safety Consumer Role, BI System |
| SOAP | Access KPIAssessmentService Service | FAR Safety Consumer Role, BI System |
| SOAP | Access MetadataService Service | FAR Safety Consumer Role, BI System |
| SOAP | Access MsgdbService Service | FAR Safety Consumer Role, BI System |
| SOAP | Access ReportEditingService Service | FAR Safety Consumer Role, BI System |
| SOAP | Access SchedulerService Service | FAR Safety Consumer Role |
| SOAP | Access ScorecardAssessmentService Service | FAR Safety Consumer Role, BI System |
| SOAP | Access ScorecardMetadataService Service | FAR Safety Consumer Role, BI System |
| SOAP | Access SecurityService Service | FAR Safety Consumer Role, BI System |
| SOAP | Access SOAP | FAR Safety Consumer Role, BI System |
| SOAP | Access Tenant Information | BI System |
| SOAP | Access UserPersonalizationService Service | FAR Safety Consumer Role |
| SOAP | Access XmlGenerationService Service | FAR Safety Consumer Role, BI System |
| SOAP | Impersonate as system user | BI System |
| View Canvas | Add/Edit Canvas View | FAR Safety Author Role |
| View Column Selector | Add/Edit Column Selector View | FAR Safety Author Role |
| View Compound Layout | Add/Edit Compound Layout View | FAR Safety Author Role |
| View Contribution Wheel | Add/Edit Contribution Wheel View | FAR Safety Author Role |
| View Create Segment | Add/Edit Create Segment View | FAR Safety Author Role |
| View Create Target List | Add/Edit Create Target List View | FAR Safety Author Role |
| View Dashboard Prompt | Add/Edit Dashboard Prompt View | FAR Safety Author Role |
| View Filters | Add/Edit Filters View | FAR Safety Author Role |
| View Funnel | Add/Edit Funnel View | FAR Safety Author Role |
| View Gauge | Add/Edit Gauge View | FAR Safety Author Role |
| View Generic Plugin View | Add/Edit Generic Plugin View View | FAR Safety Author Role |
| View Graph | Add/Edit Graph View | FAR Safety Author Role |
| View Heat Matrix | Add/Edit Heat Matrix View | FAR Safety Author Role |
| View Javascript view | Edit Javascript View | FAR Safety Author Role |
| View Legend | Add/Edit Legend View | FAR Safety Author Role |
| View Logical SQL | Add/Edit Logical SQL View | FAR Safety Author Role |
| View Map | Add/Edit Map View | FAR Safety Author Role |
| View Micro Chart | Add/Edit Micro Chart View | FAR Safety Author Role |
| View Narrative | Add/Edit Narrative View | FAR Safety Author Role |
| View No Results | Add/Edit No Results View | FAR Safety Author Role |
| View Performance Tile | Add/Edit Performance Tile View | FAR Safety Author Role |
| View Pivot Table | Add/Edit Pivot Table View | FAR Safety Author Role |
| View Report Prompt | Add/Edit Report Prompt View | FAR Safety Author Role |
| View Selection Steps | Add/Edit Selection Steps View | FAR Safety Author Role |
| View Static Text | Add/Edit Static Text View | FAR Safety Author Role |
| View Table | Add/Edit Table View | FAR Safety Author Role |
| View Ticker | Add/Edit Ticker View | FAR Safety Author Role |
| View Title | Add/Edit Title View | FAR Safety Author Role |
| View Treemap | Add/Edit Treemap View | FAR Safety Author Role |
| View Trellis | Add/Edit Trellis View | FAR Safety Author Role |
| View View Selector | Add/Edit View Selector View | FAR Safety Author Role |
| Write Back | Manage Write Back | FAR Administrator Role, BI Service Administrator |
| Write Back | Write Back to Database | Denied: Authenticated User |
To set Catalog Folder-level Permissions:
Login to Analytics.
Go to Catalog > Shared Folders > Tasks > Permissions.
The Permissions dialog box appears.
Set the Permissions as follows, and click OK.
| Accounts | Permissions |
|---|---|
| FAR Administrator Role | Open (Read, and Traverse) |
| FAR Safety Author Role | Open (Read, and Traverse) |
| FAR Safety Consumer Role | Open (Read, and Traverse) |
| BI Service Administrator (Owner) | Full Control |
|
Note: Make sure the Apply permissions option for the sub-folders and the items is NOT selected. |
Go to Shared folders > Argus Safety > Tasks > Permissions.
The Permissions dialog box appears.
Set the Permissions as follows, and click OK.
| Accounts | Permissions |
|---|---|
| FAR Administrator Role | Full Control |
| FAR Safety Author Role | Full Control |
| FAR Safety Consumer Role | Custom (Read, Traverse, Run Publisher Report, Schedule Publisher Report, and View Publisher Output) |
| BI Service Administrator (Owner) | Full Control |
|
Note: Make sure to select the Apply permissions option for the sub-folders and the items. |
To add the Data Sources to Roles in BI Publisher:
Login to the BIP with Administrator credentials.
The BIP home page appears.
Go to Administration > Roles and Permissions.
The Roles and Permissions screen appears.
From the list of roles, select FARAdminRole, and click the corresponding Add Data Sources icon.
The Add Data Sources screen appears.
From the Available Data Sources section, select asbip, and click the Move (>) icon to move the asbip data source to the Allowed Data Sources section.
Click Apply.
Repeat the steps to asbip data source to FARSafetyAuthorRole and FARSafetyConsumerRole as well.
To upload the Argus Safety.xdrz file to BI Publisher, execute the following steps:
Copy the Argus Safety.xdrz file from the following location on the Argus Safety Web Server to the local file system:
<Argus Installation Media>\SUPPORT\BIP
Log in to BI Publisher using BI Admin User credentials. This displays the BI Publisher Home Page as depicted in the following figure:

Click Catalog.
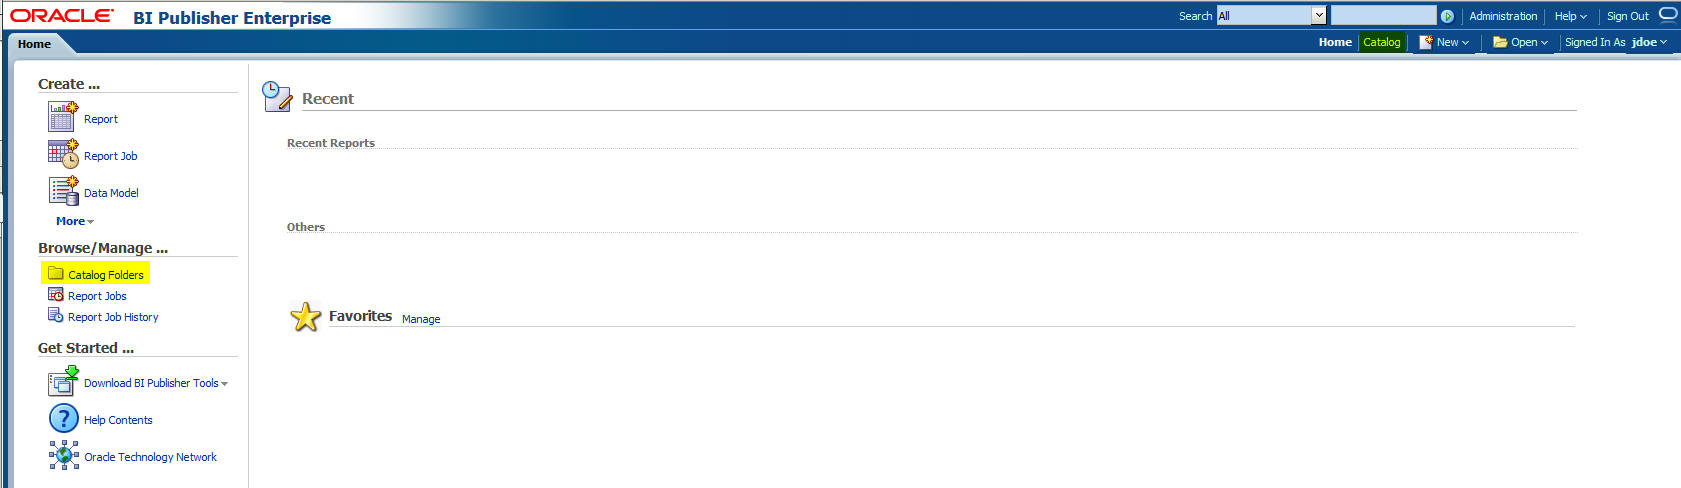
This displays the Catalog screen with the Folders and Tasks sections.
Click Shared Folders under Folders.
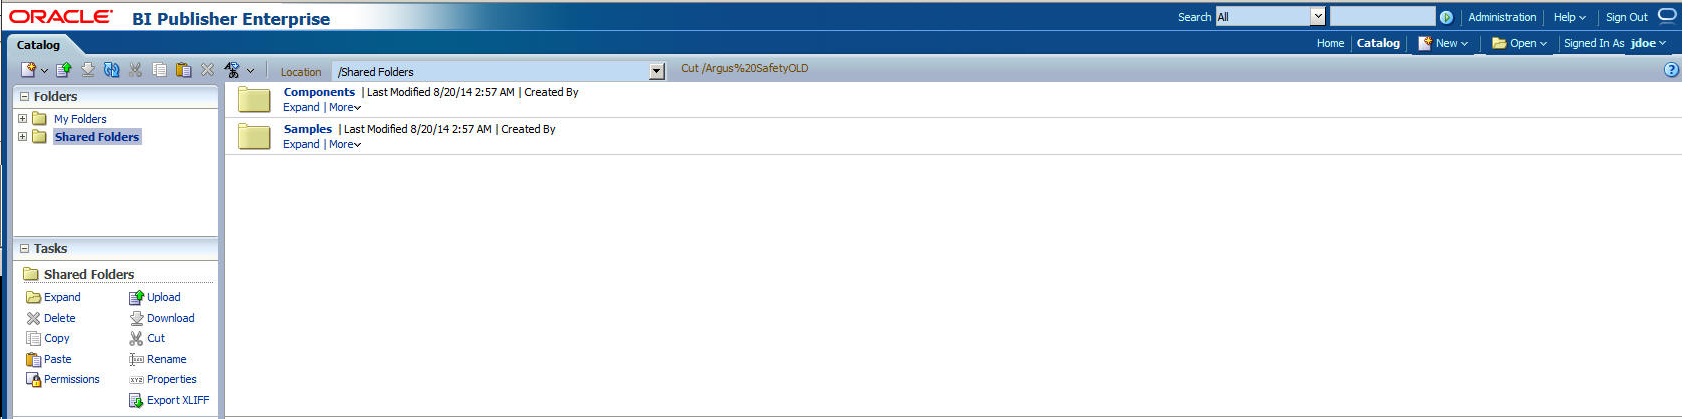
Click Upload under Tasks.
This displays the Upload dialog box.
Click Browse and navigate to the location where you have saved the Argus Safety.xdrz file on the local file system.
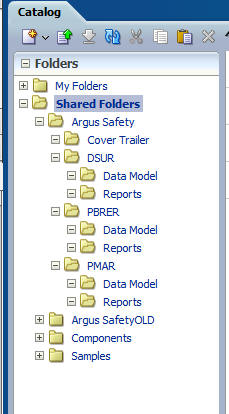
Click Upload. Once done, an Argus Safety folder is created in Shared Folders.
Expand the Argus Safety folder to verify whether the following data model and reports are present. It should look as shown below:
Perform the following steps for Argus Safety Web server configuration:
Log in to the server that hosts the AGService and the Batch Periodic Reports process.
Navigate to the ArgusInstallPath in the filesystem.
Open the file AGProc.config for editing.
Navigate to the <system.serviceModel> tag in this file.
In the endpoint element that lies within the client element, enter the following text in the Address attribute:
http://<host>:<port>/xmlpserver/services/v2/SecurityService where the name attribute is set to SecurityService
http://<host>:<port>/xmlpserver/services/v2/ScheduleService where the name attribute is set to SchedulingService
In the above instances,<host> refers to the IP address or the Fully Qualified Domain name of the BI Publisher server and <port> refers to the BI Publisher port number.
If the BI Publisher Server has been configured over an OAM/SSO controlled port, then that port number to be used here.
The following URLs need to be excluded from SSO (if SSO is enabled):
http://<host>:<port>/xmlpserver/services/v2/ScheduleService where the name attribute is set to SchedulingService
http://<host>:<port>/xmlpserver/services/v2/SecurityService where the name attribute is set to SecurityService
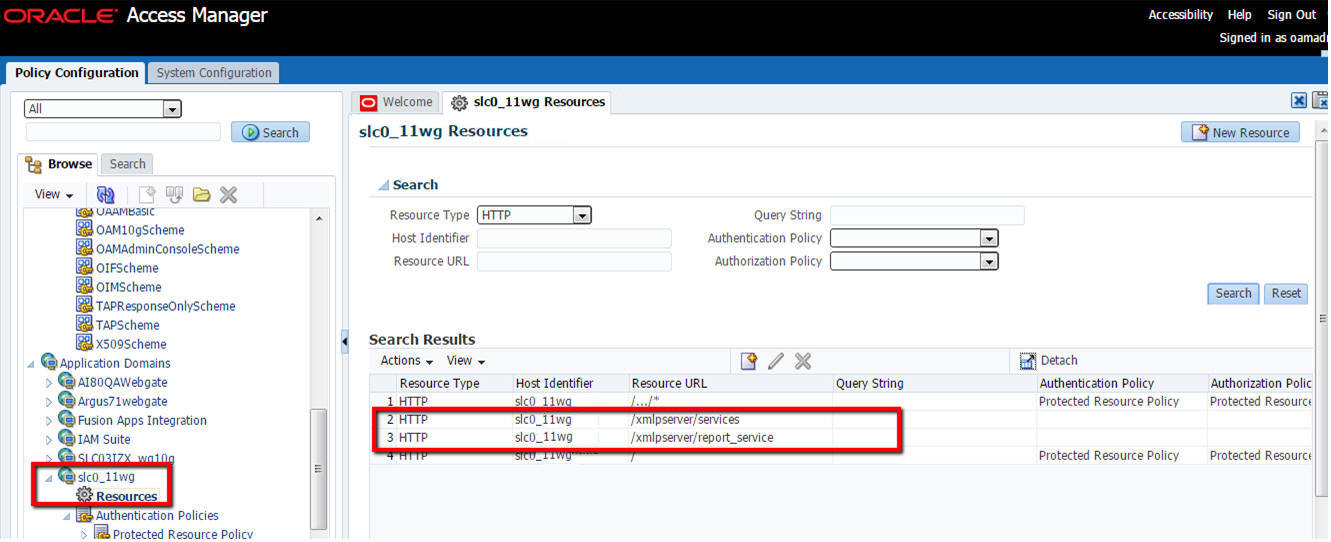
If OAM is the SSO being used, perform the following configuration:
Add excluded resource (/xmlpserver/services and /xmlpserver/report_service) on OAM Server for the OBIEE/BIP server application domain.
Copy mod_osso.conf from the disabled directory to the moduleconf directory for editing. For example:
From: ORACLE_INSTANCE/config/OHS/<ohs_name>/disabled/mod_osso.conf
To: ORACLE_INSTANCE/config/OHS/<ohs_name>/moduleconf/
Add the following Web services in the mod_osso.conf file:
<Location /xmlpserver/services/>
require valid-user
AuthType Basic
Allow from All
Satisfy any
</Location>
Save the file and restart OHS Service.
To enable execution of the BI Publisher reports from Argus Safety UI, configure the following console settings:
Navigate to Argus Console > Enabled Modules.
Enable the BIP Aggregate Reports module.
Add iisreset on webserver to ensure that the changes made to enable the BIP Aggregate Reports module are visible.
Navigate to Argus Console > System Configuration > Common Profile Switches.
Expand the Reporting node on the tree that appears on the left pane.
Click BIP Aggregate Reporting.
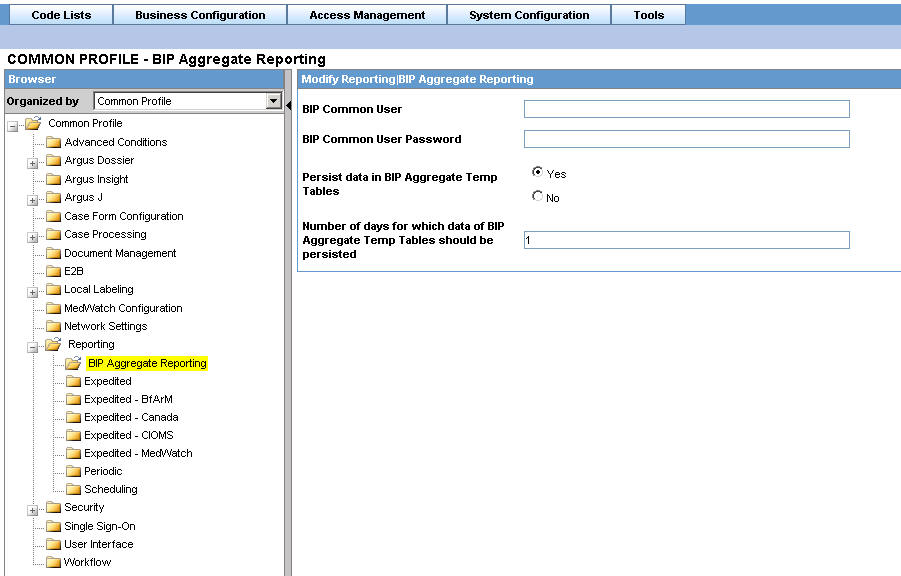
In the BIP Common User and Password fields, enter the username and password of a BI Publisher user having administrative permissions. Save the changes. Make sure that the BI Publisher User added here is not same as that of an actual Argus user. It can be a user which is available only for BI Publisher, with complete administrator privileges.
Set the Persist data in BIP Aggregate Temp tables to Yes or No. The default value is No.
Set the Number of days to persist the BIP Aggregate Temp table data. Defaulted to null.
|
Note: The Persist data parameters are used to logically retain the data from the BIP temp tables and purge them after the specified number of days. |
For BI Publisher Reports to be run from Argus Safety, the BI Publisher Report template path in the BI Publisher Server to be configured.
Execute the following steps to configure the report template path in Argus Safety:
Navigate to Argus Console > Code Lists > Flexible Data Re-categorization.
Under the Flexible Data Re-categorization tree, navigate to Flexible Re-categorization.
Select the Code List Name as REPORT_TEMPLATE and click Search.
Update the REPPATH as follows:
For PBRER - /Argus Safety/PBRER/Reports/pbrer.xdo
For PMAR - /Argus Safety/PMAR/Reports/pmar.xdo
For DSUR - /Argus Safety/DSUR/Reports/dsur.xdo
Click Save.
|
Note: As the REPPATH is case sensitive, in Linux and Unix, it must be same as that provided in Report.For example, in PBRER > Code List, the REPPATH is /Argus Safety/PBRER/Reports/pbrer.xdo The same path must be provided in the Reports and vice-versa. |
A database job must be created for polling the BI Publisher repository tables. It is up to the requirement of the customer to set up the interval based on the need.
The following example explains creating a job that would run every 3 minutes.
/*Database job that would repeat for every 3 minutes.This job will execute the procedure pkg_agg_rpt_util.p_fetchrptoutput, which will pull the BIP Output from the BIP Server into the Argus Database.*/
DECLARE
n BINARY_INTEGER;
BEGIN
DBMS_JOB.SUBMIT (job => n,
what => ' BEGIN
pkg_agg_rpt_util.p_fetchrptoutput; END ;',
interval => 'TRUNC(SYSDATE + 3/1440,''MI'')',
no_parse => FALSE);
DBMS_OUTPUT.PUT_LINE('Job Number is: ' || to_char(n));
COMMIT;
END;
/
Another database job is created to purge the data from the RM tables:
/*Database job that would repeat for every 3 minutes.This job will execute the procedure pkg_agg_rpt_util.Purge_RM_Data, which will purge the data from RM tables */
DECLARE
n BINARY_INTEGER;
BEGIN
DBMS_JOB.SUBMIT (job => n,
what => ' BEGIN
pkg_agg_rpt_util.Purge_RM_Data; END ;',
interval => 'TRUNC(SYSDATE + 3/1440,''MI'')',
no_parse => FALSE);
DBMS_OUTPUT.PUT_LINE('Job Number is: ' || to_char(n));
COMMIT;
END;
/
Both the database jobs should be created and run as BI Publisher Schema User.
This section comprises the following:
To upgrade the Flexible Aggregate Report from 8.0 to 8.1 in Argus Safety Database > BIP_OWNER Schema:
Go to C>:\Program Files\Oracle\Argus\DBInstaller\utilities\BIP_Upgrade.
Double-click the Argus_BIP_Upgrade.bat file.
Enter TNSNAMES Entry to Connect to the Argus Safety Database.
Enter DBA user name in &argus_db. Database.
For example, enter system.
Enter password for the DBA user.
Press Enter to Continue.
Enter Argus schema owner name.
For example, enter argus_app.
Enter Argus schema owner password.
Enter BIP schema owner name.
For example, enter bip_owner.
Enter BIP schema owner password.
Press Enter.
If you are unable to connect successfully to the database using bip_owner, review the log file for any errors.
Refer to the Section 13.8, "Uploading the Argus Safety.xdrz file to BI Publisher."
