Conduct what-if analysis using an Excel workbook

Conduct what-if analysis using an Excel workbook

Using Excel with an Oracle Policy Modeling rulebase model, you can easily analyze the results that different policy model versions yield, in order to decide which policies are the best ones to use. This is done by creating what-if analysis documents in the OPM project, providing the necessary inputs for the attributes, entities and relationships in Excel and using the batch processor to analyze the results.

Note that what-if analysis is only available when using Microsoft Excel 2007 or later.

What do you want to do?

Create a what-if analysis document

Populate the what-if analysis document with input data

Analyze the results of the policy model

Export the what-if analysis to CSV files

Export the what-if analysis to a test script file

Create a what-if analysis document

A What-If Analysis document, based on the rulebase model of the project, can be created by following these steps:

  1. In the Project Explorer in Oracle Policy Modeling, select the folder that you would like the file to be placed in.
  2. Right-click and select Add New What-If Analysis Document.
  3. Type a name for the new document, then press Enter.

The Excel what-if analysis file will now appear in the Project Explorer in Oracle Policy Modeling.

Populate the what-if analysis document with input data

In order to analyze the results of your policy model, you must first enter your input data.

In the Project Explorer in Oracle Policy Modeling, double-click the what-if analysis document to open it in Excel.

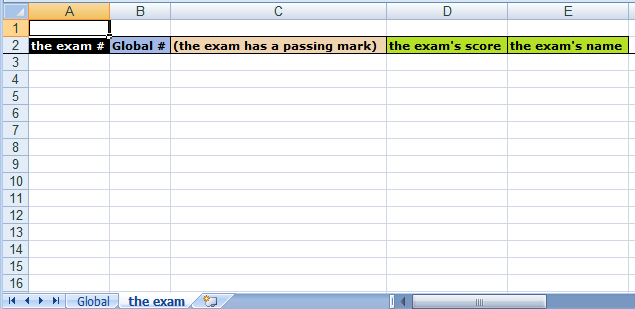
Initially, the document will just contain a worksheet for the global entity. From this starting point you can add additional worksheets for entities and many-to-many relationships, and to each worksheet you can add new columns for attributes and other relationships.

Add a worksheet (for entities and many-to-many relationships)

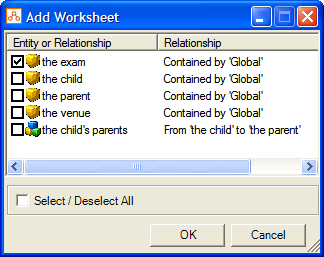
To add an entity or many-to-many relationship to a what-if analysis document, you need to add a new worksheet:

  1. On the Oracle Policy Modeling toolbar, select the Add Worksheet button.
  2. In the Add Worksheet dialog, select the checkbox for each entity or many-to-many relationship that you want to add. (Note that only those entities and many-to-many relationships that do not already exist as worksheets in the document are listed. Also, for a many-to-many relationship to be added it must have relationship text defined in Oracle Policy Modeling.)


  3. Click OK. Each worksheet is created containing any required columns. The entity name # column (eg the exam #) is always required, as is the containing entity (eg Global #).


Note that in your what-if analysis document you can have additional worksheets not intended for analysis, as long as there are no styled cells.

Add a column (for attributes and other relationships)

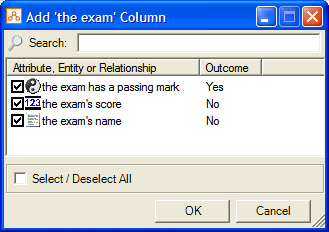
To add attributes or other (non many-to-many) relationships to an existing worksheet in a what-if analysis document, you need to add a new column:

  1. Select the tab for the entity that the attribute or relationship relates to. (For one-to-many and many-to-one relationships, the relationship column is added to the entity on the many side of the relationship.)
  2. On the Oracle Policy Modeling toolbar, select the Add Column button.
  3. In the Add Column dialog, select the checkbox for each attribute or relationship that you want to add. (Note that only those attributes and other relationships that do not already exist as columns in the active worksheet are listed. Also, for one-to-one and many-to-one relationships to be added they must have relationship text defined in Oracle Policy Modeling. For a one-to-many relationship to be used in what-if analysis, the reverse text of the relationship must have been defined.)


  4. Click OK. The columns are added to the active worksheet.


    Base attributes are colored green which indicates that these are input columns.
    Inferred attributes are colored orange which indicates that these are output columns. The names of the output columns are also enclosed in parentheses.

Notes on formatting:

  1. Columns - you can interchange the columns (as long as the styles are intact) and have spaces between them (as long as the blank columns are not styled).
  2. Rows - you can have blank rows.
  3. Cells - you can format the cells (eg 2 decimal places for numbers) and use Excel functions and formulas.

Enter data for global entities

On the Global worksheet you need to:

  1. Enter your global instances in the Global # column. These act as the IDs for each instance and should therefore always be a number and always be unique (eg 1, 2, 3 etc).
  2. Enter values for the base-level attributes for each instance (ie in the green columns). These values need to be the correct type for that attribute (eg 'true' or 'false' for booleans, numbers for number/currency attributes etc).

Enter data for non-global entities:

On a non-global entity worksheet you need to:

  1. Enter your entity instances in the entity name # column. These act as the IDs for each entity instance and should therefore always be a number and always be unique (eg 1, 2, 3 etc).
  2. Enter ID references in the containing entity column (eg the Global # column). These should always be the numbers that correspond to the associated instances of the containing entity (eg 1, 2, 3 etc).
  3. Enter ID references for any other (many-to-one, one-to-many or one-to-one) relationships (ie in the other blue columns). These should always be the numbers that correspond to the associated instances of the target entity.
  4. Enter values for the base-level attributes for each entity instance (ie in the green columns). These values need to be the correct type for that attribute (eg 'true' or 'false' for booleans, numbers for number/currency attributes etc).


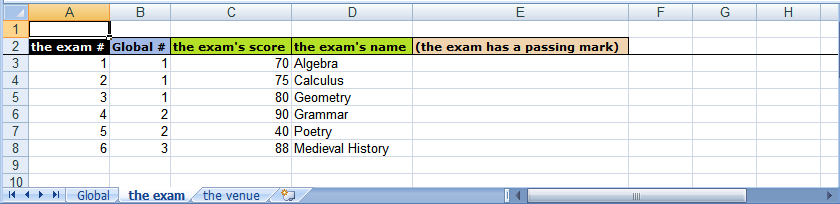
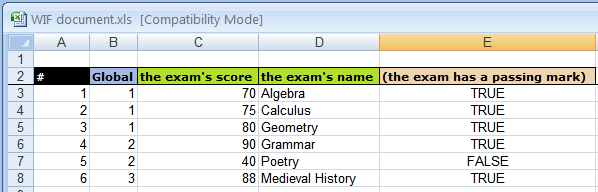
In the examples above, Beth (Global ID #1) has taken three exams (Algebra, Calculus and Geometry), Anne (Global ID #2) has taken two exams (Grammar and Poetry) and Fran (Global ID #3) has taken one exam (Medieval History).

Enter data for many-to-many relationships

On a many-to-many relationship worksheet you need to:

  1. Enter ID references for each source and target entity instance (ie in the blue columns). These should always be the numbers that correspond to the entities' instances.

For example, if you had a many-to-many relationship 'the child's parents' between 'the child' and 'the parent', and you defined the following parents and children:


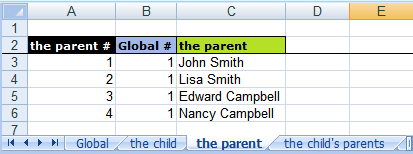
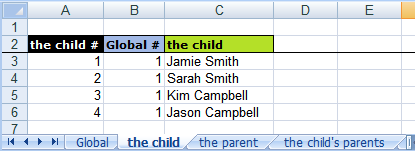
Then on the worksheet for the child's parents (the many-to-many relationship) you would specify how these entity instances relate to one another:
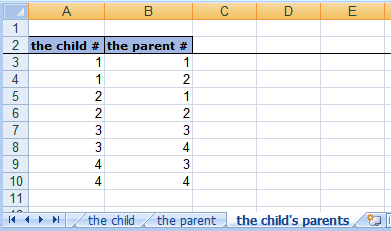


This tells us that:

Analyze the results of the policy model

To analyze the results of the policy model, click the Analyze button on the Oracle Policy Modeling toolbar. (If your rulebase needs to be built, you will be prompted to do this now.) The document will be processed and, if successful, the output columns (ie the orange ones) will be populated with values.


Note that if there are errors in your what-if analysis document, the analysis process will cease, and you will be prompted to correct those errors.

Analysis is performed using the batch processor. For more information on this utility, see the Oracle Policy Automation Developer's Guide.

Export the what-if analysis to CSV files

The what-if analysis can be exported to a set of CSV files that can then be run through the batch processor with zero configuration.

To export the what-if analysis to CSV files:

  1. Click the Export button on the Oracle Policy Modeling toolbar. (If your rulebase needs to be built, you will be prompted to do this now.)
  2. In the Export What-If Analysis dialog box, select the CSV file folder option.
  3. Specify the folder where you want to save the CSV files to, then click OK.

Note that if there are any errors, the export process will cease, and you will be prompted to correct those errors.

The number of CSV files that are exported corresponds to the number of relevant worksheets in the what-if analysis document. The input fields in the CSV files are the same as those in the what-if analysis document.

To run the CSV files through the batch processor, follow the steps for using the batch processor with zero configuration, making sure that you specify (i) the rulebase path, (ii) the location of the CSV files, and (iii) the output path for the CSV files.

After batch processing is complete, the output CSV files will be in the specified output directory. These files will show both the input and the determined output fields, with the same results as our what-if analysis document.

Export the what-if analysis to a test script file

The what-if analysis can be exported to a test script file that can then be added to the rulebase project.

To export the what-if analysis to a test script file:

  1. Click the Export button on the Oracle Policy Modeling toolbar. (If your rulebase needs to be built, you will be prompted to do this now.)
  2. In the Export What-If Analysis dialog box, select the Test script file option.
  3. In the Save As dialog, specify a location and name for the test script file, then click Save. Then click OK in the Export What-If Analysis dialog.

Note that if there are any errors, the export process will cease, and you will be prompted to correct those errors.

To add the generated tsc file to the rulebase project, go to File | Add |Add Existing File... and select the file.

When you open the test script file in the project you will notice that the number of test cases in the test script is the same as the number of global records in the associated what-if analysis document. The data in the test cases is the same as in the what-if analysis document.