
There are frequent situations where you will want to hide and make visible input controls (questions and reference relationships), input control values (for restricted input controls) and labels based on user data. You may also wish to control summary screen elements in the same way, presenting different options on the screen at different stages of the interview.
You can do so by defining an attribute specifically to control the visibility of a screen element, and then writing rules to set the respective value of that attribute to control its state.
For example,
the maternity leave question should be displayed if
the applicant is female
In this example, we only want to show the maternity leave question if the applicant is female. If the applicant is male we do not want to ask about maternity leave.
NOTE: Visibility can only be based on an attribute that is known before a screen is displayed in Oracle Web Determinations. It cannot be based on the value of another attribute on the same screen. This is because the input values on a screen are not submitted by Oracle Web Determinations to the engine immediately after each value is entered - only once the screen is submitted. If you are using a custom user interface, however, then it is possible to submit data after each question and have the screen behave dynamically as values are entered.
There are also times when you may want to make an input control read-only thereby preventing users from altering data on that control.
Control the visibility of questions, labels and relationships
Control the visibility of restricted input options
Control the visibility of summary screen elements
Once you have written rules to control the logic of when a question, label or relationship should be displayed, you then need to connect it to the related input control. To do this:
TIP: You can use the Preview button in the Screen Editor, assuming you have a debug session running containing the requisite data, to quickly check if the visibility attribute is working as expected.
NOTES:
The method for controlling restricted input control values (ie members of a drop-down list, list box or radio button group) is identical to that for controlling individual screen controls.
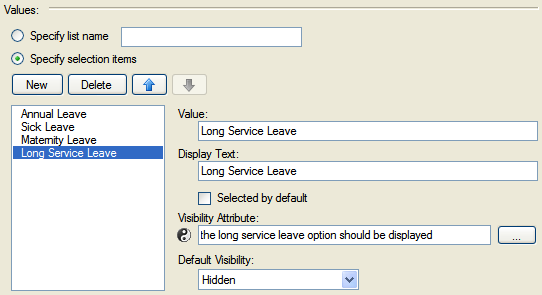
Visibility of the value will depend on the truth value of the visibility attribute - visible if the value is true and hidden if the value is false.
NOTE: A visibility attribute may be in the global entity, in the same entity as the control it is attached to, or if the control is for an entity collect it may be in the screen entity. The value of the visibility attribute can not be temporal.
TIP: You can use the Preview button in the Screen Editor, assuming you have a debug session running containing the requisite data, to quickly check if the visibility attribute is working as expected.
Summary screen elements may be controlled using the same method as screen controls and list elements, however three states are available: hidden, enabled (actionable) and disabled (displayed but not actionable). The visibility attribute for summary screen elements can be either a boolean or a text attribute. Use boolean logic to switch between two of these states, or a text variable to switch between the three states (setting the text variable to "hidden", "enabled" and/or "disabled" as required).

If you need to switch between the three states (enabled, disabled and hidden), create a text variable to control the visibility and write a rule (eg a rule table) accordingly.
NOTE: A summary screen visibility attribute may be in the global entity or in the same entity as the summary screen element it is attached to. The value of the visibility attribute can not be temporal.
TIP: You can use the Preview button in the Screen Editor, assuming you have a debug session running containing the requisite data, to quickly check if the visibility attribute is working as expected.
By making an attribute read-only, you can prevent users from altering data on the input control. During a Web Determinations interview, the control will be rendered read-only if the attribute that it is based on is known, or it will default to the user specified value (editable or read only) if the attribute is unknown or uncertain.
To make an input read-only:
NOTE: A read-only control attribute may be in the global entity, in the same entity as the control it is attached to, or if the control is for an entity collect it may be in the screen entity. The value of the read-only attribute can not be temporal.
TIP: You can use the Preview button in the Screen Editor, assuming you have a debug session running containing the requisite data, to quickly check if the visibility attribute is working as expected.