Below are steps for setting up and using the default Commentary plugin in Web Determinations:
The commentary HTML files is generated in Oracle Policy Modeling, and the generated text inside the HTML file/s modified by the rulebase author.
The rulebase package together with the commentary is deployed into Web Determinations (by default the commentary is packaged with other rulebase output files into the package).
Web Determinations must not have another custom Commentary plugin since the custom Commentary plugin will be registered into the interview session instead of the default Commentary plugin.
Generating the commentary HTML files
When the commentary HTML files are generated, it will be based on a template file. You can modify the default commentary template, or create your own template before generating the commentary files.
The default commentary template resides in <OPM Installation>\Templates\CommentaryTemplate.html; for example, C:\Program Files\Oracle\Oracle Policy Modeler\Templates\CommentaryTemplate.html
To generate commentary files in Oracle Policy Modeling, do the following:
Open the rulebase.
Click on the Build button in the menu.
In the Build submenu, click on Generate commentary files.
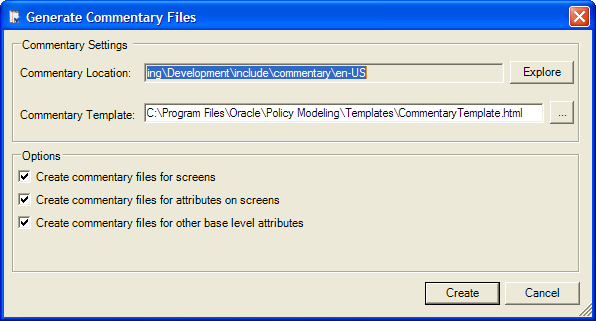
The Generate Commentary Files popup appears:
Commentary Location (readonly)
This is where the HTML commentary files will be placed; the default location is: Rulebase Folder>\Development\include\commentary\<locale>\
for example, C:\rulebase_projects\CommentaryRulebase\Development\include\commentary\en-US\
Commentary Template
This is the location of the commentary template to use. By default it uses the default commentary template, but you can set it to a custom template that you have prepared.
Options:
Create commentary files for screens - generate commentary for screens.
Create commentary files for attributes on screens - generate commentary for attributes that will be displayed/asked in screens.
Create commentary files for other base level attributes - generate commentary for all attributes, regardless of whether they will appear on screen or not.
Click on Create to generate the files.
After generating the commentary HTML files, you can go to the commentary location and further modify the content of each commentary file. Do not change the filenames of the commentary files, only the HTML content inside. To further modify the HTML commentary files, you will need to understand how the files are identified and structured.
The following is the general folder structure inside the commentary folder:
<locale 1>
attribute
screen
<locale 2>
attribute
screen
etc
HTML files inside the attribute folder are commentary files for attributes. The naming of the HTML files is straightforward; it is exactly the name of the attribute.
HTML files inside the screen folder are commentary files for screens. The naming of the HTML files for authored screens is straightforward; it uses the name of the authored screen.
You have the option of creating commentary for automatic screens, but the 'generated' names for those screens are a little more complex; for example, #personschildren^global for an 'instance collection' page, collecting the target entity 'child', for the relationship 'personschildren' with the entity global as the source.
Packaging the commentary together with the rulebase
You do not have to do anything for this step, as it happens automatically when you build the project after generating the commentary.
You must ensure that you have generated the commentary (which creates a commentary folder in the 'include' folder) before building the rulebase.
Once you have generated the commentary, building the rulebase will package all the contents of both the output and include directories into a zip file, hence the commentary folder is automatically packaged.
Ensuring the default Commentary plugin is registered
To use the default Commentary plugin, it must be the Commentary plugin registered when running the interview session.
Other custom Commentary plugin takes priority over the default Commentary plugin, so ensure there are no custom Commentary plugin that can be registered into the same interview session.
Using the Commentary during the Web Determinations interview
During the Web Determinations interview, Web Determinations will turn screen and control labels as links when there is commentary available for them. Screen and control labels will remain as text if there are no commentary available.
The user can click on the screen/control label to see the commentary available.
When the user clicks on the link, by default Web Determinations opens the commentary HTML content in a frame to the right of the interview pane.
Web Determinations can be configured to open commentary HTML in a new window; see Configuration files for information on how this is done.
Commentary plugins can also provide URL instead of HTML content. Web Determinations will display the URL webpage in the frame/new window; for more information, see Commentary plugin.