Using Jupyterhub

Jupyterhub lets multiple users work together by providing an individual Jupyter notebook server for each user. When you create a cluster, Jupyterhub is installed and configured on your cluster nodes.

Note

Jupyterhub is only available in Big Data Service clusters with version 3.0.7 and above.

Prerequisites

Before Jupyterhub can be accessed from a browser, an administrator must:

  • Make the node available to incoming connections from users. The node's private IP address needs to be mapped to a public IP address. Alternatively, the cluster can be set up to use a bastion host or Oracle FastConnect. See Connecting to Cluster Nodes with Private IP Addresses.
  • Open port 8000 on the node by configuring the ingress rules in the network security list. See Defining Security Rules.

Jupyterhub Default Credentials

The default admin login credentials for JupyterHub in Big Data Service 3.0.21 and earlier are:

  • User name: jupyterhub
  • Password: Apache Ambari admin password. This is the cluster admin password that was specified when the cluster was created.
  • Principal name for HA cluster: jupyterhub
  • Keytab for HA cluster: /etc/security/keytabs/jupyterhub.keytab

The default admin login credentials for JupyterHub in Big Data Service 3.0.22 and later are:

  • User name: jupyterhub
  • Password: Apache Ambari admin password. This is the cluster admin password that was specified when the cluster was created.
  • Principal name for HA cluster: jupyterhub/<FQDN-OF-UN1-Hostname>
  • Keytab for HA cluster: /etc/security/keytabs/jupyterhub.keytab
    Example:
    Principal name for HA cluster: jupyterhub/pkbdsv2un1.rgroverprdpub1.rgroverprd.oraclevcn.com
              Keytab for HA cluster: /etc/security/keytabs/jupyterhub.keytab 

The admin creates additional users and their login credentials, and provides the login credentials to those users. See Managing Users and Permissions.

Note

Unless explicitly referenced as some other type of administrator, the use of administrator or admin throughout this section refers to the JupyterHub administrator, jupyterhub.

Accessing Jupyterhub

Jupyterhub runs on the second utility node of an HA (highly-available) cluster, or on the first (and only) utility node of a non-HA cluster.

The Jupyterhub is accessed in a browser after the prerequisites are met.
  1. Open a browser window.
  2. Enter a URL in the following format:
    https://<node_ip_address>:8000

    For example:

    https://192.0.2.0:8000
  3. Log in with your credentials.
    If you are an admin user: Use the default admin credentials, or create a new admin user.
    If you are a non-admin user: Sign up from the Sign Up page. An admin user must authorize the new signed up user. After authorization, user can log in.

Alternatively, you can access the Jupyterhub link from the cluster's details page in the Console.

Jupyter URL on the OCI console

You can also create a load balancer to provide a secure front end for accessing services, including JupyterHub. See Connecting to Services on a Cluster Using Load Balancer.

Spawning Notebooks

Spawning notebooks in a HA cluster

The prerequisites must be met for the user trying to spawn notebooks.

  1. Access Jupyterhub.

    Jupyter login in an HA Cluster

  2. Login with your user credentials. The authorisation works only if the user is present on the Linux host. Jupyterhub searches for the user on the Linux host while trying to spawn the notebook server.
  3. You are redirected to a Server Options page where you must request a Kerberos ticket. This ticket can be requested using either Kerberos principal and the keytab file, or the Kerberos password. Cluster admin can provide the Kerberos principal and the keytab file, or the Kerberos password.

    The Kerberos ticket is needed to get access on the HDFS directories and other Big Data Services that you want to use.

Spawning notebooks in a non-HA cluster

The prerequisites must be met for the user trying to spawn notebooks.

  1. Access Jupyterhub.
  2. Login with your user credentials. The authorisation works only if the user is present on the Linux host. Jupyterhub searches for the user on the Linux host while trying to spawn the notebook server.

Launching Kernels and Running Spark Jobs

  1. Access Jupyterhub.
  2. Launch notebook server. You are redirected to the Launcher page.
    Screenshot of the Launcher page in Jupyterhub
  3. You can launch one of the multiple kernels available by default, such as Python, PySpark, Spark and SparkR. To launch a notebook, click FileNewNotebook, and then click Select Kernel or click the corresponding icon under Notebook.

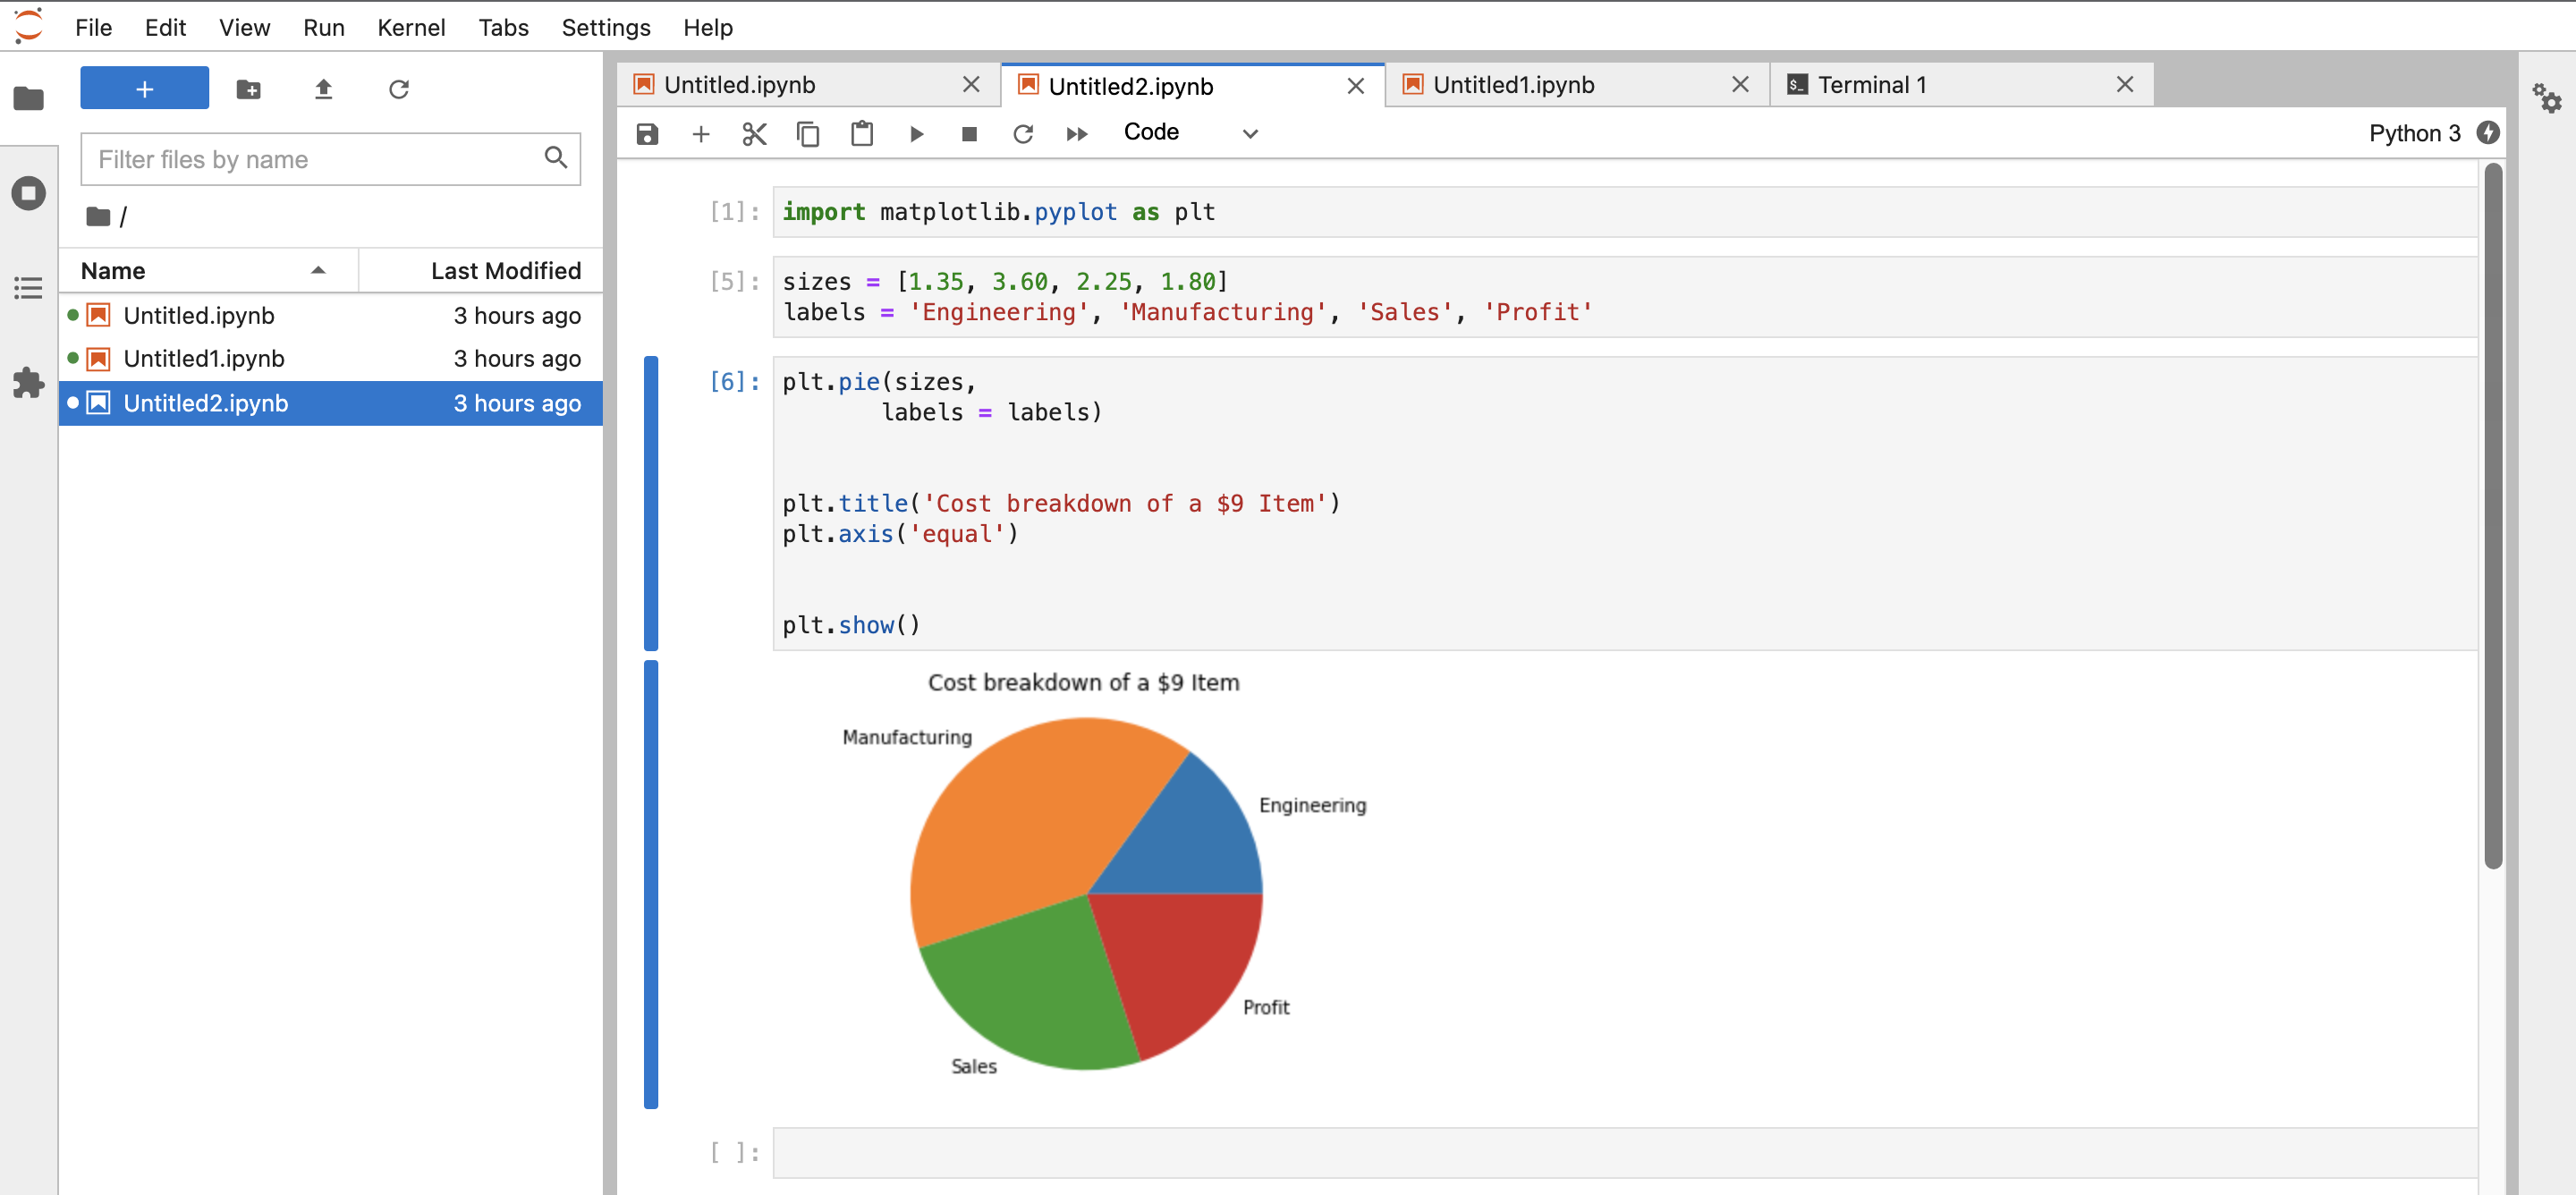
Sample Code for Python Kernel:

Screenshot showing sample code for Python kernel in Jupyterhub

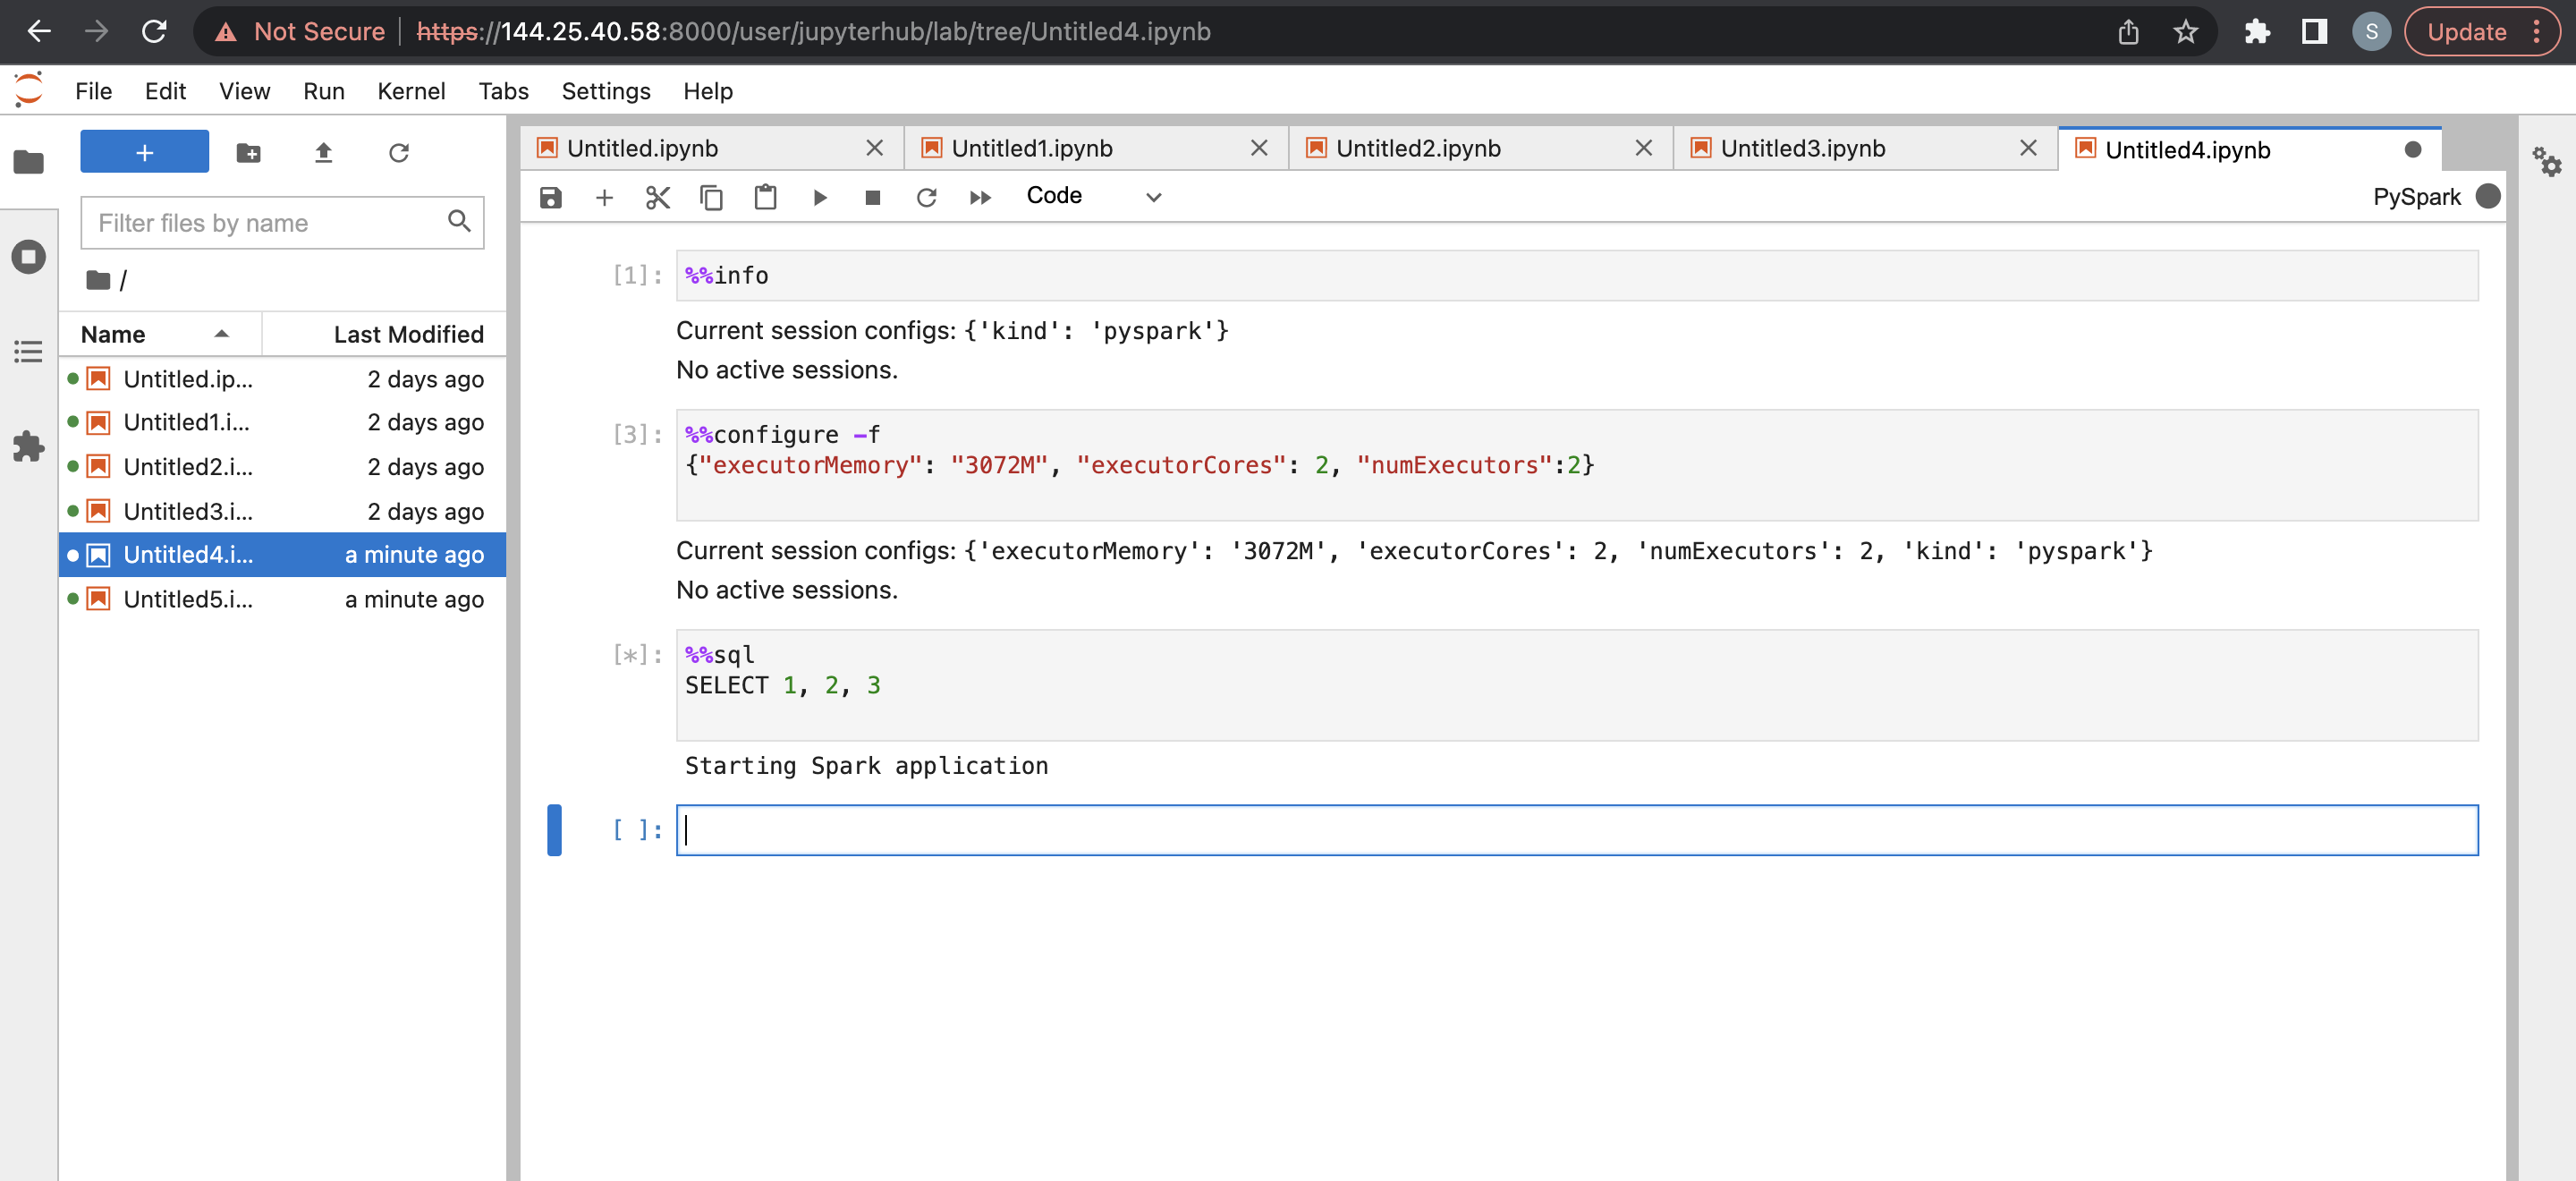
Sample Code For Sparkmagic in PySpark Kernel

Screenshot showing sample code for Sparkmagic in Python kernel in Jupyterhub

Managing Jupyterhub

A Jupyterhub admin user can perform the following tasks to manage notebooks in Jupyterhub.

To manage Oracle Linux 7 services with the systemctl command, see Working With System Services.

To log into an Oracle Cloud Infrastructure instance, see Connecting to Your Instance.

Configuring Jupyterhub

As an admin, you can configure Jupyterhub.

  1. Connect as opc user to the utility node where Jupyterhub is installed (the second utility node of an HA (highly-available) cluster, or the first and only utility node of a non-HA cluster).
  2. Use sudo to manage Jupyterhub configs that are stored at /opt/jupyterhub/jupyterhub_config.py.
    For example, to change port number of Jupyterhub, run following commands
    vi /opt/jupyterhub/jupyterhub_config.py
    # search for c.JupyterHub.bind_url and edit the port number and save
    sudo systemctl restart jupyterhub.service
    sudo systemctl status jupyterhub.service

Stopping and Starting Jupyterhub

As an admin, you can stop or disable the application so it doesn't consume resources, such as memory. Restarting might also help with unexpected issues or behavior.

  1. Connect as opc user to the utility node where Jupyterhub is installed (the second utility node of an HA (highly-available) cluster, or the first and only utility node of a non-HA cluster).
  2. Use sudo to start, stop, or restart Jupyterhub.
    sudo systemctl start jupyterhub.service
    sudo systemctl stop jupyterhub.service
    sudo systemctl restart jupyterhub.service
    sudo systemctl status jupyterhub.service

Managing Notebook Limits

As an admin, you can limit the number of active notebook servers in your cluster.

By default, the number of active notebook servers is set as twice the number of OCPUs in the node. The default OCPU limit is 3, and the default memory limit is 2G. The default settings for minimum active notebooks is 10 and maximum active notebooks is 80.

To edit these settings:

  1. Connect as opc user to the utility node where Jupyterhub is installed (the second utility node of an HA (highly-available) cluster, or the first and only utility node of a non-HA cluster).
  2. Use sudo to edit Jupyterhub configs that are stored at /opt/jupyterhub/jupyterhub_config.py.
    Example:
    c.JupyterHub.active_server_limit = 10
    c.Spawner.cpu_limit = 3
    c.Spawner.mem_limit = '2G'

Updating Notebook Content Manager

Updating HDFS Content Manager

By default, notebooks are stored in HDFS directory of a cluster.

You must have access to the HDFS directory hdfs:///user/<username>/. The notebooks are saved in hdfs:///user/<username>/notebooks/.

  1. Connect as opc user to the utility node where Jupyterhub is installed (the second utility node of an HA (highly-available) cluster, or the first and only utility node of a non-HA cluster).
  2. Use sudo to manage Jupyterhub configs that are stored at /opt/jupyterhub/jupyterhub_config.py.
    c.Spawner.args = ['--ServerApp.contents_manager_class="hdfscm.HDFSContentsManager"']
  3. Use sudo to restart Jupyterhub.
    sudo systemctl restart jupyterhub.service
Updating Object Storage Content Manager

As an admin user, you can store the individual user notebooks in Object Storage instead of HDFS. When you change the content manager from HDFS to Object Storage, the existing notebooks are not copied over to Object Storage. The new notebooks are saved in Object Storage.

  1. Connect as opc user to the utility node where Jupyterhub is installed (the second utility node of an HA (highly-available) cluster, or the first and only utility node of a non-HA cluster).
  2. Use sudo to manage Jupyterhub configs that are stored at /opt/jupyterhub/jupyterhub_config.py. See generate access and secret key to learn how to generate the required keys.
    c.Spawner.args = ['--ServerApp.contents_manager_class="s3contents.S3ContentsManager"', '--S3ContentsManager.bucket="<bucket-name>"', '--S3ContentsManager.access_key_id="<accesskey>"', '--S3ContentsManager.secret_access_key="<secret-key>"', '--S3ContentsManager.endpoint_url="https://<object-storage-endpoint>"', '--S3ContentsManager.region_name="<region>"','--ServerApp.root_dir=""']
  3. Use sudo to restart Jupyterhub.
    sudo systemctl restart jupyterhub.service

Installing Additional Notebook Kernels

By default, Python, PySpark, Spark, SparkR kernels are supported.

As an admin user, to install additional kernels or libraries:

  1. Connect as opc user to the utility node where Jupyterhub is installed (the second utility node of an HA (highly-available) cluster, or the first and only utility node of a non-HA cluster).
  2. Use pip3 module to install additional kernels. The sparkmagic configs (config.json) are stored under the .sparkmagic folder in the user's home directory.

Managing Users and Permissions

Use one of the two authentication methods to authenticate users to Jupyterhub so that they can create notebooks, and optionally administer Jupyterhub.

By default, ODH clusters support native authentication. But, authentication for Jupyterhub and other Big Data services need to be handled differently. To spawn single user notebooks, the user logging in into Jupyterhub needs to be present on the Linux host and needs to have permissions to write to the root directory in HDFS. Otherwise the spawner will fail as the notebook process is triggered as the Linux user.

Using Native Authentication

Native authentication depends on the Jupyterhub user database for authenticating users.

Native authentication applies to both HA and non-HA clusters. Refer native authenticator for details on the native authenticator.

Prerequisites for authorizing a user in a HA cluster

These prerequisites must be met to authorize a user in a HA cluster using native authentication.

  1. The user must be existing in the Linux host. Run the following command to add a new Linux user on all the nodes of a cluster.
    # Add linux user
    dcli -C "useradd -d /home/<username> -m -s /bin/bash <username>"
  2. To start a notebook server, a user should be able to provide the principal and the keytab file path/password and request a Kerberos ticket from the Jupyterhub interface. To create a keytab, the cluster admin should add Kerberos principal with a password and with a keytab file. Run the following commands on the first master node(mn0) in the cluster.
    # Create a kdc principal with password or give access to existing keytabs.
    kadmin.local -q "addprinc <principalname>"
    Password Prompt: Enter passwrod
     
    # Create a kdc principal with keytab file or give access to existing keytabs.
    kadmin.local -q 'ktadd -k /etc/security/keytabs/<principal>.keytab principal'
  3. The new user should have adequate Ranger permissions to be able to store files in the HDFS directory hdfs:///users/<username> as the individual notebooks are stored in /users/<username>/notebooks. The cluster admin can add the required permission from the Ranger interface by opening the following URL in a web browser.
    https://<un0-host-ip>:6182
  4. The new user should have adequate permissions on Yarn, Hive, and Object Storage to read and write data, and run Spark jobs. Alternatively, user can use Livy impersonation (run Big Data Service jobs as Livy user) without getting explicit permissions on Spark, Yarn, and other services.
  5. Run the following command to give the new user access to the HDFS directory.
    # Give access to hdfs directory
    # kdc realm is by default BDSCLOUDSERVICE.ORACLE.COM
    kinit -kt /etc/security/keytabs/hdfs.headless.keytab hdfs-<clustername>@<kdc_realm> 
    sudo su hdfs -c "hdfs dfs -mkdir /user/<username>"
    sudo su hdfs -c "hdfs dfs -chown -R jupy5 /user/<username>"
Prerequisites for authorizing a user in a non-HA cluster

These prerequisites must be met to authorize a user in a non-HA cluster using native authentication.

  1. The user must be existing in the Linux host. Run the following command to add a new Linux user on all the nodes of a cluster.
    # Add linux user
    dcli -C "useradd -d /home/<username> -m -s /bin/bash <username>"
  2. The new user should to be able to store files in the HDFS directory hdfs:///users/<username>. Run the following command to give the new user access to the HDFS directory.
    # Give access to hdfs directory
    sudo su hdfs -c "hdfs dfs -mkdir /user/<username>"
    sudo su hdfs -c "hdfs dfs -chown -R jupy5 /user/<username>"
Adding an admin user

Admin users are responsible for configuring and managing Jupyterhub. Admin users are also responsible for authorizing newly signed up users on Jupyterhub.

Before adding an admin user, the prerequisites must be met for an HA cluster or non-HA cluster.

  1. Add admin users to the Jupyterhub config file /opt/jupyterhub/jupyterhub_config.py.
  2. Access Jupyterhub.
  3. Sign up an admin user. Default admin username is jupyterhub.
As an admin user in the Jupyterhub config file, you do not require explicit authorization during login. After signing up, you can log in directly.

Adding other users

Before adding other users, the prerequisites must be met for an HA cluster or non-HA cluster.

  1. Access Jupyterhub.
  2. Sign up for the new user. Non-admin users need explicit authorisation from the admin users.
  3. Admin user should log into Jupyterhub and from the new menu option to authorize signed in users, authorise the new user.
    Screenshot of the Authorize Users page in Jupyterhub
  4. New user can now login.
Deleting users

An admin user can delete users.

  1. Access Jupyterhub.
  2. Open FileHubControlPanel.
  3. Navigate to the Authorize Users page.
  4. Delete the users you want to remove.

Using LDAP Authentication

To use LDAP authenticator, you must update the Jupyterhub config file with the LDAP connection details.

Refer LDAP authenticator for details on the LDAP authenticator.

  1. Connect as opc user to the utility node where Jupyterhub is installed (the second utility node of an HA (highly-available) cluster, or the first and only utility node of a non-HA cluster).
  2. Use sudo to manage Jupyterhub configs that are stored at /opt/jupyterhub/jupyterhub_config.py.
    Example LDAP config:
    c.JupyterHub.authenticator_class = 'ldapauthenticator.LDAPAuthenticator'
    c.LDAPAuthenticator.server_port = <port>
    c.LDAPAuthenticator.server_address = 'ldaps://<host>'
    c.LDAPAuthenticator.lookup_dn = False
    c.LDAPAuthenticator.use_ssl = True
    c.LDAPAuthenticator.lookup_dn_search_filter = '({login_attr}={login})'
    c.LDAPAuthenticator.lookup_dn_search_user = '<user>'
    c.LDAPAuthenticator.lookup_dn_search_password = '<example-password>'
    #c.LDAPAuthenticator.user_search_base = 'ou=KerberosPrincipals,ou=Hadoop,dc=cesa,dc=corp'
    c.LDAPAuthenticator.user_attribute = 'sAMAccountName'
    c.LDAPAuthenticator.lookup_dn_user_dn_attribute = 'cn'
    c.LDAPAuthenticator.escape_userdn = False
    c.LDAPAuthenticator.bind_dn_template = ["cn={username},ou=KerberosPrincipals,ou=Hadoop,dc=cesa,dc=corp"]
  3. Use sudo to restart Jupyterhub.
    sudo systemctl restart jupyterhub.service

Integrating with Object Storage

In Jupyterhub, for Spark to work with Object Storage you must define some system properties and populate them into the spark.driver.extraJavaOption and spark.executor.extraJavaOptions properties in Spark configs.

Prerequisites

Before you can successfully integrate Jupyterhub with Object Storage, you must:

  • Create a bucket in Object Store to store your data.
  • Create an Object Storage API key.
Retrieving system properties values

The properties you must define in Spark configs are:

  • TenantID
  • Userid
  • Fingerprint
  • PemFilePath
  • PassPhrase
  • Region

The retrieve the values for these properties:

  1. Open the navigation menu and click Analytics & AI. Under Data Lake, click Big Data Service.
  2. Under Compartment, select the compartment that hosts your cluster.
  3. In the list of clusters, click the cluster you are working with that has Jupyterhub.
  4. Under Resources click Object Storage API keys.
  5. From the actions menu of the API key you want to view, click View configuration file.

The configuration file has all the system properties details except the passphrase. The passphrase is specified while creating the Object Storage API key and you must recollect and use the same passphrase.

Example: Storing and reading data from Object Storage in python kernal using pyspark

  1. Access Jupyterhub.
  2. Open a new notebook.
  3. Copy and paste the following commands to connect to Spark.
    import findspark
    findspark.init()
    import pyspark
  4. Copy and paste the following commands to create a Spark session with the specified configurations. Replace the variables with the system properties values you retrieved previously.
    from pyspark.sql import SparkSession
    
    spark = SparkSession \
        .builder \
        .enableHiveSupport() \
        .config("spark.driver.extraJavaOptions", "-DBDS_OSS_CLIENT_REGION=<Region> -DBDS_OSS_CLIENT_AUTH_TENANTID=<TenantId> -DBDS_OSS_CLIENT_AUTH_USERID=<UserId> -DBDS_OSS_CLIENT_AUTH_FINGERPRINT=<FingerPrint> -DBDS_OSS_CLIENT_AUTH_PEMFILEPATH=<PemFile> -DBDS_OSS_CLIENT_AUTH_PASSPHRASE=<PassPhrase>")\
        .config("spark.executor.extraJavaOptions" , "-DBDS_OSS_CLIENT_REGION=<Region> -DBDS_OSS_CLIENT_AUTH_TENANTID=<TenantId> -DBDS_OSS_CLIENT_AUTH_USERID=<UserId> -DBDS_OSS_CLIENT_AUTH_FINGERPRINT=<FingerPrint> -DBDS_OSS_CLIENT_AUTH_PEMFILEPATH=<PemFile> -DBDS_OSS_CLIENT_AUTH_PASSPHRASE=<PassPhrase>")\
        .appName("<appname>") \
        .getOrCreate()
  5. Copy and paste the following commands to create the Object Storage directories and file, and store data in Parquet Format.
    demoUri = "oci://<BucketName>@<Tenancy>/<DirectoriesAndSubDirectories>/"
    parquetTableUri = demoUri + "<fileName>"
    spark.range(10).repartition(1).write.mode("overwrite").format("parquet").save(parquetTableUri)
  6. Copy and paste the following command to read data from Object Storage.
    spark.read.format("parquet").load(parquetTableUri).show()
  7. Run the notebook with all these commands.

    Access Object Storage on Jupyter

The output of the code is displayed. You can navigate to the Object Storage bucket from the Console and find the file created in the bucket.

Integrating with Trino

Prerequisite

  • Trino must be installed and configured in Big Data Service cluster.
  • Install the following python module in the JupyterHub node (UN1 for HA / UN0 for non-HA cluster)
    Note

    Ignore this step if the trino[sqlalchemy] module is already present in the node.
    python3.6 -m pip install trino[sqlalchemy]
     
    Offline Installation:
    Download the required python module in any machine where we have internet access
    Example:
    python3 -m pip download trino[sqlalchemy] -d /tmp/package
    Copy the above folder content to the offline node & install the package
    python3 -m pip install ./package/*
     
    Note : trino.sqlalchemy is compatible with the latest 1.3.x and 1.4.x SQLAlchemy versions. 
    BDS cluster node comes with python3.6 and SQLAlchemy-1.4.46 by default.
    

Integrating with Big Data Service HA cluster

If the Trino-Ranger-Plugin is enabled, then be sure to add the provided keytab user in the respective Trino ranger policies. See Integrating Trino with Ranger.

By default, Trino uses the full Kerberos principal name as the user. Therefore, when adding/updating Ranger-Trino policies, you must use full Kerberos principal name as username.

For the following code sample, use jupyterhub@BDSCLOUDSERVICE.ORACLE.COM as the user in the trino-ranger policies.

  1. Open a browser window.
  2. Enter a URL in the following format:
    https://<node_ip_address>:8000

    For example:

    https://192.0.2.0:8000
  3. Log in with your credentials. See Jupyterhub Default Credentials.
  4. Enter the Principle and Keytab.
  5. Open the Phython 3 notebook.
  6. Create engine with Trino:
    from sqlalchemy import create_engine
    from sqlalchemy.schema import Table, MetaData
    from sqlalchemy.sql.expression import select, text
    from trino.auth import KerberosAuthentication
    from subprocess import Popen, PIPE
    import pandas as pd
     
    # Provide user specific keytab_path and principal. If user wants to run queries 
    with different keytab then user can update below keytab_path & user_principal 
    else #user can use same keytab_path, principal that is used while starting the 
    notebook session.
    #Refer below sample code
     
    keytab_path='/etc/security/keytabs/jupyterhub.keytab'
    user_principal='jupyterhub@BDSCLOUDSERVICE.ORACLE.COM'
    # Cert path is required for SSL.
    cert_path= '/etc/security/serverKeys/oraclerootCA.crt'
    # trino url = 'trino://<trino-coordinator>:<port>'
    trino_url='trino://trinohamn0.sub03011425120.hubvcn.oraclevcn.com:7778'
     
     
    # This is optional step, required only if user wants to run queries with different keytab.
     
    kinit_args = [ '/usr/bin/kinit', '-kt', keytab_path, user_principal]
    subp = Popen(kinit_args, stdin=PIPE, stdout=PIPE, stderr=PIPE)
    subp.wait()
       
    engine = create_engine(
        trino_url,
        connect_args={
            "auth": KerberosAuthentication(service_name="trino", principal=user_principal, ca_bundle=cert_path),
            "http_scheme": "https",
            "verify": True
        }
    )
  7. Execute the query:
    query = "select custkey, name, phone, acctbal from tpch.sf1.customer limit 10"
    df = pd.read_sql(query, engine)
    print(df)

Integrating with Big Data Service non-HA cluster

  1. Open a browser window.
  2. Enter a URL in the following format:
    https://<node_ip_address>:8000

    For example:

    https://192.0.2.0:8000
  3. Log in with your credentials. See Jupyterhub Default Credentials.
  4. Open the Phython 3 notebook.
  5. Create engine with Trino:
    from sqlalchemy import create_engine
    from sqlalchemy.schema import Table, MetaData
    from sqlalchemy.sql.expression import select, text
    import pandas as pd
     
    # trino url = 'trino://trino@<trino-coordinator>:<port>'
    trino_url='trino://trino@trinohamn0.sub03011425120.hubvcn.oraclevcn.com:8285'
     
    engine = create_engine(trino_url)
  6. Execute the query:
    query = "select custkey, name, phone, acctbal from tpch.sf1.customer limit 10"
    df = pd.read_sql(query, engine)
    print(df)