ODB Network
Creating an ODB network is a prerequisite for creating Oracle Exadata VM Cluster(s), Oracle Autonomous VM Cluster(s), and Oracle Exadata Database(s), including Autonomous AI Database on Dedicated Infrastructure.
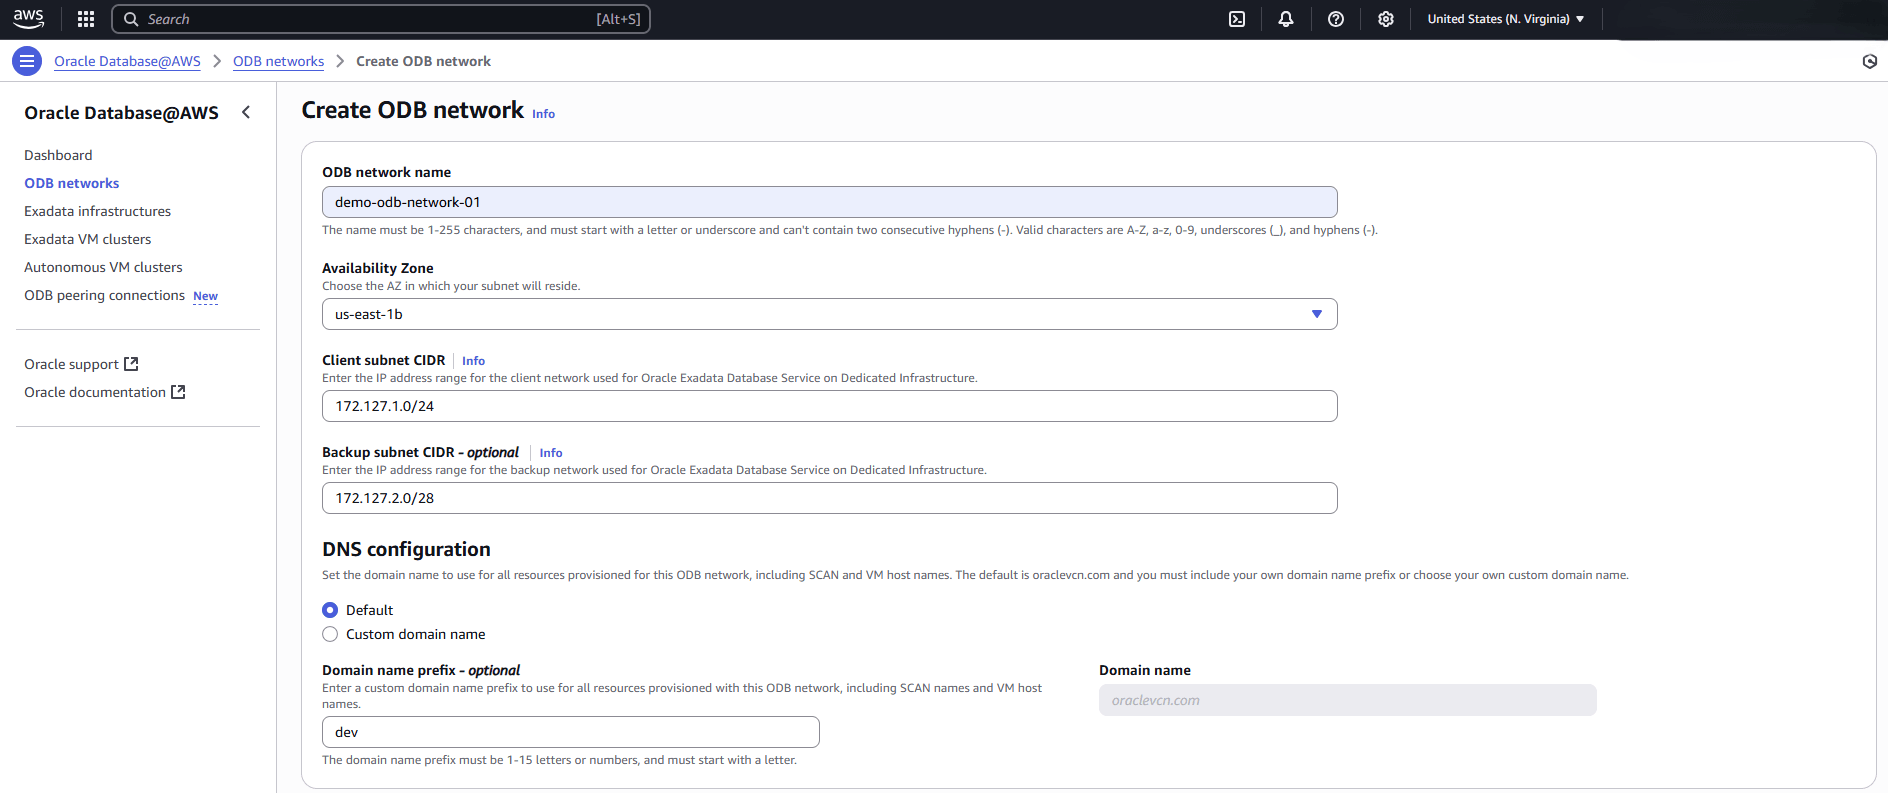
- From the Oracle Database@AWS dashboard or the ODB network list, select the Create ODB network button.
- In the ODB network name field, enter an identifier of your choice for the name. The identifier can be up to 255 characters. It can include the following characters: a-z, A-Z, 0-9, underscore (_), and dash (-). It must start with a letter or underscore (_) and cannot contain two successive hyphens(-).
- The Availability Zone field is a drop-down that contains the AZ where the ODB network will exist. The list is limited by your subscription.
- In the Client subnet CIDR field, enter a CIDR block range for your client network. See the ODB Network Design page for more information on and restrictions for this CIDR block.
- In the Backup subnet CIDR field, enter a CIDR block range for your client network. See the ODB Network Design page for more information on and restrictions for this CIDR block.
Note
The Backup subnet CIDR field is optional for Autonomous AI Database on Dedicated Infrastructure. If you are using for Oracle Exadata Database, this field is required. - Under the DNS configuration section, there are two options available to set your domain name. These options are Default and Custom domain name.
- If you select the Default option, you will notice that the Domain name field is read-only.
- In the Domain name prefix field, enter a name which will be concatenated with the Domain name to provide the IP name for your Exadata Database. The Domain name prefix must be 1-15 letters or numbers, and it must start with a letter.
- If you want to customize your domain name, select the Custom domain name option, and then specify a name.
Note
- For the Custom domain name option, the Domain name must not exceed 254 characters.
- The ODB network allows hyphens in the domain name, but this causes an error during VM Cluster creation. Therefore, it is not recommended to use hyphens in the domain name.
- During the creation process of Exadata VM Cluster, if a Custom domain name is provided, the Host domain name displays the customized domain name depending on your ODB Network selection.
- If you select the Default option, you will notice that the Domain name field is read-only.
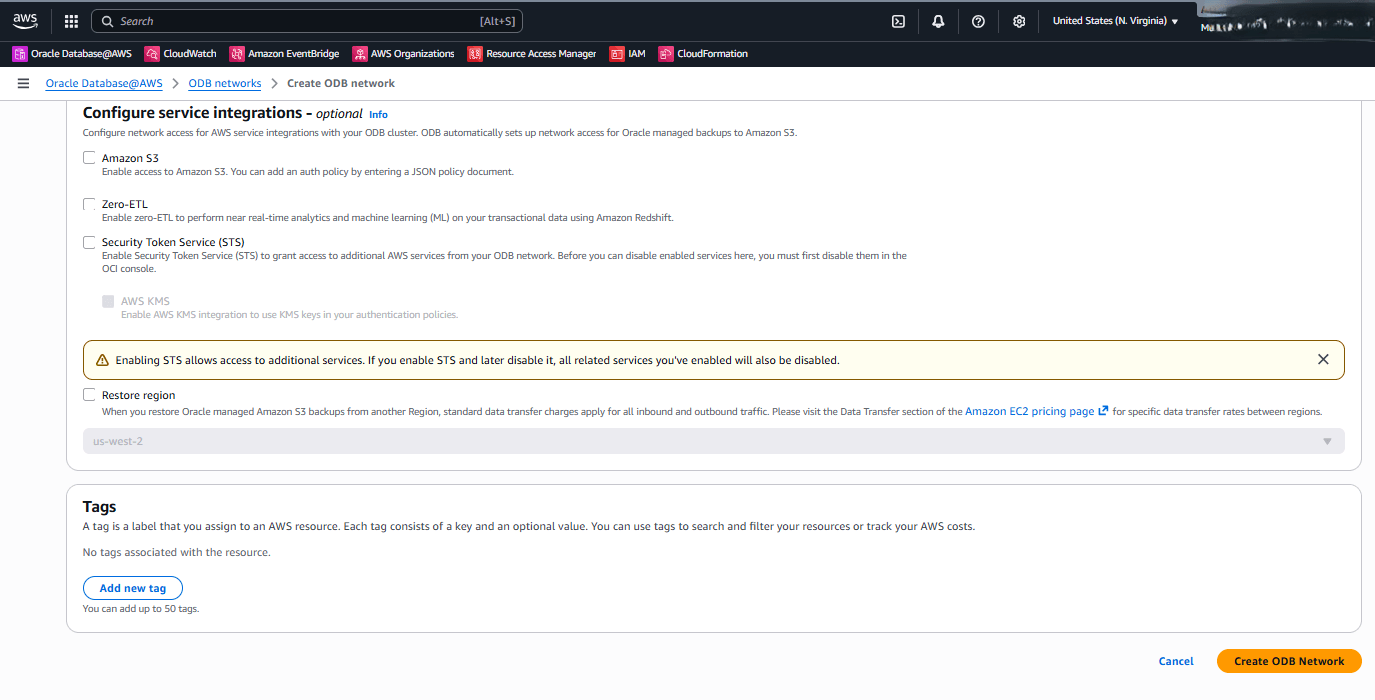
- From the Configure service integrations section, you can configure an ODB network access to Amazon S3, Zero-ETL and Security Token Service (STS) .
- The Amazon S3 option enables a network path for customers to initiate self-managed backups to their own Amazon S3 buckets.
- The Zero-ETL option enables a network path for Zero-ETL integrations, allowing customers to create data replication from Oracle Database@AWS to AWS Redshift .
- The Security Token Service (STS) field is optional. Select the checkbox to enable Security Token Service (STS) to grant access to additional AWS services from your ODB network.
- To enable AWS KMS integration to use customer-managed keys in your authentication policies, you must select the AWS KMS checkbox. For more information, see AWS KMS.
- The Restore region field is optional. Once you select the checkbox, you must also select the region you want to restore from. For more information, see Cross-Region Restore.
- You can enter Tags, if desired or required, by selecting the Add new tag button. Do this for each tag you want or need to add.

- When finished, select the Create ODB Network button to create your network, or the Cancel button to cancel ODB network creation. Either way, you will return to the ODB network list. You can monitor the status of your ODB network creation request, or manage existing ODB networks. This step can take several minutes until the status changes to Available.

- Once the ODB network is created, you can view your ODB networkfrom the ODB network list on the Oracle Database@AWS dashboard.

ODB Network creation is only available through the AWS Console and AWS CLI.
There is currently no content for this page. Oracle Database@AWS team intends to add content here, and this placeholder text is provided until that text is added. The Oracle Database@AWS team is excited about future new features, enhancements, and fixes to this product and this accompanying documentation. We strongly recommend you watch this page for those updates.
ODB Network creation is only available through the AWS Console and AWS CLI.
You can provision an ODB Network in AWS using the Terraform Provider hashicorp/aws (version 6.15.0 or higher).
Prerequisites- Terraform or OpenTofu installed
- AWS credentials configured
- HashiCorp AWS provider version >= 6.15.0
Sample Terraform ConfigurationFor detailed configuration options, see aws_odb_network.# Create an ODB Network resource "aws_odb_network" "this" { # Required Arguments display_name = "odb-network" availability_zone_id = "usw2-az3" client_subnet_cidr = "10.33.1.0/24" backup_subnet_cidr = "10.33.0.0/24" s3_access = "DISABLED" zero_etl_access = "DISABLED" # Optional Arguments availability_zone = "us-west-2c" region = "us-west-2" tags = { env = "demo" } }Reference Implementation
To review examples of integrated Terraform solutions, see the terraform-oci-multicloud-aws GitHub repository.
What's Next?
- Create an Exadata Infrastructure