Functions: Validate an API Key with API Gateway
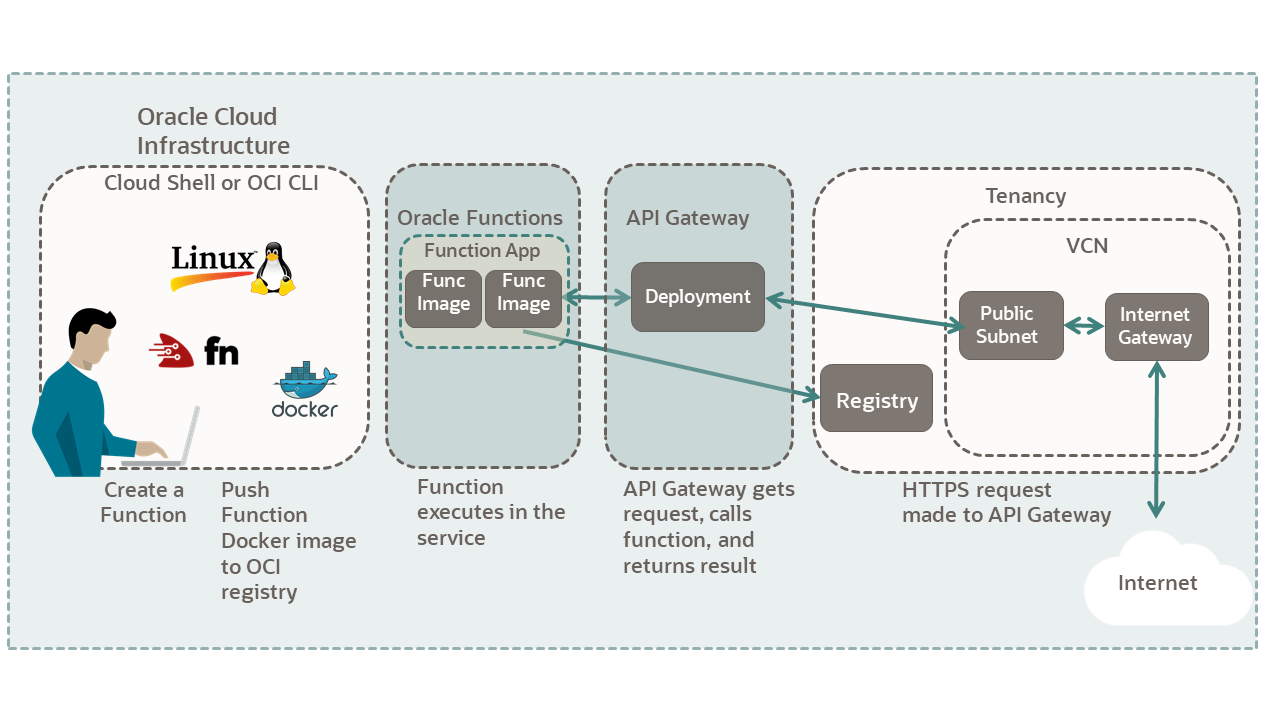
In this tutorial, you use Oracle Functions to validate an API key passed from Oracle API Gateway. An API key is a simple method for securing an API by requiring the client to pass a specific token. The gateway can use the token as a custom authorizer to validate requests. You create a Python function that validates the token and returns an authenticated JSON response.
Key tasks include how to:
- Gather required information.
- Create an application for your function.
- Create a "Hello World!" function.
- Convert your function to validate the API key.
- Deploy and test your function.
- Create an API Gateway for your function
- Call your function from the internet using your API Gateway.
For additional information, see:
Before You Begin
To successfully perform this tutorial, you must have the following:
- A paid Oracle Cloud Infrastructure account. See Signing Up for Oracle Cloud Infrastructure.
- Your OCI account configured to support Oracle Functions development. See Oracle Functions on Cloud Shell Quickstart.
- Completion of one of the two Oracle Functions introduction tutorials.
- Completing one of the two tutorials results in:
- Oracle Functions is set up and configured to create applications and deploy functions.
- Oracle Registry is set up to store function images.
- Docker is logged into the Oracle Registry.
- The required VCN and required resources needed for Oracle Functions.
- An API key pair and an auth token.
Oracle CLI
- Python 3.6+ and pip3.
- Docker Engine: A Linux computer or Linux VM. See Docker engine requirements for versions, and distros supported.
- Docker Desktop: Available for MacOS or Windows 10.
- Windows 10: Windows 10 update 2004 with WSL 2 and Ubuntu or other distro installed.
- See Windows Subsystem for Linux Installation Guide for Windows 10.
- Install Docker Desktop for Windows 10.
Note
Docker includes special Linux support for WSL 2 on Windows 10 update 2004. - MacOS: See Install Docker Desktop for MacOS.
- Windows 10: Windows 10 update 2004 with WSL 2 and Ubuntu or other distro installed.
Oracle Cloud Shell
- If you use Cloud Shell, the preceding list of software is already installed.
1. Gather Required Information
Collect all the information you need to complete the tutorial. Copy the following information into your notepad.
To create a compartment see Create a compartment. After your compartment is created, save the compartment OCID and name.
To get the compartment OCID from an existing compartment:
- Open the navigation menu and click Identity & Security. Under Identity, click Compartments.
- Select your compartment.
- Click the Copy link for the OCID field.
Save the compartment OCID and name.
Ensure you have the following information written down for the tutorial.
-
Compartment Name:
<your-compartment-name>Example:
my-compartment -
Compartment ID:
<your-compartment-OCID>Example:
ocid1.compartment.oc1.aaaaaaa... -
VCN Name:
<your-vcn-name>Example:
my-vcnOpen the navigation menu and click Networking, and then click Virtual Cloud Networks.
-
VCN Public Subnet Name:
<Public-Subnet-your-vcn-name>Example:
Public-Subnet-my-vcnOpen the navigation menu and click Networking, and then click Virtual Cloud Networks. Click on the VCN you created.
2. Perform Required Configuration
Perform all the configuration you need for the tutorial.
To create application, follow these steps.
- Open the navigation menu and click Developer Services. Under Functions, click Applications.
- Select your compartment from the Compartment drop-down.
- Click Create Application.
- Fill in the form data.
- Name:
<your-app-name> - VCN:
<your-vcn-name> - Subnets:
<Public-Subnet-your-vcn-name>
- Name:
- Click Create.
Your app is created.
- Open the navigation menu and click Networking, and then click Virtual Cloud Networks.
- Click the name of the VCN you used to for your Oracle Functions application.
- With your new VCN displayed, click your Public subnet link.
The public subnet information is displayed with the Security Lists at the bottom of the page.
- Click the Default Security List link or appropriate
security list link.
The default Ingress Rules for your VCN are displayed.
- Click Add Ingress Rules.
An Add Ingress Rules dialog is displayed.
- Fill in the ingress rule with the following information. After all the data is
entered, click Add Ingress Rules
Fill in the ingress rule as follows:
- Stateless: Checked
- Source Type: CIDR
- Source CIDR: 0.0.0.0/0
- IP Protocol: TCP
- Source Port range: (leave-blank)
- Destination Port Range: 443
- Description: VCN for applications
After you click Add Ingress Rule, HTTPS connections are allowed to your public subnet.
Next, setup a policy which allows API Gateway to invoke functions.
First, create a Dynamic Group for API Gateway.
- Open the navigation menu and click Identity & Security. Under Identity, click Dynamic Groups.
- Click Create Dynamic Group.
- Fill in the following information to define your dynamic group.
- Name:
<name-for-your-dynamic-group> - Under Matching Rules use Rule 1:
<the-rule-text>
Here is sample name and the rule you need to fill out.
- Name: api-gtw-func-dynamic-group
- Under Matching Rules use Rule 1:
ALL {resource.type = 'ApiGateway', resource.compartment.id =
                                'ocid1.compartment.<your-compartment-OCID>'}
- Name:
- Click Create.
Now create the policy for API Gateway.
- Open the navigation menu and click Identity & Security. Under Identity, click Policies.
- Click Create Policy.
- To define your policy, fill in the following information.
- Name:
<name-for-your-policy> - Description:
<description-for policy> - Compartment:
<name-of-functions-compartment>
For the Policy Builder section:
- Click Show manual editor.
- Enter your policy in the text box, for example:
Allow dynamic-group api-gtw-func-dynamic-group to use functions-family in compartment <your-compartment-name>Note
The last parameter is the compartment name, not the compartment OCID.
- Name:
- Click Create.
You have created a policy to allow API Gateway to use Functions.
- Open a terminal.
- Create a directory to store your functions and change into that directory.
mkdir my-dir-name cd my-dir-name - Create a Python "Hello World" function with Fn.
fn init --runtime python my-func-nameThis command creates a directory named
my-func-namewith the function and configuration files in it. - Change into the directory.
- Deploy the function.
fn -v deploy --app your-app-nameVarious messages are displayed as the Docker images are built, pushed to OCIR, and eventually deployed to Oracle Functions.
- Invoke the function.
fn invoke your-app-name my-func-nameReturns:
{"message": "Hello World"} - Invoke the function with a parameter.
echo -n '{"name":"Bob"}' | fn invoke your-app-name my-func-nameReturns:
{"message": "Hello Bob"}
3. Create an API Gateway
To call your function, create an API Gateway.
To create an API Gateway:
- Open the navigation menu and click Developer Services. Under API Management, click Gateways.
- Select your compartment from the Compartment drop-down.
- Click Create Gateway
- Fill in the following information to define your API Gateway.
- Name:
<your-gateway-name> - Type:
<Public> - Compartment:
<your-compartment-name> - Virtual Cloud Network in <your-vcn-name>:
<select-your-vcn> - Subnet in <your-compartment-name:
<your-public-subnet-name>
- Name:
- Click Create. Wait a few minutes for your API Gateway to e created.
Next, create a deployment for your API Gateway.
- Click Deployments in Resources section on the left side of the screen.
- Click Create Deployment.
- Ensure that From Scratch is selected for the deployment type.
- To define your deployment, fill in the Basic Information section.
- Name:
<your-deployment-name> - Path Prefix (example):
/tokens - Compartment:
<your-compartment-name> - API Request Policies: Take default values
- API Logging Policies: Take default value of Information
- Name:
- Click Next. The Routes dialog appears with Route 1 selected.
- To define your route, fill in the Route 1 section.
- Path:
<your-route-path>Example:
/val-token - Methods:
GET POST - Type: Oracle Functions
- Application in <your-compartment-name>: Select the Functions application you created.
- Function Name: Select the function you created in the configuration section.
- Path:
- Click Next. The Review dialog is displayed summarizing the choices you have made.
- Click Create. Your deployment is created.
- Click the Deployments link for your gateway. Copy the base end point for the
deployment you created.
For example:
https://aaaaa.apigateway.us-ashburn-X.oci.customer-oic.com/tokens
With your API Gateway and deployment created, you can now test you installation.
Create a simple script for the curl command. To create the URL for
curl, add your deployment path to your endpoint.
- Create the script file:
touch gtw01.sh && chmod 755 gtw01.sh - Add the command curl command to the script file:
#!/bin/bash curl <your-api-gateway-endpoint>/val-token - The command returns:
{"message":"Hello World"}
You have connected your API Gateway to a boiler plate Python function. Next, you update your Python function to display information passed in an HTTP request.
4. Update Function to Validate API Key
Next, modify the boiler plate Python function to validate an API key.
If you look at the boiler plate function, your Python function looks something like this.
import io
import json
import logging

from fdk import response


def handler(ctx, data: io.BytesIO = None):
    name = "World"
    try:
        body = json.loads(data.getvalue())
        name = body.get("name")
    except (Exception, ValueError) as ex:
        logging.getLogger().info('error parsing json payload: ' + str(ex))

    logging.getLogger().info("Inside Python Hello World function")
    return response.Response(
       ctx, response_data=json.dumps(
           {"message": "Hello {0}".format(name)}),
       headers={"Content-Type": "application/json"}
    )
Using this code as a starting point, the sections that follow convert the function into a Python function that validates an API key and returns a token.
Oracle Functions allows you to store configuration data in your context that is available in your request. Configuration data can be stored in an application or a function. The following command stores the API key in your app config.
fn config app <your-app-name> FN_API_KEY ABCD
The "ABCD" string is a sample key value.
For more information about setting function configuration values, see Fn Project's tutorial on runtime context.
First, update the func.py for required packages.
- Update the
importstatements infunc.pyfor required packages validation:import io import json import logging import datetime from datetime import timedelta from fdk import responseThe
datetimepackage is used to set an expiration time for the returned token. - Next, remove the main body of the function. The
responsemethod and related code are added back as we progress.import io import json import logging import datetime from datetime import timedelta from fdk import response def handler(ctx, data: io.BytesIO = None):
Now you are ready to update the function with the validation code.
Next add code to validate the API key and return a token in the response. Here is the code with comments following.
import io
import json
import logging
import datetime

from datetime import timedelta
from fdk import response
def handler(ctx, data: io.BytesIO = None):
auth_token = "invalid"
token = "invalid"
apiKey = "invalid"
expiresAt = (datetime.datetime.utcnow() + timedelta(seconds=60)).replace(tzinfo=datetime.timezone.utc).astimezone().replace(microsecond=0).isoformat()
try:
auth_token = json.loads(data.getvalue())
token = auth_token.get("token")
app_context = dict(ctx.Config())
apiKey = app_context['FN_API_KEY']
if token == apiKey:
return response.Response(
ctx,
status_code=200,
response_data=json.dumps({"active": True, "principal": "foo", "scope": "bar", "clientId": "1234", "expiresAt": expiresAt, "context": {"username": "wally"}})
)
except (Exception, ValueError) as ex:
logging.getLogger().info('error parsing json payload: ' + str(ex))
pass
return response.Response(
ctx,
status_code=401,
response_data=json.dumps({"active": False, "wwwAuthenticate": "API-key"})
)
- The
handlerfunction receives system information about the current request through thectxanddataparameters. - The function assumes that
FN_API_KEYis set in the app configuration. Then the function compares the configuration value to the token value sent from thecurlPOST request:-d '{"token":"ABCD"}'. - If the values match, a validation JSON message is returned. If they do not match, a 401 code is returned with JSON error data.
The function code is complete. You are now ready to test the function.
- Redeploy the updated function.
- Invoke the function to ensure that the function is working.
- Update the
gtw01.shscript to pass thePOSTdata to the script./bin/bash curl -X POST -d '{"token":"ABCD"}' https://aaaaa.apigateway.us-ashburn-X.oci.customer-oic.com/tokens/val-token - Run the script:
gtw01.sh | jq - If the API keys match, the output from the script looks similar to:
{
    "active": true,
    "principal": "foo",
    "scope": "bar",
    "clientId": "1234",
    "expiresAt": "2020-12-16T22:48:50+00:00",
    "context": {
    "username": "wally"
    }
}
If the API keys do not match, an error message is returned.
{
    "active": false,
    "wwwAuthenticate": "API-key"
}
You can download the complete source code for the function from the Oracle Function Samples site here.
Congratulations, you have converted the boiler plate Python function into a new function that validates an API key. The function demonstrates how data can be passed to API Gateway and processed in a function.
What's Next
You have successfully created an API Gateway and called a function from it. You updated the function to validate an API key.
To explore more information about development with Oracle products, check out these sites: