シナリオ: HTTPを使用した非構造化データの送信
このシナリオでは、Internet of Thingsプラットフォームを使用してデバイスを接続し、HTTPを使用して非構造化テレメトリ・データをクラウドに送信する方法と、APEXでデータを表示する方法について説明します。
開始する前に
必要な権限があることを確認してください。管理者は、必要なポリシーを作成してアクセス権を付与します。詳細は、証明書に必要なポリシーについては前提条件を、IoTリソースに必要なポリシーについてはInternet of Things (IoT)プラットフォームのポリシー詳細を参照してください。
Internet of Thingsに接続するデバイスごとに、次のステップを実行します。
ステップ1: IoTドメイン・グループの作成
oci iot domain-group createコマンド、<compartment-OCID>および<domain-group-name>の必須パラメータを使用して、特定のコンパートメントにIoTドメイン・グループを作成します。<compartment-OCID>を、ドメイン・グループを作成するコンパートメント用のOCIDに置き換えます。<domain-group-name>をドメイン・グループ名に置き換え、オプションで<your-sample-description>を説明に置き換えます。
oci iot domain-group create --compartment-id <compartment-OCID> --display-name <domain-group-name> --description <your-sample-description>IoTドメイン・グループの作成には数分かかる場合があります。このレスポンス例では、ドメイン・グループが作成され、このデータ・ホストURLが使用されています:
wtmn2xs4ifkba.data.iot.us-phoenix-1.oci.oraclecloud.com
ドメイン・グループの短縮ID: wtmn2xs4ifkba
data-host:<domain-group-short-id>.data.iot.<region>.oci.oraclecloud.com
{
  "data": {
    "compartment-id": "<compartment-OCID>",
    "data-host": "domain-group-short-id.data.iot.<region>.oci.oraclecloud.com",
    "db-allow-listed-vcn-ids": null,
    "db-connection-string": null,
    "db-token-scope": null,
    "defined-tags": {
      "Oracle-Tags": {
        "CreatedBy": "default/user@oracle.com",
        "CreatedOn": "2025-08-14T16:43:02.950Z"
      }
    },
    "description": "<your-domain-group-description>",
    "display-name": "<your-domain-group-name>",
    "freeform-tags": {},
    "id": "<domain-group-OCID>",
    "lifecycle-state": "CREATING",
    "system-tags": {},
    "time-created": "2025-08-14T16:43:03.307000+00:00",
    "time-updated": "2025-08-14T16:43:03.307000+00:00"
  },
  "etag": "<unique-id>",
  "opc-work-request-id": "<work-request-OCID>"
}
oci iot work-request getコマンドおよび必須パラメータを使用して、ドメイン・グループの作成プロセスの作業リクエストの更新を取得します。<work-request-id>を、IoTドメイン・グループ・レスポンスの作成時の作業リクエストOCIDに置き換えます。oci iot work-request get --work-request-id <work-request-OCID>このレスポンス例は、ドメイン・グループの作成操作が進行中であることを示しています。
{
  "data": {
    "compartment-id": "<compartment-OCID>",
    "id": "<work-request-OCID>",
    "operation-type": "CREATE_IOT_DOMAIN_GROUP",
    "percent-complete": 50.0,
    "resources": [
      {
        "action-type": "IN_PROGRESS",
        "entity-type": "iotDomainGroup",
        "entity-uri": "/20250531/iotDomainGroups/<iot-domain-group-OCID>",
        "identifier": "<work-request-OCID>",
        "metadata": null
      }
    ],
    "status": "ACCEPTED",
    "time-accepted": "2025-08-14T16:43:03.327000+00:00",
    "time-finished": null,
    "time-started": null,
    "time-updated": "2025-08-14T16:43:22.121000+00:00"
  },
  "etag": "<unique-id>"
}
oci iot work-request list-errorsコマンドおよび必須パラメータを使用して、ドメイン・グループの作成プロセスの作業リクエスト・エラーをリストできます。oci iot work-request list-errors --work-request-id <work-request-OCID>{
"data": {
"items": []
}
}oci iot work-request list-logsコマンドと必要なパラメータを使用して作業リクエストのログ・エントリをリストできます。oci iot work-request list-logs --work-request-id <work-request-OCID>このレスポンス例では、IoTドメイン・グループを作成するステップを示し、それが終了しています:
{
  "data": {
    "items": [
      {
        "message": "Generating database credentials",
        "timestamp": "2025-08-14T16:43:12.150000+00:00"
      },
      {
        "message": "Creating database",
        "timestamp": "2025-08-14T16:43:18.156000+00:00"
      },
      {
        "message": "Provisioning database",
        "timestamp": "2025-08-14T16:43:22.121000+00:00"
      },
      {
        "message": "Enabling data guard",
        "timestamp": "2025-08-14T16:48:25.138000+00:00"
      },
      {
        "message": "Configuring admin secret rotation ",
        "timestamp": "2025-08-14T16:53:59.878000+00:00"
      },
      {
        "message": "Generating DNS record(s)",
        "timestamp": "2025-08-14T16:54:05.318000+00:00"
      },
      {
        "message": "Configuring routing policy",
        "timestamp": "2025-08-14T16:54:06.455000+00:00"
      },
      {
        "message": "Finishing work request",
        "timestamp": "2025-08-14T16:54:58.139000+00:00"
      }
    ]
  }
}
- オプション。
oci iot work-request getコマンドおよび必須パラメータを使用して、ドメイン・グループの作業リクエストの更新を取得します。<work-request-id>を作業リクエストOCIDに置き換えます。oci iot work-request get --work-request-id <work-request-OCID>このレスポンス例では、IoTドメイン・グループの作成に成功しました。
{
  "data": {
    "compartment-id": "<compartment-OCID>",
    "id": "<work-request-OCID>",
    "operation-type": "CREATE_IOT_DOMAIN_GROUP",
    "percent-complete": 100.0,
    "resources": [
      {
        "action-type": "CREATED",
        "entity-type": "iotDomainGroup",
        "entity-uri": "/20250531/iotDomainGroups/<domain-group-OCID>",
        "identifier": "<domain-group-OCID>",
        "metadata": null
      }
    ],
    "status": "SUCCEEDED",
    "time-accepted": "2025-08-14T16:43:03.327000+00:00",
    "time-finished": "2025-08-14T16:54:58.139000+00:00",
    "time-started": "2025-08-14T16:43:12.131000+00:00",
    "time-updated": "2025-08-14T16:54:58.139000+00:00"
  },
  "etag": "<unique-id>"
}
オプションのステップ: IoTドメイン・グループの詳細の取得
oci iot domain-group getコマンドおよび必須パラメータを使用して、ドメイン・グループのデータベース接続の詳細(構成されている場合)を含むIoTドメイン・グループの詳細を取得します。<iot-domain-group-OCID>を、IoTドメイン・グループのOCIDに置き換えます。
oci iot domain-group get --iot-domain-group-id <iot-domain-group-OCID>"lifecycleState": "ACTIVE"を示し、次のデータ・ホストを使用します: wtmn2xs4ifkba.data.iot.us-phoenix-1.oci.oraclecloud.com。この例では、wtmn2xs4ifkbaはIoTドメイン・グループ短縮IDです。 {
"data": {
"compartment-id": "<compartment-OCID>",
"data-host": "wtmn2xs4ifkba.data.iot.<region>.oci.oraclecloud.com",
"db-allow-listed-vcn-ids": null,
"db-connection-string": null,
"db-token-scope": null,
"defined-tags": {
"Oracle-Tags": {
"CreatedBy": "default/user@oracle.com",
"CreatedOn": "2025-08-14T16:43:02.950Z"
}
},
"description": "This is a sample domain group",
"display-name": "Sample Domain Group",
"freeform-tags": {},
"id": "<iot-domain-group-OCID>",
"lifecycle-state": "ACTIVE",
"system-tags": {},
"time-created": "2025-08-14T16:43:03.307000+00:00",
"time-updated": "2025-08-14T16:54:58.187000+00:00"
},
"etag": "<unique-id>"
}ステップ2: IoTドメインの作成
Internet of Thingsドメインを作成するには、oci iot domain createコマンドおよび必要な<domain-group-OCID>および<compartment-OCID>パラメータを使用します。<domain-group-OCID>を、このIoTドメインに関連付けるドメイン・グループのOCIDに置き換えます。<your-sample-description>を、IoTドメインの説明に置き換えます。
oci iot domain create --compartment-id <compartment-OCID> --iot-domain-group-id <domain-group-OCID> --display-name <your-iot-domain-name> --description <your-iot-domain-description>ドメインの作成には数分かかる場合があります。このレスポンス例では、domain short idのdevice host URLが表示されます。
"device-host": "cuay2mrhlgrrg.device.iot.<region>.oci.oraclecloud.com"
ドメイン短縮ID: cuay2mrhlgrrg
"device-host": "<domain-short-id>.device.iot.<region>.oci.oraclecloud.com"
{
  "data": {
    "compartment-id": "<compartment-OCID>",
    "data-retention-periods-in-days": {
      "historized-data": 30,
      "raw-command-data": 16,
      "raw-data": 16,
      "rejected-data": 16
    },
    "db-allow-listed-identity-group-names": null,
    "db-allowed-identity-domain-host": null,
    "defined-tags": {
      "Oracle-Tags": {
        "CreatedBy": "default/user@oracle.com",
        "CreatedOn": "2025-08-14T16:57:03.140Z"
      }
    },
    "description": "<your-iot-domain-description>",
    "device-host": "cuay2mrhlgrrg.device.iot.<region>.oci.oraclecloud.com",
    "display-name": "<your-iot-domain-name>",
    "freeform-tags": {},
    "id": "<iot-domain-OCID>",
    "iot-domain-group-id": "<iot-domain-group-OCID>",
    "lifecycle-state": "CREATING",
    "system-tags": {},
    "time-created": "2025-08-14T16:57:03.384000+00:00",
    "time-updated": "2025-08-14T16:57:03.384000+00:00"
  },
  "etag": "<unique-id>",
  "opc-work-request-id": "<work-request-OCID>"
}
オプション。ドメインの作成にかかる時間中に、oci iot work-request getコマンドおよび必須パラメータを使用して、ドメインを作成するための作業リクエストの更新を取得します。<work-request-id>を、前のレスポンスの作業リクエストIDに置き換えます。
oci iot work-request get --work-request-id <work-request-OCID>レスポンス例は、IoTドメインの作成が受け入れられ、進行中であることを示しています。
{
  "data": {
    "compartment-id": "<iot-domain-OCID>",
    "id": "<work-request-OCID>",
    "operation-type": "CREATE_IOT_DOMAIN",
    "percent-complete": 50.0,
    "resources": [
      {
        "action-type": "IN_PROGRESS",
        "entity-type": "iotDomain",
        "entity-uri": "/20250531/iotDomains/<iot-domain-OCID>",
        "identifier": "<iot-domain-OCID>",
        "metadata": null
      }
    ],
    "status": "ACCEPTED",
    "time-accepted": "2025-08-14T16:57:03.413000+00:00",
    "time-finished": null,
    "time-started": null,
    "time-updated": "2025-08-14T16:57:23.124000+00:00"
  },
  "etag": "<unique-id>"
}
oci iot work-request list-logsコマンドと必要なパラメータを使用して、IoTドメイン作成作業リクエストのログ・エントリをリストできます。oci iot work-request list-logs --work-request-id <work-request-OCID>このレスポンス例では、IoTドメインを作成するステップと、ドメインが終了しているステップを示します。
{
  "data": {
    "items": [
      {
        "message": "Generating DNS record(s)",
        "timestamp": "2025-08-14T16:57:22.148000+00:00"
      },
      {
        "message": "Onboarding domain schema(s)",
        "timestamp": "2025-08-14T16:57:23.124000+00:00"
      },
      {
        "message": "Successfully onboarded domain schemas",
        "timestamp": "2025-08-14T16:58:43.508000+00:00"
      },
      {
        "message": "Finishing work request",
        "timestamp": "2025-08-14T16:58:43.771000+00:00"
      }
    ]
  }
}
oci iot work-request getコマンドおよび必須パラメータを使用して、ドメインを作成するための作業リクエストの更新を取得します。<work-request-id>を作業リクエストOCIDに置き換えます。oci iot work-request get --work-request-id <work-request-OCID>このレスポンス例では、IoTドメインの作成が成功しました。
"status": "SUCCEEDED",
{
  "data": {
    "compartment-id": "<compartment-OCID>",
    "id": "<work-request-OCID>",
    "operation-type": "CREATE_IOT_DOMAIN",
    "percent-complete": 100.0,
    "resources": [
      {
        "action-type": "CREATED",
        "entity-type": "iotDomain",
        "entity-uri": "/20250531/iotDomains/<iot-domain-OCID>",
        "identifier": "<iot-domain-OCID>",
        "metadata": null
      }
    ],
    "status": "SUCCEEDED",
    "time-accepted": "2025-08-14T16:57:03.413000+00:00",
    "time-finished": "2025-08-14T16:58:43.771000+00:00",
    "time-started": "2025-08-14T16:57:22.147000+00:00",
    "time-updated": "2025-08-14T16:58:43.771000+00:00"
  },
  "etag": "<unique-id>"
}
オプションのステップ: デバイス・ホストURLを表示するためのIoTドメイン詳細の取得
oci iot domain getコマンドと必要なパラメータを使用して、ドメインの詳細を取得します。<iot-domain-OCID>を、IoTドメインのOCIDに置き換えます。oci iot domain get --iot-domain-id <iot-domain-OCID>このレスポンス例は、ドメインがアクティブであることを示しています: "lifecycle-state": "ACTIVE"およびドメイン短縮IDのデバイス・ホストURL:
<domain-short-id>.device.iot.<region>.oci.oraclecloud.com
{
  "data": {
    "compartment-id": "<compartment-OCID>",
    "data-retention-periods-in-days": {
      "historized-data": 30,
      "raw-command-data": 16,
      "raw-data": 16,
      "rejected-data": 16
    },
    "db-allow-listed-identity-group-names": null,
    "db-allowed-identity-domain-host": null,
    "defined-tags": {
      "Oracle-Tags": {
        "CreatedBy": "default/user@oracle.com",
        "CreatedOn": "2025-08-14T16:57:03.140Z"
      }
    },
    "description": "<your-iot-domain-description>",
    "device-host": "<domain-short-id>.device.iot.<region>.oci.oraclecloud.com",
    "display-name": "<your-iot-domain-name>",
    "freeform-tags": {},
    "id": "<iot-domain-OCID>",
    "iot-domain-group-id": "<iot-domain-group-OCID>",
    "lifecycle-state": "ACTIVE",
    "system-tags": {},
    "time-created": "2025-08-14T16:57:03.384000+00:00",
    "time-updated": "2025-08-14T16:58:43.789000+00:00"
  },
  "etag": "<unique-id>"
}
ステップ3: デジタル・ツイン・インスタンスの作成
oci iot digital-twin-instance createコマンドおよび必要な<iot-domain-OCID>パラメータを使用して、関連付けられたIoTドメインのデジタル・ツイン・インスタンスを作成します。
デジタル・ツイン・モデルを持たないデジタル・ツイン・インスタンスを作成する場合、デジタル・ツイン・インスタンスには認証IDが必要です。mTLS証明書またはシークレットのいずれかを使用します。シークレットの作成を参照してください。
<iot-domain-OCID>を、デジタル・ツイン・インスタンスに関連付けるIoTドメインのOCIDに置き換えます。このコマンドの例には、オプションの表示名が含まれ、<display-name>をデジタル・ツイン・インスタンスのわかりやすい名前に置き換えます。この例では、オプションの--external-keyパラメータを使用しないため、レスポンスには生成された一意のIDが外部キーとして含まれます。 oci iot digital-twin-instance create --iot-domain-id <iot-domain-OCID> --auth-id <vault-secret-OCID-or-certificate-OCID> --display-name <display-name>{
"data": {
"auth-id": "<vault-secret-OCID>",
"defined-tags": {
"Oracle-Tags": {
"CreatedBy": "default/user@oracle.com",
"CreatedOn": "2025-08-14T06:12:43.393Z"
}
},
"description": null,
"digital-twin-adapter-id": "<iot-digital-twin-adapter-OCID>",
"digital-twin-model-id": "<iot-digital-twin-model-OCID>",
"digital-twin-model-spec-uri": "dtmi:com:oracle:example:core:Space:sp;1",
"display-name": "device for conference room 103",
"external-key": "<unique-id>",
"freeform-tags": {},
"id": "<iot-digital-twin-instance-OCID>",
"iot-domain-id": "<iot-domain-OCID>",
"lifecycle-state": "ACTIVE",
"system-tags": {},
"time-created": "2025-09-11T06:12:44.178000+00:00",
"time-updated": "2025-09-11T06:12:44.178000+00:00"
},
"etag": "<unique-id>"
}
ステップ4: データの送信
前の手順の device host URLを使用してデータを送信します。
送信するだけのデータを送信できます。この例は、2つのプレーン・テキスト・データ・メッセージの送信を示しています。詳細は、「cURLの使用」を参照してください
curlコマンドの例には、サンプル・トピックを含むデバイス・ホストURLと、プレーン・テキスト・メッセージとしてのデータ(sample data 1)が含まれ、認証にボールト・シークレットを使用する方法も示しています。本番では、デジタル・ツイン・インスタンス--auth-idにmTLS証明書を使用します。<iot-domain-short-id>および<region>を環境の値に置き換えます。<digital-twin-instance-external-key>を、前のステップ3の「デジタル・ツイン・インスタンスの作成」からのデジタル・ツイン・インスタンスの作成レスポンスの外部キーに置き換えます。- デジタル・ツイン・インスタンス
--auth-idにボールト・シークレットを使用する場合は、デバイス・パスワードにプレーン・テキスト・シークレットの内容を使用します。
curl -i -X POST \
-u '<digital-twin-instance-external-key>:<secret-contents>' \
-H 'Content-Type: plain-text' \
 https://<iot-domain-short-id>.device.iot.region.oci.oraclecloud.com/sampletopic \
-d "sample data 1"curlコマンドは、サンプル・トピックとしてプレーン・テキスト・メッセージをsample data 2として示します。curl -u '<digital-twin-instance-external-key>:<secret-contents>' https://<iot-domain-short-id>.device.iot.<region>.oci.oraclecloud.com/sampletopic -H 'Content-Type: plain-text' -d "sample data 2"
ステップ5: APEXへのIoTドメインのアクセスの構成
APEXでデータを表示するには、APEXでIoTデータを表示するためのアクセスの構成が必要です。このプロセスのステップでは、APEXにアクセスできるように、次のコマンドを使用してAPEXパスワードをIoTドメインに追加します。
oci iot domain configure-apex-data-accessコマンドおよび必要なパラメータを使用して、APEXへのIoTドメインのアクセスを構成します。<your-initial-apex-password>および<iot-domain-OCID>を環境の値に置き換えます。oci iot domain configure-apex-data-access --iot-domain-id <iot-domain-OCID> --db-workspace-admin-initial-password <your-inital-apex-password>オプション。APEXへのアクセスの構成にかかる時間中に、oci iot work-request getコマンドと必要なパラメータを使用して作業リクエストの更新を取得します。<work-request-id>を、前のレスポンスの作業リクエストIDに置き換えます。
oci iot work-request get --work-request-id <work-request-OCID>レスポンスの例:
{
  "data": {
    "compartment-id": "<compartment-OCID>",
    "id": "<work-request-OCID>",
    "operation-type": "CONFIGURE_DOMAIN_DATA_ACCESS",
    "percent-complete": 0.0,
    "resources": [
      {
        "action-type": "IN_PROGRESS",
        "entity-type": "iotDomain",
        "entity-uri": "/20250531/iotDomains/<iot-domain-OCID>",
        "identifier": "<iot-domain-OCID>",
        "metadata": null
      }
    ],
    "status": "ACCEPTED",
    "time-accepted": "2025-08-14T17:44:44.716000+00:00",
    "time-finished": null,
    "time-started": null,
    "time-updated": "2025-08-14T17:44:44.716000+00:00"
  },
  "etag": "<unique-id>"
}
oci iot work-request list-logsコマンドと必要なパラメータを使用して、作業リクエストのログ・エントリをリストできます:oci iot work-request list-logs --work-request-id <work-request-OCID>このレスポンス例では、ドメインのAPEXへのアクセスが進行中で、それが終了していることを示しています:
{
  "data": {
    "items": [
      {
        "message": "Configuring domain data access is in Progress",
        "timestamp": "2025-08-14T17:45:19.708000+00:00"
      },
      {
        "message": "Finishing work request",
        "timestamp": "2025-08-14T17:45:19.978000+00:00"
      }
    ]
  }
}
oci iot work-request list-errorsコマンドおよび必要なパラメータを使用して作業リクエスト・エラーをリストできます:oci iot work-request list-errors --work-request-id <work-request-OCID>{
"data": {
"items": []
}
}oci iot work-request getコマンドと必要なパラメータを使用して作業リクエストを取得します。<work-request-id>を作業リクエストIDに置き換えます。oci iot work-request get --work-request-id <work-request-OCID>このレスポンス例では、IoTドメインのAPEXに対する構成アクセスが更新されています:
"status": "SUCCEEDED"
{
  "data": {
    "compartment-id": "<compartment-OCID>",
    "id": "<work-request-OCID>",
    "operation-type": "CONFIGURE_DOMAIN_DATA_ACCESS",
    "percent-complete": 100.0,
    "resources": [
      {
        "action-type": "UPDATED",
        "entity-type": "iotDomain",
        "entity-uri": "/20250531/iotDomains/<iot-domain-OCID>",
        "identifier": "<iot-domain-OCID>",
        "metadata": null
      }
    ],
    "status": "SUCCEEDED",
    "time-accepted": "2025-08-14T17:44:44.716000+00:00",
    "time-finished": "2025-08-14T17:45:19.978000+00:00",
    "time-started": "2025-08-14T17:45:19.708000+00:00",
    "time-updated": "2025-08-14T17:45:19.978000+00:00"
  },
  "etag": "<unique-id>"
}
ステップ6: APEXでのIoTデータへのアクセス
- IoTのAPEX URLに移動します:
https://<domain-group-data-host>/ords/apex/APEXで、次を使用してログインします。
APEXにログインするには、デバイス・ホストのドメイン短縮IDを使用します:
たとえば:
device-host:<domain-short-id>.device.iot.<region>.oci.oraclecloud.com- ワークスペース:
<domain-short-id-from-device-host>__WKSP - ユーザー名:
<domain-short-id-from-device-host>__WKSP - CLIコマンドを使用してAPEX用のIoTドメインのデータ・アクセスを構成した場合の初期パスワード・セット:
<initial-apex-password>
ノート
2つのアンダースコア(__WKSPおよび__IOT)に注意してください。 - ワークスペース:
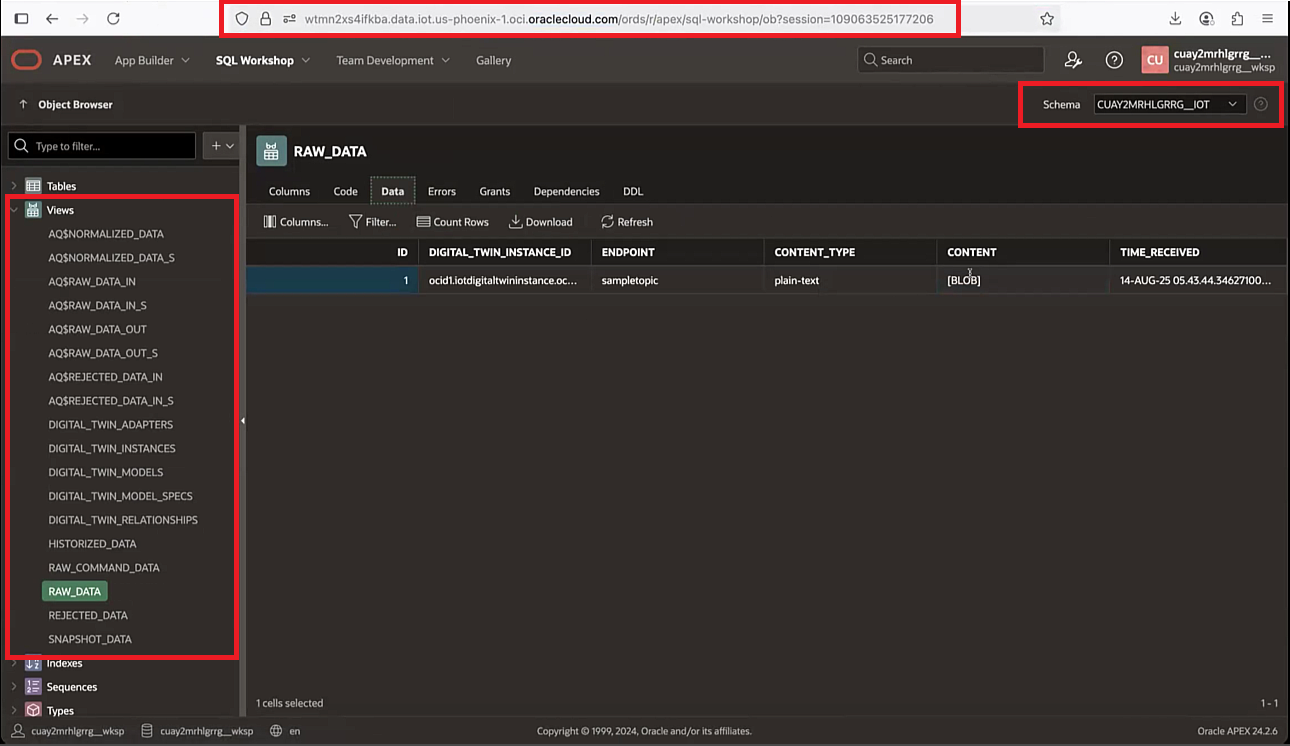
- IoTデータを問い合せるには、
<domain-short-id-from-device-host>__IOTスキーマを選択します。「SQLワークショップ」を選択し、「オブジェクト・ブラウザ」を選択します。SQLワークショップのURL:
https://<domain-group-data-host>/ords/apex/sql-workshop - SQLコマンドを入力して実行し、IoTデータを問い合せます。問合せする正しいスキーマを選択したことを確認し、次のコマンドを実行します。
select * from RAW_DATAこれで、Internet of Things接続デバイスのデータベース・ビュー、スキーマおよびRAWデータを確認できます。
大きなスクリーンショットを表示するには、右クリックして新しいブラウザ・ウィンドウでイメージを開きます。