24 デプロイ済エージェントの起動
本番アプリケーションからエージェントのエンドポイントURLを起動できます。
エージェント・エンドポイントの起動に使用されるプログラム・インタフェースに関係なく、OCIで認証され、関連する権限を持っている必要があります。エージェント・エンドポイントの場合、コール元には、エージェント・エンドポイントに対する少なくともUSE権限が必要です。
エンドポイントURIは、エージェントUIの詳細タブに記載されています。そのエンドポイントURIをコードにコピーして、エージェントを起動できます。
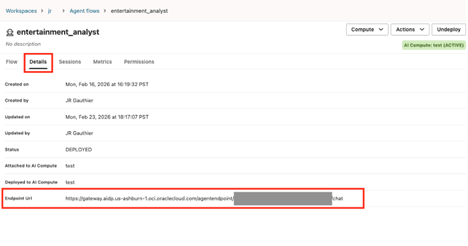
エンドポイントURIを呼び出すメソッド
エージェント・エンドポイントURIは、様々なツール、SDKおよびCLIを介して起動できます。
次のメソッドを使用すると、Oracle AI Data PlatformエージェントでエンドポイントURIを起動できます。
OCI CLIで起動
oci raw-request
--http-method POST
--target-uri <your-agent-flow-endpoint-uri>
--request-body '{"query":"Tell me about the Ryder Cup in 1985"}'
--auth <security_token>
Pythonリクエスト・ライブラリで起動
import oci import requests import json import uuid from contextlib import closing from requests import Request, Response
class AuthHelper: """ AuthHelper allows creating an OCI signer with either API key or security_token (which are short term sessions) """ def init(self, oci_profile: str, use_security_token:bool = True): config = oci.config.from_file(file_location="/Volumes/jr/default/misc/config",profile_name=oci_profile) if use_security_token: with open(config["security_token_file"], 'r') as f: token = f.read() private_key = oci.signer.load_private_key_from_file(config["key_file"])
 self.signer = oci.auth.signers.SecurityTokenSigner(token, private_key) else: self.signer = oci.signer.Signer( tenancy=config["tenancy"], user=config["user"], fingerprint=config["fingerprint"], private_key_file_location=config["key_file"], #pass_phrase=config.get("pass_phrase"), #private_key_content=config.get("key_content") )
@property
def Signer(self):
    return self.signer

class MyRawJsonRpcClient: """ Simple class using requests lib to post JSON to chat endpoint using OCI signing """ def init(self, chat_url:str, oci_profile: str, sessionKey:str, use_security_token:bool = True): self.authhelper = AuthHelper(oci_profile=oci_profile, use_security_token=use_security_token) self.authsigner = self.authhelper.Signer self.chat_url = chat_url self.sessionKey = sessionKey
def send(self, input:str) -> Response:
    body = {
        "isStreamEnabled" : False,
        "sessionKey" : self.sessionKey,
        "trace" : False,
        "input" :[{
            "role":"User",
            "content":[{
                "type" : "INPUT_TEXT",
                "text" : input
            }]
        }]
    }

    response:Request = requests.post(
        url =self.chat_url,
        params = None,
        auth = self.authsigner,
        json=body,
        headers={}
    )
    return response
sessionKeyを指定できます。sessionKeyは、エージェントとのユーザー・セッションの一意の識別子です。同じsessionKeyを再利用し続けると、ユーザー・メッセージとエージェント・レスポンスが同じ保護に追加されます。 client = MyRawJsonRpcClient(chat_url="<your-agent-flow-endpoint-uri>",
oci_profile = "DEFAULT",
sessionKey= “<your-session-key>”,
use_security_token = False )user_input = f"Hello, tell me a good dad joke."
r = client.send(input = user_input)
response_json = r.json()APEX経由
AI Data Platform Samples Githubリポジトリで使用可能なコード・サンプルを使用できます。サンプルでは、APEXアプリケーションからエージェント・デプロイメント・エンドポイントをコールするプロセスについて説明します。
Streamlitを使用
AI Data Platform Samples Githubリポジトリで使用可能なコード・サンプルを使用できます。サンプルでは、Streamlitアプリケーションからエージェント・デプロイメント・エンドポイントをコールするプロセスについて説明します。
ベスト・プラクティス- 非同期応答と非同期応答
非同期レスポンスを想定したクライアント・コードを作成することをお薦めします。たとえば:
import httpx

async def fetch_data():
    async with httpx.AsyncClient() as client:
        response = await client.get(URL)
        return response.json()