Oracle JET Webコンポーネントの強化およびアーカイブ
イントロダクション
Webコンポーネントは、WebアプリケーションにカスタムHTML要素として埋め込むことができる再利用可能なユーザー・インタフェースです。Webコンポーネントには、Oracle JavaScript Extension Toolkit (Oracle JET)コンポーネント、他のWebコンポーネント、HTML、JavaScript、TypeScriptおよびCascading Style Sheets (CSS)が含まれます。Oracle JETツールを使用してWebコンポーネントを作成し、Oracle JETスタータ・テンプレートを使用して、Webコンポーネントを追加および構成するために変更するHTMLおよびTypeescriptまたはJavaScriptファイルを生成できます。
前のチュートリアルでは、4つの入力テキスト・フィールドを表示するWebコンポーネントを作成しました。このチュートリアルでは、「アイテムID」フィールドを読取り専用フィールドに変更し、「アイテム価格」フィールドに通貨コンバータを追加し、「アイテムの説明」フィールドに長さバリデータを追加する方法を学習します。これらのフィールドに値を渡すには、WebアプリケーションのHTMLソースにある4つの入力テキスト・フィールドの属性を定義します。使用する属性には、Webコンポーネントのメタデータ・ファイルで定義された対応するプロパティが必要です。静的値を属性に渡すか、WebアプリケーションとWebコンポーネント間の一方向または双方向のデータ・バインディングにデータ・バインド式構文を使用できます。
目的
このチュートリアルでは、Oracle JET Webアプリケーションの追加機能を使用してWebコンポーネントを拡張します。また、Webコンポーネントをパッケージ化し、別のアプリケーションと共有するための準備方法についても学習します。
前提条件
- JavaScriptランタイム、Node.jsおよび最新のOracle JETリリース・コマンドライン・インタフェースがインストールされたOracle JETアプリケーションを作成するために設定された開発環境
JET_Web_Component_Applicationフォルダにdemo-update-itemWebコンポーネントが作成されるように、この学習パスでの前のチュートリアルの完了
タスク1:読取り専用へのアイテムIDの編集
Webコンポーネントの「アイテムID」フィールドは読取り専用である必要があります。アクセシビリティのために、「アイテムID」フィールドのoj-input-textカスタムHTML要素をoj-label-valueカスタムHTML要素に置き換えます。oj-label-value要素は、oj-bind-text要素を使用して「アイテムID」フィールドを読取り専用に変更するスロットを定義します。
-
JET_Web_Component_Application/src/ts/jet-composites/demo-update-itemディレクトリに移動し、エディタでdemo-update-item-view.htmlファイルを開きます。 -
属性
value="ID number"でoj-input-textカスタムHTML要素を検索し、oj-input-text要素をoj-label-value要素に置き換えます。<oj-form-layout id="form-container" label-edge="[[labelEdge]]"> <oj-label-value> <oj-label slot="label">Item ID</oj-label> <div slot="value"> <oj-bind-text value="ID number"></oj-bind-text> </div> </oj-label-value> <oj-input-text value="Name" label-hint="Item Name"></oj-input-text> . . . </oj-form-layout> -
demo-update-item-view.htmlファイルを保存します。demo-update-item-view.htmlコードは、readonly-itemid.txtのようになります。 -
JET_Web_Component_Application/src/ts/jet-composites/demo-update-itemディレクトリに移動し、エディタでdemo-update-item-viewModel.tsファイルを開きます。 -
demo-update-item-viewModel.tsファイルで、ojs/ojinputtextモジュールをインポートするエントリの後にojs/ojlabelvalueローダー・モジュールをインポートします。"use strict"; import * as ko from "knockout"; import componentStrings = require("ojL10n!./resources/nls/demo-update-item-strings"); import Context = require("ojs/ojcontext"); import Composite = require("ojs/ojcomposite"); import "ojs/ojknockout"; import * as ResponsiveUtils from "ojs/ojresponsiveutils"; import * as ResponsiveKnockoutUtils from "ojs/ojresponsiveknockoututils"; import "ojs/ojformlayout"; import "ojs/ojinputtext"; import "ojs/ojlabelvalue"; -
demo-update-item-viewModel.tsファイルを保存します。 -
ターミナル・ウィンドウで、
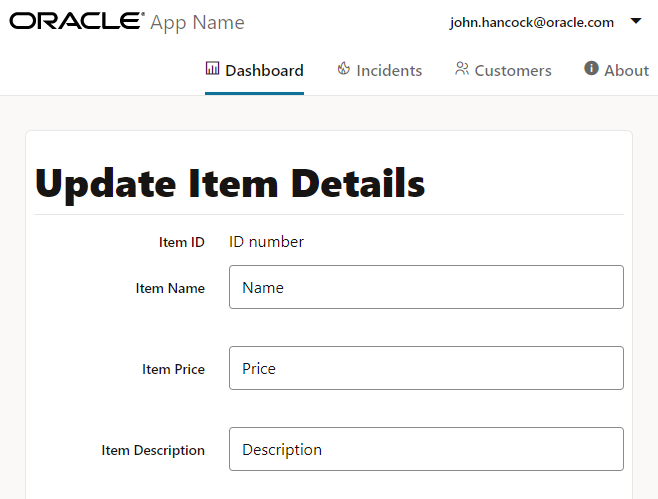
JET_Web_Component_Applicationディレクトリに移動し、アプリケーションを実行します。$ ojet serveブラウザに、Webアプリケーションの「ダッシュボード」タブに4つの入力テキスト・フィールドを含むWebコンポーネントが表示されます。「アイテムID」フィールドが読取り専用になりました。

-
端末ウィンドウおよびWebアプリケーションを表示するブラウザ・ウィンドウまたはタブを開いたままにします。
ojet serveコマンドを使用すると、ブラウザに即時に反映されるアプリケーション・コードを変更できます。
タスク2:通貨コンバータの追加
「アイテム価格」フィールドに通貨コンバータを使用します。
-
JET_Web_Component_Application/src/ts/jet-composites/demo-update-itemディレクトリに移動し、エディタでdemo-update-item-view.htmlファイルを開きます。 -
属性
value="Price"でoj-input-textカスタムHTML要素を見つけ、後のステップで定義する通貨コンバータを使用するように更新します。コンバータには文字列ではなく有効な数が必要なため、valueプロパティのプレースホルダ値としてPriceではなく00を入力します。<oj-form-layout id="form-container" label-edge="[[labelEdge]]"> ... <oj-input-text value="Name" label-hint="Item Name"></oj-input-text> <oj-input-text value="00" help.instruction="enter an amount with or without grouping separator" converter="[[currency]]" label-hint="Item Price"> </oj-input-text> <oj-input-text value="Description" label-hint="Item Description"></oj-input-text> </oj-form-layout> -
demo-update-item-view.htmlファイルを保存します。demo-update-item-view.htmlコードは、currency-code-html.txtのようになります。 -
JET_Web_Component_Application/src/ts/jet-composites/demo-update-itemディレクトリに移動し、エディタでdemo-update-item-viewModel.tsファイルを開きます。 -
demo-update-item-viewModel.tsファイルの上部で、ojs/ojconverter-numberモジュールからIntlNumberConverterをインポートします。"use strict"; import * as ko from "knockout"; . . . import "ojs/ojinputtext"; import "ojs/ojlabelvalue"; import { IntlNumberConverter } from "ojs/ojconverter-number"; -
ViewModelクラスで、次のステップで初期化する通貨コンバータの通貨フィールドを追加します。export default class ViewModel implements Composite.ViewModel<Composite.PropertiesType> { busyResolve: (() => void); . . . currency: IntlNumberConverter; constructor(context: Composite.ViewModelContext<Composite.PropertiesType>) { . . . -
観測可能なエントリの例の後に
constructor()メソッドで、通貨コンバータを追加します。constructor(context: Composite.ViewModelContext<Composite.PropertiesType>) { . . . this.res = componentStrings["demo-update-item"]; this.currency = new IntlNumberConverter({ style: "currency", currency: "USD ", currencyDisplay: "code", }); -
demo-update-item-viewModel.tsファイルを保存します。demo-update-item-viewModel.tsコードは、currency-code-ts.txtのようになります。 -
ブラウザに戻り、Webアプリケーションでの変更を表示します。
-
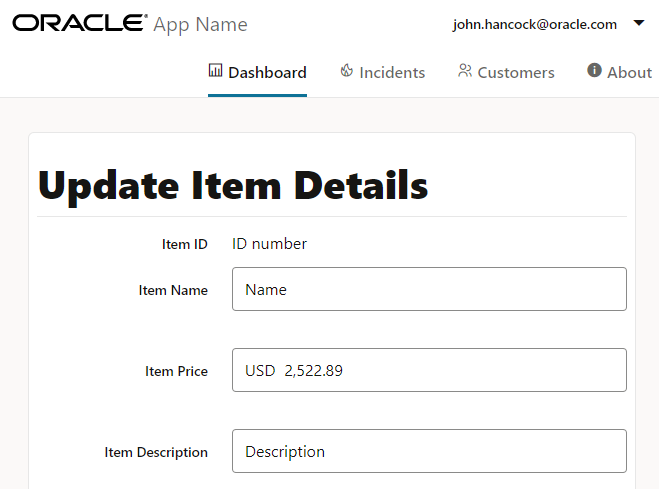
「アイテム価格」フィールドに価格を入力し、[Enter]を押して変更を確認します。

図form-wc-currency-converter.pngの説明
入力した価格にはUSDプリフィクスが表示されます。数値以外の値を入力すると、「アイテム価格」フィールドにエラーが表示されます。
-
端末ウィンドウおよびWebアプリケーションを表示するブラウザ・ウィンドウまたはタブを開いたままにします。
ojet serveコマンドを使用すると、ブラウザに即時に反映されるアプリケーション・コードを変更できます。
タスク3:長さバリデータの追加
「アイテムの説明」フィールドに長さのバリデータを使用します。
-
JET_Web_Component_Application/src/ts/jet-composites/demo-update-itemディレクトリに移動し、エディタでdemo-update-item-view.htmlファイルを開きます。 -
属性
value="Description"でoj-input-textカスタムHTML要素を見つけ、後のステップで定義する長さバリデータを使用するように更新します。<oj-form-layout id="form-container"> ... <oj-input-text value="00" help.instruction="enter an amount with or without grouping separator" converter="[[currency]]" label-hint="Item Price"> </oj-input-text> <oj-input-text value="{{lengthValue1}}" validators="[[validators]]" placeholder="Enter a description of 5-50 characters" label-hint="Item Description" ></oj-input-text> </oj-form-layout> -
demo-update-item-view.htmlファイルを保存します。demo-update-item-view.htmlコードは、validator-code-html.txtのようになります。 -
JET_Web_Component_Application/src/ts/jet-composites/demo-update-itemディレクトリに移動し、エディタでdemo-update-item-viewModel.tsファイルを開きます。 -
demo-update-item-viewModel.tsファイルの上部で、ojs/ojasyncvalidator-lengthモジュールからAsyncLengthValidatorをインポートします。import * as ko from "knockout"; . . . import { IntlNumberConverter } from "ojs/ojconverter-number"; import AsyncLengthValidator = require("ojs/ojasyncvalidator-length"); -
ViewModelクラスで、次のステップで初期化するKnockoutオブザーバブルのフィールドを追加します。export default class ViewModel implements Composite.ViewModel<Composite.PropertiesType> { busyResolve: (() => void); . . . currency: IntlNumberConverter; lengthValue1: ko.Observable<string>; validators: ko.ObservableArray<AsyncLengthValidator<string>>; -
通貨コンバータの後の
constructorメソッドで、長さバリデータを追加します。constructor(context: Composite.ViewModelContext<Composite.PropertiesType>) { . . . this.res = componentStrings["demo-update-item"]; this.currency = new IntlNumberConverter({ style: "currency", currency: "USD ", currencyDisplay: "code", }); this.lengthValue1 = ko.observable(""); this.validators = ko.observableArray([ new AsyncLengthValidator({ min: 5, max: 50 }), ]);長さバリデータは、「アイテムの説明」フィールドの最小文字長5および最大文字長50を定義します。
-
demo-update-item-viewModel.tsファイルを保存します。demo-update-item-viewModel.tsコードは、final-demo-update-item-viewModel-ts.txtのようになります。 -
ブラウザに戻り、Webアプリケーションでの変更を表示します。
-
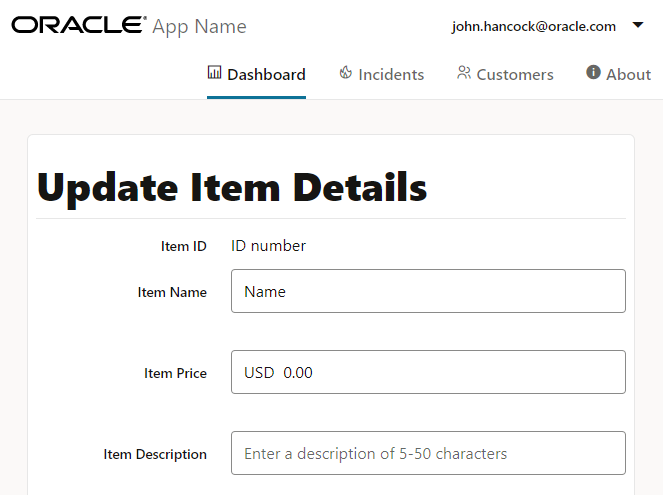
「アイテムの説明」フィールドに説明を入力して[Enter]を押し、[Tab]を押してツールチップをクリアします。

図form-wc-length-validator.pngの説明
説明が設定範囲より長い場合、「アイテムの説明」フィールドにエラーが表示されます。
-
端末ウィンドウおよびWebアプリケーションを表示するブラウザ・ウィンドウまたはタブを開いたままにします。
ojet serveコマンドを使用すると、ブラウザに即時に反映されるアプリケーション・コードを変更できます。
タスク4: Webコンポーネント・メタデータの定義
Webコンポーネントのメタデータ・ファイルは、Webコンポーネントの必須プロパティを定義します。Webコンポーネントの各入力テキスト・フィールドには、Webコンポーネントから更新をライトバックする関連プロパティが必要です。
-
JET_Web_Component_Application/src/ts/jet-composites/demo-update-itemディレクトリに移動し、エディタでcomponent.jsonファイルを開きます。 -
displayNameおよびdescriptionメタデータ・プロパティを定義します。{ "name": "demo-update-item", "version": "1.0.0", "jetVersion": "^12.0.0", "displayName": "demo-update-item", "description": "A Web Component with form layout", ... } -
descriptionメタデータ・プロパティの下で、キャメル・ケースの命名規則を使用して、Webコンポーネント・ビューのフィールドにバインドされるプロパティを定義します。"description": "A Web Component with form layout", "properties": { "itemId": { "type": "number" }, "itemName": { "type": "string", "description": "Description for the item-name attribute", "writeback": true }, "itemPrice": { "type": "number", "writeback": true }, "itemDesc": { "type": "string", "writeback": true } },writebackプロパティをtrueに設定すると、これらのプロパティは、双方向のデータ・バインディング式でプロパティを参照するWebコンポーネントからの更新を受信します。 -
component.jsonファイルを保存します。component.jsonコードは、component-json.txtのようになります。
タスク5:属性と属性値の定義
Webコンポーネント要素の属性は、Webコンポーネント・メタデータ・ファイルで宣言したプロパティを参照できます。WebアプリケーションのHTMLソースでは、プロパティ参照は、ハイフン付きの大/小文字を区別しないHTML要素属性名として表示されます。
-
JET_Web_Component_Application/src/ts/viewsディレクトリに移動し、エディタでdashboard.htmlファイルを開きます。 -
demo-update-item要素で、4つの入力テキスト・フィールドに静的な値を使用して属性を定義します。<div class="oj-hybrid-padding"> <div class="oj-panel oj-sm-margin-2x demo-mypanel"> <h1 class="oj-header-border">Update Item Details</h1> <div> <demo-update-item item-id="34" item-name="John" item-price="3434.55" item-desc="This is an updated item"> </demo-update-item> </div> </div> </div> -
dashboard.htmlファイルを保存します。
タスク6: Webコンポーネント・ビューの定義
ビュー・バインディング・コンテキストの$properties変数を使用して、Webコンポーネントのメタデータ・ファイルに定義された任意のプロパティにアクセスできます。
-
JET_Web_Component_Application/src/ts/jet-composites/demo-update-itemディレクトリに移動し、エディタでdemo-update-item-view.htmlファイルを開きます。 -
oj-form-layout要素のカスタムHTML要素で、$properties変数を使用して、component.jsonファイルに定義されているプロパティにvalue属性をバインドします。<oj-form-layout id="form-container" label-edge="[[labelEdge]]"> . . . <div slot="value"> <oj-bind-text value="[[$properties.itemId]]"></oj-bind-text> </div> </oj-label-value> <oj-input-text value="{{$properties.itemName}}" label-hint="Item Name"></oj-input-text> <oj-input-text value="{{$properties.itemPrice}}" help.instruction="enter an amount with or without grouping separator" ...> </oj-input-text> <oj-input-text value="{{$properties.itemDesc}}" . . .> </oj-input-text> </oj-form-layout>属性値を定義するには、
[[]]構文を使用して一方向のデータ・バインディングと、双方向データ・バインディングの{{}}構文を定義します。 -
demo-update-item-view.htmlファイルを保存します。demo-update-item-view.htmlコードは、final-demo-update-item-view-html.txtのようになります。 -
ブラウザに戻り、Webアプリケーションでの変更を表示します。
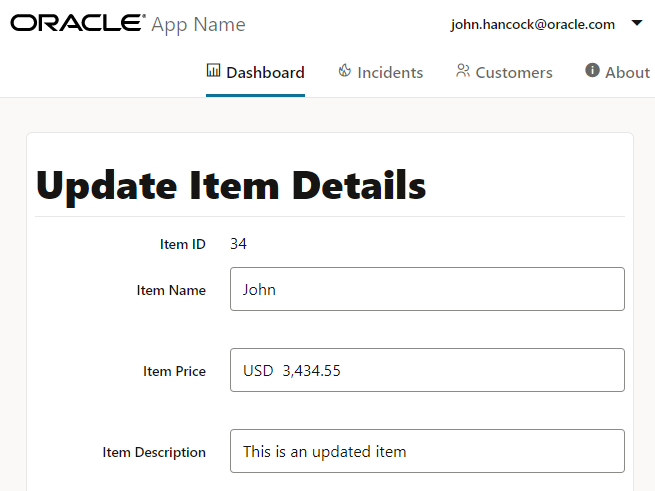
ブラウザには、4つの入力テキスト・フィールドに静的値を含むWebコンポーネントが表示されます。

-
実行中のWebアプリケーションを表示するブラウザ・ウィンドウまたはタブを閉じます。
-
端末ウィンドウでCtrl+Cを押し、プロンプトが表示されたら
yと入力してOracle JETツール・バッチ・ジョブを終了します。ターミナル・ウィンドウを閉じます。
タスク7: Webコンポーネントのアーカイブ
Webコンポーネントを構成したら、他のアプリケーション用にWebコンポーネントを準備する必要があります。
端末ウィンドウを開き、JET_Web_Component_Applicationディレクトリに移動し、コマンド・パラメータとしてコンポーネントの名前demo-update-itemを指定してojet package componentコマンドを実行します。
$ ojet package component demo-update-item
Oracle JETは、JET_Web_Component_Application/src/ts/jet-composites/demo-update-itemディレクトリの内容を、JET_Web_Component_Application/distディレクトリに作成するZIPファイル(demo-update-item_1-0-0.zip)にパッケージ化します。パッケージ・タスクの一部として、Oracle JETは、JET_Web_Component_Application/src/ts/jet-composites/demo-update-itemディレクトリのTypeScriptコードをJavaScriptコードに変換します。たとえば、JET_Web_Component_Application/dist/demo-update-item_1-0-0.zipファイルを開くと、Oracle JETツールがJET_Web_Component_Application/src/ts/jet-composites/demo-update-itemディレクトリのdemo-update-item-viewModel.tsファイルから転送されたdemo-update-item-viewModel.jsファイルが含まれていることがわかります。
demo-update-item_1-0-0.zipファイルをJET_Web_Component_Application/distディレクトリから、WebアプリケーションでWebコンポーネントを再利用するコンシューマに配布します。WebアプリケーションでWebコンポーネントを使用するには、コンシューマはZIPファイルのコンテンツをWebアプリケーションのdemo-update-itemディレクトリに抽出します。次のチュートリアルでは、この後のタスクについて詳しく説明します。
その他の学習リソース
docs.oracle.com/learnの他のラボを調べるか、Oracle Learning YouTubeチャネルでさらに無料の学習コンテンツにアクセスします。さらに、education.oracle.com/learning-explorerにアクセスしてOracle Learning Explorerにします。
製品ドキュメントは、Oracleヘルプ・センターを参照してください。
Enhance and archive the Oracle JET web component
F53217-01
February 2022
Copyright © 2022, Oracle and/or its affiliates.