| Oracle® Java ME Embedded Getting Started Guide for the Reference Platform (Qualcomm IoE) Release 8 E48513-03 |
|
 Previous |
 Next |
| Oracle® Java ME Embedded Getting Started Guide for the Reference Platform (Qualcomm IoE) Release 8 E48513-03 |
|
 Previous |
 Next |
This chapter demonstrates how to install the Oracle Java ME Embedded software on the Qualcomm Internet-of-Everything (IoE) board. The following items are required for installing and developing on the Qualcomm IoE board:
Qualcomm IoE board running the Brew MP operating system
Desktop PC running Microsoft Windows 7
USB cable with a micro-B connector that can link the Qualcomm IoE board to your desktop PC
Qualcomm IoE USB drivers
Qualcomm Brew MP SDK tools
Terminal emulator program, such as PuTTY.
Oracle Java ME Embedded 8
Oracle Java ME SDK 8
NetBeans IDE 8.0
Download the Qualcomm IoE Development Platform User Guide in PDF format from:
This guide contains important information about the Qualcomm IoE board and its hardware.
Perform the following steps.
Assemble and connect the board's components as listed in Chapter 3, "IoE Development Platform Hardware," and Chapter 5, "Hardware Configuration," of the Qualcomm IoE Development Platform User Guide.
Connect the power supply as shown in the Qualcomm IoE Development Platform User Guide and power on the board. Follow the instructions in these sections:
To use an AC power source, see Section 5.3.5.5, "AC-powered operation."
To use a battery source, see Section 5.3.5.4, "Battery-powered operation."
To develop on the Qualcomm IoE board, you must first install the Windows USB drivers for the board. To install the drivers, follow these steps:
Download the Qualcomm IoE USB drivers from the following site:
Ensure that the Qualcomm IoE board is powered on by pressing the PWR KEY button on the board. Then, follow the instructions in Chapter 2, "Software Setup," of the Qualcomm IoE Development Platform User Guide to properly install the USB drivers on Windows.
Open the Windows Device Manager (by clicking Start then Device Manager).
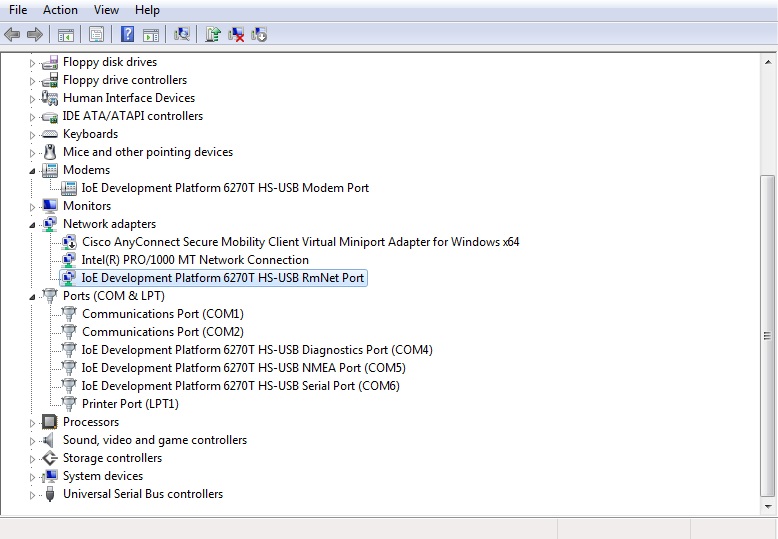
Ensure that the drivers are successfully installed by verifying the following hardware ports, as shown in Figure 1-1:
HS-USB modem port
HS-USB serial port
HS-USB diagnostics port
HS-USB NMEA port
HS-USB RmNet port (optional and reserved)
Figure 1-1 Device Manager with Qualcomm IoE USB Device Drivers Loaded

Download the Brew MP SDK tools from the following site: https://developer.brewmp.com/tools/brew-mp-sdk
The version used in this documentation is 7.12.5. Double-click the installer executable file, and install the application on your Windows platform desktop as per the instructions. You will need the Loader and Logger applications that are installed with the Brew MP SDK Tools in later sections.
You must install the Oracle Java ME Embedded software on the Qualcomm IoE board using the Loader and Logger applications. To copy the appropriate files to the board:
Download and uncompress Oracle Java ME Embedded 8 for the Qualcomm IoE board.
Get the latest java.sig signature file from the Qualcomm IoE website:
Start the Loader application that was installed with the Brew MP SDK.
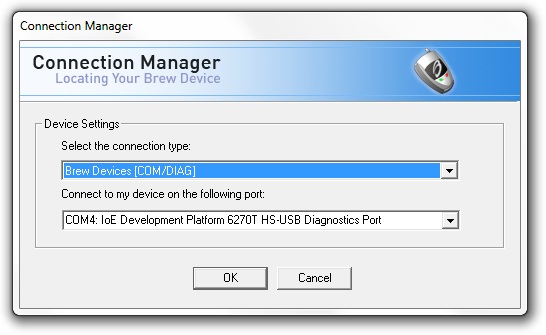
When the Loader application starts, connect to the board using the Connection type: Brew Devices (COM/DIAG), and whichever port matches the Qualcomm HS-USB Diagnostics Port, as shown in Figure 1-2.
Figure 1-2 Brew SDK Loader Connection Manager

If you are upgrading from an earlier release, such as Oracle Java ME Embedded 3.4, or Oracle Java ME Embedded 8 EA or EA2, then you must delete all the files in the /sys/mod/java and /sys/mod/netsetup directories, including the.sig file. After deleting the files, reboot the board.
If it does not exist, then create the /sys/mod/java directory and drag and drop the following files from the Oracle Java ME Embedded distribution's java folder into that directory.
appdb (folder)
java.mif
java.mod
jwc_properties.ini
watchdog.ini
Copy the java.sig signature file obtained from Qualcomm to the /sys/mod/java directory.
If you want to enable support for a Java soft reboot on your Qualcomm IoE board, then create the /sys/mod/reboot_java directory and drag and drop the following files from the Oracle Java ME Embedded distribution's reboot_java folder into that directory.
reboot_java.mif
reboot_java.mod
Copy the reboot_java.sig file obtained from Qualcomm to the sys/mod/reboot_java directory.
Reset the board by pressing the RESET KEY on the board, then wait approximately 40 seconds for the Java VM to start.
Start the Logger application.
Connect to the board using the Connection type: Brew Devices (COM/DIAG), and whichever port matches the Qualcomm HS-USB diagnostics port. Press the Start Logging button, and verify that the Java VM is sending logging information to the Logger application by checking for messages that come from the [JVMStdout] file name. See Figure 1-3.
After Java is successfully running on the Qualcomm IoE board, go to the Chapter 2, "Installing and Running Applications on the Qualcomm IoE Board" chapter to learn how to use the tooling features of the Oracle Java ME Embedded software on the board. If Java is not running, then see Chapter 3, "Troubleshooting" to diagnose possible problems.
Download the PuTTY terminal emulator program (putty.exe) from the following site:
The terminal emulator executable file is directly downloadable as putty.exe. The terminal emulator is used to connect to the Application Management System (AMS) command-line interface (CLI) that sends commands to the board.
|
Note: Using the PuTTY terminal emulator program is highly recommended. You can use any terminal program to connect to the CLI, however, Oracle cannot guarantee that other terminal programs work with the CLI in the same manner as PuTTY. |
Download and install the Oracle Java ME SDK 8 distribution onto your Windows desktop platform from the Oracle Technology Network website.
http://www.oracle.com/technetwork/java/javame/javamobile/download/sdk/index.html
To start the Java ME SDK:
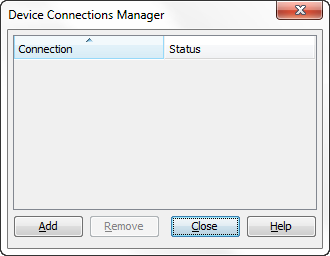
Run the Oracle Java ME SDK Device Manager (located at <SDK Installation Folder>/bin/device-manager.exe) by right-clicking its icon in the taskbar and selecting Manage Device Connections to display the Device Connections Manager as shown in Figure 1-4.
Figure 1-4 Oracle Java ME SDK Device Connections Manager

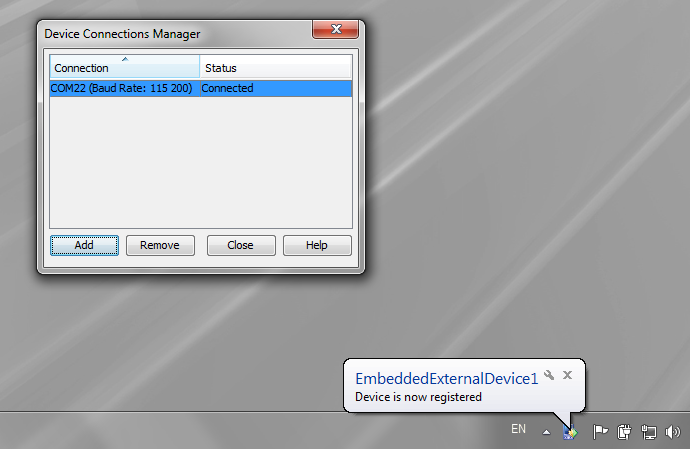
Restart the Java runtime on the Qualcomm IoE board. At this point, the Oracle Java ME SDK Device Connections Manager should locate the device and report that an EmbeddedExternalDevice1 has now become registered as shown in Figure 1-5.
Figure 1-5 Registering the External Device

Note that you can freely reboot the board or restart Java on the board without rebooting the Oracle Java ME SDK Device Connections Manager. However, if you reboot the Device Connections Manager, you must reboot Java or the board as well. If you have problems with the Device Connections Manager connecting to the board, see Chapter 3, "Troubleshooting."