| Oracle® Java ME Embedded Getting Started Guide for the Reference Platform (Raspberry Pi) Release 3.3 E38384-01 |
|
 Previous |
 Next |
| Oracle® Java ME Embedded Getting Started Guide for the Reference Platform (Raspberry Pi) Release 3.3 E38384-01 |
|
 Previous |
 Next |
This chapter describes installing the Oracle Java ME Embedded software on the Raspberry Pi board, configuring the Java ME Embedded system, connecting to the Raspberry Pi using a secure shell, and installing and running an Oracle Java ME Embedded application.
The following items are required for developing on the Raspberry Pi board:
The Raspberry Pi Rev. B 512 MB Board
A micro-USB power supply of .7 or greater amps, and 5 volts. Note that the power supply must have a micro-USB connector, not a regular USB or mini-USB connector.
A USB keyboard and mouse, as well as a monitor. If necessary for your monitor, an HDMI to DVI video cable or adapter.
An SD card of 2 GB or greater. An SD-HC class 10 card is recommended. Do not use a high speed SD card, as it may be too fast for the Raspberry Pi board.
An ethernet cable with an RJ-45 connection, and a connection to a network with a DHCP server.
A terminal emulation program, such as PuTTY, if you wish to connect to the board using the Application Management System (AMS) interface.
Download the PuTTY Terminal Emulator Program (putty.exe) from the following site:
The terminal emulator executable is directly downloadable as putty.exe. The terminal emulator is used to connect to the AMS command-line interface (CLI) that issues commands to the board.
To develop on the Raspberry Pi board, you must first download and install the Wheezy variant of Raspbian Debian Linux on the Pi board. If you have not already done this, use the following steps:
Download the Raspbian "Wheezy" hard-float (Debian Linux) ZIP file to your desktop from the following site:
Unzip the distribution file, which creates a single disk image (.img) file.
Mount the SD card to the desktop, and use a utility to write the disk image file to the SD card. Note that this is not the same as copying the file to the base-level directory on the SD card. Instead, it is akin to "burning" a disk image onto a CD-ROM or DVD-ROM. There are a number of utilities that will perform this action. With Windows, for example, you can use the Disk Image Writer utility located at https://launchpad.net/win32-image-writer to perform this task. For Mac, use the RPi-sd Card Builder located at http://alltheware.wordpress.com/2012/12/11/easiest-way-sd-card-setup. For Linux, use the dd command; for more information, see http://en.wikipedia.org/wiki/Dd_(Unix).
Eject or unmount the SD card from the desktop computer.
Connect the RJ-45 network cable, monitor, keyboard, and mouse.
Install the SD card in the Raspberry Pi.
Connect power to the Pi. The red light on the Raspberry Pi should glow, then in a few seconds, the green light should blink. The blinking green light indicates that the Raspberry Pi is booting Linux.
If the Linux installation was successful, the Raspberry Pi will boot and obtain a DHCP address.
Next, a configuration program (raspi-config) runs, which helps you expand the filesystem partition on the SD card, configure the keyboard, timezone, reset the default password, and several other useful system items. Use the up-down arrow keys to make a menu choice. Use the left-right arrow keys to select OK or Cancel. Press Return to execute your choice. Note that the default user name is "pi", and the default password is "raspberry".
If you wish, perform an update, start the ssh server, and set the graphical desktop to automatically start, then press Finish. At this point, the board should reboot. Login if necessary, and if you're using the desktop, start a LXTerminal. Then, run the ifconfig command to display the Pi's IP address. This is necessary so you can access and control the board remotely. Remember this IP address; it will be used in the next set of steps.
Use an sftp client or scp command to transfer the Oracle Java ME Embedded ZIP file to the Raspberry Pi. For example, on a Unix or Mac system, you can transfer the ZIP file using a command similar to the following:
$sftp pi@[IP address of board]
Windows users can download the psftp.exe to obtain a free SFTP client; it is available from the same address as the PuTTY executable:
Once the file is transferred, either go directly to the keyboard and the mouse connected to the Raspberry Pi, or start a secure shell script on your desktop to connect to the board using the following command:
$ssh -l pi [IP address of board]
Change directory to the location that you uploaded the Oracle Java ME Embedded distribution, create a new folder, and unzip the distribution to a folder.
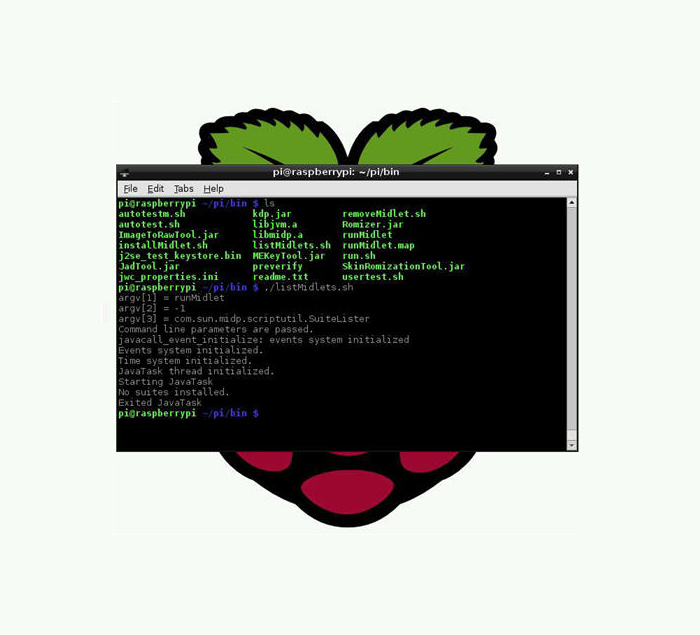
At this point, you see three subdirectories: appdb, bin, and lib. The contents of the bin directory are the most important, and from the desktop on the Raspberry Pi, are shown in Figure 1-1.
Figure 1-1 Raspberry Pi Directory Display

There are two ways to interact with the Oracle Java ME Embedded. The first is to directly execute commands using the LXTerminal command-line shell interface or logging in via ssh. The second is to connect to the board using port 65002 and run commands using the Application Management System (AMS).
If a proxy server is required for network connections (such as HTTP or apt-get), the server can be configured for IMlets by adding the following lines to the end of the bin/jwc_properties.ini file.
com.sun.midp.io.http.proxy.host = proxy.mycompany.com
com.sun.midp.io.http.proxy.port = 80
You can use a command-line shell interface to run the commands shown in Table 1-1.
Table 1-1 Raspberry Pi Shell Commands
| Syntax | Description |
|---|---|
|
|
List all installed IMlet suites and their statuses or show the detail of a single suite. |
|
|
Install an IMlet using the specified JAR file. |
|
|
Remove an installed IMlet. |
|
|
Execute the specified IMlet or the default if none is specified. All logging information from the IMlet appears in the stdout of this command. |
The following is a typical example of using the commands to install, list, run, and remove a Java ME Embedded application on the Raspberry Pi board. Note that the runSuite shell command is preceded by the sudo request to ensure that the command can run with superuser privileges and access all the peripherals on the board. Most commands can be terminated with the Ctrl-C key combination if they become unresponsive.
First, install the application using the installMidlet.sh command, specifying its location on the local filesystem.
pi@raspberrypi ~/pi/bin $ ./installMidlet.sh EmbeddedTestProject.jar
argv[1] = runMidlet
argv[2] = -1
argv[3] = com.sun.midp.scriptutil.CommandLineInstaller
argv[4] = I
argv[5] = EmbeddedTestProject.jar
Command line parameters are passed.
javacall_event_initialize: events system initialized
Events system initialized.
Time system initialized.
JavaTask thread initialized.
Starting JavaTask
The suite was successfully installed, ID: 2
Exited JavaTask
If the install process shows any error code, see Table B-1 in Appendix B, "AMS Installer Error Codes" for more information on how to resolve the error.
Once an IMlet is installed, note its ID: in this case, it is 2. Next, verify it using the listMidlets.sh command.
pi@raspberrypi ~/pi/bin $ ./listMidlets.sh
argv[1] = runMidlet
argv[2] = -1
argv[3] = com.sun.midp.scriptutil.SuiteLister
Command line parameters are passed.
javacall_event_initialize: events system initialized
Events system initialized.
Time system initialized.
JavaTask thread initialized.
Java is starting. Press Ctrl-C to exit
Starting JavaTask
Suite: 2
  Name: EmbeddedTestProject
  Version: 1.0
  Vendor: Vendor
  MIDlets:
    IMlet: GPIODemo
Exited JavaTask
The sudo runMidlet command can be used to execute any installed IMlet. This command will execute the IMlet that was just installed, passing any logging information to the stdout of this command. Note that you can press the Ctrl-C key to exit from this command, which will terminate the app.
pi@raspberrypi ~/pi/bin $ sudo ./runSuite.sh GPIODemo
argv[1] = GPIODemo
Command line parameters are passed.
javacall_event_initialize: events system initialized
Events system initialized.
Time system initialized.
JavaTask thread initialized.
Java is starting. Press Ctrl-C to exit
Starting JavaTask
Watchdog is starting
Network: Init
App started
The removeMidlet.sh command can be used to remove any installed IMlet.
pi@raspberrypi ~/pi/bin $ ./removeMidlet.sh 2
argv[1] = runMidlet
argv[2] = -1
argv[3] = com.sun.midp.scriptutil.SuiteRemover
argv[4] = 2
Command line parameters are passed.
javacall_event_initialize: events system initialized
Events system initialized.
Time system initialized.
JavaTask thread initialized.
Java is starting. Press Ctrl-C to exit
Starting JavaTask
Suite removed
Exited JavaTask
pi@raspberrypi ~/pi/bin $
The results can again be verified with the listMidlets.sh command.
pi@raspberrypi ~/pi/bin $ ./listMidlets.sh
argv[1] = runMidlet
argv[2] = -1
argv[3] = com.sun.midp.scriptutil.SuiteLister
Command line parameters are passed.
javacall_event_initialize: events system initialized
Events system initialized.
Time system initialized.
JavaTask thread initialized.

Java is starting. Press Ctrl-C to exit
Starting JavaTask
No suites installed
Network: Init
Exited JavaTask
The second method of connecting to the Raspberry Pi board is to make a raw connection to the AMS CLI on port 65002 of the board. However, in order for this to work, you must first start the Application Management System (AMS) on the board with the usertest.sh command in the command-line shell interface. Note that the command must be run using sudo to obtain superuser privileges to access all the peripherals on the board.
|
Note: All logging information from IMlets appears in the stdout of this command. |
pi@raspberrypi ~/pi/bin $ sudo ./usertest.sh
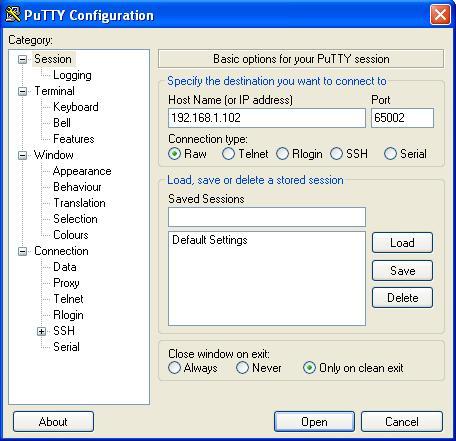
Next, start a PuTTY executable on your desktop computer. Use this to create raw socket connections to the IP address of the Raspberry Pi board, and port 65002. For example, a connection to the IP address of 192.168.1.102 and the port 65002 is shown in Figure 1-2. Note that the IP address of your Raspberry Pi board may be different.
Figure 1-2 Using PuTTY to Connect to the Command-Line Interface

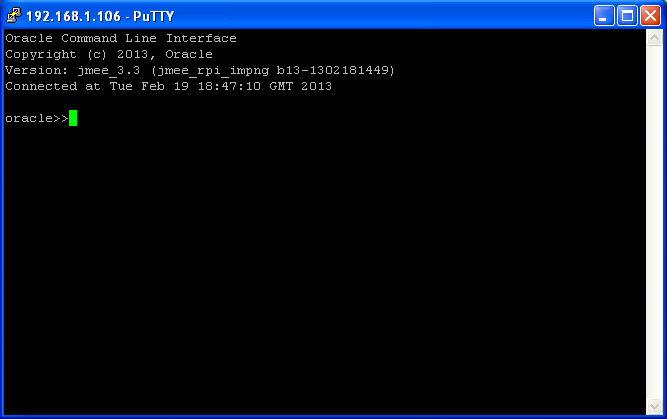
The window from port 65002 provides a command-line interface (CLI), and is shown in Figure 1-3:
Figure 1-3 Command-Line Interface to the Raspberry Pi

|
WARNING: The command-line interface (CLI) feature in this Oracle Java ME Embedded software release is provided only as a concept for your reference. It uses insecure connections with no encryption, authentication, or authorization. |
You can use the command-line interface to run the AMS commands shown in Table 1-2.
Table 1-2 AMS CLI Commands
| Syntax | Description |
|---|---|
|
|
List all installed IMlet suites and their statuses or show the detail of a single suite |
|
|
Install an IMlet using the specified JAR or JAD file, specified as a URL. An optional username and password can be supplied for login information as well. |
|
|
Update the installed IMlet |
|
|
Remove an installed IMlet |
|
|
Execute the specified IMlet or the default if none is specified. An optional debug parameter can be specified to run the IMlet in debug mode. |
|
|
Stop the specified IMlet or the default if none is specified |
|
|
Suspend (pause) the specified IMlet or the default if none is specified |
|
|
Resume the specified IMlet or the default if none is specified |
|
|
Display the setup menu of the IMlet |
|
|
Show information about the installed IMlet |
|
|
Display the IMlet log or watchdog log if recorded by the watchdog handler in the platform |
|
|
Retrieve the logger list for the IMlet or all the tasks if one is not specified |
|
|
Retrieve logger info for the specified IMlet and logger or all the loggers if is one is not specified |
|
|
Set the logger level for specified IMlet or all loggers if one is not specified |
|
|
List the available commands or detailed usages for a single command |
|
|
Enable hidden system menu commands. Currently, the password is |
|
|
Terminates the current session. |
When the sysmenu command is entered with the on option, additional system menu commands are available with the AMS CLI, as shown in Table 1-3.
Table 1-3 Additional System Commands Available in the AMS CLI
| Syntax | Description |
|---|---|
|
|
Sets a property identified by |
|
|
Returns a property identified by |
|
|
Explicitly sets the on-device debugging (ODD) property to on or off. If no parameters are passed, returns the current ODD value. |
|
|
Perform either a shutdown of the board, or a reboot if the |
Here is a typical example of using the Application Management System (AMS) to install, list, run, and remove a Java ME Embedded application on the board.
oracle>> ams-install file:///some/directory/hello.jar
<<ams-install,start install,file:///some/directory/hello.jar
<<ams-install,install status: stage 0, 5%
<<ams-install,install status: stage 3, 100%
<<ams-install,install status: stage 4, 100%
<<ams-install,OK,Install success

oracle>> ams-install http://www.example.com/netdemo.jar
<<ams-install,start install,http://www.example.com/netdemo.jar
<<ams-install,install status: stage 0, 5%
<<ams-install,install status: stage 3, 100%
<<ams-install,install status: stage 4, 100%
<<ams-install,OK,Install success

oracle>> ams-install http://www.example.com/notthere.jar
<<ams-install,start install,http://www.example.com/notthere.jar
<<ams-install,FAIL,errorCode=103 (OTHER_ERROR)
Note that the final installation example failed with an error code and matching description. If the install process shows any error code, see Table B-1 in Appendix B, "AMS Installer Error Codes" for more information on how to resolve the error.
Once an IMlet is installed, verify it using the ams-list command. Here, we have added an additional IMlet: rs232dem. Each IMlet has been assigned a number by the AMS for convenience.
oracle>> ams-list
<<ams-list,0.hello|Oracle,STOPPED
<<ams-list,1.netdemo|Oracle,STOPPED
<<ams-list,2.rs232dem|Oracle,RUNNING
<<ams-list,OK,3 suites are installed
The ams-remove command can be used to remove any installed IMlet.
oracle>> ams-remove 0
<<ams-remove,OK,hello removed
The results can again be verified with the ams-list command.
oracle>> ams-list
<<ams-list,1.netdemo|Oracle,STOPPED
<<ams-list,2.rs232dem|Oracle,RUNNING
<<ams-list,OK,2 suites are installed
Finally, start up the IMlet using the ams-run command. The application can be terminated with the ams-stop command.
oracle>> ams-run 1
<<ams-run,OK,started
oracle>> ams-list
<<ams-list,1.netdemo|Oracle,RUNNING
<<ams-list,2.rs232dem|Oracle,RUNNING
<<ams-list,OK,2 suites are installed