| Oracle® Java ME Embedded Getting Started Guide for the Reference Platform (Qualcomm IoE) Release 8 EA 2 E48513-01 |
|
 Previous |
 Next |
| Oracle® Java ME Embedded Getting Started Guide for the Reference Platform (Qualcomm IoE) Release 8 EA 2 E48513-01 |
|
 Previous |
 Next |
Beta Draft: 2014-03-25
Developers can run and debug IMlets on the Qualcomm IoE board in serial mode using the Oracle Java ME SDK, or in networking mode without Java ME SDK usage, either usving the CLI or directly from the NetBeans IDE. This chapter describes how to install and run an IMlet on the board, as well as debugging an IMLet in NetBeans.
Installing and running IMlet projects on the Qualcomm IoE board using the NetBeans IDE requires the following software:
NetBeans IDE 8.0 Beta with Java ME, which can be downloaded from https://netbeans.org/.
Oracle Java ME SDK 8
Oracle Java ME SDK 8 NetBeans Plugin
After installing NetBeans, use these steps to install the remaining software.
Ensure that Java ME is enabled in NetBeans. This can be done by selection Tools -> Plugins and selecting the Installed pane. Activate the Java ME plugin if it is not already activated.
Install the Java ME SDK 8 distribution, if you have not done so already. See the Java ME SDK 8 documentation for details.
Install the Oracle Java ME SDK 8 NetBeans plugin. This is a downloadable ZIP file that consists of a number of NetBeans modules (.nbm files) that can be added using the Tools -> Plugins dialog and selecting the Downloaded pane. Unzip the plugin file, and add all of the.nbm files to NetBeans. The Oracle Java ME SDK 8 NetBeans plugins are required to interface with the Device Selector and connect to the board.
Ensure that the Oracle Java ME SDK 8 appears in the list of Java ME platforms. In the NetBeans IDE, go to Tools -> Java Platforms. If the Oracle Java Platform Micro Edition SDK 8 does not appear in the list of Java ME platforms, follow these steps:
Click on Add Platform.
Select Java ME CLDC Platform Emulator and click Next.
Select the folder where the Oracle Java ME SDK 8 distribution resides and follow the instructions to install it. Then, click Finish to close the dialog.
Ensure that the Qualcomm IoE board has the Oracle Java ME Embedded distribution. See Chapter 1, "Installing Oracle Java ME Embedded on the Qualcomm IoE Board" for more information on how to install the runtime distribution on the Qualcomm IoE board.
If you already have an existing NetBeans project with an IMlet that you want to run or debug on the board, follow these steps:
Right-click on your project and choose Properties.
Select the Platform category on the properties window.
Select the entry that represents the board (EmbeddedExternalDevice1) from the device list.
If you are creating a new NetBeans project from scratch, follow these steps:
Select File -> New Project.
Select the Java ME Embedded category and Java ME Embedded Application in Projects. Click Next.
Provide a project name and click Next. Be sure that the Create MIDlet option is checked.
Ensure the Java ME Platform is Oracle Java Micro Edition SDK 8.0 EA. Then, select the entry that represents the board (EmbeddedExternalDevice1) from the device list and click Finish.
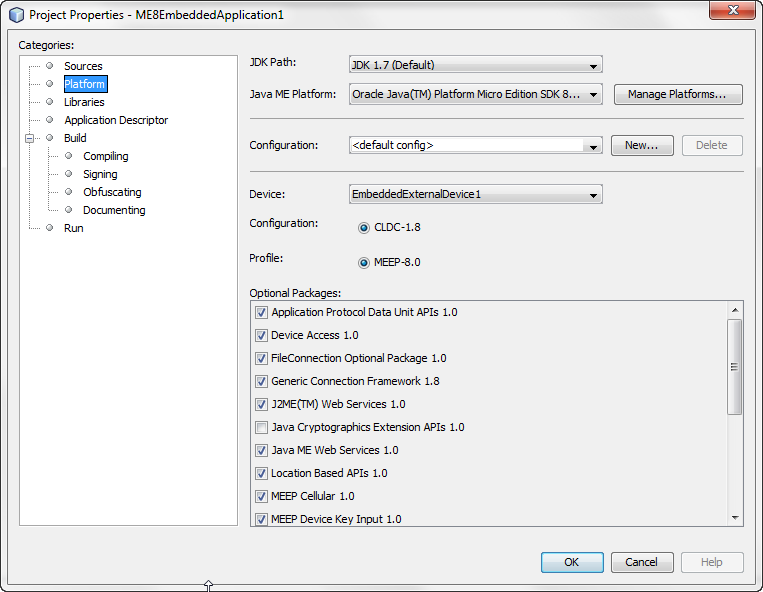
The configured Platform dialog is shown in Figure 3-1. After you assign the board to your project, the IMlets run on the board instead of on the emulator when you click on Run Project on the NetBeans IDE.
Figure 3-1 NetBeans Platform Properties Dialog

Once the project is created, use the source code in Example 3-1 for the default IMlet.java source file.
Example 3-1 Sample Code to Access a GPIO Pin
package embeddedapplication1;

import com.oracle.deviceaccess.PeripheralManager;
import com.oracle.deviceaccess.gpio.GPIOPin;
import java.io.IOException;
import javax.microedition.midlet.*;


public class IMlet extends MIDlet {

    public void startApp() {

        try {

            GPIOPin pin = (GPIOPin)PeripheralManager.open(14);

            for (int i = 0; i < 10; i++) {
                pin.setValue(true);
                Thread.sleep(1000);
                pin.setValue(false);
                Thread.sleep(1000);
            }

            pin.close();

        } catch (IOException ex) {
            ex.printStackTrace();
        } catch (InterruptedException ex) {
            ex.printStackTrace();
        }

    }

    public void pauseApp() {
    }

    public void destroyApp(boolean unconditional) {
    }
}
This sample application will obtain an object representing GPIO pin 14 from the PeripheralManager, and set it from low to high at intervals of one second. This has the effect of blinking one of the LEDs on the Qualcomm IoE board. For more information on using the Device Access APIs, see the Device Access API - Version 8 Specification at:
Follow these steps to debug an IMlet using NetBeans:
Open your IMlet class on the NetBeans editor.
Click once directly on the line number where you want to set a breakpoint. The line number is replaced by a red square and the line is highlighted in red.
Select Debug -> Debug Project or use the Debug button on the toolbar.
The debugger connects to the debug agent on the board and the program execution stops at your breakpoint, as shown in Figure 3-2.
Figure 3-2 Debugging an IMlet on the Qualcomm IoE Board Using NetBeans

Figure 3-2 shown an entire NetBeans debugging environment that allows the programmer to execute a program step by step as well as add and remove variables from a watch list on the bottom of the screen.
For more information on using the Device Access APIs, see the Device Access API - Version 8 Specification and the associated Javadocs at:
If you are not using an IDE, you can still use the Oracle Java ME Embedded 8 CLI to install an application. Simply connect to the device at port 65002, and install and run the IMlet manually. For example:
COM22@115200>> ams-install file:///Shared/hello.jar
<<ams-install,start install,file:///Shared/hello.jar
<<ams-install,install status: stage 0, 5%
<<ams-install,install status: stage 3, 100%
<<ams-install,install status: stage 4, 100%
<<ams-install,OK,Install success
COM22@115200>> ams-list
<<ams-list,0.hello|Oracle,STOPPED
<<ams-list,OK,1 suites are installed
COM22@115200>> ams-run 0
<<ams-run,OK,started
COM22@115200>> ams-list
<<ams-list,1.netdemo|Oracle,RUNNING
<<ams-list,OK,1 suites are installed
See "Using the Command-Line Interface" in Chapter 2, "Tooling Over Serial Connection" for more details.
Applications that require access to Device Access APIs must request appropriate permissions in JAD files. For more information on using the Device Access APIs, please see the Device Access API - Version 8 specification and the associated Javadocs at the following site:
http://docs.oracle.com/javame/embedded/embedded.html
First, the JAD file must have the proper API permissions. Here is how to sign the application both in NetBeans and without an IDE.
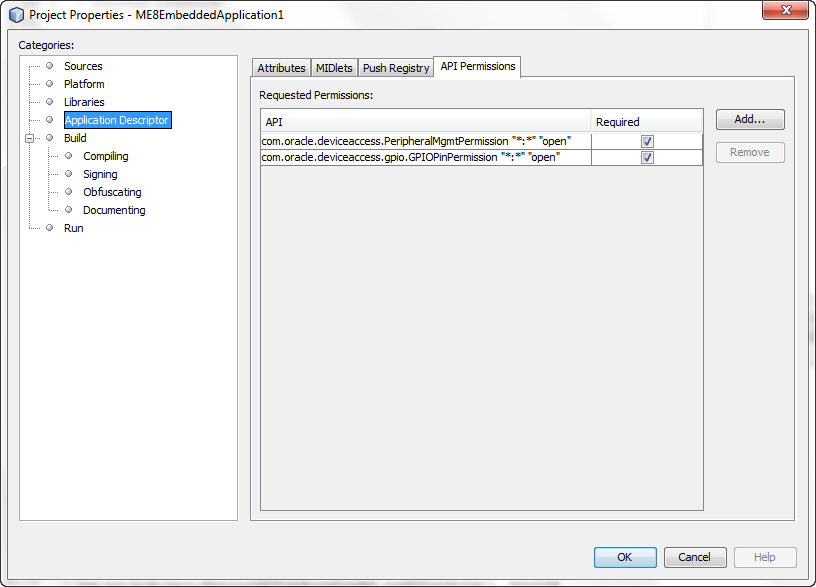
In NetBeans, right-click the project name (ME8EmbeddedApplication1 in this example) and choose Properties. Select Application Descriptor, then in the resulting pane, select API Permissions. Click the Add... button, and add the com.oracle.deviceaccess.gpio API, as shown in Figure 3-3. Click OK to close the project properties dialog.
Figure 3-3 Adding API Permissions with NetBeans

If you are not using an IDE, manually modify the application descriptor file to contain the following permissions.
MIDlet-Permission-1: com.oracle.deviceaccess.PeripheralMgmtPermission "*:*" "open"
MIDlet-Permission-2: com.oracle.deviceaccess.gpio.GPIOPinPermission "*:*" "open"
Microedition-Profile: MEEP
The first method is more complex, but is the preferred route for applications that are widely distributed. Here are the instructions on how to setup a keystore with a local certificate that can be used to sign the applications.
Generate a new self-signed certificate with the following command on the desktop, using the keytool that is shipped with the Java SE JDK.
keytool -genkey -v -alias mycert -keystore mykeystore.ks -storepass spass -keypass kpass -validity 360 -keyalg rsa -keysize 2048 -dname "CN=thehost"
This command will generate a 2048-bit RSA key pair and a self-signed certificate, placing them in a new keystore with a keystore password of spass and a key password of kpass that is valid for 360 days. Feel free to change both passwords as you see fit.
Copy the appdb/_main.ks keystore file from the Qualcomm IoE over to the desktop using the Loader tool and perform the following command using the mekeytool.exe command (or alternatively java -jar MEKeyTool.jar... if your distribution contains only that) that ships with the Oracle Java ME SDK 8 distribution.
{mekeytool} -import -MEkeystore _main.ks -keystore mykeystore.ks -storepass spass -alias mycert -domain trusted
This will import the information in mykeystore.ks you just created to the _main.ks keystore. Once this is completed, copy the certs directory back to the Qualcomm IoE using the Loader tool.
Use the following command to sign your application before deploying to the Qualcomm IoE board.
> jarsigner -keystore mykeystore.ks -storepass spass app.jad myalias
If there is an issue with a non-valid certificate, be sure to check the date and time which has been setup on the board. Refer to Chapter 4, "Troubleshooting" for more details.
This method allows to bypass a certificate check and execute unsigned applications as if they were signed and given all requested permissions. This method should be used only for development and debugging. Final testing must be done using a real certificate as described in method #1.
To use NullAuthenticationProvider, set the following property in the jwc_properties.ini file on the Qualcomm IoE board:
[internal]
authentication.provider = com.oracle.meep.security.NullAuthenticationProvider
and restart the Java runtime.