24 배치된 에이전트 호출
운용 응용 프로그램에서 에이전트의 끝점 URL을 호출할 수 있습니다.
에이전트 엔드포인트를 호출하는 데 사용되는 프로그래밍 인터페이스에 관계없이 OCI를 통해 인증되고 관련 권한이 있어야 합니다. 에이전트 끝점의 경우 호출자는 에이전트 끝점에 대해 최소한 USE 권한을 가져야 합니다.
끝점 URI는 에이전트 UI의 세부정보 탭에 문서화되어 있습니다. 해당 끝점 URI를 코드에 복사하여 에이전트를 호출할 수 있습니다.
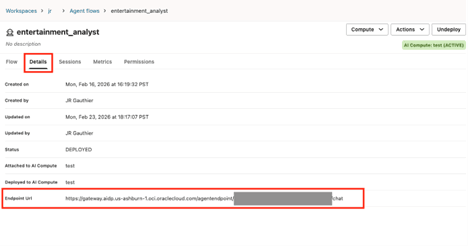
끝점 URI를 호출하는 메소드
다양한 도구, SDK 및 CLI를 통해 에이전트 끝점 URI를 호출할 수 있습니다.
다음 메소드를 사용하면 Oracle AI Data Platform 에이전트에서 끝점 URI를 호출할 수 있습니다.
OCI CLI로 호출
제공된 예제는 OCI CLI를 사용하고 보안 토큰을 사용하여 인증하는 방법을 보여줍니다. <your-agent-flow-endpoint-uri>를 에이전트 끝점 URI로 바꾸고 <security_token>를 OCI 보안 토큰으로 바꿉니다.
oci raw-request
--http-method POST
--target-uri <your-agent-flow-endpoint-uri>
--request-body '{"query":"Tell me about the Ryder Cup in 1985"}'
--auth <security_token>
Python 요청 라이브러리로 호출
OCI Python SDK를 사용하여 OCI로 인증할 서명자를 생성할 수 있습니다. Python 요청 라이브러리는 에이전트 끝점 URI에 요청을 게시하고 응답을 반환하는 데 사용할 수 있습니다. 다음 예제는 OCI 구성 및 전용 키 파일을 통해 사용자 주체를 사용하는 방법을 보여줍니다.
import oci import requests import json import uuid from contextlib import closing from requests import Request, Response
class AuthHelper: """ AuthHelper allows creating an OCI signer with either API key or security_token (which are short term sessions) """ def init(self, oci_profile: str, use_security_token:bool = True): config = oci.config.from_file(file_location="/Volumes/jr/default/misc/config",profile_name=oci_profile) if use_security_token: with open(config["security_token_file"], 'r') as f: token = f.read() private_key = oci.signer.load_private_key_from_file(config["key_file"])
 self.signer = oci.auth.signers.SecurityTokenSigner(token, private_key) else: self.signer = oci.signer.Signer( tenancy=config["tenancy"], user=config["user"], fingerprint=config["fingerprint"], private_key_file_location=config["key_file"], #pass_phrase=config.get("pass_phrase"), #private_key_content=config.get("key_content") )
@property
def Signer(self):
    return self.signer

class MyRawJsonRpcClient: """ Simple class using requests lib to post JSON to chat endpoint using OCI signing """ def init(self, chat_url:str, oci_profile: str, sessionKey:str, use_security_token:bool = True): self.authhelper = AuthHelper(oci_profile=oci_profile, use_security_token=use_security_token) self.authsigner = self.authhelper.Signer self.chat_url = chat_url self.sessionKey = sessionKey
def send(self, input:str) -> Response:
    body = {
        "isStreamEnabled" : False,
        "sessionKey" : self.sessionKey,
        "trace" : False,
        "input" :[{
            "role":"User",
            "content":[{
                "type" : "INPUT_TEXT",
                "text" : input
            }]
        }]
    }

    response:Request = requests.post(
        url =self.chat_url,
        params = None,
        auth = self.authsigner,
        json=body,
        headers={}
    )
    return response
MyRawJsonRPCClient 클래스를 인스턴스화하고 OCI 프로파일 값(OCI 구성 파일에 있음), 에이전트 끝점 URI(chat_url) 및 sessionKey를 제공하여 에이전트 끝점 URI를 호출할 수 있습니다. 임의의
sessionKey을 제공할 수 있습니다. sessionKey은 에이전트와 사용자 세션의 고유 식별자입니다. 동일한 sessionKey를 계속 재사용하는 경우 사용자 메시지와 에이전트 응답이 동일한 보존에 추가됩니다. client = MyRawJsonRpcClient(chat_url="<your-agent-flow-endpoint-uri>",
oci_profile = "DEFAULT",
sessionKey= “<your-session-key>”,
use_security_token = False )user_input = f"Hello, tell me a good dad joke."
r = client.send(input = user_input)
response_json = r.json()APEX 사용
AI Data Platform Samples Github 저장소에서 사용 가능한 코드 샘플을 사용할 수 있습니다. 이 샘플은 APEX 애플리케이션에서 에이전트 배치 끝점을 호출하는 프로세스를 안내합니다.
Streamlit을 통해
AI Data Platform Samples Github 저장소에서 사용 가능한 코드 샘플을 사용할 수 있습니다. 샘플은 Streamlit 애플리케이션에서 에이전트 배치 끝점을 호출하는 프로세스를 안내합니다.
모범 사례 - 비동기 및 비동기 응답
비동기 응답을 가정하는 클라이언트 코드를 작성하는 것이 좋습니다. 예:
import httpx

async def fetch_data():
    async with httpx.AsyncClient() as client:
        response = await client.get(URL)
        return response.json()