2 Introduction to the ADF Desktop Integration Sample Application
This chapter provides an overview of the Summit sample application for ADF Desktop Integration. The Summit sample application for ADF Desktop Integration contains several Microsoft Excel workbooks that are integrated with the sample's Fusion web application.
This chapter includes the following sections:
-
About the Summit Sample Application for ADF Desktop Integration
-
Setting Up and Running the Summit Sample Application for ADF Desktop Integration
-
Overview of the Fusion Web Application in the Summit Sample Application for ADF Desktop Integration
2.1 About the Summit Sample Application for ADF Desktop Integration
The Summit sample application for ADF Desktop Integration is a set of sample demonstrations that illustrate the main capabilities from ADF Desktop Integration. Each of the samples contain specific features that can also be identified on the developer's guide. All of the samples use the same underlying database schema which makes it very easy for accessing the source code, and also to experience the runtime behavior in a standalone way.
2.2 Setting Up and Running the Summit Sample Application for ADF Desktop Integration
Set up the development environment as described in Chapter 3, "Setting Up Your Development Environment" before you download and run the Summit sample application for ADF Desktop Integration.
Running the Summit sample application for ADF Desktop Integration requires you to:
-
Download the application resources, as described in Section 2.2.1, "How to Download the Application Resources."
-
Install the Summit ADF schema, as described in Section 2.2.2, "How to Install the Summit ADF Schema."
-
Run the Summit sample application, as described in Section 2.2.3, "How to Run the Summit Sample Application for ADF Desktop Integration."
2.2.1 How to Download the Application Resources
You download the application resources from Oracle Technology Network.
It may be helpful to have an overview of the steps required to set up and run the Summit sample application. For more information, see Section 2.2, "Setting Up and Running the Summit Sample Application for ADF Desktop Integration."
To download the application resources:
-
Download and install Oracle JDeveloper Release 11g. For more information, see Installation Guide for Oracle JDeveloper.
-
Install ADF Desktop Integration. For more information, see Section 3.4, "Installing ADF Desktop Integration."
Note:
If you have an old version of ADF Desktop Integration installed on your system, upgrade ADF Desktop Integration as described in Section 3.6, "Upgrading ADF Desktop Integration." -
Download and install the Summit ADF schema from Oracle Technology Network.
http://www.oracle.com/technetwork/developer-tools/jdev/learnmore/adf11gsamples-1969708.html
For more information, see Section 2.2.2, "How to Install the Summit ADF Schema."
-
Download and install the Summit sample application for ADF Desktop Integration ZIP file from Oracle Technology Network.
http://www.oracle.com/technetwork/developer-tools/jdev/learnmore/adf11gsamples-1969708.html
For more information, see Section 2.2.3, "How to Run the Summit Sample Application for ADF Desktop Integration."
2.2.2 How to Install the Summit ADF Schema
To install the Summit ADF schema, extract the schema files, configure the database connection, and execute the build_summit_schema.sql script in JDeveloper.
It may be helpful to have an overview of the steps required to set up and run the Summit sample application. For more information, see Section 2.2, "Setting Up and Running the Summit Sample Application for ADF Desktop Integration."
To install the Summit ADF schema to your database:
-
Navigate to the location where you downloaded the Summit ADF schema archive file and unzip it.
-
Start JDeveloper and in the main menu, choose File and then Open.
-
In the Open dialog, navigate to where you expanded the ZIP file for the
SummitADF_Schemadirectory, select theSummit_Schema.jwsapplication workspace and click Open. -
In the Application Navigator window, expand the Application Resources panel.
-
Right-click Connections and choose New Connection and then Database.
-
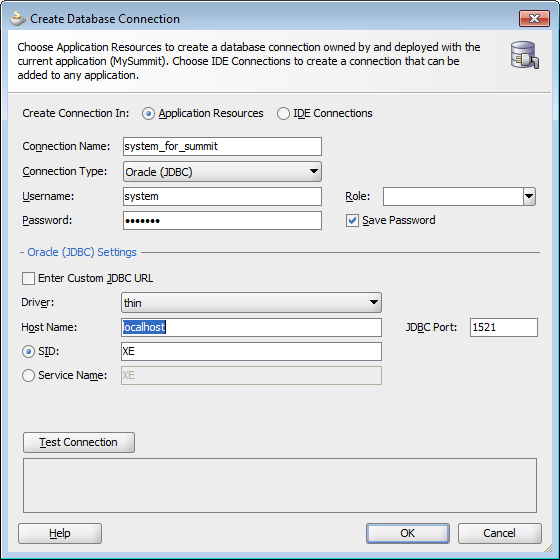
In the Create Database Connection dialog, modify the properties shown in Table 2-1 for your environment. For help with the dialog, press F1 or click Help.
Table 2-1 Properties Required to Install a Summit ADF Sample Application
Property Description Connection Name
Descriptive name for the connection. This name must be a valid Java identifier, such as
system_for_summit.User Name
The system user for your database. For example:
systemPassword
The password for the system user.
Driver
The JDBC driver for the database. Select a value from the dropdown menu. The default is thin, which is also the default value to specify for Oracle Database XE and any other Oracle database that is not using Oracle Call Interface (OCI).
Host Name
The name of the server running the Oracle database. Use an IP address or a host name that can be resolved by TCP/IP. The default value is
localhost.SID
The unique system identifier (SID) of an Oracle Database instance. The default is
XE, which is also the default value to specify if your database server is running Oracle Database XE. If your server is running another Oracle database, the SID is typicallyORCL.JDBC Port
The port of your database. The default value is
1521.Note:
If your server resides on a remote machine, you may also need to modify the script that builds the schema. To open the script, right-clickbuild_summit_schema.sqland choose Open.Figure 2-1 shows the completed Create Database Connection dialog. In this example, the connection is made to an Oracle Database XE instance residing on a local machine.
-
Click Test Connection to verify that you have a working connection.
-
Click OK to create the connection and exit the dialog.
-
In the Application Navigator, in the Projects panel, expand Database and then Resources.
-
Right-click
build_summit_schema.sqland choose Run in Sql*Plus > connection name.The connection name displayed is the one you configured in Step 6.
-
In the SQL*Plus Connection dialog, verify that the information matches the configuration you specified in Step 6 and click OK.
-
In the SQL*Plus Location dialog, click Browse and locate the
sqlplus.exeexecutable for your database.Typically, the executable is installed in the
BINdirectory under$ORACLE_HOME, where$ORACLE_HOMErepresents the path to your Oracle database installation. -
Click Open to select the
sqlplus.exeexecutable and then OK to exit the dialog. -
In the SQL*Plus window, enter the password for the system user you specified in Step 6.
Once you enter the password, the Ant build script creates the Summit ADF sample application users and populates the tables in the Summit ADF schema. In the Messages - Log window, you will see a series of SQL scripts and finally:
Commit complete.

Commit complete.
SQL>
-
At the SQL prompt, enter
quitto exit the SQL*Plus window. -
In JDeveloper, in the main menu, choose Application and then Close to close the Summit ADF schema application.
2.2.3 How to Run the Summit Sample Application for ADF Desktop Integration
To run the Summit sample application, extract the contents of the zip file and open the .JWS file in JDeveloper.
It may be helpful to have an overview of the steps required to set up and run the Summit sample application. For more information, see Section 2.2, "Setting Up and Running the Summit Sample Application for ADF Desktop Integration."
To run the Summit sample application for ADF Desktop Integration:
-
Extract the contents of the zip file that contains the sample application to a local directory.
-
Open the
SummitADFdi.jwsfile in JDeveloper.This file is located in the
Summit_ADFDIdirectory. -
In the Application Navigator, click and expand the Model project.
-
Open Model > Application Sources > oracle.summitdi.model > Model.jpx file.
-
Expand the Connection group of the General tab, and click the Add icon to create a database connection.
-
In the Create Database Connection dialog, add the connection information shown in Table 2-2 for your environment.
Table 2-2 Database Connection Properties for the Summit Sample Application for ADF Desktop Integration
Property Description Username
c##summit_adfPassword
summit_adfHost Name
The host name for your database.
For example:
localhostJDBC Port
The port for your database.
For example:
1521SID
The SID of your database.
For example:
ORCLorXEClick Test Connection to verify the connection, and then click OK to close the dialog.
-
Save the
Model.jpxfile. -
Select the ViewController project and click the Run button in JDeveloper's main menu.
2.3 Overview of the Fusion Web Application in the Summit Sample Application for ADF Desktop Integration
The Fusion web application in the Summit sample application for ADF Desktop Integration enables end users to download the integrated Excel workbooks.
2.3.1 About the Fusion Web Application in the Summit Sample Application for ADF Desktop Integration
When the end user runs the Summit sample application for ADF Desktop Integration in JDeveloper, the default browser opens the application home page. The end user can download various integrated Excel workbooks from the home page.
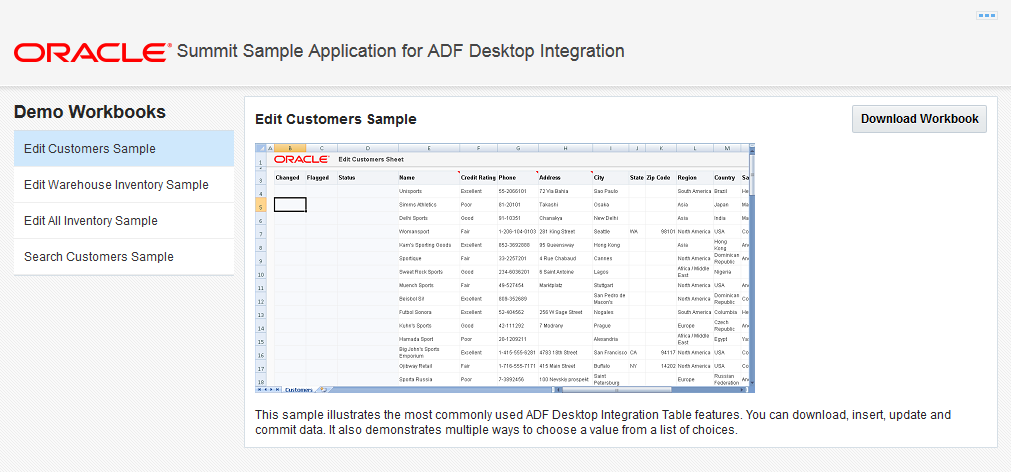
2.3.2 Downloading Integrated Excel Workbooks
The Summit sample application for ADF Desktop Integration provides various integrated Excel workbooks to meet different requirements. End users can navigate and download different workbooks from the MainPage.jsf of the application.
Table 2-3 lists the menu options and the downloaded integrated Excel workbooks.
Table 2-3 Integrated Excel Workbooks of Summit sample application for ADF Desktop Integration
| Menu Option | Description |
|---|---|
|
Edit Customers Sample |
Downloads |
|
Edit Warehouse Inventory Sample |
Downloads |
|
Edit All Inventory Sample |
Downloads |
|
Search Customers Sample |
Downloads |
2.4 Overview of the Integrated Excel Workbooks in the Summit Sample Application for ADF Desktop Integration
The Summit sample application for ADF Desktop Integration provides the EditCustomers.xlsx, EditWarehouses.xlsx, EditCustomerSearch.xlsx, and WarehouseLocations.xlsx integrated Excel workbooks.
The EditCustomers.xlsx workbook illustrates the most commonly used ADF Desktop Integration ADF Table component features. You can download, insert, update and commit data. It also demonstrates multiple ways to choose a value from a list of choices.
The EditWarehouseInventory.xlsx workbook illustrates how to use ADF Desktop Integration form components with a detail table. You can download and update data in a master form and its detail table. This sample also demonstrates how to use workbook parameters to control the workbook initialization.
The EditAllInventory.xlsx workbook demonstrates how to create an editable table with a denormalized master-detail relationship. It also demonstrates how to use a date picker, group columns, and delete existing data records.
The EditCustomerSearch.xlsx workbook demonstrates how a custom web page can be used to perform a search prior to downloading data into an ADF Table component configured to be read-only.
Subsequent sections in this chapter provide more information about the functionality in the workbooks along with cross-references to implementation details.
2.4.1 Log on to the Fusion Web Application from an Integrated Excel Workbook
At runtime, the integrated Excel workbooks in the Summit sample application for ADF Desktop Integration render an Excel ribbon tab that allows end users to log on to the Fusion web application. Figure 2-3 shows the runtime Customers tab in the Ribbon of the EditCustomers.xlsx workbook.

2.4.2 Downloading Data Rows
Some workbooks, such as EditCustomers.xlsx workbook, use an ADF Table component to download information from the Fusion web application. This component allows end users to edit rows and upload modified rows to the Fusion web application.
The following sections provide information about how to implement the download functionality:
-
Each worksheet that you integrate with a Fusion web application requires an associated page definition file.
For example, the
Customersworksheet in theEditCustomers.xlsxworkbook is associated with theExcelCustomers.xmlpage definition file. In JDeveloper, expand the following nodes in the Application Navigator to view this file:ViewController > Application Sources > oracle.summitdi.view > pageDefs
For information about how to configure a page definition file, see Section 4.2, "Working with Page Definition Files for an Integrated Excel Workbook."
-
The ADF Table component
Downloadaction downloads data from the Fusion web application to the worksheet. For information about how you invoke this action, see Section 7.4, "Downloading Data to an ADF Table Component." -
In the
EditCustomers.xlsxworkbook, the worksheetStartupevent invokes an action set that includes the ADF Table componentDownloadaction. For information about configuring worksheet events, see Section 9.2.4, "How to Invoke an Action Set from a Worksheet Event."
2.4.3 Modify Customers and Warehouses Information in the Workbooks
The EditCustomers.xlsx and EditWarehouseInventory.xlsx workbooks enable end users to edit customers and warehouses information that the ADF Table component and form components downloads from the Fusion web application. Columns in the runtime ADF Table component that have an UpdateComponent property configured permit end users to modify values and upload the changes to the Fusion web application. For example, end users can modify the values that appear in the Name, Phone, and Address columns in EditCustomers.xlsx.
Other columns, such as Status and Changed, appear in the ADF Table component to provide status information about upload operations and changed columns.
The following sections provide information about how to implement this functionality:
-
For information about inserting an ADF Table component, see Section 7.3, "Inserting an ADF Table Component into an Excel Worksheet."
-
For information about special columns, such as Status and Changed, see Section 7.12, "Special Columns in the ADF Table Component."
-
For information about action sets, see Chapter 9, "Adding Interactivity to Your Integrated Excel Workbook."
-
For information about lists of values, see Chapter 8, "Working with Lists of Values."
2.4.4 Upload Modified Information to the Fusion Web Application
The integrated workbooks allow end users to upload modified data in the ADF Table component to the Fusion web application. An action set is configured for the runtime Upload ribbon command that invokes the ADF Table component's Upload action. For information about implementing this functionality, see Section 7.8, "Uploading Changes from an ADF Table Component."