C Troubleshooting an Integrated Excel Workbook
This appendix describes how to troubleshoot an integrated Excel workbook and generate log files when you encounter problems during development. It also describes possible solutions for a number of errors and problems (such as version mismatch, 404 error, and Oracle ADF tab not visible in integrated Excel workbook) that you may encounter.
This appendix includes the following sections:
-
Verifying That Your Fusion Web Application Supports ADF Desktop Integration
-
Verifying End-User Authentication for Integrated Excel Workbooks
Note:
The property inspector does not validate that values you enter for a property or combinations of properties are valid. Invalid values may cause runtime errors. To avoid runtime errors, make sure you specify valid values for properties in the property inspector. For more information about the property inspector, see Section 5.6, "Using the Property Inspector."C.1 Verifying That Your Fusion Web Application Supports ADF Desktop Integration
Using a server ping test, you can verify that the Fusion web application is running the ADF Desktop Integration remote servlet (adfdiRemote), and the version of ADF Desktop Integration. This information can be useful if you encounter errors with an integrated Excel workbook. For example, you can determine whether the ADF Desktop Integration remote servlet is running when you are troubleshooting an integrated Excel workbook.
For Fusion web applications that enforce authentication, you can use the server ping test to confirm that the proper authentication configuration is in place for the ADF Desktop Integration servlet URL.
ADF Desktop Integration relies on various Internet Explorer specific settings. For this reason, please perform the verification test using Internet Explorer.
To verify that the ADF Desktop Integration remote servlet is running:
-
Type the concatenated values of the workbook properties
WebAppRootandRemoteServletPathinto the address bar of your web browser. This corresponds to a URL similar to the following:http://hostname:7101/FusionApp/adfdiRemoteServletIf the ADF Desktop Integration remote servlet is running, a web page returns displaying a message similar to Figure C-1.
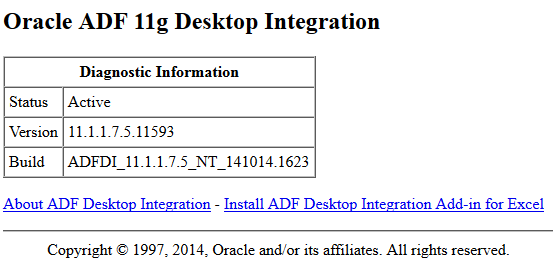
C.2 Generating an ADF Desktop Integration Diagnostic Report
For support, troubleshooting, and during diagnostic situations, you may ask end users to provide you the ADF Desktop Integration diagnostic report.
C.2.1 How to Generate the ADF Desktop Integration Diagnostic Report
End users can generate the report from the About dialog.
To generate the ADF Desktop Integration report:
-
Open the integrated Excel workbook.
-
If you have opened the integrated Excel workbook in the design mode, click the About button in the Workbook group of the Oracle ADF tab.
If you have opened the integrated Excel workbook in runtime mode, click the About button of the runtime ribbon tab.
-
Click the Diagnostic Report button of the About dialog.
-
Save the diagnostic report text file. By default, the file is saved as
adfdi-diagnostic-report.txtin theDesktopdirectory (for example,C:\Users\<USER_NAME>\Desktop). -
The Diagnostic Report dialog opens describing the location of the saved file. Click OK to open the file in the default text editor.
C.2.2 What You May Need to Know About the ADF Desktop Integration Diagnostic Report
The diagnostic report is a text file and includes a variety of information such as:
-
ADF Desktop Integration add-in version
-
Microsoft Windows version
-
Microsoft Excel version
-
Values of all properties from the Version tab of the About dialog
-
Values of all properties listed in the Properties tab of the About dialog
-
List of Excel COM add-ins
-
Branding items from the About tab, if the report is generated at runtime
-
ADF Desktop Integration servlet version, if the report is generated after a valid login
You can open and edit the text file in any text editor, or Excel. Each row in the file consists of a key-value pair separated by tabs.
Before end users send the diagnostic file to you, ask them to review the report and remove any sensitive information that they do not want to share.
C.3 Verifying End-User Authentication for Integrated Excel Workbooks
If end users of an integrated Excel workbook do not get prompted for user credentials when they invoke an action that interacts with the Fusion web application configured with ADF security, it may mean that security is not configured correctly for either the integrated Excel workbook or the Fusion web application. You can verify that your secure Fusion web application authenticates end users and that it is security-enabled by carrying out the following procedure.
To verify that a secure Fusion web application authenticates end users, in the web browser's address bar, enter the URL that you used to verify whether ADF Desktop Integration remote servlet is running. For more information, see Section C.1, "Verifying That Your Fusion Web Application Supports ADF Desktop Integration." If the Fusion web application is security-enabled, it will request that you enter user credentials.
For more information about securing your integrated Excel workbook, see Chapter 12, "Securing Your Integrated Excel Workbook."
C.4 Generating Log Files for an Integrated Excel Workbook
ADF Desktop Integration can generate log files that capture information based on events triggered by the following pieces of software within ADF Desktop Integration:
-
HTTP filter and the ADF Desktop Integration remote servlet on the web server (server-side logging)
For more information about server-side logging, see Section C.4.1, "About Server-Side Logging."
-
Excel workbook which you integrate with your Fusion web application (client-side logging)
For more information about client-side logging, see Section C.4.3, "About Client-Side Logging."
C.4.1 About Server-Side Logging
You configure the generation of server-side log files for ADF Desktop Integration the same way as for other Oracle ADF modules. This involves setting values that specify the verbosity level and output location in a configuration file named logging.xml. You can also use Oracle Diagnostic Logging Configuration of JDeveloper to configure the logging levels specified in the logging.xml file. For more information about using the JDeveloper debugging tools and ADF Logger, see the "Using the ADF Logger" section in the Fusion Developer's Guide for Oracle Application Development Framework.
Table C-1 describes the package names that you supply as attribute parameters to the <logger> elements in the logging.xml file to configure log file generation in ADF Desktop Integration.
C.4.2 Using the Oracle Diagnostics Log Analyzer to Analyze ADF Desktop Integration Servlet Requests
Using the Oracle Diagnostics Log Analyzer, you can view a hierarchical breakdown of elapsed time spent performing each ADF Desktop Integration servlet request. The hierarchical breakdown also includes the time spent in other ADF components, such as the ADF Model layer. For more information about using the log analyzer for viewing web requests, see the "How to Use the Log Analyzer to View Log Messages" section in the Fusion Developer's Guide for Oracle Application Development Framework.
Tip:
The hierarchical breakdown can be helpful in identifying performance bottlenecks due to unusually long execution times.In order to log a complete hierarchy tree of ADF event messages, including ADF Desktop Integration events, specify log level CONFIG for the oracle.adfdiagnostics package. For more information about the oracle.adfdiagnostics logger, see the "How to Create an Oracle ADF Debugging Configuration" section in Fusion Developer's Guide for Oracle Application Development Framework.
C.4.3 About Client-Side Logging
You can configure ADF Desktop Integration to create logs of activity that occur within the ADF Desktop Integration add-in at various levels of detail. By default, no log files are generated. For more information about how to configure ADF Desktop Integration module to save logs, see Section C.4.3.1, "How to Configure ADF Desktop Integration to Save Logs.".
C.4.3.1 How to Configure ADF Desktop Integration to Save Logs
ADF Desktop Integration provides logging tools to generate event logs and make them easily accessible. The logging tools are located in the Logging group of the Oracle ADF tab, and are available in both the design mode and the test mode.
Figure C-2 shows the logging tools in the Oracle ADF tab.

The Logging group provides the following buttons:
-
Console
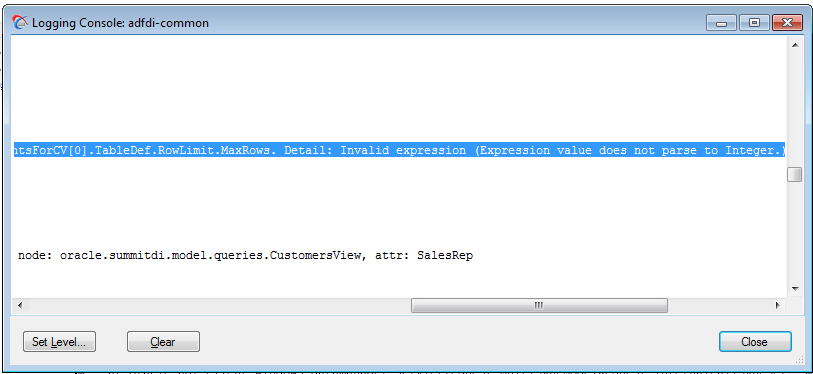
Displays the Logging Console window, which enables you to review the recent log entries while you are developing and testing the integrated Excel workbook. The console displays entries that are logged while the console is open. Figure C-3 illustrates the Logging Console window with error log entries.
The console is a resizable, non-modal window with a buffer size of 64,000 characters. When the buffer is full, the old entries are removed.
The dialog has the following buttons:
-
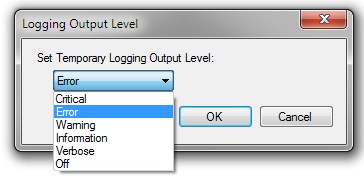
Set Level: Click to set the log output level. The button opens the Logging Output Level dialog, where you can choose the desired log output level.
-
Clear: Click to clear the log buffer.
-
Close: Click to close the dialog.
Note:
A common Logging Console window logs entries for all open integrated Excel workbooks. -
-
Set Output Level
Prompts you to choose the log output level. Table C-2 describes the log levels that client-side logging supports. The log levels are cumulative as you read down the list in Table C-2. That is, the
Informationlevel includes the data logged in theCritical,Error, andWarninglevels, but not theVerboselevel.Table C-2 Client-Side Logging Levels
Level Description CriticalCaptures critical information.
ErrorCaptures information about severe errors and exceptions.
WarningCaptures information about warnings.
InformationCaptures lifecycle and control flow events.
VerboseCaptures detailed information about the execution flow of the application.
OffNo logs are captured. This is the default value.
Note:
The log output level applies to all listeners for a given logger. -
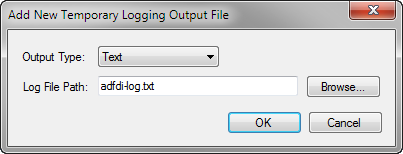
Add Log Output File
Creates a new temporary logging listener to direct logging output to the specified file or format. In the Add New Temporary Logging Output File dialog, choose the desired file output type (text or XML), and specify the path and file name of the log output file.
The temporary listener directs the logging output for the current Excel session only, and is not registered in the ADF Desktop Integration configuration file. After you exit Excel, the temporary listener is removed.
Note:
When you click the Add Log Output File button, a new listener is created. The new listener does not replace any existing listener defined in the ADF Desktop Integration configuration file, or any other temporary listener. -
Refresh Config
Reloads the ADF Desktop Integration configuration file. The ADF Desktop Integration configuration file can determine the level of information logged by the ADF Desktop Integration add-in.
For more information about the creation and configuration of the ADF Desktop Integration configuration file, see Section C.4.3.2, "About the ADF Desktop Integration Configuration File."
C.4.3.2 About the ADF Desktop Integration Configuration File
The ADF Desktop Integration configuration file is saved as adfdi-excel-addin.dll.config. To determine the correct file name and location, click the About button in the Workbook group of the Oracle ADF tab. In the dialog that opens, click the Properties tab, and consult the Configuration entry for file name and location of configuration file.
For more information about elements of the configuration file, see the "Configuration File Schema for the .NET Framework" section in Microsoft Developer Network documentation. For more information about trace and debug settings, see the "Trace and Debug Settings Schema" section in Microsoft Developer Network documentation.
Example C-1 shows a sample configuration file, one of many valid ways to configure client-side logging, that generates an .xml log file. The file captures different types of information such as ThreadId, ProcessId, and DateTime at a Verbose logging level.
Example C-1 Sample Configuration File
<?xml version="1.0"?>
<configuration>
  <system.diagnostics>
    <sources>
      <source name="adfdi-common" switchValue="Verbose">
        <listeners>
          <add type="System.Diagnostics.XmlWriterTraceListener"
            name="adfdi-common-excel.xml"
            initializeData="c:\logs\adfdi-common-excel.xml"
            traceOutputOptions="ThreadId, ProcessId, DateTime"/>
        </listeners>
      </source>
    </sources>
  </system.diagnostics>
</configuration>
C.4.3.3 How to Configure Logging Using User Environment Variables
Users who do not have access to the directory that stores the ADF Desktop Integration configuration file can change the location where log files are saved, and the logging level by setting values for user environment variables. You can add two user environment variables to configure the logging level and location for XML log files.
To add or configure user environment variables on Windows:
-
Click the Windows Start button and then click Control Panel.
-
In the Control Panel, click System, and then Advanced System Settings.
-
In the Advanced tab of System Properties dialog, click Environment Variables.
-
In the Environment Variables dialog, click New under the User variables for username input field, and add variables as described in the Table C-3.
Table C-3 User Environment Variables to Configure Logging
Enter a variable named... With a value... adfdi-common-fileThat defines the directory path and file name for the XML file that captures logging information.
The directory that you specify here must exist before you add the
adfdi-common-filevariable. The generated log file will be in XML format.adfdi-common-levelThat specifies the level of logging. Table C-2 lists valid values.
-
Click OK.
C.4.3.4 What You May Need to Know About the adfdi-common Object
The adfdi-common object is an instance of the TraceSource class from the System.Diagnostics namespace in the Microsoft .NET Framework. This object is used to generate log files that capture information about events triggered by the Excel workbook that you integrate with your Fusion web application. To know the location of the log file, check the Log Files attribute in the Properties tab of the About dialog.
For more information about the TraceSource class, see Microsoft Developer Network documentation.
C.5 Common ADF Desktop Integration Error Messages and Problems
While using or configuring the ADF Desktop Integration enabled Fusion web application or workbooks, you might see error messages or have some problems. The following list describes the most common error messages, their cause, and solutions.
- Error message: [ADFDI-00137] The client and server versions are not compatible. Contact the system administrator and ensure that the client and server versions match.
-
Cause: The client version of ADF Desktop Integration does not match the ADF Desktop Integration version in the web application.
-
Action: Uninstall client ADF Desktop Integration, and install the web application specific ADF Desktop Integration version. For more information about installing ADF Desktop Integration client, see Section 3.4, "Installing ADF Desktop Integration."
- Error message: Programmatic access to Visual Basic Project is not trusted
-
Cause: Excel has not been configured as required by ADF Desktop Integration.
-
Action: Verify that the Trust access to the VBA project object model checkbox in the Trust Center dialog is enabled. For more information, see Section 3.3, "Configuring Excel to work with ADF Desktop Integration."
- Problem: Oracle ADF tab is not visible in your integrated Excel Workbook after installing ADF Desktop Integration
-
Cause: The ADF Desktop Integration add-in is not enabled in Excel.
-
Action: Enable the ADF Desktop Integration add-in in the Excel Options dialog. In Excel, click the Microsoft Office button, and then click Excel Options to open the Excel Options dialog. In the Add-Ins tab, open the Manage dropdown list, choose COM Add-ins, and click Go. In the COM Add-ins dialog, select the Oracle ADF Desktop Integration Add-in for Excel checkbox and click OK.
For information about all ADF Desktop Integration error messages, see Error Messages Reference.
If you are a system administrator, you should also see the "Common ADF Desktop Integration Error Messages and Problems" section in Administrator's Guide for Oracle Application Development Framework.