F Enabling Memory Guard Features
This section describes property settings available to safeguard your system against memory failures caused by report requests that generate excessive data.
It includes the following sections:
-
Section F.3, "Configuring Memory Guard & Data Model Properties"
-
Section F.4, "Configuring a Maximum Threads Constraint to Avoid Out of Memory Errors"
F.1 What Are Memory Guard Features?
BI Publisher provides a set of features to protect against out-of-memory errors by blocking report requests that generate excessive amounts of data. These "memory guard" features consist of a set of properties. The properties enable you to configure conditions and processing points at which data size is inspected to determine whether the system continues to process a report request or terminates processing. When processing terminates due to data size, an error message is returned.
F.2 Key Features
The full set of properties are listed in Table F-1 and Table F-2. The properties enable you to protect against out of memory errors and enhance data processing by setting controls such as:
Maximum data size for reports
Maximum data size for scheduled reports
Minimum free memory size
SQL pruning for unused data set columns
Time out for SQL queries
The following sections highlight some of the properties and provide detail on how the system responds to the settings:
F.2.1 Restricting Maximum Data Sizes for Report Processing
By restricting the data size allowed for report processing you can prevent out of memory errors when a query returns more data than the system can handle.
Specify a Maximum Data Size Allowed for Online Processing
Property: Maximum report data size for online reports.
This property enables you to specify a maximum data size allowed for online report viewing. When you set a maximum data size, the following occurs when a user opens a report for online viewing:
-
A user submits a report to view online in the browser.
-
The data engine generates the data for the report.
-
Before document generation, the size of the data (in bytes) is inspected.
-
If the data generated is larger than the maximum setting, the report processing is ended. The user gets the following message:
The report you are trying to run exceeds the data limit set for this server. Either re-run with parameters that reduce the data or schedule this report. Contact your Administrator if you have questions.
The user can then either set parameters (if available for the report) to limit the data and resubmit online; or use the BI Publisher scheduler to submit the report.
The default value for this property is 300 MB.
Specify a Maximum Data Size Allowed for Offline (Scheduled Report) Processing
Property: Maximum report data size for offline (scheduled) reports.
This feature enables you to specify a maximum data size allowed for scheduled reports. When you set a maximum data size, the following occurs when a scheduled report job executes:
-
The scheduler commences processing of a report job.
-
The data engine generates the data for the report.
-
If the data generated is larger than the maximum setting, the report processing is ended. The scheduled report job fails with the following status message:
Report data size exceeds the maximum limit (<nnn> bytes). Stopped processing.
The user can then set parameters (if available for the report) to limit the data.
The default value for this property is 500 MB.
F.2.2 Configuring Free Memory Threshold
This set of properties helps you to protect against out of memory conditions by establishing a minimum available free memory space. This set of properties enables your system to automatically protect free memory availability and intelligently process reports with large data sets based on this availability.
-
Specify A Minimum Free Memory Threshold for Report Processing
-
Specify Maximum Report Data Size Under the Free Memory Threshold
-
Set Maximum Wait Time for Free Memory to Come Back Above the Threshold
Specify A Minimum Free Memory Threshold for Report Processing
Property: Free memory threshold
This setting enables you to specify a minimum value for free JVM space. This enables you to control whether to run a report based on two factors: current usage and the size of the report data. This feature requires the setting of several properties that work together. You specify the threshold JVM space, the report maximum report size that will be allowed when the JVM falls below the threshold, and the maximum wait time to pause the report to wait for more JVM free space to become available.
When you set these properties, the following occurs when a user opens a report for online viewing:
-
A user submits a report to view online in the browser.
-
The data engine generates the data for the report.
-
JVM memory is inspected. If the available JVM memory is above the Free memory threshold property value, the report processes as usual and there is no system intervention.
If the available JVM memory is below the threshold value, the size of the report data is inspected and compared to the property setting for Maximum report data size under the free memory threshold. If the report data is below this threshold, then the report continues processing.
If the report data size exceeds the threshold, then the report is paused to wait for free memory to become available. The report will wait for the time specified in the property Maximum Wait Time for Free Memory to Come Back Above Threshold Value. If the free memory does not rise back above the minimum in the wait period specified, the report request is rejected.
The default value for this property is 500 MB.
Specify Maximum Report Data Size Under the Free Memory Threshold
Property: Maximum report data size under the free memory threshold
Default value: (value of Free Memory Threshold)/10
Maximum single report data size allowed when free JVM memory is under the specified threshold value set in Free memory threshold. For example (assuming the default setting), if the data generated for a single report exceeds one-tenth of the value set for Free memory threshold, then processing is terminated. Therefore if the Free memory threshold is set to 100 MB and a single report data extract exceeds 10 MB, then the report processing is terminated.
This property takes effect only when Free memory threshold is set to be a positive value.
Set Minimum Time Span Between Garbage Collection Runs
Minimum time span in seconds between any two subsequent garbage collection runs. Set this value to avoid overrunning JVM garbage collection. The server enforces the minimum of 120 seconds, which means the value will be reset to 120 seconds if it falls below the minimum.
The default is 300 seconds.
Set Maximum Wait Time for Free Memory to Come Back Above the Threshold
The maximum time in seconds that a run-report request will wait for free JVM memory to come back above the threshold value. This property value takes effect only when a positive value for Free memory threshold is specified.
If the free memory becomes available within the time specified, the request will proceed immediately to generate the document. If free memory is still below the threshold value after the time specified, the request is rejected. For online requests, the larger this property value, the longer the browser will wait for a request to run.
The default for this property is 30 seconds.
F.2.3 Setting Data Engine Properties
The data engine property settings provide additional points to protect your system against out of memory errors. These include:
Set Maximum Data Size That Can Be Generated by the Data Engine
This setting sets an absolute limit to the data that can be generated from the execution of a data model. This setting applies to both online report requests and to requests submitted through the scheduler. When the size of the file generated by the data engine exceeds the limit, the data engine terminates execution of the data model and throws the exception:
"oracle.xdo.dataengine.diagnostic.XMLSizeLimitException: XML Output (NNNNNNbytes) generated exceeds specified file size limit (NNNNNbytes)..!!!!!!!".
If the report request was submitted through the scheduler, the job will show as failed in the Report Job History page. The exception error noted above displays when you rest your cursor over the status. If the report request was submitted online, the user will get the error "Unable to retrieve the data XML."
A sample data set is required for all data models. The sample data is used during template design. Sample data can be generated by the data model editor or uploaded to the data model. Large sample data sets can impact the performance of the design tools.
Set this property to limit the size of the sample data file that can be uploaded to the data model.
Set Automatic Database Fetch Size
This setting calculates and sets database fetch size at run time depending on total number of data set columns and total number of query columns. Setting this property will override the server-level and data model-level database fetch size properties. When set, this property takes effect for all data models and can significantly slow processing time. This setting is recommended for implementations of BI Publisher that frequently process complex queries of hundreds of columns, such as Oracle Fusion Applications implementations. This setting is not recommended for most general implementations of BI Publisher.
F.3 Configuring Memory Guard & Data Model Properties
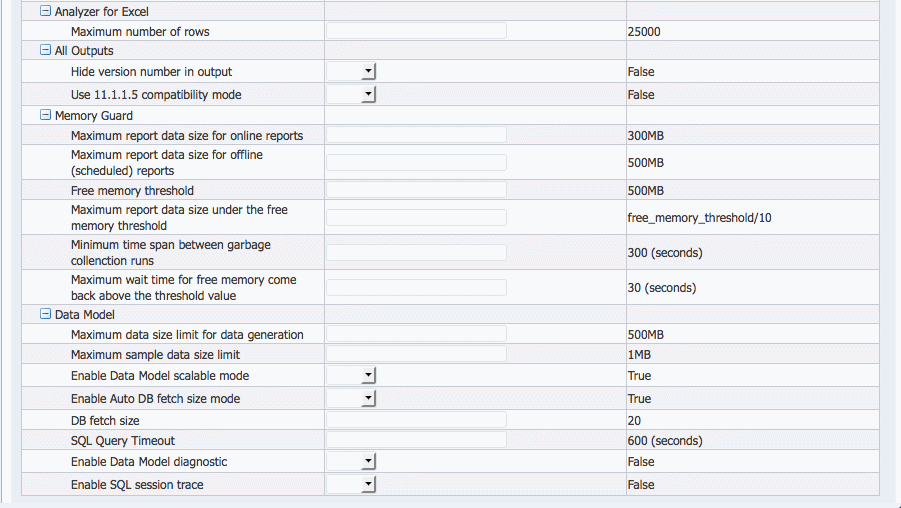
Implement the memory guard features by setting the properties in the Administration Runtime properties page.
The Memory Guard property settings are described in Table 1.
Table F-1 Memory Guard Properties and Descriptions
| Property | Description |
|---|---|
|
Maximum report data size for online reports |
Default value: 300MB Sets the maximum allowed online report data size. You can set the value in GB, MB, or KB. For example: 1GB, 200MB, or 1500KB. An online report request will be rejected immediately when the report data size returned from the execution of the data model exceeds the value of this property. To turn off this property, enter 0 or a negative number. |
|
Maximum report data size for offline (scheduled) reports |
Default value: 500 MB Set the maximum allowed offline (or scheduled) report data size. You can set the value in GB, MB, or KB. For example: 1GB, 200MB, or 1500KB. A scheduled report request will be rejected immediately when the report data size returned from the execution of the data model exceeds the value of this property. To turn off this property, enter 0 or a negative number. |
|
Free memory threshold |
Default value: 500MB Threshold value of free JVM memory to trigger possible rejection of report requests. You can set the value in GB, MB, or KB. For example: 1GB, 200MB, or 1500KB. When JVM free memory returned from run time is below the value of this property, the server will check the report data size to decide if a request should be accepted or rejected. This property works together with the three properties:
If this property value is to 0 or a negative number, this condition will be ignored. This property is for online report requests only. |
|
Maximum report data size under the free memory threshold |
Default value: (value of Free memory threshold/10) Maximum report data size allowed when free JVM memory is under the specified threshold value set in Free memory threshold. A request will be rejected when its report data size exceeds the value of this property. This property takes effect only if Free memory threshold is set to be a positive value. This property is for online report requests only. You can set the value in GB, MB, or KB. For example: 1GB, 10MB, or 1500KB. If you do not explicitly set the value, the default value is calculated by dividing the value you set for Free memory threshold by 10. So if you set Free memory threshold to 100MB, the default value for this property is 10MB. |
|
Minimum time span between garbage collection runs |
Default value: 300 (seconds) Minimum time span in seconds between any two subsequent garbage collection runs. Set this value to avoid overrunning JVM garbage collection. Note that the server automatically enforces a minimum value of 120 seconds, so if you enter a value less than 120 seconds, the server overrides it. |
|
Maximum wait time for free memory to come back above the threshold value |
Default value: 30 (seconds) The maximum time in seconds that a run-report request will wait for free JVM memory to come back above the threshold value. This property value takes effect only when a positive value of Free memory threshold is specified. If the free memory comes back in the time less than the value of Maximum wait time for free memory to come back above the threshold value, the request will proceed immediately to generate the document. If free memory is still below the threshold value after the time set for this property, the request will be rejected. The larger this property value, the longer the browser will wait for a request to run. |
The Data Model property settings are described in Table F-2.
Table F-2 Data Model Properties and Descriptions
| Property | Description |
|---|---|
|
Maximum data size limit for data generation |
Default value: 500MB Maximum XML data size in that can be generated from the execution of a data model. This setting applies to both online report requests and to requests submitted through the scheduler. When the size of the file generated by the data engine exceeds the value set for this property, the data engine terminates execution of the data model and throws an exception. You can set the value in GB, MB, or KB. For example: 1GB, 200MB, or 1500KB. To turn this property off, enter 0 or a negative number. |
|
Maximum sample data size limit |
Default value: 1MB Maximum file size of a sample data file that can be uploaded to the data model editor. |
|
Enable Data Model scalable mode |
Default: True Processing large data sets requires the use of large amounts of RAM. To prevent running out of memory, activate scalable mode for the data engine. In scalable mode, the data engine takes advantage of disk space when it processes the data. You can also set this property for specific data models. The data model setting overrides the system setting here. See "Setting Data Model Properties" in the Oracle Fusion Middleware Data Modeling Guide for Oracle Business Intelligence Publisher. |
|
Enable Auto DB fetch size mode |
Default value: True When set to True, BI Publisher calculates and sets database fetch size at run time according to the total number of data set columns and total number of query columns. This setting avoids out of memory conditions, but can significantly slow processing times. IMPORTANT: When set to True, any other DB fetch size settings are ignored. This setting is recommended for implementations of BI Publisher that frequently process complex queries of hundreds of columns, such as Oracle Fusion Applications implementations. This setting is not recommended for most general implementations of BI Publisher. Setting this property will override the data model- level database fetch size properties. When set, this property takes effect for all data models and can significantly slow processing time. |
|
DB fetch size |
Default value: 20 (rows) The maximum database fetch size for a data model. This property value takes effect only when Enable Auto DB fetch size mode is set to False. When the fetch size is met, the rows are written to a temp file and another fetch is executed; this process is repeated until all the rows are returned to the temp file. A smaller fetch size requires more round trips from BI Publisher to the database and can impact overall processing time; however, the smaller data chunks ensure against excessive memory usage. This property can also be set at the data model level. The data model setting overrides the server property. |
|
SQL Query Timeout |
Default: 600 seconds Time out for SQL query-based data models. If the SQL query is still processing when the time out value is met, the error "Failed to retrieve data xml." is returned. This property can also be set at the data model level. The data model setting overrides the server property here. |
|
Enable Data Model diagnostic |
Default value: False Setting this property to true will write data set details, memory, and SQL execution time information to the log file. Oracle recommends setting this property to true only for debugging purposes. When set to true, processing time is increased. |
|
Enable SQL Session Trace |
Default value: False Setting this property to True writes a SQL session trace log to the database for every SQL query that is executed. The log can then be examined by a database administrator. Only set this to True for debugging purposes. |
F.4 Configuring a Maximum Threads Constraint to Avoid Out of Memory Errors
During the processing of large BI Publisher reports Oracle WebLogic Server can use multiple concurrent threads to generate the report. If the threads are not constrained, out of memory errors can occur when Oracle WebLogic Server allots too many threads to report generation. To avoid this error, you can create a Work Manager to enforce the maximum number of threads that Oracle WebLogic Server can allot to BI Publisher report processing.
To configure a maximum threads constraint perform the following procedures:
-
Create the Maximum Threads Constraint in Oracle WebLogic Server
-
Redeploy the xmlpserver.ear File
Note:
This procedure describes redeploying the xmlpserver.ear file to activate the new Work Manager. Alternatively, you can perform one of the following instead of step 3:
-
Restart (stop & start) the bipublisher application
-
Restart the Oracle WebLogic Server instances (for example, bi_server1, bi_server2)
-
Once this initial setup procedure is completed, changing the value of the maximum threads count (for example from 10 to 20) takes effect immediately; no restart or redeployment operations are required.
F.4.1 Create the Maximum Threads Constraint in Oracle WebLogic Server
To create the maximum threads constraint component:
-
Log in to Oracle WebLogic Console.
-
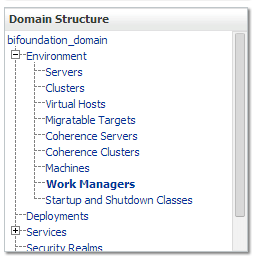
Under the Domain Structure pane, click Work Managers.
-
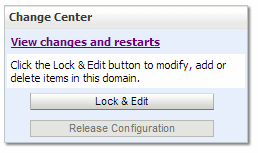
In the Change Center pane, click Lock & Edit.
-
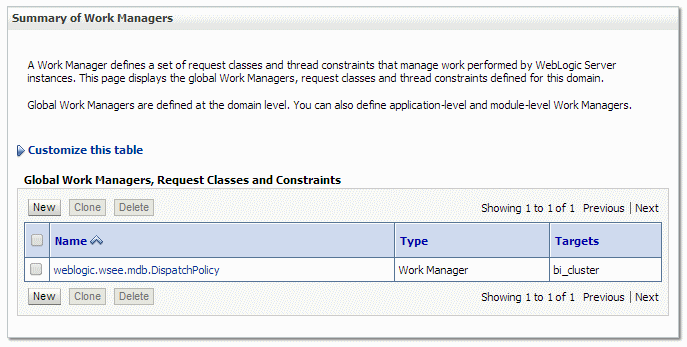
In the Global Workers, Request Classes and Constraints table, click New.
-
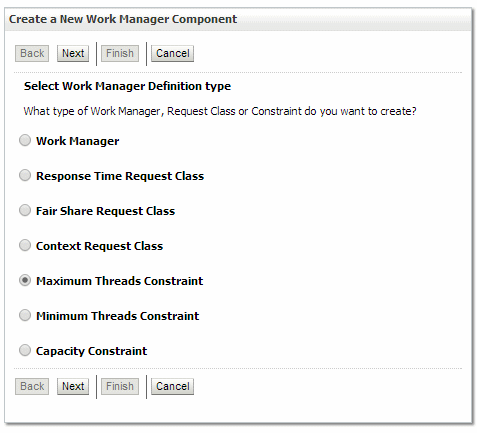
In the Create a New Work Manager Component dialog, select Maximum Threads Constraint and click Next.
-
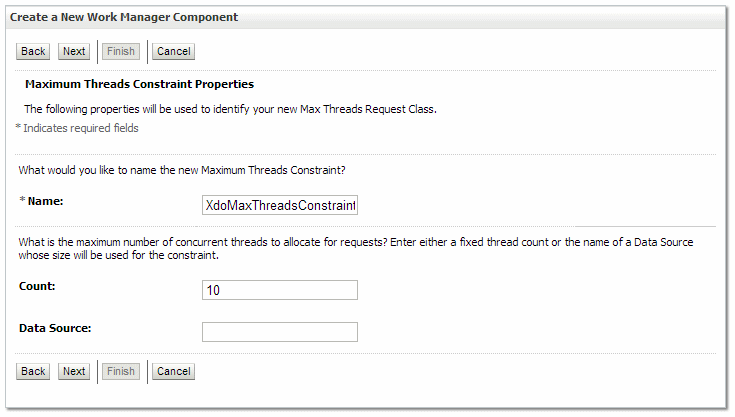
Under Maximum Threads Constraint Properties, enter the following property values:
-
Name - enter XdoMaxThreadsConstraint
-
Count - enter the maximum number of threads to allot for BI Publisher report generation, for example, 10
Click Next.
-
-
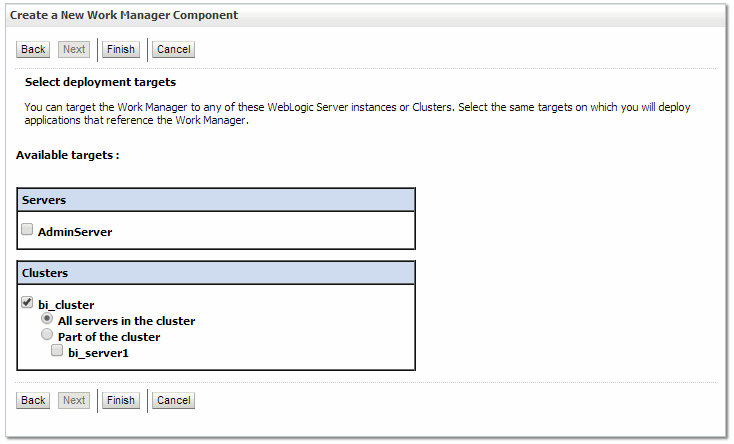
Under Select deployment targets, select "bi_cluster" and then click Finish.
F.4.2 Create the Work Manager (XdoWorkManager)
Now that you have created the Maximum Threads Constraint component and named it "XdoMaxThreadsConstraint"; next create the work manager and associate it to the XdoMaxThreadsConstraint component.
To create the work manager:
-
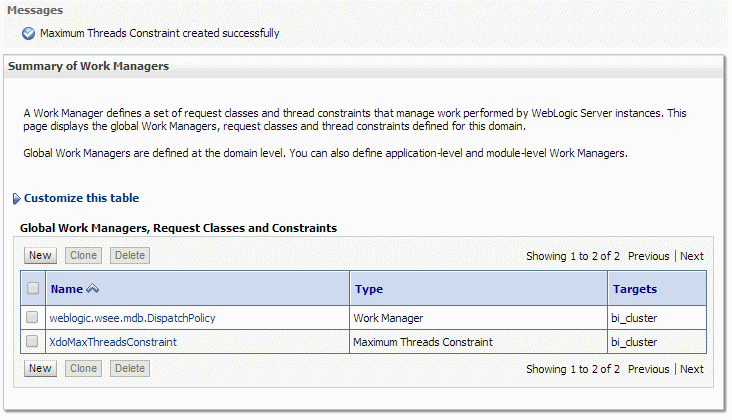
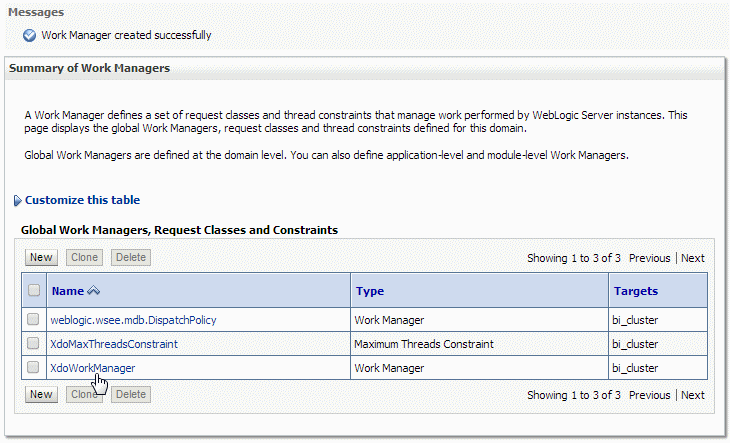
While still on the Summary of Work Managers page, click New again.
-
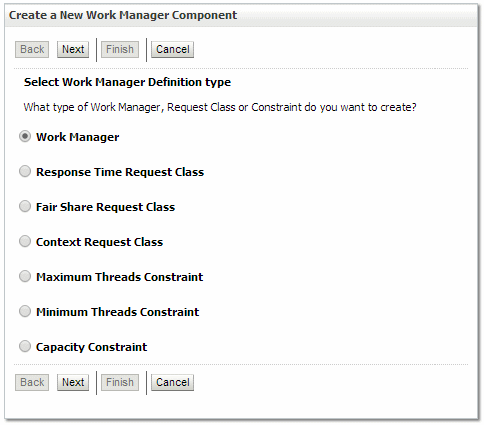
In the Create a New Work Manager Component dialog, select Work Manager and click Next.
-
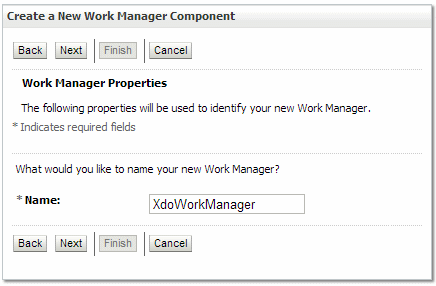
Under Work Manager Properties enter the Name property as: XdoWorkManager.
Click Next.
-
Under Select deployment targets, select "bi_cluster" and then click Finish.

-
Back on the Summary of Work Managers page, click your newly created XdoWorkManager link.
-
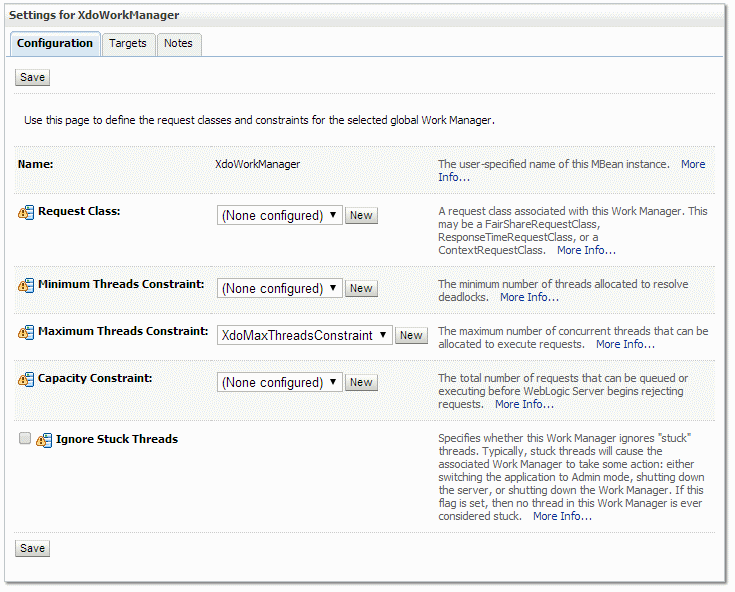
On the Settings for XdoWorkManager page, on the Configuration tab, specify the Maximum Threads Constraint as XdoMaxThreadsConstraint and click Save.
F.4.3 Redeploy the xmlpserver.ear File
To redeploy the xmlpserver.ear file:
-
In the left pane of the Console, select Deployments. A table in the right pane displays all deployed applications and modules.
-
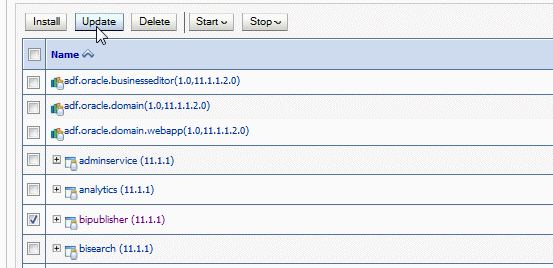
In the table, select the bipublisher application.

-
Click Update.
-
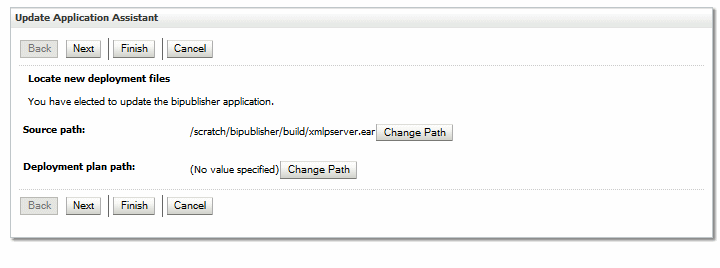
In the Upgrade Application Assistant click Next.
-
Click Finish.
-
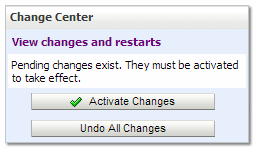
Click Activate Changes in the Change Center pane.
