5 Working with Processes and the Process Editor
This chapter provides information about creating and using business processes in Oracle BPM. It provides a general introduction to business processes and describes the process editor window and provides procedural information for creating and using processes.
See Appendix A, "BPMN Flow Object Reference" for information on using Business Process Management Notation (BPMN) to design a business process.
This chapter includes the following sections:
5.1 Introduction to Business Processes
A business process is a sequence of tasks that result in a well-defined outcome. Business processes are the core components of process-based business applications created with the Oracle BPM Suite.
Although projects are higher level wrappers that contain all the resources of a business application, the processes within the project determine how the application works. Within a business process, BPMN flow objects define the flow and behavior.
Business processes are generally created by process analysts, who determine the business requirements that must be addressed and define the corresponding process flow.
Table 5-1 describes how the type of a process determines how it behaves in relation to other business processes.
Note:
By default, new business processes are synchronous. After creating a new process, you can change the type by editing the process.Table 5-1 Types of Business Processes
| Process Type | Description |
|---|---|
|
Synchronous Service |
Synchronous services are a type of business process that is invoked from another process or service synchronously. In a synchronous service, the calling process waits until the process completes before continuing. |
|
Asynchronous Service |
Asynchronous services are a type of business process that is invoked from another process or service asynchronously. In an asynchronous service, the calling process does not wait until the process completes before continuing. |
|
Manual Process |
Manual processes are those require user interaction. Manual processes must begin with a none start event. They must end with a none end event. |
|
Reusable Process (Reusable Subprocess) |
Reusable processes are processes that can be called by a BPMN process. In BPMN terminology, reusable processes are often called reusable subprocesses. See Section A.9, "Using Subprocesses in Oracle BPM" for more information about the different types of subprocesses supported by Oracle BPM. Use the call activity to call reusable subprocesses within your business process. See Section A.4.3, "Introduction to the Call Activity" for information about calling reusable processes. |
5.2 Introduction to the Process Editor
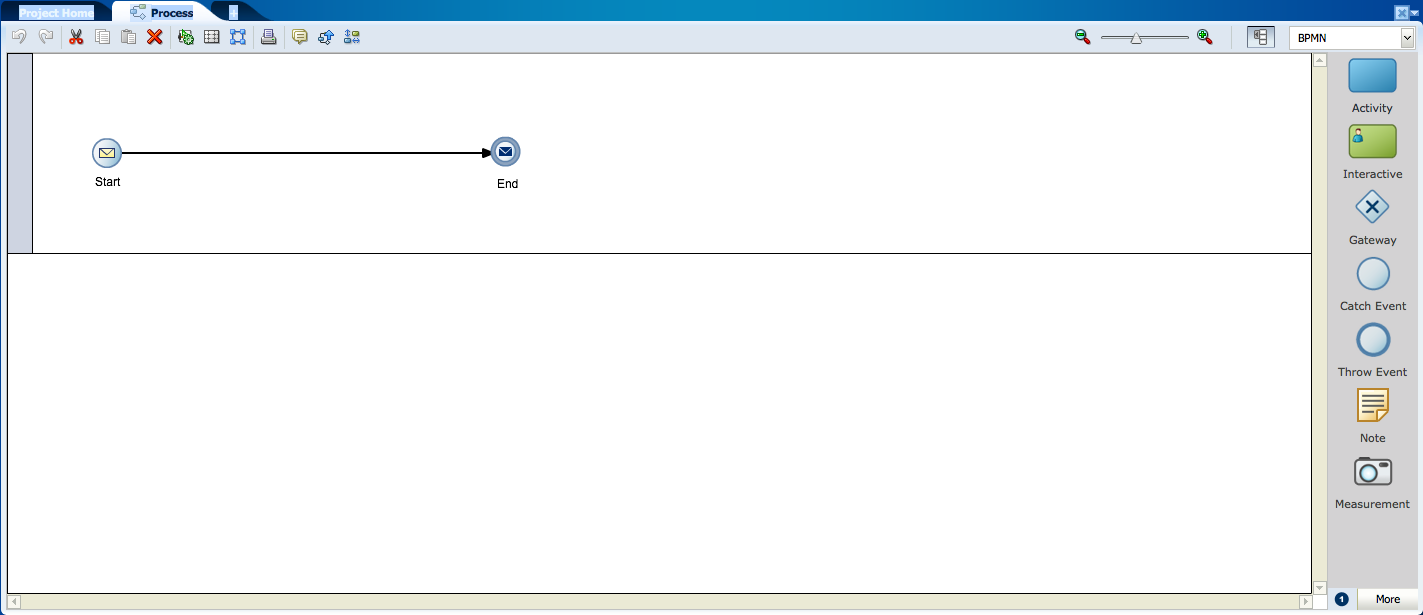
The process editor enables you to quickly create and edit BPMN processes. The process editor appears as a tabbed pane in the Business Process Composer application and is divided into three areas:
-
Process Editor Toolbar: provides quick access to menu items related to process design. See Section 5.2.1, "Introduction to the Process Editor Toolbar" for more information.
-
Process Editor Canvas: provides a work area for creating your process flow. Section 5.2.2, "Introduction to the Process Editor Canvas" for more information.
-
BPMN Component Palette: enables you to quickly access the flow objects, sequence flows, and other elements that comprise a BPMN process. You can drag and drop these elements from the BPMN component palette onto the process editor canvas. See Section 5.2.3, "Introduction to the BPMN Component Palette" for more information.
-
Business Catalog Palette: provides a list of the business catalog elements that you can use within your BPM project. See Section 5.2.4, "Introduction to the Business Catalog" for more information.
Figure 5-1 shows an example of the process editor tab.
You can open multiple processes within the same project simultaneously in Business Process Composer. Each process opens in its own tab within the editor window.
5.2.1 Introduction to the Process Editor Toolbar
The process editor window contains a toolbar enabling access to the Business Process Composer features described in Table 5-2.
| Menu Item | Description |
|---|---|
|
Undo |
Reverts the last change made to your process. |
|
Redo |
Reverses the last undo action you performed. |
|
Cut |
Cuts the selected items and copies them the clipboard. |
|
Copy |
Copies the selected items to the clipboard. |
|
Paste |
Pastes the items currently in the clipboard. |
|
Delete |
Deletes the selected elements from the process. |
|
Autolayout |
Automatically adjusts the layout of your process. |
|
Toggle grid visibility |
Shows or hides a grid in the process editor window. |
|
Snap to grid |
Centers the flow objects in your process on the nearest grid axis. Existing flow objects are automatically centered. New flow objects are automatically be centered when added. This menu item is active only when toggle grid visibility is enabled. |
|
|
Prints the process using your browser's printer setup. |
|
Edit conversations |
Opens the conversations editor. Use this editor to define the interface that determines the input and output data objects. |
|
Find process usage |
Determines which other processes within the current project call the current process. |
|
View collaboration |
Switches the process editor to collaboration view. |
|
Data objects |
Opens the data objects editor. See Section 12.3, "Working with Data Objects" for more information. |
|
Business indicators |
Opens the business indicator editor. |
|
Player |
Launches the process player. See Chapter 7, "Using Process Player" for more information. |
|
Zoom slider |
Zooms in and out of your process. |
5.2.2 Introduction to the Process Editor Canvas
The process editor canvas is the central area of the process editor window. Use the process editor canvas to create the graphical representation of your process using the elements available in the BPMN component palette. In addition to a process flow, the process editor canvas also displays swimlanes.
5.2.3 Introduction to the BPMN Component Palette
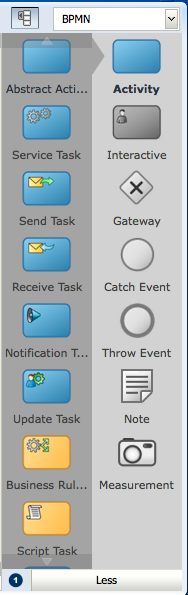
Use the BPMN component palette to add flow objects, sequence flows and business catalog elements to your process. Figure 5-2 shows the component palette.
Use the component palette to drag and drop artifacts to the process editor window.
Note:
The component palette is greyed-out until you enter edit mode for the project.The component palette separates BPMN elements into the following groups:
-
Activity
-
Interactive
-
Gateway
-
Catch Event
-
Throw Event
-
Note
-
Measurement
Business Process Composer provides two separate modes for adding flow objects to a process:
-
Single object mode: enables you to add individual flow objects one at a time. This mode is indicated by a 1 within a blue circle as shown in Figure 5-3.
-
Multiple object mode: enables you to quickly add multiple flow objects of the same type. This mode is indicated by an "N" within a blue circle.
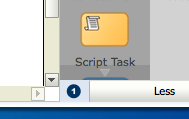
Click the blue circle, shown in Figure 5-3, to toggle between the two entry modes.
5.2.4 Introduction to the Business Catalog
Use this panel to select reusable services from the business catalog. Figure 5-4 shows the business catalog.
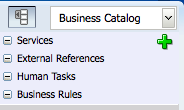
These services are grouped as follows:
-
Services
-
External references
-
Human tasks
-
Business rules
Note:
You cannot create external references using Business Process Composer. Create external references using Oracle BPM Studio.Share projects containing references using the BPM repository or include them as part of a project template.
You can use Business Process Composer to create services based on Web Services. However, you must create other services based on adapters and other SOA components in Oracle BPM Studio. You can include them within a project template or shared project.
You can use Business Process Composer to assign reusable services from the business catalog to the corresponding flow objects.
See Section 4.1.1.2, "The Business Catalog" for more information.
5.3 Working with Business Processes
The following sections describe how to create, open, and delete business processes.
5.3.1 How to Create a New Business Process
You create business processes within an Oracle BPM project. You can add one or more processes to your project.
To create a new business process
-
Go to the Project Welcome Page.
-
If you are editing a shared project, ensure that you are currently editing the project.
-
Click Processes, then click New Process.
-
Enter a name for the process, then click Create.
The new process appears in the list of processes.
When you create a new business process it contains a start and end event connected by a default sequence flow. By default, both the start and end events are none events. You can change the type as required by your business process.
See Appendix A, "Defining the Start and End Point of a Process" for more information.
5.3.2 How to Open a Business Process
After opening an Oracle BPM project, you can open any of the processes it contains.
-
Go to the Project Welcome Page.
-
Click Processes.
-
Click the name of the process you want to open.
The process opens in the process editor window. Before you can begin editing the process, you must ensure that you are in edit mode.
5.3.3 How to Delete a Business Process
You can delete processes from your project.
To delete a business process for a project:
-
Open your project.
-
Go to the Project Welcome Page.
-
Click Processes.
-
Move the cursor over the name of the process you want to delete.
-
Click the delete icon, the click OK.
5.3.3.1 What You Need to Know About Deleting a Business Process
When deleting a process, ensure that there are no remaining references to the deleted process elsewhere in your project. For example, if the deleted process was invoked from another process through a message throw event, you must ensure that you have reconfigured the invoking process so it is no longer referring to the deleted process. An error is displayed during validation if any remaining references to the deleted process still exist.
5.4 Working with Flow Elements
This section describes the basic mechanics of using the process editor to add flow elements to a process. See Appendix A, "BPMN Flow Object Reference" for information about designing your business process using BPMN 2.0.
5.4.1 How to Add a Flow Object from the Component Palette
To add flow objects to your process drag them from the component palette onto the process editor canvas.
To add a flow element from the component palette:
-
Open the process where you want to add flow elements.
-
Ensure you are in edit mode.
-
In the component palette, double-click the type of flow object you want to add.
-
Select the object entry mode you wish to use.
You can choose to enter a single flow object or multiple flow objects of the same type. See Section 5.2.3, "Introduction to the BPMN Component Palette" for more information.
-
Click and drag the flow object you want to add to the area in process editor canvas where you want to place it.
The cursor displays the icon associated with the type of flow object.
-
Position the cursor at the point in your process where you want to add the flow object, then click the mouse.
If you are in multiple object mode, you can continue clicking within the process editor canvas to add additional flow objects of the same type.
Note:
If you position the cursor over a sequence flow, Business Process Composer automatically creates incoming and outgoing sequence flows for the new flow object.
5.4.2 How to Cut, Copy, or Delete a Flow Object
Within the process editor window, you can cut, copy, or delete flow objects.
To cut, copy, or delete a flow object:
-
Select the flow object or sequence flow that you want to cut, copy, or delete.
-
Select Cut, Copy, or Delete from the process editor toolbar.
Note:
When you cut or delete a flow object that contains incoming and outgoing sequence flow, Business Process Composer automatically connects it to the outgoing sequence flow. However, you may need to manually reconfigure the surrounding flow objects.
5.4.3 How to Paste a Flow Object in a Process
You can paste the flow object that you previously cut or copied.
To paste a flow object in a process:
-
Right-click in the area of the process editor canvas where you want to paste a flow object.
-
Select Paste.
5.4.4 How to Add a Sequence Flow to a Process
Sequence flows define the order or sequence which the work is performed within a process. For more information, see Section A.6, "Controlling Process Flow Using Sequence Flows"
To add sequence flows to your process:
-
Open your process.
-
Move the cursor over the flow object where you want to create the outgoing sequence flow.
-
Click the Add Sequence flow button.
This button only appears for flow objects that do not have outgoing sequence flows.
-
Move the cursor to the flow object you want to connect to, then left-click.
5.4.5 How to Delete a Sequence Flow
You can delete a sequence flow from a BPMN process.
To delete a sequence flow from a process:
-
In the process editor canvas, right-click the sequence flow you want to delete.
-
Select Delete.
5.4.6 How to Edit the Properties of a Flow Object
You can edit the basic properties of a sequence flow.
To edit the properties of a flow object:
-
Right-click on the flow object.
-
Select Properties.
-
Edit the properties of the flow object.
-
When you are finished editing the properties, click outside the properties dialog window.
Your changes are automatically saved and the dialog window closes.
5.4.7 How to Assign a Custom Icon to a Flow Object
Use Business Process Composer to select a custom icon to replace the default BPMN icon of a flow object. You can select from a list of custom icons provided by Oracle BPM.
To assign a custom icon to a flow object:
-
Right-click the flow object, the select Properties.
-
Click Change, then select the icon you want to use.
-
Click outside the properties window to apply your changes.
5.5 Working with Business Catalog Components
The following sections provide information about working with the business catalog in Business Process Composer. See Section 4.1.1.2, "The Business Catalog" for more information about the business catalog.
5.5.1 How to Assign a Business Catalog Component to a Flow Object
Use Business Process Composer to configure implementation details for a flow object by assigning business catalog components to it.
You can assign business catalog components to the these flow objects:
-
Business rule task
-
Service task
-
User task
-
Message events and the receive task
To assign a business catalog component to a flow object:
-
Open your process.
-
Right-click on the flow object where you want to add the business catalog component.
-
Select Implementation.
-
Select Browse, then select the business catalog component from the list.
-
Click OK.
-
Click Apply Changes.
Note:
You must click Apply Changes to save any changes you make to the implementation of a flow object. Even if you save the project, implementation changes are not saved until you click Apply Changes.
5.5.2 How to Create New Human Tasks in the Business Catalog
You can create new human tasks within the business catalog. See Chapter 11, "Working with Human Tasks" for more information.
After creating human tasks, you can then assign them to the user tasks within your process. See Appendix A, "Adding User Interaction to Your Process" for information about using human tasks within a BPMN process.
5.6 Working with Draft Processes
Oracle BPM enables you to create and deploy draft processes.
5.6.1 Introduction to Draft Processes
A draft process has one or more flow objects which do not have their implementation defined. By deploying a draft process, you can test the parts of your process that have been completed without having to wait until all flow objects have been implemented. To create a draft process, mark one or more flow objects within the process as draft.
When a flow object is marked as draft, you cannot configure data associations for it. If you mark a flow object as draft that has previously had data associations configured, these are lost.
You can define the implementation details of a draft flow object. However, it is not required. A draft flow object with no implementation defined does not generate errors during project validation.
When a project containing a draft flow object is deployed, implementation details for those flow objects are ignored. For example, if your process contains a user task marked as draft, the runtime engine does not create instances of the associated human task.
5.7 Documenting Your Process
You create documentation for your process using the documentation editor. You can add documentation for an entire process or for individual flow objects within a process.
Using Oracle BPM you can create two different types of documentation:
-
End User: Documentation visible to end users of your process-based application using Process Workspace.
-
Internal (Use Case): Documentation for process analysts and developers who are collaborating on a business process or who may revise it later.
You can define use-case documentation for each of the activities, events, and gateways within your process.
Note:
You cannot create documentation for sequence flows or measurement marks.
5.7.1 Introduction to the Documentation Editor
The documentation editor contains a toolbar and editor pane that enable you to enter the documentation for your process.

5.7.2 How to Add Documentation to Your Process
Use Business Process Composer to add documentation to your processes and the flow objects within your processes.
To add documentation to a process:
-
Open your process.
-
Click Restore Pane to display the documentation editor. The Restore Pane icon is located in the lower right corner of the Business Process Composer application.
-
Click the Documentation tab, then select the tab for the process.
-
Select the type of documentation you want to create from the Documentation Type drop-down menu.
-
Enter your documentation in the editor window.
-
Click Apply to save your changes.
Note:
You must apply your changes before selecting another process or process element. If you navigate away from the documentation editor before applying your changes, they are not saved.
To add documentation to a specific flow object within a process:
-
Open the process where you want to add documentation.
-
Right-click the flow object where you want to add documentation, then select Properties.
-
In the Properties dialog box, click Documentation.
-
Select the type of documentation you want to create from the Documentation Type drop-down menu.
-
Enter your documentation in the editor window.
-
Click Apply to save your changes.
Note:
You must apply your changes before selecting another process or process element. If you navigate away from the documentation editor before applying your changes, they are not saved.
5.7.3 How to Add Notes to a Process
You can add notes to your process to make them easier to understand.
-
Open your process.
-
Ensure that you are in edit mode.
-
In the BPMN component palette, click and drag the Note icon to the point in your process where you want to add the note.
-
Double-click on the note to edit the text.
-
Enter the text of the note, then click outside of the note to finish.
5.8 Importing and Exporting Process Models
Use Business Process Composer to import and export process models created in other programs.
5.8.1 Importing Process Models into Oracle BPM
Use Business Process Composer to import process models and convert them to BPMN notation. Oracle BPM supports importing and converting process models in the following formats:
-
Visio
-
Workflow
-
XPDL
-
Oracle Tutor (files are saved using the .docx extension)
You may need to modify Visio and XPDL processes before conversion to ensure that they are converted accurately. See Appendix E, "Preparing Processes for Import into BPMN" for more information.
Note:
If the original file contains properties and artifacts that are not supported by BPMN, the unsupported elements are not converted and are omitted from the final BPMN process.For example, if the original file contains loop characteristics on a regular activity, which is not supported in BPMN, the BPMN process does not contain the loop characteristics after conversion.
-
From the main menu, select Import, then Import Model.
-
On your local file system, browse to the file you want to import, then click OK.
-
If you are importing a Visio or XPDL file, select one of the following:
-
Create a separate model from each pool
-
Merge pools into a single model
This dialog appears even if the original file does not contain multiple pools.
-
-
Click OK.
You can view the newly created BPMN processes from the Project Welcome Page.
5.8.2 Exporting BPMN Processes to Oracle Tutor
Use Business Process Composer to export BPMN processes to Oracle Tutor. These files are exported as Microsoft Word (.docx) files and contain Oracle Tutor formatting.
To export a BPMN process to Oracle Tutor:
-
From the main menu, select Export, then Export to Word.
-
Select one of the following:
-
Active process:
-
All open processes:
-
All processes of project:
The converted processes are downloaded as a .zip file to your local file system.
-
-
Click Save.
To view the exported processes, you must extract the .zip file. Each individual process file contains conversion notes for any objects modified during conversion.