9 Managing Process Workspace
This chapter explains the various tasks an administrator can perform in Process Workspace, including setting the display of the Work Items panel, and administering and configuring task-related information.
This chapter contains these topics:
-
Section 9.1, "What You May Need to Know When Managing Process Workspace"
-
Section 9.2, "Setting the Display of the Work Items Panel in Process Workspace"
-
Section 9.3, "Administering Approval Groups in Process Workspace"
-
Section 9.4, "Managing Mapped Attributes (Flex Fields) in Process Workspace"
-
Section 9.5, "Using Task Configuration in Process Workspace"
9.1 What You May Need to Know When Managing Process Workspace
When an end user launches an application from the Applications panel of the Process Tracking page, the application is launched and a form appears. If the user dismisses that form, then that process instance continues to run, but as a superfluous instance never to be processed or used. Such superfluous instances can be cleaned up by a background instance that can be specified and scheduled by the administrator of the BPMN service engine. If you are the administrator of the BPMN service engine and want more information about specifying this background instance, see Oracle Fusion Middleware Administrator's Guide for Oracle SOA Suite and Oracle Business Process Management Suite.
9.2 Setting the Display of the Work Items Panel in Process Workspace
To set the display of the Work Items panel, administrators can specify various application preferences. To do this: From the Process Workspace global toolbar, click Administration, then click Application Preferences.
This section contains these topics:
-
Section 9.2.1, "How to Specify the Login Page Realm Label in Process Workspace"
-
Section 9.2.2, "How to Specify the Resource Bundle in Process Workspace"
-
Section 9.2.3, "How to Specify the Language Locale Information in Process Workspace"
-
Section 9.2.5, "How to Specify a Branding Logo in Process Workspace"
-
Section 9.2.6, "How to Specify the Branding Title in Process Workspace"
-
Section 9.2.8, "How to Enable Customized Applications and Links in Process Workspace"
-
Section 9.2.10, "How to Specify, Show, or Hide the Default Tab Pages in Process Workspace"
9.2.1 How to Specify the Login Page Realm Label in Process Workspace
If the identity service is configured with multiple realms, then, when a user logs in to Oracle BPM Worklist, the login page displays a list of realm names. LABEL_LOGIN_REALM specifies the resource bundle key used to look up the label to display these realms. You can change the term realm to fit the user community—terms such as country, company, division, or department may be more appropriate. To change the term realm, customize the resource bundle, specify a resource bundle key for this string, and then set the Login page realm label parameter to point to that resource bundle key.
For information about customizing the resource bundle, see Appendix B, "Customizing a Resource Bundle".
For information about specifying a resource bundle, see Section 9.2.2, "How to Specify the Resource Bundle in Process Workspace."
9.2.2 How to Specify the Resource Bundle in Process Workspace
The resource bundle provides the strings displayed in the Worklist Application. By default, the class path to the resource bundle is:
As an administrator, you can add or modify strings shown in the application by creating a custom resource bundle. You can then use the Resource Bundle field in the Application Preferences page to specify the class path to your custom resource bundle.
For more information about customizing the resource bundle, see Appendix B, "Customizing a Resource Bundle."
9.2.3 How to Specify the Language Locale Information in Process Workspace
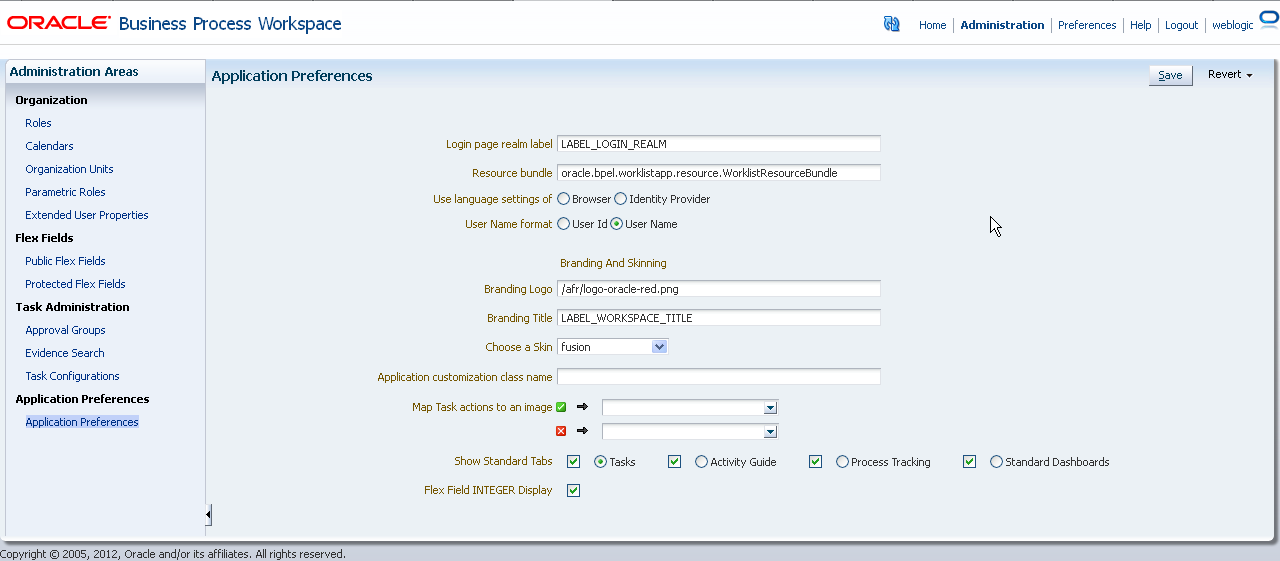
From the Application Preferences page, you can specify how the Process Workspace display language is determined. Information about the language locale can be derived from either the user's browser or the identity provider that stores information about Process Workspace users.
You reach the Application Preferences page by clicking Administration on the global toolbar at the very top of Process Workspace, then, under Administration Areas, selecting Application Preferences. The Application Preferences panel appears in the right pane. To specify the display language, in the Use language settings of field, select either Browser or Identity Provider.
Figure 9-2 Specifying Language Local Information
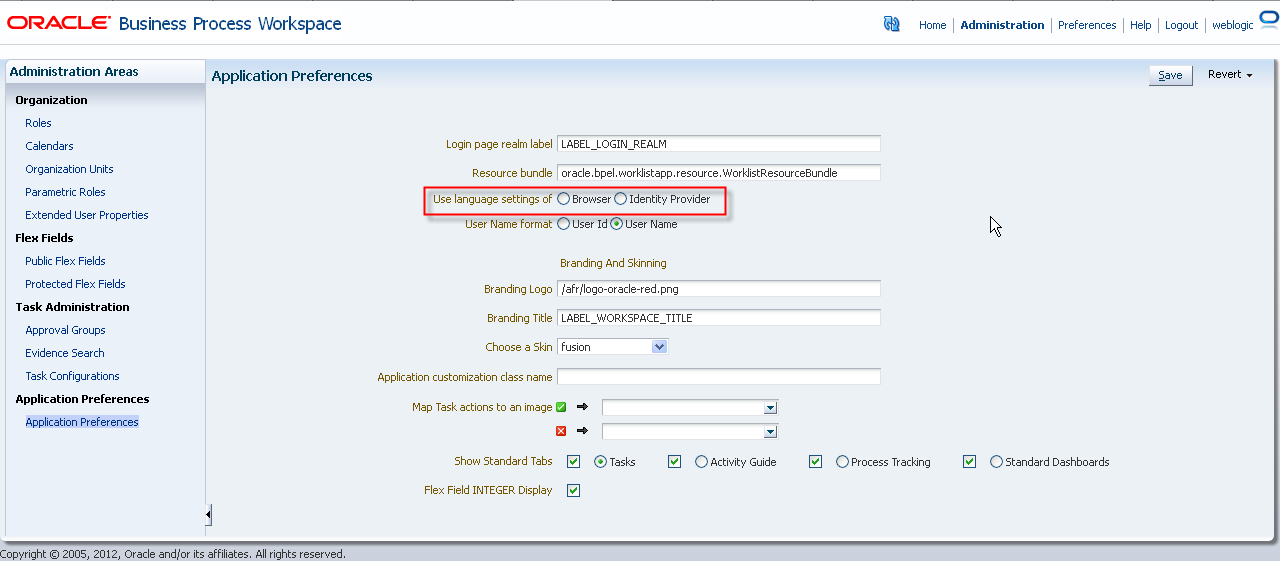
Description of "Figure 9-2 Specifying Language Local Information"
9.2.4 How to Specify the User Name Format
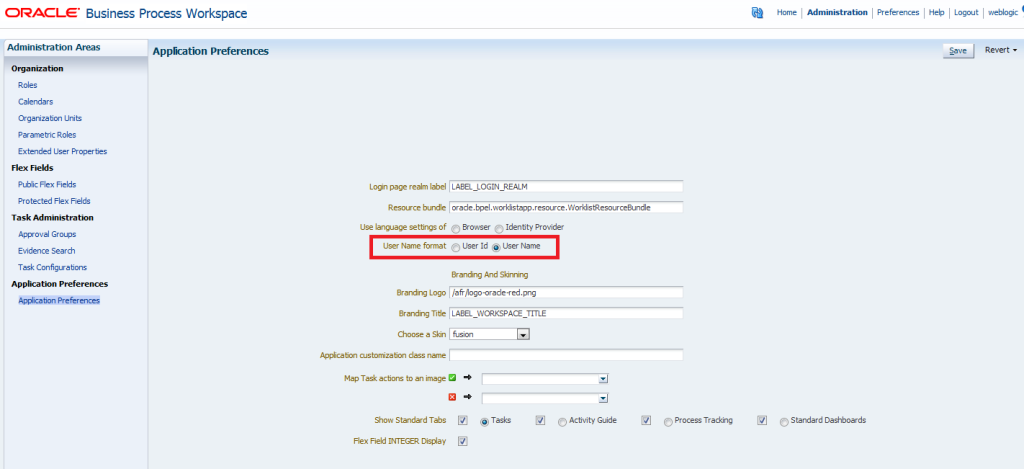
From the Application Preferences page, you can specify how the user name format is displayed in the Creator, Assignee or other name columns throughout Process Workspace. You can select to display the user ID (for example, jstein) or the full user name (for example, John Stein).
You reach the Application Preferences page by clicking Administration on the global toolbar at the very top of Process Workspace, then, under Administration Areas, selecting Application Preferences. The Application Preferences panel appears in the right pane. To specify the display language, in the User Name Format field, select User ID or User Name, as shown in Figure 9-3.
9.2.5 How to Specify a Branding Logo in Process Workspace
A branding logo is the image displayed in the top left corner of every page of the Worklist Application. The Oracle logo is the default, and you can change it to one of your choosing.
Note:
The ideal image size is 120px x 40px (length x width) for proper display. Although images with high resolution and size are compressed to fit the branding logo size, smaller images display better.Do one of the following:
-
Refer to an external image-hosting website. To do this: In the Branding Logo field, enter the URL of the image.
-
Upload an image to a particular location on the server and, in the Branding Logo field, enter its relative path, for example,
/afr/my_logo.png. -
Refer to an image from the shared library. To do this: In the Branding Logo field, enter the path of the logo name as found in the shared library, for example,
/my_logo.png
Note:
Customizing the branding logo from either the Worklist Application or Process Workspace changes the logo in both applications. For example, if you change the logo from Worklist Application, then the Process Workspace logo is changed automatically.For more information about deploying images in a shared library, see Appendix D, "Deploying Images and JAR files as Part of a Shared Library JAR file".
9.2.6 How to Specify the Branding Title in Process Workspace
You can specify the title for your site, changing the default title, BPM Worklist, to one that you choose.
To specify the branding title:
Do one of the following:
-
In the Branding Title field, enter a simple string for your title.
-
In the Branding Title field, enter a label that refers to a key-value pair in the Resource Bundle. In this way, you can internationalize your title, for example, LABEL_WORKLIST_TITLE.
9.2.7 How to Choose a Skin in Process Workspace
A skin determines the look and feel of your graphical interface.
Do one of the following:
-
From the Choose a Skin list, select one of the default ADF skins
If you want the Human Task flow application to use the skin selected in Process Workspace, you must verify that the
trinidad-config.xml file (found in the Human Task flow application) includes the following:<skin-family>#{param.sf}</skin-family> -
Upload your own customized skin
.cssfile in a.JARfile and deploy it as a part of shared library. Then, when you restart your application from the console, your custom skin appears in the Choose a Skin list.
-
Create a directory structure similar to the following example:
C:\temp\META-INF\adf\oracle\skin\images
     META-INF\skins\custom.css
     META-INF\trinidad-skins.xml
Note that, in this example, you can change the word
customto the name of your own customized skin. -
Make sure the content of
trinidad-skins.xmlfile is as follows:<?xml version="1.0" encoding="ISO-8859-1"?> <skins xmlns="http://myfaces.apache.org/trinidad/skin"> <skin> <id>custom.desktop</id> <family>custom</family> <extends>custom.desktop</extends> <render-kit-id>org.apache.myfaces.trinidad.desktop</render-kit-id> <style-sheet-name>skins/custom.css</style-sheet-name> </skin> </skins> -
Create the
.JARfile by issuing the following command from thec:\tempdirectory:jar -cvf customSkin.jar META-INF/
-
Copy this Jar file to the directory
/scratch/username/sharedLib.
Note:
Refer to the images in your CSS file this way:../adf/oracle/skin/images/example.gif (with the two trailing dots).
This allows the search for the META-INF root to start one directory above the META-INF/skin directory in which the .css file is located.
For more information about deploying images in a shared library, see Appendix D, "Deploying Images and JAR files as Part of a Shared Library JAR file".
9.2.8 How to Enable Customized Applications and Links in Process Workspace
In Process Workspace, you can create customized external applications and links that become available in the Favorites list in the Views, Applications, and Favorites pane. Moreover, in both Process Workspace and the Worklist Application you can specify the columns that appear in the inbox.
To enable customized applications:
-
In the Application Preferences page, enter the class name of your custom application in the Application customization class name field.
-
Restart the application from the console.
Depending on your customization, you can now see its effects.
If your customization is for Process Workspace and involves either creating an external application or specifying inbox columns in the Task Details pane or both, you see the following:
-
Your custom application listed in the Favorites list of the Tasks, Views, and Favorites pane.
-
The columns of the inbox adjusted according to your specifications.
For information about customizing applications, see Appendix C, "Customizing Applications in Process Workspace and the Worklist Application".
-
9.2.9 How to Specify an Image for a Task Action
If you are an administrator, then you can specify whether an action is displayed with a red X icon or with a green check mark icon.
To specify an image for a task action:
-
Select Administration, then Application Preferences.
-
From the lists in the Map task actions to an image field, select the task actions you want to map to either the green check mark icon or the red X icon.
-
Click Save.
9.2.10 How to Specify, Show, or Hide the Default Tab Pages in Process Workspace
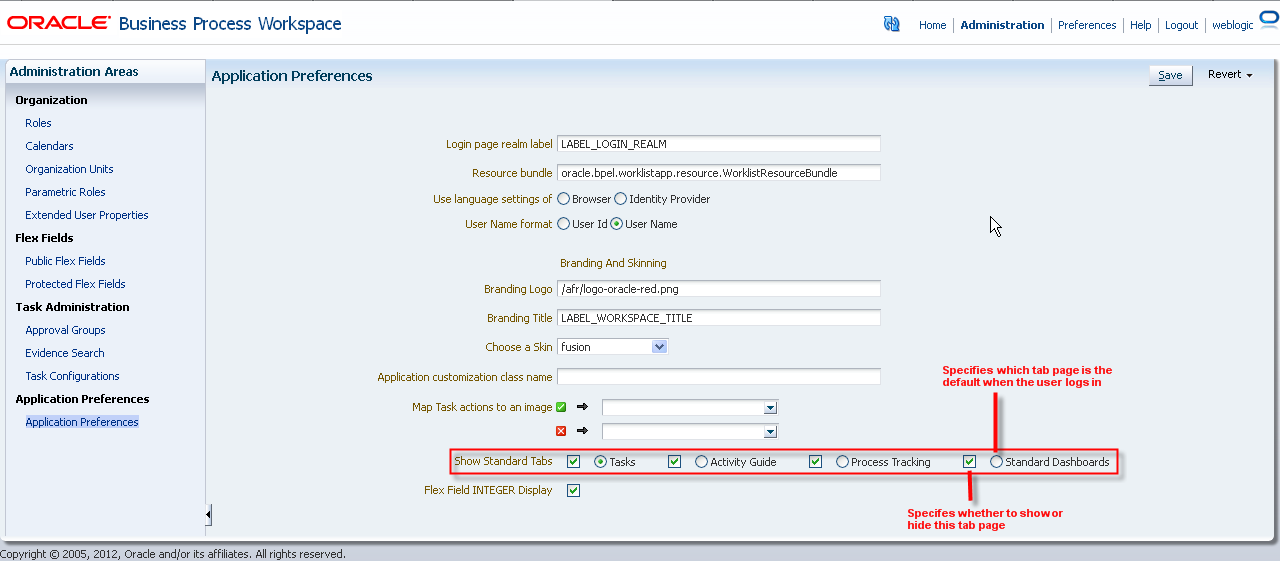
If you are an administrator, then you can specify whether to show or hide the Process Workspace standard tabs, for example, Tasks, Activity Guides, Process Tracking, and Standard Dashboards. Also, from the tabs you decide to show, you can select the one to be the default tab when a user logs in.
To show or hide the standard Process Workspace tabs:
-
Select Administration, then Application Preferences.
-
From the Show Standard Tabs row, select the check boxes for the tabs you want to show, or clear them for the tabs you want to hide.
-
From the tabs you decide to show, specify which tab is to be the default when a user logs in. Do this by selecting the radio button next to the check box for that tab. If you do not select a default tab, then the standard tabs will not show or hide as you specified.
-
Click Save.
Figure 9-4 shows the Application Preferences page with the Show Standard Tabs row highlighted. It calls out a check box for selecting a tab to show or hide, and a radio button for selecting a tab to be the default at user login.
9.3 Administering Approval Groups in Process Workspace
An approval group consists of a name and a predefined set of users configured to act on a task in a certain pattern. This pattern is similar to a human workflow routing slip pattern where users can act on tasks in serial or in parallel. An approval group also can contain a nested approval group in the pattern.
The name of an approval group is necessary when specifying the approval group list builder. The pattern configured in the approval group is used by default to order the users who must act on the task. However, when creating the list builder, the default pattern can be overridden by specifying the voting method.
Process Workspace enables with administrator rights to manage approval groups. This section contains these topics:
-
Section 9.3.6, "How to Add a New Member to a Static Approval Group"
-
Section 9.3.7, "How to Delete a Member from an Approval Group"
9.3.1 How to Use Task Forms
The human workflow service creates tasks for users to interact with the business process. Each task has two parts—the task metadata and the task form. The task form is used to display the contents of the task to the user's worklist.
The task form is designed in Oracle JDeveloper with Oracle Application Development Framework (Oracle ADF). If you are a process designer and want more information, see "Designing Task Display Forms for Human Tasks," in Oracle Fusion Middleware Developer's Guide for Oracle SOA Suite.
Process Workspace displays all worklist tasks that are assigned to a user or a group. When a worklist user drills down into a specific task, the task display form renders the details of that task. For example, an expense approval task may show a form with line items for various expenses, and a help desk task form may show details such as severity, problem location, and so on.
The sections that follow describe the task form in Process Workspace that users with administrator rights use to manage tasks. Figure 9-5 shows a task form.
9.3.1.1 Header View
The Header view, shown in Figure 9-6, is created during design time in Oracle JDeveloper using the header drop handler.
Figure 9-6 Header View in Process Workspace

Description of "Figure 9-6 Header View in Process Workspace"
By default, the JDeveloper drop handler includes the Header fields listed in Table 9-1. However, using JDeveloper, the developer can include or remove any of the fields based on the use case.
| Field | Description |
|---|---|
|
Task Number |
The number automatically assigned to the task. |
|
State |
The current status of the task. |
|
Outcome |
The user outcome. For example, if the user clicks Approve, the Outcome field displays "Approve." |
|
Priority |
The priority level assigned to the task. |
|
Creator |
The user who originated the task. |
|
Created |
The task's creation date. |
|
Updated |
The date the task was last updated. |
|
Expires |
The date the task expires. |
|
Assignees |
The name(s) of the administrator(s) to whom the task has been assigned. |
|
Acquired By |
The name of the user who claims the task before any action is taken on it. |
|
Due Date |
The date by which the task is due. |
The Header also contains custom and system actions. Custom actions are those that depend on task metadata outcomes. For example, if the metadata contains Approve and Reject outcomes, then Approve and Reject appear in the Header as custom actions. If the metadata contains more than two outcomes, then the custom actions appear in the Header as a dropdown list instead of separate buttons.
System actions, such as Escalate, Suspend, and Resume, always appear in a dropdown list. The actions that appear depend on what the user is doing. For example, after a task has been initiated it can be withdrawn. Subsequently, if a user logs into the Process Workspace to view the details of an initiated task, then Withdraw appears in the list containing the available actions.
Table 9-0 lists all the actions the administrator can perform from the Header and their descriptions.
| Action | Description |
|---|---|
|
Reject |
Enables the administrator to reject the task. |
|
Approve |
Enables the user to approve the task. |
|
Delegate |
Enables the administrator to assign a task to another person to act on his or her behalf. |
|
Reassign |
Enables the administrator to transfer a task to another administrator. |
|
Suspend |
Enables the administrator to suspend the task to work on it at a later time. |
|
Resume |
Enables the administrator to resume a suspended task. |
|
Withdraw |
Enables the administrator to withdraw an initiated task. |
|
Escalate |
Enables the administrator to escalate a task to a supervisor. |
|
Delete |
Enables the administrator to delete a task. Appears for all "To Do" tasks. |
|
Purge |
Enables the administrator to purge a task. Appears for all "To Do" tasks. |
|
Go |
Enables the administrator to "go" to the action selected from the dropdown list. |
|
Save |
Enables the administrator to save the task. |
9.3.1.2 Task Payload View
The Task Payload view, shown in Figure 9-7, displays the details of the task parameters and provides the ability to update them. Any parameter that has been designed based on SDOs also can be viewed here. While the values of the general parameters are based on what was passed to the task or update by any user, the values of the SDO-based parameters reflect the current value of the business object as it was updated in the underlying application.
If you are a process designer and want more information, see "Designing Task Display Forms for Human Tasks" in Oracle Fusion Middleware Developer's Guide for Oracle SOA Suite.
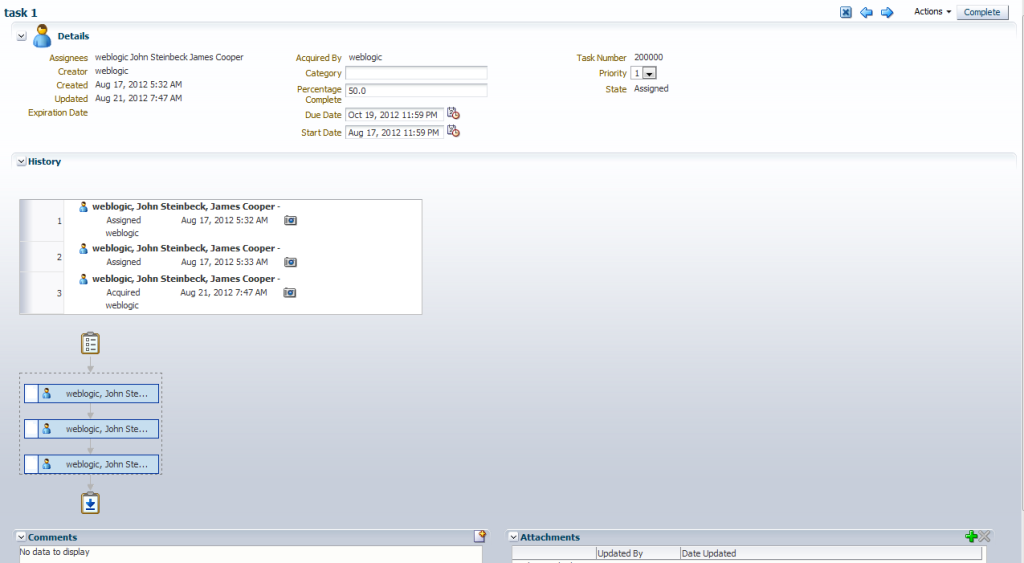
9.3.1.3 Task History View
The Task History view, shown in Figure 9-8, provides a graphical and tabular view of events in the task life cycle. In addition, if the Edit Approver Configuration option was selected in the designer, special controls in the tabular view that allow future approvers to be edited are available. Any approver added manually can be deleted and new approvers can be added. Approver changes made in the tabular view are immediately reflected in the graphical view. When the task is saved or a custom action, such as approve or reject, is performed on the task, all approver-related changes also are saved.
Figure 9-8 Task History in Process Workspace
Description of "Figure 9-8 Task History in Process Workspace"
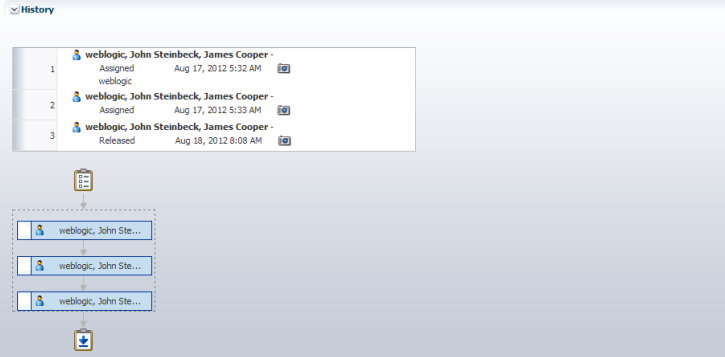
If the Allow all participants to edit future participants option is selected while configuring the approval task, the history region displays additional actions that allow a participant to edit the future participants list.
Figure 9-9 shows the addition of the Apply and Reset buttons.
Figure 9-9 Task History - Additional Actions
Description of "Figure 9-9 Task History - Additional Actions"
Table 9-3 describes all additional approval-task actions.
Table 9-3 Edit Future Participants List Actions
| Action | Description |
|---|---|
|
Add |
Enabled when the user selects a future participant. When this option is selected, the Add Participant dialog opens and the user can insert ad- hoc participants. |
|
Edit |
Enabled when the user selects a participant that has been inserted ad hoc. When this option is selected, the Edit Participant dialog opens and user can move the position of an inserted participant. |
|
Delete |
Enabled when the user selects a participant that has been inserted ad hoc. When this option is selected, the corresponding participant is deleted. |
|
Apply |
Persists the edits to the future participant list. |
|
Reset |
Resets the edits from the future participant to a system-generated list. |
Table 9-4 lists the actions the administrator can perform from the Task History view and their descriptions.
Table 9-4 Task History Actions
| Action | Description |
|---|---|
|
Task Snapshot |
Displays the task details for the selected version. |
|
Full task actions |
If checked, displays the full task-action history. If unchecked, displays only action history. By default, the box is unchecked. |
|
All parent tasks |
If checked, displays the parent task in a sub-task view. If unchecked, displays only the sub-task history. By default, the box is checked. |
|
Show future approvers |
If checked, displays the future approver with history. By default, the box is unchecked. |
9.3.1.4 Comments and Attachments View
The Comments and Attachments view, shown in Figure 9-10, is created in JDeveloper by using the task data control drop handler. It includes a text-entry field in which to enter comments about the task, and the functionality to attach supporting documents.

9.3.2 How to Create Mapped Attribute Labels
You use mapped attributes to store use-case-specific data, such as data extracted from a task's payload. You can view and create mapped attribute labels on the server by using Process Workspace.
Note:
You must have the workflow.mapping.protectedFlexfield privilege to create protected flexfield attributes. The default administrative user, weblogic, has this privilege.For more information, see Section 9.4.1, "How to Specify Mapped Attributes."
-
Click the Administration in the upper-right corner of the page.
-
In the Administration pane, click the Protected Flex Fields link. A page similar to the one shown in Figure 9-11 appears.
The page displays a list of existing attribute labels. You can filter the list by selecting an attribute type from the Show list. Clicking a specific label displays the list of mappings the attribute uses in the Details panel.
-
Click the Create Label (+) button. The Create Label dialog displays.
-
Select an attribute type and task attribute from the dropdown lists.
-
Enter a unique label name and a description.
-
Click Create. The label is created and is made available for mapping in task components.
To delete an attribute label, first select it from the list of attribute labels, then click the Delete Label (-) button.
Note:
Attribute labels can be deleted only if they are not used in any mappings.9.3.2.1 Importing and Exporting Attribute-Label Definitions
If attribute labels have been defined on one server and must be re-created on another, then you can use the user metadata migration utility to export a list of protected attribute labels from the server on which they were defined to an XML file. The utility then can deploy the attribute labels from this file to a new server. This eliminates the necessity to manually re-create the attribute labels manually in Process Workspace. For more information, see Section 9.8, "Using the User Metadata Migration Utility."
9.3.2.2 Internationalizing Attribute Labels
When attribute labels are displayed to end users, for example in the task listing page of the Process Workspace, the label name that is used is the one specified when the label was created. In cases where users of different nationalities may see the label, a translation of the label name appropriate to Process Workspace user's locale can be displayed instead. Translations of attribute labels can be customized using the WorkflowLabels.properties resource bundle.
For more information, see Section 9.2.3, "How to Specify the Language Locale Information in Process Workspace.".
9.3.3 How to View Approval Groups
-
From the Process Workspace toolbar, click Administration. The Administration Areas panel appears in the left pane.
-
Under Task Administration, click Approval Groups. The Groups page appears in the right pane.
-
In the navigation pane of the Approval Groups page, select an approval group. A details page for that approval group appears in the right pane, similar to the one shown in Figure 9-12.
Figure 9-12 Process Workspace: Approval Group Detail
Description of "Figure 9-12 Process Workspace: Approval Group Detail"
The figure shows that the DisbursementTeam approval group has two users, bpalmer and rjames. The users will act on a task in a specific sequence configuration.
9.3.4 How to Search for an Approval Group
You can search for an approval group either by user name or group name.
-
From the Process Workspace toolbar, click Administration. The Administration Areas panel appears in the left pane.
-
Under Task Administration, click Approval Groups. The Approval Groups page appears in the right pane.
-
Select User from the list.
-
Enter the full user name for the user in the field. (You also can perform a wildcard search (*) with a partial user name.)
-
Click the action (>) button.
A list of all approval groups to which the user belongs displays in the left pane, as shown in Figure 9-13.
Clicking the approval group name refreshes the details pane on the right with the structure of that group.
-
From the Process Workspace toolbar, click Administration. The Administration Areas panel appears in the left pane.
-
Under Task Administration, click Approval Groups. The Groups page appears in the right pane.
-
In the left pane of the Groups page, enter the full group name in the field. (You also can perform a wildcard search (*) with a partial group name.) and click Search. A list of all matching approval groups displays in the left pane.
Clicking the approval group name refreshes the Details pane on the right with the structure of that group.
9.3.5 How to Add a Static Approval Group
To add a static approval group:
-
From the Process Workspace toolbar, click Administration. The Administration Areas panel appears in the left pane.
-
Under Task Administration, click Approval Groups. The Groups page appears in the middle pane.
-
Click the Add (+) button and select Create Static Approval Group from the list, as shown in Figure 9-14.
Figure 9-14 Create Approval Group: Select Static Group
Description of "Figure 9-14 Create Approval Group: Select Static Group"
-
Enter a new name for the group.
-
Click Apply.
You can add members to the new approval group.
9.3.6 How to Add a New Member to a Static Approval Group
Members of a static approval group can be either users or other approval groups.
To add a new user member to an approval group:
-
From the Process Workspace toolbar, click Administration. The Administration Areas panel appears in the left pane.
-
Under Task Administration, click Approval Groups. The Groups page appears in the middle pane.
-
In the Groups pane, select an approval group.
-
From the Details page shown in Figure 9-15, click the Add (+) icon.
The other icons enable you to edit, delete, and reorder members in the approval sequence.
The Add to Group dialog box appears.
-
Select User.
-
Do one of the following:
-
Enter a full user name and click OK.
The dialog box closes and the new member appears in the Members section of the Details pane.
-
Click the magnifying glass to search for a user.
If you click the magnifying glass, an Identity Browser pop-up dialog appears.
-
-
Select Users from the list.
-
Enter a full name in the text-entry field and click Search. (You also can perform a wildcard search (*) with a partial user name.)
The Identity Browser dialog refreshes and the search results appear.
-
Choose a user from the list.
The details for that user appear in the Details section of the dialog.
-
Click OK.
-
Click OK again to close the Add to Group dialog.
A node representing the selected user appears in the approval group structure in the Members section of the Details pane.
You can add more members to the approval group by repeating the steps above. The resulting approval group structure will look similar to the one shown in Figure 9-15.
Figure 9-15 Approval Group Structure: Multiple Members
Description of "Figure 9-15 Approval Group Structure: Multiple Members"
9.3.7 How to Delete a Member from an Approval Group
To delete a member from an approval group:
-
From the Process Workspace toolbar, click Administration. The Administration Areas panel appears in the left pane.
-
Under Task Administration, click Approval Groups. The Groups page appears in the middle pane.
-
In the Groups pane, select an approval group. The corresponding Details pane appears to the right.
-
Choose the appropriate member node from the approval group structure.
-
Click the Delete icon.
The approval group structure refreshes and the member node has been deleted.
9.3.8 How to Move an Approval Group's Members
To change the sequence order of an approval group:
-
From the Process Workspace toolbar, click Administration. The Administration Areas panel appears in the left pane.
-
Under Task Administration, click Approval Groups. The Groups page appears in the right pane.
-
In the Groups pane, select an approval group. The corresponding Details pane appears to the right.
-
Choose a member node to move.
-
Use the Push Member Up (^) and Push Member Down (v) icons to move the member to the desired location.
9.3.9 How to Nest Approval Groups
Nesting an approval group means making it part of another approval group.
-
From the Process Workspace toolbar, click Administration. The Administration Areas panel appears in the left pane.
-
Under Task Administration, click Approval Groups. The Groups page appears in the right pane.
-
In the Groups pane, select an approval group. The corresponding Details pane appears to the right.
-
Click the Add icon. The Add to Group dialog box appears.
-
Select Approval Group.
-
From the Member list, choose the approval group you want to add.
Its structure appears in the right pane.
-
Click OK again to close the Add to Group dialog box.
The new approval group appears in the approval group's structure.
9.3.10 How to Rename an Approval Group
-
From the Process Workspace toolbar, click Administration. The Administration Areas panel appears in the left pane.
-
Under Task Administration, click Approval Groups. The Groups page appears in the right pane.
-
In the Groups pane, select an approval group. The corresponding Details pane appears to the right.
-
Enter the new name of the approval group in the Name field.
-
Click Apply.
The name change is reflected in other approvals groups in which this approval group is nested.
9.3.11 Using Dynamic Approval Groups
Dynamic Approval Groups provide a way to create approval groups through a custom Java class at runtime. This requires the following:
-
Writing a custom dynamic approval group class for the custom implementation by the developer
-
Registering the custom dynamic approval group using the worklist apps UI by the IT department
-
Making the class file available in a globally well-known directory that is part of the Service Integration class path
9.3.11.1 How to Write a Custom Dynamic Approval Group Class
To define a dynamic approval group, the user must define an implementation class using the interface file IDynamicApprovalGroup.java, defined by AMX for dynamic approval groups in the package oracle.bpel.services.workflow.task. This package contains only one public method that gets the approval group members. The Task object will be the only input parameter. The primary key list can be obtained from the task task/systemAttributes/collectionTarget.
Example 9-1 Implementation Class
************** IDynamicApprovalGroup.java ******************

public interface IDynamicApprovalGroup {

    /**
        *  Get members of this dynamic approval group
        *  @param task Property bag containing information required to generate
             the approver list
        *  @return list of IApprovalListMember including sequence, member, member_
             type; null for empty group
        *  The primary key list can be obtained from task:
             task/systemAttributes/collectionTarget
       */

   public List getMembers(Task task )
       throws WorkflowException;
}
**********************************************************
Figure 9-16 shows a code snippet for a sample dynamic approval group class.
9.3.11.2 How to Register the Custom Dynamic Approval Group Class
If you are a process designer and want more information, see Oracle Fusion Middleware Modeling and Implementation Guide for Oracle Business Process Management
9.3.11.3 How to Make the Custom Dynamic Approval Group Class Available
To make the class file available in a globally well-known directory that is part of the Service Integration class path, put your class files in the following Oracle WebLogic Server directory:
$BEAHOME/AS11gR1SOA/soa/modules/oracle.soa.ext_11.1.1/classes
For example, for the Java class oracle.apps.DynamicAG, the path would be $BEAHOME/AS11gR1SOA/soa/modules/oracle.soa.ext_11.1.1/classes/oracle/apps/DynamicAG.class. You must restart WebLogic Server after you put your class files there.
9.3.11.4 How to Add a Dynamic Approval Group
The following procedure explains how to add a dynamic approval group.
-
From the Process Workspace toolbar, click Administration. The Administration Areas panel appears in the left pane.
-
Under Task Administration, click Approval Groups. The Groups page appears in the right pane.
-
In the left pane, click the Add (+) button and select Create Dynamic Approval Group from the list
-
Enter a name and a class for the group.
-
Click Save.
9.3.12 How to Delete an Approval Group
-
From the Process Workspace toolbar, click Administration. The Administration Areas panel appears in the left pane.
-
Under Task Administration, click Approval Groups. The Groups page appears in the right pane.
-
In the Groups page, choose the approval group you want to delete.
-
Click the Delete (-) button.
A confirmation dialog box appears.
-
Click OK.
The approval group is deleted.
Note:
If the approval group you deleted is nested in other approval groups, it also is deleted from those parent groups.9.4 Managing Mapped Attributes (Flex Fields) in Process Workspace
Human workflow mapped attributes (formerly referred to as flex fields) store and query use case-specific custom attributes. These custom attributes typically come from the task payload values. Storing custom attributes in mapped attributes provides the following benefits:
-
They can be displayed as a column in the task listing.
-
They can filter tasks in custom views and advanced searches.
-
They can be used for a keyword-based search.
For example the Requester, PurchaseOrderID, and Amount fields in a purchase order request payload of a task can be stored in the mapped attributes. An approver logging into Process Workspace can see these fields as column values in the task list and decide which task to access. The user can define views that filter tasks based on the mapped attributes. For example, a user can create views for purchase order approvals based on different amount ranges. If the user must also retrieve tasks related to a specific requester or a purchase order ID, the user can specify this in the keyword field and perform a search to retrieve the relevant tasks.
For the mapped attributes to be populated, an administrator must create mapped attribute mappings, as follows:
-
Specify a label for the mapped attribute to be populated.
-
Map the payload attribute that contains the data to the label.
These mappings are valid for a certain task type. Therefore, each task type can have different mapped attribute mappings. After the mapping is complete and a new task is initiated, the value of the payload is transferred to the mapped attribute that has just been mapped. Tasks initiated before the mapping do not contain the value in the mapped attribute. Only top-level simple type attributes in the payload can be transferred to a mapped attribute. Complex attributes or simple types nested inside a complex attribute cannot be promoted. It is important to define the payload for a task in the Human Task Editor, keeping in mind which attributes from the payload may must promoted to a mapped attribute. All text and number mapped attributes are automatically included in the keyword-based search.
Essentially, the Human Task Editor is used only when defining the payload for a task. All other operations are performed at runtime.
Directory naming is not available concomitantly with the flex file naming convention.
Note:
Mapped attributes must be defined before instances of the business process are generated. Only instances generated after mapped attributes are created reflect the correct mapped attributes. Older instances of the business process do not reflect subsequent mapped attribute changes.For more information about how to specify mapped attributes, see Oracle Fusion Middleware Developer's Guide for Oracle SOA Suite.
9.4.1 How to Specify Mapped Attributes
An administrator, or users with the necessary privileges, can use mapped attributes, shown in Figure 9-17, to transfer data from the payload to inline mapped attributes. By promoting data to mapped attributes, the data becomes searchable and can be displayed as columns on the task list.
Administrators and users with the appropriate privileges can map both public and protected mapped attributes. They see both a Public Flex Fields node and a Protected Flex Fields node in the Administration panel as shown in Figure 9-17.
Figure 9-17 Specifying a Mapped Attribute
Description of "Figure 9-17 Specifying a Mapped Attribute"
If you are a process designer and want more information about public and protected mapped attributes, see Oracle Fusion Middleware Modeling and Implementation Guide for Oracle Business Process Management.
To create labels: To create a mapped attribute mapping, an administrator first defines a semantic label, which provides a more meaningful display name for the mapped attribute. Click Add to use the Create Label dialog box shown in Figure 9-18.
As the figure shows, labelName is mapped to the task attribute TextAttribute1. The payload attribute is also mapped to the label. In this example, the Text attribute type is associated with labelName. The result is that the value of the Text attribute is stored in the TextAttribute3 column, and labelName is the column label displayed in the user's task list. Labels can be reused for different task types. You can delete a label only if it is not used in any mappings.
A mapped payload attribute can also be displayed as a column in a custom view and used as a filter condition in both custom views and workflow rules. The display name of the payload attribute is the attribute label that is selected when doing the mapping.
Note the following restrictions:
-
Only simple type payload attributes can be mapped.
-
A mapped attribute (and thus a label) can be used only once per task type.
-
Data type conversion is not supported for the
numberordatedata types. For example, you cannot map a payload attribute that is assigned thestringdatatype to a label that is assigned the datatypenumber.
-
Click Browse all mappings.
-
Select a row in the label table to display all the payload attributes mapped to a particular label.
To edit mappings by task type:
-
Click Edit mappings by task type, optionally provide a task type, and click Search.
-
Select a task type and click OK.
-
With the task type displayed in the Edit mappings by task type field, click Go.
-
Select a mapping label and click Select.
9.5 Using Task Configuration in Process Workspace
Task Configuration is a web-based application in Process Workspace that enables business users and administrators to review and modify rules that were predefined by the workflow designer. These predefined rules can be changed for a specific customer based on the customer's applicable corporate policies.
For example, suppose that a corporate policy requires two levels of approvals for expense amounts greater than 1000. Suppose further that this policy is changed to require three levels. You can use Task Configuration to change the rule rather than having your IT department modify the rule in the underlying process and then deploy it again. Any change to the rule is applied starting with the next instance, and instances already in progress use the current rule definitions.
This section contains these topics:
-
Section 9.5.1, "About Task Configuration in Process Workspace"
-
Section 9.5.7, "How to Specify Participant Notification Preferences"
-
Section 9.5.9, "How to Specify Actions for Acting Upon Tasks"
-
Section 9.5.11, "How to Add a Rule to a Ruleset in Process Workspace"
9.5.1 About Task Configuration in Process Workspace
Task Configuration enables you to edit the event driven and data-driven rules associated with an approval flow at run time—that is, when the workflow has already been deployed.
To access the Task Configuration page:
-
From the Process Workspace toolbar, click Administration. The Administration Panel appears in the left pane.
-
In the Administration Panel, under Task Administration, click Task Configurations. The Task Configuration page appears in the right pane. To edit the task, click Edit task. The task becomes editable, as illustrated in Figure 9-19.
Figure 9-19 Task Configuration: Editable Task Page
Description of "Figure 9-19 Task Configuration: Editable Task Page"
The Tasks to be configured section in the middle pane lists all workflow tasks configured to use approval-flow rules. It also provides a search capability. When you click a link to one of the tasks, the corresponding data appears in the right pane in two tab pages: Task, shown in Figure 9-19, which displays the default configuration for the task, and Rules, shown in Figure 9-20, which you can use to override the approval-flow list builder configuration. The rule configurations are displayed graphically based on the stages defined in the approval flow.
Figure 9-20 Task Configuration: Rules Tab Page
Description of "Figure 9-20 Task Configuration: Rules Tab Page"
9.5.2 How to Edit Workflow Task Settings
This section contains information about workflow task settings (task metadata).
-
From the Process Workspace toolbar, click Administration. The Administration Panel appears in the left pane.
-
In the Administration Panel, under Task Administration, click Task Configurations.
-
To search for a particular task, enter all or art of the task name, or enter an asterisk (*) as a wildcard, then click Search Task type. The search results appear in the Tasks to be configured pane.
From the Tasks to be configured pane, select a task. The corresponding Task tab page appears in the right pane.
-
In the Tasks to be configured pane, click the Edit task icon. The Task tab page becomes editable as shown in Figure 9-19.
-
Make your changes and click either Commit task to apply the changes or Save.
Note:
An improper or incomplete rules definition in a list-creation rule set can cause runtime errors. Errors can be caused by the following:-
No rule was defined in the rule set.
-
None of the conditions defined in the rule was met.
Ensure that rules are properly defined to handle all conditions.
9.5.3 How to Specify Routing Settings
-
From the Process Workspace toolbar, click Administration. The Administration Panel appears in the left pane.
-
In the Administration Panel, under Task Administration, click Task Configurations.
-
From the Tasks to be configured pane, select a task. The corresponding Task tab page appears in the right pane.
-
In the Tasks to be configured pane, click the Edit task icon. The Task tab page becomes editable as shown in Figure 9-19.
The Task tab page contains a limited set of the routing options.
Approval aggregation requirements can be any of the following:
-
None
-
Once per task
-
Once per stage
9.5.4 How to Specify an Expiration Policy
-
From the Process Workspace toolbar, click Administration. The Administration Panel appears in the left pane.
-
In the Administration Panel, under Task Administration, click Task Configurations.
-
From the Tasks to be configured pane, select a task. The corresponding Task tab page appears in the right pane.
-
In the Tasks to be configured pane, click the Edit task icon. The Task tab page becomes editable as shown in Figure 9-19.
-
In the Task tab page, in the Expiration and Escalation Policy section, select one of the following:
-
Never Expire
-
Expire After. Select Fixed Duration to specify the amount of days, hours, and minutes for completing the task. Alternatively, select By Expression to dynamically enter a value as an XPath expression.
-
9.5.5 How to Extend an Expiration Policy Period
You can extend the expiration period when the user does not respond within the allotted time. You do this by specifying the number of times the task can be renewed upon expiration (for example, renew it an additional three times) and the duration of each renewal (for example, three days for each renewal period).
To extend an expiration policy period:
-
From the Process Workspace toolbar, click Administration. The Administration Panel appears in the left pane.
-
In the Administration Panel, under Task Administration, click Task Configurations.
-
From the Tasks to be configured pane, select a task. The corresponding Task tab page appears in the right pane.
-
In the Tasks to be configured pane, click Edit task. The Task tab page becomes editable as shown in Figure 9-19.
-
In the Task tab page, in the Expiration and Escalation Policy section, select Renew Once.
-
Specify the maximum number of times to continue renewing this task.
9.5.6 How to Specify an Escalation Policy
-
From the Process Workspace toolbar, click Administration. The Administration Panel appears in the left pane.
-
In the Administration Panel, under Task Administration, click Task Configurations.
-
From the Tasks to be configured pane, select a task. The corresponding Task tab page appears in the right pane.
-
In the Tasks to be configured pane, click Edit task. The Task tab page becomes editable as shown in Figure 9-19.
-
In the Task tab page, in the Expiration and Escalation Policy section, select Escalate Once.
-
Specify the following additional values. When both are set, the escalation policy is more restrictive.
-
Maximum Escalation Levels
Number of management levels to which to escalate the task. This field is required.
-
Highest Approver Title
The title of the highest approver (for example, self, manager, director, or CEO). These titles are compared against the title of the task assignee in the corresponding user repository. This field is optional.
The escalation policy specifies the number of times the task can be escalated on expiration and the renewal duration.
-
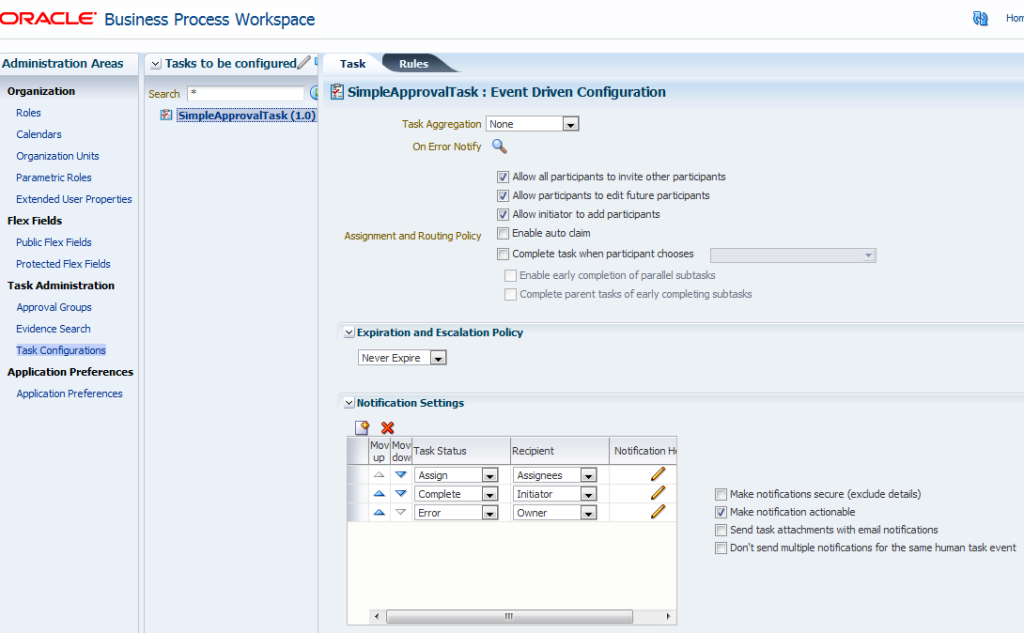
9.5.7 How to Specify Participant Notification Preferences
Notifications indicate when a user or group is assigned a task or informed that the status of the task has changed. Notifications can be sent through email, voice message, instant message, or SMS. Notifications are sent to different types of participants for different actions. Notifications are configured by default with default messages. For example, a notification message is sent to indicate that a task has completed and closed. You can create your own or modify existing configurations.
Note:
Embedded LDAP does not support group email addresses. Therefore, when a task is assigned to a group ID, emails are sent to all of its members instead of to the group email address.9.5.7.1 How to Make Email Messages Actionable
To make email messages actionable:
-
From the Process Workspace toolbar, click Administration. The Administration Panel appears in the left pane.
-
In the Administration Panel, under Task Administration, click Task Configurations.
-
From the Tasks to be configured pane, select a task. The corresponding Task tab page appears in the right pane.
-
In the Tasks to be configured pane, click the Edit task icon. The Task tab page becomes editable as shown in Figure 9-19.
-
In the Notification Settings section, select Make notification actionable. This action enables you to perform task actions through email.
9.5.7.2 How to Secure Notifications to Exclude Details
To secure notifications, make messages actionable, and send attachments:
-
-
From the Process Workspace toolbar, click Administration. The Administration Panel appears in the left pane.
-
In the Administration Panel, under Task Administration, click Task Configurations.
-
From the Tasks to be configured pane, select a task. The corresponding Task tab page appears in the right pane.
-
In the Tasks to be configured pane, click the Edit task icon. The Task tab page becomes editable as shown in Figure 9-19.
-
In Task tab page, in the Notification section, select Make notifications secure (exclude details).
If selected, a default notification message is used. There are no HTML worklist task details, attachments, or actionable links in the email. Only the task number is in the message.
-
9.5.7.3 How to Set Up Reminders
You can send task reminders, which can be based on the time the task was assigned to a user or the expiration time of a task. The number of reminders and the interval between the reminders can also be configured.
-
From the Process Workspace toolbar, click Administration. The Administration Panel appears in the left pane.
-
In the Administration Panel, under Task Administration, click Task Configurations.
-
From the Tasks to be configured pane, select a task. The corresponding Task tab page appears in the right pane.
-
In the Tasks to be configured pane, click the Edit task icon. The Task tab page becomes editable as shown in Figure 9-19.
-
In the Notification Settings section, select the number of reminders to send.
-
If you selected to remind the assignee one, two, or three times, select the interval between reminders, and whether to send the reminder before or after the assignment.
9.5.7.4 How to Notify Recipients of Changes to Task Status
Three default status types display in the Task Status column: Assign, Complete, and Error. You can select other status types for which to receive notification messages.
Notifications can be sent to users involved in the task in various capacities. When the task is assigned to a group, and there is no notification endpoint available for the group, then each user in the group is sent a notification.
To notify recipients of changes to task status:
-
From the Process Workspace toolbar, click Administration. The Administration Panel appears in the left pane.
-
In the Administration Panel, under Task Administration, click Task Configurations.
-
From the Tasks to be configured pane, select a task. The corresponding Task tab page appears in the right pane.
-
In the Tasks to be configured pane, click the Edit task icon. The Task tab page becomes editable as shown in Figure 9-19.
-
In the Task tab page, navigate to the Notification Settings area.
-
In the Task Status column, select a type to display the complete list of task types:
-
Assign
When the task is assigned to users or a group. This captures the following actions:
-
Task is assigned to a user
-
Task is assigned to a new user in a serial workflow
-
Task is renewed
-
Task is delegated
-
Task is reassigned
-
Task is escalated
-
Information for a task is submitted
-
-
Complete
-
Error
-
Expire
-
Request Info
-
Resume
-
Suspend
-
Update
-
Task payload is updated
-
Task is updated
-
Comments are added
-
Attachments are added and updated
-
-
Update Outcome
-
Withdraw
-
All Other Actions
-
Any action not covered in the above task types. This includes acquiring a task.
-
-
-
In the Recipient column, click an entry to display a list of possible recipients for the notification message:
-
Assignees
The users or groups to whom the task is currently assigned.
-
Initiator
The user who created the task.
-
Approvers
The users who have acted on the task up to this point. This applies in a serial participant type in which multiple users have approved the task and a notification must be sent to all of them.
-
Owner
The task owner
-
Reviewer
The user who can add comments and attachments to a task.
-
9.5.7.5 How to Edit the Notification Message
A default notification message is available for delivery to the selected recipient. You can modify the default message text.
To edit the notification message:
-
From the Process Workspace toolbar, click Administration. The Administration Panel appears in the left pane.
-
In the Administration Panel, under Task Administration, click Task Configurations.
-
From the Tasks to be configured pane, select a task. The corresponding Task tab page appears in the right pane.
-
In the Tasks to be configured pane, click the Edit task icon. The Task tab page becomes editable as shown in Figure 9-19.
-
In the Task tab page, navigate to the Notification Settings area.
-
In the Notification Header column, click the Edit icon to display the default notification message.
This message applies to all the supported notification channels: email, voice, instant messaging, and SMS. Email messages can also include the worklist task detail defined in this message. The channel by which the message is delivered is based upon the notification preferences you specify.
-
Modify the message wording as necessary.
-
Click OK.
9.5.7.6 How to Prevent Multiple Email Notifications for a Human Task Event
To prevent multiple email notifications for a human task event:
-
From the Process Workspace toolbar, click Administration. The Administration Panel appears in the left pane.
-
In the Administration Panel, under Task Administration, click Task Configurations.
-
From the Tasks to be configured pane, select a task. The corresponding Task tab page appears in the right pane.
-
In the Tasks to be configured pane, click the Edit task icon. The Task tab page becomes editable as shown in Figure 9-19.
-
In the Notification Settings section, select Don't send multiple notifications for the same human task event. This action enables you to perform task actions through email.
9.5.8 How to Enable Task Access
Access-rule settings can be set to control the actions a user can perform. Content and action permissions can be specified based on the logical role of a user, such as creator (inititator), owner, assignee, and reviewers.
-
From the Process Workspace toolbar, click Administration. The Administration Panel appears in the left pane.
-
In the Administration Panel, under Task Administration, click Task Configurations.
-
From the Tasks to be configured pane, select a task. The corresponding Task tab page appears in the right pane.
-
In the Tasks to be configured pane, click the Edit task icon. The Task tab page becomes editable as shown in Figure 9-19.
-
In the Task tab page, expand the Task Access section at the bottom of the page, then select the Task Content tab.
-
Assign privileges (read, write, or no access) to users to act upon task content. A user cannot be assigned a privilege above their highest level. For example, an ADMIN user cannot be assigned write access on the PAYLOAD task content. Table 9-5 shows the maximum privilege each user has on task content.
Table 9-5 Highest Privilege Levels for Users of Task Content
Task Content Individual with Read Access Individual with Write Access Assignees
Admin, Approvers, Assignees, Creator, Owner, Reviewers
--
Attachments
Admin, Approvers
Assignees, Creator, Owner, Reviewers
Comments
Admin, Approvers
Assignees, Creator, Owner, Reviewers
Dates
Admin, Approvers, Assignees, Creator, Owner, Reviewers
--
Flexfields
Admin, Approvers, Reviewers
Assignees, Creator, Owner
History
Admin, Approvers, Assignees, Creator, Owner, Reviewers
--
Payload
Admin, Approvers, Reviewers
Assignees, Creator, Owner
Reviewers
Admin, Approvers, Assignees, Creator, Owner, Reviewers
--
Payload elements
Inherited from payload
Inherited from payload
Note:
Access rules are always applied on top of what the system permits, depending on who is performing the action and the current state of the task.9.5.9 How to Specify Actions for Acting Upon Tasks
You can specify the actions that specific users can perform when acting on the task content that you specified in the Configure Task Content Access dialog in Section 9.5.8, "How to Enable Task Access."
To specify actions for acting upon tasks:
-
From the Process Workspace toolbar, click Administration. The Administration Panel appears in the left pane.
-
In the Administration Panel, under Task Administration, click Task Configurations.
-
From the Tasks to be configured pane, select a task. The corresponding Task tab page appears in the right pane.
-
In the Tasks to be configured pane, click the Edit task icon. The Task tab page becomes editable as shown in Figure 9-19.
-
In the Task tab page, expand Task Access at the bottom of the page, and select the Task Actions tab.
-
Select the task action for which to specify users.
-
Specify whether participants can or cannot perform the selected actions.
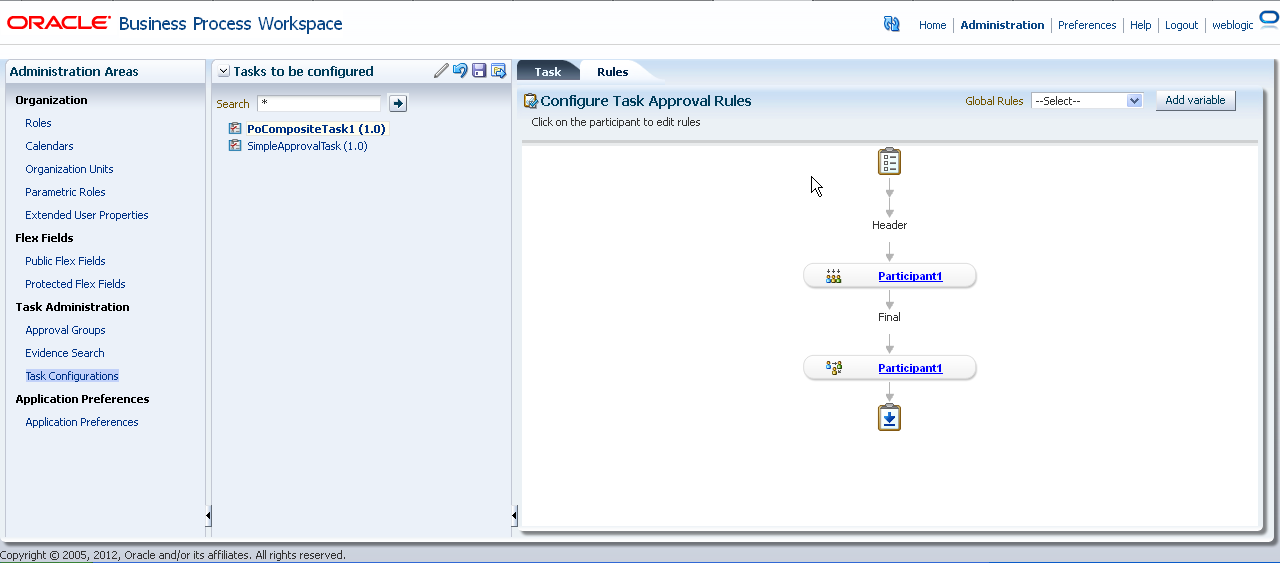
9.5.10 How to View Settings for Rules
To view a rule set for a rule-based participant:
-
From the Process Workspace toolbar, click Administration. The Administration Panel appears in the left pane.
-
In the Administration Panel, under Task Administration, click Task Configuration. The Tasks to Be Configured page appears in the middle pane.
-
In the Tasks to Be Configured page, select a rule whose settings you want to modify. The corresponding details appear in the Tasks tab page in the right pane.
-
Select Edit task. The right pane refreshes in edit mode.
-
In the right pane, select the Rules tab. The Rules tab page displays the Configure Task Approval Rules page, similar to what is shown in the example in Figure 9-21.
-
Click the Participant link to navigate to the Rules page where rules can be added, modified, or deleted.
The Configure Task Approval Rules page graphically shows the approval flow for the task. The icon in each participant node indicates the type of participant: single, parallel, serial, or FYI.
To see a tool tip displaying the name of the ruleset for a participant in this task, hover over the link for that participant.
Note that value- based participants are shown but are disabled.
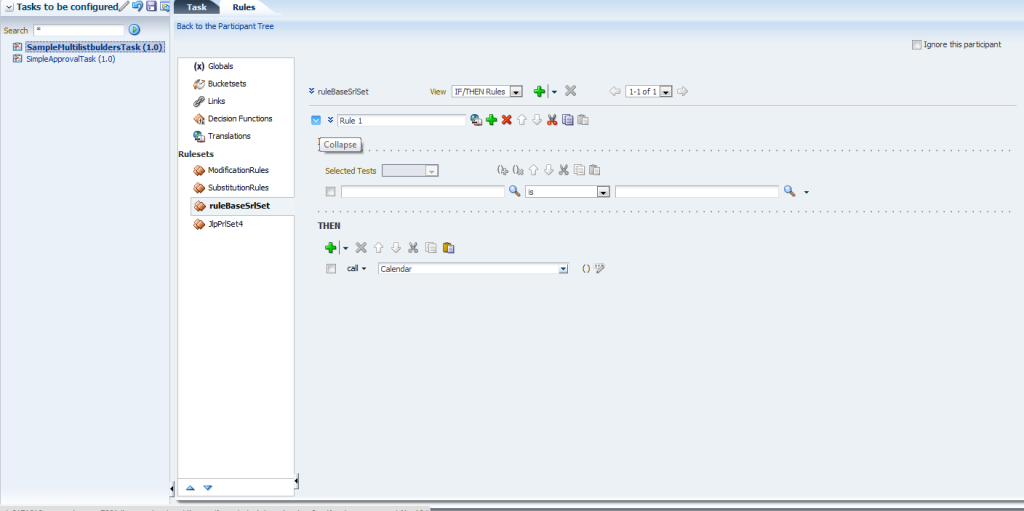
9.5.11 How to Add a Rule to a Ruleset in Process Workspace
You can add a rule to a ruleset, specifying not only conditions, but also a description, the effective date, and priority.
To add rules for a rule-based participant:
-
From the Process Workspace toolbar, click Administration. The Administration Panel appears in the left pane.
-
In the Administration Panel, under Task Administration, click Task Configuration. The Tasks to Be Configured pane appears as the middle pane.
-
In the Tasks to Be Configured pane, select a rule whose settings you want to modify. The corresponding details appear in the Tasks tab page in the right pane.
-
Select Edit task. The right pane refreshes in edit mode.
-
In the right pane, select the Rules tab. The Rules tab page displays the Configure Task Approval Rules page showing the approval flow for the task. The icon in each participant node indicates the type of participant: single, parallel, serial, or FYI.
-
To edit the rules, click the link for the participant. The rules editor page appears with the participant node (ruleset) selected. Here you can either add or edit rules defined for the rule set. (You can also add or edit decision tables as explained in Section 9.5.12, "How to Add and Customize Decision Tables".)
-
Click Add Rule as shown in Figure 9-22.
-
To specify the rule, click the Expand icon to the left of the rule field. This enables you to specify the conditions for the rule as described in Section 9.5.11.1, "How to Define Rule Conditions". To provide a description and specify the effective date and priority, click the Show Advanced Settings icon to the left of the rule field.
-
When you have finished making your changes, in the Tasks to Be Configured pane, click Save. The changes are saved to the rule definitions in the rules dictionary.
To commit the changes to MDS, click Commit. The task is refreshed and no longer editable.

For more information about adding rules, see the chapter on "Working with Rulesets and Rules" in Oracle Fusion Middleware User's Guide for Oracle Business Rules.
9.5.11.1 How to Define Rule Conditions
You can set the left and right sides of a condition by selecting operands from condition browsers. Clicking the magnifying glass icon displays the browsers.
The operator for comparing the operands of the condition change based on the type of operand selected for the left side of the condition.
You also can define more complex conditions using the Expression Builder.
For more information, see the section "Creating ADF Data Binding EL Expressions" in Oracle Fusion Middleware Fusion Developer's Guide for Oracle Application Development Framework. See also the section "Creating EL Expressions" in Oracle Fusion Middleware Web User Interface Developer's Guide for Oracle Application Development Framework.
9.5.11.2 How to Add Actions
You can add actions to a rule. To add an action:
-
From the Process Workspace toolbar, click Administration. The Administration Panel appears in the left pane.
-
In the Administration Panel, under Task Administration, click Task Configuration. The Tasks to Be Configured pane appears as the middle pane.
-
In the Tasks to Be Configured pane, select a rule. The corresponding details appear in the Tasks tab page in the right pane.
-
Select Edit task. The right pane refreshes in edit mode.
-
In the right pane, select the Rules tab. The Rules tab page displays the Configure Task Approval Rules page showing the approval flow for the task. The icon in each participant node indicates the type of participant: single, parallel, serial, or FYI.
-
To add an action, click the link for the participant. The rules editor page appears with the participant node (ruleset) selected.
-
From the View drop-down field, select IF/THEN Rules.
-
If there are no rules defined, add a rule as described in Section 9.5.11, "How to Add a Rule to a Ruleset in Process Workspace"
If there are rules defined for the ruleset, go to step 9
-
Expand the rule as shown in Figure 9-23.
-
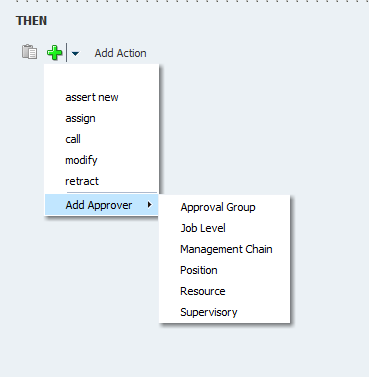
Under the THEN pane, click the add icon to add an action.
Select the action you want to add from the displayed list as shown in Figure 9-24.
You can add multiple actions for any rule by repeating step 10.
-
After adding a rule, you can perform the following commands:
-
Delete
-
Copy
-
Cut
-
Paste
-
Up and Down (to change the order of the listed actions)
-
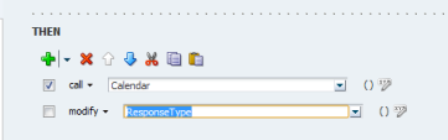
To perform commands on an action:
-
Select the action by clicking the check box next to the action as shown in Figure 9-25.
-
Select any of the possible actions such as Delete, Cut, Copy or Paste by clicking the corresponding icons.
-
If you have multiple actions, you can change the order of the actions by using the up and down arrows.
9.5.12 How to Add and Customize Decision Tables
You can customize existing decision tables or add new ones.
9.5.12.1 How to Customize an Existing Decision Table in Process Workspace
You can specify the actions for a ruleset that were specified in a previously created decision table.
To customize an existing decision table in a ruleset in Process Workspace:
-
From the Process Workspace toolbar, click Administration. The Administration Panel appears in the left pane.
-
In the Administration Panel, under Task Administration, click Task Configuration. The Tasks to Be Configured pane appears as the middle pane.
-
In the Tasks to Be Configured pane, select a rule whose settings you want to modify. The corresponding details appear in the Tasks tab page in the right pane.
-
Select Edit task. The right pane refreshes in edit mode.
-
In the right pane, select the Rules tab. The Rules tab page displays the Configure Task Approval Rules page showing the approval flow for the task. The icon to the left of each participant in the flow indicates the type of participant: single, parallel, serial, or FYI.
-
To edit the rules, click the link for the participant. This displays the ruleset associated with that participant.
-
From the View list, select the decision table you want to customize. The selected decision table appears in the lower half of the page.
-
Edit any of the existing rows in the decision table.
-
To add an action, in the decision table, from the Add list, select the action you want to add as shown in the example in Figure 9-26.
Figure 9-26 Adding Actions to a Decision Table
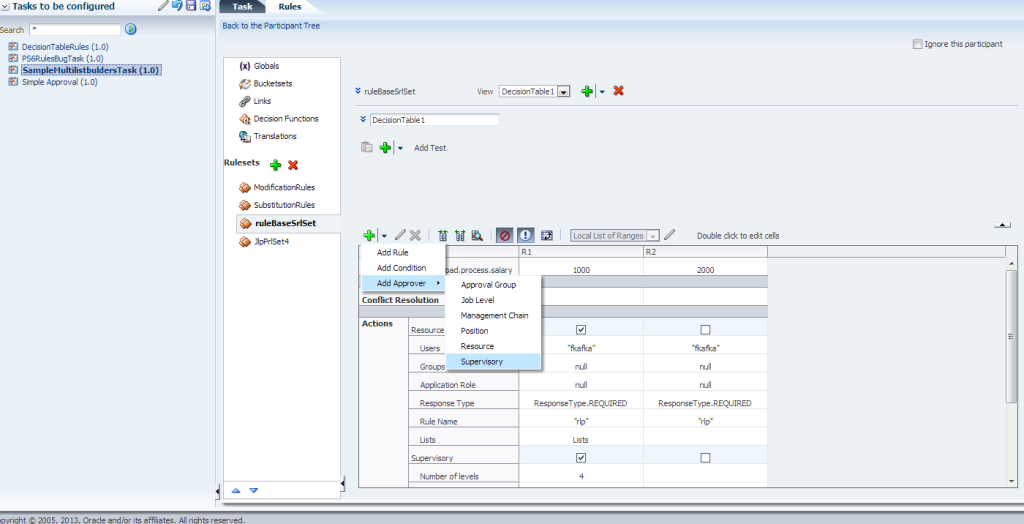
Description of "Figure 9-26 Adding Actions to a Decision Table"
The corresponding actions appear in the table for you to specify.
9.5.12.2 How to Edit an Action (Multiple Parameters: All Rules at a Time)
In the Rules tab, you can edit multiple parameters of an action from the Decision Table. To edit multiple parameters:
-
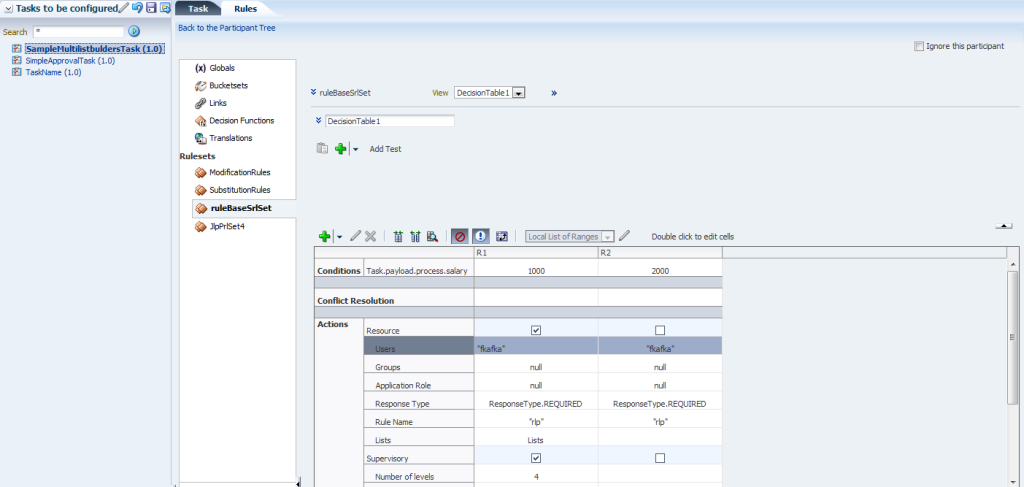
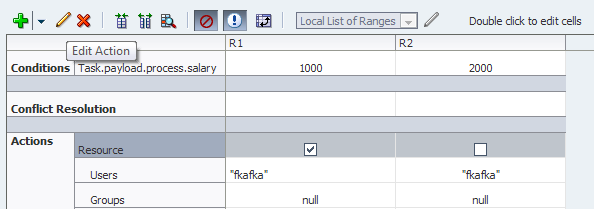
From the View list, select the decision table that contains the action you want to edit. The selected decision table appears in the lower half of the page as shown in Figure 9-27.
-
Select the action you want to edit and click Edit Action as shown in Figure 9-28.
-
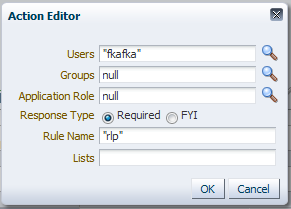
An Action Editor dialog box appears as shown in Figure 9-29. You can modify the values available for the action you selected. You can choose not to specify values for all the parameters in the Action Editor dialog box.
-
Click OK.
The values appear in the Decision Table for the selected action for all rules. For more information on Decision Tables, see Section 9.5.12, "How to Add and Customize Decision Tables".
9.5.12.3 How to Edit an Action (Single Cell Editing)
You have to option to edit one of the parameters of an action in the Decision Table. To edit a single cell of any action, you must perform the following steps:
-
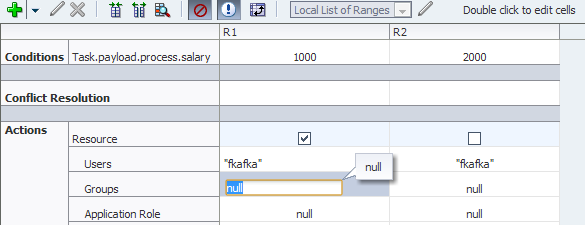
From the View list, select the decision table that contains the action you want to edit. The selected decision table appears in the lower half of the page as shown in Figure 9-27.
-
In the Decision Table, click the cell you want to modify. This makes the cell editable as shown in Figure 9-30.
-
Update the parameter with the specific value/option.
9.5.12.4 How to Add a New Decision Table to a Ruleset in Process Workspace
You can add a table to a ruleset and specify the actions it contains.
To add a new decision table to a ruleset in Process Workspace:
-
From the Process Workspace toolbar, click Administration. The Administration Panel appears in the left pane.
-
In the Administration Panel, under Task Administration, click Task Configuration. The Tasks to Be Configured pane appears as the middle pane.
-
In the Tasks to Be Configured pane, select a rule whose settings you want to modify. The corresponding details appear in the Tasks tab page in the right pane.
-
Select Edit task. The right pane refreshes in edit mode.
-
In the right pane, select the Rules tab. The Rules tab page displays the Configure Task Approval Rules page showing the approval flow for the task. The icon to the left of each participant in the flow indicates the type of participant: single, parallel, serial, or FYI.
-
To edit the rules, click the link for the participant. This displays the ruleset associated with that participant.
-
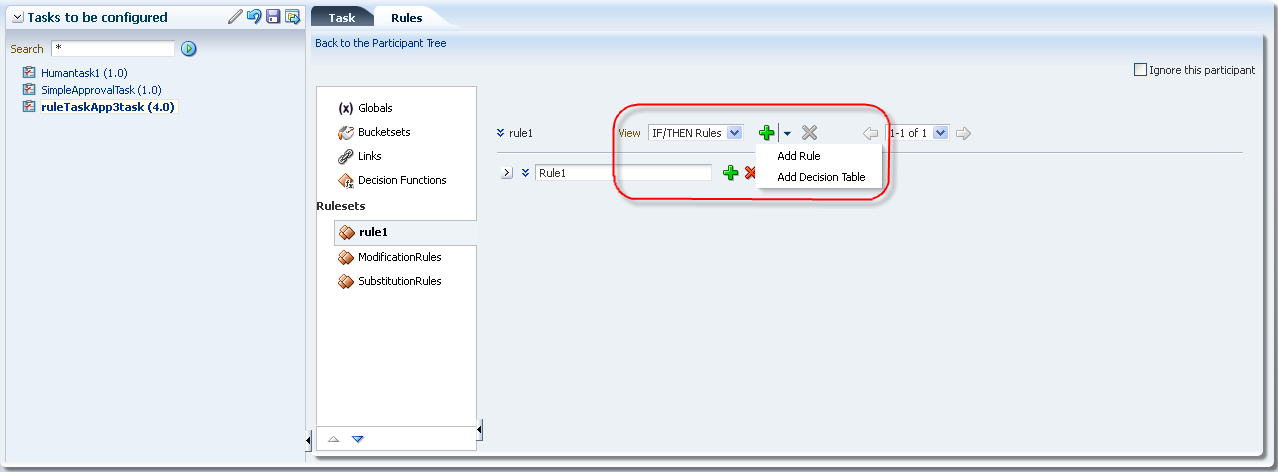
In the ruleset, from the View list, select Add Decision Table as shown in Figure 9-31.
The new decision table appears in the lower half of the page.
-
To add an action, in the decision table, from the Add list, select the action you want to add as shown in the example in Figure 9-26. The corresponding actions appear in the table for you to specify.
9.5.13 How to Add a Variable to a Rule
-
In the Rules page, click Add variable. The Add Variable window appears.
-
Enter a name for the variable and, optionally, a description.
-
From the Type list, select a variable type.
The types displayed in the list correspond to those that are available in the rule dictionary (built-in by default as well as others that have been registered).
-
Enter a value.
-
Click OK.
The variable can now be used to define conditions.
9.6 Using Evidence Search in Process Workspace
The evidence store service is used for digital signature storage and nonrepudiation of digitally signed human tasks.
-
In the Process Workspace toolbar in the upper right corner, click Administration. The Administration Areas panel appears in the left pane.
-
In the Administration Areas panel, under Task Administration, select Evidence Search. The Evidence Search page appears in the right pane, as shown in Figure 9-32.
-
Fill in the search fields, then click Search Evidence Store.
For information about the evidence store for digital signatures, see Oracle Fusion Middleware Developer's Guide for Oracle SOA Suite.
9.7 Managing Exceptions in Process Workspace
Under certain circumstances—for example, an employee who has left the company being assigned to a task—an exception can occur. When an exception occurs, the task gets put into an alerted state. The task then gets assigned to the error assignee or, if one is not specified, to the administrator.
For information about configuring the error assignee, see Oracle Fusion Middleware Developer's Guide for Oracle SOA Suite.
There are other scenarios in which an exception can happen.
9.8 Using the User Metadata Migration Utility
The user metadata migration utility, hwfMigrator, is a tool that automates the process of migrating workflow user-configurable data from one Service Integration server to another by executing a shell script. The tool also includes a property file that contains key-value pairs and all the input parameters required to perform the migration operation. You customize the property file and then perform the migration by executing the shell script.
If you are a process designer and want more information about using the User Metadata Migration Utility, see Oracle Fusion Middleware Modeling and Implementation Guide for Oracle Business Process Management.
For information about moving Oracle BPM from a test site to a production site, see Oracle Application Server Administrator's Guide.