8 Managing Keystores, Wallets, and Certificates
This chapter explains how to use Oracle Fusion Middleware security features to administer keystores, wallets, and certificates. It contains these sections:
8.1 Key and Certificate Storage in Oracle Fusion Middleware
Private keys, digital certificates, and trusted CA certificates are stored in keystores. This section describes the keystores available in Oracle Fusion Middleware and contains these topics:
8.1.1 Types of Keystores
Oracle Fusion Middleware provides two types of keystores for keys and certificates:
8.1.1.1 JKS Keystore and Truststore
A JKS keystore is the default JDK implementation of Java keystores.
You use a JKS-based keystore for the following:
-
Oracle WebLogic Server
-
Oracle Virtual Directory
-
Applications deployed on Oracle WebLogic Server, including:
-
Oracle SOA Suite
-
Oracle WebCenter Portal
-
In Oracle Fusion Middleware, you can use graphical user interface or command-line tools to create, import, export, and delete a Java keystore and the certificates contained in the keystore. See Section 8.1.2, "Keystore Management Tools" for details.
While creating a keystore, you can pre-populate it with a keypair wrapped in a self-signed certificate; such a keystore is typically used in development and testing phases.
The other choice is to generate a certificate signing request for a keypair, so that you can request a signed certificate back from a Certificate Authority (CA). Once the CA sends the certificate back, it is imported into the keystore; the keystore now contains a trusted certificate, since it comes from a trusted third-party. Such a keystore is typically used in production environments.
Keystores are always password-protected.
8.1.1.2 Oracle Wallet
An Oracle wallet is a container that stores your credentials, such as certificates, trusted certificates, certificate requests, and private keys. You can store Oracle wallets on the file system or in LDAP directories such as Oracle Internet Directory. Oracle wallets can be auto-login or password-protected wallets.
You use an Oracle Wallet for the following components:
-
Oracle HTTP Server
-
Oracle Web Cache
-
Oracle Internet Directory
Note:
Wallets configured for Oracle Internet Directory must have auto-login enabled.Certificates generated using '*' in CN, OU or O parameters of the certificate request are permitted in wallets used to configure SSL for Web tier components.
WARNING:
You must be aware of the security implications of using '*'. See Section 6.8.1.
In Oracle Fusion Middleware, you can use graphical user interface or command-line tools to create, import, export and delete a wallet and the certificates contained in the wallet. See Section 8.1.2, "Keystore Management Tools" for details.
When creating a wallet, you can pre-populate it with a self-signed certificate; such a wallet is called a test wallet and is typically used in development and testing phases.
The other choice is to create a certificate request, so that you can request a signed certificate back from a Certificate Authority (CA). Once the CA sends the certificate back, it is imported into the wallet; such a wallet is called a third-party wallet.
Either the test wallet or the third-party wallet may be password-protected, or may be configured to not require a password, in which case it is called an auto-login wallet.
8.1.2 Keystore Management Tools
Oracle Fusion Middleware provides these options for keystore operations:
-
WLST, a command-line interface for JKS keystores and wallets
-
orapki, a command-line tool for wallets
-
Fusion Middleware Control, a graphical user interface
-
Oracle Wallet Manager, a stand-alone graphical user interface for wallets, recommended for managing PKCS#11 wallets. Also see the discussion titled Using Oracle Wallet Manager in a Stand-alone Environment at the end of this section.
This table shows the type of keystore used by each component, and the tool(s) available to manage the keystore:
| Component/Application | Type of Keystore | Tasks | Tool |
|---|---|---|---|
| Oracle HTTP Server
Oracle Web Cache Oracle Internet Directory |
Oracle Wallet | Create Wallet, Create Certificate Request, Delete Wallet, Import Certificate, Export Certificate, Enable SSL | Fusion Middleware Control, WLST
Oracle Wallet Manager and orapki for PKCS#11, PKCS#12, and Hardware Security Modules (HSM)-based wallets. Also for environments where Fusion Middleware Control and WLST are not available (such as a stand-alone upgrade of these components without a domain). |
| Oracle Virtual Directory | JKS-based Keystore | Create KeyStore, Create Certificate Request, Delete KeyStore, Import Certificate, Export Certificate, Enable SSL | Fusion Middleware Control, WLST |
| Oracle SOA Suite | JKS-based Keystore | All Keystore operations | JDK Keytool |
| Oracle WebCenter Portal | JKS-based Keystore | All Keystore operations | JDK Keytool |
| Oracle WebLogic Server | JKS-based Keystore | All Keystore operations | JDK Keytool |
| Oracle WebLogic Server | JKS-based Keystore | Enable SSL | Oracle WebLogic Server Administration Console |
| All Java EE applications (for example Oracle Directory Integration Platform, Oracle Directory Services Manager) | JKS-based Keystore | All Keystore operations | JDK Keytool |
See Also:
- For details about using keytool, see Oracle Fusion Middleware Securing Oracle WebLogic Server.
-
The following support notes provide additional information about managing wallets: 1225107.1, 1242014.1, and 1237143.1.
Note:
Pre-11g wallets (corresponding to 10g Release 10.1.2 and 10.1.3 formats) are supported in 11g Release 1 (11.1.1.9).8.1.2.1 About Importing DER-encoded Certificates
You cannot use Fusion Middleware Control or the WLST command-line tool to import DER-encoded certificates or trusted certificates into an Oracle wallet or a JKS keystore. Use these tools instead:
-
To import DER-encoded certificates or trusted certificates into an Oracle wallet, use:
-
Oracle Wallet Manager or
-
orapkicommand-line tool
-
-
To import DER-encoded certificates or trusted certificates into a JKS keystore, use the
keytoolutility. For details, see "Configuring Identity and Trust" in Oracle Fusion Middleware Securing Oracle WebLogic Server.
You can also obtain the base64 encoded certificate from the CA, or use Internet Explorer or another tool to import the certificate and export it in base64 format.
8.1.2.2 Using a Keystore Not Created with WLST or Fusion Middleware Control
If an Oracle wallet or JKS keystore was created with tools such as orapki or keytool, it must be imported prior to use. Specifically:
-
For Oracle HTTP Server, Oracle Web Cache, and Oracle Internet Directory, if a wallet was created using
orapkior Oracle Wallet Manager, in order to view or manage it in Fusion Middleware Control you must first import it with either Fusion Middleware Control or the WLSTimportWalletcommand. For details, see Section 8.4.4.9 and Section 8.4.4.10. -
For Oracle Virtual Directory, if a keystore was created using
keytool, in order to view or manage it in Fusion Middleware Control you must first import it with either Fusion Middleware Control or the WLSTimportKeyStorecommand.
8.1.2.3 Copying Keystores to File System is Not Supported
Creating, renaming, or copying keystores directly to any directory on the file system is not supported. Any existing pre-11g keystore or wallet that you wish to use must be imported using either Fusion Middleware Control or the WLST utility.
8.1.2.4 About Using Oracle Wallet Manager in a Stand-alone Environment
In a stand-alone environment, such as a stand-alone Web Tier installation, you can use Oracle Wallet Manager to create and manage wallets.
For details about Oracle Wallet Manager, including its use for PKCS#12 wallets, and wallet and certificate lifecycle, see the chapter "Using Oracle Wallet Manager", in the Oracle Advanced Security Administrator's Guide.
8.2 Command-Line Interface for Keystores and Wallets
Oracle Fusion Middleware provides a set of wlst scripts to create and manage JKS keystores and Oracle wallets, and to manipulate their stored objects.
How to Launch the WLST Command-Line Interface
When running SSL WLST commands, you must invoke the WLST script from the Oracle Common home. See Section 3.5.1.1 for more information.
Note:
All SSL-related WLST commands require you to launch the script from the above-mentioned location only.This brings up the WLST shell. Connect to a running Oracle WebLogic Server instance by specifying the user name, password, and connect URL. After connecting, you are now ready to run SSL-related WLST commands as explained in the subsequent sections.
8.3 JKS Keystore Management
This section describes the typical life cycle of keystores and certificates, and how to use Oracle Fusion Middleware tools to create and maintain keystores and certificates. It includes these topics:
8.3.1 About Keystores and Certificates
Keys and certificates are used to digitally sign and verify data and achieve authentication, integrity, and privacy in network communications.
A Java keystore (JKS) is a protected database that holds keys and certificates for the organization. Oracle Fusion Middleware utilizes JKS keystores for Oracle Virtual Directory, for applications deployed in Oracle WebLogic Server, and for Oracle WebLogic Server itself.
Access to a keystore requires a password which is defined at the time the keystore is created, by the person who creates the keystore, and which can only be changed by providing the current password.
In addition, each private key in a keystore can be secured by its own password.
This section contains these topics:
8.3.1.1 Sharing Keystores Across Instances
Oracle recommends that you do not share keystores between component instances or Oracle instances, since each keystore represents a unique identity.
The exception to this is an environment with a cluster of component instances, in which case keystore sharing would be an acceptable practice.
Note that no management tools or interfaces are available to facilitate keystore sharing. However, you can export a keystore from one instance and import it into another instance. See Section 8.3.3.4 for details.
8.3.1.2 Keystore Naming Conventions
Follow these naming conventions for your JKS keystores:
-
Do not use a name longer than 256 characters.
-
Do not use any of the following characters in a keystore name:
| ; , ! @ # $ ( ) < > / \ " ' ` ~ { } [ ] = + & ^ space tabNote:
Observe this rule even if your operating system supports the character. -
Do not use non-ascii characters in a keystore name.
-
Additionally, follow the operating system-specific rules for directory and file names.
8.3.2 Managing the Keystore Life Cycle
Typical life cycle events for a JKS keystore are as follows:
-
The keystore is created. Keystores can be created directly, or by importing a keystore file from the file system.
-
The list of available keystores are viewed and specific keystores selected for update.
-
Keystores are updated or deleted. Update operations require that the keystore password be entered.
-
The keystore password can be changed.
-
The keystore can be deleted.
-
Keystores can be exported and imported.
8.3.3 Common Keystore Operations
This section explains the following keystore operations:
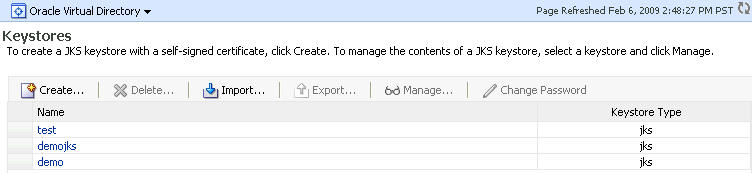
8.3.3.1 Creating a Keystore Using Fusion Middleware Control
Take these steps to create a keystore:
-
Log in to the domain of interest using Fusion Middleware Control.
-
From the navigation pane, locate your component instance.
-
Navigate to component_name, then Security, then Keystores. For example, navigate to Oracle Virtual Directory, then Security, then Keystores.
Note:
The component type is displayed at the top of the page. -
The Java Keystore page appears. On this page you can create, update, and delete keystores, and perform other keystore management tasks.
-
Click Create. The Create Keystore dialog appears.
-
Provide keystore details such as name and password.
You can also request a self-signed certificate in this dialog, and fill in the alias name and DN information.
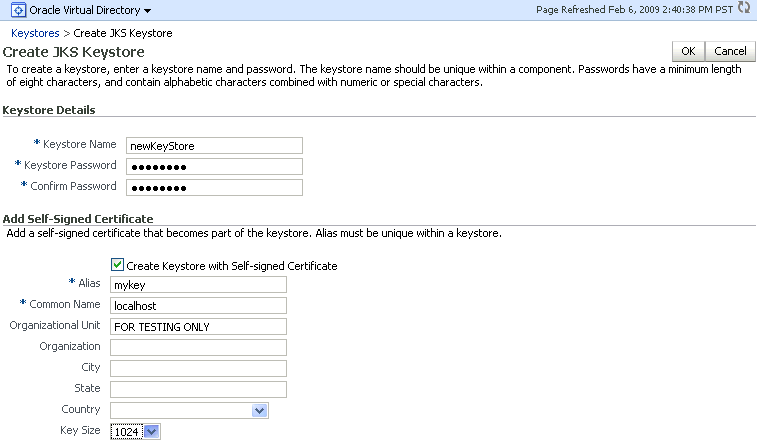
Description of the illustration ''ks22.gif''
Note:
If you want to use this keystore only to store trusted certificates, you can uncheck the Create Self-Signed Certificate checkbox. This will create a keystore with no keypair. -
Click Submit. The new keystore appears in the list of Java keystores.
8.3.3.2 Creating a Keystore Using WLST
See Also:
Section 8.2 for details about how to start and use WLST.Assuming the instance name is inst1, use this command to create a keystore:
createKeyStore('inst1', 'ovd5', 'ovd', 'newKeyStore', 'password')
where password is the password for this keystore.
See Also:
- Section 6.9.6, "createKeyStore".
-
The discussion at the start of Section 6.9, which explains how you can obtain the parameter values needed to execute the commands.
8.3.3.3 Exporting a Keystore Using Fusion Middleware Control
If multiple Oracle Virtual Directory instances want to share the same keystore file, this can be achieved by exporting the keystore from one instance and importing it into the other instances.
Take these steps to export a keystore:
-
Navigate to the Java Keystores page for the component instance, as explained in Section 8.3.3.1, "Creating a Keystore Using Fusion Middleware Control."
-
Select the desired keystore from the list of stores.
-
Click Export.
-
A dialog box appears in which you must enter the keystore password to continue.
-
Specify a file system location, and click OK.
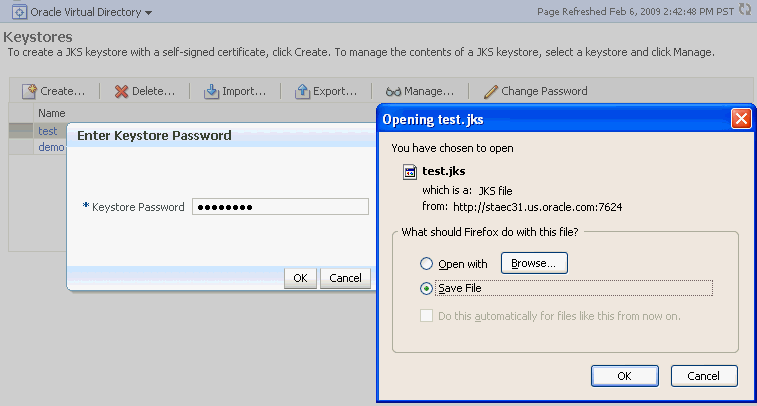
Description of the illustration ''ks33.gif''
8.3.3.4 Exporting a Keystore Using WLST
See Also:
Section 8.2 for details about how to start and use WLST.Assuming the instance name is inst1, use this command to export a keystore:
exportKeyStore('inst1', 'ovd5', 'ovd', 'test', 'password', '/tmp')
where password is the password for this keystore.
This command exports the keystore into a file named test under the directory /tmp.
See Also:
Section 6.9.10, "exportKeyStore".8.3.3.5 Deleting a Keystore Using Fusion Middleware Control
Take these steps to delete a keystore:
-
Navigate to the Java Keystores page for the component instance, as explained in Section 8.3.3.1, "Creating a Keystore Using Fusion Middleware Control."
-
Select the desired keystore from the list of stores.
-
Click Delete.
-
A dialog box appears to request confirmation of the delete request.
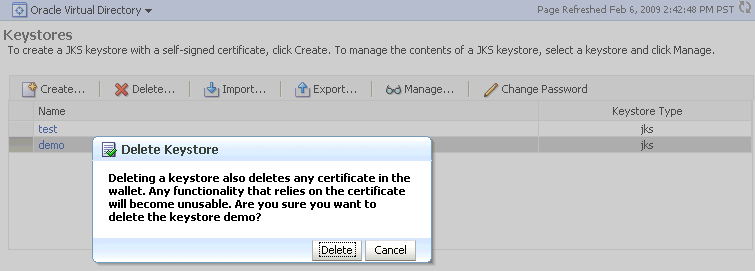
Description of the illustration ''ks44.gif''
-
Click Delete.
8.3.3.6 Deleting a Keystore Using WLST
See Also:
Section 8.2 for details about how to start and use WLST.Assuming the application server instance name is inst1, use this command to delete a keystore:
deleteKeyStore('inst1', 'ovd5', 'ovd', 'demo')
where the component type is ovd, the component instance is ovd5, and the keystore is named demo.
See Also:
Section 6.9.8, "deleteKeyStore".8.3.3.7 Importing a Keystore Using Fusion Middleware Control
-
Navigate to the Java Keystores page for the component instance, as explained in Section 8.3.3.1, "Creating a Keystore Using Fusion Middleware Control."
-
Click Import.
-
The Import Keystore dialog box appears.
-
Browse the file system to locate the keystore file.
-
Provide a name for the keystore. Enter the keystore password.
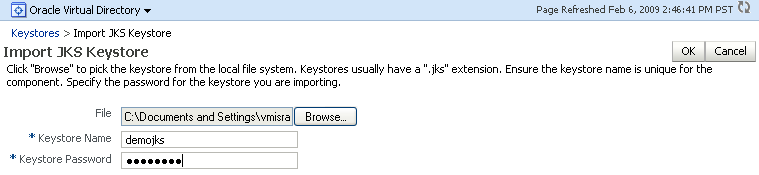
Description of the illustration ''ks40.gif''
-
Click OK.
-
The imported keystore appears in the list of Java keystores.
Description of the illustration ''ks42.gif''
8.3.3.8 Importing a Keystore Using WLST
See Also:
Section 8.2 for details about how to start and use WLST.Assuming the instance name is inst1, use this command to import a keystore:
importKeyStore('inst1', 'ovd5', 'ovd', 'demojks', 'password', '/tmp/demojks.jks')
where password is the password for this keystore.
See Also:
Section 6.9.18, "importKeyStore".8.3.3.9 Changing the Keystore Password Using Fusion Middleware Control
Take these steps to change a keystore password:
-
Navigate to the Java Keystores page for the component instance, as explained in Section 8.3.3.1, "Creating a Keystore Using Fusion Middleware Control."
-
Select a keystore and click Change Password.
-
A dialog box appears on which you must enter the current password and enter a new password. The new password must be entered a second time to confirm.
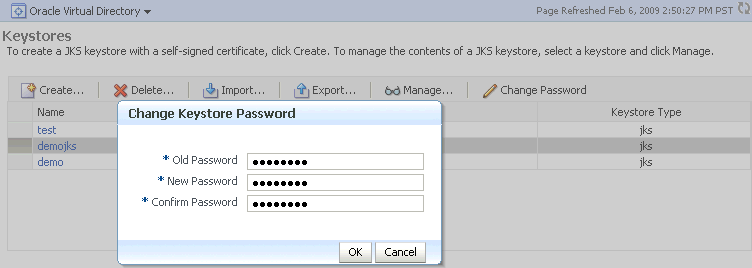
Description of the illustration ''ks43.gif''
-
Click OK to change the password. In future, any operations performed on this keystore or its certificates will require the use of the new password.
8.3.3.10 Changing the Keystore Password Using WLST
See Also:
Section 8.2 for details about how to start and use WLST.Assuming the instance name is inst1, use this command to change the keystore password:
changeKeyStorePassword('inst1', 'ovd5', 'ovd', 'demojks', 'current_password', 'new_password')
where current_password is the current password for this keystore, and new_password is the new password.
See Also:
Section 6.9.3, "changeKeyStorePassword".8.3.4 Managing the Certificate Life Cycle
Typical life cycle events for a certificate residing in a keystore are as follows:
-
A self-signed certificate is automatically created for the keypair.
-
A certificate signing request (CSR) is generated, and can then be exported to a file.
-
Certificates are imported into the keystore. A certificate can either be pasted into a text box or imported from the file system. You can import both user certificates and trusted certificates (also known as CA certificates) in this way.
-
Certificates or trusted certificates are exported from the keystore out to a file.
-
Certificates or trusted certificates are deleted from the keystore.
8.3.5 Common Certificate Operations
This section describes the following common certificate operations:
-
Generating a New Key for the Keystore Using Fusion Middleware Control
-
Generating a Certificate Signing Request Using Fusion Middleware Control
-
Importing a Certificate or Trusted Certificate into a Keystore Using Fusion Middleware Control
-
Importing a Certificate or Trusted Certificate into a Keystore Using WLST
-
Exporting a Certificate or Trusted Certificate from the Keystore Using Fusion Middleware Control
-
Exporting a Certificate or Trusted Certificate from the Keystore Using WLST
-
Deleting a Certificate or Trusted Certificate from the Keystore Using Fusion Middleware Control
-
Deleting a Certificate or Trusted Certificate from the Keystore Using WLST
-
Converting a Self-Signed Certificate to a Third-Party Certificate Using Fusion Middleware Control
-
Converting a Self-Signed Certificate to a Third-Party Certificate Using WLST
8.3.5.1 Generating a New Key for the Keystore Using Fusion Middleware Control
To generate a new key (that is, a new self-signed certificate) for a keystore:
-
Navigate to the Java Keystores page for the component instance, as explained in Section 8.3.3.1, "Creating a Keystore Using Fusion Middleware Control."
-
Select the keystore from the list of stores.
-
A dialog box appears in which you must enter the keystore password to continue.
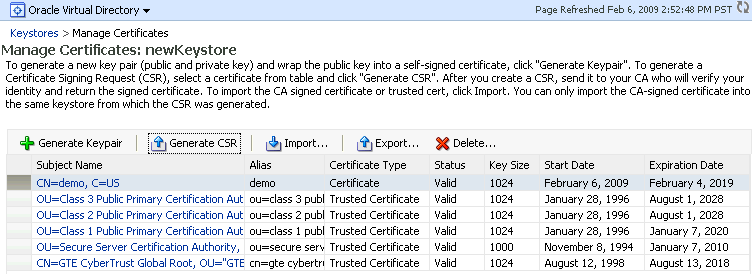
-
The Manage Certificates page appears. Here, you can manage both types of keystore entries, that is, certificates and trusted certificates.
-
Click the Generate Keypair button.
-
In the Generate Keypair dialog, enter the details for the new key and click OK.
Example: Generating a Key Pair
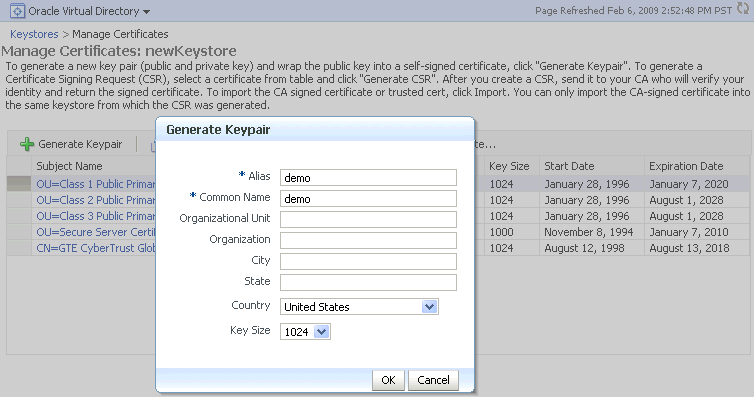
Description of the illustration ''ks27.gif''
When you complete these steps, a new public-private key pair is generated for the keystore, and the public key is wrapped in a self-signed certificate.
While these steps generate a new keypair for an existing keystore, you can also generate a new keypair when creating the keystore itself. For details, see Section 8.3.3.1, "Creating a Keystore Using Fusion Middleware Control."
8.3.5.2 Generating a New Key for the Keystore Using WLST
See Also:
Section 8.2 for details about how to start and use WLST.Assuming the instance name is inst1, use this command to generate a new key for a keystore:
generateKey('inst1', 'ovd5', 'ovd', 'newKeystore', 'password', 'subject_dn', 'key_size', 'alias')
where password is the password for this keystore, subject_dn is the distinguished name by which the key pair is generated, key_size is the key size in bits, and alias is the key alias.
See Also:
See Section 6.9 for details about using WLST commands.8.3.5.3 Generating a Certificate Signing Request Using Fusion Middleware Control
Take these steps to create a Certificate Signing Request (CSR):
-
From the navigation pane, locate your component instance.
-
Navigate to component_name, then Security, then Keystores.
-
Select the desired keystore from the list of stores.
-
A dialog box appears in which you must enter the keystore password to continue.
-
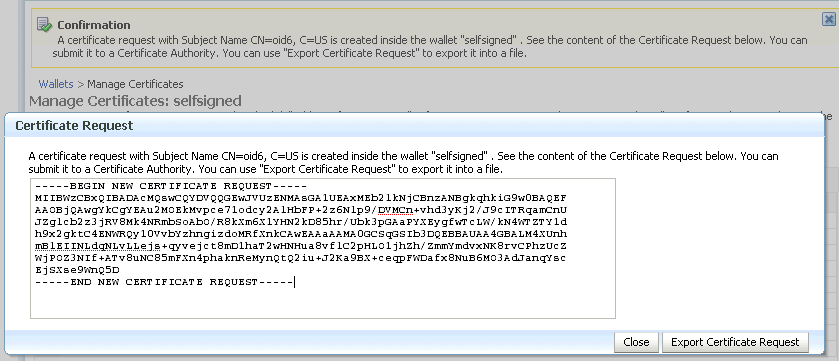
The Manage Certificates page appears. Select the self-signed certificate for which you want to generate the CSR and click Generate CSR.
Description of the illustration ''ks29.gif''
-
A dialog box appears, showing the generated signing request. You can either:
-
Copy the CSR from the dialog box and past it to a file.
-
Click the Export CSR button to directly save it to a file.
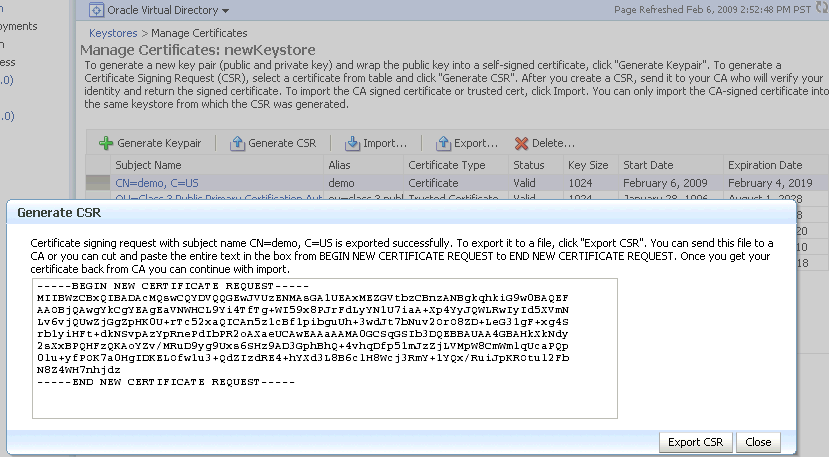
Description of the illustration ''ks30.gif''
-
After the CSR is exported, you can send it to a Certificate Authority (CA) to generate a certificate.
8.3.5.4 Generating a Certificate Signing Request Using WLST
See Also:
Section 8.2 for details about how to start and use WLST.Assuming the instance name is inst1, use this command to generate and export a CSR:
exportKeyStoreObject('inst1', 'ovd5', 'ovd', 'newKeystore', 'password', 'CertificateRequest', '/tmp', 'alias')
where password is the password for this keystore, /tmp is the path under which the certificate request is generated in BASE64 format in the file base64.txt, and alias is the alias of the key pair that is used to generate the certificate request.
See Also:
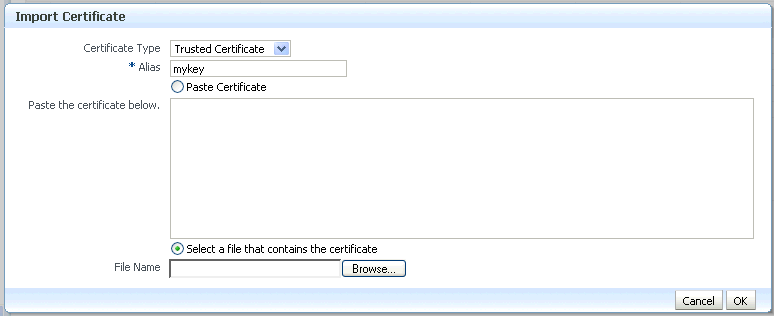
See Section 6.9 for details about using WLST commands.8.3.5.5 Importing a Certificate or Trusted Certificate into a Keystore Using Fusion Middleware Control
Note:
You cannot use Fusion Middleware Control to import DER-encoded certificates or trusted certificates into a JKS keystore; use thekeytool utility for this task. See Section 8.1.2.1 for details.Take these steps to import a certificate, or a trusted certificate, into a keystore:
-
From the navigation pane, locate your component instance.
-
Navigate to component_name, then Security, then Keystores.
-
Select the desired keystore from the list of stores.
-
A dialog box appears in which you must enter the keystore password to continue.
-
The Manage Certificates page appears. Click the Import button.
-
A dialog box appears with which you can either:
-
Paste the Base-64 encoded contents of a certificate or trusted certificate into the keystore directly.
-
Select a certificate or trusted certificate file from the file system.
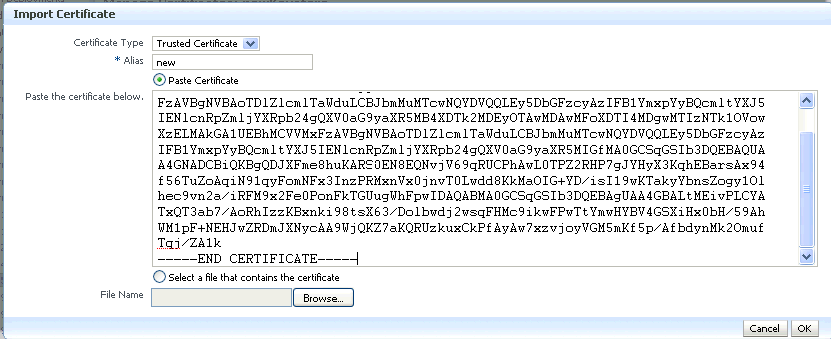
Description of the illustration ''ks34.gif''
You need to specify an alias while importing a certificate.
When importing a certificate, the alias should match the alias of the corresponding keypair.
When importing a trusted certificate, the alias should be unique in the keystore.
-
-
Click OK. The Manage Certificates page appears, showing the newly imported certificate or trusted certificate.
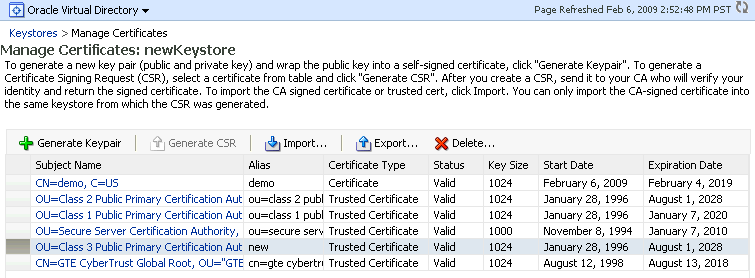
Description of the illustration ''ks35.gif''
8.3.5.6 Importing a Certificate or Trusted Certificate into a Keystore Using WLST
See Also:
Section 8.2 for details about how to start and use WLST.Note:
You cannot use theWLST command-line tool to import DER-encoded certificates or trusted certificates into a JKS keystore; use the keytool utility for this purpose. See Section 8.1.2.1.Assuming the instance name is inst1, use this command to import a certificate into a keystore:
importKeyStoreObject('inst1', 'ovd5', 'ovd', 'newKeystore', 'password', 'Certificate', '/tmp/cert.txt', 'alias')
where password is the password for this keystore, /tmp/cert.txt is the file that contains BASE64 encoded certificate, and alias is the alias by which this certificate is imported. Note that this alias must be same as that of the key pair that was used to generate this certificate request.
See Also:
See Section 6.9 for details about using WLST commands.8.3.5.7 Exporting a Certificate or Trusted Certificate from the Keystore Using Fusion Middleware Control
Take these steps to export a certificate or trusted certificate from the keystore:
-
From the navigation pane, locate your component instance.
-
Navigate to component_name, then Security, then Keystores.
-
Select the desired keystore from the list of stores.
-
A dialog box appears in which you must enter the keystore password to continue.
-
The Manage Certificates page appears. Click Export.
-
A dialog box appears which shows the Base64 encoded certificate or trusted certificate. You can either copy the contents from the text box and paste it to a file, or select the Export button to save it directly to a file.
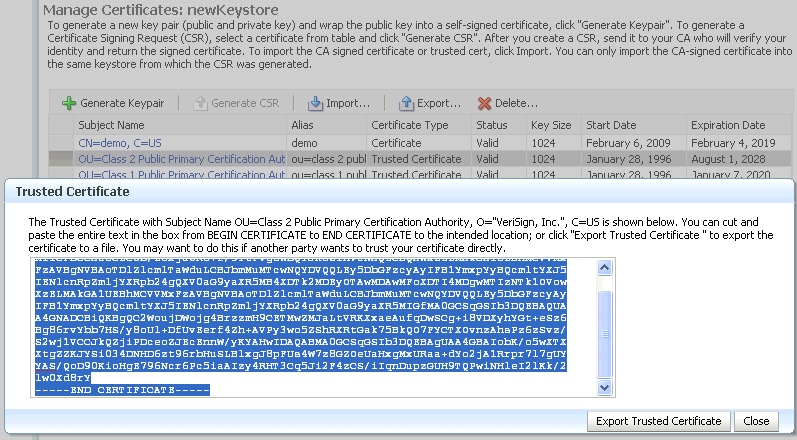
Description of the illustration ''ks32.gif''
8.3.5.8 Exporting a Certificate or Trusted Certificate from the Keystore Using WLST
See Also:
Section 8.2 for details about how to start and use WLST.Assuming the instance name is inst1, use this command to export a certificate:
exportKeyStoreObject('inst1', 'ovd5', 'ovd', 'newKeystore', 'password', 'Certificate', '/tmp', 'alias')
where password is the password for this keystore, /tmp is the path under which the certificate is generated in BASE64 format in the file base64.txt, and alias is the alias of the certificate being exported.
See Also:
See Section 6.9 for details about using WLST commands.8.3.5.9 Deleting a Certificate or Trusted Certificate from the Keystore Using Fusion Middleware Control
Take these steps to delete a certificate, or a trusted certificate, from a keystore:
-
From the navigation pane, locate your component instance.
-
Navigate to component_name, then Security, then Keystores.
-
Select the desired keystore from the list of stores.
-
A dialog box appears in which you must enter the keystore password to continue.
-
The Manage Certificates page appears. Select the certificate or trusted certificate to be deleted, and Click Delete.
-
A dialog box appears asking you to confirm the choice. Select OK to confirm.
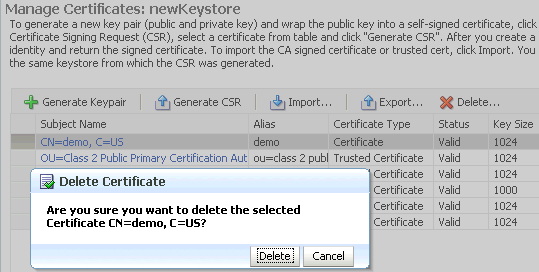
Description of the illustration ''ks50.gif''
8.3.5.10 Deleting a Certificate or Trusted Certificate from the Keystore Using WLST
See Also:
Section 8.2 for details about how to start and use WLST.Assuming the application server instance name is inst1, use this command to delete a certificate:
removeKeyStoreObject('inst1', 'ovd5', 'ovd', 'newKeystore', 'password', 'Certificate', 'alias')
where password is the password for this keystore and alias is the alias of the certificate being deleted.
See Also:
See Section 6.9 for details about using WLST commands.8.3.5.11 Converting a Self-Signed Certificate to a Third-Party Certificate Using Fusion Middleware Control
Take these steps to convert a self-signed certificate, residing in a keystore, into a third-party certificate:
-
From the navigation pane, locate your component instance.
-
Navigate to component_name, then Security, then Keystores.
-
Select the keystore that contains the self-signed certificate from the list of stores.
-
A dialog box appears in which you must enter the keystore password; click OK to continue.
-
The Manage Certificates page appears.
-
A new certificate request must be generated for the self-signed certificate that is to be converted. Select the certificate and click Generate CSR. In this example, the request is made for the self-signed certificate with alias
demo.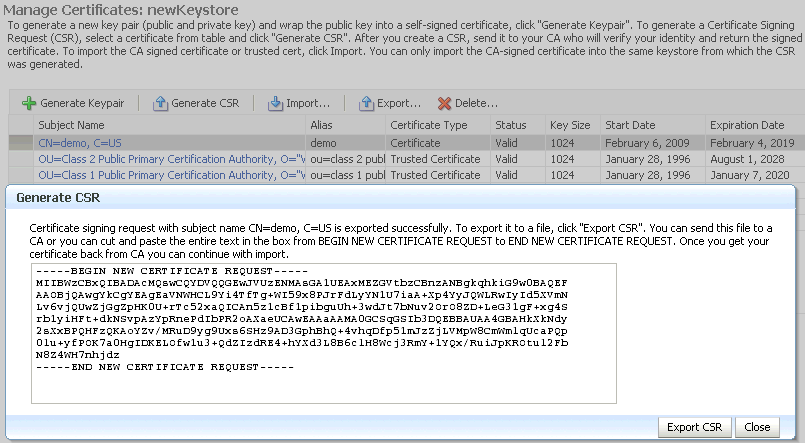
Description of the illustration ''jksconv3.gif''
The certificate request is displayed.
-
You can either:
-
Copy and paste the Base64-encoded certificate request to a file.
-
Export it directly to a file with the Export CSR button.
-
-
Submit the certificate request file to a certificate authority (CA).
-
The CA signs the certificate request and generates a certificate. The CA will return you one of the following:
-
A single file containing both the newly generated certificate and its own CA certificate in
pkcs7format -
Two files, one containing the newly generated certificate and a second containing its own CA certificate
-
-
Use Import to import these files into your keystore:
-
If you received a single file from the CA, import it as a certificate, using an alias that matches the alias of the self-signed certificate you are replacing (from Step 6)
-
If you received two files:
-
Import the file containing the CA certificate as a trusted certificate (use an alias that is unique in the keystore)
-
Import the certificate file as a certificate (using an alias that matches the alias of the self-signed certificate you are replacing
Note:
The order is important: you must import the trusted certificate first, followed by the certificate. -
The CA returned a single file, which is imported as a certificate:
Description of the illustration ''jksconv4.gif''
-
-
After import, the certificate issued by the CA replaces the self-signed certificate.
8.3.5.12 Converting a Self-Signed Certificate to a Third-Party Certificate Using WLST
See Also:
Section 8.2 for details about how to start and use WLST.Use these steps to convert a self-signed certificate to a third-party certificate (that is, one signed by a certificate authority):
-
Generate and export a CSR.
exportKeyStoreObject('inst1', 'ovd5', 'ovd', 'jks1', '<password>', 'CertificateRequest', '/tmp', 'mykey') -
Submit the CSR
/tmp/base64.txtto a certificate authority. The CA will return a newly generated certificate and its own certificate, either as one file in PKCS#7 format or as two separate files. -
If you receive a single file from the CA, run the command:
importKeyStoreObject('inst1', 'ovd5', 'ovd', 'jks1', 'password', 'Certificate', '/tmp/cert.txt', 'alias')where
passwordis the password for this keystore,/tmp/cert.txtis the file that the CA returned and contains the BASE64 encoded PKCS#7, andaliasis the alias by which this certificate is imported. Note that this alias must match that of the key pair that was used to generate the certificate request.If you receive two files from the CA, import the CA certificate first as a trusted certificate, followed by the newly generated certificate:
importKeyStoreObject('inst1', 'ovd5', 'ovd', 'jks1', 'password', 'TrustedCertificate', '/tmp/cacert.txt', 'unique_alias')where
unique_aliasis a unique alias by which the trusted certificate is imported.importKeyStoreObject('inst1', 'ovd5', 'ovd', 'jks1', 'password', 'Certificate', '/tmp/cert.txt', 'alias')where
passwordis the password for this keystore,/tmp/cert.txtis the file that the CA returned and contains BASE64 encoded certificate,/tmp/cacert.txtis the file containing the BASE64 encoded CA certificate, andaliasis the alias by which this certificate is imported. Note that this alias must match that of the key pair that was used to generate the certificate request.
See Also:
See Section 6.9 for details about using WLST commands.8.3.6 Keystore and Certificate Maintenance
This section contains the following administration topics:
8.3.6.1 Location of Keystores
The root directory for Oracle Virtual Directory keystores is located in $ORACLE_INSTANCE/config/OVD/ovd_instance_name/keystores.
This root directory will contain all the JKS files.
A sample structure, assuming there are two keystores named keys.jks and trust.jks respectively, would look like this:
ORACLE_INSTANCE/config/OVD/ovd_instance_name/keystores/keys.jks
ORACLE_INSTANCE/config/OVD/ovd_instance_name/keystores/trust.jks
8.3.6.2 Replacing Expiring Certificates
An expiring certificate should be replaced before it actually expires to avoid or reduce application downtime.
The steps for replacing an expiring certificate are as follows:
-
Generate a certificate request from the keystore (use the same key-pair for which the current expiring certificate was issued).
-
Provide this certificate request to the third-party Certificate Authority (CA) for certificate issuance. The validity date of the new certificate should be earlier than the expiration date of the current certificate. This overlap is recommended to reduce downtime.
Note:
Steps 1 and 2 are not required when the third-party CA already maintains the certificate request in a repository. In that case, simply ask the CA to issue a new certificate for that certificate request. -
Import the newly issued certificate into the keystore using the same alias as that of the key-pair.
-
If the new certificate was issued by a CA other than the one that issued the original certificate, you may also need to import the new CA's trusted certificate before importing the newly issued certificate.
8.3.6.3 Effect of Host Name Change on Keystores
Typically, the certificate DN is based on the host name of the server where the keystore is used.
For example, if a keystore is being created for the Oracle Virtual Directory server on host my.example.com, then the DN of the certificate in this Oracle Virtual Directory keystore will be something like:
"CN=my.example.com,O=organization name"
This synchronization is required because most clients do host name verification during the SSL handshake.
Clients that perform host name verification include Web browsers and Oracle HTTP Client, among others. If the host name of the server does not match that of the certificate DN:
-
A clear warning is displayed (in the case of browser clients).
-
There may be SSL handshake failure (in the case of other clients).
Thus, whenever you have a keystore on a server that is accepting requests from clients, you must ensure that whenever the host name of this server changes, you also update the certificate in the keystore.
This can be done by requesting a new certificate with a new DN (based on the new host name).
The steps are:
-
Generate a new request with the new DN (based on a new host name). See Section 8.3.5.3 for details.
-
Send this request to a certificate authority (CA).
-
Get back a new certificate from the CA.
-
Import the new certificate with the same alias as the key-pair for which certificate request was generated. See Section 8.3.5.5 for details.
The steps are:
-
Delete the existing keystore. See Section 8.3.3.5 for details.
-
Create a new keystore with a key-pair using the new DN (based on the new host name). See Section 8.3.3.1 for details.
For both production and self-signed keystores, once the new certificate is available in the keystore, ensure that it is imported into all the component keystores where it needs to be trusted. For example, if the HTTP listener on Oracle Virtual Directory was SSL-enabled and its certificate changed due to a host name change, then you need to import its new certificate into the client keystore or browser repository so that it can trust its new peer.
8.4 Wallet Management
This section contains the following topics:
-
Accessing the Wallet Management Page in Fusion Middleware Control
-
Accessing the Certificate Management Page for Wallets in Fusion Middleware Control
8.4.1 About Wallets and Certificates
This section contains the following topics:
8.4.1.1 Password-Protected and Autologin Wallets
You can create two types of wallets:
-
This is an obfuscated form of a PKCS#12 wallet that provides PKI-based access to services and applications without requiring a password at runtime. You can also add to, modify, or delete the wallet without needing a password. File system permissions provide the necessary security for auto-login wallets.
Note:
In previous releases, you could create a wallet with a password and then enable auto-login to create an obfuscated wallet. With 11g Release 1 (11.1.1.9), auto-login wallets are created without a password. When using such a wallet, you do not need to specify a password.If using an auto-login wallet without a password, specify a null password ("") in the
ldapbindcommand.Older type of wallets (such as Release 10g wallets) will continue to work as they did earlier.
-
As the name suggests, this type of wallet is protected by a password. Any addition, modification, or deletion to the wallet content requires a password.
Every time a password-protected wallet is created, an auto-login wallet is automatically generated. However, this auto-login wallet is different from the user-created auto-login wallet described in the previous bullet. While the user-created wallet can even be updated at configuration time without a password, an automatically generated auto-login wallet is a read-only wallet that does not allow direct updates. Modifications to the wallet must occur through the password protected file (by providing a password), at which time the auto-login wallet is regenerated.
The purpose of this system-generated auto-login wallet is to provide PKI-based access to services and applications without requiring a password at runtime, while still requiring a password at configuration time.
Note:
Wallets configured for Oracle Internet Directory must have auto-login enabled.8.4.1.2 Self-Signed and Third-Party Wallets
Self-signed wallets contain certificates for which the issuer is the same as the subject. These wallets are typically created for use within an intranet environment where trust is not a high priority. Each self-signed wallet has its own unique issuer; hence, in an environment with multiple components and wallets, the trust management tasks increase n-fold.
When created through Fusion Middleware Control, a self-signed wallet is valid for five years.
Third-party wallets contain certificates that are issued by well known CA's. The functionality and security remain the same as for self-signed wallets, but the use of third-party certificates provides added trust because the issuers are well known, so they are already trusted by most clients.
Difference Between Self-Signed and Third-Party Wallets
From a functional and security perspective, a self-signed certificate is comparable to one issued by a third party. The only difference is that a self-signed certificate is not trusted.
8.4.1.3 Sharing Wallets Across Instances
Oracle recommends that you do not share wallets between component instances or Oracle instances, since each wallet represents a unique identity.
The exception to this is an environment with a cluster of component instances, in which case wallet sharing would be an acceptable practice.
Note that no management tools or interfaces are available to facilitate wallet sharing. However, you can export a wallet from one instance and import it into another instance. See Section 8.4.4 for details of wallet export and import.
8.4.1.4 Wallet Naming Conventions
Follow these naming conventions for your Oracle wallets:
-
Do not use a name longer than 256 characters.
-
Do not use any of the following characters in a wallet name:
| ; , ! @ # $ ( ) < > / \ " ' ` ~ { } [ ] = + & ^ space tabNote:
Observe this rule even your operating system supports the character. -
Do not use non-ascii characters in a wallet name.
-
Additionally, follow the operating system-specific rules for directory and file names
Due to the way data is handled in an LDAP directory such as Oracle Internet Directory, wallet names are not case-sensitive.
Thus, it is recommended that you use case-insensitive wallet names (preferably, using all lower case letters). For example, if you have created a wallet named UPPER, do not create another wallet named upper; doing so could cause confusion during wallet management operations.
8.4.2 Accessing the Wallet Management Page in Fusion Middleware Control
An Oracle wallet is associated with the component where it is utilized. To locate a component instance:
-
Log into Fusion Middleware Control using administrator credentials.
-
Select the domain of interest.
Note:
You can use Setup to discover a specific Oracle WebLogic Server domain to work with. -
From the navigation pane, locate the instance (for example, an OHS instance) that will use the wallet. Click on the instance.
The component type now appears on the upper left of the page adjacent to the Farm drop-down.
-
Select the component type drop-down (for example, Oracle HTTP Server).
If the component is not started, start it by right-clicking to open the component menu, press Control, then Start Up.
-
Navigate to Security, then Wallets.
-
The Wallets page appears.
On the Wallets page, you can:
-
Create a wallet.
-
Delete a wallet.
-
Import a wallet.
-
Export a wallet.
8.4.3 Managing the Wallet Life Cycle
Typical life cycle events for an Oracle wallet are as follows:
-
The wallet is created. Wallets can be created directly, or by importing a wallet file from the file system.
Note:
Wallet names based on multi-byte character sets (MBCS) are not supported. Do not create a wallet using an MBCS. -
The list of available wallets are viewed and specific wallets selected for update.
-
Wallets are updated or deleted. Update operations for password-protected wallets require that the wallet password be entered.
-
The wallet password can be changed for password-protected wallets.
-
The wallet can be deleted.
-
Wallets can be exported and imported.
8.4.4 Common Wallet Operations
This section describes the steps required to perform a range of wallet management functions, including:
-
Creating a Self-Signed Wallet Using Fusion Middleware Control
-
Changing a Self-Signed Wallet to a Third-Party Wallet Using Fusion Middleware Control
-
Changing a Self-Signed Wallet to a Third-Party Wallet Using WLST
Note:
Wallet names based on multi-byte character sets (MBCS) are not supported. Do not create a wallet using an MBCS.8.4.4.1 Creating a Wallet Using Fusion Middleware Control
-
Navigate to the Wallets page for your component instance. See Section 8.4.2, "Accessing the Wallet Management Page in Fusion Middleware Control."
-
Click Create.
-
The Create Wallet page appears.
-
Enter a wallet name.
-
Check or uncheck the Autologin box, depending on whether your wallet will be an auto-login wallet. The default is an auto-login wallet.
See Section 8.4.1.1, "Password-Protected and Autologin Wallets" for details.
Note:
Wallets configured for Oracle Internet Directory must have auto-login enabled.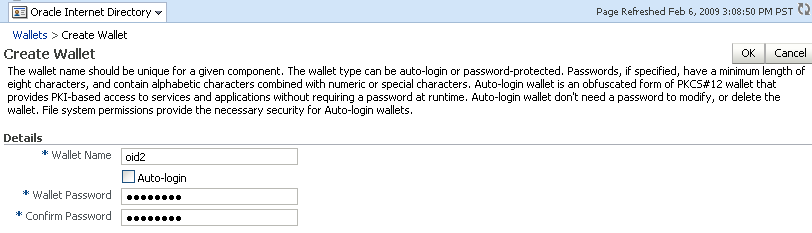
Description of the illustration ''wal3.gif''
-
Click Submit.
-
At this point, you must choose whether to add a certificate request (CR) at this time. If you choose not to do so, you can always add the CR later; see Section 8.4.7.1, "Adding a Certificate Request Using Fusion Middleware Control."
In this example, we choose to add a CR:
Description of the illustration ''wal5.gif''
Note:
The common name entered here should match the host name of the Oracle HTTP Server to which clients will connect; this helps to prevent problems of the type mentioned in Section 8.4.8.2. -
Click Finish.
-
There are two options for the CR:
-
Copy and paste the Base64-encoded certificate request from the text box to a file
-
Export it directly to a file with the Export Certificate Request button.
-
-
A message appears confirming the wallet creation.
8.4.4.2 Creating a Wallet Using WLST
See Also:
Section 8.2 for details about how to start and use WLST.Note:
The WLST commands described in this chapter use Oracle Internet Directory as the example component. The same commands can be executed for Oracle HTTP Server or Oracle Web Cache by changing the third parameter fromoid to ohs or webcache respectively.Assuming the instance name is inst1, use this command to create a wallet:
createWallet('inst1', 'oid1', 'oid', 'oid2', 'password')
where oid2 is the wallet name and password is the password for this wallet. If an auto-login wallet needs to be created, the password should be specified as '' (that is, no text between the quotes).
See Also:
Section 6.9.7, "createWallet".Note:
Wallets configured for Oracle Internet Directory must have auto-login enabled.8.4.4.3 Creating a Self-Signed Wallet Using Fusion Middleware Control
Take these steps to create a self-signed wallet:
-
Navigate to the Wallets page for your component instance. See Section 8.4.2, "Accessing the Wallet Management Page in Fusion Middleware Control."
-
Click Create Self-Signed Wallet.
-
On the Self-Signed Wallet page, enter data to create the wallet. This includes:
-
The wallet name
-
Whether this is an auto-login wallet
-
The DN information
-
The key size
Description of the illustration ''wal8.gif''
-
-
Click Submit.
-
A confirmation message is displayed and the new wallet appears in the list of wallets.
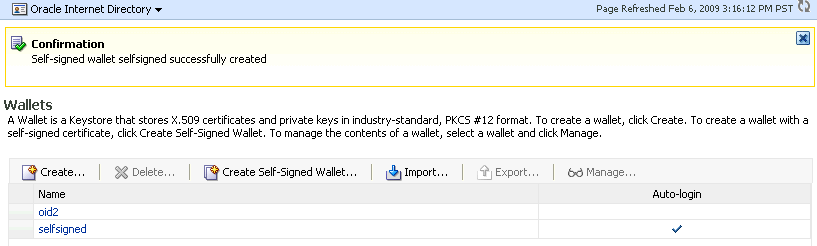
Description of the illustration ''wal9.gif''
Note:
Wallets configured for Oracle Internet Directory must have auto-login enabled.8.4.4.4 Creating a Self-Signed Wallet Using WLST
See Also:
Section 8.2 for details about how to start and use WLST.Assuming the instance name is inst1, use these commands to create a self-signed wallet:
createWallet('inst1', 'oid1', 'oid', 'oid2', 'password')
addSelfSignedCertificate('inst1', 'oid1', 'oid', 'oid2', 'password', 'subject_dn', 'key_size')
where oid2 is the wallet name, subject_dn is the distinguished name of the self-signed certificate, key_size is the key size in bits and password is the password for this wallet. If an auto-login wallet needs to be created, the password should be specified as '' (that is, with no text between the quotes).
Note:
Wallets configured for Oracle Internet Directory must have auto-login enabled.8.4.4.5 Changing a Self-Signed Wallet to a Third-Party Wallet Using Fusion Middleware Control
For steps to convert a self-signed wallet into a third-party wallet, see Section 8.4.8.3, "Changing a Self-Signed Wallet to a Third-Party Wallet."
8.4.4.6 Changing a Self-Signed Wallet to a Third-Party Wallet Using WLST
For steps to convert a self-signed wallet into a third-party wallet, see Section 8.4.8.3, "Changing a Self-Signed Wallet to a Third-Party Wallet."
8.4.4.7 Exporting a Wallet Using Fusion Middleware Control
Take these steps to export a wallet:
-
Navigate to the Wallets page for your component instance. See Section 8.4.2, "Accessing the Wallet Management Page in Fusion Middleware Control."
-
Select the row corresponding to the wallet of interest.
Note:
Do not click on the wallet name itself; this opens the wallet for certificate management operations. -
Click Export.
-
The Export Wallet page appears.
-
Enter the filename and the location where the wallet is to be exported.
-
Click OK.
Description of the illustration ''wal20.gif''
8.4.4.8 Exporting a Wallet Using WLST
See Also:
Section 8.2 for details about how to start and use WLST.Assuming the instance name is inst1, use this command to export a wallet:
exportWallet('inst1', 'oid1', 'oid', 'selfsigned', 'password', '/tmp')
where password is the password for this wallet (specify '' as password for auto-login wallet).
If it is an auto-login wallet, this command will export the wallet into a file named cwallet.sso under the directory /tmp. If it is a password-protected wallet, there will be two files created under /tmp, namely ewallet.p12 and cwallet.sso.
See Also:
Section 6.9.12, "exportWallet".8.4.4.9 Importing a Wallet Using Fusion Middleware Control
Take these steps to import a wallet:
-
Navigate to the Wallets page for your component instance. See Section 8.4.2, "Accessing the Wallet Management Page in Fusion Middleware Control".
-
Click Import.
-
The Import Wallet page appears.
-
If this is an auto-login wallet, check the box and enter the wallet name. No password is required.
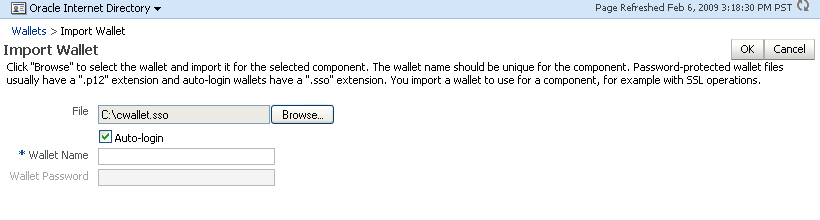
Description of the illustration ''wal10.gif''
-
If this is not an auto-login wallet, uncheck the auto-login box. Specify both the wallet name and password.
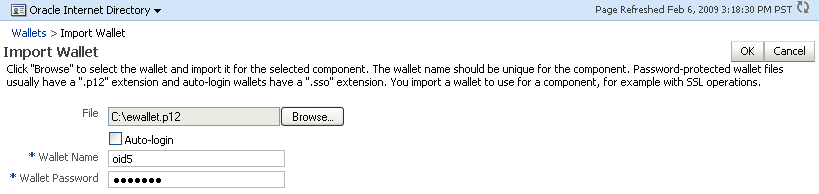
Description of the illustration ''wal11.gif''
-
Click OK. The wallet is imported into the repository.
8.4.4.10 Importing a Wallet Using WLST
See Also:
Section 8.2 for details about how to start and use WLST.Assuming the instance name is inst1, use this command to import a wallet:
importWallet('inst1', 'oid1', 'oid', 'oid5', 'password', '/tmp/ewallet.p12')
where password is the password of the wallet being imported and /tmp/ewallet.p12 contains the wallet file (if there are two files ewallet.p12 and cwallet.sso, point to ewallet.p12). Point to cwallet.sso only if it is an auto-login wallet - in this case, the password should be specified as ''.
See Also:
Section 6.9.20, "importWallet".8.4.4.11 Deleting a Wallet Using Fusion Middleware Control
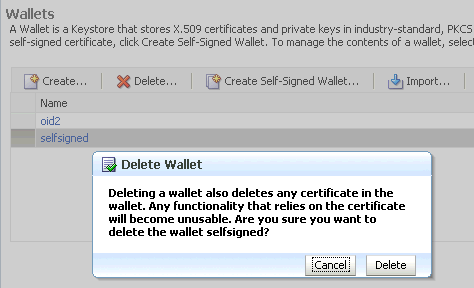
Take these steps to delete a wallet:
-
Navigate to the Wallets page for your component instance. See Section 8.4.2, "Accessing the Wallet Management Page in Fusion Middleware Control."
-
Select the row corresponding to the wallet of interest.
-
Click Delete.
Description of the illustration ''ks19.gif''
-
The wallet is deleted and no longer appears on the list of wallets.
8.4.4.12 Deleting a Wallet Using WLST
See Also:
Section 8.2 for details about how to start and use WLST.Assuming the instance name is inst1, use this command to delete a wallet:
deleteWallet('inst1', 'oid1', 'oid', 'selfsigned')
See Also:
Section 6.9.9, "deleteWallet".8.4.5 Managing the Certificate Life Cycle
The complete certificate life cycle, starting from wallet creation, includes these actions:
-
Create an empty wallet (that is, a wallet that does not contain a certificate request).
-
Add a certificate request to the wallet.
-
Export the certificate request.
-
Use the certificate request to obtain the corresponding certificate.
-
Import trusted certificates.
-
Import the certificate.
These steps are needed to generate a wallet with a third-party trusted certificate. For details about this task, see Section 8.4.7.9, "Converting a Self-Signed Certificate into a Third-Party Certificate Using Fusion Middleware Control."
8.4.6 Accessing the Certificate Management Page for Wallets in Fusion Middleware Control
An Oracle wallet is associated with the component where it is utilized.
To locate a component instance:
-
Log into Fusion Middleware Control using administrator credentials.
-
Select the domain of interest.
Note:
You can use Setup to discover a specific Oracle WebLogic Server domain to work with. -
Use the navigation pane to locate the instance (for example, an Oracle HTTP Server instance) that will use the wallet. Note: Oracle HTTP Server must be running so that subsequent steps will work.
-
Use the navigation pane to locate the instance (for example, an Oracle HTTP Server instance) that will use the wallet. Note: Oracle HTTP Server must be running so that subsequent steps will work.
After locating your component instance, there are two ways you can access a wallet's certificate management page in Fusion Middleware Control:
-
Go to the
Walletspage, select the line for the wallet of interest and click Manage. -
Go to the
Walletspage, locate the wallet of interest, and click on the wallet name.
On the Certificate Management page, you can:
-
Add a certificate request.
-
Export a certificate request, a certificate, or a trusted certificate.
-
Import a certificate or a trusted certificate.
-
Delete a certificate request, a certificate, or a trusted certificate.
8.4.7 Common Certificate Operations
This section describes the following common certificate operations:
-
Adding a Certificate Request Using Fusion Middleware Control
-
Exporting a Certificate, Certificate Request, or a Trusted Certificate Using WLST
-
Importing a Certificate or a Trusted Certificate Using Fusion Middleware Control
-
Deleting a Certificate Request, a Certificate, or a Trusted Certificate Using WLST
-
Converting a Self-Signed Certificate into a Third-Party Certificate Using Fusion Middleware Control
-
Converting a Self-Signed Certificate into a Third-Party Certificate Using WLST
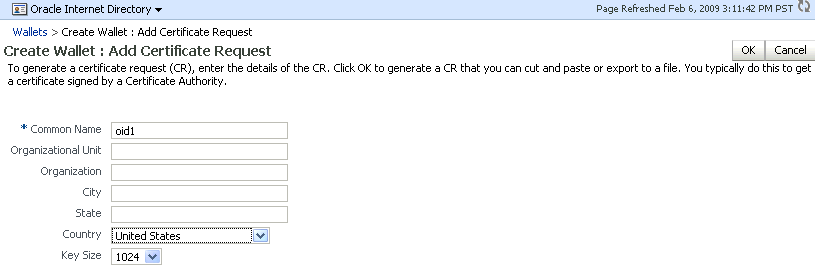
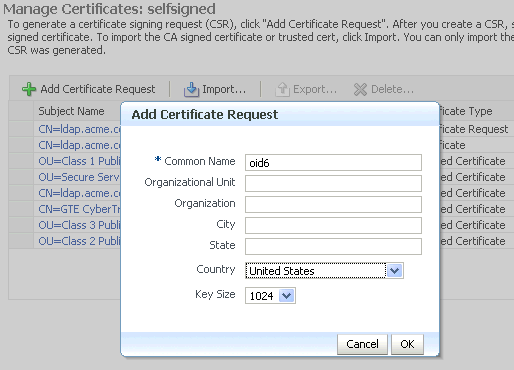
8.4.7.1 Adding a Certificate Request Using Fusion Middleware Control
It is possible to add a certificate request at the time you create the wallet, but if it was not done at that time, you can do so using the following steps:
-
Navigate to the Certificate Management page. See Section 8.4.6, "Accessing the Certificate Management Page for Wallets in Fusion Middleware Control."
-
Click Add Certificate Request.
-
A dialog box appears where you enter the CRs DN values:
Description of the illustration ''cer2.gif''
Fields marked with an asterisk (*) are required. Note: The common name must be the host name that clients will use to access the component.
-
Click OK.
-
The new CR is generated and a dialog box appears with the CR in the text box. You can either:
-
Copy and paste the Base64-encoded certificate request to a file.
-
Export it directly to a file with the Export Certificate Request button.
Description of the illustration ''cer3.gif''
-
8.4.7.2 Adding a Certificate Request Using WLST
See Also:
Section 8.2 for details about how to start and use WLST.Assuming the instance name is inst1, use this command to add a certificate request for a wallet:
addCertificateRequest('inst1', 'oid1', 'oid', 'selfsigned', 'password', 'subject_dn', 'key_size')
where password is the password for this wallet, subject_dn is the distinguished name by which the certificate request is generated and key_size is the key size in bits.
See Also:
Section 6.9.18.4.7.3 Exporting a Certificate, Certificate Request, or a Trusted Certificate Using Fusion Middleware Control
Take these steps to export a certificate, a certificate request (CR), or a trusted certificate:
-
Navigate to the Certificate Management page. See Section 8.4.6, "Accessing the Certificate Management Page for Wallets in Fusion Middleware Control."
-
Select the certificate, CR, or trusted certificate and click Export.
-
A dialog box appears with the certificate, CR, or trusted certificate in the text box. You can either:
-
Copy and paste the Base64-encoded certificate to a file.
-
Export it directly to a file with the Export Certificate or Export Trusted Certificate button.
-
8.4.7.4 Exporting a Certificate, Certificate Request, or a Trusted Certificate Using WLST
See Also:
Section 8.2 for details about how to start and use WLST.Assuming the instance name is inst1, use this command to export a certificate request:
exportWalletObject('inst1', 'oid1', 'oid', 'selfsigned', 'password', 'CertificateRequest', '/tmp', 'subject_dn')
where password is the password for this wallet, /tmp is the path under which the certificate request is exported in BASE64 format in the file base64.txt, and subject_dn is the distinguished name of the certificate request that is exported.
To export a certificate or trusted certificate, replace CertificateRequest in the above command with Certificate or TrustedCertificate.
See Also:
Section 6.9.138.4.7.5 Importing a Certificate or a Trusted Certificate Using Fusion Middleware Control
Note:
You cannot use Fusion Middleware Control to import DER-encoded certificates or trusted certificates into an Oracle wallet. Use one of these tools instead:-
Oracle Wallet Manager (see Section 8.1.2.4) or
-
orapkicommand-line tool or -
keytool(see Section 8.1.2.1)
Take these steps to import a certificate or a trusted certificate:
-
Navigate to the Certificate Management page. See Section 8.4.6, "Accessing the Certificate Management Page for Wallets in Fusion Middleware Control."
-
Click Import.
-
In the Import Certificate dialog, you can select either a certificate or a trusted certificate.
-
There are two ways to do the import:
-
Paste the Base64-encoded certificate or trusted certificate in the text box.
-
Use the file selector to browse your file system to locate a file containing the Base64-encoded certificate or trusted certificate.
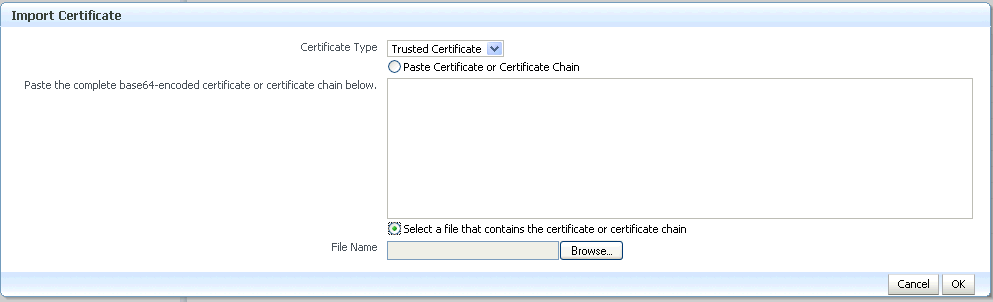
Description of the illustration ''cer4.gif''
-
-
Click OK.
8.4.7.6 Importing a Certificate or a Trusted Certificate Using WLST
See Also:
Section 8.2 for details about how to start and use WLST.Note:
You cannot use theWLST command-line tool to import DER-encoded certificates or trusted certificates into an Oracle wallet. Use one of these tools instead:
-
Oracle Wallet Manager (see Section 8.1.2.4) or
-
orapkicommand-line tool (see Appendix I) or -
keytool(see Section 8.1.2.1)
Assuming the instance name is inst1, use this command to import a certificate into a wallet:
importWalletObject('inst1', 'oid1', 'oid', 'selfsigned', 'password', 'Certificate', '/tmp/cert.txt')
where password is the password for this wallet and /tmp/cert.txt is the file that contains BASE64 encoded certificate.
To import a trusted certificate, replace Certificate in the above command with TrustedCertificate.
See Also:
Section 6.9.218.4.7.7 Deleting a Certificate Request, a Certificate, or a Trusted Certificate Using Fusion Middleware Control
Take these steps to delete a CR, a certificate, or a trusted certificate:
-
Navigate to the Certificate Management page. See Section 8.4.6, "Accessing the Certificate Management Page for Wallets in Fusion Middleware Control."
-
Select the row containing the certificate request, certificate or trusted certificate.
-
Click Delete.
-
A dialog box appears, requesting confirmation.
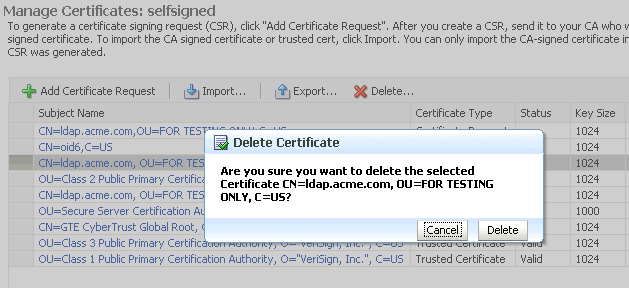
Description of the illustration ''cer5.gif''
-
Click Yes.
-
The object no longer appears in the Manage Certificates list.
8.4.7.8 Deleting a Certificate Request, a Certificate, or a Trusted Certificate Using WLST
See Also:
Section 8.2 for details about how to start and use WLST.Assuming the instance name is inst1, use this command to delete a certificate:
removeWalletObject('inst1', 'oid1', 'oid', 'selfsigned', 'password', 'Certificate', 'subject_dn')
where password is the password for this wallet and subject_dn is the distinguished name of the certificate being deleted.
To delete a certificate request or trusted certificate, replace Certificate in the above command with CertificateRequest or TrustedCertificate.
See Also:
Section 6.98.4.7.9 Converting a Self-Signed Certificate into a Third-Party Certificate Using Fusion Middleware Control
A self-signed certificate residing in a wallet can be converted into a third-party certificate signed by a certificate authority (CA). Take these steps to perform the task:
Note:
The steps are illustrated for use with Oracle Internet Directory, and similar steps are applicable for generating wallets to use with Oracle HTTP Server and Oracle Web Cache.-
From the navigation pane, locate your component instance.
-
Navigate to component_name, the Security, then Wallets.
-
From the list of wallets, select the wallet that contains the self-signed certificate.
-
The Manage Certificates page appears. It contains the list of certificates in the wallet.
-
A new certificate request must be generated for the self-signed certificate that is to be converted. Select the self-signed certificate and click Add Certificate Request. A dialog box appears:
Description of the illustration ''cer2.gif''
Note:
The common name entered here should match the host name of the server to which clients will connect; this helps to prevent problems of the type mentioned in Section 8.4.8.2. -
Enter the certificate request (CR) details and click OK.
The CR is generated. You can either:
-
Copy and paste the Base64-encoded certificate request to a file.
-
Export it directly to a file with the Export Certificate Request button.
-
-
Submit the certificate request file to a certificate authority to generate a certificate. This is an offline procedure that you can execute in accordance with your local policy for obtaining certificates.
-
The CA signs the certificate request and generates a certificate. The CA will return you one of the following:
-
A single file containing both the newly generated certificate and its own CA certificate in
pkcs7format -
Two files, one containing the newly generated certificate and a second containing its own CA certificate (or certificates, if there is a chain)
-
-
Use Import to import these files into your wallet:
-
If you received a single file from the CA, import it as a trusted certificate, using an alias that matches the alias of the self-signed certificate you are replacing (from Step 3).
-
If you received two files:
-
Import the file containing the CA certificate as a trusted certificate (use an alias that is unique in the wallet).
-
Import the certificate file as a certificate (using an alias that matches the alias of the self-signed certificate you are replacing).
Note:
The order is important: you must import the trusted certificate first, followed by the certificate. -
The CA returned a single file, which is imported as a trusted certificate:
Description of the illustration ''cer4.gif''
-
-
After import, the certificate issued by the CA replaces the self-signed certificate.
8.4.7.10 Converting a Self-Signed Certificate into a Third-Party Certificate Using WLST
See Also:
Section 8.2 for details about how to start and use WLST.See Also:
Section 6.9Follow these steps to convert a self signed certificate to a third-party certificate using WLST:
-
Add a certificate request, for example:
addCertificateRequest('inst1', 'oid1', 'oid', 'selfsigned', 'password', 'subject_dn', 'key_size') -
Export the certificate request:
exportWalletObject('inst1', 'oid1', 'oid', 'selfsigned', 'password', 'CertificateRequest', '/tmp', 'subject_dn') -
Submit the certificate request
/tmp/base64.txtto a certificate authority. The CA will return a newly generated certificate and its own certificate, either as one file in PKCS#7 format or as two separate files. -
If you receive a single file from the CA, run the following command
importWalletObject('inst1', 'oid1', 'oid', 'selfsigned', 'password', 'TrustedChain', '/tmp/cert.txt')where
passwordis the password for this wallet and/tmp/cert.txtis the file that the CA returned and contains BASE64 encoded PKCS#7.If you receive two files from the CA, import the CA certificate first as a trusted certificate, followed by the newly generated certificate.
importWalletObject('inst1', 'oid1', 'oid', 'selfsigned', 'password', 'TrustedCertificate', '/tmp/cacert.txt')

importWalletObject('inst1', 'oid1', 'oid', 'selfsigned', 'password', 'Certificate', '/tmp/cert.txt')
where
passwordis the password for this wallet,/tmp/cert.txtis the file that the CA returned and contains BASE64 encoded certificate and/tmp/cacert.txtis the file containing the BASE64 encoded CA certificate.
8.4.8 Wallet and Certificate Maintenance
This section contains the following administration topics:
8.4.8.1 Location of Wallets
This section describes the location of wallets for different components.
Root Directory for an Oracle Internet Directory Wallet
The root directory for wallets is $ORACLE_INSTANCE/OID/admin.
This root directory will contain subdirectories with wallet names; these subdirectories will contain the actual wallet files.
For example, assuming there are two wallets named oid1 and oid2, respectively; oid1 is a password-protected wallet, and oid2 is an auto-login-only wallet. A sample structure could look like:
$ORACLE_INSTANCE/OID/admin/oid1/cwallet.sso
$ORACLE_INSTANCE/OID/admin/oid1/ewallet.p12
$ORACLE_INSTANCE/OID/admin/oid2/cwallet.sso
Root Directory for an Oracle HTTP Server Wallet
The root directory for wallets is $ORACLE_INSTANCE/config/OHS/ohs_instance_name/keystores.
This root directory contains subdirectories with wallet names; these subdirectories contain the actual wallet files.
For example, assuming there are two wallets named ohs1 and ohs2, respectively; ohs1 is a password-protected wallet, and ohs2 is an auto-login-only wallet. A sample structure could look like:
$ORACLE_INSTANCE/config/OHS/ohs_instance1/keystores/ohs1/cwallet.sso
$ORACLE_INSTANCE/config/OHS/ohs_instance1/keystores/ohs1/ewallet.p12
$ORACLE_INSTANCE/config/OHS/ohs_instance1/keystores/ohs2/cwallet.sso
Root Directory for an Oracle Web Cache Wallet
The root directory for wallets is $ORACLE_INSTANCE/config/WebCache/webcache_instance_name/keystores.
This root directory will contain subdirectories with wallet names; these subdirectories will contain the actual wallet files.
For example, assuming there are two wallets named wc1 and wc2, respectively; wc1 is a password-protected wallet, and wc2 is an auto-login-only wallet. A sample structure could look like this:
$ORACLE_INSTANCE/config/WebCache/webcache_instance1/keystores/wc1/cwallet.sso
$ORACLE_INSTANCE/config/WebCache/webcache_instance1/keystores/wc1/ewallet.p12
$ORACLE_INSTANCE/config/WebCache/webcache_instance1/keystores/wc2/cwallet.sso
8.4.8.2 Effect of Host Name Change on a Wallet
Typically, the wallet DN is based on the host name of the server where the wallet is used.
For example, if a wallet is being created for the Oracle HTTP Server my.example.com, then the DN of the certificate in this Oracle HTTP Server wallet will be something like "CN=my.example.com,O=organization name".
This synchronization is required because most clients do host name verification during the SSL handshake.
Clients that perform host name verification include Web browsers and Oracle HTTPClient, among others. If the host name of the server does not match that of the certificate DN, then:
-
A clear warning will be displayed (in the case of browser clients).
-
There may be SSL handshake failure (in the case of other clients).
Thus, when you have a wallet on a server that is accepting requests from clients, you must ensure that whenever the host name of this server changes, you also update the certificate in the wallet.
You can do this by requesting a new certificate with a new DN (based on the new host name).
The steps are:
-
Generate a new request with the new DN (based on new host name).
-
Send this request to a certificate authority (CA).
-
Get back a new certificate from the CA.
-
Delete the older certificate and certificate request from the wallet.
-
Import the new certificate.
See Section 8.4.4 for details about these operations.
The steps are:
-
Delete the existing wallet.
-
Create a new wallet with a self-signed certificate using the new DN (based on the new host name).
See Section 8.4.4 for details about these operations.
For both production and self-signed wallets, once the new certificate is available in the wallet, you need to ensure that it is imported into all the component wallets where it needs to be trusted. For example, if Oracle WebLogic Server is SSL-enabled and the certificate for Oracle WebLogic Server changed due to a host name change, then you need to import its new certificate into the Oracle HTTP Server wallet so that it can trust its new peer.
8.4.8.3 Changing a Self-Signed Wallet to a Third-Party Wallet
You can convert a self-signed wallet into a third-party wallet, one that contains certificates signed by a trusted Certificate Authority (CA).
Assuming a self-signed wallet named MYWallet, containing a certificate with DN as "CN=my.example.com,O=example", take these steps to convert it into a third-party wallet:
-
Remove the user certificate "
CN=my.example.com,O=example" from the wallet. -
Remove the trusted certificate "
CN=my.example.com,O=example" from the wallet (this has the same DN as the user certificate, but is a separate entity nonetheless). -
Export the certificate request "
CN=my.example.com,O=example" from the wallet and save it to a file. -
Give this certificate request file to a third-party certificate authority (CA) such as Verisign.
-
The CA will return one of the following:
-
A user certificate file and its own certificate file
-
A single file with a certificate chain consisting of a user certificate and its own certificate
-
-
Import the above file(s) into the wallet.
See Section 8.4.4 for details about these operations.
8.4.8.4 Replacing an Expiring Certificate in a Wallet
An expiring certificate should be replaced before it actually expires to avoid or reduce application downtime.
The steps for replacing an expiring certificate are as follows:
-
Export the certificate request from the wallet (this is the same request for which the current expiring certificate was issued).
-
Provide this certificate request to the third-party Certificate Authority (CA) for certificate issuance. The validity date of the new certificate should be earlier than the expiration date of the current certificate. This overlap is recommended to reduce downtime.
Note:
Steps 1 and 2 are not required when the third-party CA already maintains the certificate request in a repository. In that case, simply request the CA to issue a new certificate for that certificate request. -
Remove the existing certificate (the one that is about to expire) from the wallet.
-
Import the newly issued certificate into the wallet.
To reduce downtime, remove the previous certificate and import the new certificate in the overlap period when the new certificate has become valid and the older one has not yet expired.
-
If the new certificate was issued by a CA other than the one that issued the original certificate, you may also need to import the new CA's trusted certificate before importing the newly issued certificate.
See Section 8.4.4 for details about these operations.