Oracle® Enterprise Data Quality
Installing and Upgrading Oracle Enterprise Data Quality Address Verification Server
Release 14.x, 15.x, 16.x
E62411-03
March 2016
Oracle Enterprise Data Quality (EDQ) Address Verification consists of two components:
-
The Address Verification Server is installed using the ZIP file obtained from the Oracle Software Delivery Cloud.
-
The Global Knowledge Repository is the data used by Address Verification, which must be purchased directly from Oracle's partner, Loqate.
To install and configure these components, follow the procedures in this document.
1 Installing the Address Verification Server
This section describes the prerequisites for installing Address Verification Server, and how to install it on different EDQ Server environments.
1.1 Installing Prerequisites
You must install a compatible release of EDQ in order to install an Address Verification Server. This version (16.1.0.0.0) of EDQ AV may require you to update your version of EDQ for compatibility purposes. Please consult the following table for a guide to compatibility:
| EDQ Address Verification Server Version | Required EDQ Version |
|---|---|
|
12.x, 13.x, 14.1.0.0.0 |
EDQ 9.0.7 or later, EDQ 11.1.1.7.3 or later, or EDQ 12.1.3 or later |
|
14.2.0.0.0, 14.3.0.0.0, 14.4.0.0.0, 15.1.0.0.0, 15.2.0.0.0, 15.3.0.0.0, 16.1.0.0.0 |
EDQ 9.0.10 or later, EDQ 11.1.1.7.4 or later, or EDQ 12.1.3 or later |
For more information about installing EDQ, see the Oracle Enterprise Data Quality Installation Guide for the release you want to install.
1.2 Additional Components You Can Install
The other components that can be selected during installation are:
-
Install Manager: installs the required data files, purchased separately from Loqate.
-
Batch Processor: allows standalone use of EDQ Address Verification
-
Demo Interface: allows EDQ Address Verification to be tested without an EDQ environment.
1.3 Obtaining the EDQ Address Verification Product
The EDQ Address Verification ZIP installation file can be downloaded from the Oracle Software Delivery Cloud. Use the following procedure:
-
Enter the Oracle Software Delivery Cloud URL into a web browser:
-
Click Sign-in/Register.
Note:
If you are not already logged in, the Oracle Single Sign-On page appears. Enter your Oracle user id and password and click Sign In.The Terms & Restrictions page appears
-
Click the Oracle Software Delivery Cloud Trial License Agreement and the Export Restrictions check boxes, and then click Continue.
The Media Pack Search page appears.
-
On the Media Pack Search page, do the following:
-
Click the Select Product Pack drop-down list and select or Oracle Fusion Middleware from the Select a Product Pack drop-down list.
-
Click the Platform drop-down list and select the platform on which you are installing EDQ.
-
Click Go.
The Results list expands to show all available media packs that include your search criteria.
-
-
Select the Oracle Enterprise Data Quality Address Verification Server Media Pack option.
-
Click the Download button.
-
Browse to the directory where you want to save the file. Click Save to start the file download. A ZIP file is downloaded.
-
Extract the ZIP file to a temporary directory.
1.4 Installing Address Verification On a Windows Environment
-
Extract the EDQ Address Verification ZIP file to the chosen directory on your EDQ Server.
-
Navigate to the
windowssub-directory of the extracted directory. -
Right-click the installation file suited to your Windows environment and select Run as administrator:
-
Windows 32-bit environment:
setup.exe -
Windows 64-bit environment:
setup_x64.exeNote:
If installed using the standard Windows installer, EDQ is configured to run in a 32-bit Java Virtual Machine (JVM), even on a 64-bit operating system such as Windows 7. Therefore, before installing the 64-bit version of the AV Server it is important to ensure that EDQ is running in a 64-bit JVM. See the Troubleshooting section of this document for more details.
-
-
Specify the installation directory. The default is
C:\Program Files\EDQAV\though you can specify a different directory. -
Select the C++ API, Java API, and Install Manager components for installation. The other components are optional.
The penultimate installer wizard window contains the path to the Install Manager component. Make a note of this path so you can run the Install Manager once the installation is complete and verified.
-
When the installation is complete, ensure that the
av.propertiesfile in theoedq_local_home/avdirectory of the EDQ installation points to the Address Verification Server installation location. See Section 3, "Configuring Address Verification Server" for further details. -
If you changed your
av.propertiesfile, then restart the EDQ Application Server. -
Verify that the
SYSTEMpath variable has been added. For example:-
On a Windows 7 operating system, open the Control Panel then double-click System, and then select Advanced system settings.
-
Select the Advanced tab
-
Click Environment Variables.
-
If the
PATHvariable does not contain the Address Verification installation path, add it manually using a semicolon to separate it from the other paths listed. -
Restart your server.
-
1.5 Installing Address Verification On a Linux or UNIX Environment
To install the Address Verification Server onto a Solaris, AIX, or Linux environment use the following procedure:
-
Extract the EDQ Address Verification ZIP file to a temporary directory on your EDQ Server.
-
Go to the sub-directory relating to your server platform,
aix,hpux,linux, orsolaris. -
Ensure that the permissions for the installer file allow you to run it or change them using the
chmodcommand.For example, for the Solaris installer the command would be:
chmod +x solaris_installer -
For installations in an AIX or Solaris environment, you must perform some additional steps to configure Address Verification Server:
-
Set the
LD_LIBRARY_PATH(Solaris) orLIBPATH(AIX) to the directory containing the Loqate libraries for the platform. -
Edit the
av.propertiesfile to setloqate.jarnotloqate.libdir.
-
-
Run the installer for your server platform. For example,
./linux_installer_x86.Note:
There are two Linux installer files: linux_installer_x86 for 32-bit environments, and linux_installer_x64 for 64-bit environments.There is one installer files for AIX.
There are two Solaris installer files (for SPARC and x86-based systems respectively). The Solaris SPARC installer requires a 64-bit environment.
-
Specify the installation directory. The default is
/opt/edqavthough you can specify a different directory.The Address Verification components are displayed in a numbered list. The currently selected components are indicated by an asterisk to the left of the component.
-
Select 8 to continue the installation and install the default components.
-
The penultimate installer wizard window contains the path to the Install Manager component. Make a note of this path so you can run the Install Manager once the installation is complete and verified.
-
When the installation is complete, ensure that the
av.propertiesfile inconfig/avdirectory of the EDQ installation points to the AV Server installation location. See Section 3, "Configuring Address Verification Server" for further details. -
If the
av.propertiesfile has been changed, restart the EDQ Application Server.
1.6 Installing Published Processors
You can install these two published processors that summarize the results of the Address Verification processor:
-
The Summarize Address Verification processor is a published processor that summarizes the results of the Address Verification processor. It reads the
av.AccuracyCodeflag added by Address Verification and produces a number of results views that indicate how many records were verified, to which level, whether postal codes were modified or not, and other views. -
The Summarize GeoCoding Results processor is a published processor that runs on the data after Address Verification where the geocoding option is enabled, and summarizes the GeoCoding results in terms of accuracy.
The processors are contained in a .dxi file in the additional processors directory of the extracted Address Verification ZIP file.
To install the processors:
-
Do one of the following to begin the installation:
-
Start EDQ Director. Select File, then select Open Package File.... Go to the
additional processorsdirectory, and then double-click on theSummarize Address Verification.dxiorSummarize GeoCoding Results.dxifile. -
Start EDQ Director. Go to the
additional processorsdirectory and then drag theSummarize Address Verification.dxiandSummarize GeoCoding Results.dxifiles into the Project Browser. -
Go to the
additional processorsdirectory then double-click one of the .dxi files to start EDQ Director.
-
-
Click and drag the Summarize Address Verification and Summarize GeoCoding Results processors into the Published Processor directory to complete installing these processors.
1.7 Installing the Global Knowledge Repository
The Global Knowledge Repository, comprising the data used by Address Verification, must be purchased directly from Oracle's partner, Loqate. The repository is installed by running the Install Manager, an Address Verification component which is added during installation.
For instructions to install the Global Knowledge Repository data files for Address Verification using the Install Manager, use the documentation provided at the Loqate web site at
http://www.loqate.com/support/releases/
Oracle recommends that you use the following directories when you install the Global Knowledge Repository data files:
-
Windows:
C:\Program Files\EDQAV\data. -
Solaris, AIX or Linux:
/opt/edqav/data.
You must ensure that your installation directories are correctly specified in the av.properties file, see Section 3, "Configuring Address Verification Server" for further information.
Note:
If you have multiple EDQ Servers that all require the use of Address Verification, both the Address Verification Server and data files can be mounted on a network file system and shared between multiple servers.2 Upgrading EDQ Address Verification
This section describes how to upgrade the Address Verification Server and the Global Knowledge Repository.
You must upgrade both the Address Verification Server and the Loqate Global Knowledge Repository data files that it uses. Newer versions of the Address Verification Server will not work with old versions of the Global Knowledge Repository data files.
You must obtain the Global Knowledge Repository data files from Oracle's partner Loqate at
2.1 Upgrading Your Address Verification Server
Use the following procedure to upgrade Address Verification Server:
-
Rename (or backup then delete) the current directory or directories containing your Address Verification Server and its data files.
-
Install the new version into the directory location where the previous version was installed. It is not necessary to change any system path variables, nor the
av.propertiesfile that EDQ uses to find the Address Verification Server.
2.2 Upgrading the Global Knowledge Repository
You can upgrade the Global Knowledge Repository without upgrading the Address Verification Server to ensure that you are using the most recent address data.
You can use the Install Manager, which verifies the software version and provides only the data that is valid for the installed version. Alternatively, you manually upgrade the can Global Knowledge Repository using the following steps:
-
Stop the Address Verification Server.
-
Back up the contents of the existing data directory to another file location.
Tip:
You can delete these files when the upgrade is completed successfully. -
Copy the new Global Knowledge Repository data files, that you obtained from Loqate, into the data directory.
-
Start your Address Verification Server.
3 Configuring Address Verification Server
After the EDQ Address Verification API and data files are installed, EDQ must be configured to use them. You must modify the av.properties file found in the av subdirectory of the EDQ local home directory.
This file must contain the correct paths to the installed Address Verification software and data, as defined in the following properties:
-
loqate.datadir: The location of the Loqate data. -
loqate.libdir: The location of the EDQ Address Verification library files. -
loqate.jar: The location of the Loqate JAR file.
The values of these properties vary depending on your installation environment. Oracle recommends the following:
| Configuration Property | Suggested Windows Path | Suggested UNIX Path |
|---|---|---|
loqate.datadir |
C:\\Program Files\\EDQAV\\data |
/opt/edqav/data |
loqate.libdir |
The DLL directory must be on the system path (this property is not required.) | The directory need not be on the system path. This property is used to set the location, for example: loqate.libdir = /opt/edqav/ |
loqate.jar |
C:\\Program Files\\EDQAV\\loqate.jar |
/opt/edqav/loqate.jar |
Note the following:
-
On UNIX operating systems, the library directory must be set on the shared library path. On AIX, use
LIBPATH; for all other UNIX operating systems, useLD_LIBRARY_PATH. This requirement does not apply to Linux operating systems. -
If you edit the
av.propertiesfile, you must restart your EDQ Application Server.
4 Troubleshooting the Installation
This section describes common errors encountered when installing EDQ Address Verification, and how to resolve them.
4.1 Incomplete Installation
Error
A process containing the Address Verification processor is run, and all the output fields are blank except for av.Accuracy Code, which has a value of -1.0. Additionally, an error is recorded in the main EDQ server log file, oeqd_home/logs/main0.log, in the following format:
WARNING: [dd-MMM-yyyy hh:mm:ss: OAV Java API jar "[path to loqate.jar]" does not exist.
Cause
Address Verification was not installed in the path referred to in the av.properties file. Verify that the software has been installed and that the paths in this file are correct. At a minimum, the following API files must be installed:
| Windows EDQ Server | Linux/Solaris/AIX EDQ Server |
|---|---|
lqtcr.dll |
liblqtcr.so |
loqate.jar |
liblqtjava.so |
lqtjava.dll |
loqate.jar |
Resolution
Perform the installation process again.
4.2 64-bit Installation Where EDQ is Running in a 32-bit JVM
Error
After installing EDQ Address Verification Server, the following error may be written to the main0.log file when the EDQ Application Server starts:
WARNING: 07-Mar-2012 07:19:56: widget bean com.datanomic.director.widget.loqator.server.LoqatorBean reported as dead: Failed to load OAV JNI library lqtjava: C:\Program Files\EDQAV\lqtjava.dll: Can't load AMD 64-bit .dll on a IA 32-bit platform (Code: 247,005)
Cause
This error usually occurs when the 64-bit version of Address Verification Server is installed and your EDQ Server is running in a 32-bit Java Virtual Machine (JVM). This could be the case even on a 64-bit Operating System, such as Windows 7. If you EDQ was installed using the provided Windows installation program, it is configured to run in a 32-bit JVM unless otherwise specified.
Resolution
If you have a 32-bit operating system, you must uninstall the 64-bit version of Address Verification and install the 32-bit version.
If you have a 64-bit operating system, configure EDQ to run in a 64-bit JVM using the following steps:
-
Ensure you are logged into your EDQ Server as a user with administrator rights.
-
Stop your EDQ Application Server service, then stop the EDQ Config Store and Results Store database services.
-
Find the utility file,
dnConfig.exe, in thedirector/[version number]directory where you installed EDQ. By default, this file is installed in theC:\Program Files\Oracle\Enterprise Data Quality\director\version numberdirectory. If you have multiple versions installed, choose the latest version number. -
Right-click on
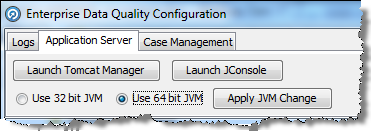
dnConfig.exeand select Run as administrator.The Enterprise Data Quality Configuration utility is started.
-
Select the Application Server tab, then select the Use 64-bit JVM option, and then click Apply JVM Change:
-
Click Launch Tomcat Manager, and then select the Java tab
-
Adjust the Maximum memory pool option to allow EDQ to use more memory. Oracle recommends that you set the maximum pool to approximately 50% of the available physical memory on your machine. For example, on a machine with 8GB of RAM this setting would be changed to 4096 (4GB):
-
Start the EDQ services in the following order:
EDQ Config Store
EDQ Results Store
EDQ Application Server
4.3 Invalid Data Directory
Error
After installing EDQ Address Verification Server, the following error may be written to the main0.log file when EDQ starts:
WARNING: 29-Aug-2012 15:34:49: widget bean com.datanomic.director.widget.loqator.server.LoqatorBean reported as dead: OAV data directory "C:\Program Files\EDQAV\data" not found or invalid (Code: 247,002)
Cause
In order to load the Address Verification processor, EDQ requires a valid data directory containing the Loqate Global Knowledge Repository data files. Although the set of data files (.lfs files) that are installed may vary depending on the licensed regions or countries, there must be a valid data directory. During startup EDQ attempts to locate the loqate.ini file in the path stated in the loqate.datadir property in the av.properties file. If the loqate.ini file is not present in the defined location, this error occurs.
Resolution
Ensure that you have a valid loqate.ini file. This should be provided to you by Loqate as part of the delivery of the licensed Global Knowledge Repository data files. Ensure that this file is present in the directory defined by the loqate.datadir property.
4.4 Missing Required File in Solaris Installation
Error
After installing EDQ Address Verification Server on Solaris, the following error may be written to the main0.log file on startup of the EDQ Application Server:
WARNING: 21-Sep-2012 19:25:14: widget bean com.datanomic.director.widget.loqator.server.LoqatorBean reported as dead: Failed to load OAV JNI library lqtjava: /opt/EDQTool/edqav-12.1.2/liblqtjava.so: ld.so.1: java: fatal: liblqtcr.so: open failed: No such file or directory (Code: 247,005)
Cause
Typically, this error occurs because the liblqtcr.so file has a dependency on a file named, libstlport.so, provided as part of Oracle Solaris Sun Studio, which may or may not be installed. To test this, check the dependencies of liblqtcr.so by running the following command:
ldd liblqtcr.so
If the output indicates that the liblqtcr.so file is not found, it is either not installed or cannot be loaded.
Resolution
Add the libstlport.so file to your installation:
-
Download and unpack the latest version of Oracle Solaris Sun Studio from the Oracle Technology Network web site at
-
Add your Oracle Solaris Sun Studio location to your
LD_LIBRARY_PATH, as in the following example:/export/home/sullah/solarisstudio12.3/lib/stlport4/v9 -
Retest using the
ldd liblqtcr.socommand.
5 Related Documents
For more information, see the following documents in the documentation set:
-
Oracle Enterprise Data Quality Installation Guide
See the latest version of this and all documents in the Oracle Enterprise Data Quality Documentation website at:
http://download.oracle.com/docs/cd/E36337_01/index.htm
Also, see the latest version of the EDQ Online Help, bundled with EDQ.
6 Documentation Accessibility
For information about Oracle's commitment to accessibility, visit the Oracle Accessibility Program website at http://www.oracle.com/pls/topic/lookup?ctx=acc&id=docacc.
Oracle customers that have purchased support have access to electronic support through My Oracle Support. For information, visit http://www.oracle.com/pls/topic/lookup?ctx=acc&id=info or visit http://www.oracle.com/pls/topic/lookup?ctx=acc&id=trs if you are hearing impaired.
Oracle Enterprise Data Quality Installing and Upgrading Oracle Enterprise Data Quality Address Verification Server, Release 14.x, 15.x, 16.x
E62411-03
Copyright © 2006, 2016, Oracle and/or its affiliates. All rights reserved.
This software and related documentation are provided under a license agreement containing restrictions on use and disclosure and are protected by intellectual property laws. Except as expressly permitted in your license agreement or allowed by law, you may not use, copy, reproduce, translate, broadcast, modify, license, transmit, distribute, exhibit, perform, publish, or display any part, in any form, or by any means. Reverse engineering, disassembly, or decompilation of this software, unless required by law for interoperability, is prohibited.
The information contained herein is subject to change without notice and is not warranted to be error-free. If you find any errors, please report them to us in writing.
If this is software or related documentation that is delivered to the U.S. Government or anyone licensing it on behalf of the U.S. Government, then the following notice is applicable:
U.S. GOVERNMENT END USERS: Oracle programs, including any operating system, integrated software, any programs installed on the hardware, and/or documentation, delivered to U.S. Government end users are "commercial computer software" pursuant to the applicable Federal Acquisition Regulation and agency-specific supplemental regulations. As such, use, duplication, disclosure, modification, and adaptation of the programs, including any operating system, integrated software, any programs installed on the hardware, and/or documentation, shall be subject to license terms and license restrictions applicable to the programs. No other rights are granted to the U.S. Government.
This software or hardware is developed for general use in a variety of information management applications. It is not developed or intended for use in any inherently dangerous applications, including applications that may create a risk of personal injury. If you use this software or hardware in dangerous applications, then you shall be responsible to take all appropriate fail-safe, backup, redundancy, and other measures to ensure its safe use. Oracle Corporation and its affiliates disclaim any liability for any damages caused by use of this software or hardware in dangerous applications.
Oracle and Java are registered trademarks of Oracle and/or its affiliates. Other names may be trademarks of their respective owners.
Intel and Intel Xeon are trademarks or registered trademarks of Intel Corporation. All SPARC trademarks are used under license and are trademarks or registered trademarks of SPARC International, Inc. AMD, Opteron, the AMD logo, and the AMD Opteron logo are trademarks or registered trademarks of Advanced Micro Devices. UNIX is a registered trademark of The Open Group.
This software or hardware and documentation may provide access to or information about content, products, and services from third parties. Oracle Corporation and its affiliates are not responsible for and expressly disclaim all warranties of any kind with respect to third-party content, products, and services unless otherwise set forth in an applicable agreement between you and Oracle. Oracle Corporation and its affiliates will not be responsible for any loss, costs, or damages incurred due to your access to or use of third-party content, products, or services, except as set forth in an applicable agreement between you and Oracle.