4 Starting Oracle Data Integrator
This chapter describes how to start the demonstration environment and the first steps in Oracle Data Integrator Studio.
This chapter includes the following sections:
4.1 Starting the Demonstration Environment
Oracle Data Integrator demonstration environment provides the initial repository and the databases that contain the data used in the examples of this Getting Started guide.
To start the demonstration environment:
-
Change directory to the
ODI_HOME/oracledi/demo/bindirectory. -
Enter the following command:
-
On UNIX operating systems:
./startdemo.sh -
On Windows operating systems:
startdemo.bat
-
The source and target data servers as well as the demo repository data server are started.
To stop these database servers, you can use the stopdemo command in the same directory:
Enter the following command:
-
On UNIX operating systems:
./stopdemo.sh -
On Windows operating systems:
stopdemo.bat
Caution:
Do not shut down the databases by using the [CTRL-C] keyboard shortcut, or by closing their execution windows. This may leave the source, target, and repository databases in an unstable state. Always use the stopdemo scripts.
4.2 Starting Oracle Data Integrator Studio
This section describes how to start Oracle Data Integrator Studio.
Note:
Before starting ODI Studio, the demonstration environment must be started as described in Section 4.1, "Starting the Demonstration Environment".
4.2.1 Starting ODI Studio
In the demonstration environment, the connection to the demonstration repository is already defined. To perform the tasks of this getting started guide, you only need to login as SUPERVISOR to start Oracle Data Integrator Studio.
To connect to the demonstration repository and launch ODI Studio:
-
Start ODI Studio:
-
On UNIX operating systems:
ODI_HOME/oracledi/client directory/odi.sh -
On Windows operating systems:
ODI_HOME\oracledi\client\odi.exeNote:
On Windows, you can launch ODI Studio from the Start menu:
On the Start menu, select All Programs > Oracle > Oracle Data Integrator > ODI Studio.
-
-
In Designer Navigator, click Connect To Repository...
The Oracle Data Integrator Login Dialog is displayed
-
Select Getting Started - ETL Project from the Login Name dropdown menu.
Note:
If this Login Name does not exist, go to Section 4.2.2, "Defining a new Getting Started Login".
-
In the User field, enter
SUPERVISOR. Note that the username is case sensitive. -
In the Password field, enter
SUNOPSIS. Note that the password is case sensitive -
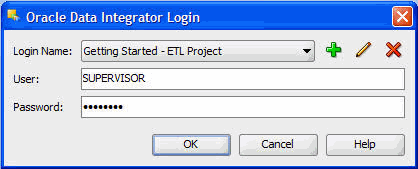
The Oracle Data Login Dialog should look as shown in Figure 4-1.
-
Click OK.
ODI Studio connects to the demonstration environment repository. You can now work in the Oracle Data Integrator demonstration environment.
4.2.2 Defining a new Getting Started Login
This section describes how to define a new connection to the demonstration repository and how to create a new ODI login.
You only need to perform the tasks described in this section, if the Getting Started - ETL Project Login Name does not appear in the Login Name list of the Oracle Data Integrator Login Dialog shown in Figure 4-1.
To define a new connection to the demonstration repository:
-
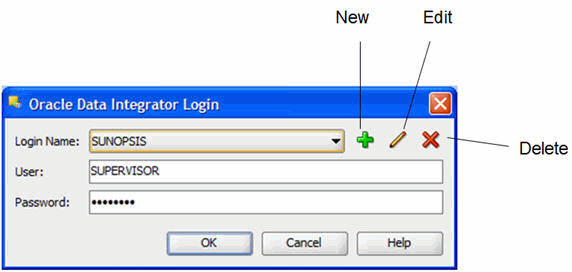
In the Oracle Data Integrator Login Dialog, click New.
Figure 4-2 shows the Oracle Data Integrator Login Dialog.
The Repository Connection Information Dialog is displayed.
-
Click New.
The Repository Connection Information Dialog is displayed.
-
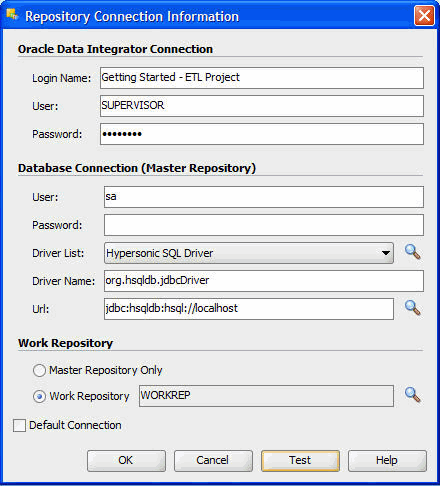
Specify the Oracle Data Integrator connection details as follows:
-
Login name:
Getting Started - ETL Project -
User:
SUPERVISOR -
Password:
SUNOPSIS
Note that username and password are case sensitive.
-
-
Specify the Database Connection (Master Repository) details as follows:
-
User:
saThis is the database user ID/login of the schema (database, library) that contains the ODI master repository
-
Password: Leave this field empty.
-
Driver List: Select Hypersonic SQL Driver from the list.
This driver is required to connect to the DBMS supporting the master repository.
-
Driver Name:
org.hsqldb.jdbcDriver -
URL:
jdbc:hsqldb:hsql://localhostThis URL is used to establish the JDBC connection to the database hosting the repository. Note that the driver name is case sensitive and make sure that the URL does not contain any extra characters, in particular spaces.
-
-
Select Work Repository and enter
WORKREPin the Work Repository field.The Repository Connection Information Dialog should look as shown in Figure 4-3.
-
Click Test to verify that the connection is working.
The Information dialog opens and informs you if the connection has been established. If the connection fails, fix the connection parameters to your repository and make sure that the startdemo script is running (see Section 4.1, "Starting the Demonstration Environment") before moving to next step.
-
Click OK to close the Information dialog.
-
In the Oracle Data Integrator Login Dialog, select Getting Started - ETL Project from the Login Name dropdown menu.
The SUPERVISOR user and the SUNOPSIS password are automatically set.
The Oracle Data Login Dialog should look as shown in Figure 4-1.
-
In the Oracle Data Integrator Login Dialog click OK.
ODI Studio connects to the demonstration environment repository. You can now work in the Oracle Data Integrator demonstration environment
4.3 Introduction to Using the ODI Navigators
ODI Studio provides four Navigators for managing the different aspects and steps of an ODI integration project:
-
Topology Navigator
-
Security Navigator
The tasks performed in this getting started guide take place in Designer Navigator (to create and execute your developments) and in Operator Navigator (to monitor the execution of your developments). This section only describes the Navigators that are used in this getting started guide. See the Oracle Fusion Middleware Developer's Guide for Oracle Data Integrator for information about the Topology and Security Navigators.
4.3.1 Designer Navigator
Designer Navigator is used to manage metadata, to design data integrity checks, and to build transformations.
The main objects you handle through Designer Navigator are models and projects.
-
The data models for your applications contain all of the metadata in your data servers (tables, columns, constraints, descriptions, cross-references, etc.)
-
The projects contain all of the loading and transformation rules for your data servers (interfaces, procedures, variables, etc.)
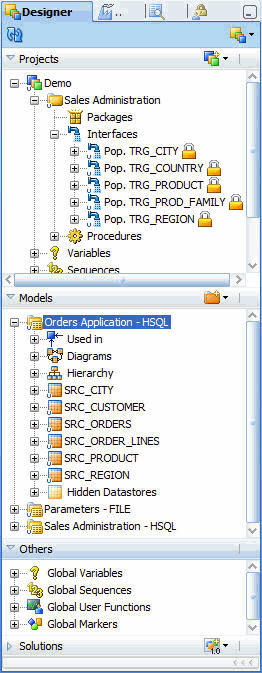
The Designer Navigator appears as shown in Figure 4-4.
The Designer Navigator has the following accordions:
-
Projects
The Projects accordion contains the developments made with Designer Navigator.
-
Models
The Models accordion contains the descriptions of the data and applications structures.
-
Others
The Others accordion contains the Global User Functions, Variables, Markers, and Sequences.
-
Solutions
The Solutions accordion contains the Solutions that have been created when working with version management.
The demonstration repository provides the objects you will need in this Getting Started guide:
-
In the Models accordion, you will find all the data models corresponding to the Orders Application, Parameters, and Sales Administration applications.
-
In the Projects accordion, you will find the Demo project and the Sales Administration folder which already contains several interfaces. You will develop your new interfaces in this folder.
-
The necessary Knowledge Modules (KM) are already imported in the Demo Project:
-
LKM File to SQL
-
LKM SQL to SQL
-
CKM HSQL
-
IKM SQL Incremental Update
-
4.3.2 Operator Navigator
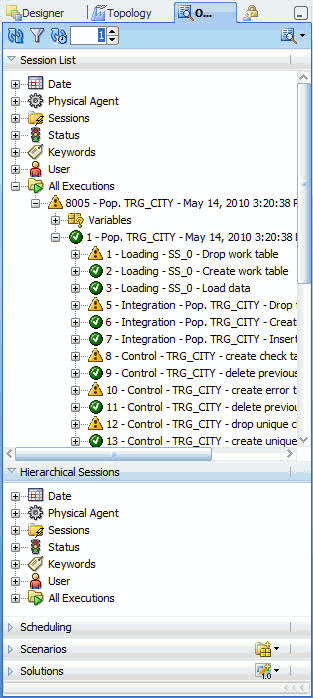
Operator Navigator is the production management and monitoring tool. It is designed for IT production operators and can be used by developers to check code execution and perform debugging operations. Through Operator Navigator, you can manage your development executions in the sessions, as well as the scenarios in production.
The Operator Navigator appears as shown in Figure 4-5.
The Operator Navigator has the following accordions:
-
Session List
The Session List accordion displays all sessions organized per date, physical agent, status, keywords, and so forth.
-
Hierarchical Sessions
The Hierarchical Sessions accordion displays the execution sessions organized in a hierarchy with their child sessions.
-
Scheduling
The Scheduling accordion displays the list of physical agents and schedules.
-
Scenarios
The Scenarios accordion displays the list of scenarios available
-
Solutions
The Solutions accordion contains the Solutions that have been created when working with version management.
Now that the demonstration environment and Oracle Data Integrator are started, you can move on to Implementing Data Quality Control.
