4 Security for Oracle Real-Time Decisions
Oracle Real-Time Decisions integrates seamlessly with the Oracle Fusion Middleware platform and they share a common security framework and features. This chapter includes an overview of the security framework to provide background for understanding the overall security model.
For more information about the Oracle Fusion Middleware platform and the common security framework, see Oracle Fusion Middleware Application Security Guide.
This chapter contains the following sections:
-
Section 4.4, "Administration Tools Used for Common Security-Related Tasks"
-
Section 4.5, "Typical System Administration Tasks for Securing Oracle RTD"
-
Section 4.7, "Managing Authorization and Privileges for Oracle RTD"
4.1 About the Security Framework
Oracle Fusion Middleware and Oracle Real-Time Decisions share a common security framework. Using a common security framework enables Oracle Real-Time Decisions to interoperate securely within your Oracle Fusion Middleware deployment. The security framework is built upon the Java security model, which is a role-based, declarative model employing container-managed security where resources are protected by roles that are assigned to users.
For a more thorough discussion of the concepts discussed in this topic, see Oracle Fusion Middleware Application Security Guide.
Oracle Platform Security Services
Oracle Platform Security Services (OPSS) is the underlying platform on which the security framework is built. OPSS is standards-based and complies with role-based-access-control (RBAC), Java Enterprise Edition (JavaEE), and Java Authorization and Authentication Servers (JAAS).
Oracle Real-Time Decisions authentication is handled by the Oracle WebLogic Server authenticator providers, in compliance with the OPSS model. An authentication provider performs the following functions:
-
Establishes the identity of users and system processes
-
Transmits identity information
-
Serves as a repository for identity information from where components can retrieve it
The default authentication provider is the directory server embedded in Oracle WebLogic Server. Alternate authentication providers can be used if desired and managed in the Oracle WebLogic Administration Console.
For more information on Oracle WebLogic Server authentication providers, see Oracle Fusion Middleware Oracle WebLogic Server Administration Console Online Help.
Oracle WebLogic Server Security Realms
An Oracle WebLogic Server security realm is specific to a domain, and contains the authentication providers, users, groups, security roles, and security policies configured together. Whereas multiple security realms can be defined for a domain, only one can be active, that is, designated as the default realm, at a given time.
The administrative tasks required to secure and protect application objects are performed through Oracle Fusion Middleware and Oracle WebLogic Server consoles, and the command-line Oracle WebLogic Scripting Tool (WLST). For details, see Section 4.4, "Administration Tools Used for Common Security-Related Tasks."
4.2 Getting Started with Security for Oracle RTD
The security platform depends on certain key elements and processes to provide uniform security and identity management for all Oracle Fusion Middleware products. The default elements created during a simple install of Oracle RTD are used to illustrate this overview of security as it affects Oracle RTD users.
For more information about these elements, processes, and the security platform, see Oracle Fusion Middleware Application Security Guide.
4.2.1 The Security Controls for Oracle RTD
This topic introduces the security controls that relate to Oracle RTD, and the security configuration that is created during a default installation.
The key protections required for applications, and the basic questions they address, are:
-
Authentication
Who are the users allowed to access the application?
Users and groups are stored in an identity store.
-
Authorization
What are the authenticated users allowed to do in and with the application?
The roles and permissions allocated to authenticated users and groups of users are stored in a policy store.
Table 4-1 summarizes the standard security controls for Oracle RTD.
Table 4-1 Standard Security Controls for Oracle RTD
| Security Control | Main Purpose | Description |
|---|---|---|
|
Identity store |
Authentication |
Trusted store to hold user and group identities. |
|
Policy Store |
Authorization |
Trusted store used to hold the application roles and application grants that enable access to application objects. |
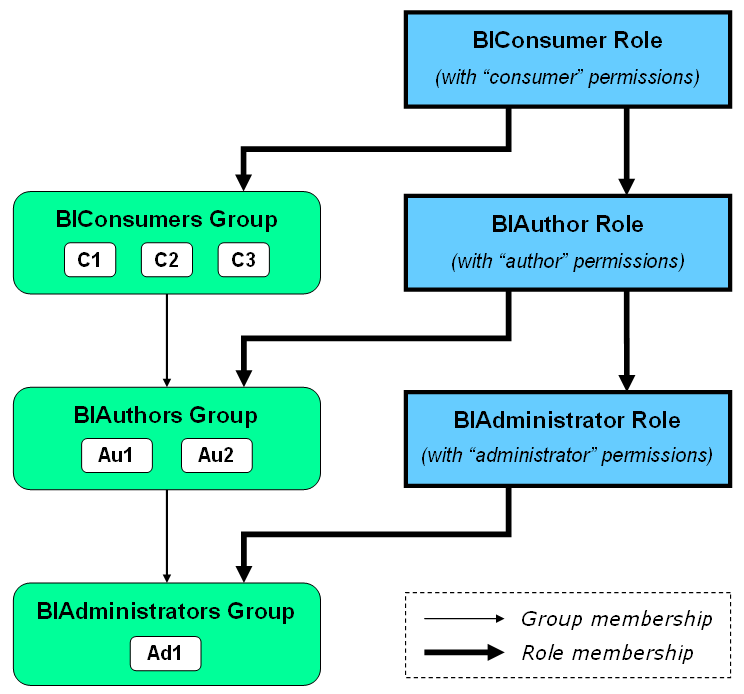
To illustrate the security concepts, Figure 4-1 shows an example of the relationships between users, groups, application roles, and permissions, as defined and used in Oracle Fusion Middleware applications. This example is used as a reference point in subsequent descriptions of the individual security elements.
The groups BIConsumers, BIAuthors, and BIAdministrators, and the application roles BIConsumer, BIAuthor, and BIAdministrator, are set up during installations that configure Oracle Real-Time Decisions or other Oracle Business Intelligence components. C1, C2, C3, Au1, Au2, Ad1 are examples of users who would be defined as members of their groups after installation.
By their membership in groups that are assigned to roles, users can inherit permissions from higher levels of group and role hierarchies.
For example, the authors Au1 and Au2 have two sets of permissions:
-
Explicit permissions from the BIAuthor role, as the BIAuthors group is a member of the BIAuthor role
-
Implicit permissions from the BIConsumer role, inherited through both the BIAuthor role and also through the BIConsumers group
The installed application roles are preconfigured with appropriate permissions and privileges to enable them to work with the installed Oracle BI and Oracle RTD software components. For example, the application role named BIAuthor is preconfigured with permissions and privileges to deploy Inline Services, and the application role BIConsumer allows access to Decision Center reports. For details of the default Oracle RTD privileges, see Section 4.3.1, "Default Oracle Real-Time Decisions Application Grants."
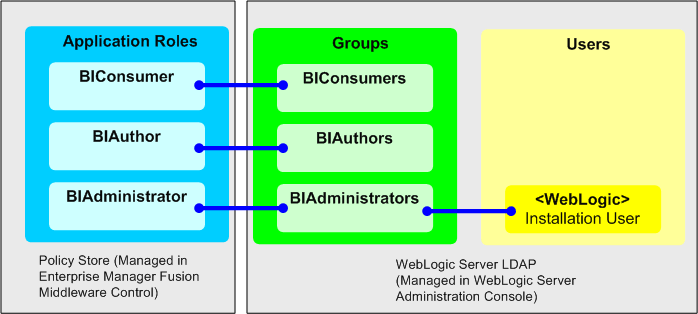
Figure 4-2 shows application roles, groups and users that are preconfigured during installation.
The user that is specified at installation time (for example, WebLogic), is automatically assigned to the WebLogic Administrators group named BIAdministrators and to the associated application role named BIAdministrator. The user has permissions to create and administer other users.
The rest of this section describes how users acquire their privileges to access applications and to control what they can do in the applications.
4.2.2 Key Authentication Elements
This section describes the security elements used for authentication.
In general, users and groups are defined in an identity store. User and group identities are stored in a directory server. Authentication of users and groups is performed by the authentication provider specified as part of Oracle WebLogic Server security setup.
- Identity Store
-
An identity store contains the definitions of users, groups, and group hierarchies. Oracle WebLogic Server's embedded LDAP server is the default identity store. By default, the authentication provider DefaultAuthenticator authenticates against the users and groups in this LDAP server.
Oracle RTD can be reconfigured to use alternative directory servers, such as other LDAP servers. For a complete list, see System Requirements and Supported Platforms for Oracle Fusion Middleware 11gR1.
- Users and Groups
-
A user is an entity that can be authenticated. A user can be a person, such as an application end user, or a software entity, such as a client application. Every user is given a unique identifier within the WebLogic domain where Oracle Real-Time Decisions is deployed. Every user has a unique identifier in the identity store and is therefore recognized across Oracle Fusion Middleware, Oracle WebLogic Server, and Oracle Real-Time Decisions.
Groups are created by organizing collections of users, and possibly other groups, who have something in common. Users can be defined in more than one group. A group is static identifier that is assigned by a system administrator.
Note:
By themselves, groups and groups hierarchies do not enable any privilege to perform any action within an application. Those privileges are conveyed through application roles and permissions, as described in Section 4.2.3, "Key Authorization Elements."
- Default Identity Store
-
The default identity store is the LDAP-based embedded directory server provided by Oracle WebLogic Server, and managed using Oracle WebLogic Server Administration Console. It contains the default users and groups created during installation.
The default authentication provider is DefaultAuthenticator.
- Default Users
-
In addition to two system users required for internal Oracle Fusion Middleware process management, there is a user with administrative privileges, whose name is entered during the installation.
Note:
For convenience, the name entered during installation is referred to as
<orig_admin_user>in this section.In the default security configuration,
<orig_admin_user>is a member of the BIAdministrators group.The default administrator user name
<orig_admin_user>can be changed to a different value, and additional user names can be added by an administrative user using Oracle WebLogic Server Administration Console. - Default Groups
-
Table 4-2 lists the default groups and group members in the default identity store. These defaults can be changed to different values and additional group names can be added by an administrative user using Oracle WebLogic Server Administration Console.
Table 4-2 Default Groups and Members
Group Name Group Members BIAdministrators
any administrative_user
BIAuthors
BIAdministrators group
BIConsumers
BIAuthors group
Oracle WebLogic Server LDAP server users group
These default group names serve as a starting point, by defining three broad categories of functional usage - administrator, author, and consumer - that correspond to the typical software user categories of administrator, application developer, and end-user. As indicated by Table 4-2 and the group hierarchy in Figure 4-1, an author is also considered to be a consumer, and an administrator is considered to be an author.
4.2.3 Key Authorization Elements
This section describes the security elements used for authorization.
- Application Policy
-
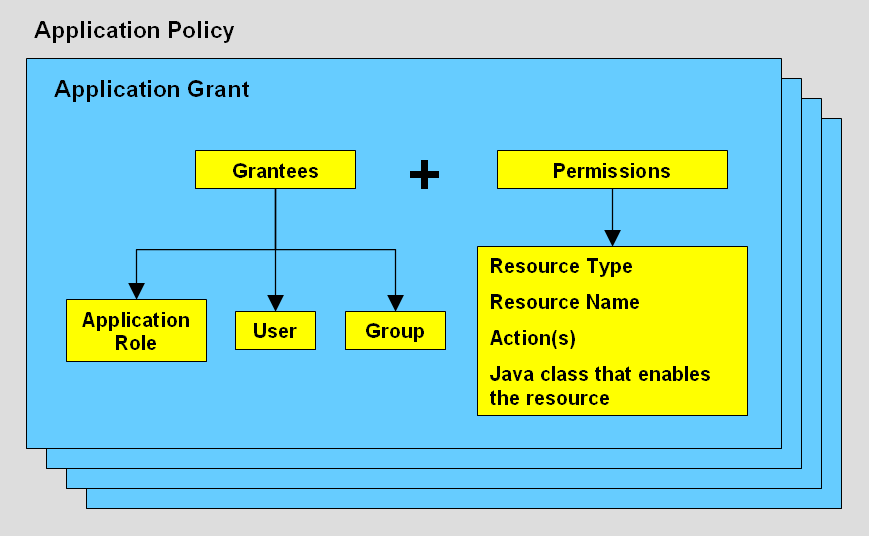
An application policy is a collection of Java 2 and JAAS policies that are applicable to a specific application. The application policy defines who can do what on which application resources, and consists of one or more application grants.
Figure 4-3 shows a conceptual overview of the elements of an application policy. Descriptions of the individual components follow later in this section.
Note:
An application stripe defines a subset of policies in the policy store. The general application stripe used by all Oracle Business Intelligence components, including Oracle Real-Time Decisions, is named obi.
- Application Role
-
An application role is a grouping construct in a policy store, that defines a collection of users and groups that need to perform a common set of application functions or processes. In general, an application role consists of users, groups, and other application roles.
Application roles provide the main way that permissions are given to application users. By themselves, application roles do not enable access to application objects - that is provided by mapping application roles to permissions in application grants in application policies.
- Application Grant
-
An application grant is a combination of one or more grantees - each of which can be an application role, a group, or a user - and one or more permissions. For more information about users and groups, see Section 4.2.2, "Key Authentication Elements."
- Permission
-
A permission is an extension of the Java permission concept, and consists of a Java class, a resource, and one or more actions allowed by the type of the resource.
For details and examples of the resources and actions available for Oracle RTD, see Section 4.3, "Resource Types and Actions for Oracle RTD."
- Application Role Mapping
-
Any user or group assigned to an application role is granted the permissions associated with that role. More than one user or group can be assigned to the same application role.
Application role mapping is the process by which users, groups, and other application roles are dynamically mapped to application roles at runtime. Permissions are granted to users and groups according to which application roles they are members of, that is, have been mapped to.
Group and role hierarchies also illustrate the principle of inheritance: roles inherit other roles through the role hierarchy, and permissions are inherited through the group and role hierarchy. See Figure 4-1 for an example of the relationships between users, groups, application roles, and permissions.
Following the Figure 4-1 example, user Au1 has all the permissions of the roles BIAuthor and BIConsumer, and user Ad1 has all the permissions of the roles BIAdministrator, BIAuthor, and BIConsumer.
- Policy Store
-
The policy store is the repository of system and application-specific policies. A policy store can be file-based or LDAP-based.
The default policy store is the
system.jazn-data.xmlfile. - Default Policy Store
-
The default policy store,
system.jazn-data.xml, contains the Oracle RTD policies, application roles, application grants, and default membership definitions as configured during installation. - Default Application Roles
-
Table 4-3 lists the default application roles and role members after installation. These defaults can be changed to different values and additional role names can be added by an administrative user using Oracle Fusion Middleware Control.
A graphical interpretation of these default application roles and the default group and role hierarchies appears in Figure 4-1, "Example of Oracle Fusion Middleware Security Elements".
Table 4-3 Default Application Roles and Role Members
Application Role Name Role Members BIAdministrator
BIAdministrators group
BIAuthor
BIAuthors group
BIAdministrator application role
BIConsumer
BIConsumers group
BIAuthor application role
The BIAdministrator role is intended for administrative permissions necessary to configure and manage the Oracle RTD installation. Any member of the BIAdministrators group is explicitly granted this role and implicitly granted the BIAuthor and BIConsumer roles. See Table 4-5 for a list of the default Oracle RTD application grants for this role.
The BIAuthor role is intended for permissions necessary to create and edit content for others to consume. Any member of the BIAuthors group is explicitly granted this role and implicitly granted the BIConsumer role. See Table 4-5 for a list of the default Oracle RTD application grants for this role.
The BIConsumer role is intended for permissions necessary to consume content created by others. See Table 4-5 for a list of the default Oracle RTD application grants for this role.
Note:
The specialized role authenticated_role is granted by default to any authenticated user. It is a member of the BIConsumer role by default. Removal of authenticated_role would result in the inability to log into the system. For more information, see "The Authenticated Role" in Oracle Fusion Middleware Application Security Guide.
- Default Application Grants
-
The default application grants for Oracle RTD users after installation are described in Section 4.3.1, "Default Oracle Real-Time Decisions Application Grants."
4.3 Resource Types and Actions for Oracle RTD
OPSS includes the Java class oracle.security.jps.ResourcePermission that can be used as the permission class within any grant to protect application or system resources. Oracle RTD uses this class to control access to three types of resource:
-
Inline Service
-
Decision Center Perspective
-
Batch Job
Table 4-4 shows the resource types supported by Oracle RTD and their associated actions.
Table 4-4 Oracle RTD Resource Types and Actions
| Type of Resource | Resource Type Name Stored in Application Grants | Action[:Qualifier] | Comments |
|---|---|---|---|
|
Inline Service |
rtd_ils |
choice_editor |
May execute any methods of the ExternalChoice web service for the named Inline Service. |
|
decision_service:normal |
May execute any integration points (advisors and informants) for the named Inline Service. Action qualifier normal allows integration point requests to be executed in the server. |
||
|
decision_service:stress |
May execute any integration points (Advisors and Informants) for the named Inline Service. Action qualifier stress allows LoadGen to issue integration point calls. To be accepted by the server, the user also needs the normal action. |
||
|
open_service:read |
Authorizes the use of Decision Center to open the named Inline Service for viewing. Also authorizes the External Rule Editor to access the named Inline Service, since the External Rule Editor does not need to update the content of the Inline Service. |
||
|
open_service:write |
Authorizes the use of Decision Center to open the named Inline Service for editing. |
||
|
deploy_service |
Authorizes the deployment of the named Inline Service from Decision Studio. |
||
|
download_service |
Authorizes the use of Decision Studio to download the named Inline Service from a server. |
||
|
clear_choice_history |
Authorizes the clearing of the choice history for the named Inline Service through the Administration web service. |
||
|
clear_study |
Authorizes the clearing of the study for the named Inline Service through the Administration web service. A study is not shared by multiple Inline Services, so naming the owning Inline Service is equivalent to naming the study. |
||
|
clear_statistics |
Authorizes the clearing of the statistics for the Inline Service through the Administration web service. |
||
|
clear_model |
Authorizes the clearing of the model for the named Inline Service through the Administration web service. |
||
|
clear_all_operational_data |
Authorizes the clearing of the operational data for the named Inline Service through the Administration web service. |
||
|
delete_service |
Authorizes the deletion of the named Inline Service through the Administration web service. |
||
|
unlock_service |
Authorizes the unlocking of the named Inline Service through the Administration web service. |
||
|
Decision Center Perspective |
rtd_dc_persp |
dc_perspective |
Open the named Decision Center Perspective, to have Decision Center render its specialized set of UI elements or capabilities. |
|
Registered Batch Job Type |
rtd_batch |
batch_admin |
May execute any methods of the BatchManager web service to start, stop, or query the status of the registered batch job type name. |
4.3.1 Default Oracle Real-Time Decisions Application Grants
The default file-based policy store includes pre-configured application grants. Oracle RTD uses the permission class, oracle.security.jps.ResourcePermission, which references attributes of the resource types listed in Table 4-4.
Table 4-5 lists the default application roles, Oracle RTD resource types, resource names, and actions in the default application grants after installation.
Note:
The resource name _all _ is a special name that matches any Oracle RTD resource name of the associated resource type.
Table 4-5 Default Application Grants for Oracle RTD Users
| Application Role | Resource Type | Resource Name | Action[:Qualifier] |
|---|---|---|---|
|
BIAdministrator |
rtd_ils |
_all_ |
open_service:read |
|
_all_ |
open_service:write |
||
|
_all_ |
deploy_service |
||
|
_all_ |
download_service |
||
|
_all_ |
choice_editor |
||
|
_all_ |
decision_service:normal |
||
|
_all_ |
decision_service:stress |
||
|
_all_ |
clear_choice_history |
||
|
_all_ |
clear_study |
||
|
_all_ |
clear_statistics |
||
|
_all_ |
clear_model |
||
|
_all_ |
clear_all_operational_data |
||
|
_all_ |
delete_service |
||
|
_all_ |
unlock_service |
||
|
rtd_dc_persp |
_all_ |
dc_perspective |
|
|
rtd_batch |
_all_ |
batch_admin |
|
|
BI Author |
rtd_ils |
_all_ |
open_service:read |
|
_all_ |
open_service:write |
||
|
_all_ |
deploy_service |
||
|
_all_ |
download_service |
||
|
_all_ |
decision_service:normal |
||
|
_all_ |
decision_service:stress |
||
|
rtd_dc_persp |
_all_ |
dc_perspective |
|
|
BI Consumer |
rtd_ils |
_all_ |
open_service:read |
|
_all_ |
choice_editor |
||
|
_all_ |
decision_service:normal |
||
|
rtd_dc_persp |
Explore |
dc_perspective |
|
|
At a Glance |
dc_perspective |
||
|
rtd_batch |
_all_ |
batch_admin |
In the Fusion Middleware Control Application Policies screen, the default permissions related to Oracle RTD for the application role BIAuthor appear as shown in Figure 4-4.
Figure 4-4 Example of Permissions in Fusion Middleware Control

Description of "Figure 4-4 Example of Permissions in Fusion Middleware Control"
For details of how to create and edit application roles and application policies, see Section 4.7.4, "Managing the Policy Store Using Fusion Middleware Control."
4.4 Administration Tools Used for Common Security-Related Tasks
Oracle Real-Time Decisions shares a common security framework with the Oracle Fusion Middleware platform. This common security configuration utilizes Oracle WebLogic Server as the defacto administration server. The implementation details are largely hidden while performing daily administrative tasks and are exposed only by the tools used to manage your Oracle Real-Time Decisions security configuration. The two main administration tools are:
-
Oracle WebLogic Server Administration Console is used to manage users and groups for the embedded LDAP server that serves as the default identity store after a default Simple install
-
Oracle Enterprise Manager Fusion Middleware Control is used to define application roles and application policies that grant permissions to users, groups, or other application roles
In addition, the Oracle WebLogic Scripting Tool (WLST) is a command-line scripting tool that you can use to create, manage, and monitor Oracle WebLogic Server domains, and administer Oracle Fusion Middleware security features. For more information about using WLST, see Oracle Fusion Middleware Oracle WebLogic Scripting Tool and Oracle Fusion Middleware WebLogic Scripting Tool Command Reference.
Table 4-6 lists common security-related tasks performed and the administration tool used.
4.5 Typical System Administration Tasks for Securing Oracle RTD
Table 4-7 shows the typical system administration tasks that you perform to secure Oracle RTD and where to find related information.
Table 4-7 Typical System Administration Tasks Performed to Secure Oracle RTD
| Task | For More Information |
|---|---|
|
Managing users and groups for authentication |
|
|
Granting privileges to access Oracle RTD resources |
Section 4.7, "Managing Authorization and Privileges for Oracle RTD" |
|
Decide if using SSL in your deployment |
|
|
Enabling SSO authentication |
4.6 Managing Authentication for Oracle RTD
This section contains the following topics:
-
Section 4.6.1, "Task Map: Configuring Authentication for Oracle RTD"
-
Section 4.6.2, "Understanding Oracle Real-Time Decisions Authentication"
-
Section 4.6.3, "Managing the Default Authentication Provider"
Note:
For configuring authentication using a Single Sign-On solution, see "Introduction to Single Sign-On in Oracle Fusion Middleware" in Oracle Fusion Middleware Application Security Guide.
4.6.1 Task Map: Configuring Authentication for Oracle RTD
The following task map contains common authentication configuration tasks and provides links for obtaining more information.
| Task | Description | For Information |
|---|---|---|
|
Decide on authentication method |
Decide whether to use the default embedded directory server (LDAP-based) or a different external authentication method |
Section 4.6.2, "Understanding Oracle Real-Time Decisions Authentication" |
|
Configure the default authentication provider |
Configure the default authentication provider for the default security realm. |
Section 4.6.3, "Managing the Default Authentication Provider" |
|
Add users and groups |
Add users and groups to the identity store |
|
|
Configure an alternate authentication provider to authenticate users |
Configure an alternate authentication provider. |
4.6.2 Understanding Oracle Real-Time Decisions Authentication
During installation an Oracle WebLogic Server domain is created and Oracle Real-Time Decisions is installed into that domain. Security for an Oracle WebLogic Server domain is managed in context of the domain's security realm. A security realm acts as a scoping mechanism. Each security realm consists of a set of configured security providers, users, groups, security roles, and security policies. Only one security realm can be active for the domain.
Oracle Real-Time Decisions authentication is performed by the authentication provider configured for the default security realm for the WebLogic Server domain in which Oracle Real-Time Decisions is installed. Oracle WebLogic Server Administration Console is the administration tool for managing an Oracle WebLogic Server domain.
The following sections include a brief introduction to key Oracle WebLogic Server security concepts. For more information about Oracle WebLogic Server security and how it is managed, see Oracle Fusion Middleware Understanding Security for Oracle WebLogic Server and Oracle Fusion Middleware Oracle WebLogic Server Administration Console Online Help.
4.6.2.1 Identity Stores and Authentication Providers
An identity store contains user name, password, and group membership information. It serves as the data store for user credentials. An authentication provider accesses the stored user information and is responsible authenticating a user. For example, when a user name and password combination is entered at log in, the authentication provider searches the identity store to verify the credentials provided. If SSO authentication is configured for Oracle RTD, the SSO provider also use the data contained in this identity store.
If using an identity store other than the embedded directory server included with Oracle WebLogic Server, the default users and groups shown in Section 4.2.2, "Key Authentication Elements" will not be automatically present. You can create users and groups with names of your own choosing or re-create the default user and group names if the authentication provider supports this. After this work is completed, you must map the default Oracle RTD application roles the equivalent groups. For example, if your corporate LDAP server is being used as the identity store and you are unable to re-create the Oracle RTD default users and groups in it, you will need to map the default application roles to different groups specific to the corporate LDAP server. For more information about the default application roles and group mappings, see Section 4.2.2, "Key Authentication Elements" and Section 4.2.3, "Key Authorization Elements."
4.6.3 Managing the Default Authentication Provider
After installation, Oracle Real-Time Decisions is configured to use the Oracle WebLogic Server default authentication provider (DefaultAuthenticator). DefaultAuthenticator supports user name and password authentication. The Oracle WebLogic Server embedded directory server is configured as the default user data source (identity store). While validating authentication requests, the authentication provider connects to the identity data store to verify credentials. The authentication provider uses the user data store configured in Oracle WebLogic Server Administration Console.
The active security realm can have multiple authentication providers configured but only one provider can be active at a time. The order of providers in the list determines priority. The effect of having multiple authentication providers defined in a security realm is not cumulative; rather, the first provider in list is the source for all user and password data needed during authentication. Having the ability to define more than one authentication provider enables you to switch between authentication providers by rearranging order in the list. For example, if you have separate directory servers for your development and production environments, you can change which server is to be used during authentication by re-ordering them in the list.
Detailed information about managing and configuring an authentication provider in Oracle WebLogic Server is available in its online help. For more information, log into Oracle WebLogic Server Administration Console and launch Oracle Fusion Middleware Oracle WebLogic Server Administration Console Online Help.
4.6.3.1 Managing Users and Groups
Groups are logically ordered sets of users. Managing a group is more efficient than managing a large number of users individually. The best practice is to first organize all Oracle RTD users into groups that have similar system access requirements. Application roles that provide the correct level of access then can be mapped to these groups. If system access requirements change then you need only modify the permissions granted by the application roles, or create a new application roles with appropriate permissions. After your groups are established, continue to add or remove users directly in the user data source (identity store) using its administration interface as you normally would.
The default identity store is Oracle WebLogic Server embedded directory server. But there are many other supported directory servers that can be used, as well as alternative sources such as a database or a table. For information about adding users or groups to a non-default directory server, consult that product's documentation. For a current list of supported authentication providers and directory servers to use with Oracle RTD, see the system requirements and certification documentation. For more information, see Section 1.4, "System Requirements and Certification."
For more information about managing users and groups in the default directory server, see Oracle Fusion Middleware Oracle WebLogic Server Administration Console Online Help.
To create a user in the default directory server:
-
In Oracle WebLogic Server Administration Console, select Security Realms from the left pane and click the realm you are configuring. For example, myrealm.
-
Select Users and Groups tab, then Users. Click New.
-
In the Create a New User page provide the following information:
-
Name: Enter the name of the user. See online help for a list of invalid characters.
-
(Optional) Description: Enter a description.
-
Provider: Select the authentication provider from the list that corresponds to the data store where the user information is contained. DefaultAuthenticator is the name for the default authentication provider.
-
Password: Enter a password for the user that is at least 8 characters long.
-
Confirm Password: Re-enter the user password.
-
-
Click OK.
The user name is added to the User table.
To create a group in the default directory server:
-
In Oracle WebLogic Server Administration Console, select Security Realms from the left pane and click the realm you are configuring. For example, myrealm.
-
Select Users and Groups tab, then Groups. Click New.
-
In the Create a New Group page provide the following information:
-
Name: Enter the name of the Group. Group names are case insensitive but must be unique. See online help for a list of invalid characters.
-
(Optional) Description: Enter a description.
-
Provider: Select the authentication provider from the list that corresponds to the data store where the group information is contained. DefaultAuthenticator is the name for the default authentication provider.
-
-
Click OK.
The group name is added to the Group table.
To add a user to a group in the default directory server:
-
In Oracle WebLogic Server Administration Console, select Security Realms from the left pane and click the realm you are configuring. For example, myrealm.
-
Select Users and Groups tab, then Users.
-
In the Users table select the user you want to add to a group.
-
Select the Groups tab.
-
Select a group or groups from the Available list box.
-
Click Save.
To change a user password in the default directory server:
-
In Oracle WebLogic Server Administration Console, select Security Realms from the left pane and click the realm you are configuring. For example, myrealm.
-
Select Users and Groups tab, then Users
-
In the Users table select the user you want to change the password for.
-
Select the Passwords tab and enter the password in the New Password and Confirm Password fields.
-
Click Save.
4.6.4 Configuring a New Authentication Provider
You have the option to use several different types of authentication providers in any environment, such as an LDAP server or a database. Configuring Oracle RTD to use an alternative external identity store is performed using the Oracle WebLogic Server Administration Console.
For a current list of supported authentication providers and directory servers to use with Oracle RTD, see the system requirements and certification documentation. For more information, see Section 1.4, "System Requirements and Certification".
Any identity store provider supported by Oracle WebLogic Server can be configured to be used with Oracle RTD. Oracle RTD delegates authentication and user population management to the authenticator and identity store configured for the domain in which it is deployed. For example, if configured to use Oracle WebLogic Server's default authenticator, then management is performed in the Oracle WebLogic Server Administration Console. If configured to use Oracle Internet Directory (OID), then the OID management user interface is used, and so on.
Note:
If a directory server other than the default is being used as the user data source for the new authentication provider, you will still be able to view the users and groups from that directory server in Oracle WebLogic Server Administration Console. However, you will continue to manage the users and groups in the interface for the directory server.
Oracle RTD uses the first authentication provider configured for the active security realm in the WebLogic Server domain. The active security realm for the domain can have multiple authentication providers configured. Their order in the list determines their priority. The effect of multiple authentication providers is not cumulative; rather, the provider in the first position is the source for all user and password definitions required for authentication. This allows you to switch between authentication providers as needed. For example, if you have separate LDAP servers for your development and production environments, you can change which server is used for authentication by re-ordering them.
If using an identity store provider other than the one installed as part of the default security configuration, the default users and groups discussed in Section 4.2.2, "Key Authentication Elements" will not be automatically present. You can create users and groups with names of your own choosing or re-create the default user and group names if the authentication provider supports this. After this work is completed, you must map the default Oracle RTD application roles to different groups again. For example, if your corporate LDAP server is being used as the identity store and you are unable to re-create the Oracle RTD default users and groups in it, you will need to map the default application roles to different groups specific to the corporate LDAP server.
Note:
If the security realm is configured to use an authentication provider other than the default embedded LDAP server, the application roles must be mapped again to the correct groups (enterprise roles) in the alternative identity store.
To configure the authentication security provider, log into Oracle WebLogic Server Administration Console and see the detailed steps in Oracle Fusion Middleware Oracle WebLogic Server Administration Console Online Help. For information about configuring Oracle Internet Directory as an authentication provider, see Section 4.6.4.1, "Configuring Oracle Internet Directory as an Authentication Provider."
4.6.4.1 Configuring Oracle Internet Directory as an Authentication Provider
Oracle Internet Directory is used in the following procedures to explain the process of configuring a different authentication provider and identity store combination. Using the same directory server for both is convenient; however, you can use any combination of directory servers as long as they are both supported by Oracle RTD.
Configuring Oracle Internet Directory to be both the authentication provider and identity store demonstrates the process but differences will exist with another directory server is used. For additional information about configuring an authentication provider for an Oracle WebLogic Server domain, see Oracle Fusion Middleware Oracle WebLogic Server Administration Console Online Help.
The Oracle Internet Directory authentication provider is configured in the Administration Console when Oracle Internet Directory provides the user data (identity store).
The rest of this section describes how to configure the Oracle Internet Directory authentication provider, and how to reorder the authentication provider list.
To configure the Oracle Internet Directory authentication provider:
In the following description, MyOIDDirectory is used to represent the Oracle Internet Directory.
-
Click Lock & Edit in the Change Center of the Oracle WebLogic Server Administration Console.
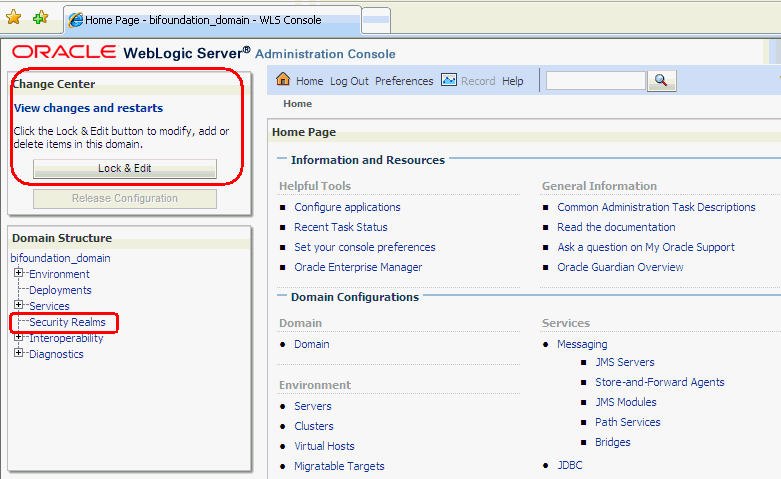
Description of the illustration wls01.gif
-
Select Security Realms from the left pane and click the realm you are configuring. For example, myrealm.
-
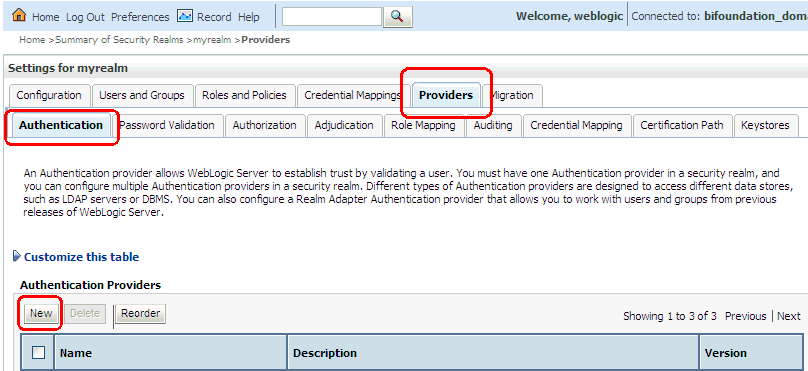
Select Providers, then Authentication. Click New to launch the Create a New Authentication Provider page.
Description of the illustration wls03.gif
-
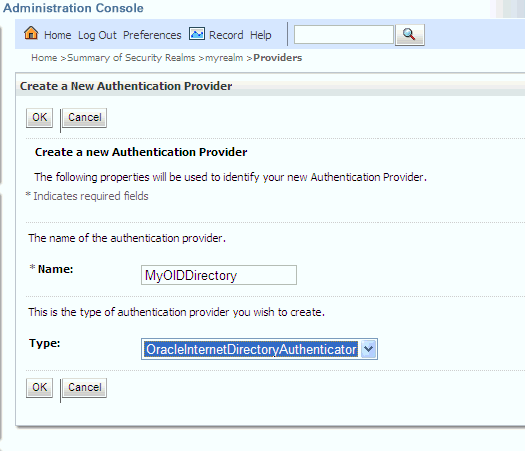
Enter values in the Create a New Authentication Provider page as follows:
-
Name: Enter a name for the authentication provider. For example, MyOIDDirectory.
-
Type: Select OracleInternetDirectoryAuthenticator from the list.
-
Click OK.
Description of the illustration wls04.gif
-
-
Select Providers, then Authentication. Click the name of the authentication provider to complete its configuration. For example, MyOIDDirectory.
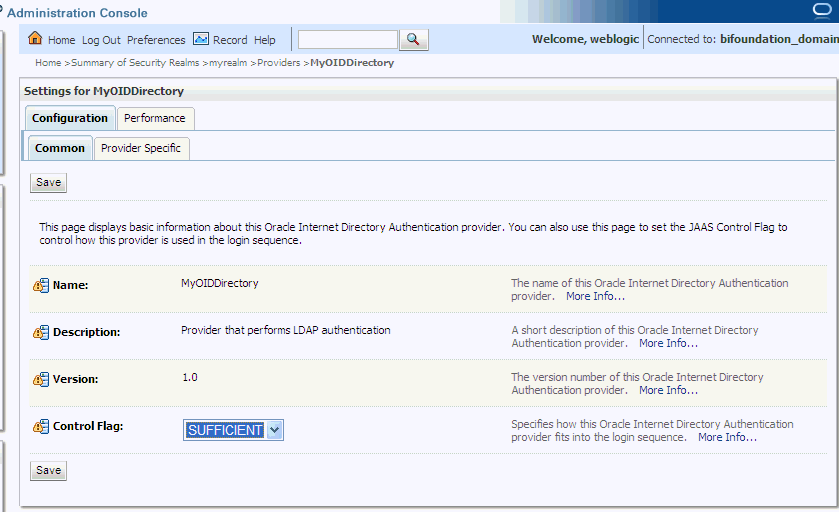
The Configuration page for the Oracle Internet Directory authentication provider is displayed and has multiple tabs.For more information about completing fields in the Configuration page, click the More Info... link located in each field.
You next set the Control Flag for the Oracle Internet Directory authentication provider. When configuring multiple authenticator providers, the Control Flag controls how the authentication providers are used in the login sequence.
-
On the Common tab, set the Control Flag to SUFFICIENT by selecting it from the list. Click More Info... for more information about the Control Flag settings.
Description of the illustration wls05.gif
-
Select the Provider Specific tab and complete these fields as follows. Click More Info... for information about completing the additional fields in each section.
Section Name Field Name Description Connection
Host
The host name of the Oracle Internet Directory server.
Port
The port number on which the Oracle Internet Directory server is listening.
Principal
The distinguished name (DN) of the Oracle Internet Directory user to be used to connect to the Oracle Internet Directory server. For example: cn=OIDUser,cn=users,dc=us,dc=mycompany,dc=com
Credential
Password for the Oracle Internet Directory user entered as the Principal.
Users
User Base DN
The base distinguished name (DN) of the Oracle Internet Directory server tree that contains users.
Groups
Group Base DN
The base distinguished name (DN) of the Oracle Internet Directory server tree that contains groups.
-
Click Save.
-
Click Activate Changes in the Change Center.
The Administration and Managed Servers must be restarted.
-
Restart Oracle WebLogic Server.
To reorder authentication providers:
The Authentication Providers page in Oracle WebLogic Server Administration Console lists all authentication providers configured for the default security realm. Oracle RTD uses only the authentication provider that is in the first position. If multiple authentication providers are configured, you must move to the first position the authentication provider that Oracle RTD is to use.
-
Click Lock & Edit in the Change Center of the Oracle WebLogic Server Administration Console.
-
Select Security Realms from the left pane and click the realm you are configuring. For example, myrealm. Select Security Realms from Domain Structure in the left pane.
-
Select the Providers tab, then Authentication.
-
Click Reorder.
-
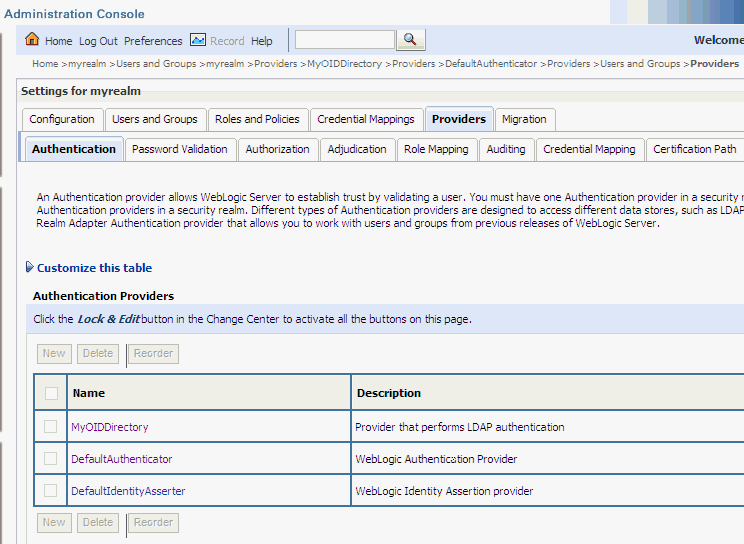
Select the name of the Oracle Internet Directory authentication provider and use the arrow buttons to move it into the first position. Your results should resemble the following figure where MyOIDDirectory represents the Oracle Internet Directory.
Description of the illustration oid23_crop.gif
4.7 Managing Authorization and Privileges for Oracle RTD
This section contains the following topics:
-
Section 4.7.1, "Task Map: Configuring Authorization for Oracle RTD"
-
Section 4.7.4, "Managing the Policy Store Using Fusion Middleware Control"
4.7.1 Task Map: Configuring Authorization for Oracle RTD
This task map contains common authorization configuration tasks and provides links for more information.
| Task | Description | Information |
|---|---|---|
|
Decide on authorization method |
Decide if the policy store will be the default file or LDAP-based |
|
|
Configure a policy store |
Configure and reassociate a policy store |
|
|
Create, edit, and delete application roles and application policies |
Create, edit, and delete application roles and application policies using Fusion Middleware Control |
Section 4.7.4, "Managing the Policy Store Using Fusion Middleware Control" |
4.7.2 Understanding the Authorization Process
After a user is authenticated, further access to Oracle RTD is controlled through the application grants in application policies in the policy store, which is managed by Fusion Middleware Control.
4.7.2.1 Policy Stores
The policy store contains the system and application-specific policies and roles used by an application. A domain policy store can be file-based or LDAP-based. The default policy store is installed as an XML file (system-jazn-data.xml). This XML file holds the mapping definitions between the default Oracle RTD application roles, permissions, users and groups all configured as part of installation.
Oracle RTD permissions are granted by mapping users and groups from the identity store to application roles and application grants located in the policy store. These mapping definitions between users and groups (identity store) and the application roles (policy store) are also kept in the policy store.
Both type of policy store, file-based and LDAP-based, are managed using Fusion Middleware Control.
4.7.3 Configuring the Policy Store
The default system-jazn-data.xml file is pre-configured as the default policy store during installation. You can continue to use the default and modify it as needed for your environment or you can migrate its data to an LDAP-based provider. An LDAP-based provider is typically used and recommended in production environments.
Permissions must be defined in a manner that Oracle RTD understands. All valid Oracle RTD resources types and resource names are provided and are pre-mapped to the default application roles, as described in Section 4.3, "Resource Types and Actions for Oracle RTD." You cannot create new resources types for Oracle RTD, but you can select a specific name for a resource instead of the dummy name "_all_".
Using the appropriate administration interface you can tailor the application grants for the application policy and role definitions contained in the policy store.
4.7.3.1 Configuring an LDAP-Based Policy Store
The only LDAP server supported in this release is Oracle Internet Directory. For more information, see "Using an LDAP-Based OPSS Security Store" in Oracle Fusion Middleware Application Security Guide.
4.7.3.2 Reassociating the Policy Store
Migrating policies and credentials from one security store to another is called reassociation. Policy store data can be reassociated from a file-based store to an LDAP-based store, or from an LDAP-based store to another LDAP-based store. Reassociation is commonly done when moving from one environment to another, such as from a test environment to a production environment.
For more information about reassociation and the steps required to migrate policy store data to Oracle Internet Directory, see "Reassociating with Fusion Middleware Control" in Oracle Fusion Middleware Application Security Guide.
4.7.4 Managing the Policy Store Using Fusion Middleware Control
A policy store is managed using Fusion Middleware Control. For information about using Fusion Middleware Control, see Oracle Fusion Middleware Administrator's Guide.
Caution:
As part of your standard backup strategy, you should make a copy of the original system-jazn-data.xml policy file and place it in a safe location. Use the copy of the original file to restore the default policy store configuration, if needed. Changes to the default security configuration may lead to an unwanted state.
The two main objects that control authorization are application roles and application policies. For general information about these objects and their inter-relationship with users and groups, see Section 4.2.3, "Key Authorization Elements" and Section 4.2.1, "The Security Controls for Oracle RTD."
The application roles, application grants, and groups that make up the default security configuration are pre-mapped to each other as detailed in Section 4.3.1, "Default Oracle Real-Time Decisions Application Grants."
Application Roles and Application Policies
An application role consists of users, groups, and other application roles. Users and groups are created in the identity store associated with the authentication provider, and can be assigned to application roles in Fusion Middleware Control.
Application grants, that control who can perform which operations on which resources, are defined in application policies in Fusion Middleware Control. An application grant typically consists of a set of application-oriented permissions and one or more application roles that are granted those permissions.
In addition to using the default application roles and application policies created during installation, you can create your own application roles and application policies. A simplified overview of the creation process is as follows:
-
Create an application role, and add one or more users, groups, and existing application roles to your new role.
-
Create an application policy, specifying one or more application-oriented permissions, together with one or more grantees. Typically the grantees are application roles, but in general a grantee can be an application role, a user, or a group.
Only after you have added a role to an application policy will the role become effective in authorizing the permissions in the application policy.
In general, in Fusion Middleware Control, there are two methods for creating a new application role or an application policy:
-
Create the application role or the application policy by explicitly defining their constituent elements.
-
Create the application role or the application policy based on an existing application role or application policy: you copy the components from the existing object, then add or modify them.
Note:
Before creating a new application role to incorporate into your security configuration, familiarize yourself with how permission and group inheritance works. It is important when constructing an application role hierarchy that circular dependencies are not introduced.
The rest of this section describes how to manage application roles and application policies in Fusion Middleware Control, and contains the following topics:
-
Section 4.7.4.2, "Creating an Application Role Like Another Application Role"
-
Section 4.7.4.6, "Creating an Application Policy Like Another Application Policy"
4.7.4.1 Creating a New Application Role
The following is an overview of the process to create a new application role:
-
Log into Fusion Middleware Control, as described in Section 2.1.1, "Logging into Fusion Middleware Control."
-
In the Target Navigation Pane, from either the server-level OracleRTD entry under Application Deployments, or the bifoundation_domain entry under WebLogic Domain, right-click and select Security, then Application Roles.
-
Select and search for application roles in the Application Stripe obi (click the button beside the Role Name box).
-
Click Create...
-
In the Create Application Role page:
-
Enter Role Name
-
Optionally enter Display Name and Description
-
Add one or more Application Roles, Groups, Users
In each case, you can search and select from the available application roles, groups, and users.
-
For additional information and the detailed steps, see "Managing Policies with Fusion Middleware Control" in Oracle Fusion Middleware Application Security Guide.
4.7.4.2 Creating an Application Role Like Another Application Role
The following is an overview of the process to create an application role by copying from another application role:
-
Log into Fusion Middleware Control, as described in Section 2.1.1, "Logging into Fusion Middleware Control."
-
In the Target Navigation Pane, from either the server-level OracleRTD entry under Application Deployments, or the bifoundation_domain entry under WebLogic Domain, right-click and select Security, then Application Roles.
-
Select and search for application roles in the Application Stripe obi (click the button beside the Role Name box).
-
Select an Application Role in the search results.
-
Click Create Like...
-
In the Create Application Role Like... page:
-
Change the Role Name
-
Optionally edit Display Name and Description
-
Add or delete one or more Application Roles, Groups, Users
For each addition, you can search and select from the available application roles, groups, and users.
-
For additional information and the detailed steps, see "Managing Policies with Fusion Middleware Control" in Oracle Fusion Middleware Application Security Guide.
4.7.4.3 Editing an Application Role
The following is an overview of the process to edit an application role:
-
Log into Fusion Middleware Control, as described in Section 2.1.1, "Logging into Fusion Middleware Control."
-
In the Target Navigation Pane, from either the server-level OracleRTD entry under Application Deployments, or the bifoundation_domain entry under WebLogic Domain, right-click and select Security, then Application Roles.
-
Select and search for application roles in the Application Stripe obi (click the button beside the Role Name box).
-
Select an Application Role in the search results.
-
Click Edit...
-
In the Edit Application Role page:
-
Optionally edit Display Name and Description
-
Add or delete one or more Application Roles, Groups, Users
For each addition, you can search and select from the available application roles, groups, and users.
-
For additional information and the detailed steps, see "Managing Policies with Fusion Middleware Control" in Oracle Fusion Middleware Application Security Guide.
4.7.4.4 Deleting an Application Role
The following is an overview of the process to delete an application role:
-
Log into Fusion Middleware Control, as described in Section 2.1.1, "Logging into Fusion Middleware Control."
-
In the Target Navigation Pane, from either the server-level OracleRTD entry under Application Deployments, or the bifoundation_domain entry under WebLogic Domain, right-click and select Security, then Application Roles.
-
Select and search for application roles in the Application Stripe obi (click the button beside the Role Name box).
-
Select an Application Role in the search results.
-
Click Delete...
-
Confirm that you want to delete the application role.
For additional information and the detailed steps, see "Managing Policies with Fusion Middleware Control" in Oracle Fusion Middleware Application Security Guide.
4.7.4.5 Creating a New Application Policy
The following is an overview of the process to create a new application policy:
-
Log into Fusion Middleware Control, as described in Section 2.1.1, "Logging into Fusion Middleware Control."
-
In the Target Navigation Pane, from either the server-level OracleRTD entry under Application Deployments, or the bifoundation_domain entry under WebLogic Domain, right-click and select Security, then Application Policies.
-
Select and search for security grants in the Application Stripe obi (click the right arrowhead button beside the Name box).
-
Select an Application Policy in the search results.
-
Click Create...
-
In the Create Application Grant page:
-
Add, edit or delete one or more Permissions
-
Add, edit, or delete one or more Grantees
When creating an application grant, you must add at least one permission and one grantee.
Add One or More Permissions
The default permissions for Oracle RTD appear in Section 4.3, "Resource Types and Actions for Oracle RTD," and contain the dummy Resource Name "_all_" that matches any Oracle RTD resource name of the associated resource type.
You can add permissions through either of the following processes:
-
Search for existing permissions in the permission class oracle.security.jps.ResourcePermission and optionally modify them
-
Specify permission actions for Oracle RTD resources, that is, resources that have one of the Resource Types specified in Section 4.3, "Resource Types and Actions for Oracle RTD"
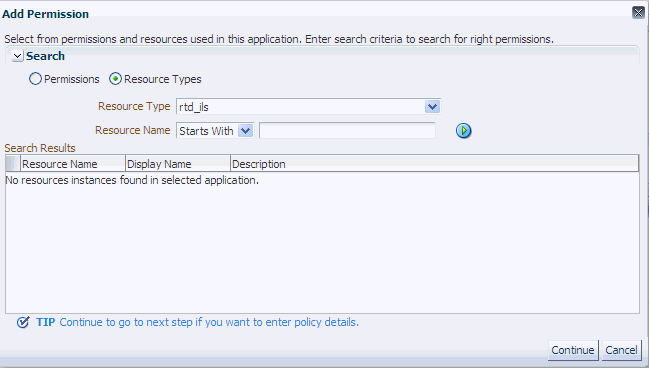
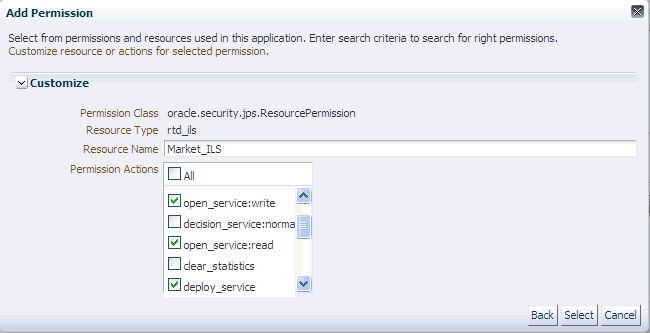
For example, to enable a single Inline Service Market_ILS to be opened for read and write and to be deployed, perform the following steps:
-
In the Add Permission window, select the radio button Resource Types, and for the Resource Type, select rtd_ils.
-
Click Continue.
-
In the Customize area, enter Market_ILS for the Resource Name, and select the appropriate Permission Actions for this resource.
-
Click Select.
You can also edit the Permissions and the Permission Actions, so long as you keep to the allowable Permission Actions and Action Qualifiers shown in Table 4-4.
Add One or More Grantees
You can add one or more Application Roles, Groups, Users.
For each addition, you can search and select from the available application roles, groups, and users.
-
After you have you finished creating the new application policy, the list of grantees that you included determines where the new application policy appears among the list of all security grants in the obi application stripe, as follows:
-
If the grantees in your new application policy match the grantees of an existing security grant, as shown in the Principal column, the existing security grant showing those grantees will show the new application policy permissions for that grantee combination.
-
If the grantees in your new application policy do not match the grantees of an existing security grant, as shown in the Principal column, a new Principal row shows the new grantees and the permissions included in your new application policy.
For additional information and the detailed steps, see "Managing Policies with Fusion Middleware Control" in Oracle Fusion Middleware Application Security Guide.
4.7.4.6 Creating an Application Policy Like Another Application Policy
The following is an overview of the process to create an application policy by copying from another application policy:
-
Log into Fusion Middleware Control, as described in Section 2.1.1, "Logging into Fusion Middleware Control."
-
In the Target Navigation Pane, from either the server-level OracleRTD entry under Application Deployments, or the bifoundation_domain entry under WebLogic Domain, right-click and select Security, then Application Policies.
-
Select and search for security grants in the Application Stripe obi (click the button beside the Permission box).
-
Select an Application Policy in the search results.
-
Click Create Like...
-
The Create Application Grant Like... page displays the permissions and grantees of the policy from which you want to copy. You can perform the following editing operations in the Create Application Grant Like... page:
-
Add, edit, and delete Permissions
-
Add and delete one or more Application Roles, Groups, Users
The same considerations and recommendations apply as described in Section 4.7.4.5, "Creating a New Application Policy."
-
After you have you finished creating the new application grant, the list of grantees in the application grant determines where the new application grant appears among the list of all security grants in the obi application stripe, as follows:
-
If the grantees in your new application grant match the grantees of an existing security grant, as shown in the Principal column, the existing security grant showing those grantees will show the new application grant permissions for that grantee combination.
-
If the grantees in your new application grant do not match the grantees of an existing security grant, as shown in the Principal column, a new Principal row shows the new grantees and the permissions selected in the new application grant.
For additional information and the detailed steps, see "Managing Policies with Fusion Middleware Control" in Oracle Fusion Middleware Application Security Guide.
4.7.4.7 Editing an Application Policy
The following is an overview of the process to edit an application policy:
-
Log into Fusion Middleware Control, as described in Section 2.1.1, "Logging into Fusion Middleware Control."
-
In the Target Navigation Pane, from either the server-level OracleRTD entry under Application Deployments, or the bifoundation_domain entry under WebLogic Domain, right-click and select Security, then Application Policies.
-
Select and search for security grants in the Application Stripe obi (click the button beside the Permission box).
-
Select an Application Policy in the search results.
-
Click Edit...
-
In the Edit Application Grant page:
-
Add, edit, or delete one or more Permissions
-
Add or delete one or more Application Roles, Groups, Users
The same considerations and recommendations, both for the editing operations and for where to see the edited policy, apply as described in Section 4.7.4.6, "Creating an Application Policy Like Another Application Policy."
-
For additional information and the detailed steps, see "Managing Policies with Fusion Middleware Control" in Oracle Fusion Middleware Application Security Guide.
4.7.4.8 Deleting an Application Policy
The following is an overview of the process to delete an application policy:
-
Log into Fusion Middleware Control, as described in Section 2.1.1, "Logging into Fusion Middleware Control."
-
In the Target Navigation Pane, from either the server-level OracleRTD entry under Application Deployments, or the bifoundation_domain entry under WebLogic Domain, right-click and select Security, then Application Policies.
-
Select and search for security grants in the Application Stripe obi (click the button beside the Permission box).
-
Select an Application Policy in the search results.
Note:
The application policy that you select is identified by its grantee combination, as shown in the Principal column. The effect of deletion will be to remove the selected row, that is, the grantee combination together with its associated permissions, from the security grants list.
-
Click Delete...
-
Confirm that you want to delete the application policy.
For additional information and the detailed steps, see "Managing Policies with Fusion Middleware Control" in Oracle Fusion Middleware Application Security Guide.
4.8 Using SSL with Oracle RTD
For general information about SSL in Oracle Fusion Middleware, see the chapter "Configuring SSL in Oracle Fusion Middleware" in Oracle Fusion Middleware Administrator's Guide.
The instructions to enable SSL for Oracle RTD are as follows:
-
In the Oracle WebLogic Server Administration Console, after selecting Environments, then Servers, enable the default SSL port (9804) and Demo Trust for the Managed Server containing Oracle RTD.
-
On the client machine, create the directory
<RTD_HOME>/etc/ssl, then copy the demo truststore file from the installed server-side location<mw_home>/wlserver_10.3/server/lib/DemoTrust.jksto<RTD_HOME>/etc/sslon the client machine. -
To make Decision Studio use the truststore file, edit
<MW_HOME>/Oracle_BI1/clients/rtd/eclipse/eclipse.inifile as follows:Change the
-Djavax.net.ssl.trustStoreline to point to the truststore file.For example:
-Djavax.net.ssl.trustStore=C:/OracleBI/RTD/etc/ssl/DemoTrust.jks -
For CommandLineDeploy, execute
java -Djavax.net.ssl.trustStore=<DemoTrust.jks>-jar deploytool.jar -deploy -sslConnection true<ILS><username><password> <host> <port>.For example:
java -Djavax.net.ssl.trustStore=C:/OracleBI/RTD/etc/ssl/DemoTrust.jks -jar deploytool.jar -deploy -sslConnection true "C:\OracleBI\RTD\examples\CrossSell" weblogic psw dadvmh0044 9804 -
For Load Generator, in the script
<RTD_HOME>/scripts/sdexec.cmd, uncomment the line:rem set TRUST_STORE_OPTS=-Djavax.net.ssl.trustStore="%SD_ROOT%\etc\ssl\sdtrust.store"and replace the
TRUST_STORE_OPTSvalue with the following one:-
Djavax.net.ssl.trustStore=<dir-name>\DemoTrustStore.jksFor example:
-Djavax.net.ssl.trustStore=c:\rtd\etc\ssl\DemoTrust.jks -
For Batch Console, execute
java -Djavax.net.ssl.trustStore="<DemoTrust.jks>" -jar batch-console.jar -urlhttps://<machine_name>:<SSL_port>For example,
java -Djavax.net.ssl.trustStore="c:\rtd\etc\ssl\DemoTrust.jks" -jar batch-console.jar -urlhttps://localhost:9804
4.9 Enabling SSO Authentication
This section provides some general guidelines for configuring single sign-on (SSO) authentication for Oracle RTD.
For general information about SSO in Oracle Fusion Middleware, see "Introduction to Single Sign-On in Oracle Fusion Middleware" in Oracle Fusion Middleware Application Security Guide.
Oracle recommends using Oracle Access Manager as an enterprise-level SSO authentication provider with Oracle Fusion Middleware 11g. For more information about configuring and managing Oracle Access Manager with Oracle Fusion Middleware, see "Configuring Single Sign-On with Oracle Access Manager 11g" and "Configuring Single Sign-On with Oracle Access Manager 10g" in Oracle Fusion Middleware Application Security Guide.
Specifically for Oracle RTD, the resource URLs to define, for both Authentication and Authorization Policies, are the following:
-
Protected resources
-
/ui/*
-
-
Public resources
-
/ui/images/*
-
/ui/do/logout
-
/ui/ping.jsp
-
/ui/logged_out.jsp
-
4.10 Topics of Interest in Other Guides
The following topics may be of interest to security administrators are covered in other guides. Table 4-8 lists these topics and the names of the guides where they can be found.
Table 4-8 Topics Covered in Other Guides
| Topic | Guide Name |
|---|---|
|
Installation |
Oracle Fusion Middleware Installation Guide for Oracle Business Intelligence |
|
Fusion Middleware Security Framework Managing Application Roles |
|
|
Using Fusion Middleware Control |
|
|
Starting the Oracle WebLogic Server Administration Console |
Oracle Fusion Middleware Introduction to Oracle WebLogic Server |
|
Security for Oracle Business Intelligence |
Oracle Fusion Middleware Security Guide for Oracle Business Intelligence Enterprise Edition |
