55 Defining and Managing Oracle BAM Data Objects
This chapter describes how to create and manage data objects in Oracle Business Activity Monitoring (Oracle BAM) Architect, including assigning permissions, managing folders, creating security filters, and adding dimensions and hierarchies.
This chapter includes the following sections:
55.1 Introduction to Oracle BAM Data Objects
Data objects are tables that store raw data in the database. Each data object has a specific layout which can be a combination of data fields, lookup fields, and calculated fields.
The data objects are used to create reports in Oracle BAM Active Studio, active data visualization components in ADF applications, among other uses. For more information about how data objects are used see "Creating and Managing Reports" in Oracle Fusion Middleware User's Guide for Oracle Business Activity Monitoring and Chapter 54, "Using Oracle BAM Data Control."
The data objects you define are based on the types of data available from Enterprise Message Sources (EMS) that you can define in Oracle BAM Architect. You must define columns in the data object. The data object contains no data when you create it. You must load or stream data into data objects using the technologies discussed in the following topics:
-
Chapter 53, "Integrating Oracle BAM with SOA Composite Applications"
-
Chapter 56, "Creating Oracle BAM Enterprise Message Sources"
Data objects can also be accessed and updated by Oracle BAM alerts. See Chapter 60, "Creating Oracle BAM Alerts" for more information.
WARNING:
Do not read or manipulate data directly in the database. All access to data must be done using Oracle BAM Architect or the Oracle BAM Active Data Cache API.
55.2 Defining Data Objects
Data objects are defined using Oracle BAM Architect. See the following topics for more information:
-
Section 55.2.3, "How to Add Lookup Columns to a Data Object"
-
Section 55.2.4, "How to Add Calculated Columns to a Data Object"
-
Section 55.2.5, "How to Add Time Stamp Columns to a Data Object"
-
Section 55.2.6, "What You May Need to Know About System Data Objects"
-
Section 55.2.7, "What You May Need to Know About Oracle Data Integrator Data Objects"
55.2.1 How to Define a Data Object
-
Select Data Objects from the Oracle BAM Architect function list.
-
Click Create Data Object.
-
Enter a name for the data object.
Caution:
A single or double quotation mark in an Oracle BAM object name, such as a data object, report, or enterprise message source name, causes a runtime error.Do not include single or double quotation marks in an Oracle BAM object name.
-
Enter the path to the location in the folder tree in which to store the data object. Click Browse to use the Select a Folder dialog.
-
Optionally, enter a description of the data object.
-
If this data object is loaded from an External Data Source (EDS) select the External Data Source checkbox and configure the following:
-
Select an External Data Source from the list. EDS definitions are configured on the External Data Sources screen. See Chapter 58, "Creating External Data Sources" for more information.
-
Select the External Table Name.
Note:
Only the tables that belong to the user are shown when a data object is created on an EDS.Creating a data object with multiple time stamp fields on an EDS is not supported.
-
-
Add columns to the data object using the Add a field or Add one or more lookup fields options.
See Section 55.2.2, "How to Add Columns to a Data Object" and Section 55.2.3, "How to Add Lookup Columns to a Data Object" for more information.
-
Click Create Data Object when you are finished adding columns or lookup columns.
55.2.2 How to Add Columns to a Data Object
To add columns to a data object:
-
In a data object you are creating or editing, click Add a field.
-
Specify the column name, data type, maximum size (scale for decimal columns), whether it is nullable, whether it is public, and tip text.
If you are adding a column in a data object based on an External Data Source you must also supply the External field name.
The data types include:
-
String. Text columns containing a sequence of characters.
A string with a max size greater than 0 and less than or equal to 2000 becomes an Oracle database data type VARCHAR field. If the max size is less than zero or greater than 2000 the string field is stored as a CLOB. To get a CLOB field, just define a string field with a max size greater than 2000.
-
Integer. Numeric columns containing whole numbers from -2,147,483,648 to 2,147,483,648.
-
Float. Double-precision floating point numbers.
The Oracle BAM Float type does not map to the Oracle database Float type. Oracle BAM Float truncates numeric data that has very high precision. If you do not want to see loss of precision use the Oracle BAM Decimal type (
NUMBERin Oracle database) with the scale you want. -
Decimal. Numbers including decimal points with scale number defined. The number is stored as a string which uses a character for each digit in the value.
The Oracle BAM Decimal data type is stored as a
NUMBER (38, X)in the Oracle database. The first argument,38, is the precision, and this is hard-coded. The second argument,X, is the scale, and you can adjust this value. The scale value cannot be greater than 38. -
Boolean. Boolean columns with true or false values.
-
Auto-incrementing integer. Automatically incremented integer column.
-
DateTime. Dates and times combined as a real number.
-
Timestamp. Date time stamp generated to milliseconds. A data object can contain only one time stamp field. See Section 55.2.5, "How to Add Time Stamp Columns to a Data Object" for more information.
A DateTime field is stored as an Oracle database data type DATE. A Timestamp field is stored as an Oracle database data type TIMESTAMP(6). Depending on how the Timestamp field is populated, Oracle BAM may fill in the time stamp value for you. For instance, in Oracle BAM Architect you cannot specify the value for Timestamp when adding a row, but if the value for Timestamp is specified in an ICommand import file, the specified value is added as the value of Timestamp instead of the current time.
-
Calculated. Calculated columns are generated by an expression and saved as another data type. See Section 55.2.4, "How to Add Calculated Columns to a Data Object" for more information.
Keep adding columns using Add a field and Add one or more lookup fields until all the required columns are listed. Click Remove to remove a column in the data object.
-
-
Click Save changes.
55.2.3 How to Add Lookup Columns to a Data Object
You can add lookup columns to a data object. This performs lookups on key columns in a specified data object to return columns to the current data object. You can match multiple columns and return multiple lookup columns.
To add a lookup column to a data object:
-
In a data object you are creating or editing, click Add one or more lookup fields.
The Define Lookup Field dialog opens.
-
Select the data object to use for the lookup.
-
Select the lookup columns from the data object. You can select one or more columns by holding down the Shift or Control key when selecting. Selecting multiple columns creates multiple lookup columns in the data object. These are the columns you want to return.
-
Select the column to match from the lookup data object.
-
Select the column to match from the current data object. You must have previously created other columns in this data object so that you have a column to select.
-
Click Add.
The matched column names are displayed in the list. You can click Remove to remove any matched pairs you create.
-
You can repeat steps 4 through 6 to create multiple matched columns. This is also known as a composite key.
-
Click OK to save your changes and close the dialog.
The new lookup columns are added to the data object. Click Modify Lookup Field in Layout > Edit Layout page to make changes to a lookup column. Multiple selection of return columns is possible when defining a new lookup but not when modifying an existing one.
You can click Remove to remove any lookups you create.
Note:
Oracle Business Activity Monitoring supports two types of schema models: unrelated tables or star schemas. Any other kind of schema that does not conform to these models may result in performance issues or deadlocks. Snowflake dimensions (daisy-chained lookups) are not supported.Supported:
Table 1 (with no lookups to any other tables)
Table 1 > Lookup > Table 2
Not supported:
Table 1 > Lookup > Table 2 > Lookup > Table 3
55.2.4 How to Add Calculated Columns to a Data Object
When creating calculated columns in a data object you can use operators and expression functions, combined with column names, to produce a new column.
Table 55-1 Describes the operators you can use to build calculated columns.
The Oracle Fusion Middleware User's Guide for Oracle Business Activity Monitoring provides the syntax and examples for expressions you can use in a calculated column.
Numbers of type Decimal require a "D" character suffix when used in a calculated column (field). See Oracle Fusion Middleware User's Guide for Oracle Business Activity Monitoring for more information.
Table 55-1 Operators Used in Calculated Columns
| Operator | Function |
|---|---|
|
+ (plus sign) |
Add |
|
- (minus sign) |
Subtract |
|
* (asterisk) |
Multiply |
|
/ (slash) |
Divide |
|
% (percent sign) |
Modulus |
|
() (parentheses) |
Parentheses determine the order of operations |
|
&& (double ampersand) |
Logical AND |
|
!= (exclamation point and equal sign) |
Logical NOT |
|
|| (double pipe) |
Logical OR For example if ((CallbackClientTime == NULL) || (ReceiveInputTime == NULL)) then (-1) else (CallbackClientTime-ReceiveInputTime) |
|
== (double equal sign) |
Equality |
|
= (equal sign) |
Assignment |
Column names containing any special characters, such as the operators listed in Table 55-1 double quotation marks, or spaces, must be surrounded with curly braces {}. If column names contain only numbers, letters and underscores and begin with a letter or underscore they do not need curly braces. For example, if the column name is Sales+Costs, the correct way to enter this in a calculation is {Sales+Costs}.
Double quotation marks must be escaped with another set of double quotation marks if used inside double quotation marks. For example, Length("""Hello World, "" I said").
WARNING:
If you enter a calculated column with incorrect syntax in a data object, you could lose the data object definition.
55.2.5 How to Add Time Stamp Columns to a Data Object
You can create a date time stamp column generated to milliseconds by selecting the Timestamp data type. This column in the data object must be empty when the data object is populated by the Oracle BAM ADC so that the time stamp data can be created.
55.2.6 What You May Need to Know About System Data Objects
The System data objects folder contains data objects used to run Oracle Business Activity Monitoring. You should not make any changes to these data objects, except for the following:
-
Custom Parameters lets you define global parameters for Action Buttons.
-
Action Form Templates lets you define HTML forms for Action Form views.
-
Chart Themes lets you add or change color themes for view formatting.
-
Matrix Themes lets you add or change color themes for the Matrix view.
-
Util Templates lets you define templates that are used by Action Form views to transform content.
For more information about matrix and color themes, Action Buttons, and Action Forms see Oracle Fusion Middleware User's Guide for Oracle Business Activity Monitoring.
55.2.7 What You May Need to Know About Oracle Data Integrator Data Objects
If you install the integration files for Oracle BAM and Oracle Data Integrator, three data objects are created in Oracle BAM Architect: Context, Scenarios and Variables in the /System/ODI/ folder. These data objects should not be deleted from Oracle BAM Architect, and their configuration should not be changed.
55.3 Creating Permissions on Data Objects
You can add permissions for users and groups on data objects. When users have at least a read permissions on a data object they can choose the data object when creating reports.
55.3.1 How to Create Permissions on a Data Object
To add permissions on a data object:
-
Select Data Objects from the Oracle BAM Architect function list.
-
Select the data object.
The general information for the data object is displayed in the right frame.
-
Click Permissions.
-
Click Edit Permissions.
Alternatively you can copy permissions from another data object. See Section 55.3.3, "How to Copy Permissions from Other Data Objects" for more information.
-
Click the Restrict access to Data Object to certain users or groups checkbox.
The list of users and groups and permissions is displayed.
-
You can choose to display the following by choosing an option:
-
Show all users and groups
-
Show only users and groups with permissions
-
Show users only
-
Show groups only
-
-
You can set permissions for the entire list by clicking the buttons at the top of the list.
The permissions are Read, Update, and Delete. You can set permissions for individual users or groups in the list by clicking the checkbox in the permission column that is next to the user or group name.
Note:
Delete and Update permissions are not effective unless a user is also granted the Read permission.Members of the Administrator role have all permissions to all data objects, and their permissions cannot be edited.
-
After indicating the permissions with selected checkboxes, click Save changes.
A message is displayed to confirm that your changes are saved.
-
Click Continue to display the actions for the data object.
55.3.2 How to Add a Group of Users
Users assigned to the Administrator role have access to all data objects. The Administrator role overrides the data object permissions.
-
Click Add a group to the list.
-
Type the Windows group name in the field. The group must previously exist as a domain group.
-
Click OK.
The group is added to the list.
55.3.3 How to Copy Permissions from Other Data Objects
You can copy the permissions from another data object and then make additional changes to the permissions before saving.
In Oracle BAM Architect for a data object, click Permissions and then click Copy from. Select the data object that contains the permissions to copy and click OK. You can edit the copied permissions and click Save changes.
To copy permissions from another data object:
-
Select Data Objects from the Oracle BAM Architect function list.
-
Click the data object to add a security filter to.
The general information for the data object is displayed in the right frame.
-
Click Permissions.
-
Click Copy from.
The Choose Data Object dialog opens.
-
Select the data object that contains the permissions to copy and click OK.
-
If the data object previously had no permissions assigned, select the Restrict access to Data Object checkbox.
-
You can edit the copied permissions or add a group to the list.
-
Click Save changes.
55.4 Viewing Existing Data Objects
This section describes how to view information about data objects.
55.4.1 How to View Data Object General Information
The general information of a data object displays the owner, when it was created, when it was last modified, and the row count.
To view the general information of a data object:
-
Click the data object in the list.
If you are currently viewing the layout or contents of a data object, click General.
The general information is displayed in the right frame. It contains the following information:
-
Created. Date and time the data object was created.
-
Last modified. Date and time the data object was last modified.
-
Row count. Number of rows of data in the data object.
-
Location. Location of the data object.
-
Type. Type of the data object.
-
Data Object ID. The ID used to identify the data object. This is based on the name although the ID is used throughout the system so that you can edit the name without affecting any dependencies.
-
Note:
If the row count is over 500,000 rows, an approximate row count is displayed in the General information for increased performance purposes. The approximate row count is accurate within 5-10% of the actual count. If you want to view an exact row count instead of the approximation, click Show exact count. The exact count is displayed. This could take a few minutes if the data object has millions of rows.55.4.2 How to View Data Object Layouts
The layout describes the columns in a data object. The columns are described by name, column ID, data type, maximum length allowed, scale, nullable, public, calculated, text tip, and lookup.
To view the layout of a data object:
-
Select the data object.
-
The general information is displayed in the right frame.
-
Click Layout.
The layout information is displayed in the right frame. It contains the following information:
-
Field name. Name of the column.
-
Field ID. Generated by the system.
-
External name. External column name from the External Data Source (only appears in data objects based on External Data Sources).
-
Field type. Data type of the column.
-
Max length. Maximum number of characters allowed in column value.
-
Scale. Number of digits on the right side of the decimal point.
-
Nullable. Whether the data type can contain null values.
-
Public. This setting determines if the column is available in Oracle BAM Active Studio to use in a report. If the box is unchecked, the column does not appear in Oracle BAM Active Studio. This is useful for including columns for calculations in data objects that should not appear in reports.
-
Lookup. Displays specifics of a lookup column.
-
Calculated. Displays the expression of a calculated column.
-
Tip Text. Helpful information about the column.
-
55.4.3 How to View Data Object Contents
You can view the rows of data stored in a data object by viewing the data object contents. You can also edit the contents of the data object.
To view the contents of a data object:
-
Select the data object.
The general information is displayed in the right frame.
-
Click Contents.
The first 100 rows of the data object display in the right frame.
(To change this default, update the
Architect_Content_PageSizeproperty. See Oracle Fusion Middleware Administrator's Guide for Oracle SOA Suite and Oracle Business Process Management Suite for information.)Oracle BAM Architect displays the total number of rows in the data object and the number of rows that are available for viewing. For better server performance, the number of rows shown in Oracle BAM Architect is limited by configuration properties.
When internal data objects are displayed in No row number mode (default), you can view all of the records in the data object using the navigation tools.
When internal data objects are displayed in Show row numbers mode, you can view a limited number of records. This number is 64000 by default, and can be changed by modifying the
ADCMaxViewsetRowCountproperty inBAMServerConfig.xml.When external data objects are displayed in either mode, you can view a limited number of records. This number is 64000 by default, and can be changed by modifying the
Import_Maxsizeproperty inBAMServerConfig.xml. -
Click Next, Previous, First, and Last to go to other sets of rows.
Rows are listed with a Row ID column. Displaying only Row ID provides faster paging for large data objects. Row IDs are assigned one time in each row and maintain a continuous row count when you clear and reload a data object.
You can click Show row numbers to display an additional column containing a current row count starting at 1. Click No row numbers to hide the row count column again.
-
Click Refresh to get the latest available contents.
55.5 Using Data Object Folders
You can organize data objects by creating folders and subfolders for them. When you create a folder for data objects, you can assign permissions by associating users and actions with the folder.
55.5.1 How to Create Folders
You can create new folders for organizing data objects. Then you can move or create data objects into separate folders for different purposes or users. After creating folders, you can set folder permissions to limit which users can view the data objects it contains.
-
Select Data Objects from the Oracle BAM Architect function list.
The current data object folders display in a tree hierarchy.
-
Click Create subfolder.
A field for naming the new folder is displayed.
-
Enter a name for the folder and click Create folder.
The folder is created as a subfolder under the Data Objects folder and a message is displayed confirming that the new folder was created.
-
Click Continue to view the folder.
55.5.2 How to Open Folders
-
Expand the tree of folders by clicking the + (plus sign) next to the Data Objects folder.
The System subfolders contain data objects for running Oracle Business Activity Monitoring. For more information about these data objects see Section 55.2.6, "What You May Need to Know About System Data Objects."
-
Click the link next to a folder to open it.
The folder is opened, and the data objects in the folder are shown in the list underneath the folder tree. The general properties for the folder display in the right frame and the following links apply to the current folder:
View. Displays the general properties of this folder such as name, date created, date last modified, user who last modified it. View is selected when you first click a folder.
Create subfolder. Creates another folder within the selected folder.
Delete. Removes the selected folder and all the data objects it contains.
Rename. Changes the folder name.
Move. Moves this folder to a new location, for example, as a subfolder under another folder.
Permissions. Sets permissions on this folder.
Create Data Object. Creates a data object in this folder.
55.5.3 How to Set Folder Permissions
When you create a folder, you can set permissions on it so that other users can access the data objects contained in the folder.
To set permissions on a folder:
-
In the Data Objects folder, select the folder to change permissions on.
-
Click Permissions.
-
Click Edit permissions.
-
Select the Restrict access to Data Object to certain users or groups checkbox.
The list of users and groups and permissions is displayed.
-
You can choose to display the following by selecting an option:
-
Show all users and groups
-
Show only users and groups with permissions
-
Show users only
-
Show groups only
-
-
You can set permissions for the entire list by clicking the column headers at the top of the list.
The permissions are Read, Update, and Delete. You can set permissions for individual users or groups in the list by selecting the checkbox in the permission column that is next to the user or group name.
Note:
Delete and Update permissions are not effective unless a user is also granted the Read permission. -
After indicating the permissions with selected checkboxes, click Save changes.
A message is displayed to confirm that your changes are saved.
-
Click Continue to display the actions for the data object.
-
Click the Add a group to the list link.
-
Type the Windows group name in the field. The group must previously exist as a domain group.
-
Click OK.
The group is added to the list.
55.5.4 How to Move Folders
-
Select the folder to move.
-
Click Move.
-
Click Browse to select the new location for the folder.
-
Click OK to close the dialog.
-
Click Move folder.
The folder is moved.
-
Click Continue.
55.5.5 How to Rename Folders
-
Select the folder to rename.
-
Click Rename.
-
Enter a new name and click Rename folder.
The folder is renamed. You must assign unique folder names within a containing folder.
-
Click Continue.
55.6 Creating Security Filters
You can add security filters to data objects so that only specific users can view specific rows in the data object. This can be useful when working with data objects that contain sensitive or confidential information that is not intended for all report designers or report viewers.
Security filters perform a lookup using another data object, referred to as a security data object, containing user names or group names. Before you can add a security filter, you must create a security data object containing the user names or group names and the value in the column to allow for each user name or each group name. Security data objects cannot contain null values.
If the user has a view open, and you change that user's security filter, it does not effect the currently open view. If the user reopens that view, it has the new security filter settings applied. Security filter settings are used to construct the query behind the view at view construction time, so changes to a security filter are not seen by previously created views.
55.6.1 How to Create a Security Filter
To add a security filter to a data object:
-
Select Data Objects from the Oracle BAM Architect function list.
-
Select the data object to add a security filter to.
The general information for the data object is displayed in the right frame.
-
Select Security Filters.
If the data object includes security filters, the filter name is displayed and you can expand and view the information.
-
Click Add filter.
The fields for defining the security filter display.
-
Enter the following information:
Name of this Security Filter. Type a name for this filter.
Security Data Object. Select the name of the security data object containing the mapped columns.
Type of identification. Select either By user or By group from the dropdown list. The security data object must include either domain or local users or groups mapped to values in the identification column.
Identification column in Security Data Object. Select the name of the column for containing user names or group names.
Match column in Security Data Object. Select the column to match in the security data object.
Match column in this Data Object. Select the name of the column to match in this data object.
-
Click Add.
-
Select the OR or AND condition when multiple security filters are created on a data object.
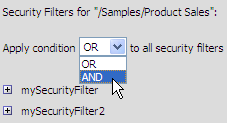
Description of the illustration bam_sec_filter.gif
By default the security filters are applied with an OR condition, meaning that if there is a match in one security data object, then the user or group identified can access the data object. The AND condition requires that the user or group be identified in all of the security data objects to access the data object protected by the filters.
Note:
If there are more than two security filters, you cannot use both AND and OR. You must either use AND or OR for all of the filters.
For example, to add a security filter to the following data object, you need a security data object containing Region information to perform the security lookup.
Sample data object:
| User | Region | Sales |
|---|---|---|
| John Smith | 1 | $55,000 |
| Bob Wright | 1 | $43,000 |
| Betty Reid | 2 | $38,000 |
Security data object:
| Login | Region ID |
|---|---|
| DomainName\jsmith | 1 |
| DomainName\jsmith | 2 |
| DomainName\bwright | 1 |
| DomainName\breid | 2 |
When the bwright account views a report that accesses the data object with a security filter applied based on Region ID and Region, it is only able to access information for jsmith and bwright. It is not able to view the breid information because it is not able to view data for the same region. However, the jsmith account is set up to view data in both region 1 and 2.
55.6.2 How to Copy Security Filters from Other Data Objects
You can copy security filters from another data object and apply them to the data object you are editing.
To copy security filters from another data object:
-
Select Data Objects from the Oracle BAM Architect function list.
-
Select the data object to add a security filter to.
The general information for the data object is displayed in the right frame.
-
Select Security Filters.
If the data object includes security filters, the filter name is displayed and you can expand and view the information.
-
Click Copy from.
The Choose Data Object dialog opens.
-
Select the data object that contains the security filters to copy and click OK.
-
You can make changes to the security filters by viewing the filter details and clicking Edit.
-
Click Save.
55.7 Creating Dimensions
In Oracle BAM Architect, you can add dimensions to data objects to define drill paths for charts in Oracle BAM Active Studio. Dimensions contain columns in a hierarchy. When a hierarchy is selected in chart, the end user can drill down and up the hierarchy of information. When a user drills down in a chart, they can view data at more and more detailed levels.
Hierarchies are an attribute of a dimension in a data object. Multiple dimensions can be created in each data object. Each column in a data object can belong to one dimension only. You can create and edit multiple, independent hierarchies.
To use hierarchies as drill paths in charts, the report designer must select the hierarchy to use as the drill path. To create a dimension, you must select multiple columns to save as a dimension. Then you organize the columns into a hierarchy.
The following is a sample dimension and hierarchy:
| Dimension | Hierarchy |
|---|---|
| Sales | Category |
| Brand | |
| Description |
55.7.1 How to Create a Dimension
To add a dimension and hierarchy:
-
Select Data Objects from the Oracle BAM Architect function list.
-
Select the data object to add a dimension to.
The general information for the data object is displayed in the right frame.
-
Select Dimensions.
-
Click Add a new dimension.
-
Enter a dimension name.
-
Enter a description for the dimension. A description is required for drilling configuration.
-
Select the column names to include in the dimension. An example is Sales, Category, Brand, and Description.
The column names are moved from the Data Objects Fields list to the Dimension Fields list to show that they are selected.
-
Click Save.
-
Click Continue.
The new dimension is listed. You must still define a hierarchy for the columns.
-
Click Add new hierarchy.
-
Enter a hierarchy name.
-
Enter a description for the hierarchy.
-
Select the column names to define as attributes for the dimension. An example is Sales remains in the Dimension Field list, and you click Category, Brand, and Description to arrange them in a general to more specific order. The order that you click the columns is the order that they are listed in the Hierarchy Field list. Arrange the more general grouping column at the top of the Hierarchy Fields list and the most granular column at the bottom of the Hierarchy Fields list.
-
Click Save.
-
Click Continue.
The new hierarchy is listed. You can edit or remove hierarchies and dimensions by clicking the links. You can also continue defining multiple hierarchies for the dimension or add new dimensions to the data object.
55.7.2 How to Create a Time Dimension
If your dimension contains a time date data type column, you can select the time levels to include in the hierarchy.
-
In a dimension containing a time date data type column, add a hierarchy.
-
Select the time date data type column. If you are editing existing time levels, click Edit Time Levels.
The Time Levels Definition dialog opens.
-
Click the levels to include in the hierarchy. The levels include:
-
Year. Year in a four digit number.
-
Quarter. Quarter of four quarters starting with quarter one representing January, February, March.
-
Month. Months one through 12, starting with January.
-
Week of the Year. Numbers for each week starting with January 1st.
-
Day of the Year. Numbers for each day of the year starting with January 1st.
-
Day of the Month. Numbers for each day of the month.
-
Day of the Week. Numbers for each day of the week, starting from Sunday to Saturday.
-
Hour. Numbers from one to twenty four.
-
Minute. Numbers from one to 60.
-
Second. Numbers from one to 60.
-
-
Click OK to close the dialog.
55.8 Renaming and Moving Data Objects
You can rename and move a data object without editing or clearing the data object. If you only want to change the data object name or description, use the Rename option.
55.8.1 How to Rename a Data Object
-
Select Data Objects from the Oracle BAM Architect function list.
-
Select the data object to rename.
The general information for the data object is displayed in the right frame.
-
Select Rename/Move.
-
Enter the new name, tip text, and description for the data object.
-
Click Save changes.
55.9 Creating Indexes
Indexes improve performance for large data objects containing many rows. Without any indexes, accessing data requires scanning all rows in a data object. Scans are inefficient for very large data objects. Indexes can help find rows with a specified value in a column.
If the data object has an index for the columns requested, the information is found without having to look at all the data. Indexes are most useful for locating rows by values in columns, aggregating data, and sorting data.
55.9.1 How to Create an Index
You can add indexes to data objects by selecting columns to be indexed as you are creating a data object.
-
Select Data Objects from the Oracle BAM Architect function list.
-
Select the data object to add an index to.
-
Select Indexes.
-
Click Add Index.
The Add Index dialog opens.
-
Enter a Name and Description for the index
-
Add as many columns as needed to create an index for the table.
Click a column in the list on the right to remove the column from the index.
-
Click OK.
The index is added and is named after the columns it contains. You can create multiple indexes. To remove an index you created, click Remove Index next to the Index name.
55.10 Clearing Data Objects
Clearing a data object removes the current contents without deleting the data object from the Oracle BAM ADC.