8 Managing Commit Processing
As the final step in Capture processing, committing applies the settings in commit profiles defined for the workspace, and outputs batch documents and their metadata in a selected output format to a specific location or content repository. After batches are successfully committed, they are permanently removed from the Capture workspace.
This chapter describes how you configure and manage commit profiles and their processing for a workspace. It includes the following sections:
-
Configuring a WebCenter Content Imaging Direct Commit Profile
-
Configuring a WebCenter Content Imaging Input Agent Commit Profile
-
Configuring an Oracle Documents Cloud Service Commit Profile
8.1 Introduction to Commit Processing
This section covers the following topics:
8.1.1 Methods of Committing Documents
Organizations choose to commit batches in a variety of ways, depending on configuration and needs.
-
Some organizations use the WebCenter Content Commit Driver or WebCenter Content Imaging Commit Driver to commit documents directly into these content repositories.
-
Some organizations use the Oracle Documents Cloud Service Commit Driver to commit documents directly into Oracle Documents Cloud Service.
-
Some organizations use the Text File Commit Driver to output to a folder and list file, for later use in a variety of ways. Another process might process the documents for intelligent data recognition (for example, using Oracle WebCenter Forms Recognition), or import documents independently into their content management system. You can customize the contents of commit text files, but they typically contain a reference to each document file and associated metadata values.
You can configure multiple commit profiles to process for a workspace. For example, one commit profile may commit documents to a content management system, while another commits to a text file. A Service Bureau might output to a commit text file containing references to images, then FTP the information to clients. Still another organization might commit directly into their content management system and create a commit text file for backup, to be kept for 90 days or archived permanently.
Figure 8-1 Commit Profile General Settings
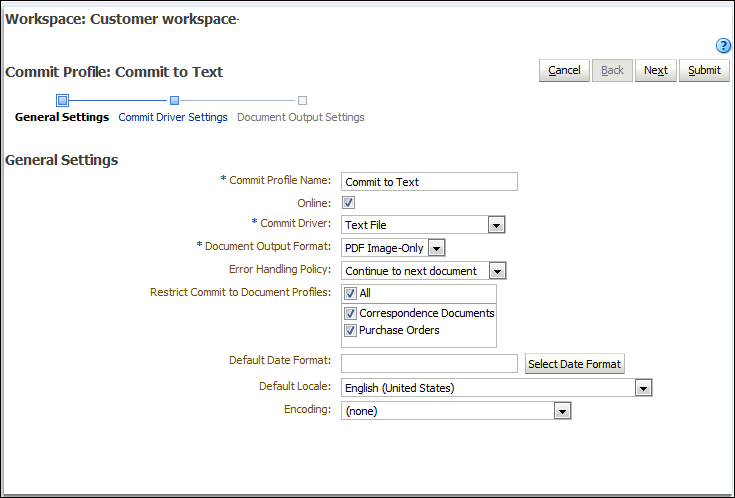
Description of ''Figure 8-1 Commit Profile General Settings''
8.1.2 About Image Document Output Formats
Regardless of the format in which image documents were captured and formatted in Capture, you can output them to one of the following formats upon commit:
-
TIFF Multi-Page: Outputs documents to multiple page, Group 4 TIFF format.
-
PDF Image-Only: Outputs documents to PDF/A format.
-
PDF Searchable: Outputs documents to PDF (portable document format) containing the original image with hidden text to facilitate full-text searching of the document. Refer to the Capture Certification Matrix for a list of platforms that support the Searchable PDF.
Caution:
The text generated from OCR results for Searchable PDF documents CANNOT be edited and may contain recognition errors.8.1.3 How Non-Image Documents Are Committed
Non-image documents include files such as Microsoft Word, Microsoft Excel, PDF, or EML documents. Depending on configuration, non-image files may be retained in their native format in Capture. At commit, non-image documents are processed differently than image documents:
-
Non-image documents remain in their native format and are not converted to TIFF or PDF format. The document output setting is ignored for all non-image documents in the batch, but applied to any image documents.
For example, a Microsoft Word document committed by a commit profile configured to output Searchable PDF is committed to the repository as a Word document. Similarly, email messages captured and stored in EML format and output to Content Server are committed in EML format regardless of the commit profile's selected document output format.
-
Once non-image documents have been successfully committed by all online and applicable commit profiles, they are deleted from the Capture workspace just like image documents.
8.1.4 How Commit Profiles are Applied During Commit Processing
Batches arriving at commit processing are ready to undergo processing by one or more commit profiles defined for the workspace. A batch may be uniform (for example, consisting of all image documents that use the same document profile) or varied (for example, consisting of image and non-image documents assigned different document profiles). Regardless, batch committing follows this general process:
-
For a batch to reach commit, Commit Processor must be selected as a post-processing step in the client profile or processor job.
-
Capture runs all commit profiles defined for the workspace on the batch, subject to the following rules:
-
Commit profiles run one at a time, in the order in which they are specified on the workspace's Commit tab.
-
Commit profiles must be Online. Changing a profile to Offline deactivates its use in commit processing for the workspace.
-
A commit profile skips processing any documents whose assigned document profile does not match the document profiles assigned to the commit profile. See Section 8.5.
-
As Capture processes each document, it verifies that required metadata fields are complete. An error occurs for a document if required fields do not contain values.
-
If an error is encountered, commit processing may skip the document, skip the commit profile, or cancel commit processing, as described in Section 8.1.5.
-
-
Capture commits documents in the batch.
-
Capture continues to commit all the documents within the batch, repeating this process until all commit profiles have been executed or an error occurs which causes the entire commit process to be canceled.
-
When there are no remaining documents in the batch, Capture deletes the batch.
If a document fails to be committed, it remains in the batch and an error is generated.
-
Based on system configuration, Capture outputs records to the audit table.
-
-
When a document has been successfully committed by all applicable commit profiles, Capture removes the document's files and associated metadata from the batch. If all documents are committed, the batch is deleted from the workspace.
8.1.5 About Commit Error Handling
Use a commit profile's error handling options to specify what happens when errors are encountered during batch committing. If an error is encountered, you can:
-
Skip to the next document
This option skips committing the current document and begins committing the next document in the batch.
-
Skip to the next commit profile
This option stops the current commit profile from executing and begins processing the next commit profile (if specified).
-
Cancel the commit
This option stops the entire commit process, including any other commit profiles, from executing.
During commit, a record is maintained that indicates if a document has been successfully committed with a commit profile. When a document is about to be committed by a commit profile, a check is performed to see if the document has already been successfully committed by the commit profile. If it has, the document will not be reattempted.
Regardless of error settings, all documents in which an error is encountered remain in the batch until the error is resolved and they are successfully committed.
8.1.6 About Documents Remaining After Commit
If uncommitted documents remain in a batch after all commit profiles have been executed, the batch lock is cleared and the batch is put in a ready state so that it can be opened in the Capture Client.
8.1.7 About Commit Processor Logging
The Capture system administrator can consult the Commit Processor performance metrics and logs to address commit processing issues and errors. For more information, see Oracle Fusion Middleware Administering Oracle WebCenter Enterprise Capture.
8.2 Adding, Copying, or Editing a Commit Profile
To add, copy, or edit a commit profile:
-
In a selected workspace, click the Commit tab.
-
In the Commit Profiles table, click the Add button or select a commit profile and click the Edit button.
You can also copy a commit profile by selecting one, clicking the Copy button, and entering a new name when prompted. Copying a commit profile allows you to quickly duplicate and modify it.
-
Complete settings on the General Settings train stop.
-
Enter a name in the Commit Profile Name field.
-
Ensure that the Online field is selected. When online, the commit profile is executed whenever a batch for the workspace is processed by the Commit Processor. See Section 8.4.
-
In the Commit Driver field, select the method by which the profile commits batches. See Section 8.1.1.
-
In the Document Output Format field, specify the format in which to commit image documents. See Section 8.1.2 and Section 8.11.
-
In the Error Handling Policy field, specify what happens if an error is encountered in one or more documents in the batch being committed. See Section 8.1.5.
-
In the Restrict Commit to Document Profiles field, select one or more document profiles to restrict the commit profile to only documents assigned those document profiles. See Section 8.5.
-
If adding a text file commit profile, complete date format, locale, and encoding settings to be used in text files in the Default Date Format, Default Locale, and Encoding fields. If adding an Oracle Documents Cloud Service commit profile, complete date format and locale settings to be used in documents in the Default Date Format and Default Locale fields.
-
-
On the Commit Driver Settings train stop, complete driver-specific settings.
-
For text file, see Section 8.6.
-
For WebCenter Content, see Section 8.7.
-
For WebCenter Content Imaging, see Section 8.8.
-
For Oracle Documents Cloud Service, see Section 8.10.
-
-
On the Document Output Settings train stop, specify settings for PDF Searchable output such as optional text file and OCR options. See Section 8.11.
This train stop is available only if you selected PDF Searchable in the Document Output Format field on the General Settings train stop.
-
Review settings on the Summary train stop and click Submit to save the commit profile.
-
Configure how batches flow to commit processing. See Section 8.12.
-
Activate the commit profile and specify execution order.
All the online commit profiles are processed in the order in which they are listed on the Commit tab. For more information, see Section 8.4.
-
Test the commit profile by committing a batch (for example, from the client). Search for and view the document in the repository or location specified in the commit profile. See Section 2.5.4.
8.3 Deleting a Commit Profile
Deleting a commit profile makes it unavailable for batches for which commit processing is set as a post-processing step. You may want to change a commit profile to offline for a time before deleting it, allowing you to resolve unexpected issues with its deletion.
To delete a commit profile:
-
In a selected workspace, select the Commit tab.
-
In the Commit Profiles table, select a profile to delete and click the Delete button.
To deactivate a commit profile instead, select it and click the Toggle Online/Offline button.
-
When prompted, click Yes to confirm the deletion.
8.4 Activating and Ordering Commit Profiles
Commit profiles apply to all batches committed from the associated workspace. When you specify Commit Processor as a post-processing step in a client profile or other processor job, all online commit profiles begin processing in the order in which they are listed on the Commit tab. You can limit their processing in several ways:
-
You can change a commit profile to Offline, as described below, which temporarily deactivates it.
-
In the commit profile, you can restrict committing to documents assigned to one of the selected document profiles. This enables you to commit different types of documents into separate content management systems based on the document's assigned document profile. See Section 8.5.
To activate and order commit profile processing.
-
In a selected workspace, click the Commit tab.
-
To activate or deactivate a commit profile, select a commit profile in the Commit Profiles table and click the Toggle Online/Offline button.
Active commit profiles display Online in the Status column, and inactive ones display Offline.
-
Use the up and down buttons to order the commit profiles as needed.
Note:
Documents in which an error is encountered remain in the batch until the error is resolved and they are committed again.
8.5 Restricting a Commit Profile Based on Document Profile
As described in Section 8.1.4, when a batch reaches commit processing as a final post-processing step, the Commit Processor runs the batch through all online commit profiles as ordered on the Commit tab. However, you can prevent a commit profile from processing a document by restricting the commit profile to processing only documents assigned to specified document profiles. For example, you might use this method to configure one commit profile to commit Purchase Order documents to WebCenter Content Imaging and another commit profile to commit Customer Agreement documents to Content Server.
To restrict a commit profile's execution based on document profile:
-
In a selected workspace, click the Commit tab.
-
In the Commit Profiles table, select a commit profile and click the Edit button.
-
In the Restrict Commit to Document Profiles field on the General Settings train stop, select one or more document profiles to commit only those documents assigned the selected document profiles.
8.6 Configuring a Text File Commit Profile
A text file commit profile creates a delimited text file that contains the full path to each document file, followed by document metadata. The document files are extracted from the batch, formatted, and output to a specified folder.
You can configure text file commit driver settings. For example, you can specify where files are written, which values are written and delimited in the text file, and how files are named.
To configure text file commit driver settings:
-
In a selected workspace, create a commit profile. See Section 8.2.
-
Select settings on the General Settings train stop.
-
Select Text File in the Commit Driver field.
-
In the Default Date Format, Default Locale, and Encoding fields, complete date format, locale, and encoding settings to be used in text files.
-
-
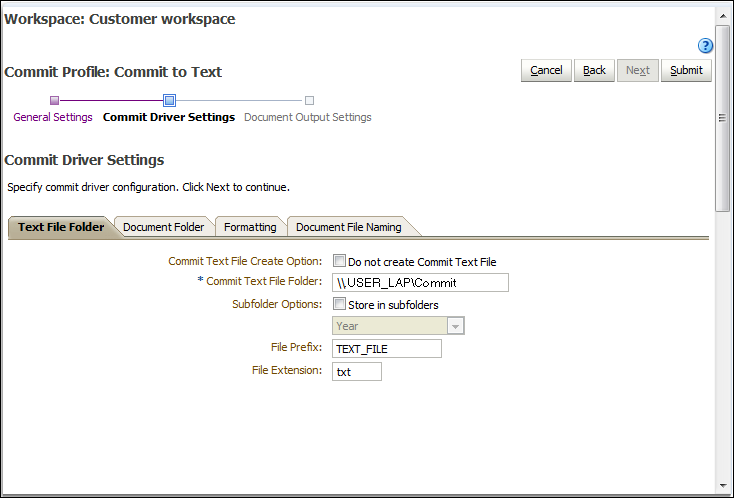
Select the Commit Driver Settings train stop.
Because you selected Text File as the commit driver, this train stop displays settings specific to text file commits.
-
On the Text File Folder tab, specify how to write commit text files.
-
In the Commit Text File Folder field, enter a location to which to write the commit text files. Use a fully qualified folder path relative to the Capture server's operating system.
-
Optionally, select the Store in subfolders field and its related field to store commit text files in subfolders named based on:
- Year
- Year and Month
- Year, Month, and Day
-
In the File Prefix and File Extension fields, specify an optional prefix and extension.
-
-
On the Document Folder tab, specify how to write the document files.
-
In the Document Folder field, enter a location to which to write the document files. Use a fully qualified folder path relative to the Capture server's operating system.
-
Optionally, select the Create a folder per committed batch field to create a folder for each committed batch, where folders are named using the syntax BatchID.WorkspaceID.
-
Optionally, under Subfolder Options, select Store in subfolders to store document files in subfolders, then specify how to name the subfolders. You can name subfolders based on:
- Year
- Year and Month
- Year, Month, and Day
You can also name subfolders based on one or more metadata field values. Select Metadata Field(s), click Configure, and select and order one or more metadata fields; the Subfolder Path field displays the structure of the subfolder path using the specified metadata fields.
-
In the If folder name consists of invalid characters field, specify how Capture should handle any invalid characters found in folder names (remove the characters or cancel the document's commit).
-
-
On the Formatting tab, specify the metadata fields and delimiters to use in the commit text file.
-
In the Field Delimiter field, specify the character to use to separate fields. If you choose Other, enter a character in the Other Character field that becomes available.
-
Optionally, in the Text Qualifier field, specify the character mark to use to identify the beginning and end of text fields. The default value for this field is (none).
-
From the Available Fields list, select metadata fields to include in the commit text file and move them to the Selected Fields list. For example, you might include the two document file fields <File Name (full path)> and <Document ID> (<Document ID> is a system generated field that represents a GUID for the document). Reorder the metadata fields as needed. Note: The order of the fields represents the order that the metadata fields appear in a document record.
-
-
On the Document File Naming tab, specify how to name the document files.
-
Optionally, select the Name document file based on Metadata field values field to name the document file based on one or more selected metadata field values. If this field is not selected, Capture names the document files using the default naming scheme that includes the internal batch ID, an underscore, and a numeric identifier. From the Available Fields list, select metadata fields to include and move them to the Selected Fields list.
-
Order the selected fields. The order of the fields affects the naming of the document file.
-
In the Field Delimiter field, specify the field delimiter to use (a space is the default).
-
In the If File Name Consists of Invalid Characters field, specify how Capture should handle any invalid characters found in document file names.
-
-
Click Submit to save the commit profile.
-
Test the commit profile.
After committing a batch, locate the commit folder and view its contents, including text file and document files.
8.7 Configuring a WebCenter Content Commit Profile
This section covers the following topics:
-
Section 8.7.2, "Configuring WebCenter Content Commit Driver Settings"
-
Section 8.7.3, "Titling and Naming WebCenter Content Document Files"
-
Section 8.7.4, "Assigning Metadata During a Content Server Commit"
8.7.1 About the WebCenter Content Commit Driver
Use the WebCenter Content Commit Driver to commit documents from Capture to Content Server. This commit driver uses the Content Server RIDC API.
Configuring the driver settings involves the following main steps. Detailed steps are provided in Section 8.7.2.
-
Create a commit profile and select WebCenter Content as the commit driver.
-
Connect to the Content Server instance after entering login information.
-
Specify how to check-in the documents into WebCenter Content, including how to title them, and who can view and access them. You can assign type, security group, and account values to documents using one of these methods:
-
Assign them a static value
-
Assign them based on Capture metadata field values
-
Assign them based on choice list values users select
-
-
Map Capture metadata fields to WebCenter Content fields. As documents are committed using this driver, metadata values entered in Capture are written into the specified Content fields.
-
Set additional options, such as document file naming, workflow bypass, and web service overrides.
Figure 8-3 Content Commit Driver Settings
Description of ''Figure 8-3 Content Commit Driver Settings''
8.7.2 Configuring WebCenter Content Commit Driver Settings
To create a Content commit profile, you need login credentials to a WebCenter Content server instance. To configure WebCenter Content commit driver settings:
-
In a selected workspace, create a commit profile. See Section 8.2.
-
On the General Settings train stop, select WebCenter Content in the Commit Driver field.
-
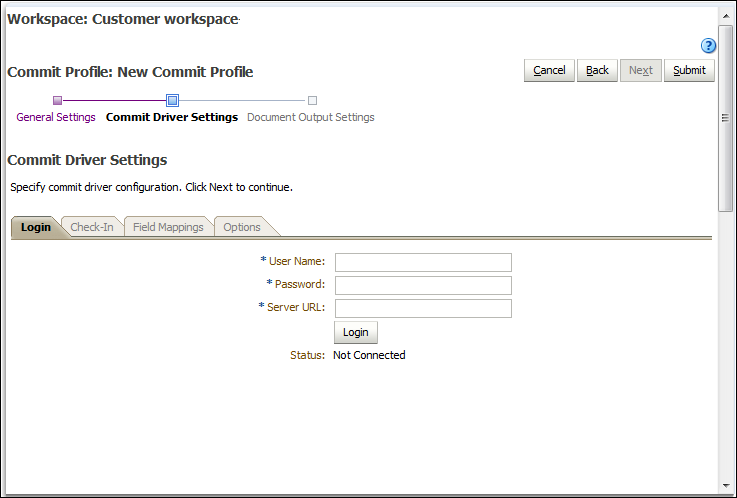
Select the Commit Driver Settings train stop.
Because you selected WebCenter Content as the commit driver, this train stop displays settings specific to WebCenter Content commits.
-
On the Login tab, enter a user name, password, and server URL to log in to the WebCenter Content server instance during commit. This user must have permission to check-in documents into Content. The user name and password are case sensitive. Use the following format for the Server URL:
http://hostname:port/cs/idcplgClick Login. Upon successful login, the status changes to Connected, and the remaining tabs become available.
-
On the Check-In tab, specify the document title, type, security group, and account within Content.
-
For information about document titles, see Section 8.7.3.
-
For information about specifying Type, Security Group, and Account metadata values, see Section 8.7.4.
-
-
On the Field Mappings tab, map Capture metadata fields to Content Server fields. As documents are committed using this driver, the document's metadata field values are written into the specified Content Server fields. To map a Content Server field, select one and click the Edit button. In the window that displays, select the Capture field.
When Assign Values Dynamically and By Field Mappings are selected on the Check-In tab, the following additional fields are displayed in the Content Server Field column on the Field Mappings tab: <Account>, <Content Type>, and <Security Group>. Mapping these fields allows metadata values to be dynamically assigned at commit, based on these Capture field values.
For information about mapping to custom Content Server fields, see Section 8.7.5.
-
On the Options tab, specify settings to customize the document check-in process, such as naming document files and providing an alternative check-in service. See Section 8.7.3.
8.7.3 Titling and Naming WebCenter Content Document Files
When committing files to Content Server, you can specify a document title and a document file name for them using a similar process.
To specify document titles or document file names:
-
While creating a WebCenter Content commit profile (Section 8.7), display the title/file name builder window:
-
For document titles, click the Configure button next to Document Title on the Check-In tab.
-
For document file names, click the Configure button on the Options tab.
The title or name builder window is displayed, as shown in Figure 8-4.
-
-
Construct a document title or file name.
From the Available Fields list, select a Capture field to add it to the title or name (multiple Capture fields can be selected).
Use the Document Title or Document File Name list to build the title or name. You can include the following elements:
-
Literal characters: Enter alphanumeric characters
-
Capture metadata fields
-
8.7.4 Assigning Metadata During a Content Server Commit
You can assign values to Content Server fields:
8.7.4.1 Using Static Values
When you assign values using this method, documents committed using the profile are assigned the metadata values selected from those available for the specified Content Server.
-
On the Check-In tab of the Commit Driver Settings train stop configured for a WebCenter Content commit, select values in the Default Type, Default Security Group, and Default Account fields.
8.7.4.2 Based on Capture Metadata Values
When you assign values using this method, documents committed using the profile are assigned metadata values based on Capture field values.
-
On the Check-In tab of the Commit Driver Settings train stop configured for a WebCenter Content commit, select the Assign Values Dynamically field, then choose By Field Mappings. This adds <Account>, <Content Type>, and <Security Group> metadata mappings to the Field Mappings tab.
-
On the Field Mappings tab of the Commit Driver Settings train stop configured for a WebCenter Content commit, select a Capture metadata field for each of the metadata mappings fields.
Note:
If you do not map the <Content Type>, <Security Group>, or <Account> fields, the value specified in the corresponding <Default Type>, <Default Security Group>, or <Default Account> field on the Check-In tab is used.
8.7.4.3 Based on User's Choice List Selections
When you assign values using this method, a combination of metadata values is assigned based on a user's choice list selection. For example, if a user selects a value of Invoice from a choice list metadata field, the document might be assigned a type of ACCTG, a security group of Finance, and no account value (<No Account> selected).
This configuration requires either a user defined choice list (Section 3.5) or a database choice list (Section 3.6).
-
On the Check-In tab of the Commit Driver Settings train stop configured for a WebCenter Content commit, select the Assign Values Dynamically field, then choose By Metadata Field.
-
In the Metadata Field field, select the Capture field whose choice list value is used to assign type, security group, and account.
-
In the Choice List Source field, select Capture Source or a previously created database choice list source.
-
In the Choice List field, select the choice list from those available for the source you selected.
-
In the Content Attribute Mapping table, click the Add button.
-
In the Add/Edit Metadata Mappings window that displays, select a choice list value and select options in the Type, Security Group, and Account fields.
-
The Type, Security Group, and Account fields each contain a default option (for example, <DEFAULT TYPE>). Select one of these default options to use the value specified in the corresponding default field on the Check-In tab (for example, Default Type field). This can simplify changing the default for many mappings by changing the default value on the Check-In tab.
-
The Account field contains a <No Account> option that you can select to skip assigning a value to the Account metadata field. Type and Security Group are required.
-
-
Repeat steps 5 and 6 to continue mapping field values.
8.7.5 Mapping to Custom Content Server Fields
In addition to mapping Capture metadata fields to Content Server fields on the Field Mappings tab, as described in Section 8.7.2, you can map Capture fields to custom Content Server fields. You might do this, for example, when you have custom code running on the Content Server that specifically references these fields. (Without custom code, these custom fields are ignored.)
To add, edit, or delete custom Content Server fields for metadata mapping:
-
On the Field Mappings tab (Section 8.7.2), click the Add button in the Custom Fields table.
-
In the Add/Edit Custom Fields window, enter the custom field's name and a description of the custom field in Field Caption field.
8.8 Configuring a WebCenter Content Imaging Direct Commit Profile
Use the WebCenter Content Imaging Commit Driver to commit documents from Capture to WebCenter Content Imaging using one of these methods:
-
Direct Commit, where Capture connects to a WebCenter Content Imaging instance and commits documents directly into it, as described in this section.
-
Input Agent Commit, where Capture creates input files from Capture batches, which are then uploaded in bulk to WebCenter Content Imaging by its Input Agent service. See Section 8.9.
Note:
To support multiple configurations, create and activate multiple WebCenter Content Imaging commit profiles. For example, you might create a profile to commit documents directly and another to commit them via Input Agent.This section covers the following topics:
8.8.1 About Direct Committing
With a direct commit profile, Capture logs into WebCenter Content Imaging and commits documents directly using WebCenter Content Imaging's web services. Creating this type of WebCenter Content Imaging commit profile involves the following configuration. Detailed steps are provided in Section 8.8.3.
-
Create a commit profile and select WebCenter Content Imaging as the commit driver.
-
Enter login information for the WebCenter Content Imaging commit driver to automatically connect to the WebCenter Content Imaging system.
Note:
Each time you commit using a WebCenter Content Imaging direct commit profile, Capture connects to the specified WebCenter Content Imaging instance, then logs out after the commit is complete. -
Specify direct commit as the commit method.
-
Map Capture metadata fields to WebCenter Content Imaging application metadata fields.
Note:
To successfully commit documents, the data types of mapped Capture metadata fields and WebCenter Content Imaging application fields must match. If the commit driver detects a problem, such as incompatible fields, it logs a message and stops the commit process. -
Optionally, set the commit driver to search for existing WebCenter Content Imaging documents and append to them, if found. To search for matches, you select a search definition created in WebCenter Content Imaging.
Figure 8-5 WebCenter Content Imaging Commit Driver Settings (Direct Commit)
Description of ''Figure 8-5 WebCenter Content Imaging Commit Driver Settings (Direct Commit)''
8.8.2 Searching For and Appending to WebCenter Content Imaging Documents
You can set the commit profile to search for a matching document during direct commits. When searching, Capture compares metadata values for the document being committed to search parameters specified in the selected WebCenter Content Imaging search definition. For more information about creating WebCenter Content Imaging search definitions, see Oracle Fusion Middleware Administering Oracle WebCenter Content: Imaging.
When searching and appending:
-
If Capture finds a match to an existing document, it appends the new document to the matched document.
-
If Capture does not find a match, a new document is created.
-
If Capture finds multiple matching documents, the document commit stops.
Important Points About Searching and Appending
-
The Searching and appending option is available for documents output in multiple page TIFF format only. (On the commit profile's General Settings train stop, the Document Output Format field must be set to TIFF Multi-Page).
-
Because the performance of searches affects the performance of the commit process, searches should be carefully defined and tuned.
-
The WebCenter Content Imaging search definition is integral to matching, and must reflect client profile settings in the workspace. For example, if a client profile contains five metadata fields but the search definition contains three fields only, searches are less specific, and documents considered separate documents in Capture could be appended to in WebCenter Content Imaging. In addition, the search definition must use AND conditions, not OR conditions.
-
Depending on the database used for the WebCenter Content Imaging server, the search may be case sensitive, meaning that if metadata values are identical but their case differs, no matching occurs.
8.8.3 Configuring Direct Commit Settings
Follow these steps to configure a commit profile that writes documents from Capture to WebCenter Content Imaging.
-
In a selected workspace, add or edit a commit profile. See Section 8.2.
-
On the General Settings train stop, select WebCenter Content Imaging in the Commit driver field.
-
In the Document Output Format field, select TIFF Multi-Page.
-
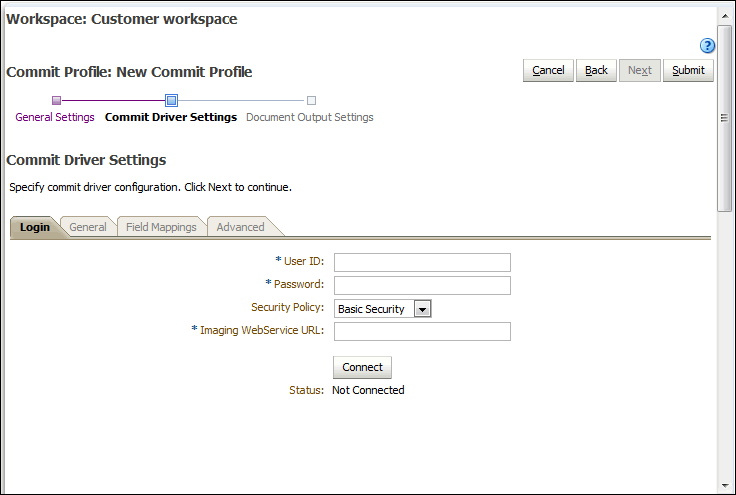
On the Commit Driver Settings train stop, log in to the WebCenter Content Imaging instance by specifying the User ID, Password, Security Policy, and Imaging WebService URL fields and click Connect. This user must have permission to check documents into WebCenter Content Imaging. The format of the Imaging WebService URL is:
http://hostname:port/imaging/wsUpon successful connection, Capture displays the connection status as Connected.
Note:
Each time users commit using the profile, Capture uses this login information to connect to WebCenter Content Imaging using the URL specified. -
On the General tab, leave the Direct Commit field selected as the commit method.
-
On the Field Mappings tab, select the WebCenter Content Imaging application to commit to, and map Capture fields to WebCenter Content Imaging fields. Make sure that the data type of mapped fields match. Select an Imaging field and click the Edit button, then select the Capture field to map to. Repeat to map additional fields.
-
On the Advanced tab, specify options for searching and appending. See Section 8.8.2.
Searching requires a previously created search definition in WebCenter Content Imaging administration that specifies how documents are matched. If you select the Search and Append to Matching Imaging Documents field, select a definition in the Search Definition field.
8.9 Configuring a WebCenter Content Imaging Input Agent Commit Profile
Use the WebCenter Content Imaging commit driver to commit documents from Capture to WebCenter Content Imaging using one of these methods:
-
Direct Commit, where Capture connects to a WebCenter Content Imaging instance and commits documents directly into it. See Section 8.8.
-
Input Agent Commit, where Capture creates input files from Capture batches, which are then uploaded in bulk to WebCenter Content Imaging by its Input Agent service, as described in this section.
Note:
To support multiple configurations, create and activate multiple WebCenter Content Imaging commit profiles. For example, you might create a profile to commit documents directly and another to commit them via Input Agent.This section covers the following topics:
8.9.1 About Input Agent Committing
During an Input Agent commit, Capture writes a delimited input file for the batch, along with its images, to a specified Capture output directory. The input file lists document images along with their associated metadata values for bulk uploading into WebCenter Content Imaging. The WebCenter Content Imaging Input Agent service monitors a specified Input Agent input directory and upon finding input files that match its input mask, uploads the files' referenced documents in bulk into WebCenter Content Imaging.
Creating this type of WebCenter Content Imaging commit profile involves the following configuration. Detailed steps are provided in Section 8.9.2.
-
Create a commit profile and select WebCenter Content Imaging as the commit driver.
-
Enter login information for the WebCenter Content Imaging commit driver to connect to the WebCenter Content Imaging system for field mapping definition.
-
Select Input Agent Commit as the commit method. Then specify the Capture output directory to which Capture writes input files and images upon commit. In addition, you also specify the Input Agent input directory from which the WebCenter Content Imaging Input Agent uploads documents.
Note:
These settings identify the same directory but in different ways. For example, if Capture is running on a Windows system and WebCenter Content Imaging is running on a Linux system, these fields would contain different paths to the same location. -
Map Capture metadata fields to a selected WebCenter Content Imaging input definition.
Note:
When committing documents indirectly using input files, Capture metadata fields and WebCenter Content Imaging application field names do not have to match. However, you must ensure that your input file definitions are correct so they correspond to the input files generated by Capture.
8.9.1.1 About Input Definitions
Configuring an Input Agent commit requires an input definition created in WebCenter Content Imaging's Manage Inputs area. For information, see Oracle Fusion Middleware Administering Oracle WebCenter Content: Imaging.
Creating an input definition in WebCenter Content Imaging includes these steps:
-
Upload a sample file that specifies how input files from Capture are composed. The sample file also specifies how input files are named, as described in Section 8.9.1.2.
-
Specify the Imaging application to input documents and their metadata values.
-
Based on the sample file, define an input mask that the Input Agent uses to locate files for input. For example, if you specify a mask of ServiceReportsInput*.txt, the Input Agent finds and processes input files that begin with that name.
-
Define a delimiter that specifies the character by which values in the input text file are separated. For example, enter a pipe (|) character.
8.9.1.2 How Capture Names Input Files Upon Commit
Capture names input files it creates upon commit based on the file attributes defined in the corresponding WebCenter Content Imaging input definition.
8.9.2 Configuring Input Agent Settings
Follow these steps to configure a commit profile that writes input files from Capture to WebCenter Content Imaging for processing by a WebCenter Content Imaging Input Agent. Also see Section 8.9.1.
Note:
A WebCenter Content Imaging input definition is required for configuring an Input Agent commit. For more information, see Oracle Fusion Middleware Administering Oracle WebCenter Content: Imaging.Figure 8-6 WebCenter Content Imaging Commit Driver Settings (Input Agent Commit)
Description of ''Figure 8-6 WebCenter Content Imaging Commit Driver Settings (Input Agent Commit)''
-
In a selected workspace, add or edit a commit profile. See Section 8.2.
-
On the General Settings train stop, select WebCenter Content Imaging in the Commit Driver field.
-
On the Login tab of the Commit Driver Settings train stop, log in to the WebCenter Content Imaging instance by specifying the User ID, Password, Security Policy, and Imaging WebService URL fields and clicking Connect. The format of the Imaging WebService URL is:
http://hostname:port/imaging/wsUpon successful connection, Capture displays the connection status as Connected.
Note:
Each time users commit using the profile, Capture uses this login information to connect to WebCenter Content Imaging using the URL specified. -
On the General tab, select Input Agent Commit as the commit method.
-
In the Input Agent Directory field, select a directory configured for the selected WebCenter Content Imaging instance.
-
In the Capture Output Directory field, specify the directory to write the input files and images. Use a fully qualified folder path relative to the Capture server's operating system.
Note:
These settings identify the same directory but in different ways. For example, if Capture is running on a Windows system and WebCenter Content Imaging is running on a Linux system, these fields would contain different paths to the same location. -
In the Imaging Input Definition field on the Field Mappings tab, select the input definition to use to generate input files.
-
Map Capture fields to Imaging fields. Make sure that the data type of mapped fields match. Select an Imaging field and click the Edit button, then select the Capture field to map to. Repeat to map additional fields.
8.10 Configuring an Oracle Documents Cloud Service Commit Profile
This section covers the following topics:
-
Section 8.10.1, "About the Oracle Documents Cloud Service Commit Driver"
-
Section 8.10.2, "Configuring Oracle Documents Cloud Service Commit Driver Settings"
8.10.1 About the Oracle Documents Cloud Service Commit Driver
Use the Oracle Documents Cloud Service Commit Driver to commit documents from Capture to Oracle Documents Cloud Service (DOCS). For more information about DOCS, see Oracle Cloud Administering Oracle Documents Cloud Service in the Oracle Cloud documentation set.
Configuring the driver settings involves the following main steps. Detailed steps are provided in Section 8.10.2.
-
Create a commit profile and select Oracle Documents Cloud Service as the commit driver.
-
Connect to the DOCS instance after entering login information.
-
Specify where to check-in the documents into DOCS and how to name them.
8.10.2 Configuring Oracle Documents Cloud Service Commit Driver Settings
To configure Oracle Documents Cloud Service commit driver settings:
-
In a selected workspace, create a commit profile. See Section 8.2.
-
On the General Settings train stop, select Oracle Documents Cloud Service in the Commit Driver field.
-
Select the Commit Driver Settings train stop.
Because you selected Oracle Documents Cloud Service as the commit driver, this train stop displays settings specific to Oracle Documents Cloud Service commits.
-
On the Login tab, enter a user name, password, and server URL to log in to the DOCS server instance during document commits.
Click Login. Upon successful login, the status changes to Connected, and the remaining tabs become available.
-
On the Document Folder tab, specify where to commit the documents:
-
In the Parent Folder section, click Select Folder... to display the Select Parent Folder window. In the Select Parent Folder window, if there is no parent folder specified for the commit profile, the user's home folder is displayed; otherwise, the selected parent folder is displayed. Select a folder to which to commit all the documents and click OK. The name of the selected parent folder is displayed in the Name field and the corresponding unique ID of the parent folder is displayed in the ID field. Optionally, click Clear Folder to clear the current selection and select a new DOCS folder.
-
Optionally, in the Subfolder Creation section, select Create Subfolders using Field values option to store document files in subfolders created dynamically within the parent folder and named using metadata field values. From the Available Fields list, select metadata fields to include and move them to the Selected Fields list. The order of the fields determines the subfolder creation order.
In the If folder name consists of invalid characters field, specify how Capture should handle any invalid characters found in a subfolder name by selecting either Remove invalid characters option or Cancel document commit option.
Note:
-
When creating subfolders in DOCS, detection of existing folder names is case insensitive.
-
If a metadata field value used to create a subfolder is blank, and there are subsequent non-blank subfolders, the document commit is aborted with the error message indicating that the subfolder path is invalid.
-
If a metadata field value used to create a subfolder is blank and there are no subsequent non-blank subfolders, the document is stored in the parent folder of the first blank subfolder.
-
-
-
On the Document File Naming tab, specify how to name the document files.
-
Optionally, select Use original file name for non-image files field to name non-image files using their original file names.
-
Optionally, select the Name document file based on Metadata field values field to name the document file based on one or more selected metadata field values. If this field is not selected, Capture names the document files using the default naming scheme that includes the internal batch ID, an underscore, and a numeric identifier. From the Available Fields list, select metadata fields to include and move them to the Selected Fields list.
-
Order the selected fields. The order of the fields affects the naming of the document file.
-
In the Field Delimiter field, specify the field delimiter to use between metadata field values (a space is the default).
-
In the If File Name Consists of Invalid Characters field, specify how Capture should handle any invalid characters found in document file names by selecting either Remove invalid characters option or Cancel document commit option.
-
8.11 Configuring PDF Searchable Document Output
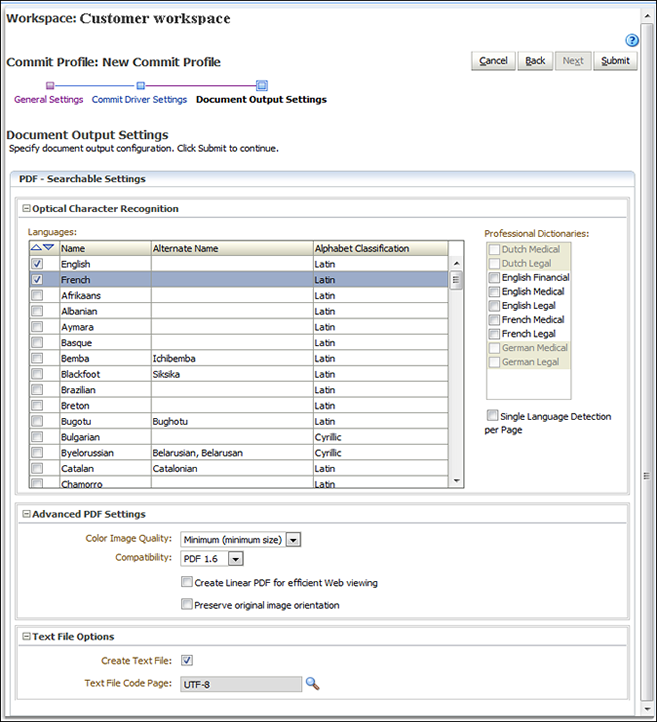
If you specified a document output format of PDF Searchable on the General Settings train stop, complete fields on the Document Output Settings train stop to configure additional settings related to this document format.
Figure 8-7 PDF Searchable Document Output Settings
Description of ''Figure 8-7 PDF Searchable Document Output Settings''
-
In a selected workspace, add or edit a commit profile. See Section 8.2.
-
Complete settings on the Document Output Settings train stop.
-
In the Optical Character Recognition settings:
-
Select the languages to use for the PDF Searchable output. The English language is selected by default.
Note:
In case Asian languages are selected for OCR, English is also recognized by default without having to specify it explicitly.The following table lists the available languages:
Name Alternate Name Alphabet Classification English Latin German Latin French Latin Dutch Latin Norwegian Latin Swedish Latin Finnish Latin Danish Latin Icelandic Latin Portuguese Latin Spanish Latin Catalan Catalonian Latin Galician Gallegan Latin Italian Latin Maltese Latin Greek Greek Polish Latin Czech Latin Slovak Latin Hungarian Latin Slovenian Latin Croatian Latin Romanian Rumanian Latin Albanian Latin Turkish Latin Estonian Latin Latvian Latin Lithuanian Latin Esperanto Latin Serbian(Latin) Bosnian Latin Serbian Cyrillic Macedonian Cyrillic Moldavian Cyrillic Bulgarian Cyrillic Byelorussian Belarusian, Belarusan Cyrillic Ukrainian Cyrillic Russian Cyrillic Chechen Cyrillic Kabardian Cyrillic Afrikaans Latin Aymara Latin Basque Latin Bemba Ichibemba Latin Blackfoot Siksika Latin Breton Latin Brazilian Latin Bugotu Bughotu Latin Chamorro Latin Tswana(Chuana) Chuana, Setswana Latin Corsican Latin Crow Latin Eskimo Inuit Latin Faroese Latin Fijian Latin Frisian Latin Friulian Latin Gaelic(Irish) Irish Latin Gaelic(Scottish) Scottish Latin Ganda(Luganda) Luganda Latin Guarani Latin Hani Latin Hawaiian Latin Ido Latin Indonesian Latin Interlingua Latin Kasub Kashubian Latin Kawa Wa, Blang Latin Kikuyu Gikuyu Latin Kongo Latin Kpelle Latin Kurdish Latin Latin Latin Luba Latin Luxembourgian Letzeburgesch, Luxembourgeois Latin Malagasy Latin Malay Latin Malinke Maninkakan Latin Maori Latin Mayan Latin Miao Hmong Latin Minankabaw Minangkabau Latin Mohawk Latin Nahuatl Latin Nyanja Chewa, Chichewa Latin Occidental Latin Ojibway Ojibwa Latin Papiamento Latin PidginEnglish Tok Pisin Latin Provencal Occitan Latin Quechua Latin Rhaetic Romansh Latin Romany Latin Ruanda Rwanda, Kinyarwanda Latin Rundi Latin Samoan Latin Sardinian Latin Shona Latin Sioux Dakota Latin Sami Latin Sami(Lule) Lule Sami Latin Sami(Northern) Northern Sami Latin Sami(Southern) Southern Sami Latin Somali Latin Sotho Sesotho, Sutu Latin Sundanese Latin Swahili Kiswahili Latin Swazi Swati Latin Tagalog Filipino Latin Tahitian Latin Tinpo Latin Tongan Latin Tun Tunia Latin Visayan Cebuano Latin Welsh Latin Sorbian(Wend) Wend Latin Wolof Latin Xhosa Latin Zapotec Latin Zulu Latin Japanese Asian Chinese(S) Simplified Chinese Asian Chinese(T) Traditional Chinese Asian Korean Asian -
Optionally, to optimize OCR recognition for financial, medical and legal documents, from the list of available professional dictionaries, select the ones that you want to use in the PDF Searchable output.
Note:
Although the Asian languages support English recognition, the professional dictionaries are not used when an Asian language is selected for OCR. -
Select the Single Language Detection per Page field to detect the predominant language on a page in the document. This option is particularly useful when the language for a page is unknown. This field is unchecked by default.
Notes:
The Single Language Detection per Page field is enabled only when multiple languages are selected.When this field is not selected, it is recommended to use fewer than five languages to improve recognition accuracy.
A configuration error message may be displayed in the following cases:
-
If you deselect this field when multiple Asian languages are selected for OCR.
-
If you select this field when an unsupported language (for example, Greek) has been selected for recognition.
-
If you select an unsupported language for OCR when this field is selected.
-
-
-
In the Advanced PDF Settings:
-
Select the Color Image Quality for color images. You can choose: Minimum (minimum size), Good (medium size), or Best (maximum size).
-
In the Compatibility field, select the PDF version of the searchable PDF document. You can choose: PDF 1.4, PDF 1.5, PDF 1.6, PDF 1.7, PDF A/1b, PDF A/2b, or PDF A/2u.
-
Select the Create Linear PDF for efficient Web Viewing field to create a linear PDF document. This option is enabled only when you select PDF 1.4, PDF 1.5, PDF 1.6, or PDF 1.7 in the Compatibility field. Linear PDFs are documents that have been organized in a special way to enable efficient incremental access in a network environment. This field is unchecked by default.
-
Select the Preserve original image orientation field to prevent the automatic reorientation of the image. This field is unchecked by default.
-
-
In the Text File Options settings:
-
Select the Create Text File field to create a text file along with the PDF Searchable output file that contains all text captured during the OCR process.
-
In the Text File Code Page field, search for and select the character set to use for the OCR text file. The default value is UTF-8. The following table lists the available character sets:
Code Page Name Description Big5 Traditional Chinese (support Eten extension and HKscs non-standard mode) Code Page 437 DOS Latin US Code Page 850 DOS Latin 1 Code Page 852 DOS Latin 2 Code Page 860 DOS Portuguese Code Page 863 DOS French-Canadian Code Page 865 DOS Nordic Code Page 866 DOS Cyrillic CIS CWI Magyar DOS Hungarian EUC-CN Simplified Chinese EUC-JP Japanese EUC-TW Traditional Chinese GB 18030 Simplified Chinese GBK Simplified Chinese Greek-ELOT DOS Greek Greek-MEMOTEK DOS Greek HKSCS-2004 Traditional Chinese (HKscs standard mode, supports Eten extension) Icelandic DOS Icelandic IVKAM C-S Czech & Slovak Latin 1 ISO 8859-1 Mac Central EU PT 202 Mac INSO Latin 2 MAC CE Mac Primus CE u MAC CE Macintosh Mac Western Magyar Ventura DOS Hungarian Maltese Malta; 7 bits used Mazowia Polish DOS Polish OCR Non Standard Win Roman 8 For HP printers Shift_JIS Japanese Sloven & Croat 7 bits used Turkish DOS Turkish UHC Korean (extended EUC-KR) Unicode Multilingual UTF-8 Multilingual Windows ANSI Code Page 1252 Windows Baltic Code Page 1257 Windows Cyrillic Code Page 1251 Windows Eastern Code Page 1250 Windows Esperant Non Standard Win Windows Greek Code Page 1253 Windows Sami Sami Windows Turkish Code Page 1254 WordPerfect Multilingual WordPerfect Old Multilingual
-
-
-
Click Submit to save the commit profile.
8.12 Configuring Batch Flow to the Commit Processor
To commit batches, a client profile or batch processor job must be configured to flow to the Commit Processor, as described in Section 8.1.4. You do this by setting the Commit Processor as the post-processing step in a client profile or other processor job. To configure batch flow from:
-
A client profile, see Section 4.17.
-
An Import Processor job, see Section 5.10.
-
A Document Conversion Processor job, see Section 6.6.
-
A Recognition Processor job, see Section 7.2.4.