B Configuring Additional Siebel Objects
To use the Siebel Adapter for Oracle WebCenter Content with additional Siebel entities beyond those automatically configured (see Section 1.2), follow the steps in this Appendix. The Siebel Adapter for WebCenter Content uses an IFrame to display Managed Attachments. Before use, an IFrame applet must be created and configured for each business object.
This appendix contains the following topics:
-
Section B.8, "Set IFrame to Refresh When Parent Applet Changed"
-
Section B.10, "Configuring the IFrame URL in the Siebel Web Client"
-
Section B.11, "Testing the Additional Objects Siebel Configuration"
B.1 Identifying Objects to Lock
Prior to modifying Siebel business objects, you must identify and lock those business components, applets, and views affected. To identify what to lock, do the following:
-
Log in to Siebel Web Client with User ID: SADMIN.
-
Select the tab of the business object being modified. For example, select the Agreements tab if modifying a Service Agreement. The object screen is displayed.
-
Select the Attachments tab. A listing of attachments associated with the existing applet is displayed.
-
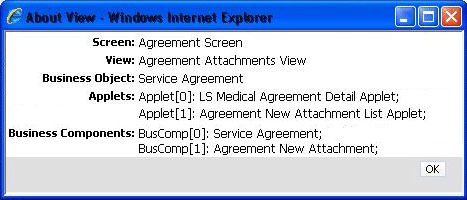
Select About View from the Web Client Help menu. The About View screen is displayed with information about the view, applets, and business components used for the selected object. For example, if modifying a service agreement object, information on the following items might be displayed:
-
Screen: Agreement Screen
-
View: Agreement Attachments View
-
Business Object: Service Agreement
-
Applets: Applet[0]: LS Medical Agreement Detail Applet; Applet[1]: Agreement New Attachment List Applet;
-
Business Components: BusComp[0]: Service Agreement; BusComp[1]: Agreement New Attachment;
In this example you are replacing the Agreement New Attachment List Applet (Applet[1]).
-
-
Note the information and click OK to close the About View screen.
B.2 Locking Additional Siebel Objects
Once the appropriate business components, applets, and views have been identified, you must use Siebel Tools to search and determine the associated projects.
-
Log in to Siebel Tools with User ID: SADMIN.
-
Search for the view, applets, and business components that you noted in the About View screen to find the projects associated with each. For example, you may find the following projects associated with a Service Agreement object:
-
Srvagree (SSV)
-
LS Medical Terms
-
Srvagree
-
-
Search for the projects you found in step 2 by doing the following:
-
Select Project in the Object Explorer and press Ctl+Q to display the query dialog screen.
-
Enter a query string that includes the projects found in step 2 and press Enter. A list of projects is displayed. In this example, the query string would be
Srvagree ?SSV? OR LS Medical Terms OR Manage Attachments?UCM? OR Srvagree
-
-
Lock each project found in step 2 by selecting the Locked column next to the project name. This locks all objects, views, applets, business components, and screens that are associated with each project. A check mark is displayed in the Locked column when a project is successfully locked.
Figure B-2 Project Listing with Projects Locked
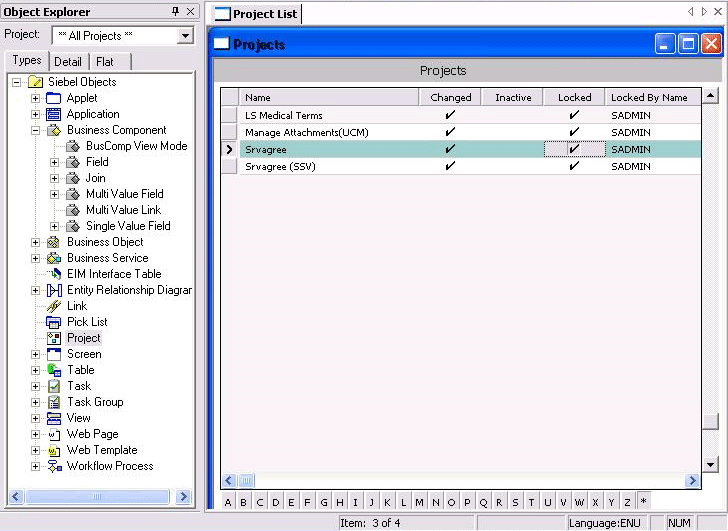
Description of ''Figure B-2 Project Listing with Projects Locked''
B.3 Adding Fields to the Business Component
After locking all projects associated with the identified business components, applets, and views, you must add fields to the appropriate business component. For example, to add fields to the Srvagree project, do the following:
-
Select Srvagree in the Projects List.
-
Select Field under Business Component in the Object Explorer. The Field List is displayed.
-
Add the following fields:
Name Calculated Calculated Value UcmServUrl Yes UcmServUrl SiebelEntityName Yes xsiebelAgreement QueryText Yes [SiebelEntityName]+" <matches> "+"'"+[Id]+"'" Note:
Ensure that the correct single quote "`" is used in the last part of the QueryText Calculated Value string. It is typically the character on the key to the left of the number 1 key. Also ensure that there is a space on either side of <matches>.
B.4 Creating an Applet for the IFrame
Once fields are added to the business object, you must create an applet for the IFrame. For this example, do the following:
-
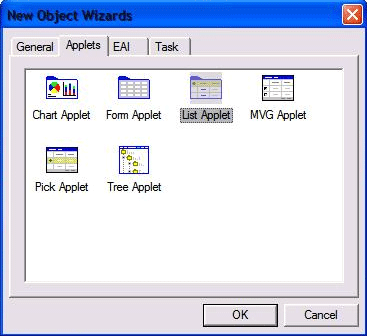
From the File Context Menu, select New Object. The New Object Wizard is displayed.
-
Under the Applets tab, select List Applet and click OK. The New Applet Wizard is displayed.
-
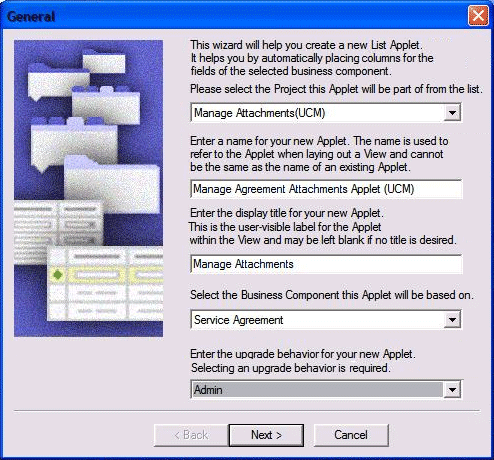
Select Manage Attachments (UCM) as the project.
-
Enter a descriptive name. For example, enter Manage Agreement Attachments Applet (UCM).
-
Enter Managed Attachments as the display title.
-
Select Service Agreement as the Business Component the applet is to be based on.
-
Select Admin as the upgrade behavior, then click Next. The Web Layout screen is displayed.
-
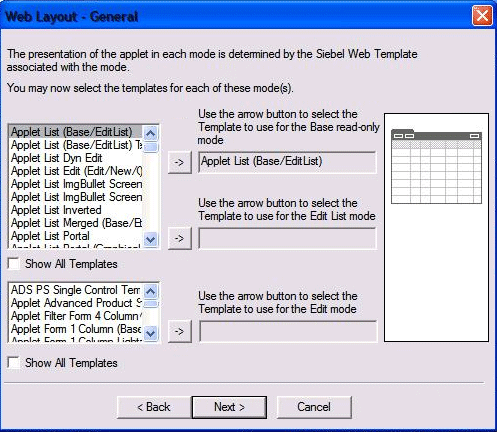
Select Applet List (Base/Edit List) from the first list of template options and click the arrow to confirm its use, then click Next. The Fields screen is displayed.
Figure B-6 The Fields Screen with Available Fields Section
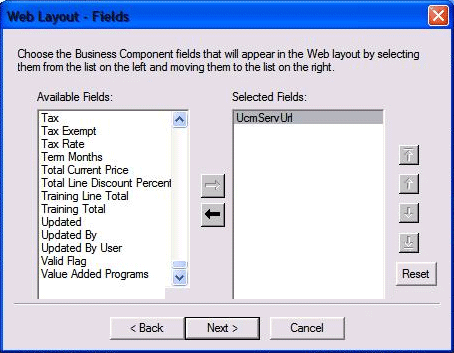
Description of ''Figure B-6 The Fields Screen with Available Fields Section''
-
Select UcmServUrl from the Available Fields section and click the arrow to move it to the Selected Fields section and click Next. The Fields screen changes to display the Available Controls section.
Figure B-7 Fields Screen with Available Controls Section
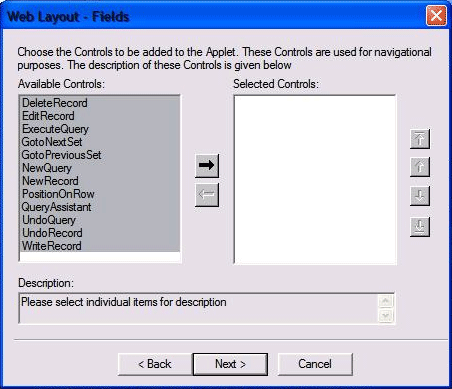
Description of ''Figure B-7 Fields Screen with Available Controls Section''
-
Select all controls in the Available Controls section and click the arrow to move them to the Selected Controls section, then click Next.
-
Click Finish. The IFrame applet is created.
B.5 Modifying Applet View Layout
When created, the IFrame applet uses a generic layout. To view and modify the layout, do the following:
-
Right-click on the newly created applet and select Edit Web Layout from the contextual menu. The new applet is displayed using the Web Template (base) layout.
-
Expand Applet in the Object Explorer then expand List and select List Column. The List Columns screen is displayed showing the UcmServUrl as a list control. The UcmServUrl list control is a place holder for the IFrame.
-
In the Field Retrieval Type column, select Symbolic URL as the attribute.
-
In the HTML Type column, select Field as the attribute.
-
Under Applet in the Object Explorer, expand Applet Web Template and select Applet Web Template Item. A screen is displayed listing the available templates in the top section and the available items on the bottom section.
-
Select Base in the top Applet Web Templates section of the screen. The Web Template dialog is displayed.

Description of the illustration ''web_template_dialog.gif''
-
Select Analytics Applet from the Name column and click OK. The Web Template dialog closes.
-
Save all.
-
Confirm the changes have been saved by right-clicking on the applet and selecting Edit Web Layout from the contextual menu. The applet is displayed using the modified layout.
B.6 Inactivating Existing Applet from View
Before you can use the newly created applet, you must inactivate the old applet from the view. To inactivate the old applet, do the following:
-
Search for the old view name. Find the old view's name by selecting About View from the Web Client Help menu. In this example, search for the Agreement Attachments View. The Views screen is displayed.
-
Select the old view in the Views screen.
-
In the Object Explorer, expand View, then expand View Web Template and select View Web Template Item. The View Web Template Items screen is displayed.
-
Select the applet in the View Web Template Items section and enable Inactive.
Note:
If editing the properties directly rather than editing the record, set the inactive attribute to True.
B.7 Adding the New Applet to the View
After inactivating the old applet from the view, follow these steps to add the new applet:
-
In the Object Explorer, expand View, right-click on the view and select Edit Web Layout from the contextual menu. The applet is displayed.
-
Drag and drop the List applet onto the place holder showing the Child applet. A Pick Record dialog asking for the particular list applet is displayed.
-
Select the name of the new applet from the list and click Pick. The new applet is added to the view.
B.8 Set IFrame to Refresh When Parent Applet Changed
By default, the new applet caches information when a parent record is displayed. If the parent record is changed, the information in the applet view does not get refreshed. You must add a browser script to ensure the applet information is refreshed by doing the following:
-
Determine the parent applet of the new Managed Attachments applet by expanding View Web Template under the View section of the Object Explorer and selecting View Web Template Items.
-
In the View Web Template Items screen, right-click on the parent applet and select Edit Browser Scripts from the contextual menu. Events associated with the applet are displayed in the Object Explorer.
-
In the General Declaration, add the following:
var applet; function refresh() { applet.InvokeMethod("ToggleTo"); } -
In the Applet_Load event, add the following:
function Applet_Load() { applet = this; } -
In the Applet_ChangeRecord event, add the following:
function Applet_ChangeRecord()
{
   setTimeout("refresh()",10);
}
Note:
To activate the browser script you will need to execute the 'genscript' command. Once you have compiled your work to a new SRF and copied the SRF to your server directory, execute the following command (change to match your environment):genbscript "ENU\siebel.cfg" D:\sea\siebsrvr\WEBMASTER ENU
You then need to restart IIS by restarting the IIS Admin Service from within the Windows Services screen.
B.9 Compiling the Additional Objects Project
To compile the completed project, do the following:
-
From the tools menu, select Compile Projects. The Object Compiler screen is displayed.
-
Select Locked Projects.
-
Verify that the correct repository is selected in the Siebel repository file field. This repository file must exist in the Web Client installation folder.
-
Click Compile. The length of time necessary to compile varies and may be extensive.
B.10 Configuring the IFrame URL in the Siebel Web Client
Follow the procedure detailed in Section 2.3.4.
B.11 Testing the Additional Objects Siebel Configuration
Test the configuration by following the steps in Section 2.3.5.
B.12 Creating a SIF File for Export
After compiling and testing the project, follow these steps to unlock the modified objects and create a new SIF file for export:
-
Unlock all projects locked in Section B.2 and select each object.
-
Right-click on the selected objects and choose Add to Archive from the contextual menu. The Export to Archive File screen is displayed.
-
In the Export to Archive File screen open, right-click on each object to export and select Add to Archive from the contextual menu. Repeat until all objects for export are added to the archive.
-
Enter or browse to a location and enter a name for the exported SIF file in the Archive file field of the Export to Archive File screen and click Save. The SIF file is created in the specified location.
B.13 Configuring Content Server
After completing the necessary Siebel configuration, you must configure Content Server to support the exposed entity. This section has the following topics:
B.13.1 Adding Content Server Information Fields
You must add the appropriate information fields to Content Server using the Content Server Configuration Manager applet. To add the appropriate fields, do the following:
-
Log in to Content Server as an administrator.
-
Open the Administration panel and click Admin Applets. The Admin Applets page is displayed.
-
Click Configuration Manager. The Configuration Manager screen is displayed.
-
Ensure that the Information Fields tab is displayed and click Add. The Add Metadata Field Name is displayed.
-
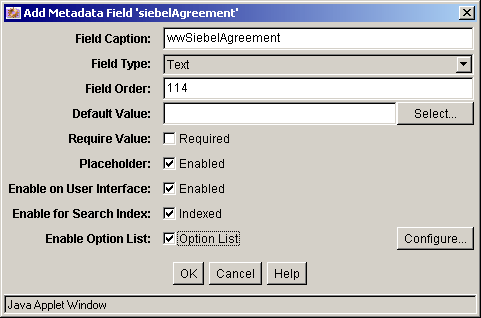
Enter the name of the field being added. Typically the format is siebel followed by the Entity name. For example siebelAgreement.
-
Click OK. The Add Metadata Field 'field_name' is displayed.
-
Ensure that the following options are enabled:
-
Placeholder
-
Enable on User Interface
-
Enable for Search Index
-
Enable Option List
-
-
Modify the Field Caption by adding ww to the beginning of the caption and capitalizing Siebel. For example, siebelAgreement becomes wwSiebelAgreement.
Description of the illustration ''add_meta_field_detail.gif''
-
Click Configure. The Configure Option List for 'field_name' screen is displayed.
-
Select Multiselect List as the Option List Type.
-
Enable Use view and click OK. The Add Metadata Field 'field_name' screen closes and the Configuration Manager screen is displayed.
B.13.2 Adding Rules for Displaying Fields
To ensure that fields are displayed, you must use Configuration Manager to add rules. To add rules for displaying fields, do the following:
-
With the Configuration Manager screen still displayed, click Rules. The Rules tab is displayed.
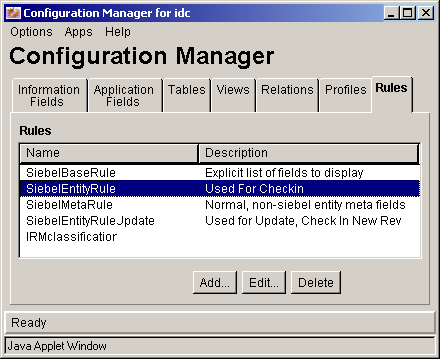
Description of the illustration ''config_man_rules.gif''
-
Select SiebelEntityRule and click Edit. The Edit Rule SiebelEntityRule screen is displayed.
-
Click Fields. The Fields tab is displayed listing the Entities already built.
-
Click Add. The Add Rule Field screen is displayed.
-
Under Field Name, select the name of the field you created in Section B.13.1. For example, wwSiebelAgreement. The newly created field is typically last on the list.
-
Click OK. The Add Rule Field screen closes and the Add Rule Field 'xfieldName' screen is displayed.
-
Click OK. The Add Rule Field 'xfieldName' screen closes and the Configuration Manager screen is displayed.
-
With the Rules tab displayed, select SiebelEntityRuleUpdate.
-
Repeat steps 3 through 7. The relevant fields are now added and displayed.
-
Click OK to close the Configuration Manager screen.
B.13.3 Editing Necessary Content Server Resource and String Files
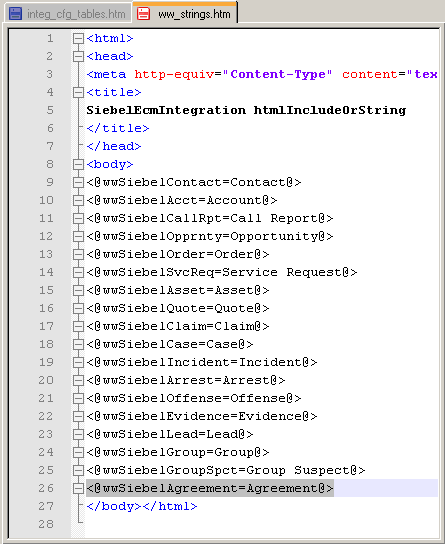
After adding the information fields to Content Server, you must account for them in the Content Server integ_cfg_tables.htm and ww_strings.htm files. Do the following steps:
-
Open the integ_cfg_tables.htm file in a standard text editor. The integ_cfg_tables.htm file is located in the following directory:
content_server_install_dir/custom/SiebelEcmIntegration/resources -
Add a row to the end of the DocTagDefList table with a cell for the field name entered in step 5 of Section B.13.2 and the field caption entered in step 8 of the same section. For example:
<tr>
   <td>xsiebelAgreement</td>
   <td>wwSiebelAgreement</td>
</tr>
-
Open the ww_strings.htm file in a standard text editor. The ww_strings.htm file is located in the following directory:
content_server_install_dir/custom/SiebelEcmIntegration/resources/lang/enNote:
Only the ww_strings.htm file in the content_server_install_dir/custom/SiebelEcmIntegration/resources/lang/en directory needs to be edited. The change will modify the ww_strings.htm files in the other language directories automatically. -
Add the field caption information added in 8 of Section B.13.2 to the end of the body section. For example:
<@wwSiebelAgreement=Agreement@>
Note:
Agreement was the Siebel Entity added as an example in this appendix. Ensure that you use the name of the Entity that you added. -
Restart Content Server. The new Entity is enabled.
Description of the illustration ''ww_string_edit.gif''