67 Implementing Custom Data Providers: Introduction
This chapter introduces data providers, discusses their important role in the Personalization architecture, and presents a basic example that you can build and run in JDeveloper. After reading this chapter, you will have a basic understanding of how to implement a custom data provider.
This chapter includes the following topics:
-
Section 67.6, "Invoking the Data Provider in a Scenario from JDeveloper"
-
Section 67.7, "Designing Custom Data Providers: Best Practices"
67.1 Introduction to Data Providers
Data providers are connecting points between services provided by external systems, like business management or inventory systems, and the Conductor. The Conductor is a container for running and managing scripted components called scenarios. Scenarios consume and process the data that one or more data providers retrieve, and thereby make that data available for use in a client application, like a portal or mobile application. See Figure 67-1.
Note:
Another type of provider used with Personalization is a function provider. While data providers fetch data from external sources and return the data to a scenario, function providers filter and transform data within a scenario. See Chapter 68, "Implementing Custom Function Providers: Introduction."Figure 67-1 Personalization Architecture Overview
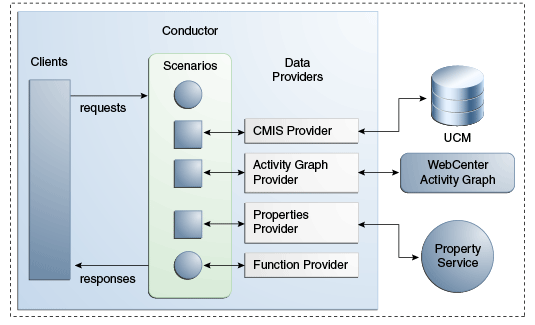
Description of ''Figure 67-1 Personalization Architecture Overview''
Data providers are essential components within the Personalization architecture. Data providers offer the flexibility to connect to and retrieve data from almost any kind of service. WebCenter Portal includes several out-of-the-box providers. You can begin using these out-of-the-box providers immediately, or you can write your own custom data providers to satisfy specific use cases.
For example, you might want to write an inventory provider to retrieve parts and inventory information, a purchasing provider to retrieve purchasing information from a business management system, a sales provider to retrieve sales information from a CRM system, and so on.
67.2 Do I Need to Write a Custom Data Provider?
The first thing you need to do is determine if one of the out-of-the-box data providers is sufficient for your Personalization use case. The out-of-the-box data providers include:
-
Property Service Provider – Allows you to integrate property service data into a scenario. See Section 70.5, "Using the Property Service Data Provider."
-
CMIS Data Provider – Provides services to retrieve and search for content from standards-based CMIS (Content Management Interoperability Services) content servers, specifically provided by the Oracle WebCenter Content Server.
-
Activity Graph Data Provider – Provides integration with the Activity Graph engine (the basis for Activity Graph), which provides recommendations about what a user may be interested in connecting with based on analytics within WebCenter.
These data providers might not be suitable for all use cases. For example, you may need to retrieve data from a legacy application with a non-standard set of APIs. In these cases, you need to implement a custom data provider. See Section 67.4, "Implementing a Simple Custom Data Provider."
67.3 Discovering Data Providers
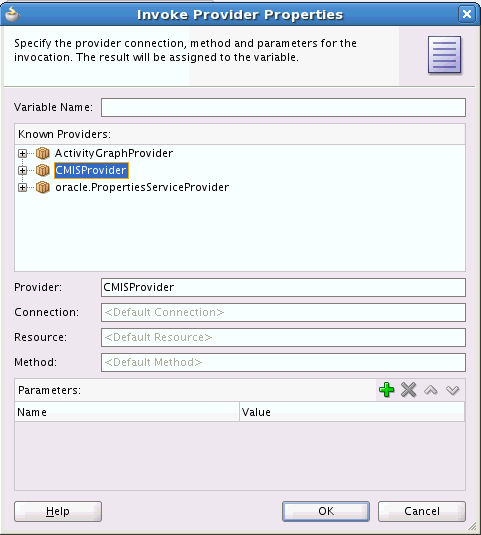
Data providers (both out-of-the-box and custom providers) are listed in the Invoke Provider Properties dialog as shown in Figure 67-2.
To access this dialog, create a scenario and add an Invoke Provider node to it. Right-click the node and select Invoke Provider Properties. For more information on creating scenarios and accessing this dialog, see Section 66.2.2, "Authoring Personalized Scenarios in JDeveloper."
For an example that demonstrates how to invoke a data provider, see Section 67.6, "Invoking the Data Provider in a Scenario from JDeveloper."
67.4 Implementing a Simple Custom Data Provider
This section describes how to implement a simple custom data provider, configure it, and invoke it inside a scenario. Even though this is a very basic example, it illustrates many important aspects of custom provider development and configuration.
67.4.1 Overview of the Example and Prerequisites
This example demonstrates how to implement a data provider that accepts one parameter and returns a message to the server console when it is called in a scenario. In the following sections, we discuss the required provider code and explain how to integrate the provider into the Conductor, use it in a scenario, and run the scenario.
The prerequisites for developing custom Personalization components, including data providers, are described in Section 2.5, "Setting Up JDeveloper for Personalization." The prerequisites include making certain required components available to your project.
Note:
This example is presented in the context of a Portal Framework application in JDeveloper.For custom data provider development, JDeveloper is not required. You can use any Java IDE, however, you need to include the required WebCenter Personalization JAR files and Java components to your project. See Section 2.5, "Setting Up JDeveloper for Personalization." for more information.
67.4.2 Data Provider Architecture
To create a custom data provider, you must extend a set of Java base classes to provide the appropriate functionality. Table 67-1 gives a quick summary of the data provider classes used in this example section. If you intend to write a custom provider, you'll become familiar with these classes. If you're using an out-of-the-box provider, it's helpful to understand this basic architecture.
Table 67-1 Required Data Provider Base Classes
| Interface | Primary Purpose |
|---|---|
|
DefaultDataProvider |
Instantiates a connection configuration object used by the provider. Each data provider has one connection (1-1 relationship). |
|
BaseConnectionConfig |
Specifies a name for the connection. A connection name is required and must be added to a configuration file called |
|
DefaultProviderConnection |
Instantiates one or more ExecutableResource objects. A data provider can reference multiple executable resource objects (1-many relationship). |
|
DefaultExecutableResource |
ExecutableResource methods do whatever work is required for your data provider to perform. Typically, this work involves interacting with external services. For example, if your provider is written to interact with Mail, you might retrieve certain Mail connection information and then implement getMail() and sendMail() methods. These methods can then be invoked within the context of a scenario. These concepts will become more clear when you review the simple data provider example presented in this chapter. |
67.4.3 Extending the DefaultDataProvider Class
The first step in creating our example custom data provider is to extend DefaultDataProvider. This approach is best used for a quick implementation of a custom provider that does not rely on external resources, like databases or applications. For cases where you do need external resources, extend the ExternalDataProvider class instead.
Example 67-1 lists the code for the extended DefaultDataProvider class. In JDeveloper, refer to online help for detailed information on creating and compiling Java classes.
Tip:
The general instructions for creating a class are to select New from the File menu and choose to create a new Java class. Copy the example code into the file and save it. If you explicitly enter the packageproviders.data in the Create Java Class dialog, the package directory will be created for you and your class file will be placed in that package directory. Follow the same approach to create all of the classes presented in this example.Example 67-1 Extending DefaultDataProvider
package providers.data;

import oracle.wcps.conductor.annotation.ContextualProvider;
import oracle.wcps.dataprovider.base.DefaultDataProvider;
import oracle.wcps.conductor.provider.IConnection;
import oracle.wcps.dataprovider.base.IConnectionConfig;

@ContextualProvider
        (
                contextName="SayHelloProvider",
                resourceBundle="resources.SayHelloProperties",
                descriptionBundleKey="hello.provider.description",
                nameBundleKey="hello.provider.name"
        )

public class SayHelloProvider extends DefaultDataProvider {

    public Class<?> getConnectionConfigClass()
    {
       return SayHelloConnectionConfig.class;
    }

    @Override
    protected IConnection createConnection(IConnectionConfig config)
    {
        return new SayHelloConnection((SayHelloConnectionConfig)config);
    }


}
The first thing to notice about SayHelloProvider is that it is annotated. Every data provider class requires the following @ContextualProvider annotation stanza immediately before the class definition:
@ContextualProvider
        (
                contextName="SayHelloProvider",
                resourceBundle="resources.SayHelloProperties",
                descriptionBundleKey="hello.provider.description",
                nameBundleKey="hello.provider.name"
        )
The contextName element specifies the name that will appear in the scenario editor dialog that lets you select the data provider. The resourceBundle element refers to a resource file that exists in the class path of the data provider. You can have multiple resource files in a project. Just remember that the resourceBundle value must correspond to one of them. The other annotations are resource bundle keys used to identify strings in the resource file, which primarily support localization. We'll discuss creating the resource file in the next section, Section 67.4.4, "Creating a Resource Properties File."
Note that to use these class-level annotations, you must import the following class:
import oracle.wcps.conductor.annotation.ContextualProvider;
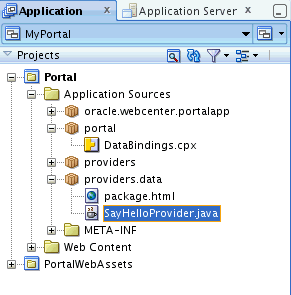
Figure 67-3 shows the new SayHelloProvider.java source file in the Application Navigator in JDeveloper. Note that the source file is in a package called providers.data. You are responsible for creating the package, according to your own conventions.
67.4.4 Creating a Resource Properties File
The class-level Java annotations placed in the data provider source file specify a resource properties file. This file must exist and must include the keys used in the class annotations and provide their values.
Note:
The resource properties file's package must be located within the same parent directory as your source code or source code package. You can create multiple resource files, as long as they are referenced properly in the provider class.For example, the following resource keys were listed in the SayHelloProvider class annotations (see the listing in Example 67-1). The first annotation, hello.provider.name, specifies the name of the provider as it will appear in the scenario editor's Invoke Provider dialog. The second annotation provides a brief description and also appears in the Invoke Provider dialog when you hover the mouse over a provider's name.
hello.provider.name=SayHelloProvider
hello.provider.description=Simple data provider that greets a user by name.
Figure 67-4 shows a properties file in the Application Navigator called SayHelloProperties.properties and it is in a package called resources. Recall from Example 67-1 that the class annotations specified the resource file to be resources.DataProviderResources, which is what is reflected in Figure 67-4.
Figure 67-4 The Resource Properties File
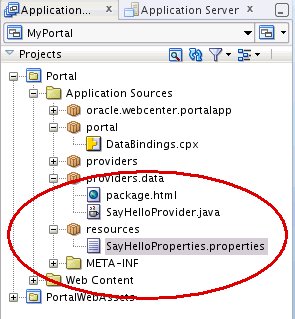
Description of ''Figure 67-4 The Resource Properties File''
67.4.5 Extending BaseConnectionConfig and DefaultProviderConnection
If you created the SayHelloProvider class as presented previously, you noticed that two classes are unresolved. We'll create those classes next. The first class, SayHelloConnectionConfig, extends the base class BaseConnectionConfig. The second, SayHelloConnection extends DefaultProviderConnection.
Note:
Each DataProvider class has a single Connection class, whose attributes are described in the ConnectionConfig class.Example 67-2 lists SayHelloConnectionConfig. It's empty because for this example, there are no connections to configure. In this example, you could just use BaseConnectionConfig directly, rather than extending it. If you are writing a provider that needs to connect to external resources, then this class is more important.
Example 67-2 Extending BaseConnectionConfig
package providers.data;

import oracle.wcps.dataprovider.base.BaseConnectionConfig;
import oracle.wcps.connection.annotation.ConnectionConfiguration;

 @ConnectionConfiguration
        (
                connectionType="client.simple.connection"
        )
public class SayHelloConnectionConfig extends BaseConnectionConfig {
    public SayHelloConnectionConfig() {
        super();
    }
}
The class-level annotation, @ConnectionConfiguration, is important. It specifies the connection type for the provider. The connection type specified in this annotation must match the <connection-type> element in the wcps-connections.xml configuration file, which we'll discuss shortly in Section 67.5.6, "Updating the WCPS Connections Configuration File."
The next class, SayHelloConnection, extends DefaultProviderConnection. This class is primarily responsible for instantiating ExecutableResource objects, which do the work of the data provider, like retrieving data by calling external APIs. A provider can have multiple ExecutableResource objects; however, for this example, we only need one.
Example 67-3 Extending DefaultProviderConnection
package providers.data;

import oracle.wcps.conductor.provider.IExecutableResource;
import oracle.wcps.dataprovider.base.DefaultProviderConnection;

public class SayHelloConnection extends DefaultProviderConnection {

    public SayHelloConnection(SayHelloConnectionConfig config) {
        super(config);
    }
    @Override
       protected void createExecutableResources()
       {
           IExecutableResource resource = new SayHelloExecutableResource();
           executableResources.put("SimpleDataProvider", resource);

       }
}
Note that the Map key "SimpleDataProvider" is an arbitrary name. It does not have to match the class name.
67.4.6 Extending DefaultExecutableResource
The last class you need to extend is DefaultExecutableResource. ExecutableResource objects are the data provider work horses. These classes let you implement the custom code that runs in a scenario. If you write a provider that fetches data from an external source, the code for performing that task goes in an ExecutableResource class.
Note:
A Connection may have several implementations of an ExecutableResource. For example, the ActivityGraphProvider's ActivityGraphConnection has three different ExecutableResources related to common items, common users, and recommendations.The ExecutableResource class for this simple example doesn't do very much: it just returns a message. Review the code in Example 67-4 and we'll discuss the details immediately after the example.
Example 67-4 Extending DefaultExecutableResource
package providers.data;

import oracle.wcps.conductor.annotation.PublicFunction;
import oracle.wcps.conductor.annotation.PublicParameter;
import oracle.wcps.dataprovider.base.DefaultExecutableResource;

public class SayHelloExecutableResource extends DefaultExecutableResource {

    @PublicFunction
               (
                       functionName = "sayHello",
                       descriptionBundleKey = "provider.method.sayHello.description"
               )
    public String sayHello(@PublicParameter(parameterName = "user",
                       descriptionBundleKey = "provider.parameter.sayHello.user.description")
                       String user)

    {
        String msg = "Hello, " + user +
            ".  How are you today!";
        System.err.println(msg);
        return msg;
    }
}
The most important thing to notice about this code is that the sayHello() method and its parameter are annotated. The annotation is required and allows the scenario editor to pick up and display metadata about the method. As with other annotations, these represent a name/value pair, where the value part is a resource bundle key. This key is then referenced in the same resource properties file that was specified in the SayHelloProvider class.
Tip:
Use of the resource bundle to isolate the string values is a best practice and assists with localization. You must be sure to include the properties file in your final, deployed JAR file. We'll discuss creating the JAR file in Section 67.5, "Deploying the Custom Data Provider." See also Section 67.4.4, "Creating a Resource Properties File."That's it for coding our simple SayHelloExecutableResource class. As you can see, this class allows you to implement custom methods that can be executed in a scenario. Don't forget that annotation is required for both methods and parameters.
Next, we need to deploy the data provider to the server, where it can be used in a scenario. See Section 67.5, "Deploying the Custom Data Provider."
67.5 Deploying the Custom Data Provider
After you create a new data provider class, you need to compile it and deploy it properly. After you accomplish these tasks successfully, the provider will show up in the scenario editor in the Invoke Data Provider Properties dialog, as explained in Section 67.6, "Invoking the Data Provider in a Scenario from JDeveloper."
Note:
Data provider deployment can be tricky, because it's largely a manual procedure. You must follow these instructions carefully–even a simple typo at any point will prevent the provider from being deployed successfully.To summarize the steps, you must deploy a JAR file containing:
-
your compiled data provider classes
-
a resource properties file (which must be in the same parent directory as the classes)
-
a configuration file listing the classname(s) of your data provider(s)
67.5.1 Compile Your Data Provider Classes
Data providers are written in Java, and must be compiled before they are deployed.
-
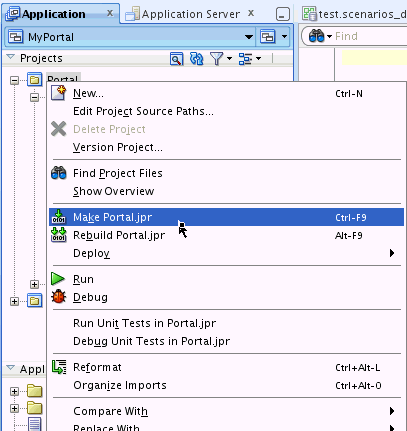
In Application Navigator, right-click the project containing your source code and select either the Make or Rebuild options, as shown in Figure 67-5.
67.5.2 Create a Configuration File in META-INF/services
The next step in preparing your data provider for deployment is to create a simple configuration file that lists the full class name(s) of your provider(s).
-
In the Application Navigator, create a new folder called
META-INFin the Application Sources folder. -
In the
META-INFfolder, create a folder calledservices. -
In the
servicesfolder, create a text file calledoracle.wcps.conductor.provider.IDataProvider. You must use this exact name. -
Open the
oracle.wcps.conductor.provider.IDataProviderfile and enter the full class name for each data provider you wish to deploy. If you have more than one provider, place each one on a separate line in the file.For example:
providers.data.SayHelloProvider
67.5.3 Setting Up the JAR File Structure
If you are unfamiliar with JAR file creation in JDeveloper, this section explains how to set up your JAR file structure (a deployment profile) to ensure that all the required elements are included.
-
Right-click the project containing your data provider source code in the Application Navigator and select Project Properties.
-
In the Project Properties dialog, select Deployment.
-
Click New.
-
Select JAR File as the Archive Type and give the JAR a name.
-
Click OK.
-
In the JAR Options dialog, select Contributors.
-
Be sure that Project Output Directory, Project Source Path, and Project Dependencies are selected, as shown in Figure 67-6.
Figure 67-6 Selecting Project Output Contributors
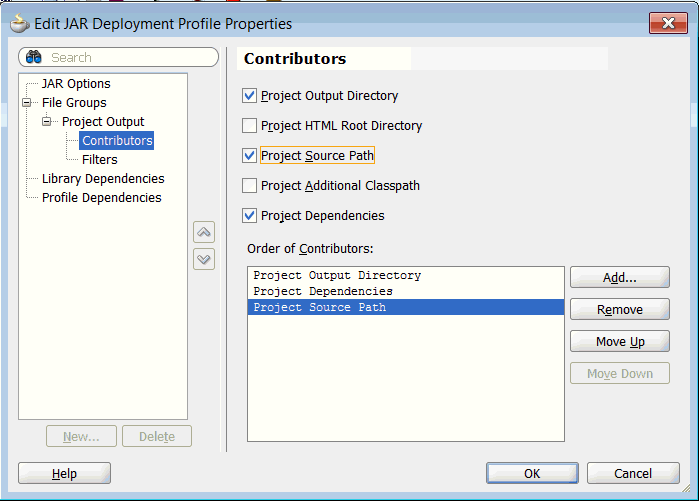
Description of ''Figure 67-6 Selecting Project Output Contributors''
-
Select Filters.
-
Select the Patterns tab.
-
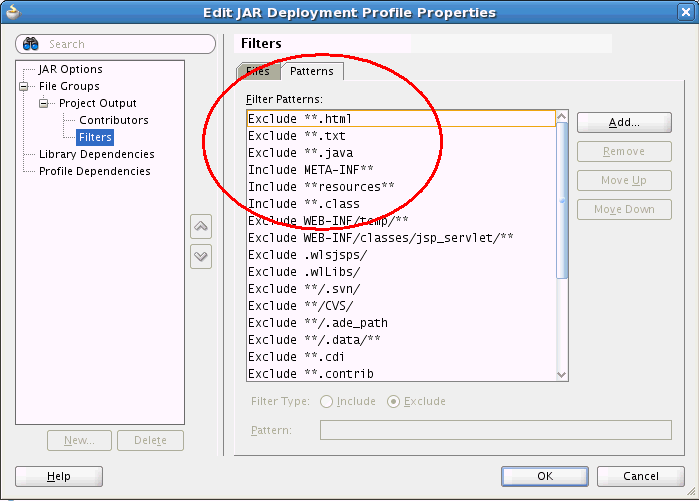
In the Patterns tab, add the following file patterns to include and exclude specific types of files from the JAR.
-
Include:
**.class -
Include:
**resources** -
Include:
META-INF** -
Exclude:
**.java -
Exclude: **.txt -
Exclude:
**.html
Figure 67-7 shows these patterns after they have been added to the list.
-
-
Click OK, and then OK in the Project Properties dialog.
-
Save your project.
67.5.4 Create a JAR File
After the JAR deployment profile is set, you are ready to generate a JAR file from your project.
-
Right-click the project (in this case, the Portal project) in the Application Navigator and select Deploy.
-
Select the JAR file you want to deploy. This is the name you gave the file in Section 67.5.3, "Setting Up the JAR File Structure."
-
In the Deployment Action dialog, select Deploy to JAR file and click Finish.
The JAR file is placed in your project directory. You can view it on the file system in: <Workspace_Directory>/Portal/deploy. For example, if your Workspace is called MyProviders, you might find the JAR here: C:\JDeveloper\mywork\MyProviders\Portal\deploy.
67.5.5 Copy the JAR File to the Server
You must copy the JAR file to the server.
-
Copy the JAR file that you created in the previous step. As noted previously, the file is located in
<Workspace_Directory\Portal\deploy. -
Paste the JAR file the following location on the server:
DOMAIN_HOME/conductor-extensions-library/WEB-INF/libFor example, for an Integrated WebLogic Server environment:
C:\JDeveloper\system11.1.7.40.63.82\DefaultDomain\conductor-extensions-library\WEB-INF\libOr, in a managed server environment:
ORACLE_HOME/oracle/user_projects/applications/wc_domain/conductor-extensions-library/WEB-INF/lib
-
Restart the server.
67.5.6 Updating the WCPS Connections Configuration File
Finally, you need to update wcps-connections.xml. This file exists on the server, in a configuration directory in the default domain directory. In your own development environment, the simplest way to update this file is to edit it manually. The file is located in your default domain, here:
DOMIAIN_HOME/config/fmwconfig/wcps-connections.xml
Note:
After editing and saving this file, redeploy the wcps-services application using the WebLogic Server Console. To do this, go to the Deployments section of the console and locate wcps-services in the Deployments table. Select wcps-services and click Update to redeploy it.Add the <connection> element shown in Example 67-5 to the wcps-connections.xml file.
Example 67-5 Sample wcps-connection.xml Entry
    <connection>
        <connection-name>SayHelloConnection</connection-name>
        <connection-type>client.simple.connection</connection-type>
        <namespace>*</namespace>
        <properties>
            <property>
                <name>isDefault</name>
                <value>true</value>
            </property>
        </properties>
    </connection>
The namespace attribute specifies the namespace in which the scenario exists. By default, the namespace is the name of your portal application. Or, namespace can be an asterisk (*), which specifies all namespaces.
Tip:
You can discover the namespace through REST commands. From the resourceIndex, follow the namespaces link. For example:http://localhost:7101/wcps/api/conductor/resourceIndex
For more on the resourceIndex, see Section 66.4, "Tutorial: Creating, Testing and Deploying a Simple Application."
The connection name is an arbitrary name that will appear in the scenario editor user interface. The connection type must match the connectionType annotation in your extension of BaseConnectionConfig (see Example 67-2). The connection types for the out-of-the-box data providers are:
-
properties.provider.connection – Property Service Data Provider
-
activity.provider.connection – Activity Graph Data Provider
-
cmis.provider.connection – CMIS Data Provider
Tip:
If you deploy your provider and find that it does not show up in the user interface, it's possible you specified an incorrect namespace inwcps-connections.xml. Try using the asterisk (*) if you are in doubt about which namespace to use.If you do not have direct access to the server file system, you can update the connection information using Fusion Middleware Control. For more details using Fusion Middleware Control, see the "Configuring Connections Using Fusion Middleware Control" section in Administering Oracle WebCenter Portal.
67.5.7 Testing the Deployment
To test the deployment, simply verify that the custom data provider shows up in the Scenario editor user interface. For details, see Section 67.3, "Discovering Data Providers."
If you're unable to discover the deployed provider, then go back over your steps and carefully check that there are no obvious errors, like configuration or resource file misspellings. Be sure that you created your JAR file properly as described in Section 67.5.3, "Setting Up the JAR File Structure." Also, be sure you copied the JAR file to the correct domain.
These are common mistakes to double-check for:
-
The
META-INF/servicescontents must be included in the JAR file at the top level. For example, this folder is packaged in the JAR file asMETA-INF/services/oracle.wcps.conductor.provider.IDataProvider, not in any other location. -
The properties file describing the annotations must be included in the JAR file at the top level. See also Section 67.4.4, "Creating a Resource Properties File."
-
The JAR file must be copied to the folder:
DOMAIN_HOME/conductor-extensions/WEB-INF/libYou must restart the server after copying the file.
-
The data provider connection entry must be added to
wcps-connections.xml. See Section 67.5.6, "Updating the WCPS Connections Configuration File."
67.6 Invoking the Data Provider in a Scenario from JDeveloper
After your custom data provider is deployed successfully, you can use it in a scenario. Let's see how this works for our example provider.
-
Right-click your project in the Application Navigator and select New.
-
In the New Gallery dialog, select the General category, then click Personalization.
-
In the Items list, select Conductor Scenario and click OK.
-
In the New Conductor Scenario dialog, give the scenario a name and click OK.
-
In the scenario editor, right-click the Start node and select Add Following Statement and then Invoke Provider.
-
Right-click the provider node and select Invoke Provider Properties.
-
Drill into the SayHelloProvider node and select the sayHello(user) method, as shown in Figure 67-8.
Figure 67-8 Selecting the Data Provider Method
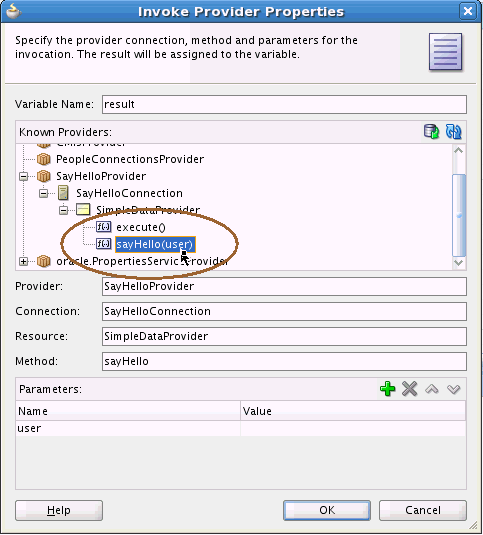
Description of ''Figure 67-8 Selecting the Data Provider Method''
-
Enter a variable name in the Variable Name field. You'll reference this variable in the next step, when you create a return statement. For example, simply enter
result.Note:
It's easy to forget to enter the variable name. The variable becomes available within the scenario context, and therefore, can be reused by other scenario components and operations, as we will see. -
In the Parameters section of the dialog, enter a value for the user parameter. This value will be a static variable that will print out when the scenario is run.
Tip:
Another approach is to add an EL expression that gets the name of the logged in user and uses it in the scenario. For example:${ScenarioContext.scenarioRequest.userPrincipal.name}. -
Click OK.
-
Right-click the Invoke Provider node and select Add Following Statement, and then select Return.
-
Right-click the Return node and select Set Expression.
-
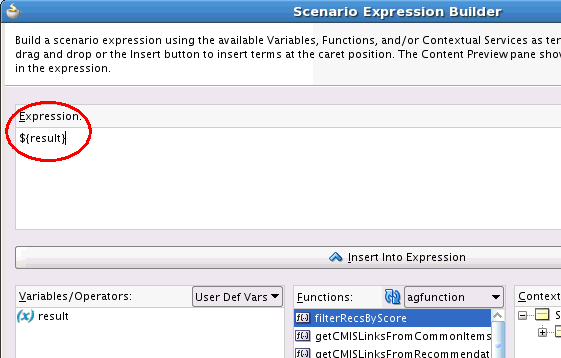
In the Scenario Expression Builder dialog, simply enter the variable name you created in the Invoke Expression Provider dialog. You must use proper Expression Language syntax. For example, if you called the variable
result, enter:${result}.Figure 67-9 Entering a Result Expression
Description of ''Figure 67-9 Entering a Result Expression''
-
Click OK.
-
Right-click the Start node and select Run.
-
In the Scenario Input dialog, click OK.
-
After the server starts and the scenario is deployed, check the results in the JDeveloper log window, as shown in Figure 67-10.
For more information on using the scenario editor and the Expression Builder, see Chapter 66, "Authoring Personalized Scenarios in JDeveloper."
67.7 Designing Custom Data Providers: Best Practices
This section discusses best practices to consider in the design of a custom data provider.
67.7.1 Create Domain-Specific Providers
Create individual data providers that are specific to your use cases or problem domains. For example, if you want to access data from a business services, like PeopleSoft and Siebel, the best practice is to create separate data providers to clearly delineate the two.
Also keep in mind that a single data provider could have multiple executable resources, each representing a specific service. For example, a PeopleSoftProvider could extend the base ExternalDataProvider, and have several executable resources: one for retrieving a person's basic information, another for retrieving the job description, and so on.
67.7.2 Extend the Existing Data Provider Infrastructure
It's a best practice to extend existing data provider classes rather than implementing your own from scratch.
67.7.2.1 Extend Base Classes
The Conductor provides a base infrastructure for data providers, and it is strongly recommended that you extend one of these providers instead of starting from scratch. As an example, an AbstractSOAPProvider could extend the ExternalDataProvider. More specific providers, such as a PeopleSoftProvider, could extend the SoapProvider.
67.7.2.2 Use Connection Configuration
For external systems, make use of the Conductor connection configuration files. Information that is rather static, such as host, port, and WSDL, are good attributes to associate with the data provider connection. You can manage conductor connections using Fusion Middleware Control, meaning you can add or change the values of connection attributes at runtime. "Configuring Connections Using Fusion Middleware Control" in Administering Oracle WebCenter Portal.
67.7.2.3 Reuse Connections
Because the Conductor's use of data providers is REST-ful, the data provider is instantiated every time a scenario is invoked. Sometimes, connections to external resources can be expensive to create. The base infrastructure for data providers has the ability to cache these connections.
67.7.2.4 Use Caching
Personalization will provide APIs to leverage Coherence caching.
For details, see Chapter 73, "Cache Management for Personalization."
67.7.3 Reuse Scenarios and Data Providers
One of the most powerful aspects of Personalization is that you can reuse both data providers and scenarios in multiple contexts and with multiple clients. For instance, a single scenario can be reused to deliver data to a mobile application, a transactional web site, a portal, and a tablet.
Scenarios may invoke multiple data (and function) providers and encapsulate a particular business process. Scenarios may also be chained together: the output of one scenario can be used as input to another.
