6 User Communication Preferences
This chapter describes the User Communication Preferences (UCP). It describes how to work with communication channels and to create contact rules using messaging filters. This chapter also discusses how to manage communication preferences from a web interface by managing channels and filters. It also provides information for system administrators about configuring User Communication Preferences; and for developers about integrating their applications with User Communication Preferences.
Note:
To learn about the architecture and components of Oracle User Messaging Service, see Administering Oracle User Messaging Service.
This chapter includes the following sections:
6.1 Introduction to User Communication Preferences
User Communication Preferences allows a user who has access to multiple channels to control how, when, and where they receive messages. Users define filters, or delivery preferences, that specify which channel a message should be delivered to, and under what circumstances. Information about a user's channels and filters are stored in any database supported for use with Oracle Fusion Middleware. Since preferences are stored in a database, this information is shared across all instances of User Communication Preferences in a domain.
UCP does not provide services for message delivery, rather provides user interface and APIs to access and manage a user's channels and delivery preferences. When a message is addressed to a user, UMS acquires the user's delivery preferences from UCP services and sends the message according to the user's preferences. For an application developer, User Communication Preferences provide increased flexibility. By sending messages through UMS, an application is indirectly using UCP service. Applications can also directly access UCP services by calling UCP APIs to access and manage a user's preferences and by integrating with UCP using task flow library to provide web user interface.
6.1.1 Terminology
User Communication Preferences defines the following terminology:
-
Channel: a combination of delivery type and address. For instance, a cell phone number 6503334444 can be used in two channels, SMS:650333444 and VOICE:650333444, where SMS and VOICE are delivery types and 6503334444 is the delivery address.
-
Channel address: one of the addresses that a channel can communicate with.
-
Filter: a message delivery preference rule that controls how, when, and where a user receives messages.
-
System term: a pre-defined business term where the fact for the term is automatically supplied by UCP service.
-
Business term: a named attribute for messages, such as a subject. The fact for a business term can be extracted from messages or supplied by applications and used to compare with a specified value in a filter condition to select the filter.
-
Fact: actual value for a business term extracted from messages or supplied by applications.
-
Condition: a combination of a business term, an operator and a specified value. The fact about a message is used to compare against the value to evaluate the truth of the condition.
-
Action: the action to be taken if the specified conditions in a filter are true, such as do not send message, send to first available channel, or send to all selected channels.
6.2 Managing User Preferences
This section provides information about managing user preferences using web user interface. This section discusses the following topics:
6.2.1 Managing Communication Channels
A communication channel defines an address (such as a phone number) and a type (such as a short message service or SMS) for message delivery.
User Communication Preferences (UCP) creates a few channels automatically for a user based on the user profile settings in the Identity Store. These channels, called as IDM channels, can be used for message delivery. A POPUP or WORKLIST channel is automatically created when you deploy the corresponding driver. This channel will be removed when the driver is undeployed. The address value for this channel is the user's login ID. Users cannot modify these channels by using the UCP UI.
Note:
For messaging drivers you cannot specify a channel address with spaces. As the channel address value is the login ID, do not use spaces when you create the login ID for the user.
Alternately, users can create, modify, and delete user-defined channels. These are called USER channels. Any channel that a user creates is associated with that user's system ID. In Oracle User Communication Preferences, channels represent both physical channels, such as mobile phones, and also email client applications running on desktops, and are configurable in the UCP UI.
6.2.1.1 Creating a Channel
To create a USER channel, perform the following tasks:
-
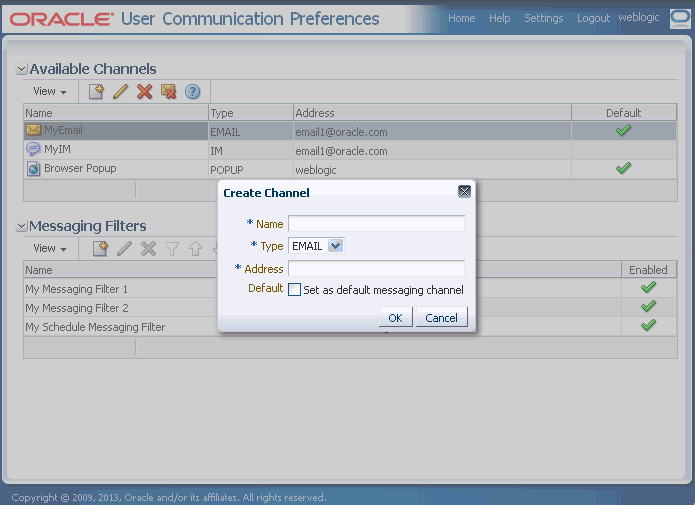
Click the Create icon as shown in Figure 6-1, located in the toolbar under Available Channels.
The Create Channel dialog box appears as shown in Figure 6-2.
-
Enter a name for the channel in the Name field.
-
Select the delivery type from the Type drop-down list.
-
Enter the address appropriate to the delivery type you selected.
-
Select the Default check box if you want to set this channel as a default channel. You can have multiple default channels.
-
Click OK to create the channel. The new channel appears in the Available Channels section. The Available Channels page enables you to modify or delete the channel.
6.2.1.2 Modifying a Channel
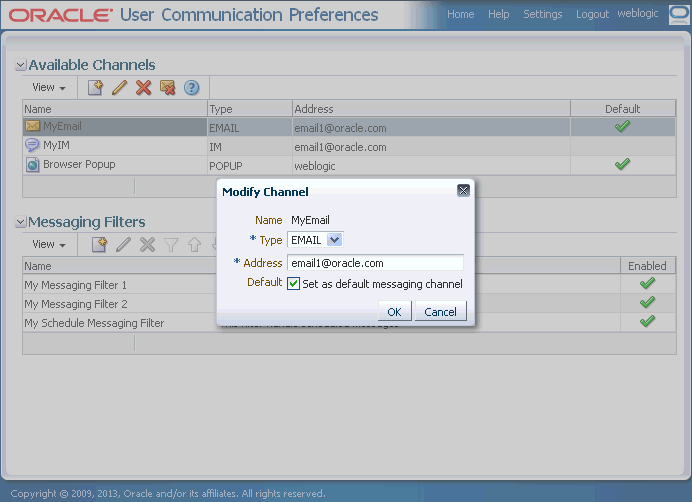
To modify a USER channel, select it from the list of Channels in the Available Channels section, and click the Modify icon as shown in Figure 6-3.
The Modify Channel page appears as shown in Figure 6-4. This page enables you to change the channel properties described in Section 6.2.1.1, "Creating a Channel".
6.2.1.3 Deleting a Channel
To delete a USER channel, select the channel from the list of channels in the Available Channels section, and click the Delete icon as shown in Figure 6-5.
Certain channels are based on information retrieved from your user profile in the identity store. These are called IDM channels. Users are not allowed to modify or delete such channels through this interface. The only operation that can be performed on such a channel is to make it the default channel. IDM channel addresses are managed through Identity Management System.
6.2.1.4 Setting a Default Channel
You can configure one or more channels as default channels. You can set a channel as default messaging channel either during channel creation or after channel creation directly from the list of channels.
To set a channel as default, select that channel from the list of channels, and click the default icon as shown in Figure 6-6. A checkmark appears next to the selected channel, designating it as a default means of receiving messages. Repeat this procedure to add additional default channels, if required.
To remove the default setting of a channel already set as default, select that channel from the list of channels, and click the icon shown in Figure 6-7.
Note:
The Business Email channel that is automatically created from the Identity Store attribute is set as a default channel. You cannot remove the default setting of the Business Email channel unless another default channel is set.
For more information about configuring LDAP settings, see Configuring User Messaging Service Access to LDAP User Profile in Administering Oracle User Messaging Service.
6.2.2 Managing Filters
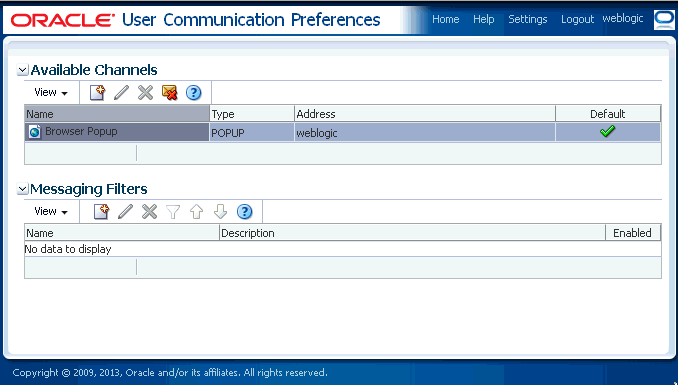
A messaging filter defines rules on how to handle incoming messages addressed to a user. The Messaging Filters section on the User Communications Preferences page (Figure 6-8) enables the users to build filters that specify not only the type of messages they want to receive, but also the channel through which to receive these messages.
A filter is composed of two primary sections, condition (or the If section) and action (or the Then section). For each incoming message, the filters are evaluated to determine the appropriate filter that must be selected for handling the message. The condition section determines the circumstances under which a filter is selected; while the action section specifies how the message is handled if the filter is selected.
6.2.2.1 Creating a Filter
To create a filter, perform the following tasks:
-
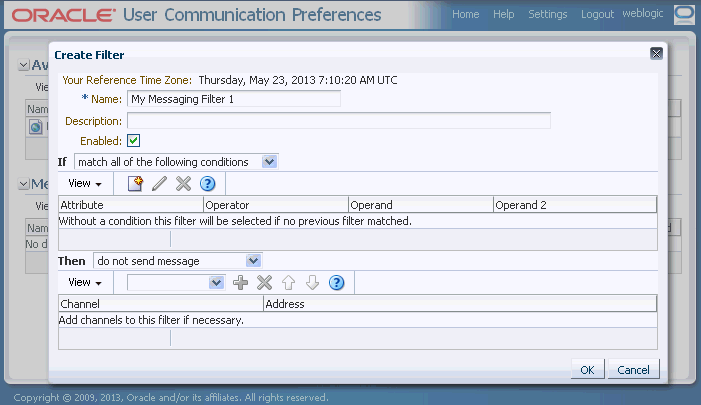
Click the Create icon as shown in Figure 6-1, located in the toolbar under Messaging Filters. The Create Filter page appears as shown in Figure 6-9.
-
Enter a name for the filter in the Name field.
-
If needed, enter a description of the filter in the Description field.
The checkbox allows you to temporarily enable or disable a filter.
-
Select whether messages must meet all of the conditions or any of the conditions by selecting either the match all of the following conditions or match any of the following conditions options.
-
Create a filter condition in the If section as follows:
-
Click the Create icon located in the toolbar. The Create Condition dialog box appears.
-
Select the message's attribute from the Attribute drop-down list that lists the available Business terms. Refer to Table 6-1 for a list of these attributes.
-
Combine the selected attribute with one of the comparison operators from the Operator drop-down list.
-
Enter an appropriate value in the Operand field. This is the value that the fact for the selected attribute is used to compare with, using the selected operator.
For instance, if you select the Date attribute, select one of the comparison operators and then select the appropriate dates from the date chooser. If you choose a range operation such as is between, then two operand fields will appear for entering lower and upper limit value.
-
Click OK to add the condition to the table.
-
-
Repeat the above mentioned steps to add more filter conditions. To delete a filter condition, select the condition from the list of conditions in the table, and click the Delete icon as shown in Figure 6-5.
-
When a message is addressed to a user, the If section of the user's filters are evaluated against the facts in the message. After a filter is selected in the If section, the Then section determines how the message will be handled. The Then section consists of action type and a list of channels. Select one of the following actions:
-
do not send message -- Select this option to block the receipt of any messages that meet the filter conditions.
-
send to first available channel (Failover in the order) -- Select this option to send messages matching the filter criteria to a preferred channel (set using the up and down arrows) or to the next available channel.
-
send to all selected channels -- Select this option to send messages to every listed channel.
-
-
If you have selected the action type to send messages, then you must select channels from the drop-down list in the toolbar to add to the action channel list for this filter. After selecting a channel, click Add as shown in Figure 6-10. To delete a channel, click Delete as shown in Figure 6-5.
-
If needed, use the up and down arrows to prioritize channels. If available, the top-most channel receives messages meeting the filter criteria if you select send to first available channel.
-
Click OK to create the filter, or Cancel to discard the filter.
6.2.2.2 Modifying a Filter
To modify a filter, select the filter from the list of messaging filters, and click Modify as shown in Figure 6-3. The Modify Filter page appears. Except the filter name, this page enables you to add or change the filter properties described in Section 6.2.2.1, "Creating a Filter".
6.2.2.3 Deleting a Filter
To delete a filter, select the filter from the list of messaging filters, and click Delete as shown in Figure 6-5.
6.2.2.4 Disabling a Filter
You can temporarily enable or disable a filter. A filter that is disabled will be skipped during the message processing. You can disable or enable a filter in either of the following ways:
-
Select the filter from the list of messaging filters. If the selected filter is enabled, the disable filter icon appears in the toolbar as shown in Figure 6-11. Click this icon to disable the filter.
If the selected filter is disabled, the enable filter icon appears in the toolbar as shown in Figure 6-12. Click this icon to enable the filter.
-
You can also enable or disable a filter from the filter creation or modification dialog box.
6.2.2.5 Organizing Filters
You can prioritize the order of the filters in the list by selecting the filter and moving them up or down in the list, using the up or down arrow icons in the toolbar. During message processing, filters are evaluated in the order from top to bottom in the list until a filter matching the condition is found. If a matching filter is not found, the default channel is used for message delivery with the send to all selected channels action type.
6.2.3 Configuring Preference Settings
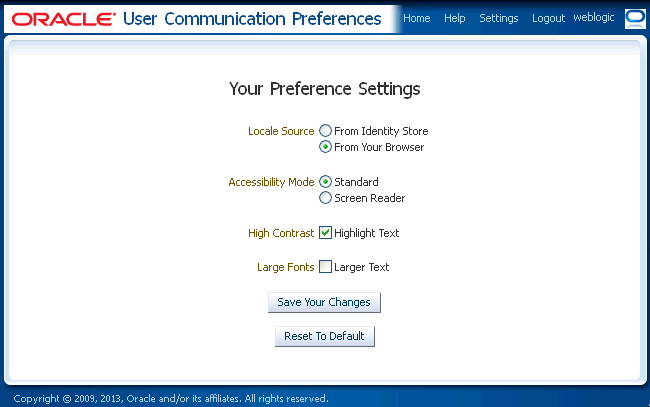
You can configure your preference settings by accessing the Settings tab located in the upper right area of the UCP UI. You can set the following parameters:
-
Locale Source: Select From Identity Store or From Your Browser.
-
Accessibility Mode: Select Standard or Screen Reader.
-
Select the Highlight Text checkbox if you want the text to be displayed in high contrast.
-
Select the Larger Text checkbox if you want the text to be displayed in large fonts.
-
Click Save Your Changes in order to save the changes you made, or click Reset to Default to restore default settings.
6.3 Administering User Communication Preferences
This section provides information about configuring profiles and managing user data using WebLogic Scripting Tool (WLST). It also provides information about business terms that are used during profile configuration.
6.3.1 About Business Terms
As mentioned earlier in this document, each filter condition is defined against a Business Term. UCP supports the Business Terms as listed in the table below. A business term consists of a name, a data type, and an optional description.
Table 6-1 lists the pre-defined business terms supported by User Communication Preferences.
Table 6-1 Pre-defined Business Terms for User Communication Preferences
| Business Term | Data Type |
|---|---|
|
Organization |
String |
|
Priority |
String |
|
Application |
String |
|
Application Type |
String |
|
Expiration Date |
Date |
|
From |
String |
|
To |
String |
|
Customer Name |
String |
|
Customer Type |
String |
|
Status |
String |
|
Amount |
Number (Decimal) |
|
Due Date |
Date |
|
Process Type |
String |
|
Expense Type |
String |
|
Total Cost |
Number (Decimal) |
|
Processing Time |
Number (Decimal) |
|
Order Type |
String |
|
Service Request Type |
String |
|
Group Name |
String |
|
Source |
String |
|
Classification |
String |
|
Duration |
Number (Decimal) |
|
User |
String |
|
Role |
String |
|
Subject |
String |
|
Service Name |
String |
|
Process Name |
String |
|
System Code |
String |
|
Error Code |
String |
|
Occurrence Count |
Number (Decimal) |
UCP supports two System Terms listed in Table 6-2. System Terms are pre-defined business terms. Administrators cannot extend the system terms. System Terms are available for defining conditions though they are not managed here. The facts for System Terms are automatically obtained based on the current time and user's time zone. Thus, unlike other Business Terms, during message processing, applications do not need to supply facts for System Terms.
Table 6-2 System Terms Supported by User Communication Preferences
| System Term | Data Type | Supported Values |
|---|---|---|
|
Date |
Date |
Date is accepted as a |
|
Time |
Time |
A 4-digit integer to represent time of the day in HHMM format. First 2-digit is the hour in 24-hour format. Last 2-digit is minutes. |
Note:
The Server Properties page in the Oracle Enterprise Manager enables you to manage business terms (add or remove business terms). However, do not use this page to add or remove business terms as this feature will soon be deprecated. You are allowed to use a subset of business terms during profile configuration as discussed in Section 6.3.2, "Configuring Profiles by using Oracle Enterprise Manager".
6.3.2 Configuring Profiles by using Oracle Enterprise Manager
Multiple applications may consume a single instance of UCP services. However, not all applications might consume the same set of UCP features. To meet various requirements of different applications, UCP features are virtualized into profiles. This enables each application to target to a specific profile that encapsulates a subset of UCP features.
Each profile is identified by a profile ID. Oracle UCP service provides APIs for a client application to target to a profile, by specifying a profile ID. After upgrading, legacy applications consuming old UCP APIs, without profile ID, will target to a default profile sharing with other applications that targets to the default profile. It is recommended to migrate legacy applications to use latest APIs so that each application can target to a specific profile without sharing with other applications. For more information about UCP API, refer to User Messaging Service Java API Reference.
You can manage messaging preferences profiles using Oracle Enterprise Manager Fusion Middleware Control. This interface lists the existing configured profiles, and allows the user to add, modify, or remove profiles. To configure preference profiles, perform the following tasks:
-
Open the User Messaging Server home page in Oracle Enterprise Manager and select Server Properties from the drop down menu, as shown in the following figure.
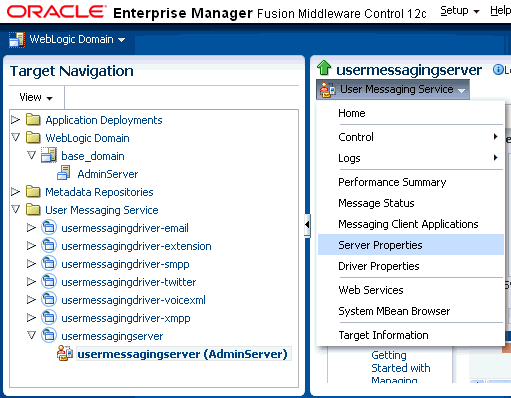
Description of the illustration ums_server_properties.gif
The Server Properties page appears as shown in the following figure. All existing profiles are listed in the Messaging Preference Profiles section.
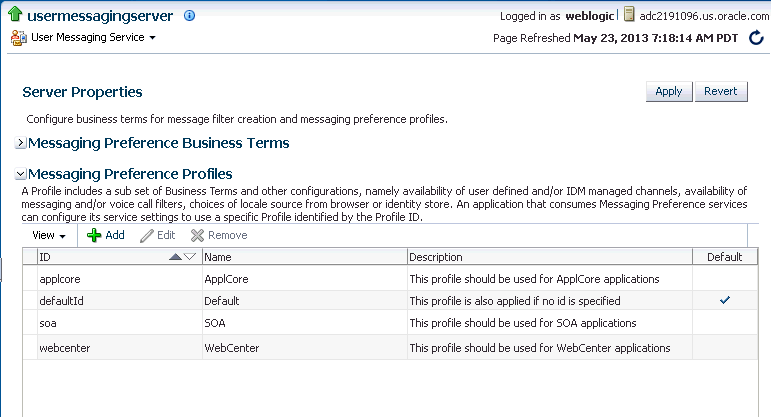
Description of the illustration ums_msg_profiles.gif
-
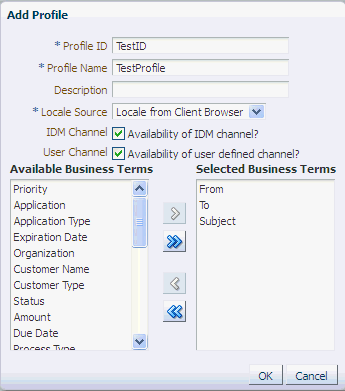
To add a new profile, click the Add icon in the Messaging Preference Profiles section. A dialog box appears as shown in the following figure. You must specify the configuration details to add a new profile.
Click OK to save the new profile.
Description of the illustration ums_add_profile.gif
You can define the profile features by selecting a Locale Source, availability of IDM and/or User Channels and a subset of Business Terms. UCP renders the web user interface based on the locale from three different locale sources, namely Client Browser, Identity Store and System Default. The Locale Source field provides a choice from two sources - Locale from Client Browser and, Locale from Identity Store. This determines the locale lookup sequence for the UI rendering. If Locale from Client Browser is selected, then the lookup sequence will be (1) Locale from Client Browser, (2) Locale from Identity Store and (3) System Default Locale. Otherwise, the sequence will be (1) Locale from Identity Store, (2) Locale from Client Browser and (3) System Default Locale. In each sequence, UCP renders the UI using the first supported locale.
In the above figure, the check box for User Channel defines the availability of user defined channels for that particular profile. If the check box is selected, then the users are allowed to create User Channels from the UCP web user interface. The check box for IDM Channel determines the availability of auto-synced channels from Identity Store. Channels are the properties of users. These check boxes determine the visibility of channels for each profile.
Each Profile encapsulates a subset of Business Terms listed under Selected Business Terms as shown in the above figure. In this example, only three terms - From, To, and Subject, are selected. To add more terms, select them from the Available Business Terms list on the left and click the right arrow (>) to move them to the Selected Business Terms list. Only selected Business Terms are available for users to define conditions for filters in a particular profile. This means that, on defining filter conditions only the selected Business Terms will be seen in the Attribute drop-down list in UCP web user interface.
-
To modify an existing profile, click the Edit icon in the Messaging Preference Profiles section. A dialog box appears as shown in the following figure. You must specify the configuration details to edit the profile.
Click OK to save the profile.
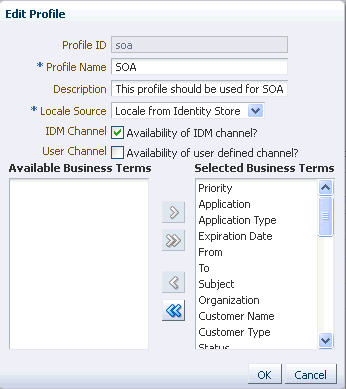
Description of the illustration ums_edit_profile.gif
-
To remove the messaging preference profile, select the profile from the list of profiles and click Remove.
-
Click Apply to apply changes in the User Messaging Server instance. Restart the server for the changes to take effect.
6.3.3 Managing User Data using WLST Commands
UCP provides a command line scripting tool, Oracle Weblogic Scripting Tool (WLST), for downloading user preferences data from the UCP repository to the specified XML file, or for uploading user preferences data from an XML file into the UCP repository.
For information about how to use WLST for uploading or downloading user preferences data, see manageUserCommunicationPrefs in Oracle Fusion Middleware Core Components WLST Command Reference. For information about how to get started with WLST, refer to section Getting Started Using the Oracle Weblogic Scripting Tool (WLST) in the Oracle Fusion Middleware Administering Oracle Fusion Middleware.
A user may be deleted from the identity store. If a new user is subsequently created with the same name as the old deleted user, then the new user will have access to the User Communication Preferences (UCP) data of the old user of the same name. Such data includes communication channels, message delivery preferences, and messaging filters configured by the old user. To prevent such access by the new user with the same name as the old deleted user, perform the following steps after deleting a user from the Identity Store:
-
Using the following WLST command, download the UCP data for all users into an XML file, for example userdata.xml:
wls:/offline> manageUserCommunicationPrefs(operation='download', filename='userdata.xml', url='t3://<hostname>:<portnumber>', username='<adminusername>', password='<adminpassword>')
-
Make a backup copy of the XML file. Edit the userdata.xml file to delete all data for the old deleted user. Each user data section is organized in the
<user guid=username>element in the XML file. Find the user element with guid for the old user, and delete all data of the user from the user element. The following example shows how the user element should appear after deleting all data of a user, for example david:<user guid="david"> <devices> </devices> </user>
-
Save the userdata.xml file and upload the modified file using the following WLST command:
wls:/offline> manageUserCommunicationPrefs(operation='upload', filename='userdata.xml', merge='overwrite', url='t3://<hostname>:<portnumber>', username='<adminusername>', password='<adminpassword>')
6.4 Integrating UCP Web User Interface
With UCP services, an end user can manage his communication preferences from a web interface by managing his channels and filters. To ensure that the end users are provided control over their communication preferences, the application developers must ensure the integration of UCP web user interface to their application. UCP provides an ADF task flow library which makes it easy to add a region in your web application so that end users can access their preference directly from your application.
This section discusses how to implement the web user interface using an ADF task flow library and targeting a specific profile. The ADF task flow library makes it easy to integrate the web interface with a new application or an existing application. For more information about ADF task flows, refer to Creating ADF Task Flows in Developing Fusion Web Applications with Oracle Application Development Framework. To integrate your UCP instance with web user interface, perform the tasks in this section.
6.4.1 Integrate ADF Web Application with UCP
This section describes how to create an ADF web application, and how to add a page or a region to an existing web application using the ADF task flow library in Oracle JDeveloper.
6.4.1.1 Create a New ADF Application
You can integrate UCP with a new application or an existing application. To create a new ADF web application in Oracle Jdeveloper, perform the following tasks:
-
Open the Oracle JDeveloper 12c wizard. Select New Application from the Application Navigator on the left pane. A New Gallery window appears.
-
In the New Gallery window, select ADF Fusion Web Application from the list of items, and click OK. The Create ADF Fusion Web Application window appears as shown in the following figure.
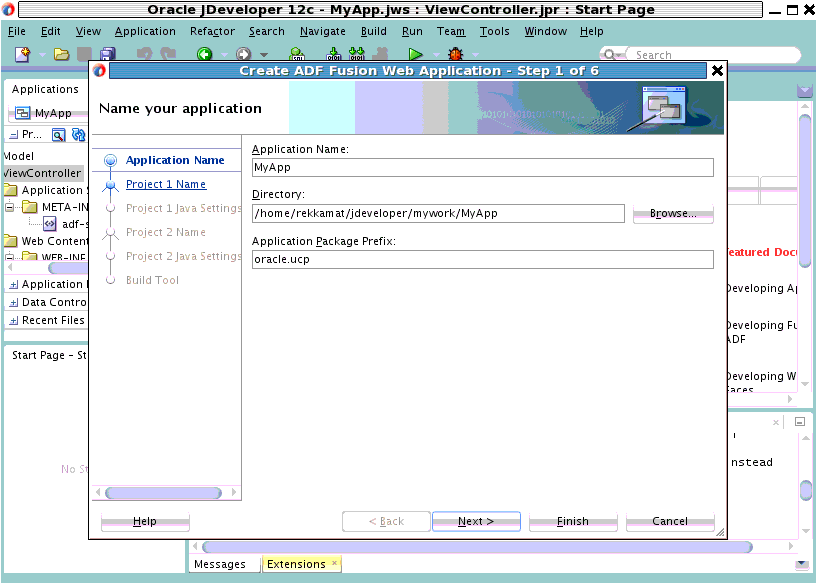
Description of the illustration ucp_create_app.gif
-
In this window, enter an application name, for example, MyApp. Also, enter the application package prefix, for example, oracle.ucp. Click Finish to create a new ADF application.
6.4.1.2 Create an ADF Web Page
The bounded task flow in the UCP library can be added in any region to provide seamless integration to your application. In this section, we will create a demo ADF web page to host a region for the UCP task flow. To create a new ADF web page, perform the following tasks:
-
In the left window pane, right-click ViewController to display the context menu.
-
In the ViewController context menu, from the New menu, select Page. The Create JSF Page window appears as shown in the following figure.
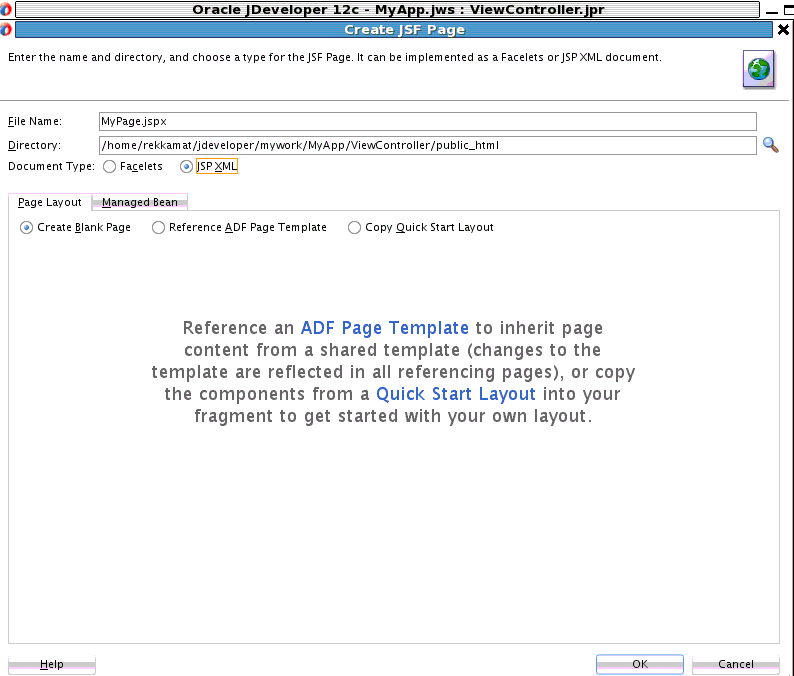
Description of the illustration ucp_create_page.gif
-
In this wizard, enter the file name, for example, MyPage.jspx. From the Document Type menu, select JSP XML.
-
From the Page Layout menu, select Create Blank Page. Click OK. The new MyPage.jspx is created.
-
Open the newly created page by double-clicking MyPage.jspx under the ViewController node in the navigation pane. In the MyPage.jspx window, select Source from toolbar at the bottom to view the source code of the page as shown in the following figure.
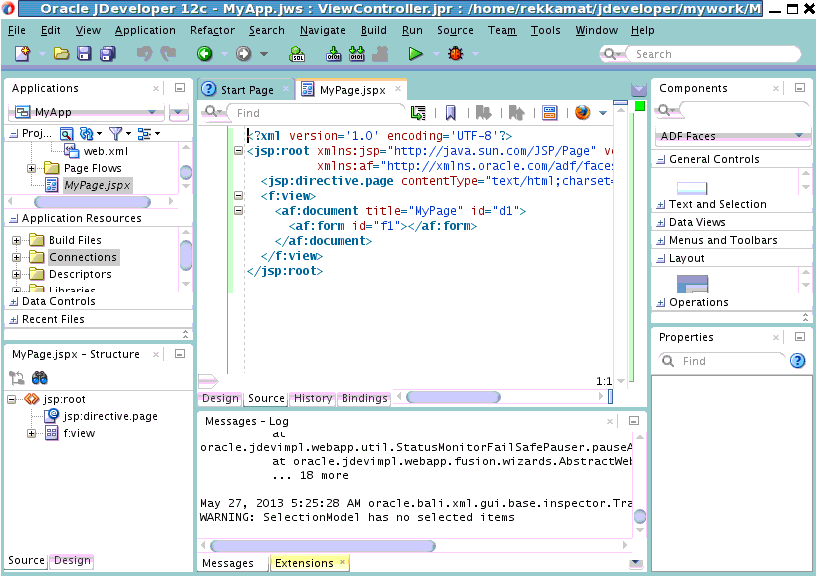
6.4.1.3 Connect UCP Task Flow Library
If you have deployed UMS to Weblogic Server, then the UCP task flow library is already deployed to the server. However, the UCP task flow library may not be accessible from your JDeveloper instance. Therefore, it is important to connect the task flow library to you application. You must first create a file system connection from your JDeveloper instance to the library. To achieve this, perform the following steps:
-
Click the Window tab located in the toolbar on the top pane to display a drop-down list. From the list, select Resources to add the Resources tab to the right pane of the Jdeveloper window.
-
Under the Resources tab, click the folder icon to display a drop-down list. In the list, navigate to IDE Connections, and select File System. The Create File System Connection wizard appears as shown in the following figure.
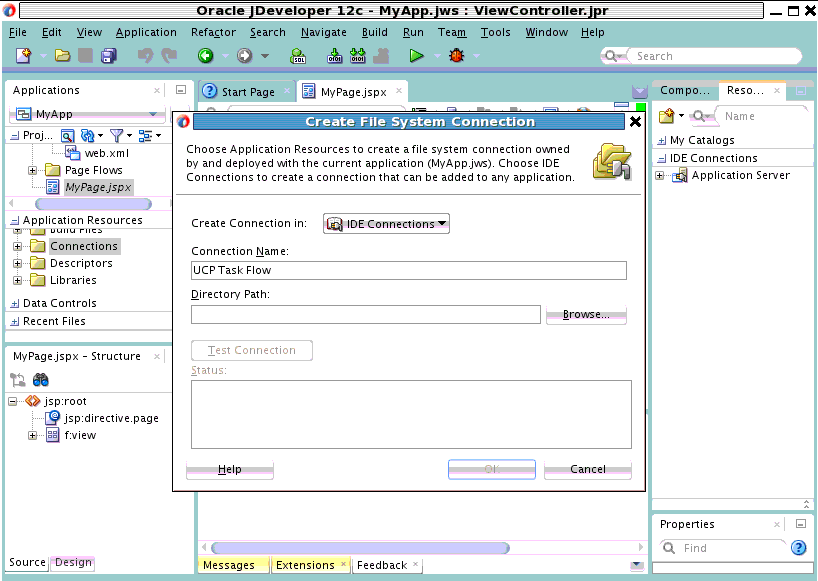
-
Enter the connection name, for example, UCP Task Flow.
-
Click Browse to select the folder that contains the UCP task flow library. This folder is located in the
oracle_commondirectory and the path would look like the following:oracle_common/communications/modules/oracle.ucs.userprefs.webapp_xx.x.x
where xx.x.x is the version number, for example, 12.1.2.
Navigate to this folder and click Select.
-
Click Ok. The File System Connection is created. To verify, expand the File System navigation tree in the right pane. On expanding the ADF Task Flows folder, you will see UserCommunicationPreferences as shown in the following figure.
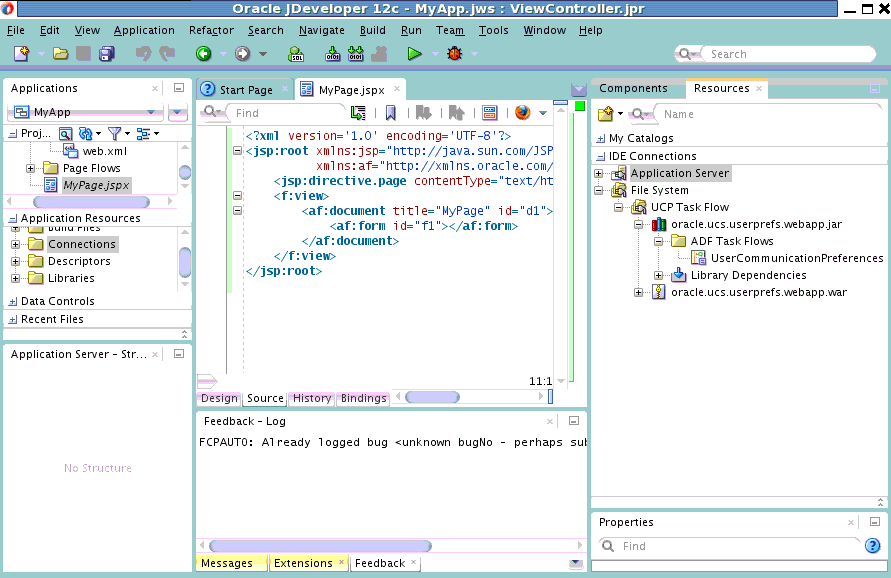
Description of the illustration ucp_taskflow.gif
6.4.1.4 Add a Region in the New Page
With the support of an ADF task flow library, you can add a region in your web application so that the end users can access their preference directly from your application. To achieve this, perform the following tasks:
-
Click the Source tab of the newly created page, MyPage.jspx.
-
From the File System navigation tree in the right pane, drag the UserCommunicationPreferences task flow and drop it inside the
<af:form> </af:form>tag in the page source to create a region in this tag.A context menu appears as shown in the following figure.
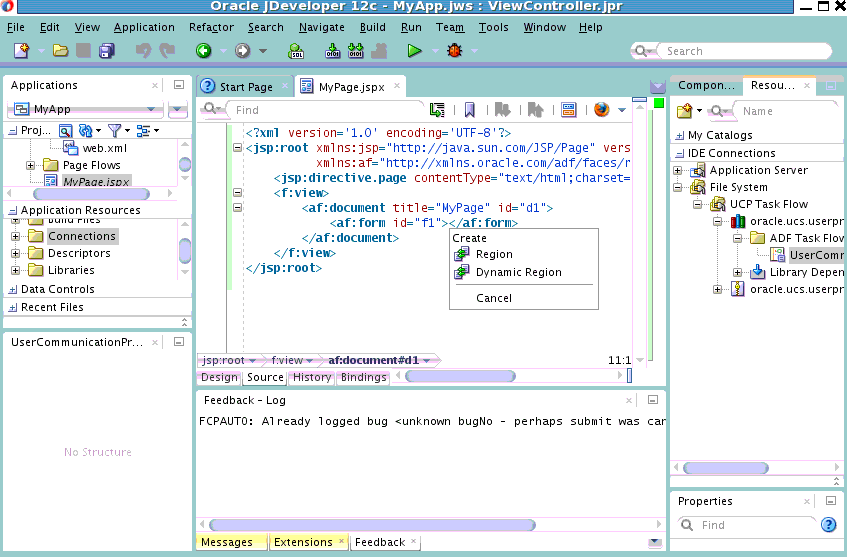
-
Select Region from the context menu. A confirmation window appears.
-
Click Add Library. The Edit Task Flow Binding wizard appears.
-
In the Input Parameters table, enter a value for
profield, for example, soa. The value for the Profile ID determines that the created user interface accesses only user filters and channels in this profile. This should be the same profile that your application is targetting. Click OK. A region has been added to the page.If you have an existing ADF web application that you want to integrate with UCP by including a user preference page, then you can add a region to your existing or new ADF page, in the same manner as mentioned in this section.
6.4.1.5 Reference UCP Libraries
Since UMS and UCP task flow libraries are deployed in WebLogic server, you do not need these libraries in your application. You must reference these libraries from the weblogic.xml file. To achieve this, perform the following tasks:
-
Right-click the ViewController node located in the navigation pane. A context menu appears.
-
From the context menu, select New, and click From Gallery. The New Gallery wizard appears.
-
In the navigation pane, expand the General node and select Deployment Descriptors. From the list of items on the right pane, select Weblogic Deployment Descriptor. Click OK. See the following figure.
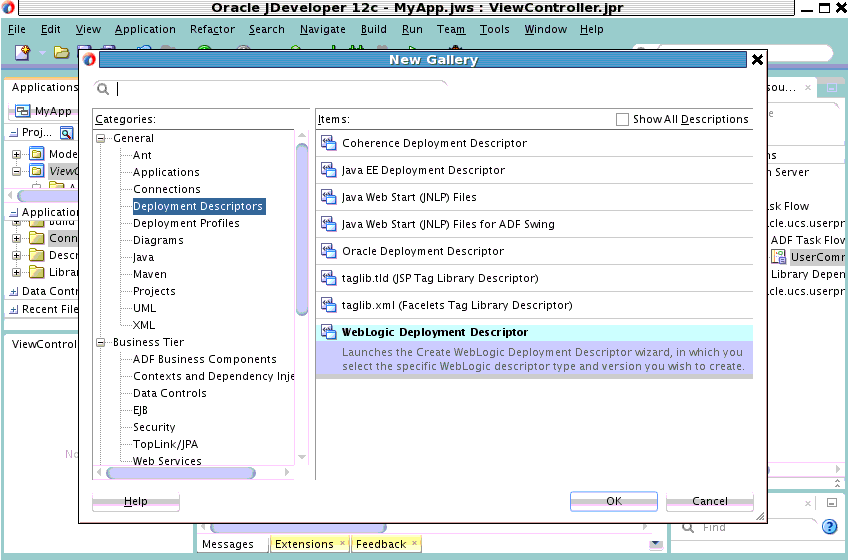
The Create WebLogic Deployment Descriptor wizard appears.
-
From the list of deployment descriptors, select weblogic.xml, and click Next. In the next screen, select 12.1.1 or the newer version as the deployment descriptor version, and click Next. In the Summary page, click Finish
-
Open the newly created page by double-clicking weblogic.xml under the ViewController node in the navigation pane. In the weblogic.xml window, select Source from toolbar at the bottom to view the source code of the page.
-
In the weblogic.xml file, you will reference two libraries, that is, the UMS library (oracle.sdp.client) and the UCP library (oracle.ucs.userprefs.webapp). Add the following library references as shown in the following figure:
<library-ref><library-name>oracle.sdp.client</library-name></library-ref>
<library-ref><library-name>oracle.ucs.userprefs.webapp</library-name></library-ref>
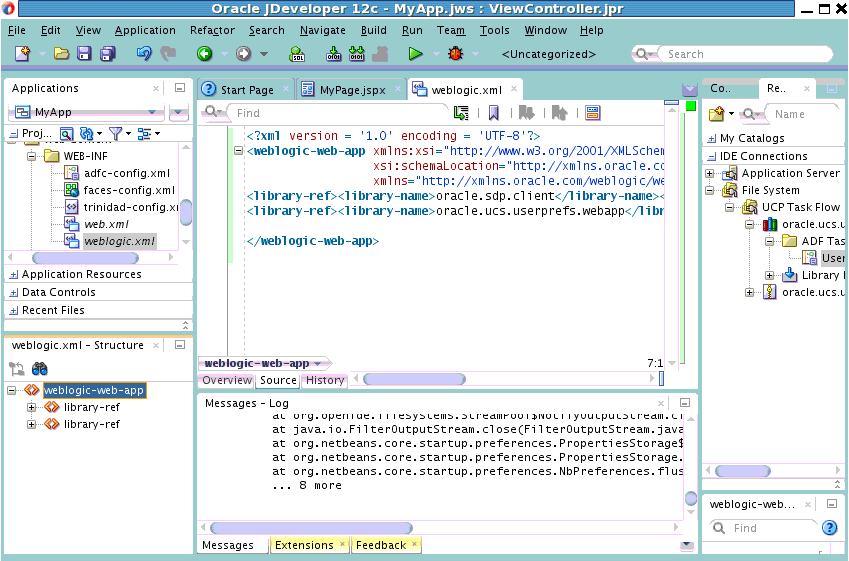
Description of the illustration ucp_library_prefs.gif
6.4.1.6 Manage Project Deployment Profile
Since you have already referenced the two libraries in the weblogic.xml file, you do not need to package these libraries in your application. This can be managed through the project deployment profile. To achieve this, perform the following tasks:
-
You must first create a project deployment profile. Right-click the ViewController node from the navigation pane. A context menu appears.
-
From the context menu, click Deploy, and select New Deployment Profile. The Create Deployment Profile wizard appears.
-
From the Profile Type drop-down list, select WAR File, and click OK.
The project deployment profile has been created. You must, now, ensure that the libraries are not packaged in your application.
-
Under the General tab, select the Specify Java EE Web Context Root option, and enter your application context root, for example, myapp as shown in the following figure.
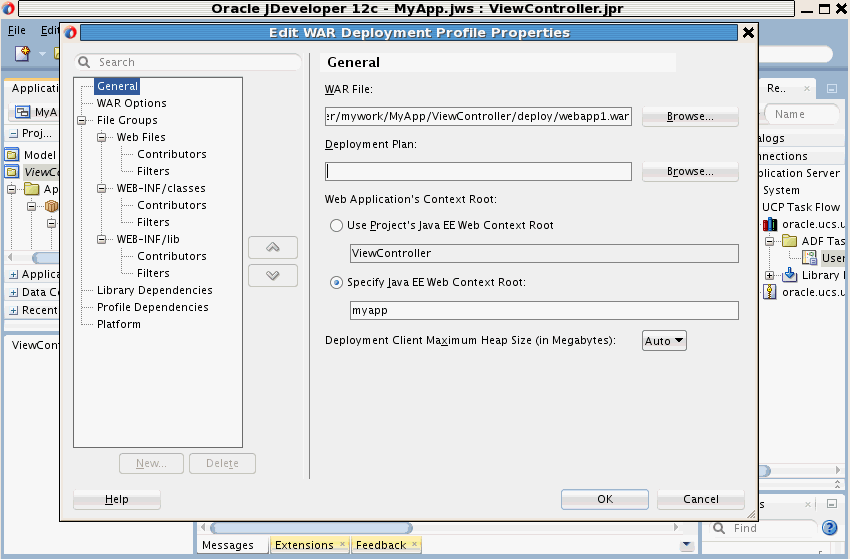
Description of the illustration ucp_deploy_profile.gif
-
From the navigation tree, select Filters listed under WEB-INF/lib. Deselect all the
.jarfiles listed in the right pane as shown in the following figure. Click OK to save changes to your deployment profile.This ensures that the libraries are not packaged in your application, as you have already referenced the important libraries in the
weblogic.xmlfile in the previous section.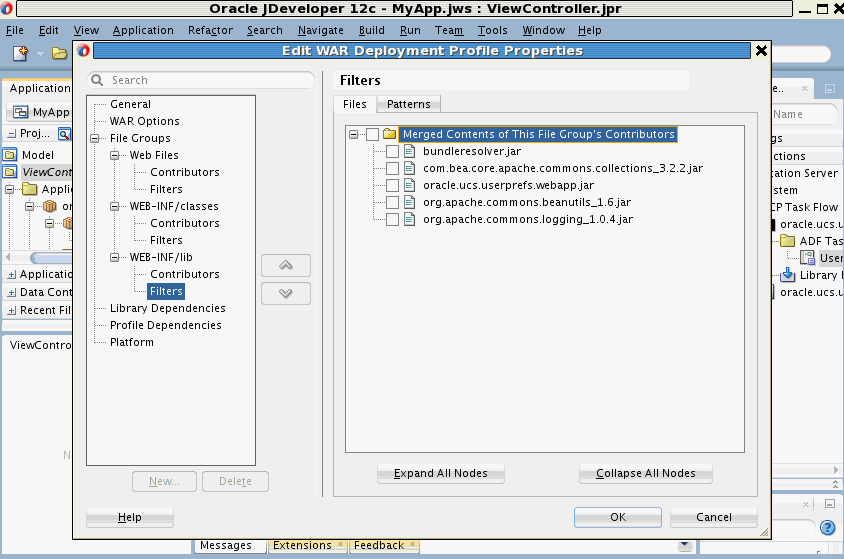
Description of the illustration ucp_filters.gif
6.4.1.7 Create Application Deployment Profile
To create a new application deployment profile, perform the following tasks:
-
From the Applications drop-down list in the left pane, select Deploy and click New Deployment Profile from the context menu.
The Create Deployment Profile wizard appears.
-
From the Profile Type drop-down list, select EAR File, and enter a name for your application deployment profile, for example, MyApp.
Click OK to create the application deployment profile. The Edit EAR Deployment Profile Properties wizard appears.
-
From the navigation tree, select Application Assembly.
-
In the right pane, expand the ViewController.jpr node and select webapp1. to include it in the application as shown in the following figure.
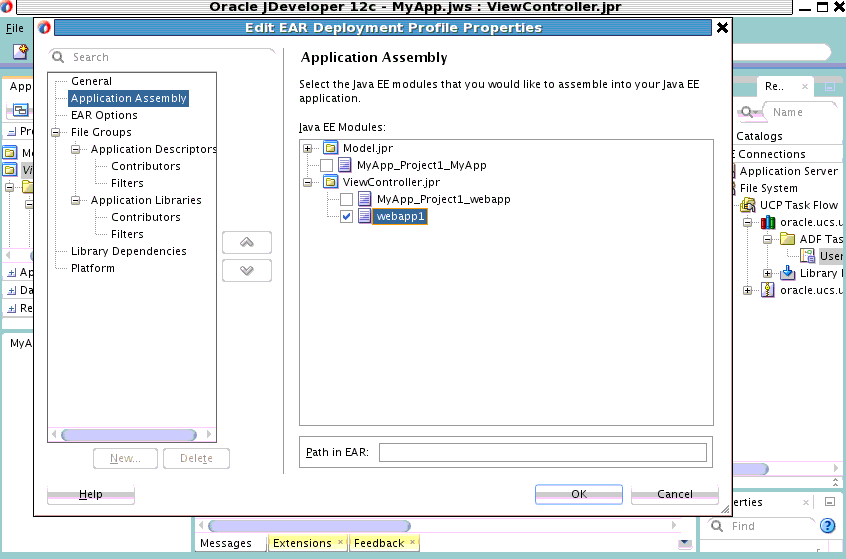
Description of the illustration ucp_app_profile.gif
-
In the toolbar, click Save All to save your application.
6.4.2 Deploy Your Application
You must, now, deploy your application to the WebLogic application server. If your application server has not been configured already, then you must first configure your application server connection.
6.4.2.1 Deploy Application
To deploy your application, perform the following tasks:
-
From the Applications drop-down list, select Deploy and click MyApp from the context menu. The Deploy MyApp wizard appears.
-
In the Deployment Action screen, select Deploy to Application Server and click Next.
-
In the Select Server screen, select the server from the list of Application servers, and click Finish to deploy your application.
If the server is not in the list of application servers, then follow instructions in Section 6.4.2.2, "Configure Application Server Connection" to configure your server connection.
6.4.2.2 Configure Application Server Connection
If you have not configured your application server connection, then you must first configure it by performing the following tasks:
-
From the Applications drop-down list, select Deploy and click MyApp from the context menu. The Deploy MyApp wizard appears.
-
In the Deployment Action screen, select Deploy to Application Server and click Next.
-
In the Select Server screen, click the plus icon located at the top right corner.
The Create Application Server Connection wizard appears.
-
In the Connection Name field, enter your server connection name, for example, MyServer. Click Next.
-
In the Authentication screen, enter your application server's admin Username and Password. Click Next.
-
In the Configuration screen, specify the host name, port numbers and, domain name as shown in the following figure.
Click Next.
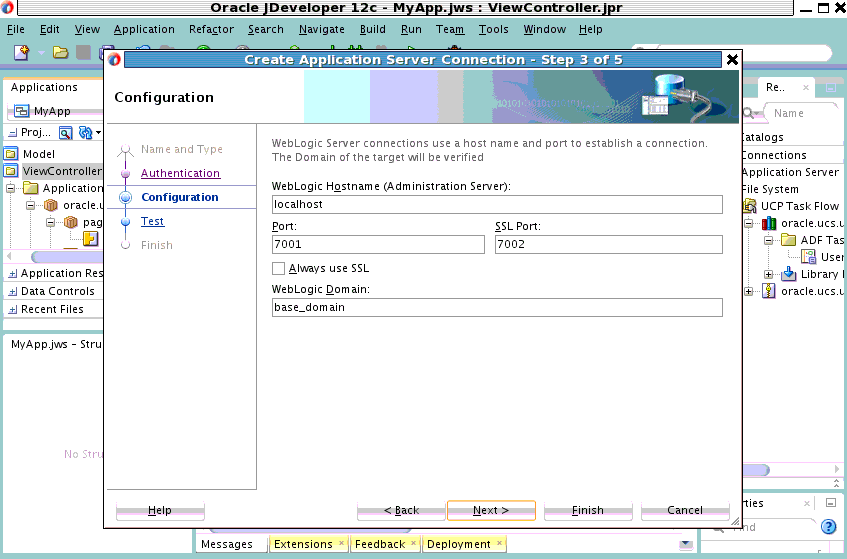
Description of the illustration ucp_configuring_server.gif
-
On the Test screen, verify your connection by clicking Test Connection. If the test is successful, then click Finish. You should be able to see your application server in the list of application servers as shown in the following figure.
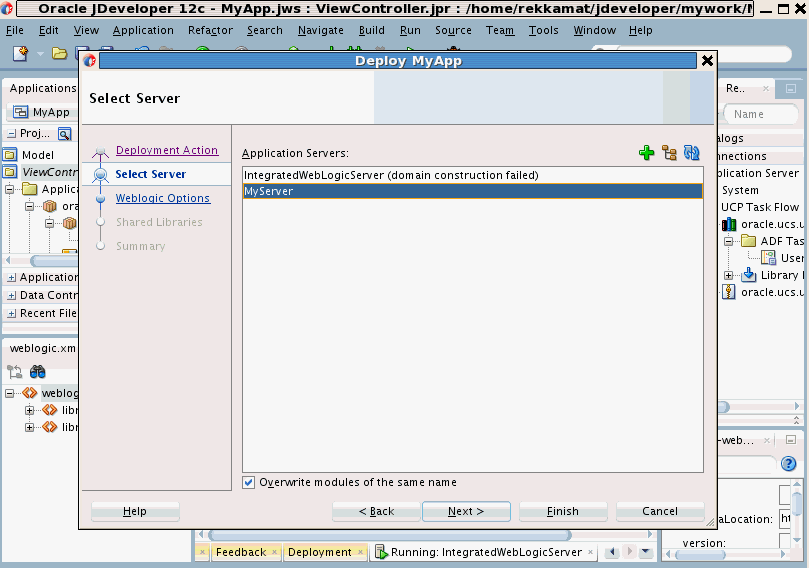
Description of the illustration ucp_configure_appserver.gif
-
To deploy your application to the newly configured application server, select the server from the list and click Finish. You will receive a confirmation for the successful deployment of your application.
6.4.3 Verify Your Application
Your can access your application to manage user preferences. To verify your application, open a browser and point the URL to your newly created page, for example, http://localhost:7001/myapp/faces/MyPage.jspx. You should see your communication preference web interface as shown in the following figure.
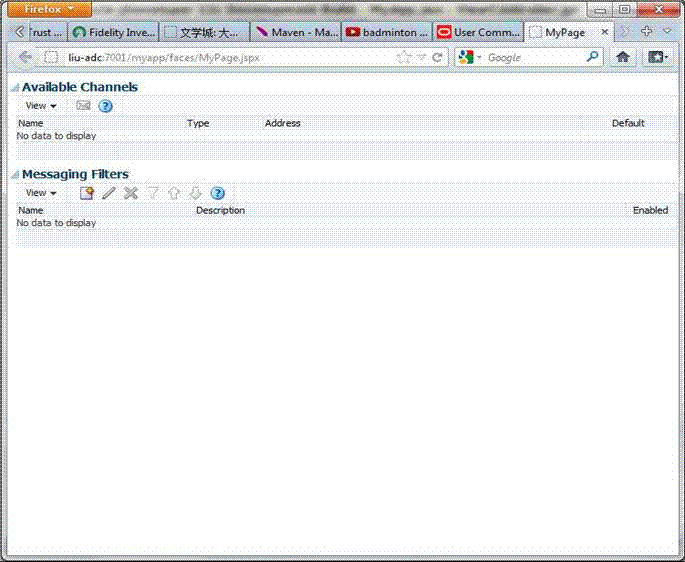
Description of the illustration ucp_verify_app.gif
Note:
When you access your application for the first time on your browser, you might see a blank page. This is expected behavior if your application does not include authentication. For the simplicity of this demo, we have not included authentication. But it is recommended that you protect your web application with proper authentication.
To test your demo application without authentication, you can try the following workaround. If there is another Oracle SSO protected web application, you can first log in to that application, and then access your application from the same browser. As a result, you will see the channels and filters of the authenticated user, instead of seeing a blank page.
6.5 Java Application Interface
UCP services can be consumed directly or indirectly from your application. To consume UCP services indirectly, you must call UMS API that, in turn, will send messages to the users. UMS will deliver messages to the best channels according to the user's preferences. If you want to consume UCP services directly, then you must call UCP Java API. For instance, if you want to control the message format depending on the delivery type of the channel that a user prefers, then you are required to consume the UCP services directly. Or for instance, if you want to build a new application to send messages to the users of your application on certain events, then you can programmatically create a default email channel for each user using the UCP API to ensure that each user receives the message initially upon the deployment of your application. A user may change his preferences later if he does not want the email as his default channel.
UCP Java APIs provide program interface for implementing applications to consume UCP services. UCP also provides Java APIs for managing channels and filters. The Java interface, oracle.ucs.userprefs.UserCommunicationPreference is the primary interface for clients to access UCP services. The oracle.ucs.userprefs package contains the User Communication Preferences API classes. For more information, refer to User Messaging Service Java API Reference. This is the root interface for managing user's preference objects such as addresses, filtersets, etc. For more information about APIs and interfaces for UCP services, refer to User Messaging Service Java API Reference.
6.5.1 Obtain Delivery Preferences
A user's delivery preferences can be obtained by invoking the Java method getDeliveryPreference(String guid, String profileID, Map>String,Object> facts), where guid is case-sensitive. The profileID parameter, introduced in 12c, is used to target user preferences for a specific profile. It is recommended that each application targets a specific profile. There is a default profile ID that can be acquired by applications by calling the getDefaultProfileId method. For applications that invoke the 11g APIs (without a Profile ID), the default profile is automatically used. Finally, applications calling this API must provide all the necessary facts so that UCP can select a matched filter in the target profile. The facts are in a Map<String,Object> of name/value pair where the name is the business term and the key in the map. For more information about using this API, refer to User Messaging Service Java API Reference.
The following code snippet demonstrates how to obtain the delivery preferences for testUser1:
// Obtain a UserCommunicationPreference object
UserCommunicationPreference ucp = UserPrefsServicesFactory.createUserCommunicationPreference();

// Set target user ID
String userId = “testUser1”;

// Specify the Profile ID, or default id from ucp.getDefaultProfileId()
String profileId = “soa”;

// Add all facts into Hashtable facts. Facts for Date and Time are not needed.
Map <String, String> facts = new HashMap<String, Object>();
facts.put(“Application”, “BPEL”);                   // Add application name
facts.put(“Due Date”, new Date());                        // Use current date
facts.put(“Amount”, new Double(“678.00”));          // Set number for 678


// Invoke getDeliveryPreference() function with userId, profileId and and facts.
DeliveryPreference dp = ucp.getDeliveryPreference(userId, profileId, facts);

// Retrieve Action Type and delivery Channels from the returned DeliveryPreference object.
ActionType at = dp.getActionType();              //Get Action Type
Vector <DeviceAddress>  channels = dp.getDevices();   //Get delivery Channels
6.5.2 Manage Channels
UCP provides an automatic channel management feature to sync UCP respository with the Identity Store (usually, LDAP). When an email address is added to the Identity Store, an EMAIL channel corresponding to that email address is automatically created in the UCP respository. This channel is removed from the repository when the corresponding email address is deleted from the Identity Store. UCP automatically creates channels for email, IM, business, home and mobile phones. These channels are called IDM Channels.
Since these channels are automatically managed by UCP, applications must not attempt to create or remove them. Applications are allowed only to set or unset these channels as default channels. However, applications can create, modify, or remove USER channels using APIs such as, createDeviceAddress, getDeviceAddresses, etc. A channel can be flagged as a default channel using the setDefaultChannel API.
The following code snippet demonstrates how to create a communication channel for a user, testUser1 with a particular email address:
// Create an email channel for testUser1
DeviceAddress channel = ucp.createDeviceAddress(“testUser1”,               // User ID
                                        “myEmail”,                        // Channel name
                                        DeliveryType.EMAIL,             // Delivery Type for email
                                        “myemail@somecompany.com”);        // Email address
ucp.save(channel);      // without this line, the Channel will not be persisted in UCP repository
The channel name must be unique for each user. The combination of Delivery Type and Delivery Address must also be unique for each user. Following are some sample code snippets that demonstrate how to manage a channel:
// Set the Channel as a default Channel
ucp.setDefaultAddress(“testUser1”,                // User ID
                          “soa”,                  // Profile ID
                          channel);                     // Channel to be flagged

// Unset a default Channel
ucp.removeDefaultAddress(“testUser1”,             // User ID
                                 “soa”,                   // Profile ID
                                 channel);              // Channel to be unset

// Modify the Channel's address
channel.setAddress(newemail@somecompany.com);
ucp.save(channel);      // without this line, the change will not be persisted in UCP repository

// Remove the Channel
ucp.delete(channel);
6.5.3 Manage Filters
Filters are managed in a set for each profile. The following code snippet demonstrates how to create a messaging filter for a user, testUser1 for the soa profile.
// Get, or create if not exist, user's Filter Set for Profile “soa”
FilterSet  filterSet = ucp.getFilterSet(“testUser1”        // User ID
                                    “soa”);               // Profile ID

// Create a new Filter
Filter  filter = filterSet.createFilter(“Test Email Filter”);      // Create a new Filter named “Test Email Filter”
filter.setConditionType(ConditionType.MATCH_ANY).        // Set the Condition Type to logical OR

// Create a new Condition
Condition  condition = filter.createCondition();         // Create a new Condition first
Map<String, BusinessRuleTerm> terms = ucp.getBusinessTerms();
BusinessRuleTerm term = terms.get(“Subject”);      // Business Term for “Subject”
condition.setFilterTerm(term);
condition.setTermOperation(TermOperationType.Contains);
condition.setOperandOne(“approved”);              // Set value “approved”
ArrayList<Condition> conditions = new ArrayList<Condition>();
conditions.add(condition);
fitler.setConditions(conditions);                       // Add the Condition list to the Filter

// Set Action Type
Filter.setActionType(ActionType.SERIAL);                // Set Action Type for SERIAL

// Get all the Channels for “soa” Profile
Set<DeviceAddress> allAddresses = ucp.getDeviceAddress(“testUser1”,     // User ID
                                                      “soa”);             // Profile ID
ArrayList<DeviceAddress> channels = new ArrayList(allAddresses);      // Convert to a List
filter.setDeviceAddressList(channels);                  // Add to the Filter as target Channels

// Add the Filter to the Filter Set
filterSet.addFilter(filter);

// Finally persist the FilterSet object
ucp.save(filterSet);                            // Required to persist the Filter
To deploy your application, you must reference the shared library oracle.sdp.client from your application's development descriptor. The application must be deployed in the same domain with the UCP service.
Though UCP provides Java APIs for applications to manage channels and filters, it is recommended that users manage their preferences through UCP web interface integrated in their web application using the UCP task flow library.
