4 Domain Template Builder Screens
This chapter describes each of the Domain Template Builder screens.
It contains the following sections:
Template Type
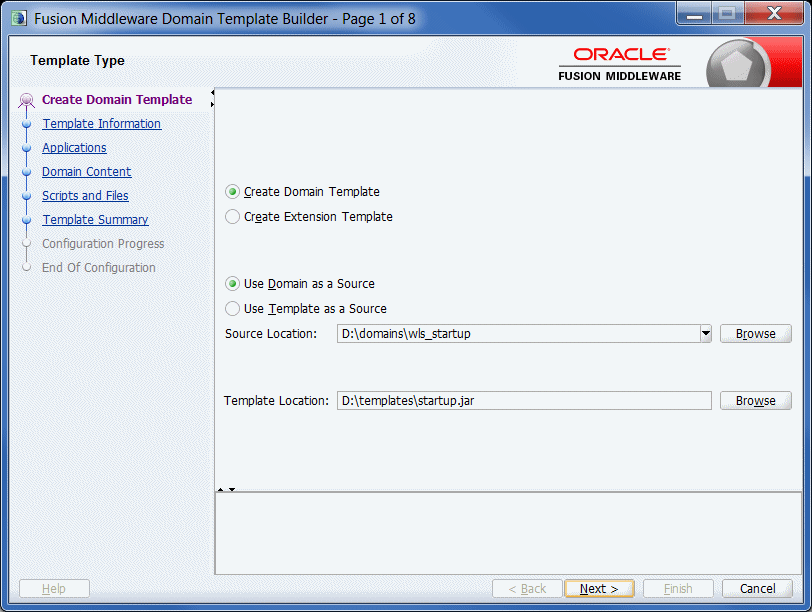
Description of the illustration createdomain.gif
Use this page to specify whether or not you want to create a domain template or an extension template, and then specify the source and destination for the new template.
| Option | Description |
|---|---|
|
Select this option to create a new domain template that defines the full set of resources within a WebLogic domain, including infrastructure components, applications, services, security options, and general environment and operating system parameters. You can use the template that you create as the basis for creating a WebLogic domain, by specifying the template in the Configuration Wizard, WLST, or the |
|
|
Select this option to create a template that defines applications and services that can be used to extend existing WebLogic domains. You can import applications and services stored in extension templates into an existing WebLogic domain by using the Configuration Wizard. For information about the Configuration Wizard, see Creating Domains Using the Configuration Wizard |
Create Domain Template From Existing Domain
To create a domain template from an existing domain directory:
-
Select Create Domain Template.
-
Select Use Domain as a Source.
-
Enter the full path of the source domain directory in the Source Location field, or use the Browse button to navigate to the domain directory (for example, C:\domains\mydomain).
-
In the Template Location field, enter the full path and JAR file name for the new template, or use the Browse button to navigate to an existing directory. Ensure that you include the JAR file name, for example, C:\templates\domains\mynewtemplate.jar.
-
Click Next to continue.
Create Extension Template From Existing Domain
To create an extension template from an existing domain directory:
-
Select Create Extension Template.
-
Select Use Domain as a Source.
-
Enter the full path of the source domain directory in the Source Location field, or use the Browse button to navigate to the domain directory (for example, C:\domains\mydomain).
-
In the Template Location field, enter the full path and JAR file name for the new template, or use the Browse button to navigate to an existing directory. Ensure that you include the JAR file name, for example, C:\templates\domains\mynewtemplate.jar.
-
Click Next to continue.
Create Domain Template From Existing Template
To create a domain template from an existing template:
-
Select Create Domain Template.
-
Select Use Template as a Source.
-
Enter the full path of the source domain JAR file in the Source Location field, or use the Browse button to navigate to the domain directory and select the JAR file (for example, C:\domains\mydomain.jar).
-
In the Template Location field, enter the full path and JAR file name for the new template, or use the Browse button to navigate to an existing directory. Ensure that you include the JAR file name, for example, C:\templates\domains\mynewtemplate.jar.
-
Click Next to continue.
Create Extension Template From Existing Template
To create an extension template from an existing template:
-
Select Create Extension Template.
-
Select Select Template Source.
-
Enter the full path of the source application JAR file in the Select Source Location field, or use the Browse button to navigate to the application directory and select the jar file (for example, C:\applications\myapplication.jar).
-
In the Select Template Location field, enter the full path and JAR file name for the new template, or use the Browse button to navigate to an existing directory. Ensure that you include the JAR file name, for example, C:\templates\applications\mynewapplication.jar.
-
Click Next to continue.
Template Information
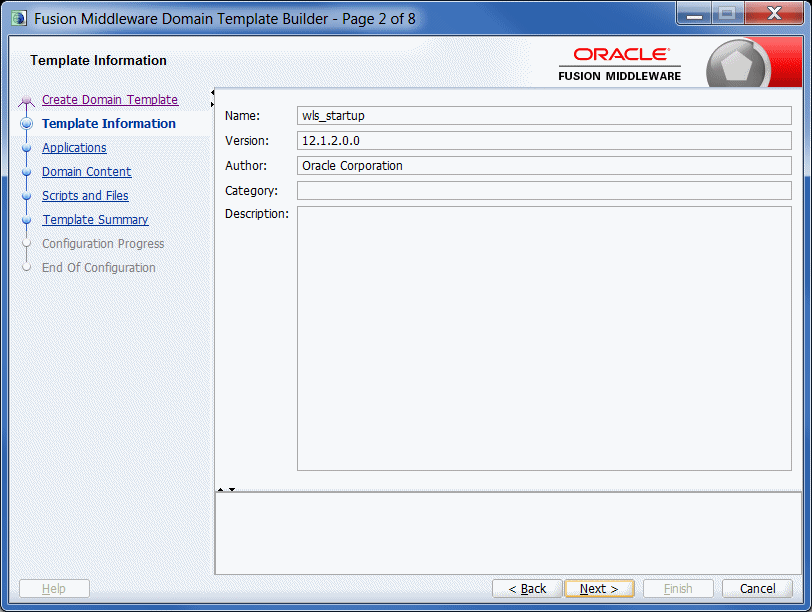
Description of the illustration templateinfo.gif
Use this screen to provide basic information about the template. The information you enter here is stored in the template-info.xml file that is generated for the domain or extension template. It is also stored in the config.xml file for the domain.
-
If you selected a WebLogic domain or an application as the source for the new template, enter the information required for the domain and application, and click Next.
-
If you selected a template as the source for the new template, information about the selected template is displayed. Review the information, and, if necessary, change it to suit the requirements of your domain or application template. When done, click Next.
| Field | Description |
|---|---|
|
Required. Enter a valid name for the template. The name must be a string of characters, and can include spaces. |
|
|
Required. Enter a version number for the template. The version number can be anything you want, as long as it contains four or five digits, for example, 12.1.2.0 or 12.1.2.0.0. |
|
|
Optional. Enter the name of the author of the template. |
|
|
Leave this field blank as it does not apply to custom templates. This field applies only to Oracle-provided templates that are selectable on the Templates screen of the Fusion Middleware Configuration Wizard. |
|
|
Optional. Enter a detailed description of the template. The description must be a string of characters, and can include spaces. |
Applications
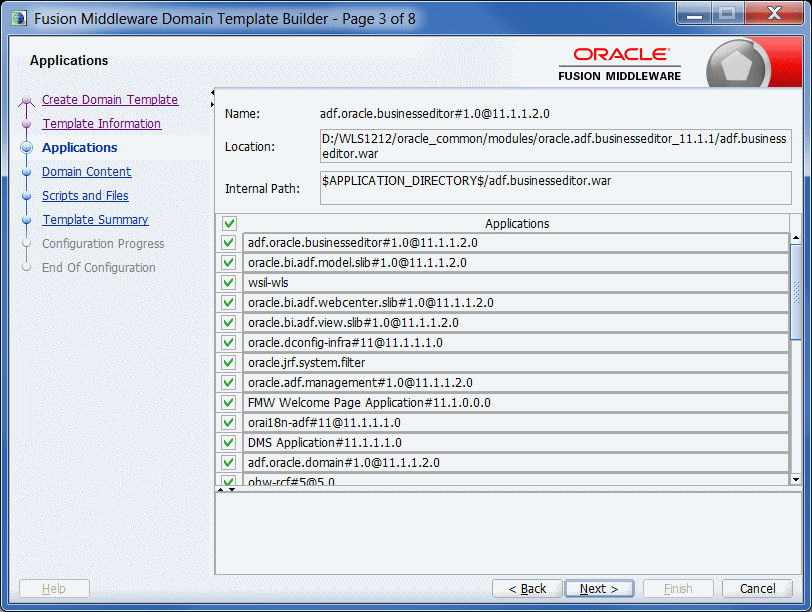
Description of the illustration applications.gif
This screen is displayed only if applications are included in the template or domain that you selected. You can
-
Review the list of applications that are currently defined in your template source.
-
Review the paths of the current and imported applications. To do so, click on the name of the application in the Applications list.
-
If necessary, omit applications from the list of files to be imported. To do so, deselect the check box.
By default, the Domain Template Builder includes applications from the domain or template you specified as the source for the template that you are creating. For example:
-
If you selected a template as the source for the new template, and if the source template has a separately defined applications directory, all the application files defined in the applications directory are included by default.
-
If you selected a domain as the source for the new template, applications that fulfill the following conditions are included by default:
-
Applications that are defined in the config.xml file by the app-deployment element
-
Applications that are not considered internal applications in your product installation are included by default
-
When you create or extend a clustered domain (by using the Configuration Wizard or WLST) based on a template that contains applications with application-scoped JDBC or JMS resources, you may need to perform certain additional steps after creating or extending the domain. These steps are needed to ensure that the application and its application-scoped resources are targeted and deployed properly.
For more information about targeting and deploying application-scoped modules, see Deploying Applications to Oracle WebLogic Server.
To include an application (or omit it from) the template, select or deselect the check box for the application as appropriate.
The listed applications reside in the directory specified in the Location box. The applications are copied into your template from this location. If more than one application is selected, the Location box contains the location of the first one in the list. To see the location of a specific application, click on the application name in the Applications column.
Domain Content
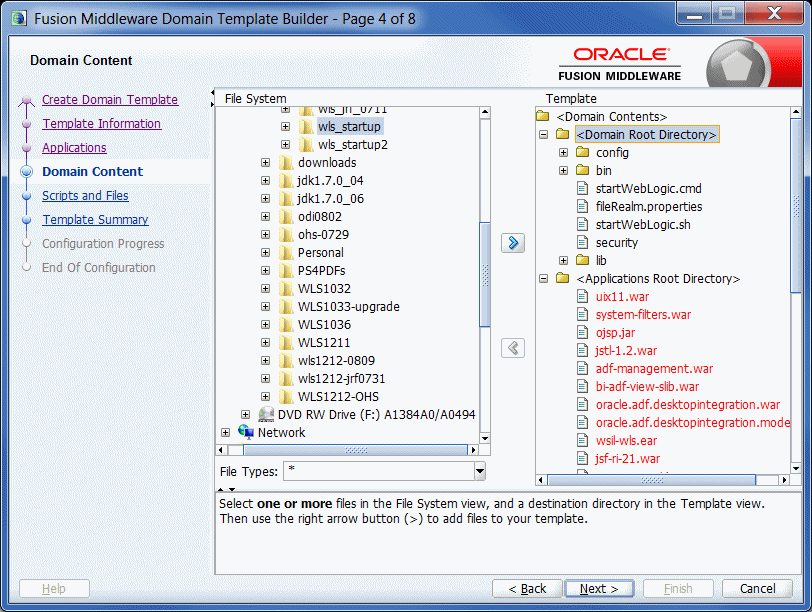
Description of the illustration domaincontent.gif
Use the Domain Content screen to review the files in the domain, add files to the domain, and remove files from the domain.
By default, the Domain Template Builder includes files from the WebLogic domain or template you specified as the source for the new template. You may also need to include other files from your domain or file system that are required by the applications in the domain.
-
If you selected an existing template as the source for the new template, all files from the source template are automatically included. If the existing template defines a separate applications directory, the applications in the template are listed under the Applications Root Directory in the Template section on the right.
-
If you selected a domain as the source for your new template, the following files and directories are included by default:
-
All files in the root directory with the following extensions:
.cmd,.sh,.xml,.properties, and.ini -
All files with the
.pemextension defined in the SSL configuration for your domain -
bindirectory -
libdirectory -
All files in the
securitydirectory that are not created automatically during domain creationFor example, in WebLogic,
XACMLRoleMapperInit.ldiftis not created automatically, and therefore is included in the template by default when creating a template. -
All files and subdirectories in the
configdirectory that are not included by the Domain Template Builder automatically during template creation. For example,config.xmland any JDBC and JMS resources defined inconfig.xmlare not displayed in the Template section by default because the Domain Template Builder automatically includes them in the template when creating the template.Note:
By default, the
serversdirectory is not included in the template. If you have configured additional security data such as users, groups, or roles, through the WebLogic Server Administration Console or other online tools, it is stored in the LDAP server and is not included in the template. You must export the data first and then import it into the target domain.
-
Reviewing Files in the Template
To view the current list of files in your template, expand the Domain Root Directory and Applications Root Directory under Domain Contents in the Template section on the right.
Adding Files and Directories to the Template
To add files to the template:
-
In the File System section on the left, navigate to the file you want to add. You can use the Show File Types drop-down list to restrict the list to a specific file type. For example, to display only files with the
.cmdextension, select*.cmdfrom the drop-down list. -
Select one or more files or directories to move into a specific subdirectory of either the Domain Root Directory or the Application Root Directory. The files you select must all be either domain or application files, not a mix of both. Select only those files that you want to move to a given subdirectory.
-
In the Template section on the right, select either the Domain Root Directory or Application Root Directory as appropriate for the files or directories you are adding.
-
Expand the directory and navigate to the subdirectory in which you want to store the selected files or directories.
-
Click the right arrow button to move the files or directories into the selected template directory.
If you attempt to add a file that is created automatically by the Configuration Wizard at domain creation time, an error message is displayed.
-
Repeat steps 2 through 5 for any additional files or directories you need to add to the template.
Removing Files and Directories From the Template
To remove files and directories:
-
In the Template section, navigate to and select all files and directories that you want to remove from the template.
-
Click the left arrow to remove the selected files or directories. The files are removed from the template. They are not copied or moved into any directory that may be currently selected in the File System section
You cannot remove files shown in red or their parent directories as they consist of the applications defined in the
config.xmlfile in the template source. These files are included by default in the template being created. If you do not want these files included in your template, you must remove the application with which they are associated. To do so, click Previous to return to the Applications screen and deselect the appropriate check box for the application.
Scripts and Files
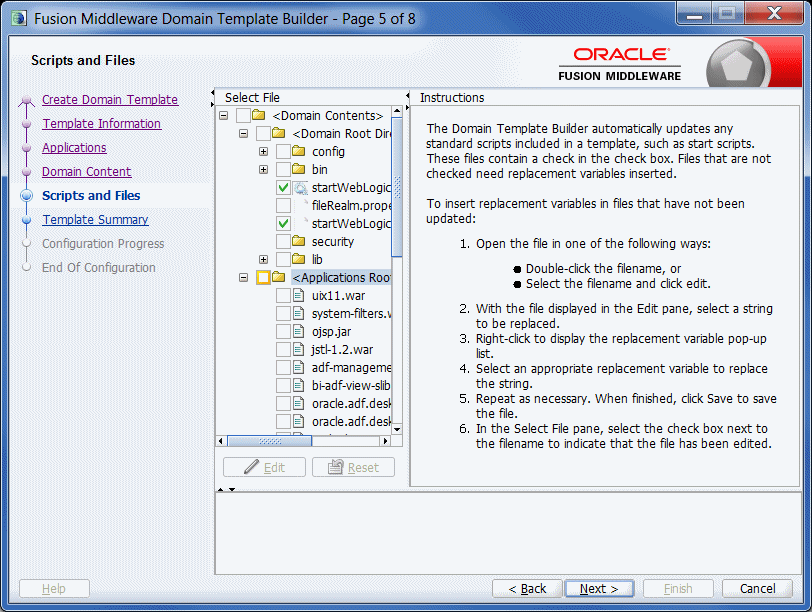
Description of the illustration scriptsandfiles.gif
When you are creating a template, you want the scripts and files that you are packaging with your template to be free of local domain environment settings and therefore be ready for use by the Configuration Wizard.
The Domain Template Builder automatically updates any standard scripts included in a template (such as start scripts) by replacing hard-coded values for various domain environment settings with replacement variables. The Configuration Wizard can replace these variables with new hard-coded values during the configuration of a new WebLogic domain.
Use the Scripts and Files screen to replace hard-coded strings with replacement variables in files that have not been updated by the Domain Template Builder. The check box for any file that was automatically updated by the Domain Template Builder is already selected.
To insert replacement variables into your files:
-
Open the file in one of the following ways:
-
Double-click the appropriate filename in the Select File list.
-
Select the appropriate filename in the list and click Edit.
The Instructions pane is replaced by an Edit File pane, in which the file is displayed. An editing toolbar is provided at the top of the Edit File pane.
-
-
To insert a replacement variable:
-
Select the string to be replaced.
-
Click the right mouse button. A list of replacement variables is displayed.
-
Select the required variable.
The replacement variable replaces the selected string. The Configuration Wizard later substitutes literal strings for the replacement variables to set up a specific WebLogic domain.
For definitions of the available replacement variables, see Replacement Variable Definitions.
-
-
Repeat steps 1 and 2 for each string for which you want to substitute a variable.
-
Review the changes and click Save to preserve your changes, or Revert to replace the current version of the file with the last saved version. If you edited the file since the last time you saved it, you are prompted to confirm the revert operation.
Note:
You can also click Reset in the Select File pane to revert to the saved version of the file.
-
If you saved the edited file, select the check box next to the filename in the Select File pane.
-
Repeat steps 1 through 5 for each file in which you want to insert replacement variables.
-
Click Next.
The Template Summary screen is displayed.
Replacement Variable Definitions
The following table defines the replacement variables most commonly used in files.
Table 4-1 List of Replacement Variables
| Variable | Definition |
|---|---|
|
|
URL specifying the listen address (host name or IP address) and port number of the Administration Server for the WebLogic domain. |
|
|
Directory containing the applications required by the domain. By default, the path name for this directory is |
|
|
The Oracle Home directory ( |
|
|
The URL specifying the location of the product documentation on the Internet. |
|
|
Directory in which the domain resides. |
|
|
Name of the domain. |
|
|
Administration username required to start the server. |
|
|
Location of the JDK used to start WebLogic Server. |
|
|
Vendor of the JVM, for example, Oracle, HP, IBM, and Sun. |
|
|
Mode in which you want the JVM to run, such as |
|
|
Port to be used to listen for regular, non-secure requests (through protocols such as HTTP and T3). The default value is 7001. |
|
|
Mode in which the server is started. If this variable is set to true, the server starts in production mode; if set to false, the server starts in development mode. |
|
|
Name or address of the machine hosting the server. |
|
|
Name of the server to be started. |
|
|
Port to be used to listen for regular, non-secure requests (through protocols such as HTTP and T3). The default value is 7001. |
|
|
Port to be used to listen for secure requests (through protocols such as HTTPS and T3S). The default value is 7002. |
|
|
Mode in which the server is started: development or production. |
|
|
Directory containing the user domains created with the Configuration Wizard. By default, the path for this directory is |
|
|
Root directory of your WebLogic Server installation. By default, this directory is defined as |
Template Summary
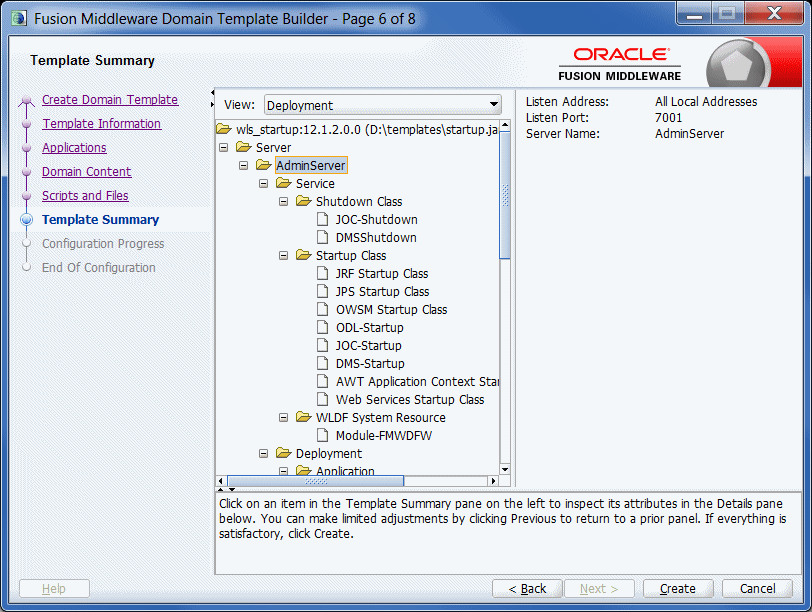
Description of the illustration templatesummary.gif
Use the Template Summary screen to review the settings for the new template before it is created.
-
Select an item in the Template Summary pane on the left and review the associated details in the Details pane on the right. If you need to change any settings that you defined in previous windows, select Previous to return to the required configuration window.
Note:
You can limit the type of information displayed in the Template Summary screen by using the View drop-down list.
-
Click Create.
The Configuration Progress screen is displayed.
Configuration Progress
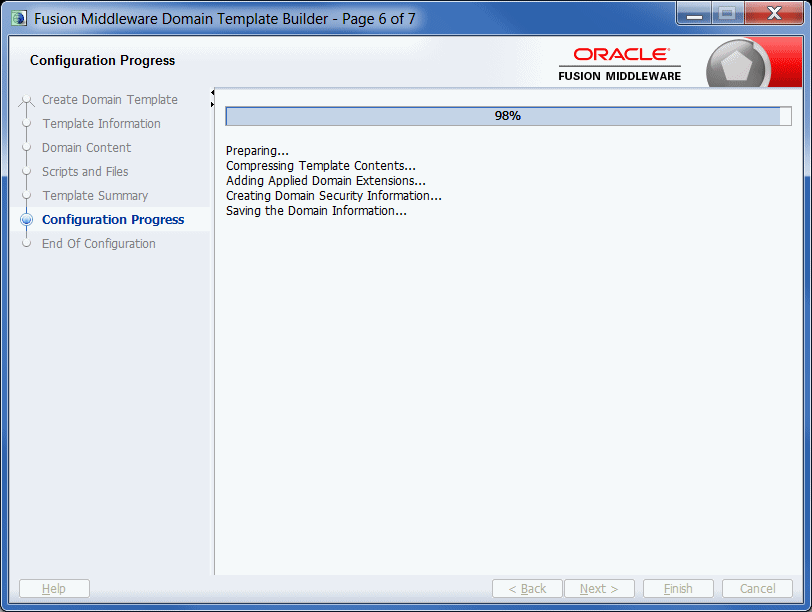
Description of the illustration configprogress.gif
The Configuration Progress screen displays status messages during the template creation process. The Domain Template Builder generates a JAR file that contains all the components required to generate a new WebLogic domain, including the template settings that you provided.
When the process completes, click Finish.
The files included in a template vary, depending on the WebLogic domain or template on which the template is based.
For more information, see "Files Typically Included in a Template" in the Domain Template Reference.
End of Configuration
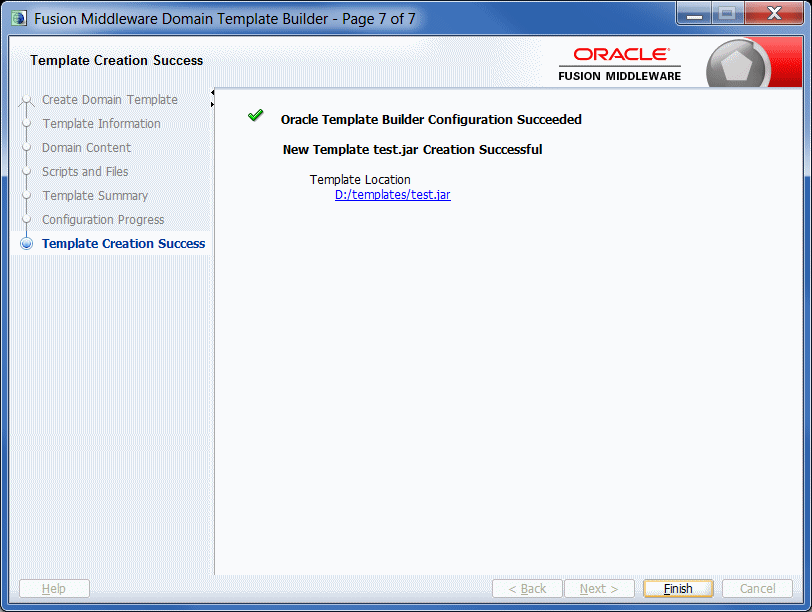
Description of the illustration endconfig.gif
This screen displays the final configuration status.
-
If the template was created successfully, a link to the template JAR file is provided under Template Location.
-
If the template was not created successfully, an error message and error code are displayed. In this case, try to determine the cause of the failure from the message and correct the issue.