8 Rerendering Partial Page Content
This chapter describes how to use the partial page render features provided with ADF Faces components to rerender areas of a page without rerendering the whole page.
This chapter includes the following sections:
8.1 About Partial Page Rendering
Ajax (Asynchronous JavaScript and XML) is a web development technique for creating interactive web applications, where web pages appear more responsive by exchanging small amounts of data with the server behind the scenes, without the whole web page being rerendered. The effect is to improve a web page's interactivity, speed, and usability.
With ADF Faces, the feature that delivers the Ajax partial page render behavior is called partial page rendering (PPR). During PPR, the JSF page request lifecycle (including conversion and validation) is run only for certain components on a page. Certain ADF Faces components are considered event root components, and are what determine the boundaries on which this optimized lifecycle is run.
The event root component can be determined in two ways:
-
Events: Certain events indicate a component as a root. For example, the disclosure event sent when expanding or collapsing a
showDetailcomponent (see Section 9.9, "Displaying and Hiding Contents Dynamically"), indicates that theshowDetailcomponent is a root. When theshowDetailcomponent is expanded or collapsed, only that component, and any of its child components, goes through the lifecycle. Other examples of events identifying a root component are the disclosure event when expanding nodes on a tree, or the sort event on a table. For a complete list of events that have corresponding event root components, see Table 6-1 in Section 6.1.1, "Events and Partial Page Rendering." -
Components: Certain components are recognized as an implicit boundary, and therefore a root component. For example, the framework knows a popup dialog is a boundary. No matter what event is triggered inside a dialog, the lifecycle does not run on components outside the dialog. It runs only on the popup.
The following components are considered event root components:
-
popup -
region -
panelCollection -
calendar -
editableValueHoldercomponents (such asinputText)
-
In addition to this built-in PPR functionality, there may be cases when you want components that are outside of the boundary to be included in the optimized lifecycle. You can configure this declaratively, using the partial trigger attributes to set up dependencies so that one component acts as a trigger and another as the listener. When any event occurs on the trigger component, the lifecycle is run on the trigger and its children (as described above), and then also on any listener components and child components to the listener.
For example, suppose you have an inputText component on a page whose required attribute is set to true. On the same page are radio buttons that when selected cause the page to either show or hide text in an outputText component, as shown in Figure 8-1.
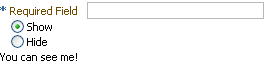
Also assume that you want the user to be able to select a radio button before entering the required text into the field. While you could set the radio button components to automatically trigger a submit action and also set their immediate attribute to true so that they are processed before the inputText component, you would also have to add a valueChangeEvent listener, and in it, jump to the Render Response phase so that validation is not run on the input text component when the radio buttons are processed.
Instead of having to write this code in a listener, you can use the partialTriggers attribute to have the lifecycle run just on the radio buttons and the output text component. You would set the radio buttons to be triggers and the panelGroupLayout component that contains the output text to be the target, as shown in Example 5-4.
Tip:
Because the output text won't be rendered when it's configured to hide, it cannot be a target. Therefore it is placed in apanelGroupLayout component, which is then configured to be the target.Example 8-1 Example of Declarative PPR
<af:form>
  <af:inputText label="Required Field" required="true"/>
  <af:selectBooleanRadio id="show" autoSubmit="true" text="Show"
                        value="#{validate.show}"/>
  <af:selectBooleanRadio id="hide" autoSubmit="true" text="Hide"
                         value="#{validate.hide}"/>
  <af:panelGroupLayout partialTriggers="show hide" id="panel">
    <af:outputText value="You can see me!" rendered="#{validate.show}"/>
  </af:panelGroupLayout>
</af:form>
Because the autoSubmit attribute is set to true on the radio buttons, when they are selected, a SelectionEvent is fired, for which the radio button is considered the root. Because the panelGroupLayout component is set to be a target to both radio components, when that event is fired, only the selectBooleanRadio (the root), the panelGroupLayout component (the root's target), and its child component (the outputText component) are processed through the lifecycle. Because the outputText component is configured to render only when the Show radio button is selected, the user is able to select that radio button and see the output text, without having to enter text into the required input field above the radio buttons.
Note however, than when you use the partial trigger attributes to set up dependencies between components, any event from the trigger component will cause the target component, and its children, to execute and render. This can result in validation errors.
For example, suppose instead of using an outputText component in the panelGroupLayout, you want to use an inputText component whose required attribute is set to true, as shown in Example 8-2.
Example 8-2 inputText Component Within a panelGroup Component Will Be Validated with PPR
<af:form>
  <af:selectBooleanRadio id="show1" autoSubmit="true" text="Show"
                         value="#{validate.show1}"/>
  <af:selectBooleanRadio id="hide1" autoSubmit="true" text="Hide"
                         value="#{validate.hide1}"/>
  <af:panelGroupLayout partialTriggers="show1 hide1">
    <af:inputText label="Required Field" required="true"
                                         rendered="#{validate.show1}"/>
  </af:panelGroupLayout>
</af:form>
In this example, the inputText component will be validated because the lifecycle runs on the root (the selectBooleanRadio component), the target (the panelGroupLayout component), and the target's child (the inputText component). Validation will fail because the inputText component is marked as required and there is no value, so an error will be thrown. Because of the error, the lifecycle will skip to the Render Response phase and the model value bound to the radio button will not be updated. Therefore, the panelGroupLayout component will not be able to show or hide because the value of the radio button will not be updated.
For cases like these, you can explicitly configure which targets you want executed and which targets you want rendered when a specific event (or events) is fired by a component. In this new example, we want the valueChange event on the selectBooleanRadio buttons to trigger PPR, but instead of executing the panelGroupLayout component and its children through the lifecycle, only the radio buttons should be executed. However, the entire form should be rendered. As that happens, the inputText component can then determine whether or not to render. When you need to explicitly determine the events that cause PPR, and the components that should be executed and rendered, you use the target tag. Example 8-3 shows the JSF code to do this.
Example 8-3 Target Tag Determines the Events and Components Involved in PPR
<af:panelFormLayout id="pfl1">
  <af:selectBooleanRadio id="show2" autoSubmit="true" text="Show"
                         value="#{validate.show2}"/>
    <af:target events="valueChange" execute="show2 hide2" render="pfl1"/>
  <af:selectBooleanRadio id="hide2" autoSubmit="true" text="Hide"
                         value="#{validate.hide2}"/>

    <af:target events="valueChange" execute="hide2 show2" render="pfl1"/>
  <af:panelGroupLayout id="pgl1">
    <af:inputText label="Required Field" required="true"
                                         rendered="#{validate.show2}"/>
  </af:panelGroupLayout>
</af:panelFormLayout>
In this example, when the valueChange event is fired from either of the selectBooleanRadio components, only the selectBooleanRadio components will be executed in the lifecycle, while the entire panelFormLayout component will be rendered.
Tip:
If your application uses the Fusion technology stack, you can enable the automatic partial page rendering feature on any page. This causes any components whose values change as a result of backend business logic to be automatically rerendered. For more information, see the "What You May Need to Know About Partial Page Rendering and Iterator Bindings" section in Developing Fusion Web Applications with Oracle Application Development Framework.Additionally, ADF Faces applications can use PPR for navigation. In standard JSF applications, the navigation from one page to the next requires the new page to be rendered. When using Ajax-like components, this can cause overhead because of the time needed to download the different JavaScript libraries and style sheets. To avoid this costly overhead, the ADF Faces architecture can optionally simulate full-page transitions while actually remaining on a single page, thereby avoiding the need to reload JavaScript code and skin styles.
Note:
The browser must have JavaScript enabled for PPR to work.8.2 Using Partial Triggers
Using partial triggers, one component, referred to as the target component, is rerendered when any event occurs on another component, referred to as the trigger component.
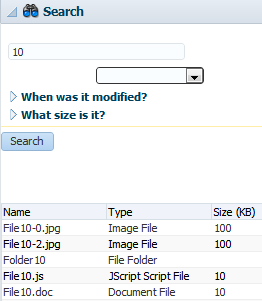
For example, as shown in Figure 8-2, the File Explorer application contains a table that shows the search results in the Search panel. This table (and only this table) is rendered when the search button is activated. The search button is configured to be the trigger and the table is configured to be the target. When any event fires from the button, the table and its components will be processed through the lifecycle (as well as the button)
Note:
In some cases, you may want a component to be executed or rendered only when a particular event is fired, not for every event associated with the trigger component. In these cases, you should use the target tag. For more information, see Section 8.3, "Using the Target Tag to Execute PPR." When you want some logic to determine whether a component is to be executed or rendered, you can programmatically enable PPR. For more information, see Section 8.4, "Enabling Partial Page Rendering Programmatically."Trigger components must inform the framework that a PPR request has occurred. On command components, this is achieved by setting the partialSubmit attribute to true. Doing this causes the command component to fire a partial page request each time it is clicked.
For example, say a page includes an inputText component, a button component, and an outputText component. When the user enters a value for the inputText component, and then clicks the button component, the input value is reflected in the outputText component. You would set the partialSubmit attribute to true on the button component.
However, components other than command components can trigger PPR. ADF Faces input and select components have the ability to trigger partial page requests automatically whenever their values change. To make use of this functionality, use the autoSubmit attribute of the input or select component so that as soon as a value is entered, a submit occurs, which in turn causes a valueChangeEvent event to occur. It is this event that notifies the framework to execute a PPR, as long as a target component is set. In the previous example, you could delete the button component and instead set the inputText component's autoSubmit attribute to true. Each time the value changes, a PPR request will be fired.
Tip:
TheautoSubmit attribute on an input component and the partialSubmit attribute on a command component are not the same thing. When partialSubmit is set to true, then only the components that have values for their partialTriggers attribute will be processed through the lifecycle.
The autoSubmit attribute is used by input and select components to tell the framework to automatically do a form submit whenever the value changes. When a form is submitted and the autoSubmit attribute is set to true, a valueChangeEvent event is invoked, and the lifecycle runs only on the components marked as root components for that event, and their children. For more information, see Section 5.3, "Using the Optimized Lifecycle."
Once PPR is triggered, any component configured to be a target will be processed through the lifecycle. You configure a component to be a target by setting the partialTriggers attribute to the relative ID of the trigger component. For information about relative IDs, see Section 4.8, "Locating a Client Component on a Page."
In the example, to update the outputText in response to changes to the inputText component, you would set its partialTriggers attribute to the inputText component's relative ID.
Note that certain events on components trigger PPR by default, for example the disclosure event on the showDetail component and the sort event on a table. This means that any component configured to be a target by having its partialTriggers attribute set to that component's ID will rerender when these types of events occur. When you don't want all events to trigger PPR, then instead of using the partialTriggers attribute, you should use the target tag. This tag allows you to explicitly set which events will cause PPR.
Another example of when to use the target tag instead of the partialTriggers attribute is when your trigger component is an inputLov or an inputComboBoxLov, and the target component is a dependent input component set to required. In this case, a validation error will be thrown for the input component when the LOV popup is displayed. If you use the target tag instead, you can explicitly set which components should execute (the LOV), and which should be rendered (the input component). For more information, see Section 8.3, "Using the Target Tag to Execute PPR."
8.2.1 How to Use Partial Triggers
For a component to be rendered based on an event caused by another component, it must declare which other components are the triggers.
Best Practice:
Do not use both partial triggers and thetarget tag on the same page. When in doubt, use only the target tag. For more information, see Section 8.3, "Using the Target Tag to Execute PPR."It may be helpful to have an understanding of declarative partial page rendering. For more information, see Section 8.2, "Using Partial Triggers."
-
In the Structure window, select the trigger component (that is, the component whose action will cause the PPR):
-
Expand the Common section of the Properties window and set the
idattribute if it is not already set. Note that the value must be unique within that component's naming container. If the component is not within a naming container, then the ID must be unique to the page. For more information about naming containers, see Section 4.8, "Locating a Client Component on a Page."Tip:
JDeveloper automatically assigns component IDs. You can safely change this value. A component's ID must be a valid XML name, that is, you cannot use leading numeric values or spaces in the ID. JSF also does not permit colons (:) in the ID. -
If the trigger component is a command component, expand the Behavior section of the Properties window, and set the
partialSubmitattribute totrue. -
If the trigger component is an input or select component in a form and you want the value to be submitted, expand the Behavior section of the Properties window, and set the
autoSubmitattribute of the component totrue.Note:
Set theautoSubmitattribute totrueonly if you want the component to submit its value. If you do not want to submit the value, then some other logic must cause the component to issue aValueChangeEventevent. That event will cause PPR by default and any component that has the trigger component as its value for thepartialTriggersattribute will be rerendered.
-
-
In the Structure window, select the target component that you want to rerender when a PPR-triggering event takes place.
-
Expand the Behavior section of the Properties window, click the icon that appears when you hover over the
partialTriggersattribute and choose Edit. -
In the Edit Property dialog, shuttle the trigger component to the Selected panel and click OK. If the trigger component is within a naming container, JDeveloper automatically creates the relative path for you.
Tip:
TheselectBooleanRadio components behave like a single component with partial page rendering;, however, they are in fact multiple components. Therefore, if you want other components (such as inputText components) to change based on selecting a different selectBooleanRadio component in a group, you must group them within a parent component, and set the partialTriggers attribute of the parent component to point to all of the SelectBooleanRadio components.Example 8-4 shows a link component configured to execute PPR.
Example 8-4 Code for Enabling Partial Page Rendering Through a Partial Submit
<af:link id="deleteFromCart" partialSubmit="true"
                actionListener="#{homeBean...}" text="Delete From Cart">
Example 8-5 shows an outputText component that will be rerendered when the link with ID deleteFromCart in Example 8-4 is clicked.
Example 8-5 Code for Partial Page Rendering Triggered by Another Component
<af:outputText id="estimatedTotalInPopup"
               partialTriggers="deleteFromCart"
               value="#{shoppingCartBean...}"/>
Tip:
If you need to prevent components from being validated on a page during PPR, then you should use thetarget tag. For more information, see Section 8.3, "Using the Target Tag to Execute PPR."8.2.2 What You May Need to Know About Using the Browser Back Button
In an ADF Faces application, because some components use PPR (either implicitly or because they have been configured to listen for a partial trigger), what happens when a user clicks the browser's back button is slightly different than in an application that uses simple JSF components.
In an application that uses simple JSF components, when the user clicks the browser's back button, the browser returns the page to the state of the DOM (document object model) as it was when last rendered, but the state of the JavaScript is as it was when the user first entered the page.
For example, suppose a user visited PageA. After the user interacts with components on the page, say a PPR event took place using JavaScript. Let's call this new version of the page PageA1. Next, say the user navigates to PageB, then clicks the browser back button to return to PageA. The user will be shown the DOM as it was on PageA1, but the JavaScript will not have run, and therefore parts of the page will be as they were for PageA. This might mean that changes to the page will be lost. Refreshing the page will run the JavaScript and so return the user to the state it was in PageA1. In an application that uses ADF Faces, the refresh is not needed; the framework provides built-in support so that the JavaScript is run when the back button is clicked.
8.2.3 What You May Need to Know About PPR and Screen Readers
Screen readers do not reread the full page in a partial page request. PPR causes the screen reader to read the page starting from the component that fired the partial page request. You should place the target components after the component that triggers the partial request; otherwise, the screen reader would not read the updated target components.
8.3 Using the Target Tag to Execute PPR
For components such as tables that have many associated events, PPR will happen each time an event is triggered, causing any child component of the table, or any component with the table as a partial trigger, to be executed and rendered. If you want components to be rendered or executed only for certain events, or if you only want certain components to execute or render, you can use the target tag.
Using the target tag can be especially useful when you want to skip component validation under very specific circumstances. For example, say you have a form with a required field, along with a Submit button and a Cancel button, as shown in Figure 8-3.
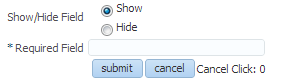
Under normal circumstances, when the Cancel button is clicked, all fields in the form are processed. Because the input text field is required, it will fail validation.
To avoid this failure, you can use the target tag as a child to the Cancel button. Using the target tag, you can state which targets you want executed and rendered when a specific event (or events) is fired by the component. In this example, you might configure the Cancel button's target tag so that only that button is executed, as shown in Example 8-6.
Example 8-6 Target Tag for Button Determines Which Components to Execute and Render
<af:panelFormLayout id="pfl1" labelAlignment="top">
. . .
  <af:panelLabelAndMessage id="plam12" for="it3">
    <af:inputText label="Required Field" required="true"
                  rendered="#{validate.show3}" id="it3"/>
  </af:panelLabelAndMessage>
  <af:panelGroupLayout layout="horizontal" id="pgl9">
    <af:button text="submit" partialSubmit="true" id="cb2"
      <af:target execute="@this it3" render="pfl1"/>
    </af:button>
    <af:button actionListener="#{validate.handleCancel}"
                      partialSubmit="true" text="cancel" id="cb1">
      <af:target execute="@this"/>
    </af:button>
  </af:panelGroupLayout>
</af:panelFormLayout>
In this example, when the Submit button is clicked, that button and the inputText component are executed, and the contents of the panelFormLayout component are rendered. However, when the Cancel button is clicked, only the Cancel button is executed. Nothing is rendered as a result of the click.
Another common validation issue can occur when you have an LOV component and a dependent input text component. For example, say you have an inputListOfValues component from which the user selects an employee name. You want the Employee Number input text field to be automatically populated once the user selects the name from the LOV, and you also want this field to be required.
If you were to use partial triggers by setting the LOV as the trigger, and the input text component as a target, the input text component would fail validation when the popup closes. When the user clicks the search icon, the inputText component will be validated because the lifecycle runs on both the root (the inputListOfValues component) and the target (the inputText component). Validation will fail because the inputText component is marked as required and there is no value, as shown in Figure 8-4

Instead, you can use a target tag as a child to the inputListOfValues component, and configure it so that only the inputListOfValues component is executed, but the input text component is rendered with the newly selected value, as shown in Example 8-7.
Example 8-7 Using the Target Tag with LOV Component
<af:panelFormLayout id="pfl2">
  <af:inputListOfValues label="Ename" id="lov21" required="true"
                 value="#{validateLOV.ename}" autoSubmit="true"
                  popupTitle="Search and Select: Ename" searchDesc="Choose a name"
                  model="#{validateLOV.listOfValuesModel}"
                  validator="#{validateLOV.validate}">
    <af:target execute="@this" render="it1"/>
  </af:inputListOfValues>
  <af:inputText label="Empno" value="#{validateLOV.empno}" required="true"
                id="it1"/>

</af:panelFormLayout>
8.3.1 How to Use the Target Tag to Enable Partial Page Rendering
You place the target tag as a child to the component whose event will cause the PPR. For example, for the form shown in Figure 8-3, you would place the target tag as a child to the Cancel button. You then explicitly name the events and components to participate in PPR.
Best Practice:
Do not use both partial triggers and thetarget tag on the same page. When in doubt, use only the target tag.It may be helpful to have an understanding of form components. For more information, see Section 8.3, "Using the Target Tag to Execute PPR."
-
In the Components window, from the Operations panel, drag a target and drop it as a child to the component that triggers events for which you want to control the PPR.
-
In the Properties window, set the following:
-
Events: Enter a space delimited list of events that you want the target tag to handle for the component. The following events are supported:
-
action -
calendar -
calendarActivity -
calendarActivity -
durationChange -
calendarDisplayChange -
carouselSpin -
contextInfo -
dialog -
disclosure -
focus -
item -
launch -
launchPopup -
poll -
popupCanceled -
popupFetch -
query -
queryOperation -
rangeChange -
regionNavigation -
return -
returnPopupData -
returnPopup -
rowDisclosure -
selection -
sort -
valueChange
Any events that the component executes that you do not list will be handled as usual by the framework.
You can also use the
@allkeyword if you want the target to control all events for the component.The default is
@all. -
-
Execute: Enter a space delimited list of component IDs for the components that should be executed in response to the event(s) listed for the
eventattribute. Instead of component IDs, you can use the following keywords:-
@this: Only the parent component of the target will be executed. -
@all: All components within the sameaf:formtag will be executed. Using this means that in effect, no PPR will occur, as all components will execute as in a normal page lifecycle. -
@default: Execution of components will be handled using event root components or partial triggers, in other words, as if no target tag were used. This value is the default.Note:
While the JSFf:ajaxtag supports the@nonekeyword, theaf:targettag does not.
-
-
Render: Enter a space delimited list of component IDs for the components that should be rendered in response to the event(s) listed for the
eventattribute. Instead of component IDs, you can use the following keywords:-
@this: Only the parent component of the target will be rendered. -
@all: All components within the same af:form tag will be rendered. -
@default: Rendering of components will be determined by the framework. This value is the default.
-
Example 8-8 shows the code for the form with the radio buttons and required field shown in Figure 8-3. For the first target tag, because it's a child to the
show3radio button, and it is configured to execute theshow3andhide3radio buttons and render thepanelFormLayout, when that button is selected, only the two radio buttons are run through the lifecycle and the entire form is rendered. TheinputTextcomponent is not executed because it is not in the execute list, but it is rendered because it is included in the form.The
targettag is also used on the Submit and Cancel buttons. For the Submit button, because the input text component should be processed through the lifecycle, it is listed along with the Submit button as values for its target'sexecuteattribute. However, for the Cancel button, because the input text component should not be processed, it is not listed for that target'sexecuteattribute, and so will not throw a validation error.Example 8-8 Using the Target Tag to Avoid Validation Issues
<af:panelFormLayout id="pfl1">
  <af:panelLabelAndMessage label="Show/Hide Field" id="plam11">
    <af:selectBooleanRadio id="show3" autoSubmit="true" text="Show" group="group3"
                           value="#{validate.show3}">
      <af:target execute="show3 hide3" render="pfl1"/>
    </af:selectBooleanRadio>
    <af:selectBooleanRadio id="hide3" autoSubmit="true" text="Hide" group="group3"
                           value="#{validate.hide3}">
      <af:target execute="hide3 show3" render="pfl1"/>
    </af:selectBooleanRadio>
  </af:panelLabelAndMessage>
  <af:panelLabelAndMessage label="Required Field" id="plam12" showRequired="true">
    <af:inputText label="Required Field" required="true" simple="true"
                  rendered="#{validate.show3}" id="it3"/>
  </af:panelLabelAndMessage>
  <af:panelGroupLayout layout="horizontal" id="pgl9">
    <f:facet name="separator">
      <af:spacer width="2px" id="s7"/>
    </f:facet>

    <af:commandButton text="submit" partialSubmit="true"
                      disabled="#{validate.hide3}" id="cb2">
      <af:target execute="@this it3" render="pfl1"/>
    </af:commandButton>
    <af:commandButton actionListener="#{validate.handleCancel}"
                      partialSubmit="true" text="cancel" id="cb1">
      <af:target execute="@this" render="ot10"/>
    </af:commandButton>

    <af:outputText clientComponent="true"
                   value="Cancel Click: #{validate.clickCount}" id="ot10"/>
</af:panelGroupLayout>
-
8.4 Enabling Partial Page Rendering Programmatically
When you want a target to be rerendered based on specific logic, you can enable partial page rendering programmatically.
8.4.1 How to Enable Partial Page Rendering Programmatically
You use the addPartialTarget method to enable partial page rendering.
How to enable PPR programmatically:
-
Create a listener method for the event that should cause the target component to be rerendered.
Use the
addPartialTarget()method to add the component (using its ID) as a partial target for an event, so that when that event is triggered, the partial target component is rerendered. Using this method associates the component you want to have rerendered with the event that is to trigger the rerendering.For example, the File Explorer application contains the
NavigatorManager.refresh()method. When invoked, the navigator accordion is rerendered. -
In the JSF page, select the target component. In the Properties window, enter a component ID and set ClientComponent to true.
Note:
You must set theclientComponentattribute totrueto ensure that a client ID will be generated. -
In the Properties window, find the listener for the event that will cause the refresh and bind it to the listener method created in Step 1.
8.5 Using Partial Page Navigation
Instead of performing a full page transition in the traditional way, you can configure an ADF Faces application to have navigation triggered through a PPR request. The new page is sent to the client using PPR. Partial page navigation is disabled by default.
When partial page navigation is used, in order to keep track of location (for example, for bookmarking purposes, or when a refresh occurs), the framework makes use of the hash portion of the URL. This portion of the URL contains the actual page being displayed in the browser.
Additionally, JavaScript and CSS will not be loaded for each page. You must use the resource tag to include JavaScript and CSS content specific to the current page. Using the <f:verbatim> or <trh:stylesheet> tags will not work. For more information, see Section 4.2, "Adding JavaScript to a Page."
When partial page navigation is enabled in an application, get requests are supported for the button and link components:
Note:
PPRget requests are not supported in Internet Explorer. When using that browser, URLs will be loaded using a standard get request.
For other browsers, get requests for these components are only supported for pages within an application.
8.5.1 How to Use Partial Page Navigation
You can turn partial page navigation on by setting the oracle.adf.view.rich.pprNavigation.OPTIONS context parameter in the web.xml file to on.
It may be helpful to have an understanding of partial page navigation. For more information, see Section 8.5, "Using Partial Page Navigation."
To use partial page navigation:
-
Double-click the
web.xmlfile. -
In the source editor, change the
oracle.adf.view.rich.pprNavigation.OPTIONSparameter to one of the following:-
on: Enables partial page navigation.Note:
If you set the parameter toon, then you need to set thepartialSubmitattribute totruefor any command components involved in navigation. -
onWithForcePPR: Enables partial page navigation and notifies the framework to use the PPR channel for all action events, even those that do not result in navigation. Since partial page navigation requires that the action event be sent over PPR channel, use this option to easily enable partial page navigation.When partial page navigation is used, normally only the visual contents of the page are rerendered (the header content remains constant for all pages). However, the entire document will be rerendered when an action on the page is defined to use full page submit and also when an action does not result in navigation.
-
8.5.2 What You May Need to Know About PPR Navigation
Before using PPR navigation, you should be aware of the following:
-
When using PPR navigation, all pages involved in this navigation must use the same CSS skin.
-
You must use the
resourcetag to include JavaScript and CSS content specific to the current page. -
Unlike regular page navigation, partial navigation will not result in JavaScript globals (variables and functions defined in global scope) being unloaded. This happens because the window object survives partial page transition. Applications wishing to use page-specific global variables and/or functions must use the
AdfPage.getPageProperty()andAdfPage.setPageProperty()methods to store these objects.