2 Installing and Configuring Eclipse and OEPE with Coherence
This chapter describes how to set up the Kepler release of the Eclipse IDE for Java EE Developers (Eclipse) and Oracle Enterprise Pack for Eclipse 12.1.3.0.0 (OEPE) to build and run Coherence-based Java applications.
This chapter contains the following sections:
2.1 Installing Eclipse and OEPE
You can download an "all-in-one" version of OEPE (12.1.3.0.0) that bundles a preconfigured version of Eclipse Kepler and the OEPE plugins. Oracle recommends installing the "all-in-one" version.
As an alternative, you can download the OEPE distribution by itself and install it into an existing Eclipse Kepler installation. The OEPE installer includes Oracle WebLogic Server, Oracle Coherence, and the Oracle ADF Runtime.
To download either version, select the Downloads tab on the Oracle Enterprise Pack for Eclipse page:
http://www.oracle.com/technetwork/developer-tools/eclipse/overview/index.html
Follow the instructions in the installer. You can also find installation instructions at this URL:
http://docs.oracle.com/cd/E27086_01/help/oracle.eclipse.tools.common.doc/html/install.html
This tutorial assumes that you will be installing Eclipse into an eclipse folder that you have created at the file system root, for example:
C:\eclipse\*
2.2 Configuring Eclipse and OEPE for Coherence
To start and configure Eclipse for use with Coherence:
-
Open a terminal window and verify that the
PATHenvironment variable is set to include the Java JDK or JRE, for example:C:\Oracle\Middleware\Oracle_Home\jdk1.7.0_25\bin. Note that you must have a working installation of Java JDK or JRE version 7 or higher.If the
PATHenvironment variable does not include the Java JDK or JRE\binfolder, then set the variable as follows:-
Set the
JAVA_HOMEenvironment variable to the base of the JDK or JRE installation, for example:set JAVA_HOME=\Oracle\Middleware\Oracle_Home\jdk1.7.0_25
-
Include
%JAVA_HOME%\binin thePATHenvironment variable, for example:set PATH=%JAVA_HOME%\bin;%PATH%
-
-
Start Eclipse.
The eclipse executable is
eclipse.exe. If you extracted Eclipse into a directory calledeclipse, you will findeclipse.exehere:C:\eclipse\eclipse.exe
-
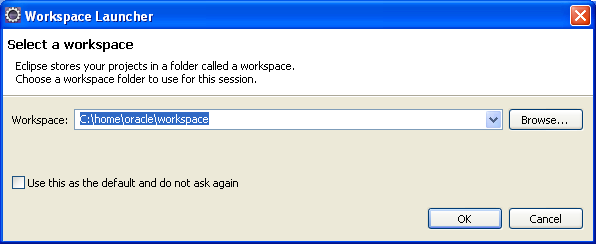
If Eclipse prompts you to set or select a workspace in the Workspace Launcher dialog box, enter
C:\home\oracle\workspace.Figure 2-1 illustrates the Workspace Launcher dialog box with the path
C:\home\oracle\workspaceselected. -
After Eclipse starts, select the Java EE perspective:
-
Select Window then Open Perspective, then Java EE, or
-
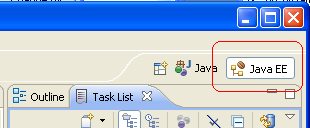
Select the Java EE perspective icon in the menu bar
Figure 2-2 illustrates the location of the Java EE perspective icon.
Figure 2-2 The Java EE Perspective in the Menu Bar
Description of "Figure 2-2 The Java EE Perspective in the Menu Bar"
-
2.3 Creating a New Project in the Eclipse IDE
To create a new project in the Eclipse IDE:
-
Select File then New then Application Client Project.
-
In the New Application Client Project dialog box, enter a value, Coherence for example, as the Project name.
Figure 2-3 New Application Client Project Dialog Box
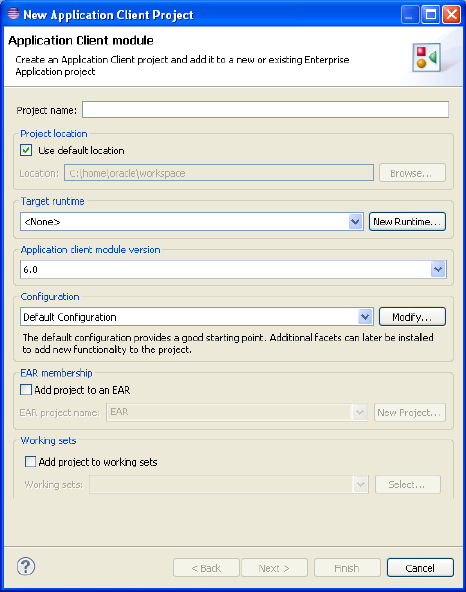
Description of "Figure 2-3 New Application Client Project Dialog Box"
-
In the Configuration section, click Modify. In the Project Facets dialog box, select the Oracle Coherence check box. Select version 12.1.3 from the drop-down list if it is not already displayed.
Adding the Oracle Coherence facet automatically adds the
coherence.jarto your project class path. It also makes these commonly used configuration files available in the Project Explorer:-
coherence-cache-config.xml, the default cache configuration file. -
pof-config.xml, the configuration file for Portable Object Format serialization. -
tangosol-coherence-override.xml, the override file for operational and runtime settings used by Coherence.
Figure 2-4 Selecting Oracle Coherence in the Project Facets Dialog Box
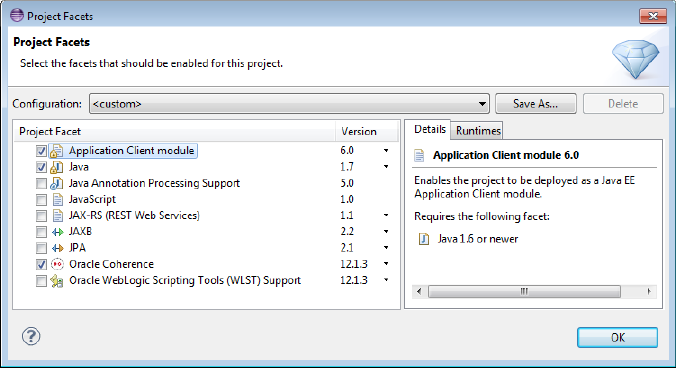
Description of "Figure 2-4 Selecting Oracle Coherence in the Project Facets Dialog Box"
-
-
Click Save As to enter a name for the configuration in the Save Preset dialog box. For example, enter
CoherenceConfigin the Name field andIncludesCoherenceFacetin the Description field.Figure 2-5 illustrates the Save Preset dialog box.
Figure 2-5 Specifying a Configuration Name in the Save Preset Dialog Box
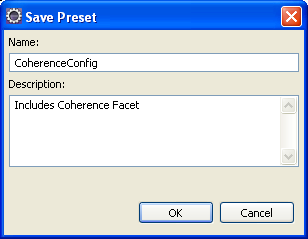
Description of "Figure 2-5 Specifying a Configuration Name in the Save Preset Dialog Box "
Click OK to close the Save Preset dialog box. Click OK to close the Project Facets dialog box.
-
Click Next in the Java page of the New Application Client Project dialog box to accept the defaults.
-
Deselect the Create a default Main class in the Application Client Module page. Click Next.
-
In the Coherence page, illustrated in Figure 2-6, add the Coherence 12.1.3 library as a User Library to the project.
Figure 2-6 Creating a Coherence User Library
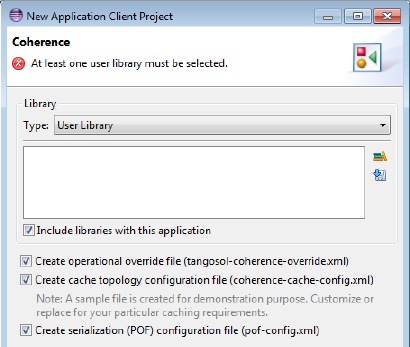
Description of "Figure 2-6 Creating a Coherence User Library"
-
Click the Manage Libraries... icon, then click New in the Preferences dialog box.
-
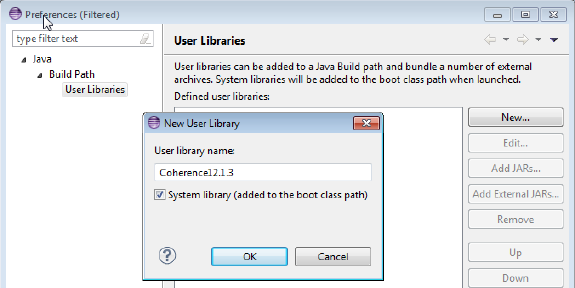
Enter Coherence12.1.3 in the New User Library dialog box, as illustrated in Figure 2-7. Select the System library (added to the boot class path) check box. Click OK to close the New User Library dialog box.
-
In the Preferences dialog box, click Add External JARs to add the
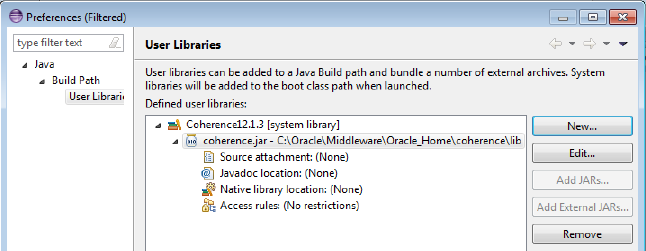
coherence.jarfile to the library. Navigate to the location of thecoherence.jarfile in the Coherence distribution that you downloaded to your file system in "Installing Coherence".The Preferences dialog box should look similar to Figure 2-8. Click OK to close the Preferences dialog box.
Figure 2-8 The coherence.jar File Defined in the Coherence User Library
Description of "Figure 2-8 The coherence.jar File Defined in the Coherence User Library"
-
-
Select the Coherence12.1.3 library in the Coherence page and click Finish.
The new project and its associated files appear in the Project Explorer window in the Eclipse IDE.
2.4 Launching a Cache Server in the Eclipse IDE
-
Right click the project in the Eclipse IDE. Select Run As then Run Configurations. In the Run Configurations dialog box, select Oracle Coherence then the New launch configuration icon. Enter
DefaultCacheServeras the name for the cache server configuration. -
Under Project, click Browse and select the name of the project from the Project Selection dialog box.
-
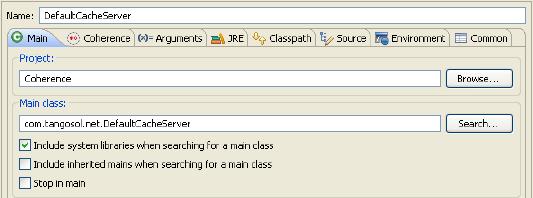
Under Main class, select the Include system libraries when searching for a main class checkbox. Click the Search button and enter
DefaultCacheServerin the Select Main Type dialog box. Select com.tangosol.net.DefaultCacheServer and click OK. Click Apply. The Main tab should look similar to Figure 2-9.Figure 2-9 Main Tab in the Run Configurations Dialog Box
Description of "Figure 2-9 Main Tab in the Run Configurations Dialog Box"
-
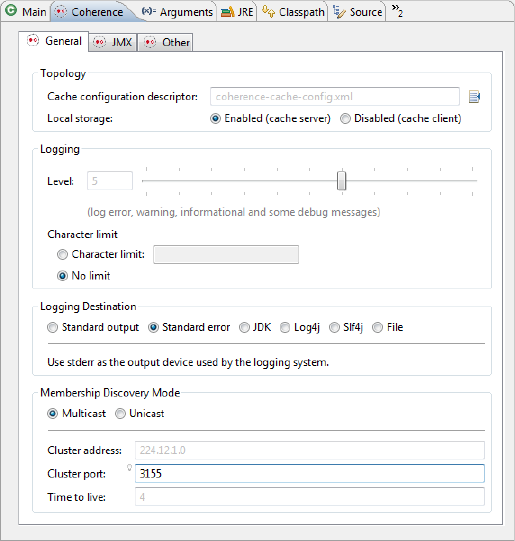
In the Coherence tab, select the General tab. Click the Browse icon to navigate to the cache configuration file if it is not already selected. Select local storage to be enabled (cache server). Enter a unique value, such as
3155for the Cluster port. Click Apply. The Coherence tab should look similar to Figure 2-10.Figure 2-10 Coherence Tab of the Run Configurations Dialog Box
Description of "Figure 2-10 Coherence Tab of the Run Configurations Dialog Box"
-
Open the Arguments tab. Enter
-showversionin the VM Arguments field. Click Apply. -
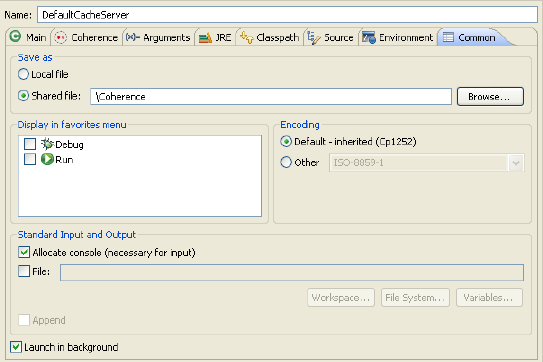
Open the Common tab of the dialog box. Click the Shared file radio button and click Browse to navigate to the project. Click Apply. The Common tab should look similar to Figure 2-11.
Figure 2-11 Common Tab of the Run Configurations Dialog Box
Description of "Figure 2-11 Common Tab of the Run Configurations Dialog Box"
-
Click Run to start the cache server. The cache server should start and display output similar to Example 2-1.
Example 2-1 Cache Server Output in the Eclipse Console Window
java version "1.7.0_25"
Java(TM) SE Runtime Environment (build 1.7.0_25-b17)
Java HotSpot(TM) 64-Bit Server VM (build 23.25-b01, mixed mode)

2013-11-14 11:47:51.241/0.562 Oracle Coherence 12.1.3.0.0 <Info> (thread=main, member=n/a): Loaded operational configuration from "jar:file:/C:/Oracle/Middleware/Oracle_Home/coherence/lib/coherence.jar!/tangosol-coherence.xml"
2013-11-14 11:47:51.366/0.687 Oracle Coherence 12.1.3.0.0 <Info> (thread=main, member=n/a): Loaded operational overrides from "jar:file:/C:/Oracle/Middleware/Oracle_Home/coherence/lib/coherence.jar!/tangosol-coherence-override-dev.xml"
2013-11-14 11:47:51.444/0.765 Oracle Coherence 12.1.3.0.0 <Info> (thread=main, member=n/a): Loaded operational overrides from "file:/C:/home/oracle/workspace/Coherence/build/classes/tangosol-coherence-override.xml"
2013-11-14 11:47:51.459/0.780 Oracle Coherence 12.1.3.0.0 <D5> (thread=main, member=n/a): Optional configuration override "cache-factory-config.xml" is not specified
2013-11-14 11:47:51.459/0.780 Oracle Coherence 12.1.3.0.0 <D5> (thread=main, member=n/a): Optional configuration override "cache-factory-builder-config.xml" is not specified
2013-11-14 11:47:51.459/0.780 Oracle Coherence 12.1.3.0.0 <D5> (thread=main, member=n/a): Optional configuration override "/custom-mbeans.xml" is not specified

Oracle Coherence Version 12.1.3.0.0 Build 48392
 Grid Edition: Development mode
Copyright (c) 2000, 2013, Oracle and/or its affiliates. All rights reserved.

2013-11-14 11:47:52.224/1.545 Oracle Coherence GE 12.1.3.0.0 <Info> (thread=main, member=n/a): Loaded cache configuration from "jar:file:/C:/Oracle/Middleware/Oracle_Home/coherence/lib/coherence.jar!/coherence-cache-config.xml"
2013-11-14 11:47:52.396/1.717 Oracle Coherence GE 12.1.3.0.0 <Info> (thread=main, member=n/a): Loaded cache configuration from "jar:file:/C:/Oracle/Middleware/Oracle_Home/coherence/lib/coherence.jar!/internal-txn-cache-config.xml"
2013-11-14 11:47:53.145/2.466 Oracle Coherence GE 12.1.3.0.0 <Info> (thread=main, member=n/a): Created cache factory com.tangosol.net.ExtensibleConfigurableCacheFactory
2013-11-14 11:47:54.128/3.449 Oracle Coherence GE 12.1.3.0.0 <D4> (thread=main, member=n/a): TCMP bound to /10.159.162.203:8088 using SystemDatagramSocketProvider
2013-11-14 11:47:58.107/7.428 Oracle Coherence GE 12.1.3.0.0 <Info> (thread=Cluster, member=n/a): Created a new cluster "cluster:0x47DB" with Member(Id=1, Timestamp=2013-11-14 11:47:54.535, Address=10.159.162.203:8088, MachineId=47251, Location=site:,machine:TPFAEFFL-LAP,process:7096, Role=CoherenceServer, Edition=Grid Edition, Mode=Development, CpuCount=4, SocketCount=4)
2013-11-14 11:47:58.107/7.428 Oracle Coherence GE 12.1.3.0.0 <Info> (thread=main, member=n/a): Started cluster Name=cluster:0x47DB

Group{Address=224.12.1.0, Port=3155, TTL=4}

MasterMemberSet(
  ThisMember=Member(Id=1, Timestamp=2013-11-14 11:47:54.535, Address=10.159.162.203:8088, MachineId=47251, Location=site:,machine:TPFAEFFL-LAP,process:7096, Role=CoherenceServer)
  OldestMember=Member(Id=1, Timestamp=2013-11-14 11:47:54.535, Address=10.159.162.203:8088, MachineId=47251, Location=site:,machine:TPFAEFFL-LAP,process:7096, Role=CoherenceServer)
  ActualMemberSet=MemberSet(Size=1
    Member(Id=1, Timestamp=2013-11-14 11:47:54.535, Address=10.159.162.203:8088, MachineId=47251, Location=site:,machine:TPFAEFFL-LAP,process:7096, Role=CoherenceServer)
    )
  MemberId|ServiceVersion|ServiceJoined|MemberState
    1|12.1.3|2013-11-14 11:47:54.535|JOINED
  RecycleMillis=1200000
  RecycleSet=MemberSet(Size=0
    )
  )

TcpRing{Connections=[]}
IpMonitor{Addresses=0}

2013-11-14 11:47:58.138/7.459 Oracle Coherence GE 12.1.3.0.0 <D5> (thread=Invocation:Management, member=1): Service Management joined the cluster with senior service member 1
2013-11-14 11:47:58.139/7.460 Oracle Coherence GE 12.1.3.0.0 <Info> (thread=main, member=1): Loaded Reporter configuration from "jar:file:/C:/Oracle/Middleware/Oracle_Home/coherence/lib/coherence.jar!/reports/report-group.xml"
2013-11-14 11:47:58.623/7.944 Oracle Coherence GE 12.1.3.0.0 <Info> (thread=NameService:TcpAcceptor, member=1): TcpAcceptor now listening for connections on 10.159.162.203:8088.3
2013-11-14 11:47:59.107/8.428 Oracle Coherence GE 12.1.3.0.0 <D5> (thread=DistributedCache, member=1): Service DistributedCache joined the cluster with senior service member 1
2013-11-14 11:47:59.153/8.474 Oracle Coherence GE 12.1.3.0.0 <D5> (thread=DistributedCache, member=1): This member has become the distribution coordinator for MemberSet(Size=1
  Member(Id=1, Timestamp=2013-11-14 11:47:54.535, Address=10.159.162.203:8088, MachineId=47251, Location=site:,machine:TPFAEFFL-LAP,process:7096, Role=CoherenceServer)
  )
2013-11-14 11:47:59.153/8.474 Oracle Coherence GE 12.1.3.0.0 <D5> (thread=ReplicatedCache, member=1): Service ReplicatedCache joined the cluster with senior service member 1
2013-11-14 11:47:59.154/8.475 Oracle Coherence GE 12.1.3.0.0 <D5> (thread=OptimisticCache, member=1): Service OptimisticCache joined the cluster with senior service member 1
2013-11-14 11:47:59.154/8.475 Oracle Coherence GE 12.1.3.0.0 <D5> (thread=Invocation:InvocationService, member=1): Service InvocationService joined the cluster with senior service member 1
2013-11-14 11:47:59.154/8.475 Oracle Coherence GE 12.1.3.0.0 <Info> (thread=main, member=1):
Services
  (
  ClusterService{Name=Cluster, State=(SERVICE_STARTED, STATE_JOINED), Id=0, Version=12.1.3, OldestMemberId=1}
  InvocationService{Name=Management, State=(SERVICE_STARTED), Id=2, Version=12.1.3, OldestMemberId=1}
  PartitionedCache{Name=DistributedCache, State=(SERVICE_STARTED), LocalStorage=enabled, PartitionCount=257, BackupCount=1, AssignedPartitions=220, BackupPartitions=0}
  ReplicatedCache{Name=ReplicatedCache, State=(SERVICE_STARTED), Id=4, Version=12.1.3, OldestMemberId=1}
  Optimistic{Name=OptimisticCache, State=(SERVICE_STARTED), Id=5, Version=12.1.3, OldestMemberId=1}
  InvocationService{Name=InvocationService, State=(SERVICE_STARTED), Id=6, Version=12.1.3, OldestMemberId=1}
  )

Started DefaultCacheServer...
2.5 Learning Eclipse IDE Basics
This section describes common tasks that are a part of building projects in the Eclipse IDE.
2.5.1 Creating a Java Class
To create a new Java class in the Eclipse IDE:
-
Right-click the project entry in the Project Explorer window. Select New then Class.
-
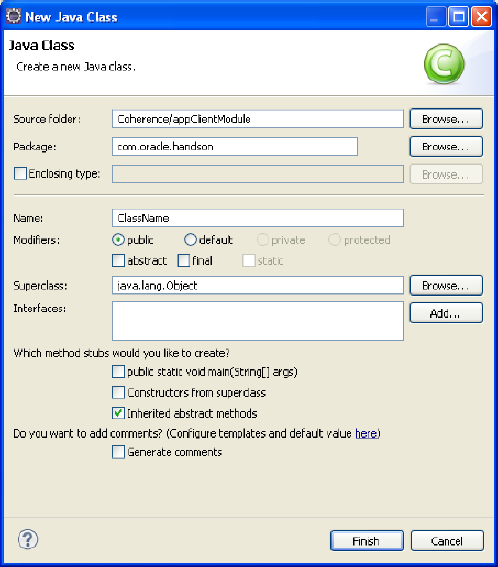
In the New Java Class dialog box, enter a package name. In this tutorial, the value will typically be
com.oracle.handson. -
Enter the name of the class in the Name field.
-
Under Which method stubs would you like to create?:
-
Select the public static void main(String[]args) if you want the file to be runnable.
-
Select Constructors from superclass check box if you want stubs of the constructors from the new class's superclass to be added.
-
Inherited abstract methods should be selected by default. This option adds stubs of any abstract methods from superclasses or methods of interfaces that need to be implemented.
-
-
Click OK to create the Java class.
Figure 2-12 illustrates the New Java Class dialog box.
2.5.2 Creating a Runtime Configuration
To create a runtime configuration for a runnable file:
-
Right click the name of the runnable file in the Project Explorer window. Select Run As then Run Configurations.
-
Click Oracle Coherence, then the New Launch Configuration icon. Select the Java Application node. Click the New Launch Configuration button.
-
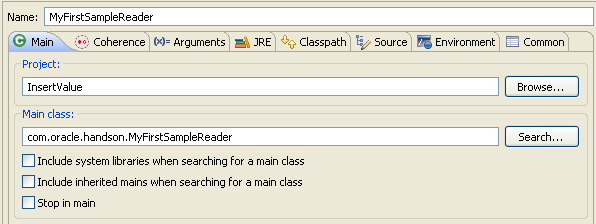
Enter a name for the new configuration. Under Project in the Main tab, click the Browse button to navigate to the name of the current project. Click the Search button to navigate to the name of the runnable file for which you are creating the runtime configuration. Click Apply.
This figure illustrates the Main tab of the Run Configurations dialog box.
Figure 2-13 Defining a Launch Configuration for a Runnable File
Description of "Figure 2-13 Defining a Launch Configuration for a Runnable File"
-
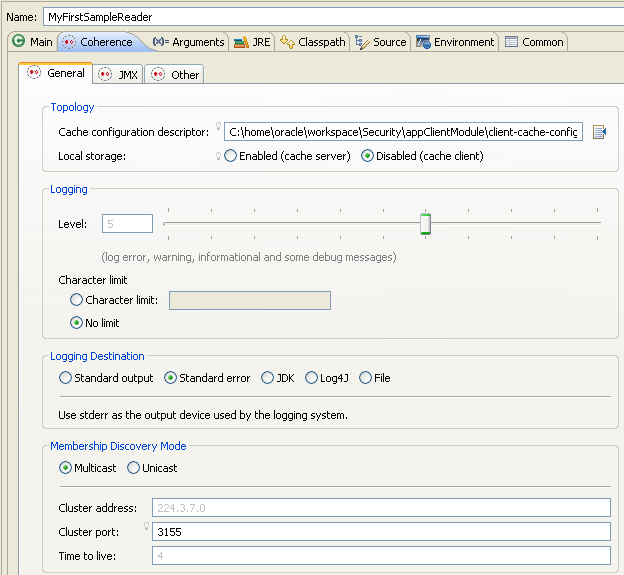
Click the Coherence tab. Under the General tab, you can set many of the more commonly used VM runtime arguments for the configuration. Examples of runtime arguments include the path to the cache configuration descriptor, and the local storage, log level, and cluster port values.
Figure 2-14 illustrates the General tab of the Coherence tab in the Run Configurations dialog box.
Figure 2-14 Setting Runtime Arguments for the Launch Configuration
Description of "Figure 2-14 Setting Runtime Arguments for the Launch Configuration"
2.5.3 Stopping Cache Servers
In the Eclipse IDE, you can stop any running cache server or client by clicking the Terminate and Remove all terminated launches icons in the Eclipse Console.
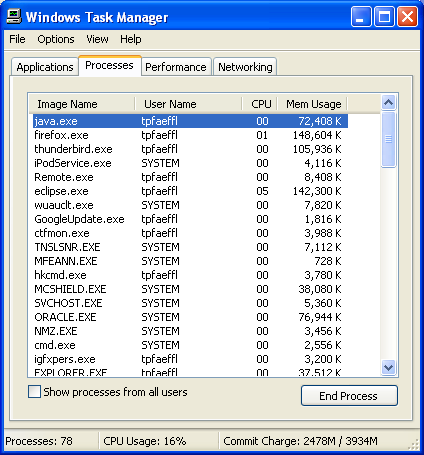
However, if you look in the Windows Task Manager window, you might notice that the Java process (java.exe) associated with the server or client is still running. To prevent any errors being thrown when the server or client is restarted, you must delete its associated Java process. Select the Java process in the Windows Task Manager window and click End Process.
Figure 2-15 illustrates the Windows Task Manager window with the Java process selected.
Figure 2-15 Java Process in the Windows Task Manager
Description of "Figure 2-15 Java Process in the Windows Task Manager"
