10 Configuring High Availability for Oracle SOA Suite
This chapter describes how to configure high availability for Oracle SOA Suite products.
This chapter includes the following topic:
Note:
For more information on SOA, see the following documents:
-
Oracle Fusion Middleware Installing and Configuring Oracle SOA Suite and Business Process Management
-
Oracle Fusion Middleware Upgrading Oracle SOA Suite and Business Process Management
-
Oracle Fusion Middleware Enterprise Deployment Guide for Oracle SOA Suite
10.1 Configuring Oracle BAM for High Availability
This section describes how to complete high availability configuration for Oracle Business Activity Monitoring (Oracle BAM). There are additional steps you must take for Oracle BAM high availability because the product uses local queues to configure JMS system resources.
Note:
You must complete all steps in Section 7.7, "Configuring WLS JMS After Machine Scale Up or Scale Out" before you start the Oracle BAM procedures in this topic.
This section includes the following topics:
-
Section 10.1.1, "Configuring Oracle BAM Managed Server JMS System Resources After Scale Up."
-
Section 10.1.2, "Configuring Automatic Service Migration for Oracle BAM."
10.1.1 Configuring Oracle BAM Managed Server JMS System Resources After Scale Up
Oracle BAM requires manual JMS configuration steps in addition to the typical configuration steps described in Section 7.7, "Configuring WLS JMS After Machine Scale Up or Scale Out."
Note the following when configuring JMS system resources for Oracle BAM:
-
Procedures in this topic use the name bam_server2 to represent the new Managed Server that you are adding. Replace bam_server2 with the name of the Managed Server that your configuration uses.
-
Pay close attention to the targeting of the BAM JMS system resources, particularly whether the resources are targeted to the Managed Server bam_server2 or to the migratable target bam_server2 (migratable).
-
If the procedures in this topic do not specify a JMS system resource property, accept the default value.
This topic includes the following sections:
-
Section 10.1.1.1, "Configuring Oracle BAM Server JMS Server."
-
Section 10.1.1.2, "Configuring Oracle BAM CQService JMS Server"
10.1.1.1 Configuring Oracle BAM Server JMS Server
This section describes the steps to manually configure JMS system resources for Oracle BAM Server JMS Server for a new Managed Server.
To configure Oracle BAM Server JMS Server resources for a new Managed Server:
-
Create the JMS persistent store
BamServerJmsFileStore_bam_server2 with the directoryBamServerJmsFileStore_bam_server2 targeting to Managed Server bam_server2. -
Create the JMS Server
BamServerJmsServer_bam_server2with the persistent storeBamServerJmsFileStore_bam_server2targetingbam_server2. -
Select JMS Modules then select BamServerJmsSystemResource in the table.
-
Select the Subdeployments tab. Click the Subdeployment BamServerSubdeployment then select BamServerJmsServer_bam_server2 in the JMS Servers section.
-
Click Save.
10.1.1.2 Configuring Oracle BAM CQService JMS Server
To manually configure the Oracle BAM CQService JMS Server for the new Managed Server:
-
Create a JMS Persistent Store
BamCQServiceJmsFileStore_bam_server2 with directoryBamCQServiceJmsFileStore_bam_server2 targeting bam_server2. -
Create JMS Server
BamCQServiceJmsServer_bam_server2 with the persistent storeBamCQServiceJmsFileStore_bam_server2 targeting bam_server2. -
Create the JMS System Module
BamCQServiceJmsSystemResource_bam_server2 targeting it to All servers in the cluster. Select Would you like to add resources to this JMS system module to add resources to the JMS System Module.Note:
In the following steps:
-
The JMS Connection Factories and Queues that you create for this JMS System Module specify the Local JNDI Name (local name) only; leave the JNDI Name (global name) field blank.
-
All references to "Queues" are for "Queues" only, not "Distributed Queues."
In the following steps you add resources for this JMS System Module:
-
-
Create Subdeployment
BamCQServiceReportCacheSubdeployment_bam_server2 targeting BAM JMS ServerBamCQServiceJmsServer_bam_server2. -
Create Subdeployment
BamCQServiceAlertEngineSubdeployment_bam_server2 targeting the BAM JMS ServerBamCQServiceJmsServer_bam_server2. -
Create JMS Connection Factory
BamCQServiceReportCacheConnectionFactory. Leave the field JNDI Name blank.-
Set Subscription Sharing Policy to Exclusive.
-
Set Client ID Policy to Unrestricted.
-
Select XA Connection Factory Enabled.
-
Target the Connection Factory to the SubDeployment
BamCQServiceReportCacheSubdeployment_bam_server2. To do this, select Advanced Targeting in the Create a New JMS System Module Resource screen. Select the SubDeployment from the pull down list. -
After the Connection Factory is created, click on it. In the General tab, expand the Advanced section. Enter
queue/oracle.beam.cqservice.mdbs.reportcachein the Local JNDI Name field.
-
-
Create the JMS Queue
BamCQServiceReportCacheQueue. Leave the JNDI Name field blank.-
Set the SubDeployment to
BamCQServiceReportCacheSubdeployment_bam_server2. -
After the Queue is created, click on it. In the General tab, expand the Advanced section. Enter
queue/oracle.beam.cqservice.mdbs.reportcachein the Local JNDI Name field
-
-
Create the JMS Connection Factory
BamCQServiceAlertEngineConnectionFactory. Leave the JNDI Name field blank.-
Set Subscription Sharing Policy to Exclusive.
-
Set Client ID Policy to Unrestricted.
-
Select XA Connection Factory Enabled.
-
Target the Connection Factory to the SubDeployment
BamCQService AlertEngineSubdeployment_bam_server2. To do this, select Advanced Targeting in the Create a New JMS System Module Resource screen and then select the SubDeployment from the pull down menu. -
After the Connection Factory is created, click on it. In the General tab, expand the Advanced section. Enter
queuecf/oracle.beam.cqservice.mdbs.alertenginein the Local JNDI Name field
-
-
Create JMS Queue
BamCQServiceAlertEngineQueue. Leave the JNDI Name field blank and SubDeployment set to BamCQServiceAlertEngineSubdeployment_bam_server2.-
After the Queue is created, click on it and go to General tab.
-
Expand the Advanced section and enter
queue/oracle.beam.cqservice.mdbs.alertenginein the JNDI Local Name field.
-
-
Click Save and then click Activate All Changes.
10.1.2 Configuring Automatic Service Migration for Oracle BAM
Oracle BAM Managed Servers use per-server JMS services. These per-server queues are also referred to as "pinned" services, because they are pinned to a specific Managed Server, rather than to the cluster. To ensure that these server-specific queues are highly available and can fail over to another Managed Server, you must configure the servers for automatic service migration.
For more information about Automatic Server Migration, see "Service Migration" in Administering Clusters for Oracle WebLogic Server.
A data source and a leasing configuration is created during the configuration of the Oracle BAM servers, but you must manually enable automated migration for the specific Oracle BAM services, as follows:
- Task 1 Log in to the Oracle WebLogic Server Administration Console
-
For example:
ADMVHN:7001/console - Task 2 Select the Managed Servers to configure for service migration
-
-
In the Domain Structure pane, expand the Environment node and then click the Servers node.
The Summary of Servers page appears.
-
Click the name of the server WLS_BAM1 (represented as a hyperlink) in Name column of the table.
The settings page for the selected server appears and defaults to the Configuration tab.
-
Click Lock and Edit to start making modifications.
-
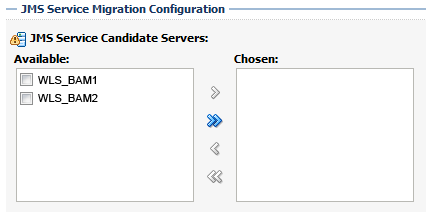
In the JMS Service Migration Configuration section of the page, select the WLS_BAM1 and WLS_BAM2 Managed Servers in the Available list box, and then click the move button
 to move them into the Chosen list box.
Description of the illustration wls_console_migrat_srvcs.gif
-
Click Save.
-
- Task 3 Set the service migration policy for each Managed Servers
-
-
In the Domain Structure pane, select Environment, then Clusters, then Migratable Targets.
-
Click WLS_BAM1 (Migratable).
-
Click the Migration tab.
-
In the Service Migration Policy drop-down list, select Auto-Migrate Exactly-Once Services.
-
- Task 4 Manually Target the UMS JMS Server and Persistent Stores to non-migratable targets
-
Oracle User Messaging Service (UMS) 12c (12.1.3.0.0) does not support service migration. As a result, you must manually retarget the UMS JMS server and persistent stores to a non-migratable target; otherwise, service migration for Oracle BAM will fail.
To target the UMS services to non-migratable targets:
-
In the Domain Structure window, expand Environment, expand Services, and click Persistent Stores.
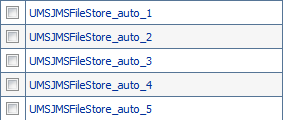
The console displays a list of persistent stores. In the list you will see a set of UMS persistent stores names called
UMSJMSFileStore_auto_, followed by a number, one for each Managed Server.
Description of the illustration ums_persistent_stores.gif
-
Click the first UMS file store that is targeted to WLS_BAM1 (migratable).
-
On the settings page for the selected persistent store, change the value selected in the Target drop-down menu from WLS_BAM1 (migratable) to WLS_BAM1.
-
If an error occurs, explaining that the JMS server is not targeted to the same target as its persistent store, then you can ignore the error.
-
Repeat steps 2 through 4 for the remaining UMS file store entries that are targeted to WLS_BAM1 (migratable).
-
In the Domain Structure window, expand Environment, expand Services, expand Messaging, and then click JMS Servers.
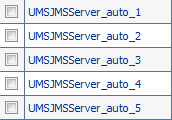
The console displays a list of JMS Servers. In the list you will see a set of UMS persistent stores names called
UMSJMSServer_auto_, followed by a number, one for each Managed Server.
Description of the illustration ums_jms_servers.gif
-
Click on the first JMS store that is currently targeted to WLS_BAM1 (migratable).
-
On the settings page for the selected JMS server, click the Targets tab.
-
Change value in the Target drop-down menu from to WLS_BAM1 (migratable) to WLS_BAM1.
-
Repeat steps 7 through 10 for the remaining UMS JMS Servers that are targeted to WLS_BAM1 (migratable).
-
Click Activate Changes.
-
Note:
If automatic service migration occurs, and the required Oracle BAM services are automatically migrated to another Managed Server, note that those services will remain targeted to the failover server, even after the original Managed Server is back online and has rejoined the cluster.
Oracle recommends that you manually fail the services back to the original server. For more information, see the topic Failing Back Oracle BAM Services After Automatic Service Migration in Enterprise Deployment Guide for Oracle SOA Suite.