5 Upgrading SOA with Oracle Business Activity Monitoring (Oracle BAM)
This chapter describes the process of upgrading from a supported Oracle SOA Suite 11g environment that includes Business Activity Monitoring (Oracle BAM) to a SOA 12c (12.1.3) environment with the newly redesigned Oracle BAM 12c.
The following procedures are described in this chapter:
-
Section 5.1, "Understanding an Upgrade to Business Activity Monitoring in 12c"
-
Section 5.2, "Performing the Pre-Upgrade Tasks for Oracle BAM"
-
Section 5.3, "Upgrading a SOA with Oracle BAM Domain to 12c"
5.1 Understanding an Upgrade to Business Activity Monitoring in 12c
Oracle Business Activity Monitoring (BAM) 12c has been completely redesigned for use with Oracle SOA Suite 12c, so there is no direct upgrade path. The schemas, binaries, and directory structure used in Oracle BAM 12c are different than those used with Oracle BAM 11g. Therefore, upgrading from Oracle BAM 11g to BAM 12c cannot be handled with the standard upgrade procedures. You will need to perform several manual configuration tasks to complete the upgrade.
It is also important to understand that the only Oracle BAM 11g objects that can be used in your BAM 12c domain are data objects (DOs) and enterprise message sources (EMS). You will need to manually export these objects to an XML file and then import them into the BAM 12c domain. The other Oracle BAM 11g artifacts, such as dashboards for example, will have to be manually recreated in Oracle BAM 12c domain.
Oracle recommends that you continue to use your Oracle BAM 11g domain after the upgrade to allow time to create and test all of the necessary artifacts. Therefore, before you begin the SOA with Oracle BAM upgrade process, it is strongly recommended that you reinstall the Oracle BAM 11g domain in a separate location so that the source files remain untouched during the domain reconfiguration. You will configure SOA 12c to point to this new 11g domain after the upgrade as your existing 11g Oracle BAM domain will be altered and will not function with SOA 12c.
Note:
There is no upgrade support for an Oracle BAM-only domain (a domain without SOA). If you have a BAM-only domain, and want to upgrade to Oracle BAM 12c, then you must create a new Oracle BAM 12c domain and import data objects and recreate all the dashboards and alerts.The following flowchart shows a process overview of upgrading a SOA 11g domain with Oracle BAM to a SOA 12c domain with Oracle BAM 12c.
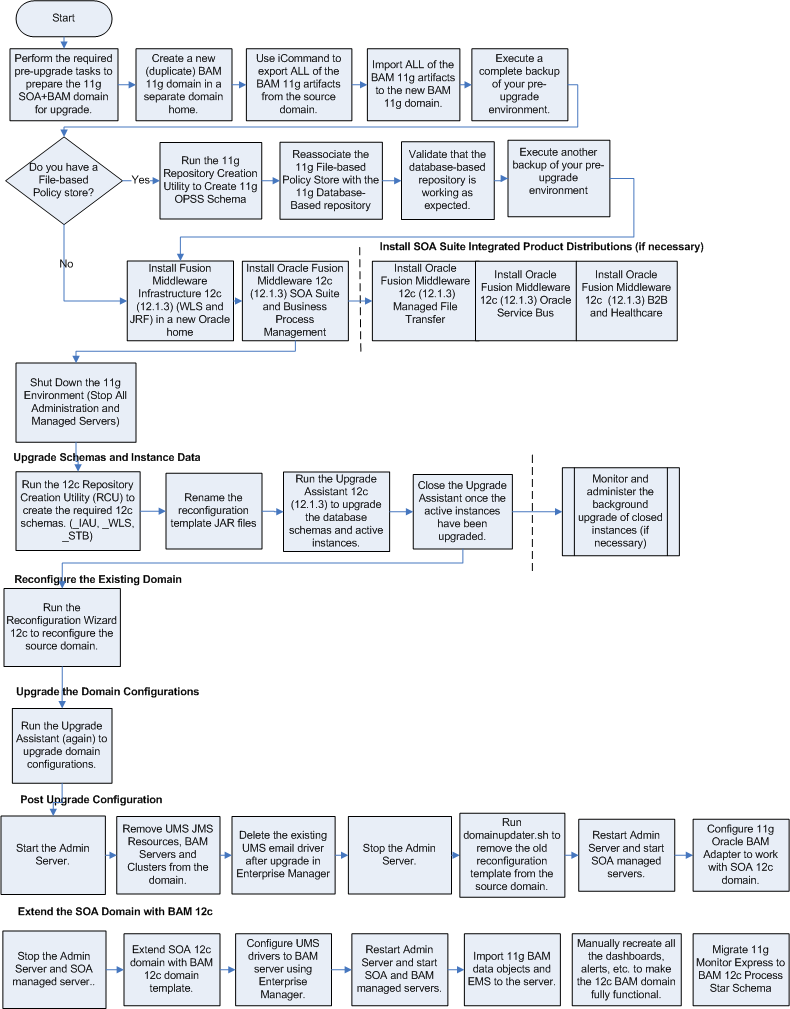
Description of the illustration fupss_upgrade_flowchart_bam.png
5.2 Performing the Pre-Upgrade Tasks for Oracle BAM
The tasks in this section should be performed when upgrading a SOA domain with Oracle BAM 11g to 12c (12.1.3).
Note:
If you are using a file-based policy store in your existing 11g environment, you must reassociate to database-based policy store before you begin the upgrade process. This is a standard pre-upgrade requirement and must be performed before you can upgrade BAM. See Reassociating a File-Based Policy Store Before Upgrade.-
Section 5.2.1, "Creating a New Oracle BAM 11g Domain Before You Upgrade"
-
Section 5.2.2, "Exporting All Oracle BAM 11g Artifacts from the Existing Domain"
-
Section 5.2.3, "Importing Oracle BAM 11g Artifacts into the New Oracle BAM 11g Domain"
-
Section 5.2.4, "Creating a Complete Backup of the Oracle BAM 11g Domain"
Make sure that you have already completed all of the applicable pre-upgrade tasks described in Performing the Required Pre-Upgrade Tasks for SOA Suite and BPM.
5.2.1 Creating a New Oracle BAM 11g Domain Before You Upgrade
You will continue to use your existing Oracle BAM 11g domain after the upgrade, so you must install BAM 11g in a new domain home before you upgrade. If you do not create a new (separate) BAM 11g domain, you will not have a functioning BAM domain after the upgrade and you will lose many of your artifacts and configurations.
Note:
f you do not create separate domain for Oracle BAM 11g, then you will lose BAM artifacts and BAM-related configurations only (SOA artifacts will not be impacted).In addition, any composites referring to BAM artifacts (such as adapters) or new instances will be faulted during runtime.
Use the installation instructions in the 11.1.1.7.0 version of the Oracle Fusion Middleware Installation Guide for Oracle SOA Suite and Oracle Business Process Management Suite.
To preserve your existing 11g BAM environment, use the 11g ICommand to export ALL of your Oracle BAM 11g artifacts (not just DOs and EMS), and then import them into your new Oracle BAM 11g domain so you have a fully functional Oracle BAM 11g domain after the upgrade.
-
Exporting All Oracle BAM 11g Artifacts from the Existing Domain
-
Importing Oracle BAM 11g Artifacts into the New Oracle BAM 11g Domain
After the upgrade, you can continue using the Oracle BAM 11g domain. Alternatively, you can extend the 12c SOA domain with Oracle BAM 12c and export the DOs and EMS artifacts from 11g domain and import them into extended Oracle BAM 12c domain. For more information, see Extending the SOA Domain with Oracle BAM 12c.
5.2.2 Exporting All Oracle BAM 11g Artifacts from the Existing Domain
After you install and configure your new Oracle BAM 11g domain in its new location, you will have to use 11g Oracle BAM ICommand utility to export the data from the existing (old) Oracle BAM 11g domain and then import it into the new Oracle BAM 11g domain before you upgrade.
For more information on using the 11g Oracle BAM ICommand command-line utility to export data files, see the "Export" section of Monitoring Business Activity with Oracle BAM.
5.2.3 Importing Oracle BAM 11g Artifacts into the New Oracle BAM 11g Domain
After you have created a complete export XML of your Oracle BAM 11g artifacts (not just the DOs and EMS), you must import the XML file into the newly created Oracle BAM 11g domain. This will ensure that you continue to have a fully functioning Oracle BAM domain after the upgrade and domain reconfiguration.
For more information on using the 11g Oracle BAM ICommand command-line utility to export data files, see the "Import" section of Monitoring Business Activity with Oracle BAM.
5.2.4 Creating a Complete Backup of the Oracle BAM 11g Domain
In the event that the upgrade fails, you will need to restore the entire pre-upgrade environment using a backup version. Make sure that you have created a backup version of the entire Oracle BAM 11g environment before you continue with the upgrade process. Note that the backup domain is separate from the new Oracle BAM11g domain you created in Section 5.2.1.
For more information, see "Backup and Recovery Strategies for Upgrade" in the Oracle Fusion Middleware Planning an Upgrade of Oracle Fusion Middleware.
5.3 Upgrading a SOA with Oracle BAM Domain to 12c
This section describes the process of upgrading a SOA 11g domain that includes Oracle BAM to a SOA 12c (12.1.3) domain that will also include Oracle BAM. Do not perform these tasks until you have created a complete backup of the Oracle BAM 11g domain.
-
Task 1, "Install the Fusion Middleware Infrastructure 12c (12.1.3) in a new Oracle home directory."
-
Task 4, "Create new schemas using the 12c (12.1.3) Repository Creation Utility (RCU)."
-
Task 5, "Rename the Oracle BAM templates before upgrading the 11g schemas."
-
Task 6, "Run the Upgrade Assistant to upgrade the 11g schemas."
-
Task 7, "Reconfigure the existing 11g domain using the Reconfiguration Wizard."
-
Task 8, "Run the Upgrade Assistant to upgrade component configurations."
- Task 1 Install the Fusion Middleware Infrastructure 12c (12.1.3) in a new Oracle home directory.
-
Create a new Oracle home for Infrastructure 12c (12.1.3) as described in Installing WebLogic Server and JRF Infrastructure.
- Task 2 Install Oracle SOA Suite and Business Process Management 12c (12.1.3) in the 12.1.3 Oracle home.
-
Add the latest SOA component binaries to the 12c (12.1.3) Oracle home as described in Installing Oracle SOA Suite and Business Process Management.
- Task 3 Stop Servers and Processes.
-
Stop all of the 11g servers and processes that are currently running before you begin the upgrade. See Stopping Servers and Processes for information on stopping servers.
- Task 4 Create new schemas using the 12c (12.1.3) Repository Creation Utility (RCU).
-
You may need to create new schemas for SOA and Oracle BAM 12c (12.1.3). For the SOA with Oracle BAM upgrade you will need to create the following schemas (if you have not done so already):
-
Service Table (
_STB) -
Audit Services (
_IAU) -
WebLogic Services (
_WLS) - The Oracle WebLogic Services schema is required for Oracle BAM - though Oracle BAM does not have its own separate schema in 11g.
See Creating the Required Schemas Before You Upgrade for more information on creating and preparing schemas for upgrade.
-
- Task 5 Rename the Oracle BAM templates before upgrading the 11g schemas.
-
Before upgrading the 11g schemas with the Upgrade Assistant, you must change the names of the following Oracle BAM reconfiguration templates upgrade will fail.
Make sure that you have exported your 11g Oracle BAM data before completing this step. If you are unsure, read Section 5.2.2.
The templates can be found in the following 12c directory:
$ORACLE_HOME/soa/common/templates/wlsTemplate Name Rename To: oracle.bam.reconfig_template_12.1.3.jar oracle.bam.reconfig_template_12.1.3.jar.old oracle.bam.reconfig.template_12.1.3.jar.rename oracle.bam.reconfig_template_12.1.3.jar - Task 6 Run the Upgrade Assistant to upgrade the 11g schemas.
-
Follow the standard procedure for upgrading schemas using the Upgrade Assistant. For more information, see Section 3.4, "Upgrading SOA Schemas Using the Upgrade Assistant".
When upgrading SOA Suite and BPM with Oracle BAM 11g schemas, select the following options on the Available Components screen (the schema names are listed for each):
-
Oracle Platform Security Services (
_OPSS) -
Oracle SOA (
_SOAINFRA)
When Oracle Platform Security Services and Oracle SOA are selected, the following dependencies are also selected:
-
Oracle Audit Services (
_IAU) -
Oracle Metadata Services (
_MDS) -
User Messaging Service (
_ORASDPM)NOTE: The 11g
_ORASDPMschema has been renamed to_UMSin 12c. However, you must provide the 11g schema name prefix_ORASDPMwhen prompted in the Upgrade Assistant. The schema will continue to be <prefix>_ORASDPMfor upgraded domains since schema names cannot be changed by Upgrade Assistant.
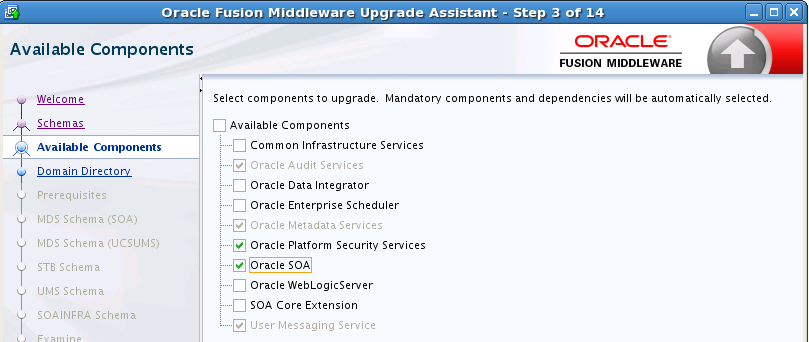
Description of the illustration 1213_ua_avail_comp_soa.png
-
- Task 7 Reconfigure the existing 11g domain using the Reconfiguration Wizard.
-
After you have renamed the Oracle BAM reconfiguration templates, start the Reconfiguration Wizard and follow the steps as described Section 3.5, "Reconfiguring the Domain Using the Reconfiguration Wizard".
The Reconfiguration Wizard will remove the Oracle BAM 11g application, library, BAMDataSource, BAMJMSSserver and BAMJmsSystemResource from the domain.
NOTE: You must manually remove the Oracle BAM server and cluster after the upgrade as described in Remove the Oracle BAM Servers and Clusters from the domain..
- Task 8 Run the Upgrade Assistant to upgrade component configurations.
-
After the domain reconfiguration, run the Upgrade Assistant (again) to upgrade any remaining component configurations.
For more information, see Section 3.6, "Upgrading the Domain Component Configurations Using the Upgrade Assistant".
5.4 Post-Upgrade Configuration Tasks
After a successful upgrade, you must perform the following tasks to run the SOA 12c domain that will eventually include Oracle BAM 12c.
-
Task 2, "Log in to the WebLogic Server Administration Console 12c."
-
Task 3, "Delete the UMS JMS resources running on the Oracle BAM server or Oracle BAM cluster."
-
Task 4, "Delete Subdeployment resources targeted to UMS JMS Server targeted to Oracle BAM."
-
Task 5, "Remove the Oracle BAM Servers and Clusters from the domain."
-
Task 6, "Remove unnecessary Oracle BAM 11g files from the upgraded domain."
-
Task 7, "For Cluster Upgrades Only: Stop the Admin and Managed Servers."
-
Task 10, "Configure 11g Oracle BAM Adapter to work with SOA 12c domain."
-
Task 12, "Delete the existing UMS Email driver from the SOA domain."
Note:
Oracle recommends that you first run the 12c SOA environment with Oracle BAM 11g. Once you have verified that the environment is functioning as expected, you can extend the domain with Oracle BAM 12c as described in Section 5.5, "Extending the SOA Domain with Oracle BAM 12c".- Task 1 Start the Admin Server.
-
To start the Oracle WebLogic Administration Server, use the following script:
(UNIX) DOMAIN_HOME/bin/startWebLogic.sh

(Windows) DOMAIN_HOME\bin\startWebLogic.cmd
- Task 2 Log in to the WebLogic Server Administration Console 12c.
-
To display the Administration Console:
-
Enter the following URL in a browser:
http://host name:port_number/console
The port number is the port number of the Administration Server. By default, the port number is 7001.
The login page is displayed.
-
Log in using the user name and password supplied during installation or another administrative user that you created.
Oracle WebLogic Server Administration Console is displayed as shown in the following figure:
Description of the illustration jms_services_menu.png
Alternatively, you can access the Administration Console from Fusion Middleware Control, from the home pages of targets such as the Administration Server or Managed Servers.
-
- Task 3 Delete the UMS JMS resources running on the Oracle BAM server or Oracle BAM cluster.
-
These steps can be used to remove the UMS JMS resources for standalone or clustered environments. Note the additional steps needed for Oracle BAM cluster.
-
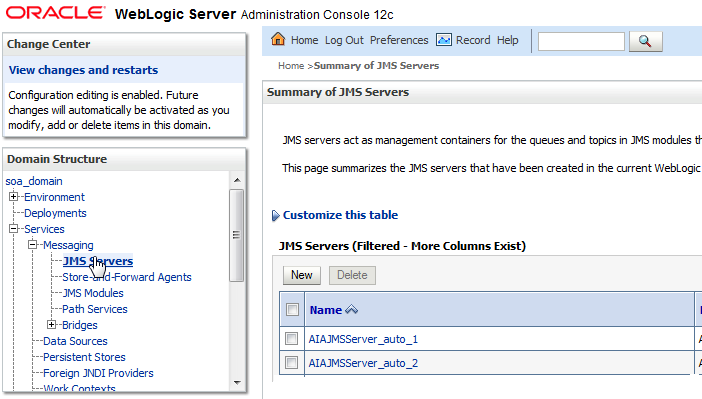
Determine which JMS Server name is targeted to the Oracle BAM server or Oracle BAM cluster. You may have multiple JMS servers, and it is important to note which server is targeted to the Oracle BAM server or cluster before you continue. If you have only one UMS JMS Server, the default name is
UMSJMSServer_auto_1. Always validate that the target of the selected UMS JMS Server is the Oracle BAM server or Oracle BAM cluster.Navigate to the Summary of JMS Servers screen (shown below). From the Domain Structure menu, expand Services, select Messaging and then select JMS Servers. Locate the UMSJMSServer that is targeted to the Oracle BAM server.
In the example below,
UMSJMSServer_auto_3is the server targeted to the Oracle BAM server.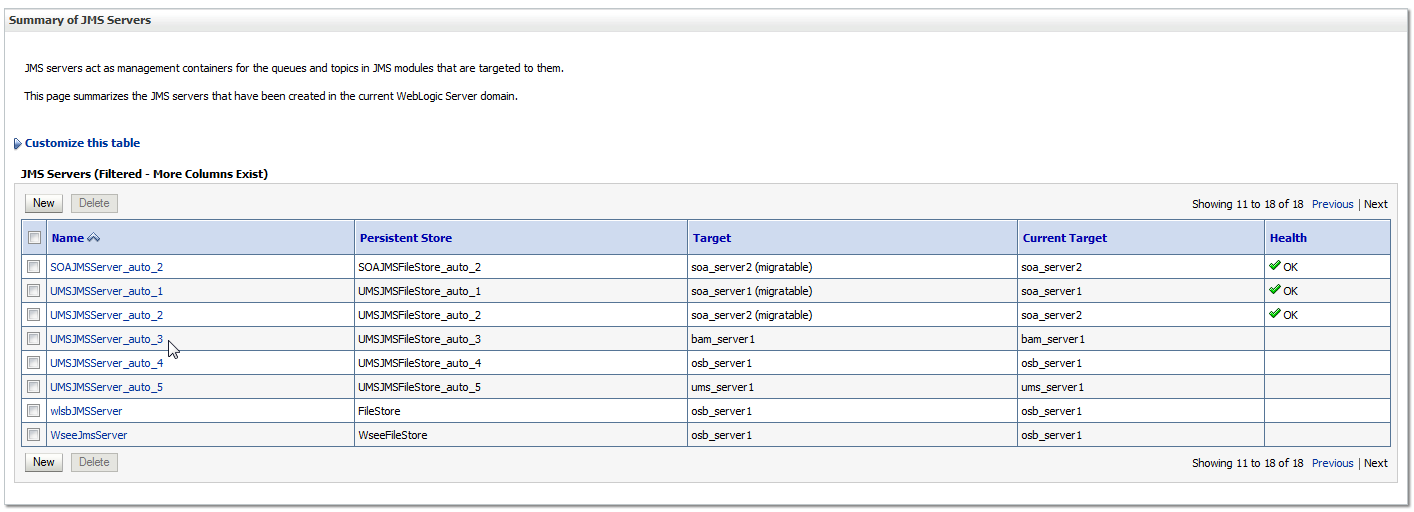
Description of the illustration umsjms_servers_list.png
-
Delete the local queues for the UMS JMS Server targeted to Oracle BAM (
UMSJMSServer_auto_3in this example).Navigate to the Summary of JMS Modules screen (shown below). From the Domain Structure menu, expand Services, select JMS Modules. Locate
UMSJMSSystemResourceand click to display the local (and distributed) queues in the Settings for UMSJMSSystemResource screen. You can filter the results to show only those queues targeted to your UMS JMS Server.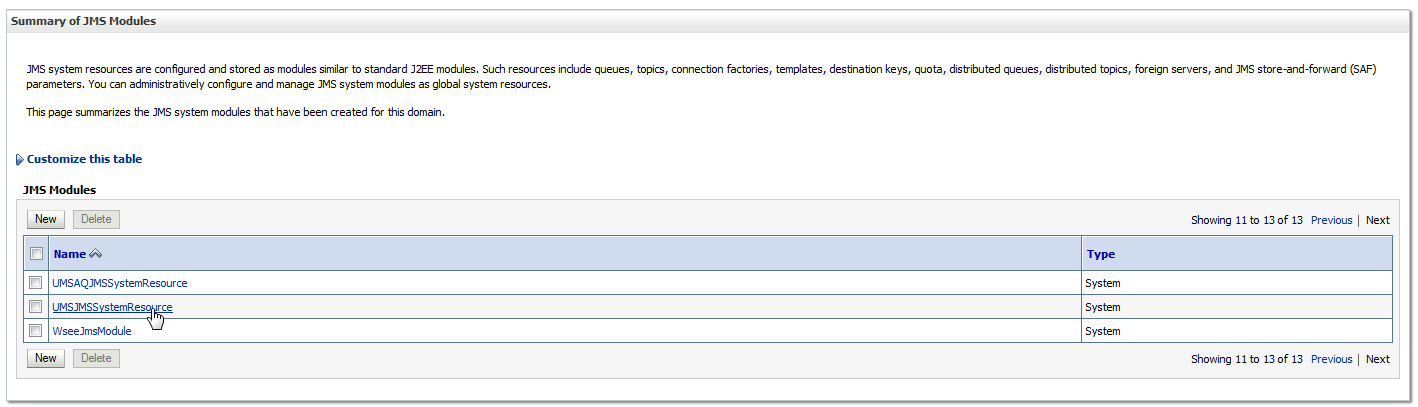
Description of the illustration jms_modules.png
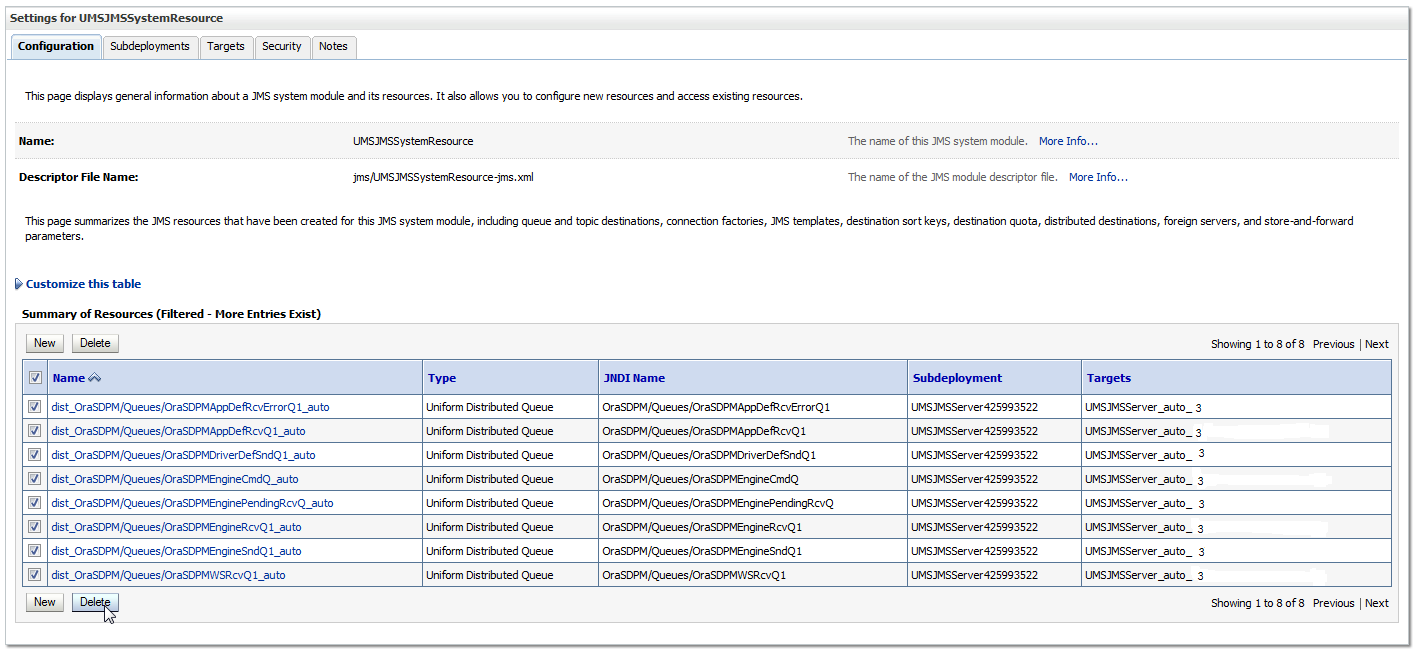
-
Oracle BAM Cluster Only: Select all Uniform Distributed Queues targeted only to the Oracle BAM server or cluster (
UMSJMSServer_auto_3in this example). (You can filter by type Uniform Distributed Queues). Click Delete.CAUTION: Do not delete distributed queues that include server targets other than Oracle BAM. If there are other targeted servers, you must first remove (untarget) the Oracle BAM server from the distributed queue as shown in Step 4.
Description of the illustration dist_queue.png
-
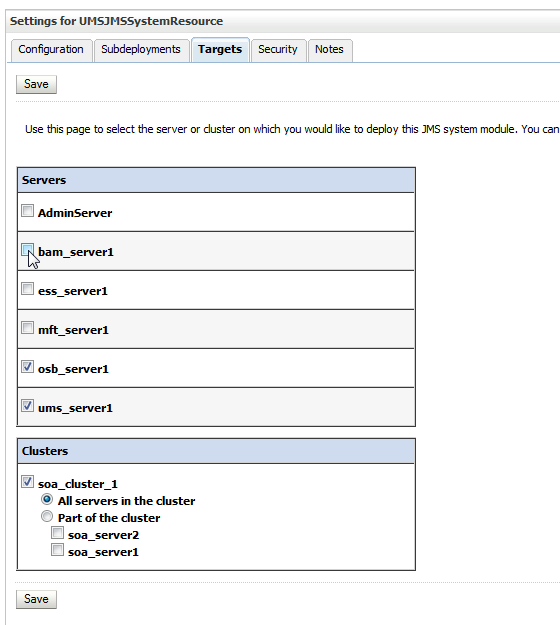
Untarget the Oracle BAM server from the distributed queue (if necessary).
To untarget the Oracle BAM server from the distributed queue, click the Targets tab from the Settings for UMSJMSSystemResource screen. Remove the checkmark next to the Oracle BAM server and click Save. Now you can safely delete the distributed queues as described in Step 3.
Description of the illustration untarget_queue.png
-
Delete the local queues that are targeted to the UMS JMS Server.
Select all local queues that are targeted to the UMS JMS Server targeted to Oracle BAM (
UMSJMSServer_auto_3) from the Settings for UMSJMSSystemResource screen (as shown below):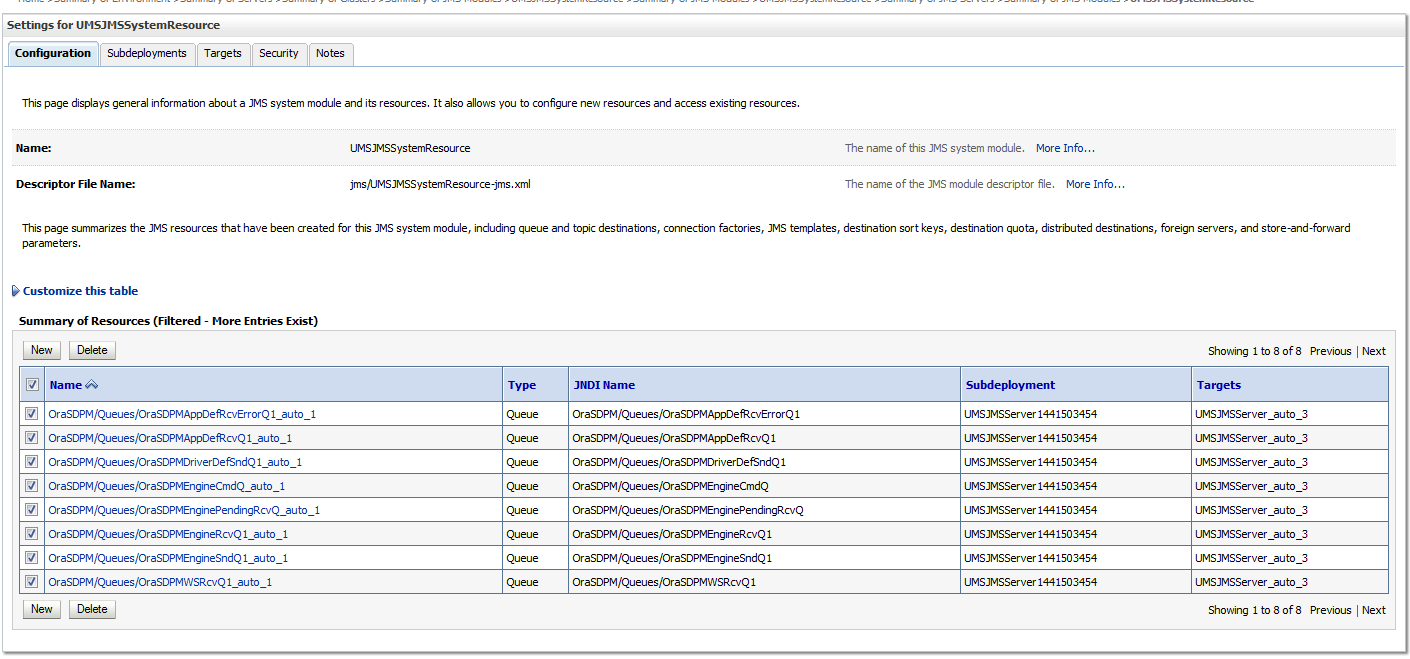
Description of the illustration jms_queues.png
-
Click Delete.
-
- Task 4 Delete Subdeployment resources targeted to UMS JMS Server targeted to Oracle BAM.
-
-
Delete the subdeployment resources from the UMS JMS Server.
From the Settings for UMSJMSSystemResource screen (shown above), click the Subdeployments tab.
-
Select the UMS JMS Server targeted to Oracle BAM (in the example below its
UMSJMSServer_auto_3).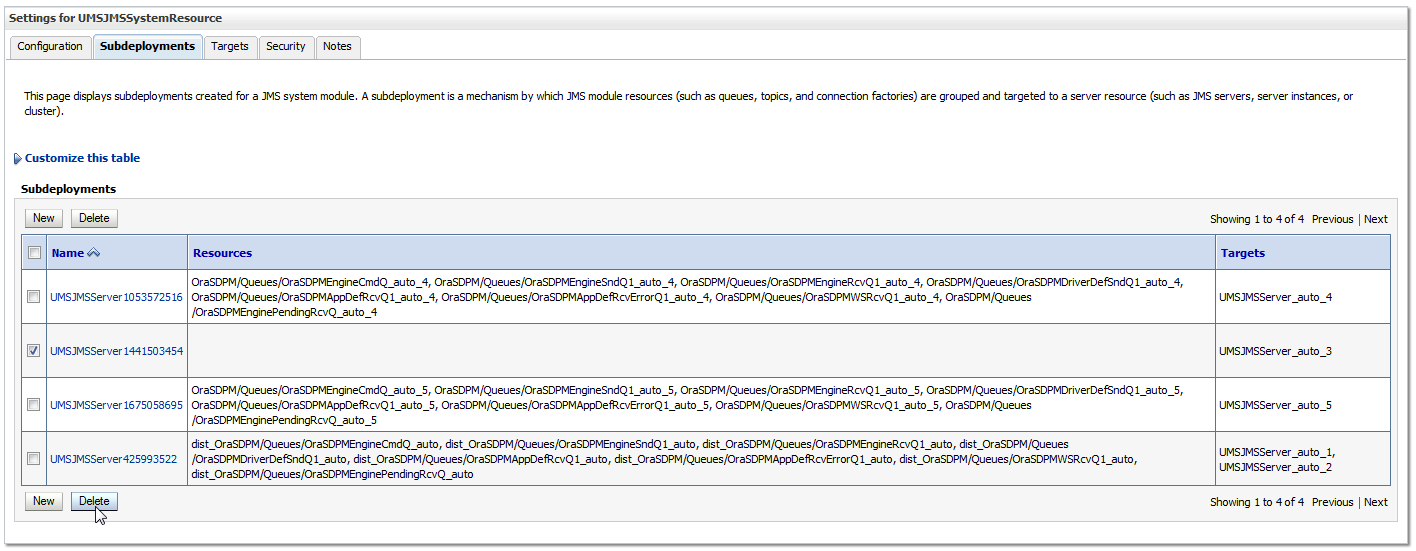
Description of the illustration bam_subdeployment.png
-
Click Delete.
-
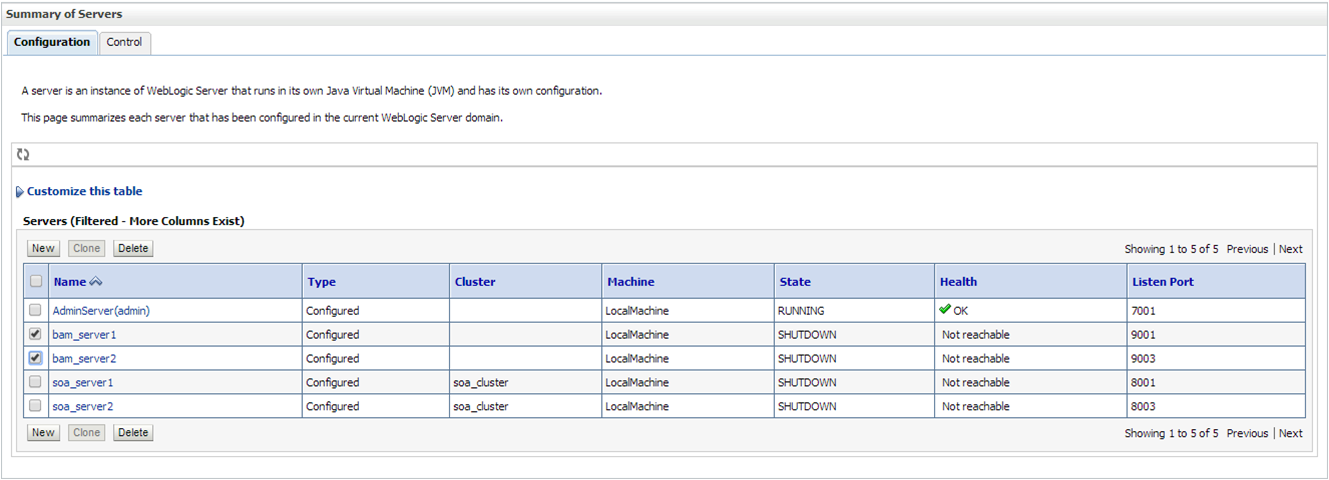
- Task 5 Remove the Oracle BAM Servers and Clusters from the domain.
-
While the Admin Server is running, use Weblogic Console to complete the following tasks.
Note:
For more information on navigating through the Fusion Middleware Control Console, see "Getting Started with Administering Oracle SOA Suite and Oracle BPM Suite" in Administering Oracle SOA Suite and Oracle Business Process Management Suite.-
Navigate to the Summary of JMS Servers screen (shown below). From the Domain Structure menu, expand Services, select Messaging and then select JMS Servers.
-
Select the
UMSJMSServer_auto_x from the list. Make sure the Current Target is the Oracle BAM server.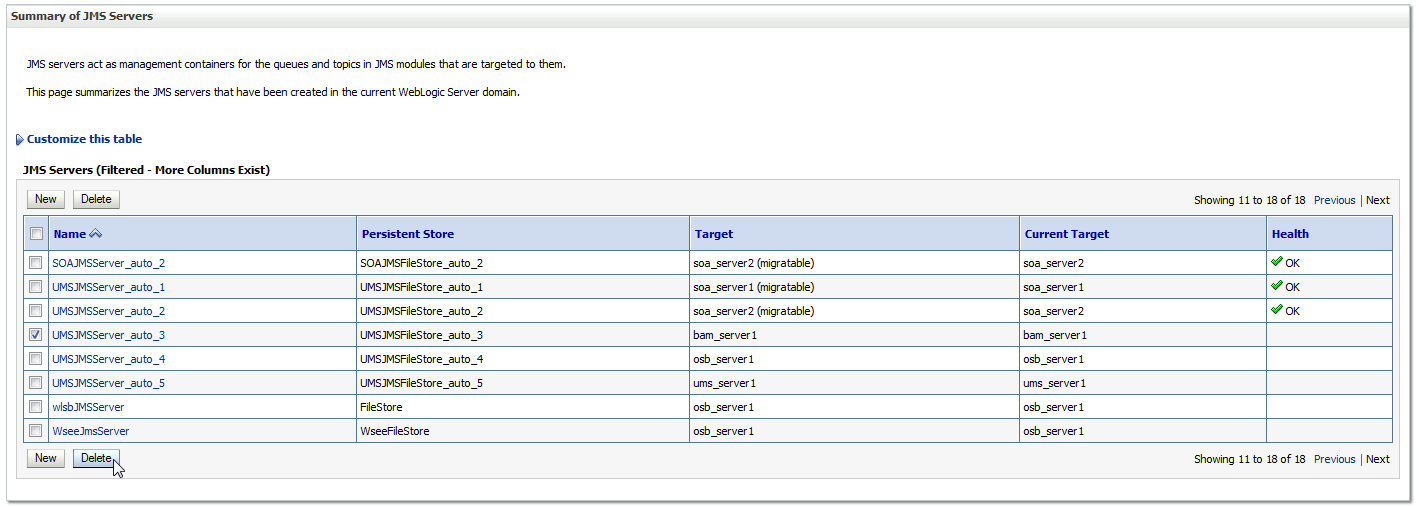
Description of the illustration umsjmsserver_auto_1.png
-
Click Delete.
-
Navigate to the Summary of Persisted Stores screen (shown below).
-
Select
UMSJMSFileStore_auto_x from the list. (Make sure the Target is the Oracle BAM server.)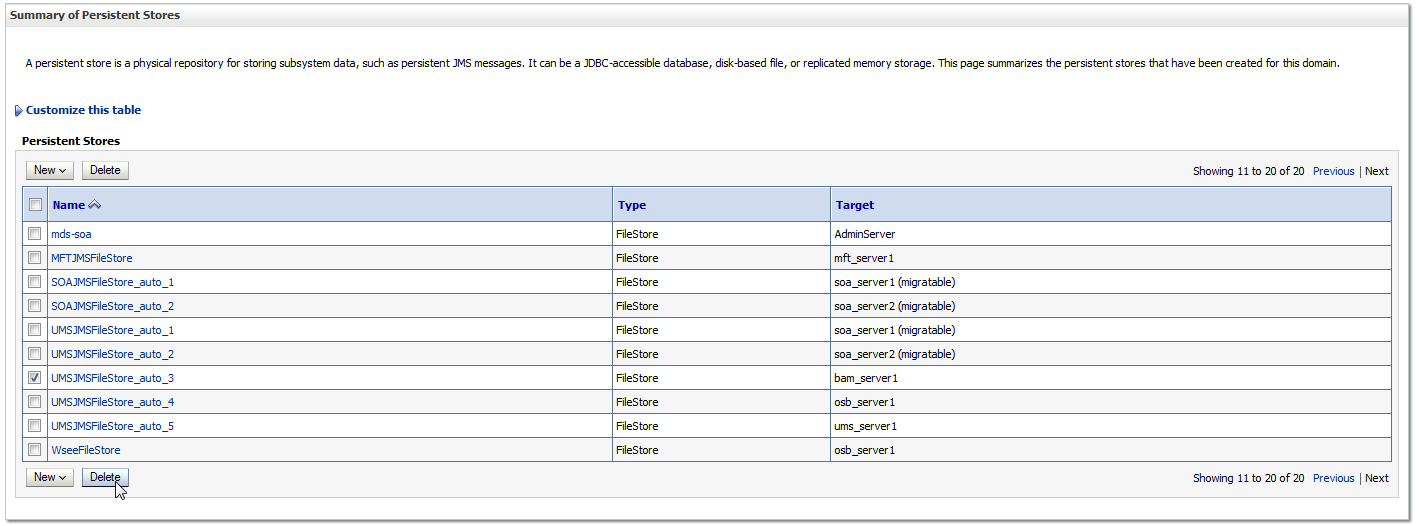
Description of the illustration persisted_file.png
-
Click Delete.
-
Navigate to the Summary of Clusters screen (shown below). From the Domain Structure menu, expand Environment and select Clusters.
-
Select
bam_clusterfrom the list of clusters.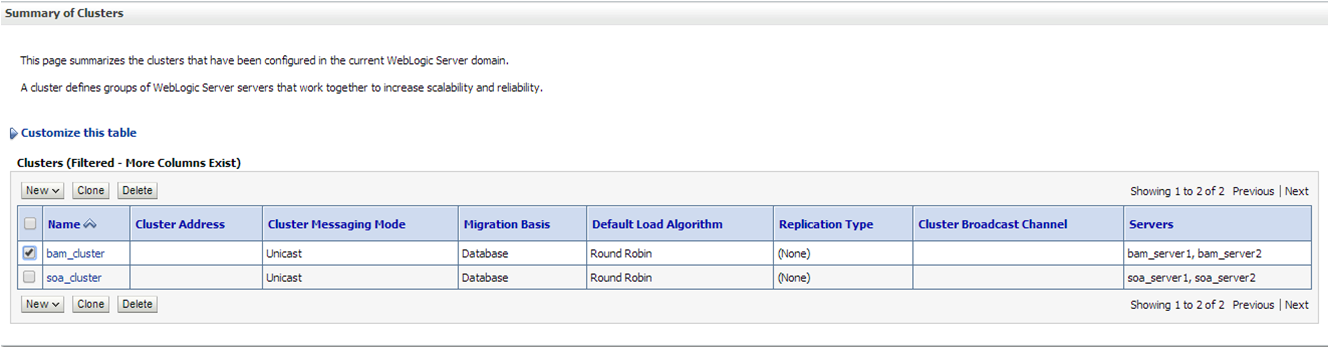
Description of the illustration bam_cluster.png
-
Click Delete.
-
Navigate to the Summary of Servers screen (shown below). From the Domain Structure menu, expand Environment and select Servers.
-
Select the Oracle BAM server(s) from the list.
Description of the illustration bam_servers.png
-
Click Delete.
-
- Task 6 Remove unnecessary Oracle BAM 11g files from the upgraded domain.
-
Use the domainupdater script to remove any unnecessary 11g files from the upgraded domain.
-
Stop the 12c Admin Server:
DOMAIN_HOME/bin/stopWebLogic.sh
       username password [admin_url]
-
Run the
domainupdaterscript from the SOA 12c home to remove any unnecessary legacy 11g files from the upgraded domain.(UNIX) cd ORACLE_HOME/soa/bam/bin ./domainupdater.sh Enter the 11g domain path: (ex:)/soa11g/user_projects/domains/soa_domain (Windows) cd ORACLE_HOME\soa\bam\bin domainupdater.cmd Enter the 11g domain path: (ex:)\soa11g\user_projects\domains\soa_domain
-
Restart the 12c Admin Server.
(UNIX) DOMAIN_HOME/bin/startWebLogic.sh

(Windows) DOMAIN_HOME\bin\startWebLogic.cmd
-
- Task 7 For Cluster Upgrades Only: Stop the Admin and Managed Servers.
-
If you are upgrading a cluster, you must stop the Admin and Managed Servers before you execute the pack and unpack commands described in the next steps.
To stop the WebLogic Server:
DOMAIN_HOME/bin/stopWebLogic.sh
       username password [admin_url]
To stop the SOA server:
(UNIX) DOMAIN_HOME/bin/stopManagedWebLogic.sh
           soa_server_name admin_url
(Windows) DOMAIN_HOME\bin\stopManagedWebLogic.cmd
           soa_server_name admin_url
See Starting and Stopping Servers for information on stopping servers in the correct order.
- Task 8 For Cluster Upgrades Only: Run the pack command on the server where the Admin Server and one of the managed servers is installed.
-
The pack command creates a template archive (.jar) file that contains a snapshot of either an entire domain or a subset of a domain. You can use a template that contains a subset of a domain to create a Managed Server domain directory hierarchy on a remote machine.
To get the reconfigured domain, including NodeManager, onto the other node in the cluster, one must do a managed pack from the Admin Server machine, and then unpack this on the remote nodes.
For more information on using the pack command, see "Overview of the Pack and Unpack Commands" in Creating Templates and Domains Using the Pack and Unpack Commands.
NOTE: The pack and unpack command utility must be run from 12c install directory pointing to the upgraded 11g domain.
Execute the
packcommand on the server where the Admin Server and one of the Managed Servers is installed.In our example, you would execute the following on
SOAHOST1:cd/12c_ORACLE_HOME/oracle_common/common/bin./pack.sh -domain=/11g_DOMAIN_HOME-template=domainupgradetemplate.jar -template_name=domainupgradetemplate -managed=trueIn this example:
-
12c_ORACLE_HOME refers the actual path to the 12c Oracle Home directory (the installation directory for the 12.1.3 bits).
-
Replace 11g_DOMAIN_HOME with the actual path to the upgraded domain directory.
-
domainupgradetemplate.jaris a sample name for the jar file you are creating, which will contain the domain configuration files. -
domainupgradetemplateis the name assigned to the domain template file. -
By default, the
domainupgradetemplateis created in the current directory where you ran the pack command. In this example, it would be created in the following directory, but you can specify a full path for the template jar file as part of the-templateargument to the pack command:ORACLE_COMMON_HOME/common/bin/
The
packcommand creates a template archive (.jar) file that contains a snapshot of either an entire domain or a subset of a domain. You can use a template that contains a subset of a domain to create a Managed Server domain directory hierarchy on a remote machine.For more information on using the pack command, see "Overview of the Pack and Unpack Commands" in Creating Templates and Domains Using the Pack and Unpack Commands.
-
- Task 9 For Cluster Upgrades Only: Run the unpack command to replicate the domain configuration of SOAHOST1 on SOAHOST2.
-
Make sure that the Admin and Managed Servers are still stopped and then execute the following unpack command to create a full domain or a subset of a domain used for a Managed Server domain directory on the remote machine. You may use unpack only with a template compatible with your current installation.
A sample unpack command code snippet is shown below. Use this as an example only. Note that you must specify the "
-overwrite_domain=true" flag on unpack.For more information on using the pack command, see "Overview of the Pack and Unpack Commands" in Creating Templates and Domains Using the Pack and Unpack Commands.
cd/12c_ORACLE_HOME/oracle_common/common/bin./unpack.sh -template=domainupgradetemplate.jar - domain=11g_DOMAIN_HOME-overwrite_domain=trueIn this example:
-
12c_ORACLE_HOME refers the actual path to the 12c Oracle Home directory (the installation directory for the 12.1.3 bits).
-
Replace 11g_DOMAIN_HOME with the actual path to the upgraded domain directory.
-
domainupgradetemplate.jaris a sample name for the jar file you are creating, which will contain the domain configuration files. -
domainupgradetemplateis the name assigned to the domain template file.
-
- Task 10 Configure 11g Oracle BAM Adapter to work with SOA 12c domain.
-
Once the SOA 12c domain has been upgraded, you must configure the SOA 12c domain to use the Oracle BAM 11g domain you created in Section 5.2.1, "Creating a New Oracle BAM 11g Domain Before You Upgrade".
For more information on how to configure this setup, see "Configuring Oracle BAM Adapter" in the 11g version of the Oracle Fusion Middleware Administrator's Guide for Oracle SOA Suite and Oracle Business Process Management Suite.
- Task 11 Start the Managed Server.
-
To start the SOA server:
(UNIX) DOMAIN_HOME/bin/startManagedWebLogic.sh
           soa_server_name admin_url
(Windows) DOMAIN_HOME\bin\startManagedWebLogic.cmd
           soa_server_name admin_url
See Starting and Stopping Servers for information on stopping servers in the correct order.
- Task 12 Delete the existing UMS Email driver from the SOA domain.
-
Due to incompatibility issues with the mail patterns, you must delete the UMS driver in Oracle Enterprise Manager. Note that you will create a new driver after you have extended the SOA 12c domain with the Oracle BAM 12c templates.
-
While the Admin Server and all the managed servers are running in the SOA domain, navigate to User Messaging Service, select the
usermessagingdriver-mailservice targeted to the soa_server.From the User Messaging Email Driver drop-down menu, select Email Driver Properties as shown below.
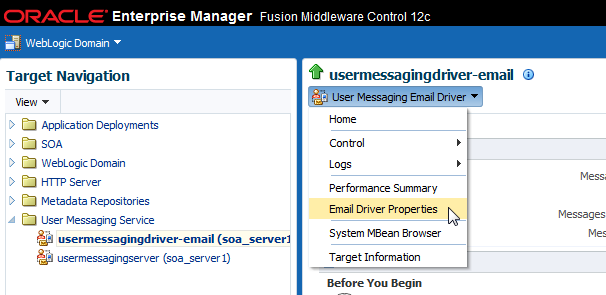
Description of the illustration email_driver_prop_menu.png
-
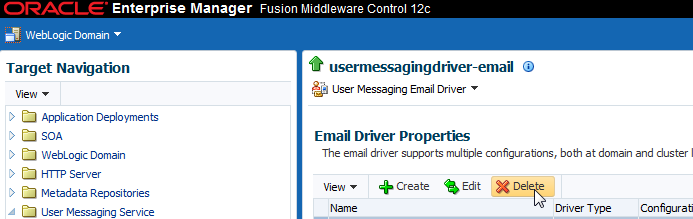
Select the User Messaging Service Email driver name from the Target Navigation pane.
Description of the illustration delete_mail_driver.png
-
Click Delete.
-
Repeat the process for any other cluster present in the domain.
-
5.5 Extending the SOA Domain with Oracle BAM 12c
When you are ready to use Oracle BAM 12c with your upgraded SOA 12c environment, you must complete the following tasks. Note that some tasks are optional.
-
Task 2, "Extend the SOA 12c domain with Oracle BAM 12c domain template."
-
Task 3, "Create the new UMS Email driver for the Oracle BAM server."
-
Task 4, "Import the Oracle BAM 11g data objects and EMS data to the BAM 12c server."
-
Task 6, "Migrate 11g Process Cubes to BAM 12c Process Star Schema (BPM Users Only)"
-
Task 7, "Migrate the 11g Monitor Express data to BAM 12c Process Star schema. (Optional)"
Additional Tasks (Optional):
-
Section 5.5.1, "Migrating 11g Monitor Express to Process Star Schema"
-
Section 5.5.2, "Generating 11g Compatible Process Star Schema Data Views in 12c (Optional)"
- Task 1 Stop the Admin Server and SOA Managed Server(s)
-
Stop all of the 12c servers and processes that are currently running before you begin extending the domain.
To stop the WebLogic Server:
DOMAIN_HOME/bin/stopWebLogic.sh
       username password [admin_url]
To stop the SOA server:
(UNIX) DOMAIN_HOME/bin/stopManagedWebLogic.sh
           soa_server_name admin_url
(Windows) DOMAIN_HOME\bin\stopManagedWebLogic.cmd
           soa_server_name admin_url
See Starting and Stopping Servers for information on stopping servers in the correct order.
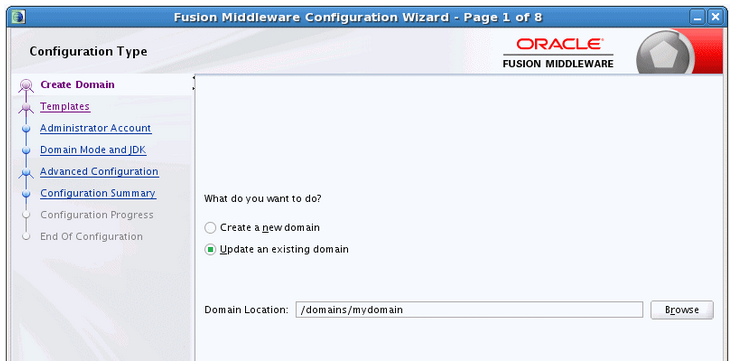
- Task 2 Extend the SOA 12c domain with Oracle BAM 12c domain template.
-
Use the Configuration Wizard to extend the existing SOA domain with Oracle BAM 12c.
-
Launch the Configuration Wizard.
(UNIX) ORACLE_HOME/oracle_common/common/bin
./config.sh

(Windows) ORACLE_HOME\oracle_common\common\bin
config.cmd
-
Select Extend Existing Domain when prompted:
Description of the illustration config_type.png
-
Select the following templates on the Templates screen:
-
Oracle WSM Policy Manager - 12.1.3
-
Oracle Business Activity Monitoring - 12.1.3
-
-
Complete the remaining Configuration Wizard screens as described in "Configuring the Oracle SOA Suite and Business Activity Monitoring (BAM) Topology" in Installing and Configuring Oracle SOA Suite Foundation and Business Process Management.
Note:
Certain Fusing Middleware components such as SOA, OSB and BAM have a dependency on UMS in 12c. If you configure more than one of these components within a single 12.1.3 domain, then each of these components must run within its own cluster — even if there is only one server that runs that component. See Figure 4-1, "Clustered SOA Topology" in Chapter 4, "Upgrading a Clustered SOA Environment".When you reach the Advanced Configuration screen of the Configuration Wizard, select Managed Servers, Clusters, and Coherence to create a BAM cluster as described in "Clusters" in Creating WebLogic Domains Using the Configuration Wizard.
-
- Task 3 Create the new UMS Email driver for the Oracle BAM server.
-
While the Oracle BAM server is running in the cluster, use Fusion Middleware Control Console to complete the following tasks:
-
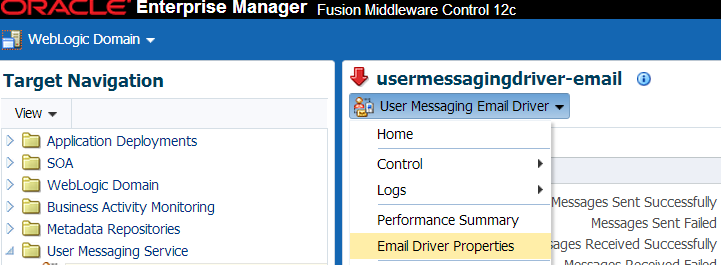
Navigate to the Email Driver Properties screen.
From the Target Navigation pane, select User Messaging Service and from the User Messaging Email Driver drop-down menu, select Email Driver Properties (as shown below).
Description of the illustration ums_config_12c_pic1.png
-
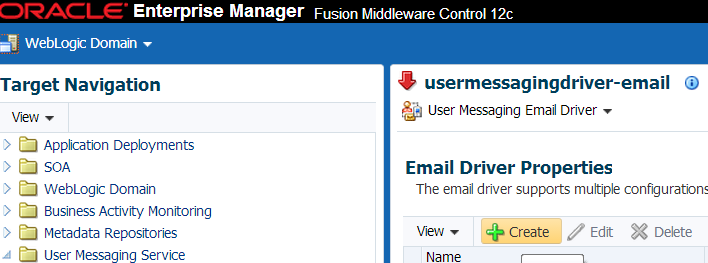
Click Create to add a new UMS Email driver.
Description of the illustration ums_config_12c_pic2-1.png
-
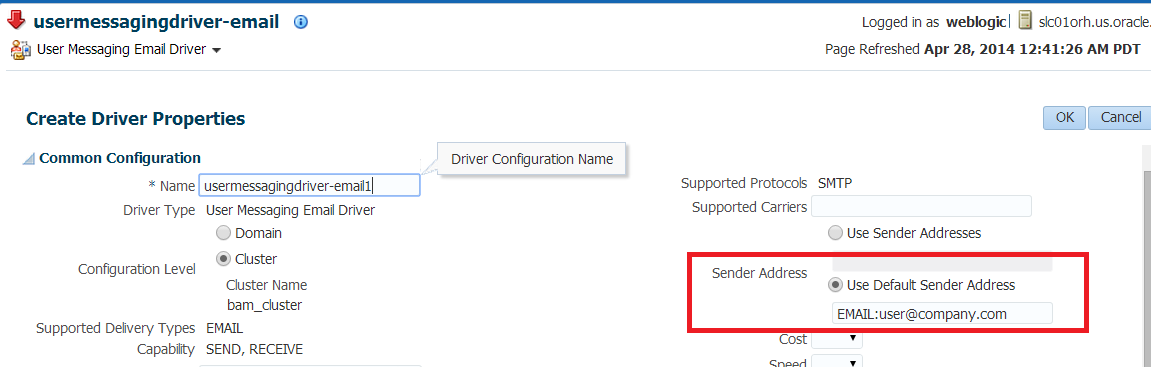
Provide a unique name for the new Email driver in the Name field as shown below. Note that UMS needs to be configured on each cluster in a 12c domain. Therefore maintain the default selection for Configuration Level as Cluster as shown in the image.
Description of the illustration ums_config_12c_pic3.png
-
Select Use Default Sender Address and enter
EMAIL:emailid@company.com. Note that theEMAIL:prefix is mandatory in this field. -
Click OK to create the new driver with the given properties.
-
- Task 4 Import the Oracle BAM 11g data objects and EMS data to the BAM 12c server.
-
Once you have extended the domain to include BAM 12c, you must export the data objects and EMS data from the BAM 11g environment you have been using with SOA 12c. You will then import this data to the SOA with BAM 12c environment.
-
Export the data objects and EMS data from the 11g BAM domain using the 11g ICommand command-line utility. (Note that the EMS definitions were upgraded as part of the standard upgrade process and do not need to be imported.)
The following example shows how to use ICommand 11g to export information about one or more objects in the Oracle BAM server to a XML file:
$11g_ORACLE_HOME/soa/bam/bin/icommand -cmd export -name "/Samples/Call Center" -type dataobject -file C:\CallCenter.xml
NOTE: You may need to modify the ICommand configuration file before you run the script. Specifically, verify that the correct usernames and passwords have been entered. The BAMICommandConfig.xml file is located in
WLS_HOME/user_projects/domains/base_domain/config/fmwconfig/servers/bam_server1/applications/oracle-bam_11.1.1/config/.The following is an example configuration file.
<host>www.example.com</host>
<port>7001</port>
<username>weblogic</username>
<password>welcome1</password>
<dbusername>SOAINFRA</dbusername>
<dbpassword>welcome1</dbpassword>
<dburl>jdbc:oracle:thin:@localhost:1521:orcl</dburl>
For more information on using the 11g BAM ICommand command-line utility to export data files, see the "Export" section of Monitoring Business Activity with Oracle BAM.
-
Import the XML file (created in the previous step) using the 12c BAMCommand command-line utility.
The following example shows how to use 12c BAMCommand to import the information:
$12c_ORACLE_HOME/soa/bam/bin/bamcommand -cmd import -file BPELOrderBookingDataObject.xml -upgrade 1 -username weblogic -port 7001 -host server.yourcompany.com
For more information on using the BAMCommand command-line utility to import data files, see the "Import" section of Monitoring Business Activity with Oracle BAM.
Note:
When you use theimportcommand with the-upgradeparameter to bring Oracle BAM 11g artifacts into Oracle BAM 12c, some information is modified.For more information, see "Upgrade Considerations" in Monitoring Business Activity with Oracle BAM.
-
- Task 5 Manually recreate the 11g BAM dashboards, alerts, and other artifacts for use in the BAM 12c domain.
-
The dashboards, alerts, views, etc. you used in your BAM 11g domain must be recreated for the BAM 12c domain.
See the following sections of the BAM user guide, Monitoring Business Activity with Oracle BAM:
- Task 6 Migrate 11g Process Cubes to BAM 12c Process Star Schema (BPM Users Only)
-
Oracle strongly recommends that you perform the process cubes migration after extending an upgraded BPM 12c domain with BAM 12c. This migration will ensure that all of the necessary 12c data objects are created for BPM entities. This will also ensure the BPM process analytics data has been migrated from the 11g Process cubes (applicable only if cube tables are populated with run-time data).
While exporting and importing each archive, you will be required to provide the server admininstrator (admin) username and password, as well as the SOAINFRA schema username and password.
CAUTION:
The process cubes migration is a required prerequisite before proceeding with the Monitor Express migration described in Task 7.This step is required even if you did not use Oracle BAM 11g Monitor Express with BPM 11g.
-
Disable the Process Metrics.
-
Log in to the Fusion Middleware Control console.
-
In the Target Navigation pane, expand the Weblogic Domain node.
-
Select the domain in which Oracle SOA 12c server is installed.
For example, the domain might be
soainfraorbase_domain. -
Right-click on the domain and select System MBean Browser.
The System MBean Browser page appears.
-
In the System MBean Browser, expand the Application Defined MBeans node.
-
Under Application Defined MBeans, expand the oracle.as.soainfra.config node.
-
Under oracle.as.soainfra.config, expand the Server: server_name node.
-
Under Server: server_name, expand the AnalyticsConfig node.
-
Under AnalyticsConfig, click analytics.
The analytics attributes are listed.
-
If not already set to
true, change the value of theDisableProcessMetricsattribute to true. -
Click Apply.
-
-
Determine the exportType to be used for the migration. The exportType must be decided before migration because once the active instance migration is complete, and process analytics are enabled, you will not be able to go back and migrate the Completed instance data.
The valid exportType values are:
-
INFLIGHT_WITH_DIMENSION_AND_DEFINITION(default): Migrates only Active instance fact data archives -
ALL: Migrates all Active and Completed instance fact data archives
-
-
(UNIX Only) Run migrateBPMProcessCubes script from the 12c SOA home.
The migrateBPMProcessCubes shell script performs migration in two phases: export and import. The first phase exports the following archives from BPM Process Cubes, and then the second phase imports them to BAM 12c.
-
DefinitionExport.zip
-
DimensionExport.zip
-
ActiveFactDataExport.zip
-
CompletedFactDataExport.zip (if running with -exportType = ALL option)
On UNIX Operating Systems:
cd $ORACLE_HOME/bam/bin
./migrateBPMProcessCubes.sh -serverUrl <BAM 12c server url> -serverPort <BAM 12c server port> -serverUserName <BAM 12c server user> -dbUrl <soa db jdbc url> -dbUserName <soainfra schema username> -exportDir <export dir> [-exportType ALL] [-importOnly]
Where:
 serverUrl      (mandatory) : BAM 12c Server URL
 serverPort     (mandatory) : BAM 12c Server Port
 serverUserName (mandatory) : BAM 12c Server  admin user
 dbUrl          (mandatory) : SOA DB jdbc URL
 dbUserName     (mandatory) : SOAINFRA schema username
 exportDir      (mandatory) : A writable Directory where exported archives will be written
 exportType     (optional ) : Export Type.  Valid values are
                                a)INFLIGHT_WITH_DIMENSION_AND_DEFINITION (default):  Migrates only Active instance fact data archives
                                b)ALL                                             :  Migrates all Active and Completed instance fact data archives
 importOnly     (optional ) : If specified, data object definition and data archive export phase is skipped and only import is performed. It is assumed that archives are already present under "exportDir"
Note:
If there were errors during the migration, you may need to manually correct the issues and start the script again. For more information, see Error Handling: 11g Process Cubes to BAM 12c Star Schema Migration. -
-
(Windows Only) Export data object definitions and data from 11g BPM Process Cubes and then import them to 12c:
The data object definitions migration is performed in two steps. Step one involves exporting the data from 11g process cubes and step 2 imports the data into 12c.
The first phase exports the following archives from BPM Process Cubes, and then the second phase imports them to BAM 12c.The export command shown below will generate the following archive files under the <exportDir> directory:
-
DefinitionExport.zip
-
DimensionExport.zip
-
ActiveFactDataExport.zip
-
CompletedFactDataExport.zip (if running with
-exportType = ALLoption)
Step 1: Export the data objects and definitions using the following code example: (make sure that you provide your actual directory names)
java -cp

%ORACLE_HOME%\soa\modules\oracle.bpm.runtime_11.1.1\oracle.bpm.analytics.metrics.interface.jar;
%ORACLE_HOME%\soa\modules\oracle.bpm.runtime_11.1.1\oracle.bpm.analytics.metrics.model.jar;
%ORACLE_HOME%\oracle_common\modules\oracle.jdbc_12.1.0\ojdbc6.jar;
%ORACLE_HOME%\bam\modules\oracle.bam.client\bam-client.jar;%ORACLEHOME%\bam\lib\bam-schema.jar;
%ORACLE_HOME%\soa\modules\oracle.bpm.runtime_11.1.1\oracle.bpm.analytics.metrics.dataobject.jar;
%ORACLE_HOME%\soa\modules\oracle.bpm.runtime_11.1.1\oracle.bpm.hwfanalytics.dataobject.jar

oracle.bpm.metrics.dataobject.migration.application.Migrate11gProcessCubesto12cDO -url <soa db jdbc url> -userName <soa schema user name> -exportDir <export directory path> [-exportType ALL]
Step 2: Import the data object definitions(DefinitionExport.zip) into the BAM server.
cd %ORACLE_HOME%\bam\bin\

bamcommand.cmd  -host <bam server host> -protocol t3 -port <bam server port> -username <bam server admin user> -dburl <bam database jdbc url>
-dbusername <bam database db user>  -cmd import -file <Path to  DefinitionExport.zip> -mode update
NOTE: After importing the archive for BAM 12c, review the bamcommand.log.* files under ORACLE_HOME/bam/bin directory to make sure no errors occurred. If error conditions do exist, see Error Handling: 11g Process Cubes to BAM 12c Star Schema Migration.
-
-
(Windows Only) Import dimension data (DimensionExport.zip) into the BAM server. (Note that this command uses -datamode and -migrate parameters.)
Use the following code example to import the dimension data:
cd %ORACLE_HOME%\bam\bin\

bamcommand.cmd  -host <bam server host> -protocol t3 -port <bam server port> -username <bam server admin user> -dburl <bam database jdbc url>
-dbusername <bam database db user>  -cmd import -file <Path to  DimensionExport.zip>  -datamode update -migrate 1
NOTE: After importing the archive for BAM 12c, review the bamcommand.log.* files under ORACLE_HOME/bam/bin directory to make sure no errors occurred. If error conditions do exist, see Error Handling: 11g Process Cubes to BAM 12c Star Schema Migration.
-
(Windows Only) Import active fact data (ActiveFactDataExport.zip) into the BAM server. (Note that this command uses -datamode and -migrate parameters.)
cd %ORACLE_HOME%\bam\bin\

bamcommand.cmd  -host <bam server host> -protocol t3 -port <bam server port> -username <bam server admin user> -dburl <bam database jdbc url>
-dbusername <bam database db user>  -cmd import -file <Path to  ActiveFactDataExport.zip>  -datamode update -migrate 1
-
(Windows Only - if exportType=ALL) Import completed fact data (CompletedFactDataExport.zip) into the BAM server. (Note that this command uses -datamode and -migrate parameters.)
Use this command only if you used the exportType ALL when you migrated the data objects definitions for the BAM 11g process cubes.
cd %ORACLE_HOME%\bam\bin\

run the following command
bamcommand.cmd  -host <bam server host> -protocol t3 -port <bam server port> -username <bam server admin user> -dburl <bam database jdbc url>
-dbusername <bam database db user>  -cmd import -file <Path to  ActiveFactDataExport.zip>  -datamode update -migrate 1
NOTE: After importing the archive for BAM 12c, review the bamcommand.log.* files under ORACLE_HOME/bam/bin directory to make sure no errors occurred. If error conditions do exist, see Error Handling: 11g Process Cubes to BAM 12c Star Schema Migration.
-
Restart the Oracle BAM server once the migration has completed successfully.
(UNIX) DOMAIN_HOME/bin/startManagedWebLogic.sh
           bam_server_name admin_url

(Windows) DOMAIN_HOME\bin\startManagedWebLogic.cmd
           bam_server_name admin_url
When prompted, enter your user name and password.
-
While the Oracle BAM server is running, enable the process metrics.
-
Log in to the Fusion Middleware Control console.
-
In the Target Navigation pane, expand the Weblogic Domain node.
-
Select the domain in which the Oracle BAM server is installed.
For example, the domain might be
soainfraorbase_domain. -
Right-click on the domain and select System MBean Browser.
The System MBean Browser page appears.
-
In the System MBean Browser, expand the Application Defined MBeans node.
-
Under Application Defined MBeans, expand the oracle.as.soainfra.config node.
-
Under oracle.as.soainfra.config, expand the Server: server_name node.
-
Under Server: server_name, expand the AnalyticsConfig node.
-
Under AnalyticsConfig, click analytics.
The analytics attributes are listed.
-
Change the value of the DisableProcessMetrics attribute to false.
-
Click Apply.
-
-
- Task 7 Migrate the 11g Monitor Express data to BAM 12c Process Star schema. (Optional)
-
If want to be able to analyze historical data from BAM 11g through the BAM 12c process analytics dashboards, you will need to migrate the 11g Monitor Express data to BAM 12c process star schema using the steps described in Section 5.5.1, "Migrating 11g Monitor Express to Process Star Schema".
Note:
Complete this optional task only if want to be able to analyze historical data from BAM 11g through the BAM 12c process analytics dashboards. To do this, you must migrate the 11g process analytics data from BAM 11g the Monitor Express data objects to the BAM 12c Process star schema data objects as described in Section 5.5.1.
5.5.1 Migrating 11g Monitor Express to Process Star Schema
This section describes the pre-requisites and steps for migrating 11g Monitor Express Data to BAM 12c Process star schema. Note that some tasks in the process apply only to certain components or operating systems. If you are not using the component or operating system, skip to the next task.
-
Task 1, "Migrate 11g Process Cubes to BAM 12c Process star schema (BPM Users Only)"
-
Task 2, "Migrate BPM data from BAM 11g Monitor express schema."
- Task 1 Migrate 11g Process Cubes to BAM 12c Process star schema (BPM Users Only)
-
Before you can upgrade the 11g Monitor Express data to BAM 12c Process Star schema, you must migrate 11g process cubes to the BAM 12c star schema to ensure that all of the necessary 12c data objects are created for BPM entities. This will also ensure the BPM process analytics data has been migrated from the 11g Process cubes (applicable only if cube tables are populated with run-time data).
Before you continue to the next step, perform the steps in Migrate 11g Process Cubes to BAM 12c Process Star Schema (BPM Users Only).
- Task 2 Migrate BPM data from BAM 11g Monitor express schema.
-
Complete this optional task only if want to be able to analyze historical data from BAM 11g through the BAM 12c process analytics dashboards. To do this, you must migrate the11g process analytics data from BAM 11g the Monitor Express data objects to the BAM 12c Process star schema data objects as described in this section.
-
Disable the Process Metrics.
-
Log in to the Fusion Middleware Control console.
-
In the Target Navigation pane, expand the Weblogic Domain node.
-
Select the domain in which the Oracle BAM server is installed.
For example, the domain might be
soainfraorbase_domain. -
Right-click on the domain and select System MBean Browser.
The System MBean Browser page appears.
-
In the System MBean Browser, expand the Application Defined MBeans node.
-
Under Application Defined MBeans, expand the oracle.as.soainfra.config node.
-
Under oracle.as.soainfra.config, expand the Server: server_name node.
-
Under Server: server_name, expand the AnalyticsConfig node.
-
Under AnalyticsConfig, click analytics.
The analytics attributes are listed.
-
Change the value of the DisableProcessMetrics attribute to true.
-
Click Apply.
-
-
Run the BAM/BPM 11g migration utility to migrate the Monitor Express data. (Data objects and data object definitions were migrated in Migrate 11g Process Cubes to BAM 12c Process Star Schema (BPM Users Only).)
The following command will generate the data export for BPM data in zipped CSV files:
java -cp
$DOMAIN_HOME/soa/modules/oracle.bpm.runtime_11.1.1/oracle.bpm.analytics.metrics.interface.jar:
$ORACLE_HOME/oracle_common/modules/oracle.jdbc_12.1.0/ojdbc6.jar:
$ORACLE_HOME/bam/modules/oracle.bam.client/bam-client.jar:
$ORACLE_HOME/bam/lib/bam-schema.jar:
$ORACLE_HOME/soa/modules/oracle.bpm.runtime_11.1.1/oracle.bpm.analytics.metrics.dataobject.jar:
$ORACLE_HOME/soa/modules/oracle.bpm.runtime_11.1.1/oracle.bpm.hwfanalytics.dataobject.jar:
$ORACLE_HOME/soa/modules/oracle.bpm.runtime_11.1.1/oracle.bpm.analytics.metrics.model.jar    oracle.bpm.metrics.dataobject.migration.application.Migrate11gBAMBPMTo12cDO  PropertyFiles
This command will generate "FactDataExport.zip" file under
<PATH>directory.NOTE: You can specify the composite name in the property file. If a composite name is specified, then data for only those composites will be migrated. If a composite name is not defined in the property file, then all the composite data will be migrated.
#*************************************
#Mandatory Fields
#*************************************
#11g User Name
BAM_11g_USER_NAME= <<11gUserName>>
#12c User Name
BAM_12c_SOURCE_NAME = <<12cUserName>>

#11g URL
BAM_11g_URL=jdbc:oracle:thin:@<<11gBAMSchemaDatabaseIP>>:<<Port>>:<<SID>>
#12c URL
BAM_12c_URL=jdbc:oracle:thin:@<<12cDatabaseIP>>:<<Port>>:<<SID>>

#Path where data to be exported
PATH = <<Path where data need to be exported>>
#*************************************
#Optional Fields
#************************************

COMPOSITE_LIST = <<List of Composite for which data needs to be exported. This is ':' seperated>>
#If above mention configurable is missing then all the composite data will be migrated.
DATAOBJECT_FOLDER_PATH = <<DataObject Path If this field is absent then default path will taken as Samples/Monitor Express/BI_>>
#************************************
-
Import BPM data to BAM 12c.
This step will ensure that the previously exported BPM Monitor Express data is imported to BAM 12c.
cd $DOMAIN_HOME/bam/bin

./bamcommand -host <<host>> -protocol t3 -dbusername <<DbUserName>>  -dburl jdbc:oracle:thin:@<<DBIP>>:<<Port>><<SID>> -username  <<weblogicUserName>> -cmd import  -file <<Path of BPM FactDataExport zip file >> -mode update -migrate 1
-
Once the migration is complete, enable publishing to BAM 12c by setting the
DisableProcessMetricsparameter to false.-
Log in to the Fusion Middleware Control console.
-
In the Target Navigation pane, expand the Weblogic Domain node.
-
Select the domain in which the Oracle BAM server is installed.
For example, the domain might be
soainfraorbase_domain. -
Right-click on the domain and select System MBean Browser.
The System MBean Browser page appears.
-
In the System MBean Browser, expand the Application Defined MBeans node.
-
Under Application Defined MBeans, expand the oracle.as.soainfra.config node.
-
Under oracle.as.soainfra.config, expand the Server: server_name node.
-
Under Server: server_name, expand the AnalyticsConfig node.
-
Under AnalyticsConfig, click analytics.
The analytics attributes are listed.
-
Change the value of the DisableProcessMetrics attribute to false.
-
Click Apply.
-
-
Note:
If there are any errors while importing the archive files, you can roll back all of the imported data in the BAM 12c process star schema data objects by running the rollback SQL file.From a BAM 12c database SQL prompt, log in as the SOAINFRA schema user, navigate to the <PATH> directory and execute the following command:
sql> @rollbackMonitorExpressMigration.sql
For additional error handling procedures, see Section A.4.1, "Error Handling: 11g Process Cubes to BAM 12c Star Schema Migration".
5.5.2 Generating 11g Compatible Process Star Schema Data Views in 12c (Optional)
Prerequisite: You must complete the steps described in Task 6, "Migrate 11g Process Cubes to BAM 12c Process Star Schema (BPM Users Only)" before generating these views.
If you have an Oracle Fusion Middleware 11g application built on top of 11g process star schema views, and you want to continue to use the application in 12c, then you will need to recreate the views after the upgrade. The Star schema database views in 12c are different from the 11g views and cannot be automatically upgraded.
Specifically, the star schema database views in 12c have different names, are based on top of Oracle BAM data objects (and not on process cube tables), and are created at the composite level (instead of process level as in 11g). An automated utility is provided to assist you in recreating your views - both standard and process-specific - for use in your Oracle 12c environment.
Note:
While this step is optional, Oracle recommends that you use BAM 12c process star schema views as they provide more information that the 11g process stars schema views.- Task 1 Update the classpath to include the interface JAR file.
-
You must updated the CLASSPATH to include the location of the oracle.bpm.analytics.interface.jar file located in the SOA Home.
For example:
DOMAIN_HOME
/soa/modules/oracle.bpm.runtime_11.1.1/oracle.bpm.analytics.interface.jar - Task 2 Recreating Standard Views
-
Use the Standard View 11g Migration Utility to create 12c compatible versions of the following 11g standard views:
BPM_ACTIVITY_DEFINITION_V
BPM_ACTIVITY_INSTANCE_V
BPM_ACTIVITY_PERFORMANCE_V
BPM_PROCESS_DEFINITION_V
BPM_PROCESS_INSTANCE_V
BPM_PROCESS_PERFORMANCE_V
BPM_ROLE_DEFINITION_VUse the following command to run the utility:
java -cp $DOMAIN_HOME/soa/modules/oracle.bpm.runtime_11.1.1/oracle.bpm.analytics.interface.jar oracle.bpm.analytics.cube.persistence.util.StandardView11gMigrationUtil<initialContextFactory> <protocol> <host name> <soa-port> <username>[]Where:
-
initialContextFactory is the JNDI Initial Context Factory such as
weblogic.jndi.WLInitialContextFactory -
protocol is the RMI / JNDI protocol configured for the target server. Specify t3, IIOP, HTTP, T3s, IIOPS, or HTTPS.
-
host name is the full name of the host such as
soa.mycompany.com -
soa-port is the SOA listening port such as
7001 -
username is the server login name such as
weblogic.
-
- Task 3 Recreating Process-Specific Views
-
Use the Process Specific View 11g Migration Utility to create 12c compatible versions of the following 11g process-specific views:
BPM_ACTV_INST_<viewIdentifier>_V
BPM_ACTV_PERF_<viewIdentifier>_V
BPM_PRCS_INST_<viewIdentifier>_V
BPM_PRCS_PERF_viewIdentifier>_VUse the following command to run the utility:
java -cp $ORACLE_HOME/soa/modules/oracle.bpm.runtime_11.1.1/oracle.bpm.analytics.interface.jar oracle.bpm.analytics.cube.persistence.utill.ProcessSpecificView11gMigrationUtil <initialContextFactory> <protocol> <host name> <soa-port> <username > [<composite-name>]
Where:
-
initialContextFactory is the JNDI Initial Context Factory such as
weblogic.jndi.WLInitialContextFactory -
protocol is the RMI / JNDI protocol configured for the target server. Specify t3, IIOP, HTTP, T3s, IIOPS, or HTTPS.
-
host name is the full name of the host such as
soa.mycompany.com -
soa-port is the SOA listening port such as
7001 -
username is the server login name such as
weblogic. -
composite-name (optional) is the name of a single composite you want to create views
-