4 Installing and Configuring the Archiva Maven Repository Manager
This chapter describes the installation and basic configuration of Apache Archiva. Archiva is one of several choices for an artifact repository, an important component of a Maven-based continuous integration build system.
If you are not familiar with Maven Repository Managers or artifact repositories, see Section 1.5 for more details.
This chapter contains the following sections:
After you have completed installation and configuration of Archiva (as detailed in this chapter) and Maven (as detailed in Chapter 5), you should populate your Archiva repository with the Oracle-provided artifacts. Refer to Section 5.3 for more details.
4.1 Overview of Archiva
Archiva is distributed as a standalone installation that is bundled with Jetty. A WAR file distribution is also provided so that Archiva can be installed into an existing application server.
This chapter describes the process of installing the standalone version. Instructions for WAR file installation and configuration are available in the official Archiva documentation in the following location:
4.2 Downloading Archiva
You can download the latest standalone Archiva release either as a .zip file or tar.gz file from the following location:
4.3 Installing Archiva
Unpack the distribution to the target installation directory. This location depends on your preference and target operating system. Oracle recommends that you create a common location for continuous integration related workspaces. For example, unpack the distribution in the following location:
/ciroot/archiva
-
On Linux
Run the following command:
sudo mkdir -p /ciroot/archiva ; sudo tar xzvf apache-archiva-1.3.6-bin.tar.gz
 --strip-components 1 -C /ciroot/archiva
After you run the command, ensure that you change the owner of the files to match your user and group. For example, if you are using
oracleas the user id andoracleas the group name, you would run the following command:chown -R oracle:oracle /ciroot/archiva
-
On Windows
Create a directory to create the Archiva installation files:
mkdir c:\ciroot\archiva
Extract the Archiva zip file that you downloaded into this new directory.
4.4 Configuring Archiva
This section provides details on how to configure Archiva, not just in general, but also some specific configuration for use in a Fusion Middleware environment.
This section contains the following topics:
4.4.1 Configuring the Server
The Archiva Jetty instance starts up with a default HTTP port of 8080. If you want to change this, before startup, modify /ciroot/archiva/conf/jetty.xml. Change the connector configuration's SystemProperty value for jetty.port to a different value, for example, 8081:
For example:
<Call name="addConnector">
 <Arg>
   <New class="org.mortbay.jetty.nio.SelectChannelConnector">
  <Set name="host">
    <SystemProperty name="jetty.host"/>
  </Set>
  <Set name="port">
    <SystemProperty name="jetty.port" default="8081"/>
  </Set>
4.4.2 Starting the Server
After the server is configured, you can start it from the command-line interface.
To start the server:
-
Run the following command:
/ciroot/archiva/bin/archiva start
On 64-bit Linux systems, you may receive an error message similar to this:
./archiva: /ciroot/archiva/bin/./wrapper-linux-x86-32:
 /lib/ld-linux.so.2: bad ELF interpreter: No such file or directory
If you receive this error, install the
glibc.i686package (using yum for example) and try again. -
Check the log output while the server is starting, to ensure that it starts as expected, by running the following command:
tail -f /ciroot/archiva/logs/*
After the startup tasks complete, the Archiva server is available in the following location:
http://localhost:8081/archiva
4.4.3 Creating an Administrator User
When you visit the Archiva home page for the first time, you are prompted to set the administration password. Specify the full name, email address, and password of the administration user.
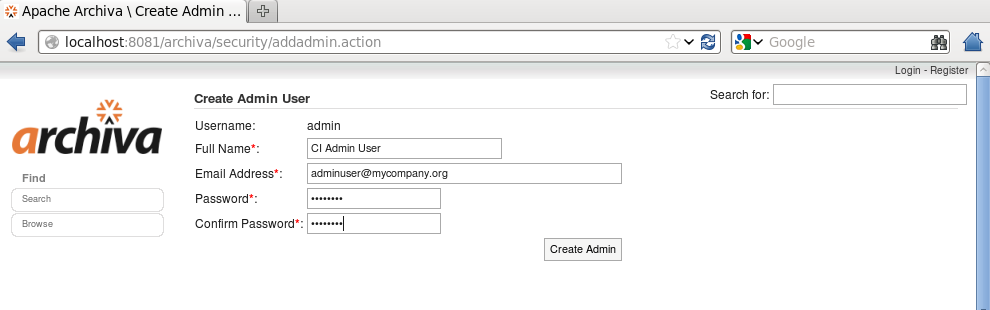
Description of the illustration create-admin-user.png
4.4.4 Internal and Snapshot Repositories
Archiva starts up with two hosted repositories configured:
-
Internal
The internal repository is for maintaining fixed-version released artifacts deployed by your organization, which includes finished versions of artifacts, versions that are no longer in development, and released versions. Note that in-development versions of the same artifacts may exist in the snapshot repository in the future.
-
Snapshot
The snapshot repository holds the work-in-progress artifacts, which are denoted with a version with the suffix
SNAPSHOT, and artifacts that have not yet been released.
4.4.5 Proxy Repository
In addition to hosting your internally deployed artifacts, the internal repository is configured to serve as a proxy for the public Maven Central repository by default. A proxy repository can be used instead of directly referring to a third-party repository. A proxy caches previously requested artifacts locally. This reduces the load on public servers, which is recommended, especially if you run builds from a clean repository. If you place too much load on the public server, it may throttle or ban your host from placing additional requests. For significant build performance improvement, fetch dependencies from a less loaded, more proximate, proxy server.
If you require third party artifacts from other public repositories, then add them to your repository as additional Proxy Connectors.
4.4.6 Configuring Mirror Repositories
Because you will typically want to share cached third-party proxied artifacts among multiple repositories, you should separate the cached artifacts from your project artifacts by moving them into a separate repository.
To create mirror repositories:
-
Remove the proxy connections from the internal repository.
-
Under the Administration menu, click Proxy Connections.
-
Delete the Central Repository and maven2-repository.dev.java.net proxy connectors by clicking the red X on each entry.
-
-
Add a new mirror repository.
-
From the Administration menu, click Repositories.
-
From the top right corner, click Add.
-
Specify the following information in the Admin: Add Managed Repository dialog box:
-
Identifier: mirror
-
Name: Mirror
-
Directory:
/ciroot/archiva/data/repositories/mirror -
Select Releases Included, Block Re-deployment of Released Artifacts, and Scannable.
-
-
Click Add Repository.
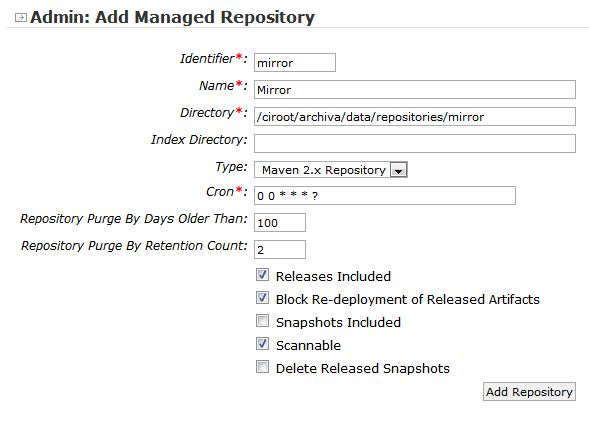
Description of the illustration add-managed_mirrror.png
-
-
Add proxy connectors to the mirror repository:
-
Under the Administration menu, click Proxy Connections.
-
Click Add.
-
Select mirror in Managed Repository.
-
Select central for Remote Repository.
-
Click Add Proxy Connector.
-
For configuring a mirror repository in a remote repository, complete steps 1-3. However, select maven2-repository.dev.java.net in step 1-b.
After completing these steps, you should see the following:
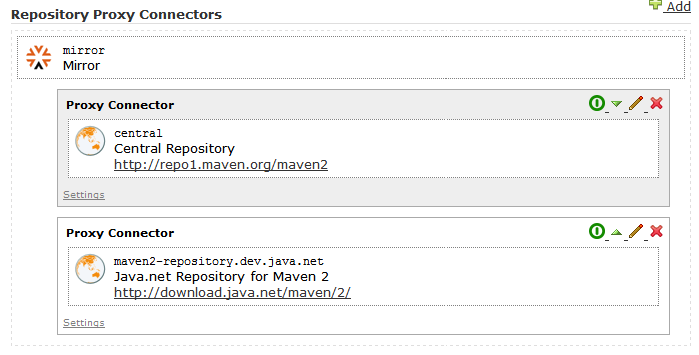
Description of the illustration proxy-conn-list.png
To configure the anonymous guest user to enable read privileges for the new repository:
-
Under the Management menu, click User management.
-
Click Guest.
-
Click Edit Roles.
-
Select the Repository Observer role next to mirror.
-
Click Submit to save your changes.
4.4.7 Creating Development, Production, Quality Assurance, and Test Repositories
You must create a separate repository for each Oracle Fusion Middleware environment that you want to target with a Maven build. Oracle's support for one-off patching (see Section 5.3.8), means that it is possible that you could have two different environments (for example, production and test), which are at the same version but have some different files due to different one-off patches applied.
To ensure that your Maven builds are using the correct version of files, create and configure a group Maven repository for each target environment:
-
Create a repository:
-
From the Administration menu, click Repositories.
-
To add a new repository, click Add from the top right corner.
-
In the Admin: Add Managed Repository dialog box, specify the following details:
-
Identifier: Provide an identifier, like
dev,prod,qa, ortest. -
Name: Provide a name.
-
Directory: Add a directory path like
/ciroot/archiva/data/repositories/${IDENTIFIER}, where${IDENTIFIER}matches the string that you provided in Identifier. -
Deselect Block Re-deployment of Released Artifacts.
-
Select Releases Included and Scannable.

Description of the illustration add-managed-repo.png
-
-
Click Add Repository.
-
-
To configure the anonymous guest user to have read privileges for the new repository:
-
Under Manage, click User Management.
-
Select guest.
-
Select Edit Roles.
-
Select the Repository Observer role next to the appropriate repository entry.
-
Click Submit to save your changes.
-
-
To create a corresponding group for the new repository:
-
From the Administration menu, click Repository Groups.
-
In the top right corner, click Add Group.
-
In the Identifier field, specify a name that matches the repository that you created, with the addition of -group, for example, dev-group.
-
Click Add Group.
-
Select your new repository, like dev, from the drop-down menu next to Add Repository and click Add Repository.
Repeat steps 3-a to 3-d to add mirror and snapshots.
The following figure shows the Repository Groups page.
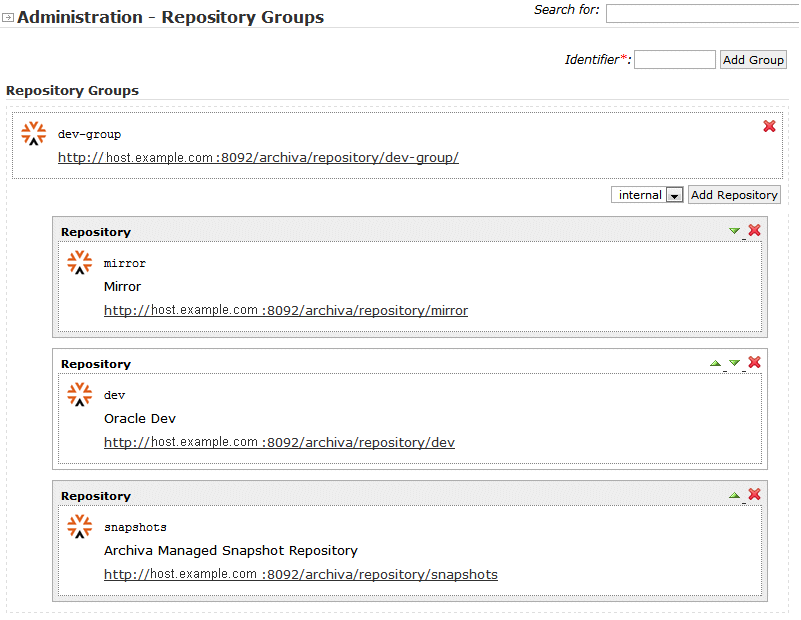
Description of the illustration admin_repo-group.png
-
Repeat the repository and group creation steps 1-3 for each repository type: test, qa, and prod.
-
4.4.8 Creating a Deployment Capable User
To support deployment in your internal repository, you must add at least one user with appropriate permissions:
-
Under Management, click User Management.
-
Click Create New User to add a user. Then, specify the required details like name, email address, and password. After the user is added, you are directed to a Role Administration dialog box for that user.
-
In the Role Administration dialog box, under Resource Roles, select the Repository Manager role for Snapshot and Internal Repositories.
-
Click Submit to save your changes.
Note:
The Repository Manager role, while allowing you to upload artifacts, also allows you to change the repository configuration.To customize or change the role, in the User Roles section, add a new more limited role and assign it to the appropriate users.
Typically, you want to create a new user for each individual with access to the repository. For Hudson, to publish build output to the repository, each user who accesses the repository should have their own user ID, and you should create an additional user with deployment permissions.
After you have completed installation and configuration of Archiva (as detailed in this chapter) and Maven (as detailed in Chapter 5), you should populate your Archiva repository with the Oracle-provided artifacts, as described in Section 5.3.
4.5 More Information About Archiva
The user guide for Archiva 1.3.6 is available at:
http://archiva.apache.org/docs/1.3.6/userguide/
Other releases are available in the Archiva home page at:
4.6 Maven Repository Manager Administration
This section contains the following topics:
4.6.1 Snapshot Cleanup
Archiva retains an instance of a particular snapshot-versioned artifact for every successfully deployed job. When you request a snapshot artifact, the most recent snapshot is obtained. Maven examines the associated metadata in the repository to determine the correct copy to download. The Maven Repository Manager maintains each copy with a unique timestamp and build number.
For example, the contents of the repository directory for an artifact should look similar to the following:
maven-metadata.xml
test-artifact-2.1-20110928.112713-14.jar
test-artifact-2.1-20110928.112713-14.pom
test-artifact-2.1-20110924.121415-13.pom
test-artifact-2.1-20110924.121415-13.jar
The corresponding repository metadata should look similar to the following:
<?xml version="1.0" encoding="UTF-8"?>
<metadata>
  <groupId>com.my.company</groupId>
  <artifactId>test-artifact</artifactId>
  <version>2.1-SNAPSHOT</version>
  <versioning>
    <snapshot>
      <timestamp>20110928.112713</timestamp>
      <buildNumber>14</buildNumber>
    </snapshot>
    <lastUpdated>20110928112718</lastUpdated>
    <snapshotVersions>
      <snapshotVersion>
        <extension>jar</extension>
        <value>2.1-20110928.112713-14</value>
        <updated>20110928112713</updated>
      </snapshotVersion>
      <snapshotVersion>
        <extension>pom</extension>
        <value>2.1-20110928.112713-14</value>
        <updated>20110928112713</updated>
      </snapshotVersion>
      <snapshotVersion>
        <extension>jar</extension>
        <value>2.1-20110924.121415-13</value>
        <updated>20110924121415</updated>
      </snapshotVersion>
      <snapshotVersion>
        <extension>pom</extension>
        <value>2.1-20110924.121415-13</value>
        <updated>20110924121415</updated>
      </snapshotVersion>
      ...
    </snapshotVersions>
  </versioning>
</metadata>
The /metadata/versioning/snapshot element contains the information for the latest snapshot that is fetched when you request the snapshot artifact for test-artifact-2.1-SNAPSHOT. You can directly request a specific snapshot of your requirement by referencing timestamp and build numbers in your version, for example, 2.1.-20110928.112713-14.
Usually, only the latest snapshot is required for proper operation of continuous integration builds. Retention of older instances of a snapshot is helpful for troubleshooting purposes when the continuous integration server indicates that a snapshot dependency change has broken the integration process. It is sometimes useful to pull slightly older builds from the repository, after the last working build, to identify the problem.
If no recurring cleanup operation occurs, snapshot instances can accumulate quite rapidly over the lifetime of a project. To keep storage requirements of the repository manager under control, delete older snapshots. Set options regarding retention policy according to available storage and performance requirements.
4.6.1.1 Setting Retention Options
In a continuous integration environment, where builds are often triggered by checking in artifacts, there is the potential for a large number of builds to be executed. Each of these builds, at least the successful ones, results in some artifacts being published into the repository. These can start consuming a lot of space, and it is important to manage them.
Archiva provides two different options for automatically cleaning up old snapshots on a per-repository basis:
-
Repository Purge by Number of Days Older
Archiva automatically deletes snapshots older than the specified number of days. Archiva always retains the most recent snapshot, no matter how old it is.
-
Repository Purge by Retention Count
To use this method, you must set the
purge-by-days-oldervalue to0. Archiva retains only the most recent snapshot instances up to this value. Older instances that exceed this count are deleted.
Both of these options can be viewed and changed by clicking Repositories under the Administration menu, and then clicking Edit for the repository you are interested in.
4.6.1.2 Deleting Released Snapshots
Once the corresponding version is released, a snapshot of that version is no longer needed. Not only does this save space, but it also ensures that your dependency references are up-to-date.
Any existing continuous integration builds that refer to the snapshot fail with a missing dependency message after the dependency is deleted from the repository manager. This failure reminds you that a dependency reference is stale and encourages you to fix the problem.
4.6.2 Advanced User Management
Archiva uses Apache Redback for its user management infrastructure. To use Archiva's authentication and role management system with your organization's existing user management system, you must provide additional configuration with Redback. Redback has limited support for LDAP and other authentication systems.
Complete details are available in the following location:
4.6.3 Backing Up Archiva
You should provide a mechanism for backing up your Archiva file store and configuration so that you can restore it if a file system failure or corruption occurs.
The choice of backup solutions may be affected by your failover method.
4.6.4 Archiva and Failover
Although Archiva does not provide a failover solution, it is important for you to maintain a failover system that stays current. Depending on your preference, you can either set up an identically configured backup system with a separate file system that is synchronized with the primary systems or configure both systems to use the same shared file system.
For more information, see the Archiva page:
https://cwiki.apache.org/ARCHIVA/high-availability-archiva.html