4 Configuring Oracle Data Integrator Studio
This chapter describes how to install and configure Oracle Data Integrator (ODI) Studio.
The following topics are covered in this chapter:
4.1 About ODI Studio
Oracle Data Integrator Studio is a developer's interface for configuring and managing ODI. Studio is installed as part of standalone or enterprise option under the specified ORACLE_HOME. ODI Studio provides four graphical Navigators for managing ODI artifacts: Designer, Operator, Topology, and Security.
ODI Studio can also directly execute jobs on demand, and can be used for development and initial testing.
4.2 Creating the Database Schema
Before you can configure your ODI topology, create the master and work repository database schemas using the Repository Creation Utility (RCU) as described in Chapter 3, "Creating the Master and Work Repository Schema."
4.3 Starting ODI Studio
To start the ODI Studio:
-
Go to the
ORACLE_HOME/odi/studiodirectory. -
Start ODI Studio.
On UNIX operating systems:
./odi.sh
On Windows operating systems:
odi.exe
4.4 Connecting to the Master Repository
Before an agent can be created you must connect to the Master repository:
Note:
If you have installed any previous version of Oracle Data Integrator on the same computer you are currently using, you may be asked whether or not you want to import preferences and settings from those previous installations into ODI Studio. The tasks and descriptions in this section assume that no previous versions of Oracle Data Integrator exist on your computer.
For more information, refer to the topics in the ODI Studio Help menu.
- Task 1 Getting Started
-
From the ODI Studio menu, select File, then select New.
On the New gallery screen, select Create a New ODI Repository Login, then click OK.
- Task 2 Creating a Login
-
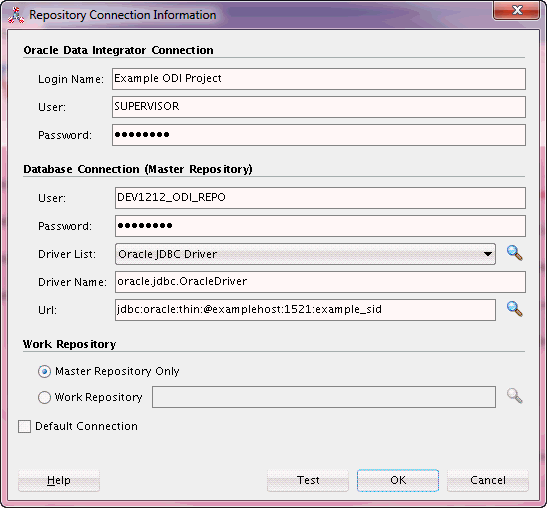
On the Oracle Data Integrator Login screen, click the plus sign (+) icon to create a new login. On the Repository Connection Information screen:
-
Oracle Data Integrator Connection section:
-
Login Name: Specify a custom login name.
-
User: Specify
SUPERVISOR(all CAPS). -
Password: Specify the supervisor password of RCU Custom Variable screen.
-
-
Database Connection (Master Repository) section
-
User: Specify the schema user name for the Master repository. This should be
prefix_ODI_REPOas specified on the Select Components screen in RCU. -
Password: Specify the schema password for the Master repository. This was specified on the Schema Passwords screen in RCU.
-
Driver List: Select the appropriate driver for your database from the drop-down list.
-
URL: Specify the connection URL. Click on the magnifying glass icon for more information about the connection details for your driver.
-
-
In the Work Repository section, select Master Repository Only.

Description of the illustration studio_repo_connection.gif
Click Test to test the connection, and fix any errors. After the test is successful, click OK to create the connection.
-
- Task 3 Specifying a New Wallet Password
-
Specify and confirm a new wallet password on the New Wallet Password screen.
- Task 4 Logging in to the Master Repository
-
After you have successfully created a new login, you are returned to ODI Studio.
Select Connect to Repository and, when prompted, provide your new wallet password.
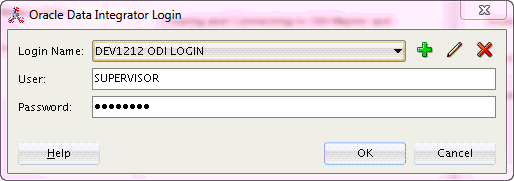
After providing your wallet password, the Oracle Data Integrator Login screen appears. Provide the following information to log in:
-
In the drop-down menu in the Login Name field, select the name of the new login you just created.
-
Specify
SUPERVISORas the user name. -
Provide the password for the Supervisor user.

Description of the illustration studio_odi_login.gif
When you are logged in, follow the instructions in Section 4.5 to create the agent.
-
4.5 Creating an Agent in the Master Repository Using ODI Studio
A physical agent corresponds to a single standalone agent or a Java EE agent. A physical agent should have a unique name in the topology.
As part of its startup sequence, an agent connects to the Master Repository to see if there is a physical agent defined with its name. If it finds its entry, the agent continues with startup and, once started, it reads all the scheduled jobs of itself from the repository and starts processing.
If there is no physical agent entry for an agent, then the agent startup fails.
Follow the instructions in this section to create an ODI agent after you have connected to the repository in ODI Studio.
Note:
If you do not wish to configure any of the agent types, and you just want to work with ODI Studio, then the following procedures for creating Java EE and standalone agents are not necessary.
- Task 1 Adding an Agent to the Oracle Data Integrator Topology
-
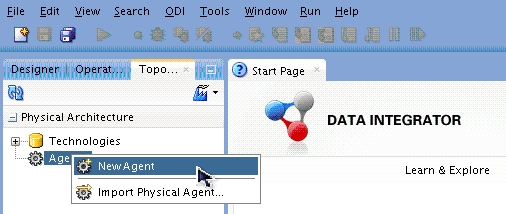
In the navigation pane on the left side, select the Topology tab, then right-click Agents, then select New Agent.

Description of the illustration studio_add_new_agent.gif
- Task 2 Specifying the Agent Details
-
Specify the new agent details as summarized in the following table:
Field Description Name
Specify
OracleDIAgent1as the agent name.This name must match the system component name specified in Task 8 in Section 7.2.2.
Host
Enter the IP address or name of the machine where the agent is running. Do not use "localhost."
Port
Enter the port number on which the agent listens.
For more information about the fields in this screen, see "Creating a Physical Agent" in Administering Oracle Data Integrator.
Note:
If your environment includes a cluster with Oracle HTTP Server acting as a front-end to the cluster, you should provide the host name and port of the Oracle HTTP Server host instead.

Description of the illustration studio_config_new_agent_1.gif
- Task 3 Saving Your Changes
-
From the ODI Studio menu, select File, then select Save All to save your changes.
4.6 Starting the New Agent
To start the new agent go to one of the following sections:
To start a new Java EE agent, go to Section 5.4, "Starting a Java EE Agent."
To start a new standalone agent, go to Section 6.4, "Starting a Standalone Agent Using Node manager."
To start a new colocated standalone agent, go to Section 7.4, "Starting a Colocated Standalone Agent."
4.7 Performing Next Steps
Section 8.1 contains basic administration tasks. You should familiarize yourself with the tasks described in this section and perform them as needed to verify that your domain is properly configured.
Section 8.2 contains additional domain configuration tasks that take advantage of additional Oracle Fusion Middleware products and features.
Section 8.3 contains common tasks to help prepare your Oracle Data Integrator environment for development.
Section 8.4 contains important tasks to help prepare your environment to move to a highly available environment.