6 Building XQueries
This chapter describes how to build XQueries.
This chapter contains the following sections:
6.1 How To
These sections describe how to build XQueries:
-
Section 6.1.2, "Add a Complex Child Element to a Return Type"
-
Section 6.1.4, "Create Conditional Elements in Return Types"
6.1.1 Create a Return Type
This topic describes the basics of creating return types for logical entity data services in the Query Mapper and directly in XML.
This section describes the following topics:
6.1.1.1 Choose a Technique
Data services use both XML types and return types.
XML types represent the shape of a logical data service, in the form of an XML schema. They are templates from which return types are created, comparable to a Java class. You use an XML type when you first create a logical entity service and add an XML schema to define its shape.
Figure 6-1 Adding an XML Type to a Service
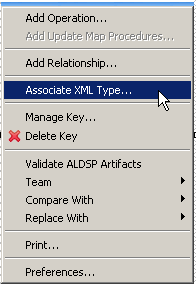
Description of "Figure 6-1 Adding an XML Type to a Service"
Return types represent the shape of data that a query produces when it is run. They are specific instances of an XML type, comparable to a Java object. Return types are the R in an XQuery FLWOR clause. For example, a service's primary read function returns a return type.
Figure 6-2 Checking the Return Type of a Read Function
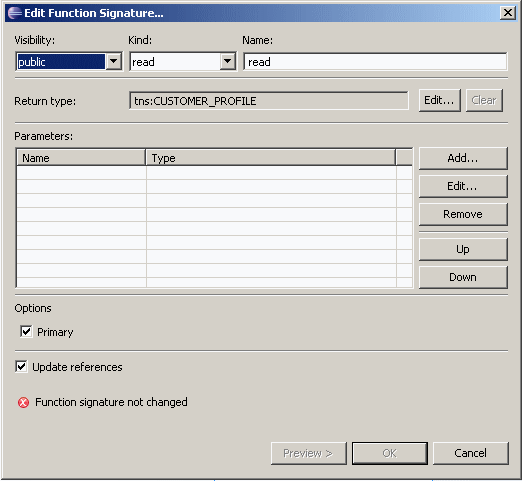
Description of "Figure 6-2 Checking the Return Type of a Read Function"
An XML type is the backbone of a logical data service, because it defines the data the service returns. The XML schema that represents the XML type can combine any elements from any data sources the logical data service uses, including relational sources, web services, XML files, text files, and Java methods.
The schema for the logical data service is designed as a separate layer of the dataspace project, regardless of the actual structure of the underlying physical data sources. The schema is not required to use all elements in, or the same structure as, the physical data sources.
You can create a return type schema, an XSD file, in two ways:
-
Top down, in an XML editor, either the one built into Eclipse for WebLogic or a standalone editor.
-
Bottom up, by building the service visually in Query Map view and then using the Save and Associate XML Type command.
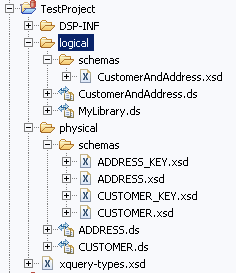
You should create the XSD file in the logical layer of your dataspace project, as it belongs to the logical data service. Eclipse for WebLogic provides several XML editors, which you can see if you right-click an XSD file in the Project Explorer and choose Open With.
Figure 6-3 Choosing an XML Editor in Eclipse for WebLogic
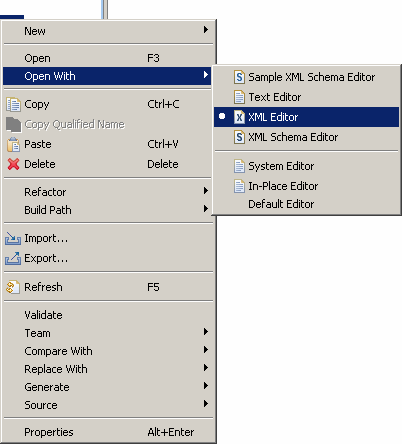
Description of "Figure 6-3 Choosing an XML Editor in Eclipse for WebLogic"
6.1.1.2 Write a Return Type Schema
To create the schema in an XML editor in Eclipse for WebLogic:
-
Choose a location for logical data service schemas in your dataspace project.
You may want to create a folder for schemas in the logical layer of your project (for example,
MyDataSpace/logical/schemas) separate from the schemas folder that Oracle Data Service Integrator auto-generates for physical data services. -
Choose File > New > Other.
-
Choose XML > XML Schema, and click Next.
-
Choose a folder, enter a file name that ends in
.xsd, and click Finish.The generated schema looks something like this:
<?xml version="1.0" encoding="UTF-8"?> <schema xmlns="http://www.w3.org/2001/XMLSchema" targetNamespace="http://www.example.org/MySchema" xmlns:tns="http://www.example.org/MySchema" elementFormDefault="qualified"> </schema> -
In the XML editor, change the URL of
targetNamespaceto one within your dataspace project:targetNamespace="ld:logical/CustomerAndAddress"
The targetNamespace URL should start with the prefix
ld:, and logical indicates that the schema resides in the folder named logical in your dataspace project. The identifier that follows (here, CustomerAndAddress) defines the namespace. -
Delete the namespace definition for
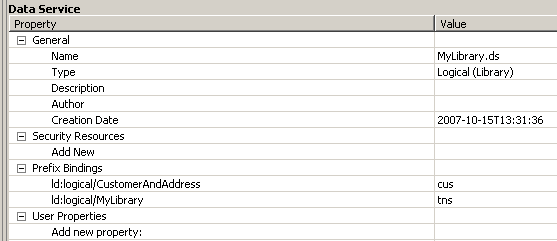
xmlns:tns, if your service bindstnsto a different namespace. You can check this by clicking the Overview tab, then the Properties tab.At this point, your schema file should like this:
<?xml version="1.0" encoding="UTF-8"?> <schema xmlns="http://www.w3.org/2001/XMLSchema" targetNamespace="ld:logical/CustomersAndOrders" elementFormDefault="qualified"> </schema> -
Continue adding complex types, elements, and attributes using the XML editor.
-
Save the file, then right-click anywhere in it and choose Validate.
You can also create the return type schema using an XML editor outside Eclipse for WebLogic and then move the XSD file to your Eclipse for WebLogic dataspace project.
6.1.1.3 Generate a Schema File
You can also have Oracle Data Service Integrator generate the return type schema after you build the query map visually.
To generate the schema in Eclipse for WebLogic, follow these instructions (or see Section 1.3, "Example: How to Create Your First Data Services" for detailed instructions):
-
Create a dataspace.
-
Create physical data services in the dataspace.
-
Also in the dataspace, create a logical data service (File > New > Logical Data Service).
-
Create a Read function in the logical data service (Overview tab, right-click, Add Operation).
-
Drag the Read functions of the physical services you want to use to the Query Map tab.
-
Click Overwrite
 , and drag the root element in the For box to the root element in the Return type.
 -
Right-click on the complex element in the Return type, and choose Expand Complex Mapping.
-
Right-click the return type box, and choose Save and Associate XML Type.
Figure 6-6 Save and Associate XML Type dialog
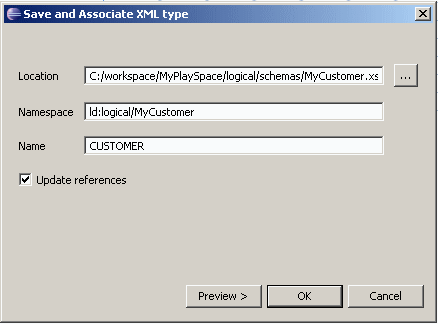
Description of "Figure 6-6 Save and Associate XML Type dialog"
For Location, select the correct folder for logical schemas. In Namespace, enter a namespace that starts with
ld:logical, such asld:logical/MyCustomer. Be sure that the name of the root element (here,CUSTOMER) is unique within the namespace. (Theldnamespace refers to the original name of Oracle Data Service Integrator, Liquid Data). -
Click OK.
-
Save the file, then right-click anywhere in it and choose Validate.
6.1.1.4 See Also
-
Section 6.1.2, "Add a Complex Child Element to a Return Type"
-
Section 1.3, "Example: How to Create Your First Data Services"
-
XML Schema Tutorial (W3Schools)
-
XML Schema Part 1: Structures (W3C)
-
XML Schema Part 2: Datatypes (W3C)
6.1.2 Add a Complex Child Element to a Return Type
Add a Complex Child Element to a Return Type
This topic describes how to add a complex child element to a return type, in Eclipse for WebLogic or in the XML source of the return type.
This section describes the following topics:
6.1.2.1 Add the Child Element Visually
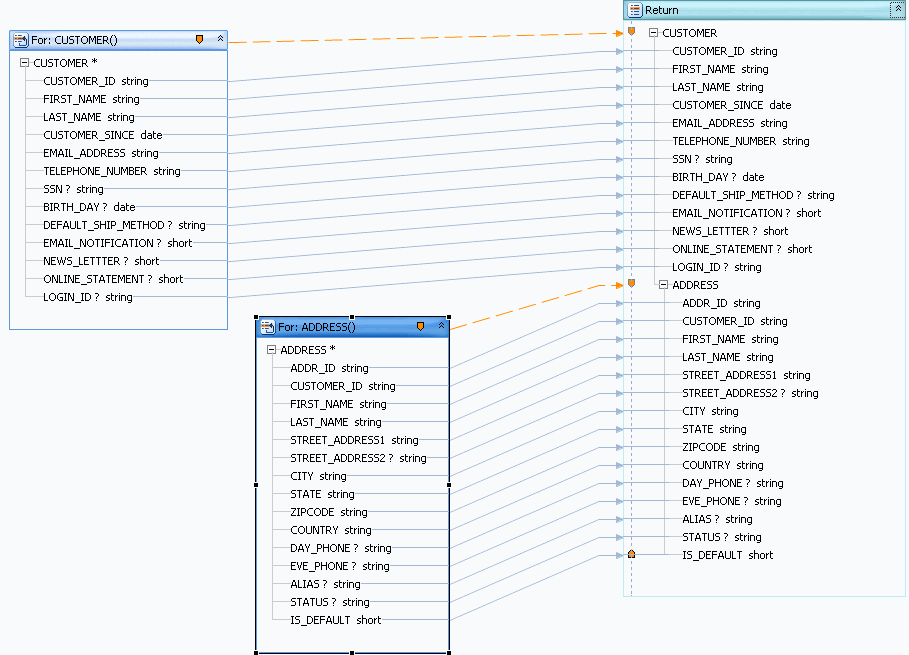
Once you create a return type, you can add a complex type as a child of any element, in Query Map view. The complex child element must represent a physical data service. The parent element can have a one-to-many or one-to-one relationship with the child, depending on how you want the result data returned.
Figure 6-7 A Simple Return Type Before Adding a Child Element
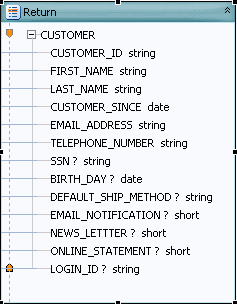
Description of "Figure 6-7 A Simple Return Type Before Adding a Child Element"
To add a complex child element to a return type visually:
-
Open the logical data service in Eclipse for WebLogic.
-
Check Project Explorer. Be sure that your dataspace project has a physical data service for the complex child element you want to add. If it does not, add one
File > New > Physical Data Service
-
Click the Query Map tab.
-
In the return type, right-click the new parent element, and choose Add Complex Child Element.
Figure 6-8 Add Complex Child Element dialog
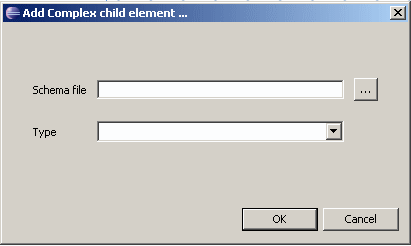
Description of "Figure 6-8 Add Complex Child Element dialog"
-
For the Schema File field, browse (...) to the schema of the physical data service that represents the complex child element.
-
For Type, choose a complex type from the schema, then click OK.
-
From Project Explorer, drag the primary read function of the physical data service to the Query Map.
-
Starting from the child element's
Forblock, drag the zone icon to the child element in the return type. -
Starting from the child element's
Forblock, drag the parent type of the complex element to the return type.This step maps all of the elements in the complex child to the return type.
-
Right-click the title bar of the return type, and choose Save and Associate XML Type.
-
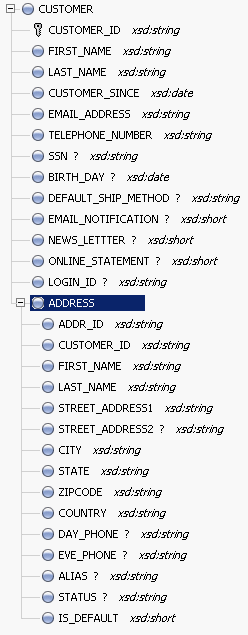
Click the Overview tab, and expand the schema to view the complex child in the return type.
You can also right-click the schema and choose Edit Schema to view the XML source.
6.1.2.2 Edit the XML Source
Adding the complex child element to the return type in the XML source accomplishes the same thing as adding it visually.
To add a complex child element to a return type in XML source:
-
Open the logical data service in Eclipse for WebLogic.
-
Check Project Explorer. Be sure that your dataspace project has a physical data service for the complex child element you want to add. If it does not, add it:
File > New > Physical Data Service
-
Click the Overview tab.
-
Right-click the return type schema in the center, and choose Edit Schema.
You see the schema for the logical data service, without the child element:
<?xml version="1.0" encoding="UTF-8"?> <xs:schema targetNamespace="ld:logical/MyCustomer" xmlns:xs="http://www.w3.org/2001/XMLSchema"> <xs:element name="CUSTOMER"> <xs:complexType> <xs:sequence> <xs:element name="CUSTOMER_ID" type="xs:string"/> <xs:element name="FIRST_NAME" type="xs:string"/> <xs:element name="LAST_NAME" type="xs:string"/> <xs:element name="CUSTOMER_SINCE" type="xs:date"/> </xs:sequence> </xs:complexType> </xs:element> </xs:schema> -
In Project Explorer, right-click the schema file of the physical data service that represents the child element, and choose Open With.
You see the schema of the child element.
-
Copy the complex type from the physical data service schema to the logical data service schema. Take only the complex type:
<xs:complexType> <xs:sequence> <xs:element name="ADDR_ID" type="xs:string"/> <xs:element name="CUSTOMER_ID" type="xs:string"/> <xs:element name="FIRST_NAME" type="xs:string"/> <xs:element name="LAST_NAME" type="xs:string"/> <xs:element name="STREET_ADDRESS1" type="xs:string"/> <xs:element name="STREET_ADDRESS2" type="xs:string" minOccurs="0"/> <xs:element name="CITY" type="xs:string"/> <xs:element name="STATE" type="xs:string"/> <xs:element name="ZIPCODE" type="xs:string"/> <xs:element name="COUNTRY" type="xs:string"/> <xs:element name="DAY_PHONE" type="xs:string" minOccurs="0"/> <xs:element name="EVE_PHONE" type="xs:string" minOccurs="0"/> <xs:element name="ALIAS" type="xs:string" minOccurs="0"/> <xs:element name="STATUS" type="xs:string" minOccurs="0"/> <xs:element name="IS_DEFAULT" type="xs:short"/> </xs:sequence> </xs:complexType> -
Right-click in the schema, and choose Validate.
6.1.2.3 See Also
-
XML Schema Tutorial (W3Schools)
-
XML Schema Part 1: Structures (W3C)
-
XML Schema Part 2: Datatypes (W3C)
6.1.3 Check Namespaces in Return Types
How To Check Namespaces in Return Types
This topic shows you how to make sure the namespaces used in your return type are correct.
This section describes the following topics:
6.1.3.1 Check Prefix Bindings
In the return type, a child element must be in the same namespace as its parent. If a return type uses elements in different namespaces, you cannot deploy the logical data service to the server or test it from Eclipse for WebLogic.
The exception to this rule is when the parent and child are in different namespaces, but both namespaces have the same prefix binding. Check prefix bindings first, and then edit the namespace, if needed.
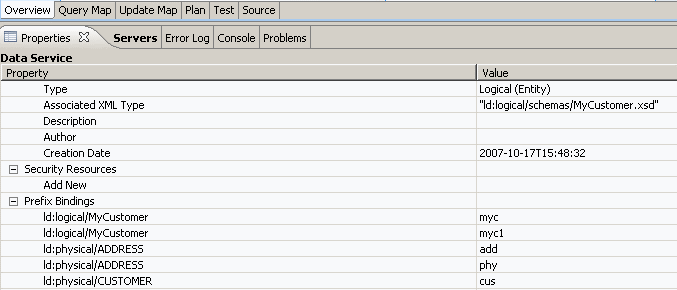
To check prefix bindings in the Overview tab:
-
Click the Overview tab.
-
Click the Properties tab (if it's not visible, choose Window > Show View > Properties).
To check prefix bindings in Source:
-
Click the Source tab.
-
Look for the XQuery namespace statements:
import schema namespace myc="ld:logical/MyCustomer" at
"ld:logical/schemas/MyCustomer.xsd";
declare namespace cus= "ld:physical/CUSTOMER";
import schema namespace myc1="ld:logical/MyCustomer" at
"ld:logical/schemas/MyCustomer_KEY.xsd";
In both these examples, the myc and myc1 namespaces have the same prefix binding. You can have a parent element in one and a child element in another. But if you have a parent element in myc and a child in cus, you need to change one namespace in the return type.
6.1.3.2 Edit the Namespace
Once you check the prefix binding, you can check a namespace used in a return type and change it in the Query Map or Source view.
To edit a namespace in Query Map view:
-
Click the Query Map tab.
-
Select the parent element in the return type, then click it.
Be sure to select and then click; do not double-click.
-
Select the child element in the return type, then click it.
-
If the child element is in a different namespace, change it to the namespace of the parent.
-
Right-click the title bar of the return type, and choose Save and Associate XML Type.
Figure 6-13 Save and Associate XML Type dialog

Description of "Figure 6-13 Save and Associate XML Type dialog"
-
Enter the correct location, namespace, and root element name for the return type. Click OK.
To edit a namespace in Source view:
-
Click the Source tab.
-
Expand the primary
Readfunction: -
Locate the namespace of the child element and change it to the namespace of the parent, both in the start and end elements:
declare function myc:read() as element(myc:CUSTOMER)*{ for $CUSTOMER in cus:CUSTOMER() return <myc:CUSTOMER> ... { for $ADDRESS in add:ADDRESS() where $CUSTOMER/CUSTOMER_ID eq $ADDRESS/CUSTOMER_ID return <myc:ADDRESS > ... </myc:ADDRESS> } -
Save the changes.
6.1.3.3 See Also
-
XML Schema Tutorial (W3Schools)
-
XML Schema Part 1: Structures (W3C)
-
XML Schema Part 2: Datatypes (W3C)
6.1.4 Create Conditional Elements in Return Types
These sections describe how to add a condition to a return type and determine the elements that are returned when the condition is true or false:
6.1.4.1 Add the Condition
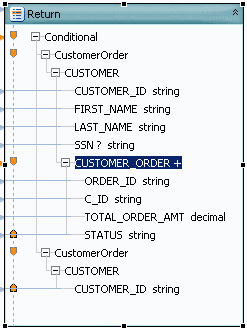
A condition in a return type defines two groups of elements: those returned when an expression is true, and those returned when an expression is false. When you add a condition to a return type, you see two groups of return type elements.
To add a condition to the return type:
-
Click the Query Map tab.
-
Right-click an element in the return type, and choose Make Conditional.
The conditional element is now duplicated.
6.1.4.2 Create the Expression
You must add the conditional expression, that determines which element is returned, in the XQuery source. You cannot add a conditional expression in the expression editor.
-
Click the Source tab.
The primary
Readfunction now has anif...elseclause:declare function tns:read() as element(cus:CustomerOrder)*{ for $CUSTOMER in cus1:CUSTOMER() return if (true()) then <cus:CustomerOrder> ... </cus:CustomerOrder> else <cus:CustomerOrder> ... </cus:CustomerOrder> };The expression after the if statement is evaluated, and the service returns either the first or second set of elements. The XQuery
true()function simply returns the Boolean value true. -
In the XQuery source, replace
true()with another XQuery expression, for example:if ( fn:data( $CUSTOMER/LAST_NAME ) = "Black" ) then
You can use any XQuery expression that returns a value of true or false. In this example, if a customer has the last name Black, the first element group is returned. If not, the second element group is returned.
To add the value of an element in a
Forblock, use the XQueryfn:datafunction, which takes the value of an element:<LAST_NAME>Black</LAST_NAME>
-
Click the Query Map tab.
-
In the return type, add or delete elements in either group to create the return groups you want.
Remember that the first group is returned if the expression is true, and the second group if the expression is false.
-
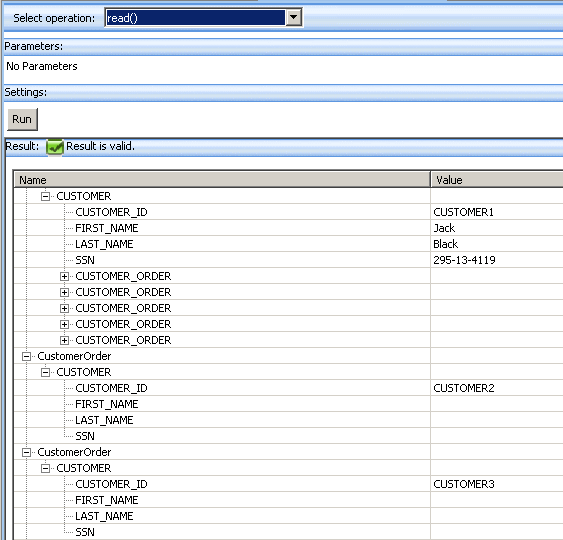
Click the Test tab. Choose the Read function, and click Run. Check that the results are what you intend.
In this example, the full group of elements is only returned for customers with the last name Black. For other customers, only the CUSTOMER_ID is returned.
6.1.4.3 See Also
-
Section 6.1.2, "Add a Complex Child Element to a Return Type"
-
Test a Read Function and Simple Update
-
Introduction to XQuery
http://www.devx.com/xml/Article/8046/0/page/3 -
XQuery Tutorial
http://www.w3schools.com/xquery/default.asp -
XQuery 1.0 Specification
http://www.w3.org/TR/xquery/
6.1.5 Add a Where Clause to a Query
These sections describe several ways of adding XQuery where clauses to queries to join relational data sources:
6.1.5.1 Define the Condition
A where clause in XQuery specifies criteria defining some return data. This is a simple XQuery where clause:
where $CUSTOMER/CUSTOMER_ID = "1111"
A where clause is usually part of an XQuery FLWOR (for-let-where-order by-return) expression. The where clause can be any XQuery expression, including another FLWOR expression. A common use of a where clause is to join two relational data sources, for example:
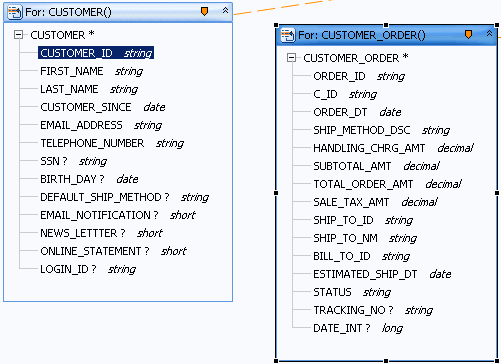
for $CUSTOMER_ORDER in cus1:CUSTOMER_ORDER()
where $CUSTOMER/CUSTOMER_ID eq $CUSTOMER_ORDER/C_ID
return
... xml elements here ...
The where clause here specifies a condition that defines a subset of results to return. The SQL statement Oracle Data Service Integrator generates from this XQuery expression creates a left outer join between two tables:
SELECT t1."CUSTOMER_ID" AS c1, t1."FIRST_NAME" AS c2, t1."LAST_NAME" AS c3,
t1."SSN" AS c4,t2."C_ID" AS c5, t2."ORDER_ID" AS c6, t2."STATUS" AS c7, t2.
"TOTAL_ORDER_AMT" AS c8
FROM "RTLCUSTOMER"."CUSTOMER" t1
LEFT OUTER JOIN "RTLAPPLOMS"."CUSTOMER_ORDER" t2
ON (t1."CUSTOMER_ID" = t2."C_ID")
ORDER BY t1."CUSTOMER_ID" ASC
Before you add a where clause to a logical data service, think about how to structure it. If you want to join two data sources, you can only do so on a key field that appears in both. In this example, the CUSTOMER table has a primary key named CUSTOMER_ID joined to a CUSTOMER_ORDER table with a foreign key named C_ID.
6.1.5.2 Join Tables with a Where Clause
The simplest way to create a where clause between two relational data sources is to map it in Query Map view.
To map the where clause:
-
Open a logical data service in Eclipse for WebLogic.
-
Click Query Map.
-
Drag the read functions
 of at least two physical data sources from Project Explorer to the Query Map view.
 -
In Query Map view, drag from a key element in the first data source to the corresponding key element in the second.
If you click the second data source, you see the XQuery where clause in the expression editor:
Where $CUSTOMER/CUSTOMER_ID eq $CUSTOMER_ORDER/C_ID
6.1.5.3 Use an XQuery Function in a Where Clause
A where clause can also contain an XQuery function, including any built-in or Oracle-defined functions available from the Design Palette. The where clause is defined on an element within a For node.
To create a where clause with an XQuery function:
-
Click Query Map.
-
Click the For title bar of the node that contains the element.
-
Click Add Where Clause
 to insert the where clause.
 -
Open the Design Palette (Window > Show View > Design Palette).
-
Expand XQuery Functions, then choose a function (for example: Duration, Date, and Time Functions > fn:year-from-date).
-
Drag the function to the expression editor.
-
Delete
$argin the function, then click the element in theFornode that you want to add. -
Add an operator and a value to complete the expression.
fn:year-from-date($CUSTOMER/CUSTOMER_SINCE) < 2000
You can use any of the XQuery operators available in Design Palette > XQuery Operators.
-
Click Save
 .
.In Source view, the where clause in the
readfunction looks like this:declare function tns:read() as element(tns:CUSTOMER_PROFILE)*{ for $CUSTOMER in cus1:CUSTOMER() where fn:year-from-date($CUSTOMER/CUSTOMER_SINCE) < 2000 return ... xml elements here ... -
Test the query in Test view, preferably on sample data, to make sure the results are what you expect.
6.1.6 Use the XQuery Expression Editor
How To Edit XQuery Expressions
This topic describes how to edit XQuery expressions in the expression editor in Eclipse for WebLogic.
This section describes the following topics:
6.1.6.1 Overview
You can edit the generated XQuery expressions in an update map using the expression editor.
Figure 6-20 The Expression Editor in an Update Map

Description of "Figure 6-20 The Expression Editor in an Update Map"
The update map expression language is a subset of XQuery syntax. In an update map, you can use any of the following XQuery constructs.
| Type | Description | Example |
|---|---|---|
|
Variable |
A variable already defined in a For Each or Update block in the update map. $$root is a special predefined variable that refers to the root of the service's XML type. |
|
|
Constant |
A numeric, string, or other constant. |
"a" "12345" |
|
Constant Cast |
A constant cast to another XSD data type using the parentheses operator. |
|
|
Function |
A call to any XQuery function. You can see the built-in and Oracle-provided functions in the Design Palette. You can use a variable, path, or constant as an argument to a function. |
|
|
Path |
An expression that locates an XML element in a tree using variables, elements, and attributes. The syntax is: $VARIABLE_NAME /elementName @attributeName |
|
Namespace prefixes are declared in the data service's XQuery source, which you can see in the Source tab. If a namespace is only used in the update map, and not in the logical data service, you must declare it. If a namespace cannot be resolved, it is shown with the prefix ns?.
The most common ways you use the expression editor are to:
-
Add a constant to an unmapped element
-
Cast a constant to an XSD data type, especially to resolve update block elements with no mappings
-
Use an XQuery function available in the Design Palette to cast a value
-
Use a custom XQuery cast function you have written
6.1.6.2 The fn-bea:value Function
A mapping between an element in a return type and an element in an update block uses the fn-bea:value function with a path name, for example:
fn-bea:value($CUSTOMER/CUSTOMER_ID)
An update mapping should always use fn-bea:value, whether Oracle Data Service Integrator auto-generates the mapping or you draw it. If you remove the fn:bea:value function from the expression and simply use an XQuery path expression ($CUSTOMER/CUSTOMER_ID), the element becomes disabled in the update map and you see this error message:
The expression does not match the expected type for this element
The expression assigned to this element is not valid
Hint: did you forget to use the value function?
The fn-bea:value function is required, because an update map updates a Service Data Object (SDO) and requires a special XML structure called a datagraph that includes a change summary showing both the old and new values. The fn-bea:value function handles the update to the SDO correctly.
If you do not use fn-bea:value, Oracle Data Service Integrator throws an exception when you attempt to update the value.
6.1.6.3 See Also
-
How To Handle Unmapped Required Values (includes Cast a Constant)
-
W3Schools XQuery Tutorial
6.1.7 Use the Source Editor
This section describes the Oracle Data Service Integrator Source editor and highlights its editing features. The following topics are included:
6.1.7.1 What is the Source Editor?
The Source editor is available from a tab in the Oracle Data Service Integrator Eclipse perspective. As you build up your data service, the underlying source is always available from this editor.
Data service source typically:
-
References a schema as the data service's XML type (for Entity data services).
-
Defines functions in the data service.
-
Declares namespaces for referenced data services.
-
Contains
pragmadirectives to the query engine.
In addition, data services created from physical data sources contain physical source metadata. For example, data services based on relational data describe the XML type (such as xs:string), the XPath, native size, native type, null-ability setting and so forth.
In developing data services there are many occasions when it is necessary or convenient to view and/or modify source.
The Source editor allows you to directly edit data service source code, as well as schemas. Changes to source are immediately reflected in other data service modes such as the Query view editor; similarly, source is immediately updated when changes are made through the Query editor or in Overview mode.
Tip:
When a data service is created the root level of your dataspace has "ld:" as its namespace. ld referred to the original name of Oracle Data Service Integrator, Liquid Data.
declare namespace ns4= "ld:Update/PhysicalDSs/SDO_WLCO_SET";
Note:
Data Service Annotations
6.1.7.2 Searching Source
Eclipse offers several types of search.
-
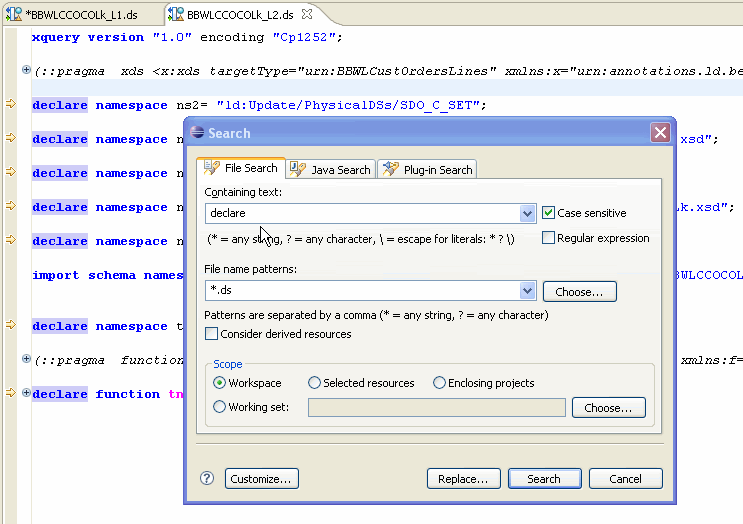
You can find all occurrences of a string in Source view using Eclipse Search menu. Each instance of the term in your project will be highlighted.
-
You can use page search (Ctrl-F). search to find the next occurrence of a term. Standard search/replace functionality is available.
6.1.7.3 Navigating to Specific Functions
To open Source View to a particular query function in Overview mode, first select the function, then click the Source tab.
6.1.7.4 Color Coding
XQuery documents in Source View are color-coded according to the following scheme:
| Color | Meaning |
|---|---|
|
Blue |
Keywords |
|
Dark gray |
Comments |
|
Magenta |
Variable |
|
Dark green |
XML markup |
|
Red |
Error conditions |
6.1.7.5 Code Completion
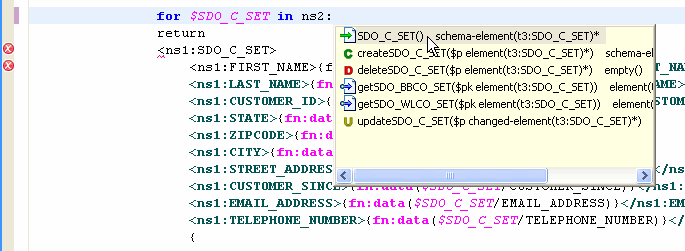
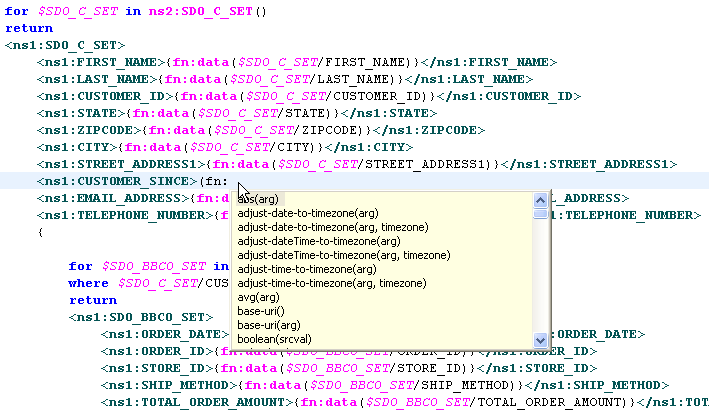
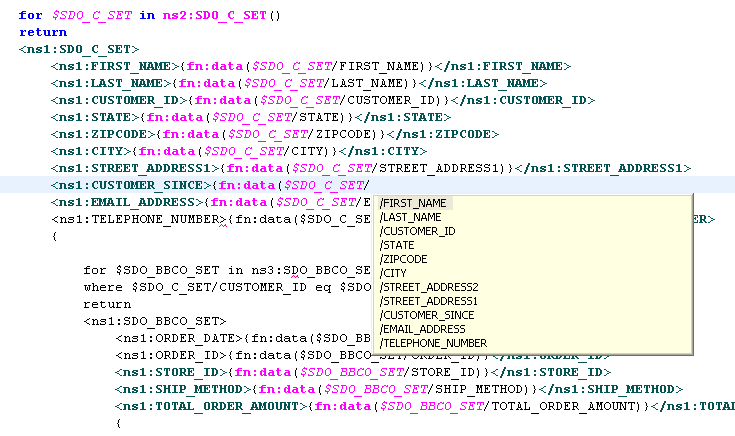
Code completion is available for XPath built-in and user-defined functions. Similarly, function completion is invoked when you type a namespace prefix followed by a colon.
Figure 6-22 Function Completion from Namespace
Description of "Figure 6-22 Function Completion from Namespace"
Figure 6-23 XPath Completion in Source View
Description of "Figure 6-23 XPath Completion in Source View"
Figure 6-24 Selecting from Available XQuery Functions
Description of "Figure 6-24 Selecting from Available XQuery Functions"
6.1.7.5.1 Error Identification
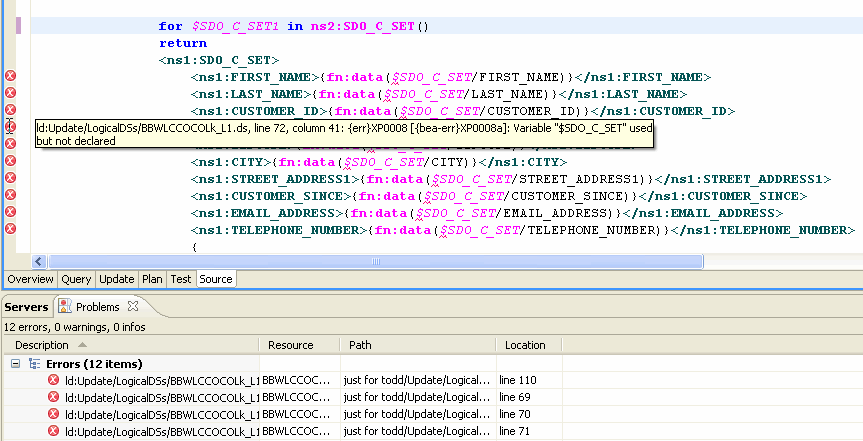
Syntax errors that occur in source either as a result of editing or as a result of changes made in the XQuery Editor appear in the Problems tab.
Windows > Show View > Problems
Figure 6-25 Induced Error Condition in Source View
Description of "Figure 6-25 Induced Error Condition in Source View"
Tip:
-
Click on the error condition in the Problems tab, your cursor will be placed on the relevant line of code.
-
Mouse over the error indicator in the Source editor, the complete error condition will appear.
-
Right-click on the left margin of Source view several options appear including the option to make line numbering active.
-
Right-click anywhere in Source view to access Source editor Preferences including permanently displaying line numbering.
6.2 Reference
These sections provide reference information for building XQueries:
6.2.1 XQuery Language Version Support
Oracle Data Service Integrator supports the XQuery language as specified in XQuery 1.0: An XML Query Language, W3C Working Draft of July, 23, 2004. You can use any feature of the language described by the specification.
Oracle Data Service Integrator supplements the base XQuery syntax with a set of elements and directives that appear in Source View as pragmas. Pragmas are a standard XQuery feature that give implementors and vendors a way to include custom elements and directives within XQuery code.
The Oracle implementation of XQuery also contains some extensions to the language and additional functions. Oracle extensions to XQuery and links to W3C documentation are described in the XQuery and XQSE Developer's Guide (http://download.oracle.com/docs/cd/E13162_01/odsi/docs10gr3/xquery/index.html).
6.2.2 Built-in XQuery Functions
XQuery Functions in Eclipse for WebLogic
Eclipse for WebLogic provides numerous XQuery functions in the Design Palette. If it is not visible you can access it with:
Window > Show View > Design Palette
XQuery functions can be utilized in both Query and Update Map views.
Figure 6-26 XQuery Functions in the Design Palette
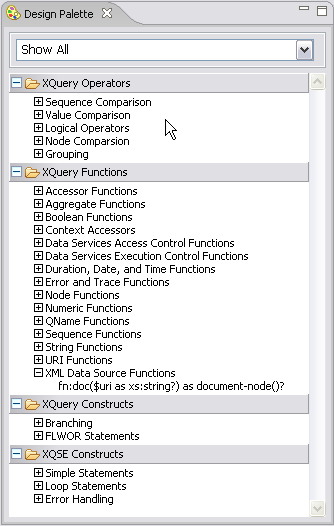
Description of "Figure 6-26 XQuery Functions in the Design Palette"
Tip:
-
For information on
fn-beaXQuery functions, see the XQuery and XQSE Developer's Guide. -
For information on standard XQuery functions, see the W3C XQuery 1.0 and XPath 2.0 Functions and Operators specification.
6.3 Related Topics
-
Section 1.3, "Example: How to Create Your First Data Services"
-
Test a Read Function and Simple Update
-
Test a Create or Delete Procedure
-
How To Develop Good XQSEs
-
Understanding Data Service Annotations
-
XQuery Scripting Extensions
