3 Configuring the Oracle Enterprise Repository Domain
This chapter describes how to create and configure the WebLogic Server domain for Oracle Enterprise Repository.
The following topics are covered:
3.1 Creating the Database Schemas
Before you can configure an Oracle Enterprise Repository domain, you must install the Oracle Enterprise Repository (OER) schema on a certified database for use with this release of Oracle Enterprise Repository.
Follow the instructions in this section to install these schemas:
-
Section 3.1.1, "Installing and Configuring a Certified Database"
-
Section 3.1.2, "Starting the Repository Creation Utility (RCU)"
-
Section 3.1.3, "Navigating the RCU Screens to Create the Schemas"
3.1.1 Installing and Configuring a Certified Database
Make sure you have installed and configured a certified database, and that the database is up and running.
For more information, see "Installing a Database and Database Schemas" in Oracle Fusion Middleware Planning an Installation of Oracle Fusion Middleware.
3.1.2 Starting the Repository Creation Utility (RCU)
Note:
Before creating product schemas, ensure that you have already applied the RCU patch as described in Section 2.4.1, "Installing the RCU Patch".To start the Repository Creation Utility (RCU):
-
Navigate to the
ORACLE_HOME/oracle_common/bindirectory on your system. -
Start RCU:
On UNIX operating systems:
./rcu
On Microsoft Windows operating systems:
rcu.bat
3.1.3 Navigating the RCU Screens to Create the Schemas
Follow the instructions in this section to create the schema for Oracle Enterprise Repository:
- Task 1 Introducing RCU
-
Click Next.
- Task 2 Selecting a Method of Schema Creation
-
Ensure that Create Repository is selected, and then select System Load and Product Load on the Create Repository screen. The procedure in this document assumes that you have the necessary privileges to perform DBA activities.
Tip:
For more information about the options on this screen, see "Create repository" in Oracle Fusion Middleware Creating Schemas with the Repository Creation Utility. - Task 3 Providing Database Credentials
-
On the Database Connection Details screen, provide the database connection details for RCU to connect to your database.
Click Next to proceed, then click OK on the dialog window confirming that connection to the database was successful.
Tip:
For more information about the options on this screen, see "Database Connection Details" in Oracle Fusion Middleware Creating Schemas with the Repository Creation Utility. - Task 4 Specifying a Custom Prefix and Selecting Schemas
-
Specify the custom prefix you want to use for your schemas, then expand SOA Suite. Select Oracle Enterprise Repository.
Note:
It is important that you select the correct schema only for the product that you are installing. For instance, if you are installing Oracle Enterprise Repository, do not select the schema for Oracle API Catalog; if you are installing Oracle API Catalog, do not select the schema for Oracle Enterprise Repository.The custom prefix is used to logically group these schemas together for use in this domain.
Tip:
For more information about custom prefixes, see "Understanding Custom Prefixes" in Oracle Fusion Middleware Creating Schemas with the Repository Creation Utility.For more information about how to organize your schemas in a multi-domain environment, see "Planning Your Schema Creation" in Oracle Fusion Middleware Creating Schemas with the Repository Creation Utility.
Tip:
You must make a note of the custom prefix you choose to enter here; you will need this later on during the domain creation process.Click Next to proceed, then click OK on the dialog window confirming that prerequisite checking for schema creation was successful.
- Task 5 Specifying Schema Passwords
-
Specify how you want to set the schema passwords on your database, then specify and confirm your passwords.
Tip:
You must make a note of the passwords you set on this screen; you will need them later on during the domain creation process. - Task 6 Completing Schema Creation
-
Navigate through the remainder of the RCU screens to complete schema creation. When you reach the Completion Summary screen, click Close to dismiss RCU.
For more information about RCU and its features and concepts, see Oracle Fusion Middleware Creating Schemas with the Repository Creation Utility
3.2 Configuring Your WebLogic Domain
This section provides instructions for creating a WebLogic domain using the configuration wizard. For more information on other methods available for domain creation, see "Additional Tools for Creating, Extending, and Managing WebLogic Domains" in Creating Domains Using the Configuration Wizard.
Note:
Before configuring the WebLogic Domain, ensure that you have installed the WebLogic Server patch as described in Section 2.4.2, "Installing the WebLogic Server Patch".The following topics are covered in this section:
3.2.1 Starting the Configuration Wizard
To begin domain configuration, navigate to the ORACLE_HOME/oracle_common/common/bin directory and start the WebLogic Server Configuration Wizard.
On UNIX operating systems:
./config.sh
On Microsoft Windows operating systems:
config.cmd
On Windows operating systems, you can also start the Configuration Wizard from the Start menu by selecting All Programs, then selecting Oracle, then selecting OracleHome, then selecting WebLogic Server 12c (12.1.3), then selecting Tools, then selecting Configuration Wizard.
3.2.2 Navigating the Configuration Wizard Screens to Configure the Domain
Follow the instructions in this section to create and configure the domain.
Note:
You can use the same procedure described in this section to extend an existing domain. If your needs do not match the instructions given in the procedure, be sure to make your selections accordingly, or refer to the supporting documentation for additional details.If you need to configure multiple products in a single domain, refer to "Installing Multiple Products in the Same Domain" in Oracle Fusion Middleware Planning an Installation of Oracle Fusion Middleware for important information.
-
Task 1, "Selecting the Domain Type and Domain Home Location"
-
Task 8, "Configuring the Administration Server Listen Address"
-
Task 12, "Reviewing Your Configuration Specifications and Configuring the Domain"
-
Task 13, "Writing Down Your Domain Home and Administration Server URL"
- Task 1 Selecting the Domain Type and Domain Home Location
-
On the Configuration Type screen, select Create a New Domain.
In the Domain Location field, specify your Domain home directory.
Oracle recommends that you locate your Domain home in accordance with the directory structure summarized in "What are the Key Oracle Fusion Middleware Directories?" in Oracle Fusion Middleware Understanding Oracle Fusion Middleware, where the Domain home is located outside the Oracle home directory. This directory structure will help you avoid issues when you need to upgrade or reinstall your software.
Tip:
For more information about the Domain home directory, see "Choosing a Domain Home" in Oracle Fusion Middleware Planning an Installation of Oracle Fusion Middleware.For more information about reinstalling the software, see Section 7.10, "Reinstalling the Software".
For more information about the other options on this screen, see "Configuration Type" in Creating Domains Using the Configuration Wizard.
- Task 2 Selecting the Configuration Templates
-
On the Templates screen, make sure Create Domain Using Product Templates is selected, then select the Oracle Enterprise Repository template.
Note:
When installing Oracle Enterprise Repository, select only the Oracle Enterprise Repository template. Do not select the Oracle API Catalog template. Do not select both templates simultaneously.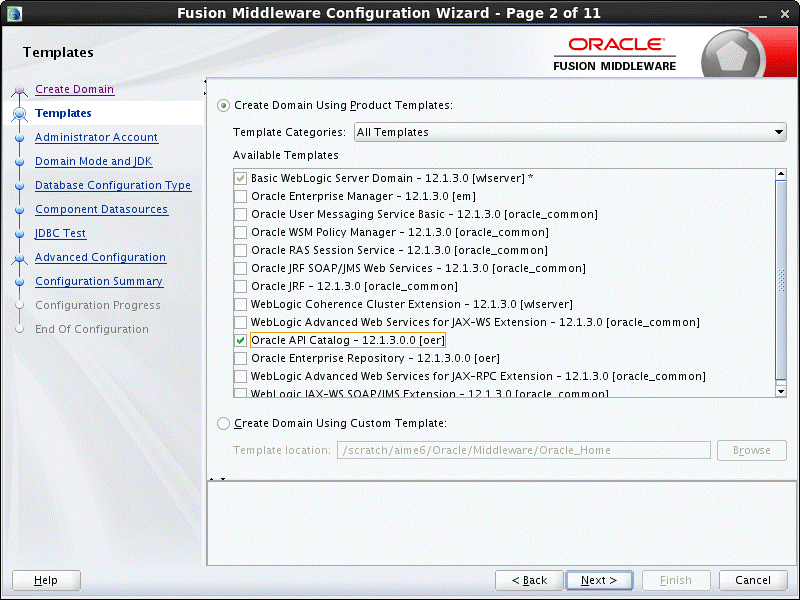
Description of the illustration ''config_templates.gif''
Tip:
For more information about the options on this screen, see "Templates" in Creating Domains Using the Configuration Wizard. - Task 3 Configuring the Administrator Account
-
On the Administrator Account screen, specify the user name and password for the default WebLogic Administrator account for the domain.
Oracle recommends that you make a note of the user name and password specified on this screen; you will need these credentials later to boot and connect to the domain's Administration Server.
- Task 4 Specifying the Domain Mode and JDK
-
On the Domain Mode and JDK screen:
-
Select Production in the Domain Mode field.
-
Select the Oracle Hotspot JDK in the JDK field.
Selecting Production Mode on this screen gives your environment a higher degree of security, requiring a user name and password to deploy applications and to start the Administration Server.
Tip:
More information about the options on this screen, including the differences between development mode and production mode, can be found in Domain Mode and JDK in Creating Domains Using the Configuration Wizard.In production mode, a boot identity file can be created to bypass the need to provide a user name and password when starting the Administration Server. For more information, see "Creating a Boot Identity File for an Administration Server" in Administering Server Startup and Shutdown for Oracle WebLogic Server.
-
- Task 5 Specifying JDBC Component Schema Information
-
The JDBC component schemas associated with the products for which you are creating the domain are listed in the lower half of the screen.
Select the schemas for which you want to specify data source settings by selecting the check box adjacent to each schema name.
Fill in each field at the top of the screen with information for the database schema you created in Section 3.1, "Creating the Database Schemas".
Field Description Vendor Select the database vendor. Driver Select the JDBC driver to use to connect to the database. The list includes common JDBC drivers for the selected database vendor. DBMS/Service Enter a database DBMS name, or service name if you selected a service type driver. Host Name Enter the name of the server hosting the database. Port Enter the port number to be used to connect to the server that hosts the database. Schema Owner Enter the user name for connecting to the database's Oracle Enterprise Repository schema. This is the schema user name that was specified on the "Schema Passwords" screen in RCU (see Section 3.1, "Creating the Database Schemas"). The default user name is
prefix_OER, whereprefixis the custom prefix that you defined in RCU.Schema Password Enter the password for connecting to the database's schema. This is the password that was specified for the Service Table component on the "Schema Passwords" screen in RCU (see Section 3.1, "Creating the Database Schemas"). Tip:
More information about the other options on this screen can be found in JDBC Component Schema in Creating Domains Using the Configuration Wizard. - Task 6 Testing the JDBC Connections
-
Use the JDBC Component Schema Test screen to test the datasource connections you have just configured.
A green check mark in the Status column indicates a successful test. If you encounter any issues, see the error message in the Connection Result Log section of the screen, fix the problem, then try to test the connection again.
Tip:
More information about the other options on this screen can be found in Test Component Schema in Creating Domains Using the Configuration Wizard - Task 7 Selecting Advanced Configuration
-
To complete domain configuration, select the following options on the Advanced Configuration screen:
-
Administration Server
This is required to properly configure the listen address of the Administration Server.
-
Managed Servers, Clusters and Coherence
This is required to configure the Managed Servers.
-
- Task 8 Configuring the Administration Server Listen Address
-
On the Administration Server screen, select the drop-down list next to Listen Address and select All Local Addresses.
(Optional) Select the Enable SSL check box to enable SSL.
- Task 9 Configuring Managed Servers
-
Use the Managed Servers screen to create a new Managed Servers:
-
Specify
oer_server1in the Server name column. -
In the Listen Address drop-down list, select All Local Addresses.
-
(Optional) Select the Enable SSL check box to enable SSL.
Tip:
More information about the options on this screen can be found in Managed Servers in Creating Domains Using the Configuration Wizard. -
- Task 10 Configuring a Cluster
-
There is no need to create a cluster for a single-instance installation. Click Next.
Tip:
More information about the options on this screen can be found in Clusters in Creating Domains Using the Configuration Wizard. - Task 11 Creating a New Machine
-
You do not need to create a new machine for a single-instance installation. Click Next.
Tip:
More information about the options on this screen can be found in Machines in Creating Domains Using the Configuration Wizard. - Task 12 Reviewing Your Configuration Specifications and Configuring the Domain
-
The Configuration Summary screen contains the detailed configuration information for the domain you are about to create. Review the details of each item on the screen and verify that the information is correct.
You can go back to any previous screen if you need to make any changes, either by using the Back button or by selecting the screen in the navigation pane.
Domain creation will not begin until you click Create.
Tip:
More information about the options on this screen can be found in Configuration Summary in Creating Domains Using the Configuration Wizard. - Task 13 Writing Down Your Domain Home and Administration Server URL
-
The Configuration Success screen will show the following items about the domain you just configured:
-
Domain Location
-
Administration Server URL
-
You must make a note of both items as you will need them later; the domain location is needed to access the scripts used to start the Administration Server, and the URL is needed to access the Administration Server.
Click Finish to dismiss the configuration wizard.
3.3 Starting the Servers
After configuration is complete, do the following to access the tools with which you can manage your domain:
Note:
For more information on additional tools you can use to manage your domain, see "Overview of Oracle Fusion Middleware Administration Tools" in Oracle Fusion Middleware Administering Oracle Fusion Middleware.3.3.1 Starting the Administration Server
To start the Administration Server, go the DOMAIN_HOME/bin directory.
On UNIX operating systems, run:
./startWebLogic.sh
On Windows operating systems, run:
startWebLogic.cmd
If you selected Production Mode on the Domain Mode and JDK screen in Task 4, you will be prompted for the login credentials of the Administrator user as provided on the Administrator Account screen in Task 3.
Tip:
For more information about starting the Administration Server, see "Starting and Stopping Administration Servers" in Oracle Fusion Middleware Administering Oracle Fusion Middleware.In production mode, a boot identity file can be created to bypass the need to provide a user name and password when starting the Administration Server. For more information, see "Creating a Boot Identity File for an Administration Server" in Administering Server Startup and Shutdown for Oracle WebLogic Server.
You can verify that the Administration Server is up and running by accessing the Administration Server Console. The URL is provided on the Configuration Success screen in Task 13.
Note:
Make sure that the database hosting your product schemas is up and running and accessible by the Administration Server.http://administration_server_host:administration_server_port/console
The default Administration Server port number is 7001.
For more information about how to use the Administration Console, see "Getting Started Using Oracle WebLogic Server Administration Console" in Oracle Fusion Middleware Administering Oracle Fusion Middleware.
3.3.2 Starting the Managed Server
To start the Managed Server, go the DOMAIN_HOME/bin directory.
On UNIX operating systems, run:
./startManagedWebLogic.sh servername adminURL
On Windows operating systems, run:
startManagedWebLogic.cmd servername admin_URL
Where servername is the name of the managed server you created in Task 9 and admin_URL is the URL of the administration server (for instance, http://example.com:7001).
You may be prompted for the login credentials of the Administrator user as provided on the Administrator Account screen in Task 3.
It will take a few moments for the script to start the servers.
3.4 Next Steps
To verify that your domain is configured properly, see Chapter 6, "Post-Installation Steps". You should familiarize yourself with the tasks described in this chapter and perform them to verify that your domain is properly configured.