2 Configuring Oracle JDeveloper to Support Integration with Oracle Enterprise Repository
This chapter describes how to configure Oracle JDeveloper to integrate with Oracle Enterprise Repository. First, you must download the Oracle Enterprise Repository plug-in for JDeveloper. Next, you can create a connection to an Oracle Enterprise Repository server. After installing the plug-in and creating a repository connection, see Chapter 3, "Using Oracle JDeveloper to Interact with Oracle Enterprise Repository" for the next steps.
This chapter includes the following sections:
2.1 Install the Oracle Enterprise Repository JDeveloper 12c Plug-in
To install the Oracle Enterprise Repository plug-in for Oracle JDeveloper 12c:
-
Install Oracle JDeveloper on your local computer. Starting in 12c, you must use the Oracle SOA Suite Quick Start distribution to obtain a version of JDeveloper pre-configured for Oracle SOA Suite. See "Installing Oracle SOA Suite Quick Start for Developers" in Installing SOA Suite and Business Process Management Suite Quick Start for Developers for more information.
Note:
Ensure that you are using the Oracle SOA Suite Quick Start for Developers distribution. The Oracle BPM Suite Quick Start for Developers distribution includes a version of JDeveloper that will not work with the plug-in and is not supported for use with Oracle Enterprise Repository. -
Acquire the file for patch 19721053 (
p19721053_121300_Generic.zip) from My Oracle Support. -
Ensure that JDeveloper is closed before continuing.
-
Follow the instructions in the patch's
README.txtfile. -
Restart JDeveloper.
2.2 Create a New Repository Connection
After you have installed the plug-in, you can create a connection to a repository server.
To create a new repository connection:
-
Click File, New. The New Gallery dialog is displayed.
-
Select General, Connections, and then select Oracle Enterprise Repository Connection, as shown in Figure 2-1.
-
Click OK. The Create Oracle Enterprise Repository Connection dialog is displayed, as shown in Figure 2-2.
Figure 2-2 Create Oracle Enterprise Repository Connection Dialog
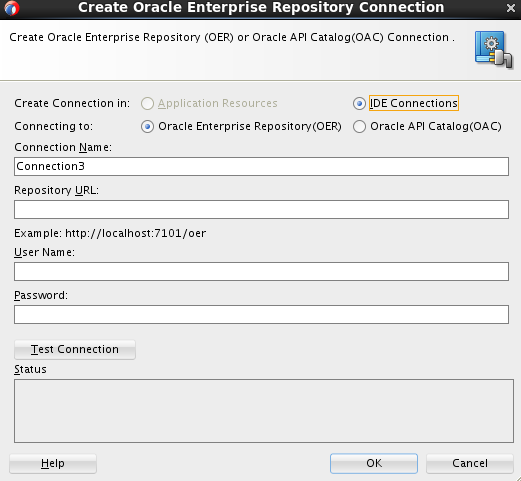
Description of "Figure 2-2 Create Oracle Enterprise Repository Connection Dialog"
-
Enter the following information:
-
Connecting To: Select Oracle Enterprise Repository if you are connecting to OER, or select Oracle API Catalog if you are connecting to OAC.
-
Connection Name: A descriptive name for the Oracle Enterprise Repository connection.
-
Repository URL: The URL from where a running instance of Oracle Enterprise Repository can be accessed.
-
User Name: The user name for the Oracle Enterprise Repository.
-
Password: The password for the Oracle Enterprise Repository.
-
-
Click Test Connection. A success message is displayed in the Status pane.
-
Click OK.
-
In the Resource Palette, under IDE Connections, expand Oracle Enterprise Repository to see the application server connection that you created, as shown in Figure 2-3.
-
Enter a search criteria to search for assets in the Search field. A list of all the assets is displayed, as shown in Figure 2-4.

2.3 Edit an Existing Repository Connection
To edit an existing connection between JDeveloper and Oracle Enterprise Repository:
-
In the Resource Palette, under IDE Connections, expand Oracle Enterprise Repository to see the existing repository connections.
-
Right-click on the connection you want to edit, and then click Properties.
-
Edit any of the following fields:
-
Repository URL: The URL from where a running instance of Oracle Enterprise Repository can be accessed.
-
User Name: The user name for the Oracle Enterprise Repository.
-
Password: The password for the Oracle Enterprise Repository.
-
-
Click Test Connection. A success message is displayed in the Status pane.
-
Click OK to save the changes and close the dialog.