5 Configuring the Oracle Enterprise Repository Domain for a Clustered Environment
This chapter describes how to create and configure the WebLogic Server domain for Oracle Enterprise Repository in a clustered environment.
Note:
The instructions in this chapter apply only for configuring the domain in a clustered environment. Refer to Chapter 3 if you are not configuring the domain for a clustered environment.The following topics are covered:
5.1 Installing Oracle HTTP Server
You must install Oracle HTTP Server to the same Oracle Home as you installed the Oracle Fusion Middleware Infrastructure (including Oracle WebLogic Server) and Oracle Enterprise Repository on one of the machines.
See "Installing the Oracle HTTP Server Software" in Installing and Configuring Oracle HTTP Server for information about installing Oracle HTTP Server.
Note:
When running the installer for Oracle HTTP Server, select the Colocated HTTP Server (Managed through WebLogic server) option on the Installation Type screen referenced in "Navigating the Installation Screens".Section 5.3, "Configuring Your WebLogic Domain" includes the procedures required to configure the Oracle HTTP Server.
5.2 Creating the Database Schemas
Before configuring the clustered environment, you must create schemas required for the OPSS Security Store. Production WebLogic domains with several server instances (administration and managed servers) on the same host or distributed across multiple machines, must use an OID- or an Oracle RDBMS-based OPSS security store. See Introduction to the OPSS Security Store in Securing Applications with Oracle Platform Security Services for more information.
Follow the instructions in this section to install these schemas:
-
Section 5.2.1, "Installing and Configuring a Certified Database"
-
Section 5.2.2, "Starting the Repository Creation Utility (RCU)"
-
Section 5.2.3, "Navigating the RCU Screens to Create the Schemas"
5.2.1 Installing and Configuring a Certified Database
Make sure you have installed and configured a certified database, and that the database is up and running.
For more information, see "Installing a Database and Database Schemas" in Oracle Fusion Middleware Planning an Installation of Oracle Fusion Middleware.
5.2.2 Starting the Repository Creation Utility (RCU)
Note:
Before creating product schemas, ensure that you have already applied the RCU patch as described in Section 2.4.1, "Installing the RCU Patch".To start the Repository Creation Utility (RCU):
-
Navigate to the
ORACLE_HOME/oracle_common/bindirectory on your system. -
Start RCU:
On UNIX operating systems:
./rcu
On Microsoft Windows operating systems:
rcu.bat
5.2.3 Navigating the RCU Screens to Create the Schemas
Follow the instructions in this section to create the schemas for a clustered deployment of Oracle Enterprise Repository:
- Task 1 Introducing RCU
-
Click Next.
- Task 2 Selecting a Method of Schema Creation
-
Ensure that Create Repository is selected, and then select System Load and Product Load on the Create Repository screen. The procedure in this document assumes that you have the necessary privileges to perform DBA activities.
Tip:
For more information about the options on this screen, see "Create repository" in Oracle Fusion Middleware Creating Schemas with the Repository Creation Utility. - Task 3 Providing Database Credentials
-
On the Database Connection Details screen, provide the database connection details for RCU to connect to your database.
Click Next to proceed, then click OK on the dialog window confirming that connection to the database was successful.
Tip:
For more information about the options on this screen, see "Database Connection Details" in Oracle Fusion Middleware Creating Schemas with the Repository Creation Utility. - Task 4 Specifying a Custom Prefix and Selecting Schemas
-
Select the following schemas:
-
<prefix>_OPSS -
<prefix>_IAU -
<prefix>_IAU_APPEND -
<prefix>_IAU_VIEWER -
<prefix>_STB -
<prefix>_MDS -
<prefix>_OER
Note:
You should have already created the schema for Oracle Enterprise Repository in Chapter 3, "Configuring the Oracle Enterprise Repository Domain". These schemas are for OPSS, which is required for production WebLogic domains with several server instances (administration and managed servers) on the same host or distributed across multiple machines See Securing Applications with Oracle Platform Security Services for more information.The custom prefix is used to logically group these schemas together for use in this domain.
Tip:
For more information about custom prefixes, see "Understanding Custom Prefixes" in Oracle Fusion Middleware Creating Schemas with the Repository Creation Utility.For more information about how to organize your schemas in a multi-domain environment, see "Planning Your Schema Creation" in Oracle Fusion Middleware Creating Schemas with the Repository Creation Utility.
Tip:
You must make a note of the custom prefix you choose to enter here; you will need this later on during the domain creation process.Click Next to proceed, then click OK on the dialog window confirming that prerequisite checking for schema creation was successful.
-
- Task 5 Specifying Schema Passwords
-
Specify how you want to set the schema passwords on your database, then specify and confirm your passwords.
Tip:
You must make a note of the passwords you set on this screen; you will need them later on during the domain creation process. - Task 6 Completing Schema Creation
-
Navigate through the remainder of the RCU screens to complete schema creation. When you reach the Completion Summary screen, click Close to dismiss RCU.
For more information about RCU and its features and concepts, see Oracle Fusion Middleware Creating Schemas with the Repository Creation Utility
5.3 Configuring Your WebLogic Domain
This section provides instructions for creating a WebLogic domain using the configuration wizard. For more information on other methods available for domain creation, see "Additional Tools for Creating, Extending, and Managing WebLogic Domains" in Creating Domains Using the Configuration Wizard.
Note:
Before configuring the WebLogic Domain, ensure that you have installed the WebLogic Server patch as described in Section 2.4.2, "Installing the WebLogic Server Patch".The following topics are covered in this section:
5.3.1 Starting the Configuration Wizard
To begin domain configuration, navigate to the ORACLE_HOME/oracle_common/common/bin directory and start the WebLogic Server Configuration Wizard.
On UNIX operating systems:
./config.sh
On Microsoft Windows operating systems:
config.cmd
On Windows operating systems, you can also start the Configuration Wizard from the Start menu by selecting All Programs, then selecting Oracle, then selecting OracleHome, then selecting WebLogic Server 12c (12.1.3), then selecting Tools, then selecting Configuration Wizard.
5.3.2 Navigating the Configuration Wizard Screens to Configure the Domain
Follow the instructions in this section to create and configure the domain.
Note:
You can use the same procedure described in this section to extend an existing domain. If your needs do not match the instructions given in the procedure, be sure to make your selections accordingly, or refer to the supporting documentation for additional details.If you need to configure multiple products in a single domain, refer to "Installing Multiple Products in the Same Domain" in Oracle Fusion Middleware Planning an Installation of Oracle Fusion Middleware for important information.
-
Task 1, "Selecting the Domain Type and Domain Home Location"
-
Task 10, "Configuring the Administration Server Listen Address"
-
Task 24, "Reviewing Your Configuration Specifications and Configuring the Domain"
-
Task 25, "Writing Down Your Domain Home and Administration Server URL"
- Task 1 Selecting the Domain Type and Domain Home Location
-
On the Configuration Type screen, select Create a New Domain.
In the Domain Location field, specify your Domain home directory.
Oracle recommends that you locate your Domain home in accordance with the directory structure summarized in "What are the Key Oracle Fusion Middleware Directories?" in Oracle Fusion Middleware Understanding Oracle Fusion Middleware, where the Domain home is located outside the Oracle home directory. This directory structure will help you avoid issues when you need to upgrade or reinstall your software.
Tip:
For more information about the Domain home directory, see "Choosing a Domain Home" in Oracle Fusion Middleware Planning an Installation of Oracle Fusion Middleware.For more information about reinstalling the software, see Section 7.10, "Reinstalling the Software".
For more information about the other options on this screen, see "Configuration Type" in Creating Domains Using the Configuration Wizard.
- Task 2 Selecting the Configuration Templates
-
On the Templates screen, make sure Create Domain Using Product Templates is selected, then select the Oracle Enterprise Repository template. For a clustered install, you must ensure that the following templates are also selected:
-
Oracle HTTP Server (Collocated)
-
Oracle Enterprise Manager Plugin for WEBTIER
-
Oracle Enterprise Manager
-
Oracle JRF
-
WebLogic Coherence Cluster Extension
Note:
When installing Oracle Enterprise Repository, select only the Oracle Enterprise Repository template. Do not select the Oracle API Catalog template. Do not select both templates simultaneously.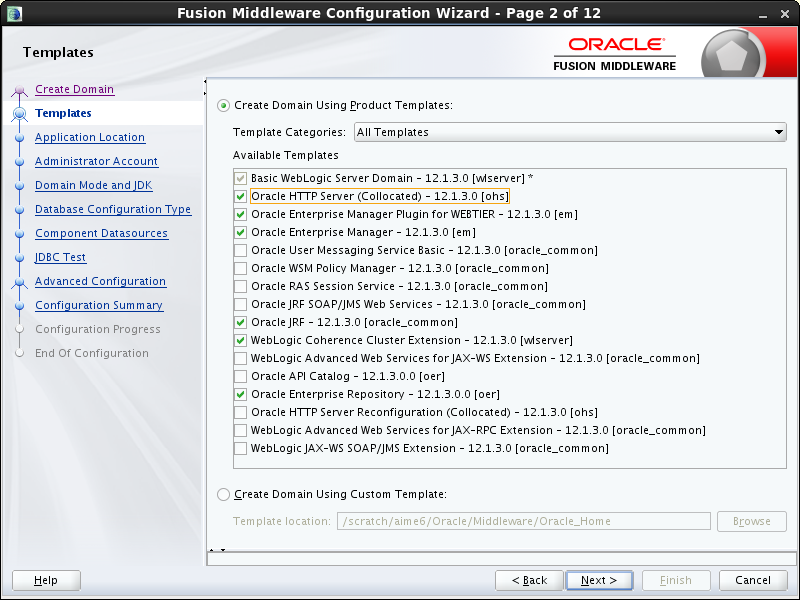
Description of the illustration ''rcu_select_comps_cluster.png''
Tip:
For more information about the options on this screen, see "Templates" in Creating Domains Using the Configuration Wizard. -
- Task 3 Selecting the Application Home Location
-
On the Application Location screen, select the location where you want to store your applications associated with your domain. This location is also referred to as the Application home directory.
Oracle recommends that you locate your Application home in accordance with the directory structure summarized in "What are the Key Oracle Fusion Middleware Directories?" in Oracle Fusion Middleware Understanding Oracle Fusion Middleware, where the Application home is located outside the Oracle home directory. This directory structure will help you avoid issues when you need to upgrade or reinstall your software.
Tip:
For more information about the Application home directory, see "Choosing an Application Home" in Oracle Fusion Middleware Planning an Installation of Oracle Fusion Middleware.For more information about reinstalling the software, see Section 7.10, "Reinstalling the Software".
For more information about the options on this screen, see "Application Location" in Creating Domains Using the Configuration Wizard.
- Task 4 Configuring the Administrator Account
-
On the Administrator Account screen, specify the user name and password for the default WebLogic Administrator account for the domain.
Oracle recommends that you make a note of the user name and password specified on this screen; you will need these credentials later to boot and connect to the domain's Administration Server.
- Task 5 Specifying the Domain Mode and JDK
-
On the Domain Mode and JDK screen:
-
Select Production in the Domain Mode field.
-
Select the Oracle Hotspot JDK in the JDK field.
Selecting Production Mode on this screen gives your environment a higher degree of security, requiring a user name and password to deploy applications and to start the Administration Server.
Tip:
More information about the options on this screen, including the differences between development mode and production mode, can be found in Domain Mode and JDK in Creating Domains Using the Configuration Wizard.In production mode, a boot identity file can be created to bypass the need to provide a user name and password when starting the Administration Server. For more information, see "Creating a Boot Identity File for an Administration Server" in Administering Server Startup and Shutdown for Oracle WebLogic Server.
-
- Task 6 Specifying the Datasource Configuration Type
-
Select RCU Data to activate the fields on this screen. The RCU Data option instructs the Configuration Wizard to connect to the database and Service Table (STB) schema to automatically retrieve schema information for the schemas needed to configure the domain.
Note:
If you choose to select Manual Configuration on this screen, you will have to manually fill in the parameters for your schema on the JDBC Component Schema screen.After selecting RCU Data, fill in the following fields:
Field Description DBMS/Service Enter the database DBMS name, or service name if you selected a service type driver. Host Name Enter the name of the server hosting the database. Port Enter the port number on which the database listens. Schema Owner Schema Password
Enter the user name and password for connecting to the database's Service Table schema. This is the schema user name and password that was specified for the Service Table component on the "Schema Passwords" screen in RCU (see Section 5.2, "Creating the Database Schemas"). The default user name is
prefix_STB, whereprefixis the custom prefix that you defined in RCU.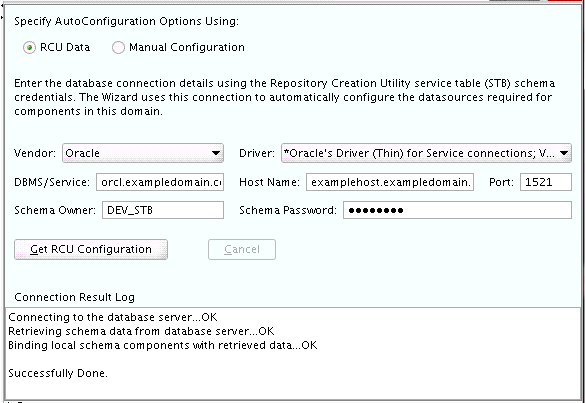
Description of the illustration ''config_datasource.gif''
Click Get RCU Configuration when you are finished specifying the database connection information. The following output in the Connection Result Log indicates that the operating succeeded:
Connecting to the database server...OK
Retrieving schema data from database server...OK
Binding local schema components with retrieved data...OK

Successfully Done.
Tip:
More information about the RCU Data option can be found in "Understanding the Service Table Schema" in Oracle Fusion Middleware Creating Schemas with the Repository Creation Utility.More information about the other options on this screen can be found in Datasource Defaults in Creating Domains Using the Configuration Wizard
- Task 7 Specifying JDBC Component Schema Information
-
The JDBC component schemas associated with the products for which you are creating the domain are listed in the lower half of the screen.
Select the schemas for which you want to specify data source settings by selecting the check box adjacent to each schema name. The schemas for which you must provide information in a clustered install are shown in Figure 5-1.
Fill in each field at the top of the screen with information for the database schema you created in Section 5.2, "Creating the Database Schemas".
Field Description Vendor Select the database vendor. Driver Select the JDBC driver to use to connect to the database. The list includes common JDBC drivers for the selected database vendor. DBMS/Service Enter a database DBMS name, or service name if you selected a service type driver. Host Name Enter the name of the server hosting the database. Port Enter the port number to be used to connect to the server that hosts the database. Schema Owner Enter the user name for connecting to the database's schema. This is the schema user name that was specified on the "Schema Passwords" screen in RCU (see Section 5.2, "Creating the Database Schemas"). Schema Password Enter the password for connecting to the database's schema. This is the password that was specified for the Service Table component on the "Schema Passwords" screen in RCU (see Section 5.2, "Creating the Database Schemas"). Tip:
More information about the other options on this screen can be found in JDBC Component Schema in Creating Domains Using the Configuration Wizard. - Task 8 Testing the JDBC Connections
-
Use the JDBC Component Schema Test screen to test the datasource connections you have just configured.
A green check mark in the Status column indicates a successful test. If you encounter any issues, see the error message in the Connection Result Log section of the screen, fix the problem, then try to test the connection again.
Tip:
More information about the other options on this screen can be found in Test Component Schema in Creating Domains Using the Configuration Wizard - Task 9 Selecting Advanced Configuration
-
To complete domain configuration, select the following options on the Advanced Configuration screen:
-
Administration Server
This is required to properly configure the listen address of the Administration Server.
-
Node Manager
-
Managed Servers, Clusters and Coherence
This is required to configure the Managed Servers and cluster, and also for configuring the machine and targeting the Managed Servers to the machine.
-
Domain Frontend Host Capture
-
Deployments and Services
-
- Task 10 Configuring the Administration Server Listen Address
-
On the Administration Server screen, select the drop-down list next to Listen Address and select All Local Addresses. Select Unspecified from the Server Groups list.
(Optional) Select the Enable SSL check box to enable SSL.
- Task 11 Configuring Node Manager
-
The Node Manager screen can be used to select the type of Node Manager you want to configure, along with the Node Manager credentials.
Select Per-Domain Default Location as the Node Manager type, then specify the Node Manager credentials.
Tip:
More information about the options on this screen can be found in Node Manager in Creating Domains Using the Configuration Wizard.More information about the types of Node Manager can be found in "Node Manager Overview" in Administering Node Manager for Oracle WebLogic Server.
- Task 12 Configuring Managed Servers
-
Use the Managed Servers screen to create a new Managed Servers:
-
Specify
oer_server1in the Server name column. -
In the Listen Address drop-down list, select the hostname of the server or the IP address on which the server listens for HTTP or HTTPS requests.
-
In the Server Groups drop-down list, select Unspecified.
-
(Optional) Select the Enable SSL check box to enable SSL.
-
Click the Add button to create a new Managed Server.
-
Repeat this process to create a second Managed server named
oer_server2.Configuring a second Managed Server is one of the steps needed to configure the standard topology for high availability. If you are not creating a highly available environment, then this step is optional.
For more information about the high availability standard topology, see "Understanding the Fusion Middleware Standard HA Topology" in Oracle Fusion Middleware High Availability Guide.
Tip:
More information about the options on this screen can be found in Managed Servers in Creating Domains Using the Configuration Wizard. -
- Task 13 Configuring a Cluster
-
Use the Clusters screen to create a new cluster:
-
Click the Add button.
-
Specify
oer_cluster_1in the Cluster Name field. -
Enter the IP Addresses or hostnames and port numbers of the managed servers cluster into the Cluster Address and Frontend Host fields.
-
- Task 14 Assigning Managed Servers to the Cluster
-
Use the Assign Servers to Clusters screen to assign
oer_server1andoer_server2to the new clusteroer_cluster_1:-
In the Clusters pane, select the cluster to which you want to assign the servers; in this case,
oer_cluster_1. -
In the Servers pane, assign
oer_server1tooer_cluster_1by doing one of the following:-
Click once on
oer_server1to select it, then click on the right arrow to move it beneath the selected cluster (oer_cluster_1) in the Clusters pane. -
Double-click on
oer_server1to move it beneath the selected cluster (oer_cluster_1) in the clusters pane.
-
-
Repeat to assign
oer_server2tooer_cluster_1.
Description of the illustration ''config_servers_to_clusters.gif''
Tip:
More information about the options on this screen can be found in Assign Servers to Clusters in Creating Domains Using the Configuration Wizard. -
- Task 15 Configuring Coherence Clusters
-
Use the Coherence Clusters screen to configure the Coherence cluster that is automatically added to the domain. Leave the default port number 0 as the Coherence cluster listen port.
Note:
Setting the unicast listen port to 0 creates an offset for the Managed Server port numbers. The offset is 5000, meaning the maximum allowed value that can be assigned to a Managed Server port number is 60535, instead of 65535.Note:
For Coherence licensing information, refer to "Oracle Coherence" in Licensing Information. - Task 16 Creating a New Machine
-
Use the Machines screen to create a new machine in the domain. A machine is required for the Node Manager to be able to start and stop the servers.
Tip:
If you plan to create a high availability environment and know the list of machines required for your target topology, you can follow the directions in this section to create all of the machines at this time. For more information, see "Optional Scale Out Procedure" in Oracle Fusion Middleware High Availability Guide.-
Click the Add button to create a new machine.
-
Specify
oer_machine_1in the Name field. -
In the Node Manager Listen Address field, select the IP address or hostname of the machine where the Managed Server is being configured.
You must select a specific interface and not "localhost." This allows Coherence cluster addresses to be dynamically calculated.
-
Verify the port in the Node Manager Listen Port field.
Note:
The default port number,5556, may be referenced by other examples in the documentation. Replace this port number with your own port number as needed -
Repeat Steps 1-4 to create a second machine named
oer_machine_2.
Note:
If you are extending an existing domain, you can assign servers to any existing machine. It is not necessary to create a new machine unless your situation requires it. -
- Task 17 Assigning Servers to Machines
-
Use the Assign Servers to Machines screen to assign the Administration Server and Managed Servers to the new machine you just created:
-
In the Machines pane, select the machine to which you want to assign the servers; in this case,
oer_machine_1. -
In the Servers pane, assign
oer_server1andAdminServertooer_machine_1by doing one of the following:-
Click once on
oer_server1to select it, then click on the right arrow to move it beneath the selected machine (oer_machine_1) in the Machines pane. Repeat the procedure forAdminServer. -
Double-click on
oer_server1to move it beneath the selected machine (oer_machine_1) in the Machines pane. Repeat the procedure forAdminServer.
-
-
Assign
oer_server2tooer_machine_2.
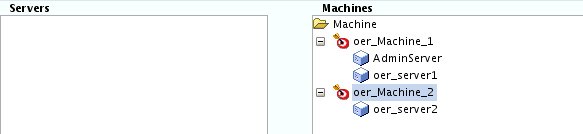
Description of the illustration ''config_servers_to_machines.gif''
Tip:
More information about the options on this screen can be found in Assign Servers to Machines in Creating Domains Using the Configuration Wizard. -
- Task 18 Adding System Components
-
Use the System Components screen to add the Oracle HTTP Server:
-
Click Add to create a new Oracle HTTP Server instance.
-
Enter
ohs_SystemComponent_1into the System Component field. -
Select OHS from the Component Type list.
-
Enter a value into the Restart Interval Seconds field. This value determines the number of seconds to wait before attempting a restart if an application is not responding.
-
Enter a value into the Restart Delay Seconds field. This value determines the number of seconds to wait between restart attempts.
-
- Task 19 Configuring the OHS Server
-
Use the OHS Server screen to configure the OHS servers in your domain.
In the Listen Address field, specify the IP address or the host name of the Oracle HTTP Server instance. Do not use "localhost". For more information, see "Specifying the Listen Address" in Creating WebLogic Domains Using the Configuration Wizard.
All of the remaining fields are pre-populated, but you can change the values as per your needs.
- Task 20 Configuring the Domain Frontend Host
-
Use this screen to configure the Domain Frontend Host:
-
Ensure that the Configure Domain Frontend Host check box is selected.
-
Ensure that the values in the Plain and SSL fields match the Server Name and ports for the OHS server specified in Task 19.
-
Select the appropriate radio button to make either the Plain or SSL URL the default URL for the frontend host.
For more information, see "Domain Frontend Host" in Creating WebLogic Domains Using the Configuration Wizard.
-
- Task 21 Assign System Components to Machines
-
Use this screen to assign system components to machines:
-
From the System Components pane, select the
ohs_SystemComponent_1item. -
From the Machines column, select the machine that corresponds with the information you used to configure the OHS server in Task 19 (
oer_machine_1in this example). -
Use the right arrow button to move the
ohs_SystemComponent_1item to the machine you selected.
For more information, see "Assigning System Components to Machines" in Creating WebLogic Domains Using the Configuration Wizard.
-
- Task 22 Configuring Deployments Targeting
-
Use this screen to assign deployments to target servers or clusters:
-
From the Deployments Pane, under the Application folder, select the
oer_serveritem. -
From the Targets pane, select
oer_server1. -
Use the right arrow button to move
oer_servertooer_server1. -
Repeat Steps 2 and 3 to move
oer_servertooer_server2.
For more information, see "Deployments Targeting" in Creating WebLogic Domains Using the Configuration Wizard.
-
- Task 23 Configuring Services Targeting
-
Use this screen to assign services to target servers or clusters:
-
From the Services Pane, under the JDBC System Resource folder, select the
OERDataSourceitem. -
From the Targets pane, select
oer_server1. -
Use the right arrow button to move
OERDataSourcetooer_server1. -
Repeat Steps 2 and 3 to move
OERDataSourcetooer_server2.
For more information, see "Services Targeting" in Creating WebLogic Domains Using the Configuration Wizard.
-
- Task 24 Reviewing Your Configuration Specifications and Configuring the Domain
-
The Configuration Summary screen contains the detailed configuration information for the domain you are about to create. Review the details of each item on the screen and verify that the information is correct.
You can go back to any previous screen if you need to make any changes, either by using the Back button or by selecting the screen in the navigation pane.
Domain creation will not begin until you click Create.
Tip:
More information about the options on this screen can be found in Configuration Summary in Creating Domains Using the Configuration Wizard. - Task 25 Writing Down Your Domain Home and Administration Server URL
-
The Configuration Success screen will show the following items about the domain you just configured:
-
Domain Location
-
Administration Server URL
-

You must make a note of both items as you will need them later; the domain location is needed to access the scripts used to start the Node Manager and Administration Server, and the URL is needed to access the Administration Server.
Click Finish to dismiss the configuration wizard.
5.4 Starting the Servers
After configuration is complete, do the following to access the tools with which you can manage your domain:
Note:
For more information on additional tools you can use to manage your domain, see "Overview of Oracle Fusion Middleware Administration Tools" in Oracle Fusion Middleware Administering Oracle Fusion Middleware.5.4.1 Starting the Node Manager
To start your per-domain Node Manager, go to the DOMAIN_HOME/bin directory.
On UNIX operating systems, start the Node Manager as shown below, using nohup and nm.out as an example output file:
nohup ./startNodeManager.sh > nm.out&
On Windows operating systems, run:
startNodeManager.cmd
Note:
On Windows operating systems, Oracle recommends that you configure Node Manager to run as a startup service. This allows Node Manager to start up automatically each time the system is restarted.For more information, see "Running Node Manager as a Startup Service" in Administering Node Manager for Oracle WebLogic Server.
For more information about additional Node Manager configuration options, see Administering Node Manager for Oracle WebLogic Server.
5.4.2 Starting the Administration Server
To start the Administration Server, go the DOMAIN_HOME/bin directory.
On UNIX operating systems, run:
./startWebLogic.sh
On Windows operating systems, run:
startWebLogic.cmd
If you selected Production Mode on the Domain Mode and JDK screen in Task 5, you will be prompted for the login credentials of the Administrator user as provided on the Administrator Account screen in Task 4.
Tip:
For more information about starting the Administration Server, see "Starting and Stopping Administration Servers" in Oracle Fusion Middleware Administering Oracle Fusion Middleware.In production mode, a boot identity file can be created to bypass the need to provide a user name and password when starting the Administration Server. For more information, see "Creating a Boot Identity File for an Administration Server" in Administering Server Startup and Shutdown for Oracle WebLogic Server.
You can verify that the Administration Server is up and running by accessing the Administration Server Console. The URL is provided on the Configuration Success screen in Task 25.
Note:
Make sure that the database hosting your product schemas is up and running and accessible by the Administration Server.http://administration_server_host:administration_server_port/console
The default Administration Server port number is 7001.
For more information about how to use the Administration Console, see "Getting Started Using Oracle WebLogic Server Administration Console" in Oracle Fusion Middleware Administering Oracle Fusion Middleware.
5.4.3 Starting the Managed Server
To start the Managed Server, go the DOMAIN_HOME/bin directory.
On UNIX operating systems, run:
./startManagedWebLogic.sh servername adminURL
On Windows operating systems, run:
startManagedWebLogic.cmd servername admin_URL
Where servername is the name of the managed server you created in Task 12 and admin_URL is the URL of the administration server (for instance, http://example.com:7001).
You may be prompted for the login credentials of the Administrator user as provided on the Administrator Account screen in Task 4.
It will take a few moments for the script to start the servers.
5.4.4 Starting the Oracle HTTP Server Instance
See "Starting the Oracle HTTP Server Instance" in Installing and Configuring Oracle HTTP Server in a WebLogic Domain for more information.
5.5 Next Steps
Return to Section 4.4, "Step 3: Create the Clustered Environment" and complete the remaining steps for a clustered install.
To verify that your domain is configured properly, see Chapter 6, "Post-Installation Steps". You should familiarize yourself with the tasks described in this chapter and perform them to verify that your domain is properly configured.