1 Upgrading Oracle Enterprise Repository
This chapter describes the upgrade process when upgrading to Oracle Enterprise Repository 12c.
This chapter contains the following sections:
1.1 Performing the Upgrade Tasks
These instructions enable you to upgrade from Oracle Enterprise Repository 11g on WebLogic Server using the Oracle Enterprise Repository 12c installation program.
This section contains the following topics:
-
Section 1.1.3, "Run the Oracle Enterprise Repository Installation Program"
-
Section 1.1.4, "Upgrading OER Schemas Using the Upgrade Assistant"
-
Section 1.1.5, "Configuring the Domain Using the Configuration Wizard"
1.1.1 Prerequisites
To upgrade from Oracle Enterprise Repository 11g to 12c on WebLogic Server, you must ensure you have the following prerequisites:
-
Oracle Enterprise Repository 12c requires WebLogic Server 12c. If the currently installed Oracle Enterprise Repository application is not running on the required version, upgrade or install the supported version of WebLogic Server into a separate Oracle Home directory. For more information about installing WebLogic Server, see Installing and Configuring WebLogic Server and Coherence.
-
The Oracle Enterprise Repository domain should be installed within the default location of
<FMW_HOME>/user_projects/domains/oer. If the Oracle Enterprise Repository domain is installed in a different location, you must make the appropriate adjustments to the location. -
Refer to the password encryption requirements section before performing upgrade steps. For more information, see Section 2.3.4, "Creating Encrypted Passwords".
-
Stop the WebLogic server before performing these upgrade steps.
-
If BPM is in use, ensure that you back up the BPM Database.
-
Back up the existing Oracle Enterprise Repository database.
1.1.2 Performing Pre-Upgrade Tasks
The following tasks must be performed before continuing the upgrade process:
-
Task 2, "Remove the Current Oracle Enterprise Repository Installation Files"
-
Task 4, "(Optional) Run the Repository Creation Utility on Your Database"
- Task 1 Back Up Custom or Edited Files
-
Review your current OER implementation to see if there is anything you will need to recreate, such as artifact stores, custom files, properties files, and customizations, once you have upgraded to the most recent release. Document how these were created so you can restore the same functionality after you have completed the upgrade.
Tip:
Section 1.1.8 of this guide requires that you modify several properties in the course of the installation. It may be helpful to record these values form your current OER implementation as a guide to populate these values during the upgrade.Note:
The installer provides an application template to create a domain with the Oracle Enterprise Repository 12c application. Therefore, the existing domain is no longer used. - Task 2 Remove the Current Oracle Enterprise Repository Installation Files
-
Caution:
Perform this step only after backing up files you may want to keep, as described in Task 1, "Back Up Custom or Edited Files".If you wish to use the same domain name, then rename /remove the current Oracle Enterprise Repository domain. For example, <
FMW_HOME>/user_projects/domains/<domain_name>to<FMW_HOME>/user_projects/domains/old_<domain_name>. - Task 3 Uninstall Oracle Enterprise Repository 11g
-
Oracle Enterprise Repository 11g Uninstall process to remove all components of the previous release. For more information about uninstalling the previous version of OER, see the Oracle Fusion Middleware Developer's Guide for Oracle Enterprise Repository for the 11g Release.
- Task 4 (Optional) Run the Repository Creation Utility on Your Database
-
The Upgrade Assistant Plugin requires some components to already exist in the database. If you have never run the Repository Creation Utility (RCU) on your database before, you must do this before upgrading the OER Schemas using the Upgrade Assistant, as described in Section 1.1.4.
To install the components required by the Upgrade Assistant:
-
Run the
rcu.shorrcu.batutility from this directory in your WebLogic Server installation:<FMW_HOME>/oracle_common/bin/rcu.sh or rcu.bat
-
Click Next from the Welcome screen.
-
Ensure that Create Repository is selected, and then select System Load and Product Load on the Create Repository screen. The procedure in this document assumes that you have the necessary privileges to perform DBA activities. Click Next.
-
On the Database Connection Details screen, provide the database connection details for RCU to connect to your database.
Click Next to proceed, then click OK on the dialog window confirming that connection to the database was successful.
-
Expand AS Common Schemas. Ensure that only Common Infrastructure Services is selected, as shown in the following figure.
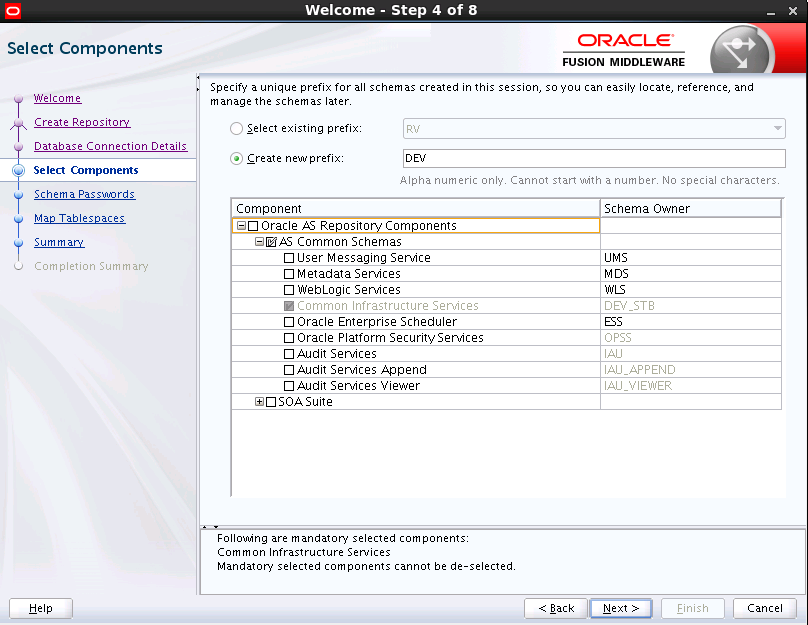
Description of the illustration pre_ua_rcu.png
Leave the default value of
DEVin the Create new prefix field. Click Next to proceed, then click OK on the dialog window confirming that prerequisite checking for schema creation was successful. -
Specify how you want to set the schema passwords on your database, then specify and confirm your passwords.
-
Navigate through the remainder of the RCU screens to complete schema creation. When you reach the Completion Summary screen, click Close to dismiss RCU.
-
1.1.3 Run the Oracle Enterprise Repository Installation Program
Before you can upgrade your existing Oracle Enterprise Repository (OER) 11g components, you must first install the OER 12c distribution. Follow the instructions described in the "Installing the Oracle Enterprise Repository Software" chapter in the Oracle Fusion Middleware Installation Guide for Oracle Enterprise Repository.
1.1.4 Upgrading OER Schemas Using the Upgrade Assistant
Follow the instructions in this section to upgrade OER schemas and instances using the Upgrade Assistant.
Caution:
Do not start the Upgrade Assistant if purge scripts or scheduled database jobs are running.Wait until the purge or upgrade is complete before starting the upgrade process. The upgrade will fail if the purge scripts or instance upgrade jobs are running while using the Upgrade Assistant to upgrade your schemas.
If you must start the Upgrade Assistant, stop the purge and be sure to disable any scheduled jobs.
- Task 1 Start the Upgrade Assistant
-
Complete the following steps to start the Upgrade Assistant:
-
Change directory to
ORACLE_HOME/oracle_common/upgrade/bin(on UNIX operating systems) orORACLE_HOME\oracle_common\upgrade\bin(on Windows operating systems). -
Enter the following command to start the Upgrade Assistant.
(UNIX) ./ua
(Windows)
ua.bat
Oracle recommends that you run the Upgrade Assistant with logging enabled as shown in the example below.
./ua [-logLevel <log_level>] [-logDir <log_directory>]
-
- Task 2 Upgrade the Schemas
-
The Upgrade Assistant displays a sequence of screens listed in Table 1-1 when upgrading schemas. Perform the respective action(s) for each of the screens. When Oracle Enterprise Repository is selected, the
OERschema will be included in the upgrade.Table 1-1 Upgrade Assistant Screens: Upgrading Schemas
Screen Description and Action Required This screen provides an overview of the Upgrade Assistant and some information about important pre-upgrade tasks.
Select Schemas.
This screen provides a list of installed Oracle Fusion Middleware components that have schemas that can be upgraded. When you select a component, the schemas and any dependencies are automatically selected. For example, when Oracle Enterprise Repository is selected, the
OERschema will be included in the upgrade.NOTE: By default, the Oracle Platform Security Services (OPSS) and Audit Services schemas may be selected. OER does not require these schemas. Ensure that these options are not selected before proceeding.
Check that the prerequisites for schema upgrade are met. You must select each prerequisite before you click Next.
CAUTION: Upgrade Assistant will NOT verify that these prerequisites have been met.
Use this screen to enter database connection details for each of the schemas you are upgrading.
-
Select a the database type from the Database Type drop-down menu.
-
Enter the database connection details, and click Connect.
-
Enter the user name and password for the schema.
-
Click Next.
Notes:
-
For information on the fields required to connect to the database, click Help, or refer to "Schema Credentials" in Upgrading with the Upgrade Assistant.
Review the status of the Upgrade Assistant as it examines each component, verifying that the component is ready for upgrade.
Verify that the Source Version displayed for each schema is listing the correct version number for the schema to be upgraded.
Review the summary of the options that you have selected for schema upgrade. Verify that the correct Source and Target versions are listed for each schema you intend to upgrade.
Click Upgrade to upgrade the schemas, or click Back if you wish to change the configurations.
Review the status of the current upgrade process.
NOTE: The progress bar on this screen displays the progress of the current upgrade procedure. It does not indicate the time remaining for the upgrade.
Click Next when the upgrade is complete.
Click Close if the Upgrade was successful.
If the upgrade failed or if you canceled the upgrade before it completed successfully, you should review the log files, restore the backed up environment, and restart the Upgrade Assistant.
-
1.1.5 Configuring the Domain Using the Configuration Wizard
Follow the instructions in the "Configuring Your WebLogic Domain" section in the Oracle Fusion Middleware Installation Guide for Oracle Enterprise Repository to configure the WebLogic Server domain.
1.1.6 Start WebLogic Server
See "Starting the Servers" in the Oracle Fusion Middleware Installation Guide for Oracle Enterprise Repository for information about starting the required servers for Oracle Enterprise Repository.
1.1.7 Restore Backed-up Properties Files
If you backed up properties files in Task 1 of Section 1.1.2, "Performing Pre-Upgrade Tasks", paste those files into the <FMW_HOME>/user_projects/domains/oer_domain/oer-config directory, which is created with the new OER domain.
Note:
You do not need to paste thedatabase.properties file into the new directory.
Also note that the database connections for OER are not handled using the standard datasource mechanism built into WebLogic Server.
1.1.8 Configure the Application
Configure Oracle Enterprise Repository properties by logging into the application as an administrative user, and then using the System Settings section of the Admin page:
-
Update the following Oracle Enterprise Repository properties that reference the application server file system paths:
cmee.asset.xml.paths.export-destinationcmee.asset.xml.paths.xsl-sourcecmee.asset.xml.paths.out-destinationcmee.server.paths.uploadcmee.extframework.export.tempfileAdditional properties that are affected by the deployment of Oracle Enterprise Repository are:
cmee.server.paths.upload-registrarThe application server based FTP, HTTP, HTTPS and SMB/CIFS artifact store definitions are also affected by the change in paths based on the WLS application template configuration process.
Ensure you take a special note of these types of artifact stores and update the configurations appropriately.
-
If you are unable to access the Oracle Enterprise Repository login page or application, or if you see an error message of some kind, it may be possible that the
db.passwordproperty in thedatabase.propertiesfile was not encrypted. Check thecmee.logfile for any messages that explains this behavior.
For more information about enabling the Oracle Enterprise Repository diagnostics tools, see Section 2.3.1, "Enable the Oracle Enterprise Repository Diagnostics Tool".
1.2 Performing Post-Upgrade Tasks
After completing the upgrade process, you may want to migrate assets, reports, or other data into the new Oracle Enterprise Repository installation. This is necessary only if you wish to migrate custom reports or other customizations to OER 12c. See Chapter 2, "Optional Post Installation Tasks" for more information about these post-upgrade tasks.