Setting Up a JDBC Connection to the Data Source

Make sure all prerequisites have been met before setting up a JDBC connection to a data source:

  • The JDBC driver for the selected database must be available to BI Publisher. If you are using an Oracle database or one of the DataDirect drivers provided by WebLogic Server, then the drivers must be installed in the correct location and there is no further setup required.

  • If you plan to use a different version of any of the drivers installed with WebLogic Server, then you can replace the driver file in WL_HOME\server\lib with an updated version of the file or add the new file to the front of your CLASSPATH.

    If you plan to use a third-party JDBC driver that is not installed with WebLogic Server, then you must update the WebLogic Server classpath to include the location of the JDBC driver classes. Edit the commEnv.cmd/sh script in WL_HOME/common/bin and prefix your classes as described in “Modifying the Classpath” in Command Reference for Oracle WebLogic Server.

    For more information, see Administering JDBC Data Sources for Oracle WebLogic Server.

    Note:

    When the JDBC connection is defined, the administrator defines the user that BI Publisher uses to connect to the database. It is the responsibility of the administrator to establish security on the database to allow or disallow actions this user can take on the database schema.

    For report consumer access to data that is returned in a report, the administrator and data model developer can establish security, if needed, that can limit the data viewed by a particular BI Publisher user. One method for securing data returned is to use pre-process and post-process function calls to pass the xdo_username. For more information see About Pre Process Functions and Post Process Functions.

To set up a JDBC connection to a data source:
  1. From the Administration page, click JDBC Connection to display the list of existing JDBC connections.

    Private JDBC connections are also supported. For more information, see Data Modeling Guide for Oracle Business Intelligence Publisher.

  2. Click Add Data Source.
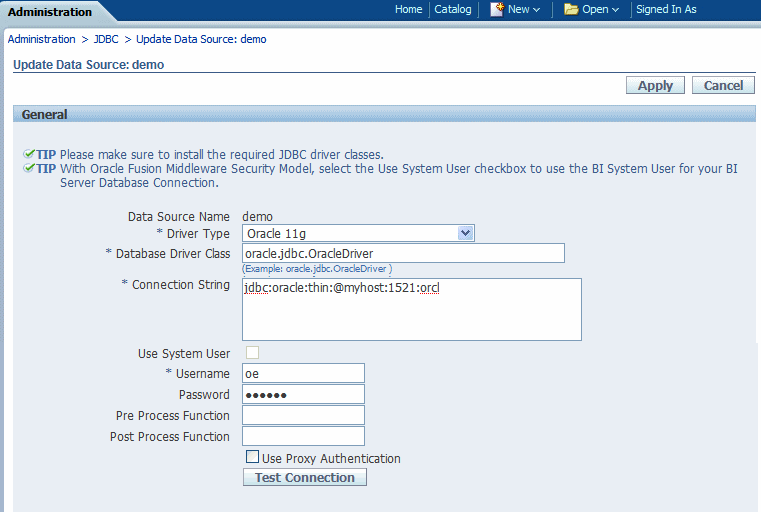
  3. Enter the following fields for the new connection:
    • Data Source Name — Enter a display name for the data source. This name is displayed in the Data Source selection list in the Data Model Editor.

    • Driver Type — Select the database type from the list. When you select a driver type, BI Publisher automatically displays the appropriate Database Driver Class and provides the appropriate Connection String format for your selected database.

    • Database Driver Class — This is automatically entered based on your selection for Driver Type. You can update this field if desired.

      For example: oracle.jdbc.OracleDriver or

      hyperion.jdbc.sqlserver.SQLServerDriver

    • Connection String — Enter the database connection string.

      Example connection strings:

      • Oracle database

        For an Oracle database (non-RAC) the connect string must have the following format:

        jdbc:oracle:thin:@[host]:[port]:[sid]

        For example: jdbc:oracle:thin:@myhost.us.example.com:1521:prod

      • Oracle RAC database

        To connect to an Oracle RAC database, use the following format:

        jdbc:oracle:thin:@//<host>[:<port>]/<service_name>

        For example: jdbc:oracle:thin:@//myhost.example.com:1521/my_service

      • Microsoft SQL Server

        For a Microsoft SQL Server, the connect string must have the following format:

        jdbc:hyperion:sqlserver://[hostname]:[port];DatabaseName=[Databasename]

        For example:

        jdbc:hyperion:sqlserver://myhost.us.example.com:7777;DatabaseName=mydatabase

    • Use System User — This is reserved for connections to the Oracle BI Server.

      See Setting Up a JDBC Connection to the Oracle BI Server.

    • User Name — Enter the user name required to access the data source on the database.

    • Password — Enter the password associated with the user name for access to the data source on the database.

    • Pre Process Function and Post Process Function — (Optional) Enter a PL/SQL function to execute when a connection is created (Pre Process) or closed (Post Process). For more information see About Pre Process Functions and Post Process Functions.

    • Use Proxy Authentication — Select this box to enable Proxy Authentication. See About Proxy Authentication for more information.

  4. Click Test Connection. A confirmation is displayed.

    The figure below shows the general settings of the JDBC connection page.

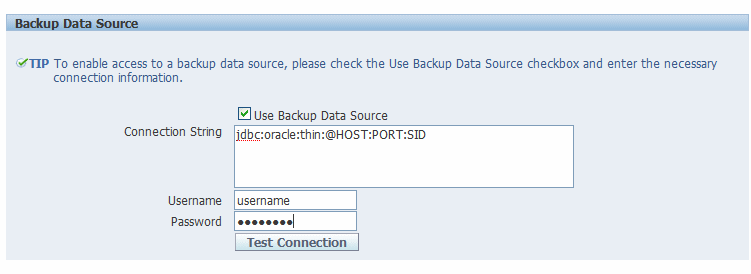
  5. (Optional) Enable a backup database for this connection by entering the following:
  6. Define security for this data source. Use the shuttle buttons to move roles from the Available Roles list to the Allowed Roles list. Only users assigned the roles on the Allowed Roles list can create or view reports from this data source.

    The settings defined here are passed down to the backup data source, if one is defined.